
HGF 6.8 AB X/HA - Kitchen hood HOTPOINT - Free user manual and instructions
Find the device manual for free HGF 6.8 AB X/HA HOTPOINT in PDF.




| Product type | Kitchen hood |
| Brand | HOTPOINT |
| Model | HGF 6.8 AB X/HA |
| Height (min-max) | 61-82 cm |
| Width | 59.8 cm |
| Depth | 50 cm |
| Exhaust duct diameter | 150/120 mm |
| Lighting | LED (risk group 1 according to EN 62471) |
| Electrical supply | 230 V ~ 50 Hz |
| Lighting power | 2 x 25 W (halogen) or LED depending on model |
| Number of speeds | 4 (including 1 booster) |
| Control | Touch |
| Timer function | Yes (on models with display) |
| Installation type | External extraction or recirculation (optional kit) |
| Grease filter | Metallic, dishwasher safe |
| Charcoal filter | To be replaced every 20 months (depending on usage) |
| Minimum safety distance | 65 cm (gas cooking), 55 cm (electric cooking) |
| Standards | CE, directives 2006/95/EC, 2004/108/EC |
Frequently Asked Questions - HGF 6.8 AB X/HA HOTPOINT
User questions about HGF 6.8 AB X/HA HOTPOINT
0 question about this device. Answer the ones you know or ask your own.
Ask a new question about this device
Download the instructions for your Kitchen hood in PDF format for free! Find your manual HGF 6.8 AB X/HA - HOTPOINT and take your electronic device back in hand. On this page are published all the documents necessary for the use of your device. HGF 6.8 AB X/HA by HOTPOINT.
USER MANUAL HGF 6.8 AB X/HA HOTPOINT
HGA6.5SABX/HA HGF9.5AMX/HA HGF6.5AMX/HA HGF9.5SAMX/HA HGA6.8ABX/HA HGF9.8ABX/HA HGA9.8ABX/HA HGF6.8ABX/HA HHDF9.7CBX/HA HGF6.8ADX/HA

EN
English
User Manual
COOKER HOOD
Table of Contents
User Manual,1
Warnings,11
Assistance,28
Installation,39
GLASS Controls,40
Operating Instructions
COOKER HOOD
Contents
Operating Instructions,1
Warnings, 10
Assistance, 28
Installation, 35
GLASS controls, 36
Maintenance and care, 37
Troubleshooting, 38
PT
Portuguese
! Keep this manual for reference. If you sell, transfer or move the unit to another location, make sure to keep the manual with the product.
! Read the instructions carefully - they contain important installation, user and safety information.
! Do not tamper with the electrical or mechanical equipment of the product or its exhaust ducts.
General safety information
- The distance between the cookware support surface on top of the cooking appliance and the lowest part of the cooker hood must be at least:
65 cm if the hood is installed over a gas cooktop 55 cm if the hood is installed over an electric cooktop.
If the installation instruction manual for the gas cooking appliance specifies a greater distance, this measurement should be taken into account.
- The cooker hood comes with anchor plugs which are suitable for use with most walls/ceilings. However, you must contact a qualified technician to check the suitability of the materials in relation to the type of wall/ceiling, which must be strong enough to support the weight of the unit.
- Caution! Do not hook the unit up to its electrical power supply until the installation has been completed.
- Before cleaning or servicing the unit, disconnect it from the mains by pulling the power plug or disconnecting the main circuit breaker.
- Always wear work gloves when installing and servicing the unit.
- It is not intended for use by children or persons with sensory or mental disability and lack of experience or familiarity, except under the supervision or instruction of a person responsible for their safety.
- Make sure children do not play with the unit.
- Never operate the unit without its grease filter installed!
- NEVER use the hood as a support, unless expressly instructed to do so.
- The room must be adequately ventilated if the hood is used at the same time with other equipment burning gas or other fuels.
- Extracted air must not be conveyed into a duct used for exhausting combustion fumes from gas or other fuel-fired equipment.
- Observe all regulations in relation to air extraction.
- NEVER cook food with an open flame under the hood; open flames will damage the filters and may cause fires. Never do this.
- Always supervise frying to make sure the heated oil does not catch fire.
- Strictly observe all local regulations in relation to the technical and safety measures to be employed in fumes extraction.
- Clean the product frequently, inside and out (AT LEAST ONCE A MONTH, and in observance of the maintenance instruction given in this manual).
- Failure to observe the hood cleaning and filter cleaning/replacement instructions can result in fires.
- Never use the hood without its bulbs properly installed - electrocution hazard.
- The manufacturer is not liable for any inconvenience, damage or fire caused by the unit as a result of failure to observe the instructions given in this manual.
- Caution! The unit's accessible parts can get very hot when used with cooking equipment.
- This appliance can be used by children aged from 8 years and above and persons with reduced physical, sensory or mental capabilities or lack of experience and knowledge if they have been given supervision or instruction concerning use of the appliance in a safe way and understand the hazards involved. Children shall not play with the appliance. Cleaning and user maintenance shall not be made by children without supervision.
The minimum distance from the supporting surfaces on the cooking hob to the lowest part of the cooker hood must be not less than:
65 cm, if the hood is installed above a gas hob
55 cm, if the hood is installed above an electric hob. If the installation instructions for the gas hob specify a greater distance, this must be taken into account when installing the hood.
The hood comes with fixing screws designed for most types of walls and ceilings. However, it is necessary to consult a qualified technician to verify the suitability of the materials in accordance with the type of wall/ceiling, which must be strong enough to support the weight of the cooker hood. Attention! Do not connect the appliance to the electrical supply until installation is fully completed. - Before carrying out any cleaning or maintenance work, disconnect the hood from the electrical supply by removing the plug from the socket or switching off the main switch in the house. - For all installation and maintenance work, wear protective gloves. - The appliance is not intended for use by children or persons with reduced physical, sensory or mental capabilities, without experience and knowledge, unless they are supervised or instructed in the safe use of the appliance by persons responsible for their safety. Ensure that children do not play with the appliance. - Never use the appliance without the correctly installed grease filter! - NEVER use the cooker hood as a support surface, unless this is clearly permitted. - The room must be well ventilated when the cooker hood is used in conjunction with other appliances burning gas or other fuels.
The extracted air must not be discharged into a flue used for exhausting fumes from appliances burning gas or other fuels.
- The extracted air must not be discharged into a flue used for exhausting fumes from appliances burning gas or other fuels.
- Observe all regulations regarding fume extraction. It is strictly forbidden to cook on an open flame grill; an open flame can damage the filters and cause a fire, so its use is strictly prohibited.
- It is recommended to continuously monitor the preparation of food in the fryer to avoid the ignition of hot oil.
- The safety and technical rules applicable to the fume extraction system must strictly comply with the regulations of local competent authorities.
- It is recommended to regularly clean the appliance both inside and outside (at least once a month, in any case follow the maintenance instructions given in this technical manual).
- Failure to follow the rules for caring for the range hood and for replacing and cleaning the filters leads to fire. Do not use or leave the hood without properly installed lamps, as this can cause an electric shock.
- The manufacturer assumes no responsibility for possible damage, harm, or fires that may occur to the appliance due to non-compliance with the instructions given in this technical manual. Warning! Exposed parts can become very hot from the burner plate.
This appliance can be used by children aged 8 and above and by persons with reduced physical, sensory, or mental capabilities or lack of experience and knowledge if they have been given supervision or instruction concerning use of the appliance in a safe way and understand the hazards involved. Children shall not play with the appliance. Children shall not carry out cleaning and user maintenance without supervision.
Spare parts
ASSISTANCE - SPARE PARTS, ACCESSORIES
199.199.199
TOLL-FREE NUMBER
! Never use the services of an unauthorised technician.
Please have the following information to hand:
The type of problem encountered. The appliance model (Mod.). The serial number (S/N).
The latter two pieces of information can be found on the data plate located on the appliance.
Assistance
! Do not contact unauthorized technicians.
When contacting the Technical Service Center, please provide:
Type of malfunction;
Model of the appliance (Mod.)
Serial number (S/N)
You will find this data on the data plate located on the appliance.
Help
! Contact authorized technicians only.
Please provide:
Type of malfunction; - Model of the appliance (Mod.) Serial number (S/N)
- "Low voltage" Directive 2006/95/EC (12-12-2006)
- "EMC" Directive 2004/108/EC (15-12-2004)
The installation procedure is illustrated in the first pages of this manual.
The installation must be done by a qualified technician.
Electrical hook up
The mains voltage must match that given on the ratings label inside the hood itself. If the hood has a power plug, connect the hood to an easily accessible regulatory power socket. If it does not (direct connection to the mains), or the socket is not easily accessible, install a two-pole regulatory switch to enable total disconnection from the mains in case of category III overvoltage, as required by the installation regulations.
Caution! Always check that the mains cable is hooked up properly and check that it operates correctly before reconnecting the hood to the mains.
Air exhaust (for ducted units)
Connect the hood to a duct and wall exhaust hole of a diameter equal to that of the air outlet flange. Using a smaller diameter tube and exhaust hole reduces the extraction capacity of the hood and also increases its running noise. The manufacturer is not liable for any consequences of doing so.
! Use the shortest duct required to achieve the purpose.
! Use a duct with as few bends as possible
! Avoid suddenly changing the diameter of the duct.
! The duct must have as smooth an inner surface as possible.
! The duct must be made of regulatory material.
! Do not connect the hood to flues carrying combustion fumes from other equipment (boilers, heaters, stoves, etc.).
! Observe the instructions of the competent authorities in relation to the air exhaust. The air being exhausted may not be exhausted into a wall cavity unless the cavity in question is specifically intended for this purpose.
Equip the room with air intakes to prevent the hood creating suction pressure in the interior (this must not exceed 0.04 mbar).
The manufacturer is not liable for any consequences of failure to observe these instructions.
Filter or ducted?
Your hood is supplied as a ducted unit.
If you wish to use it as a filter unit, you must install the proper ACCESSORY KIT.
Note: If supplied with the hood, the accessory active charcoal filter unit may already be installed.
Instructions for transforming the hood from the ducted to the filter version are given in this manual (see "Filter version").

Ducted version
GB
The hood purifies the air and expels it outdoors via an exhaust duct (dia. 150 mm) connected to its outlet flange. The diameter of the exhaust tube must be equal to that of the outlet flange.
Caution! The exhaust duct is not supplied and must be purchased separately.
When routed horizontally, the tube must be angled slightly upwards (around 10°) to enable the air to be conveyed outdoors more easily. If the hood is fitted with charcoal filters, they must first be removed.

Filter version
The hood purifies the air and returns it to the room. This version of the hood requires installation of an accessory active charcoal filter unit.
This version requires an air deflector, a reduction adapter and the charcoal filter/s. The top tube must have its air outlet slots uppermost.
Technical data
| Model | Height (cm) | Width (cm) | Depth (cm) | dia. of exhaust tube (cm) |
| GLASS 60cm | 61-82 | 59.8 | 50 | 15/12 |
| GLASS 90cm | 61-82 | 89.9 | 50 | 15/12 |
Please check the plate in order to verify the total absorption and the light absorption
| Power | Voltage | Cap | Dimensions | |
| Halogen 25 W | 2 x 25 W | 230 V | G9 | L40xØ14 |
| Halogen 20 W | 2 x 20 W | 12 V | G4 | L30xØ10 |
LED
Risk Group 1 according to Standard EN 62471
| CE | The model is in accordance with the following EU directives: |
| The hoods are conforming to the following EC Directives: | |
| •“Low voltage” Directive 2006/95/EC (12-12-2006) | |
| •“EMC” Directive 2004/108/EC (15-12-2004) | |
| •UR Reference no. 66/2014 integrating Directive no. 2009/125/EC. |
Reference standard:
EN 60704-2-13:2011; EN 60704-3:2006 EN 61591:1997; EN 61591:1997/A1:2006; EN 61591:1997/A2:2011; EN 61591:1997/A11:2014 EN 50564:2011
- Only available in certain models
Models with mechanical keypad
HGF9.5AMX/HA
HGF6.5AMX/HA
HGF9.5SAMX/HA
T1
T2
T3
T4
T5
T1 Motor reset
Pressing the button while the hood is in operation turns it OFF.
T2 Speed 1
Pressing the button sets the hood to speed 1.
T3 Speed 2
Pressing the button sets the hood to speed 2.
T4 Speed 3
Pressing the button sets the hood to speed 3.
T5 Lights ON/OFF
Models with soft button keypad
HGA6.5SABX/HA
HGA6.8ABX/HA
HGF9.8ABX/HA
HGA9.8ABX/HA
HGF6.8ABX/HA
HHDF9.7CBX/HA
T1
T2
T3
T4
T5
T6
T1 Motor reset
Press the button with the hood off to set speed 1. Pressing the button while the hood is in operation turns it OFF.
T2 Speed 1
Pressing the button sets the hood to speed 1.
T3 Speed 2
Pressing the button sets the hood to speed 2.
T4 Speed 3
Pressing the button sets the hood to speed 3.
T5 Booster
Pressing the button sets the hood to high speed. After 5 minutes, the hood returns to the previous speed; pressing a speed button (T2, T3 or T4) quits booster mode and sets the selected speed.
T6 Lights ON/OFF
Grease/odour filter warnings
The T2 icon flashes to indicate that the grease filter is saturated, while T3 flashes to indicate that the odour filter is saturated, and if both are flashing then both filters are saturated. You must then clean/replace the grease filter (A) or odour filter (B) or both, accordingly (see "Maintenance and care").
To reset the filter counter:
Hold down T5 for three seconds while the hood is on.
The warning led flashes three times, then returns to its normal mode. If both filter warnings are active at the same time, you must reset each separately.
The first sequence resets the grease filter, while the second sequence resets the odour filter.
Hood configuration:
To set the operating mode of the hood, hold down T5 for 6 seconds while the product is off. Icons T2 or T3 will light up to show the type of installation: T2 ventilation, T3 filtering. You can change the type of installation by pressing T4 cyclically.
To save the new configuration press T1 individually.
Models with soft button keypad and display
HGF 6.8 AD X/HA
T1
T2
T3

T4
T5
T6
1 Motor ON/OFF
Press the button with the hood off to set speed 1. Pressing the button while the hood is in operation turns it OFF.
T2 Speed -
Pressing the button returns the hood to the previous speed.
T3 Speed +
Pressing the button returns the hood to the next speed.
T4 Booster
Pressing this button sets the hood to high speed; the letter "b" flashes slowly on the display. After 5 minutes, the hood returns to its previous speed; this can also be done while booster mode is on by pressing either speed button (T2 or T3).
T5 Timer
Pressing this button delays the automatic shut-off of the hood by 5 minutes. The timer counts down on the display in minutes. The timer can only be set for manual speeds, not for booster mode.
T6 Lights ON/OFF
Grease/odour filter warnings
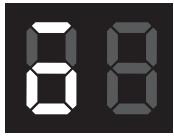
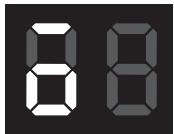
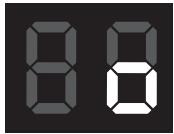
The bar at the top left flashes to indicate that the grease filter is saturated.
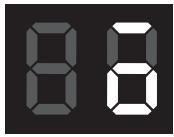
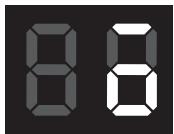
The bar at the top right flashes to indicate that the odour filter is saturated.
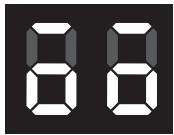
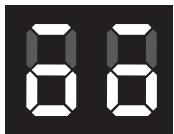
If both bars are flashing, then both filters are saturated.
You must then clean/replace the grease filter (A) or odour filter (B) or both, accordingly (see "Maintenance and care"). The latter only applies to the filter version.
To reset the filter counter:
Hold down T4 for three seconds while the hood is on. If both filter warnings are active at the same time, you must reset each separately. The first sequence resets the grease filter, while the second sequence resets the odour filter.
Configuring the hood
To set the operating mode of the hood, hold down T4 for 6 seconds, while the product is off. After a long beep, the type of installation displays:
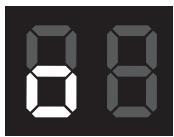
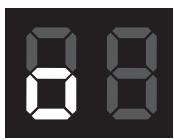
Ducted
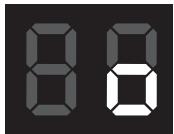
(square at bottom left flashing).
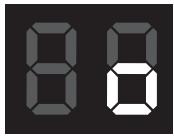
Filter
(square at bottom right flashing).
You can change the type of installation by pressing T4. To quit configuration mode, press T1 once; this switches the unit off and saves the last displayed setting.
Maintenance and care
Caution! Before cleaning or servicing the unit, disconnect it from the mains by pulling the power plug or disconnecting the main circuit breaker.
First cleaning
- Remove the protective film
- Clean with a damp sponge and a little neutral soap
- Rinse off with a damp cloth
- Dry with a soft cloth; if the hood is stainless steel, dry along the metal's grain
Periodic cleaning
The hood must be cleaned frequently (at least as often as you service the grease filter), inside and out. Use a damp
cloth and a neutral liquid detergent with lukewarm water. Do not use abrasive or corrosive products.
Warning: Failure to observe the hood cleaning and filter cleaning/replacement instructions can result in fires. Follow the instructions carefully. The manufacturer is not liable for any damage to the motor or fires caused by incorrect care or failure to follow the above instructions.
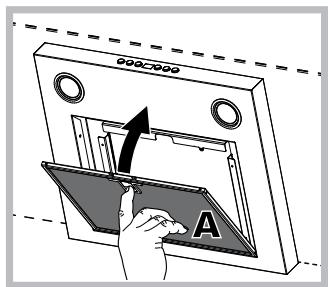
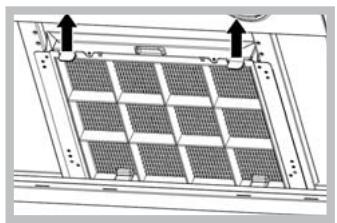
Servicing the grease filter (A)
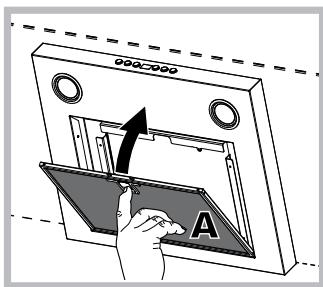
The grease filter retains the particles of grease produced during cooking; it must be cleaned at least once a month with a non-aggressive detergent, either by hand or with a low temperature, short dishwasher cycle.
To extract the grease filter, pull the spring loaded handle.
If washed in a dishwasher, the metal filter may change colour, but this does not affect its performance.
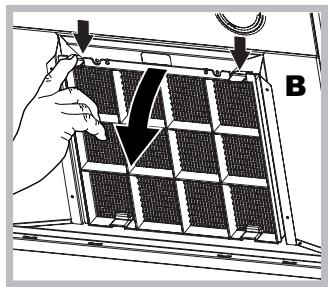
Servicing the charcoal filter (B)
The charcoal filter retains unpleasant cooking odours. The filter saturates after a variable time, depending on the type of cooking and how often the grease filter is cleaned. The cartridge must be replaced at least once every twenty months.
This filter can NOT be washed or regenerated
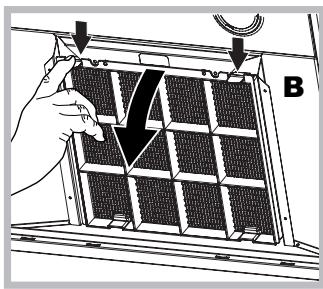
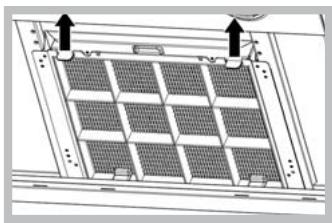
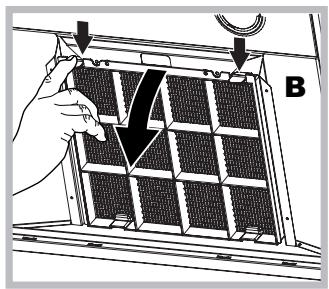
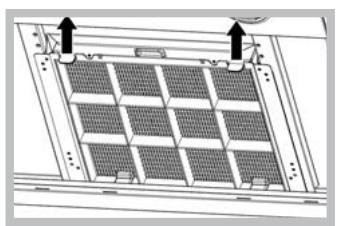
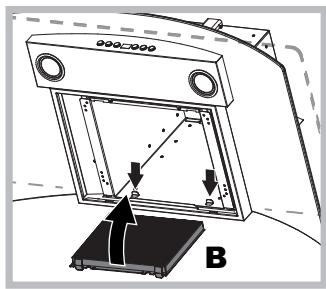
Disassembly: Remove the activated-carbon filter by pressing the two front levers which secure it to the hood.
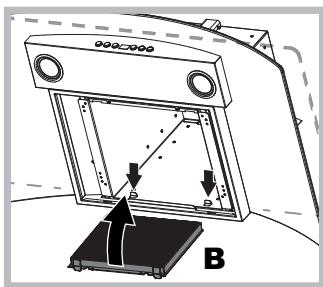
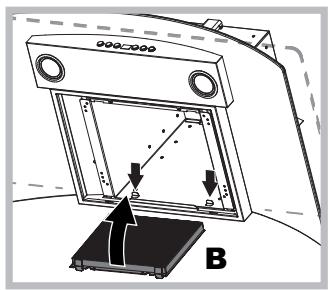
Assembly: Secure the activated-carbon filter first in the back using the hood's metal tabs and then in the front by pressing the two levers.
Replacing the bulbs
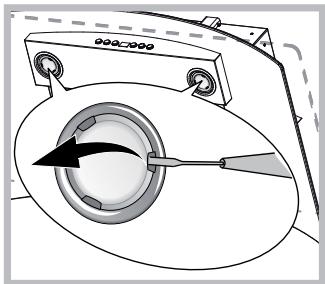
Disconnect the unit from the mains and remove the grease filter.
Caution! Make sure the bulbs are cool before touching them.
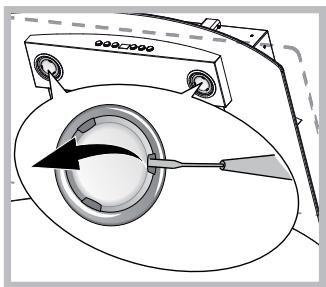
- Extract the guard by prising it out with a small flat head screwdriver or something similar.
- Replace the faulty bulb. Use only bulbs of the same type (for details, see the technical data in the following manual).
- Refit the guard (push it in).
Replacing the lights LED *
The hood is fitted with a lighting system based on LED technology. The LEDs ensure optimal lighting, longer life and lower consumption compared with traditional lights. To replace them please contact the assistance service.
Electrical cable
If the power cable is damaged, it can be replaced by the manufacturer or their technical service to prevent any attendant risks.
SCRAPPING
The unit is marked for conformity with European Directive 2012/19/EC, Waste Electrical and Electronic Equipment (WEEE). By ensuring that the unit is scrapped properly, the user contributes to safeguarding the environment and public health.
The symbol on the product or on its accompanying documents indicates that the product may not be treated as domestic waste but must be handed over to a sorting centre for electrical and electronic waste. Dispose of it in accordance with local waste disposal regulations. For further information on the handling, recovery and recycling of this product, contact the local authority, domestic waste disposal service or the reseller from whom you purchased it.
Save energy and respect the environment
- Please use the hood by setting the speed in line with the real extraction need; please limit the use of the "intensive speed" feature, if present. Using the hood in a rational way allows you to limit energy consumption and to avoid an useless waste of clean and air-conditioned air.
- Please don't turn on the hood light unless this is needed to light the cooking area.
Troubleshooting
If something does not work, make the following simple checks before contacting Technical Service:
If the hood does not operate:
Check that:
the unit is powered up. - a speed has been set.
If the hood is not working effectively:
Check that:
- the selected motor speed is sufficient to handle the amount of smoke and steam being produced.
- the kitchen is adequately ventilated for the unit to take air in.
- the charcoal filter is not exhausted (filter version).
If the hood turns off during normal operation:
Check that:
the unit is powered up. - the circuit breaker has not tripped.
In case of faulty operation, before contacting Technical service, first disconnect the machine from the mains for at least 5 seconds by pulling its plug, then reconnect it. If the fault persists, contact Technical Service.
Installation
T1 Motor stop
When pressing button N, the hood switches to 3rd speed.
T5 Light on/off
Models with electronic control
HGA6.5SABX/HA - HGA6.8ABX/HA - HGF9.8ABX/HA
HGA9.8ABX/HA - HGF6.8ABX/HA - HHDF9.7CBX/HA
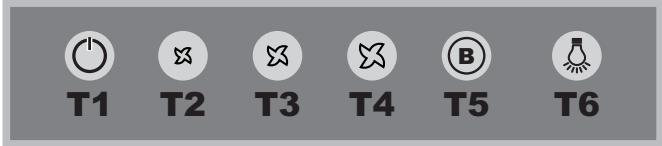
T1 Motor stop
When pressing this button on the switched-off hood, the first speed is set. When pressing the button during operation, the hood switches to off mode.
T2 Speed 1
When the extraction button is pressed, it switches to the 1st speed.
T2 Speed 2
When the extraction button is pressed, it switches to the 2nd speed.
T2 Speed 3
(Press the square in the lower left corner).
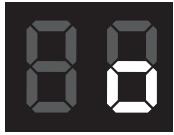
Filter
(Press the square in the lower right corner).
You can change the version by pressing the T4 button. To exit the setup mode, press the T1 button once, which turns off the extraction, saving the last setting shown on the display.
Technical maintenance
Warning! Before any cleaning or maintenance work, disconnect the extractor from the electrical network by pulling the plug out of the wall socket or switching off the main switch in the house. First cleaning
- Remove the protective film
- Wipe the dirty parts with a damp cloth with a neutral detergent. Carefully wipe with a damp cloth. - Wipe dry with a soft cloth. If the extractor is made of stainless steel, wipe along the metal grain.
Regular cleaning
Clean the grease filter (not more often than the metal grease filters) both inside and outside. For cleaning, use a neutral detergent and warm water. Do not use detergents containing abrasive substances.
Warning: Failure to follow the maintenance instructions for the hood and to replace the filters may lead to a fire. It is recommended to follow the provided instructions. The manufacturer disclaims all liability for possible engine damage, fire, or improper maintenance or non-compliance with the above warnings.
Maintenance of the grease filters (A)
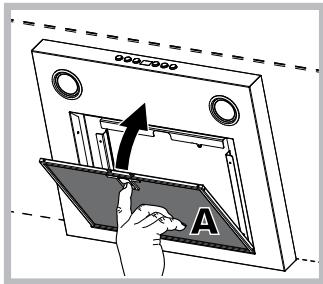
The grease filter retains grease particles that are contained in the vapors emitted during cooking. It is necessary to clean this filter once a month with neutral detergents by hand or in the dishwasher at low temperature and on a short program. To remove
the grease filter, pull the handles of the spring release. When cleaning the grease filter in the dishwasher, its color may fade, but this does not affect its filtering characteristics.
Maintenance of the charcoal filter (B)
The charcoal filter retains unpleasant odors from cooking vapors. Saturation of the charcoal filter occurs after a fairly long period of operation, depending on the type of cooking and the frequency of cleaning the grease filter. In any case, even without a saturation indicator, the filter cartridge should be replaced at least once every 20 months. This filter cannot be washed or regenerated.
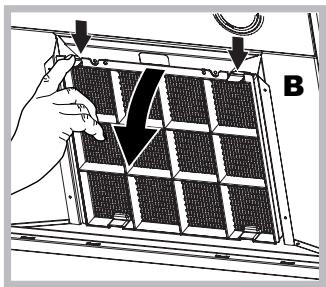
Removal: Remove the charcoal filter by pressing on the two front levers, releasing it from the hood.
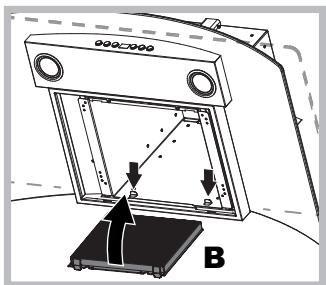
Installation: First connect the charcoal filter to the metal hooks at the rear part of the hood, then at the front part, pressing on the levers.
- Only available on some models
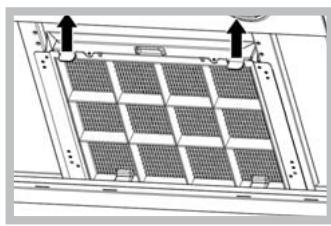
Procedure for replacing bulbs
Disconnect the hood from the electrical supply and remove the grease filter.
Warning! Before touching the bulbs, make sure they are cold.
1. Remove the diffuser by prying it with a small flathead screwdriver or similar tool. 2. Replace the burnt-out bulb. Use only bulbs with the same characteristics (more detailed data see in the technical manual). 3. Close the diffuser (locking follows).
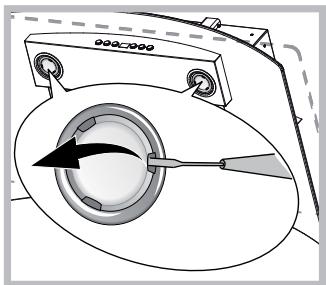
Procedure for replacing LED bulbs*
The hood is equipped with LED lighting system. LED lamps provide optimal illumination, longer service life and lower energy consumption compared to traditional lamps. Their replacement should be carried out in a service center.
Mains cable
If the mains cable is damaged, to avoid any risk, its replacement must be carried out by the manufacturer or an authorized service center.
Disposal
This product bears the marking according to European Directive 2012/19/EC on waste electrical and electronic equipment (WEEE). Make sure that at the end of its service life, this product is disposed of properly. This way you can help protect the environment.

The symbol on the product or in the accompanying documents indicates that this product must not be treated as household waste, but must be handed over to a specialized recycling center for the disposal of electrical and electronic appliances. The product must be disposed of in accordance with local waste disposal regulations. For additional information on the treatment, recovery and recycling of this product, please contact your local authority, the waste collection service for household appliances, or the store where you purchased the product.
Save energy and protect the environment
Using the hood in a rational way allows you to limit energy consumption and avoid
useless waste of clean and conditioned air.
- Do not switch on the hood lighting except in cases where it is necessary for lighting the cooking surface.
Malfunctions and how to fix them
In case of malfunction, before contacting the service center, perform the following simple checks:
If the hood does not work:
Check:
Power supply - plug or set speed.
Press the hood release button:
Check:
- That the set engine speed is sufficient for the volume of vaporized fuel. - That the hood release lever is not obstructed for air intake. Do not replace the charcoal filter (filter version with extraction).
If the extraction is switched off during operation:
Check:
- The power supply has not triggered the multi-pole circuit breaker.
In case of possible malfunctions, before contacting service, disconnect the extraction for about 5 seconds from the mains power by pulling the plug out of the socket, then reconnect. If the malfunction is not resolved, contact service.
Cleaning the grease filter
Signal for cleaning the grease filter and charcoal filter
The illumination of the icon corresponding to the first speed T2 indicates clogging of the grease filter. The illumination of the icon corresponding to the second speed T3 indicates clogging of the charcoal filter. The illumination of both icons T2 and T3 indicates clogging of both filters. Therefore, it is necessary to clean/replace the grease filters “A” and/or the charcoal filters against odors “B” (see “Maintenance”).
To clean the filter:
On the hood, press and hold the T5 button for 3 seconds. The signal light will blink three times, then return to normal operation display. In case of simultaneous signaling of both filters, it is necessary to perform the cleaning. The first procedure concerns the grease filter, the second the charcoal filter against odors.
Configuration of the hood:
To set the hood to the desired operating mode, press the T5 button in the off state and hold it for 6 seconds. While T2 or T3 flash, they indicate the mode: T2 for suction mode, T3 for filtration mode. You can change the mode by pressing the T5 button sequentially.
To save the new configuration, press the T1 button.
Soft Button control panel
HGF 6.8 AD X/HA
T1
T2
T3

T4
T5
T6
T1 Press and hold to activate
Pressing and holding the button will activate the first speed. Pressing and holding it again during operation will activate the extraction.
T2 Speed -
Pressing the button will switch to the previous speed.
T3 Speed +
Extraction configuration
To configure the extraction, press T4 and hold it for 6 seconds. (On the product) After the timer, the display will show T1 and the extraction configuration mode.
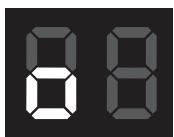
(6πnMaioyKBaIpaT BnI3y JIbOpuy).
ΦiNbTpyuOua
(6nmaouk Kbaapat Bn3y npabopuy).
MoXHa 3MiHnTm MoiΦikaIIO, HATNCHyBwH Ha KONKy T4. ΜIo6 BnItn 3 peKmMy KOHφirypaIi, HATNCHiTb OOnH pa3 Ha KONky T1, ΜIo npN3BeDe Do BVMKHeHH BITJxKn i3 36epeXeHHM OCTaHHbOro HaNlaSTyBaHHra.
LcE fJIbTp He nepeI6aue MHTT a 6o BiHOBJeHHA.
ДемоNTax:ВиMuMt bФiNbTp aKtNBoBaHOrO ByrIJIЯ, HATnCHyBwH Na dBa nepeDi bAxKeJI, rki φikCyHb Yoro Do BHTaXKn.
MOnTaX: PIneHaHTe φiIbTp aKtNbBOBaHOro ByrIiNЯ cNoOaTKy No3aNy Ha MeTaleBi Y3nUKN BNTJxKn, NOTIM nonepedy, HATnCHyBUn Ha dBa BaxKen.
3aMiHa JAmNoyOK
BiD'cHaHTe npnlaad BiM mepeXe eJeKtpuHOro KMBneHHa i BmMiTb fiNbTpN-KnpOpyNoBIOBaHi.
Ybara!IepH HIX TOPKaTnCJ IaMn, BnEhBiTbCJ, 1O BOH XoIoDHi.
- Bn m itb 3ax nche npncTocyBaHHa. BnKopNCTOBHyOuN BЯKOCTi BaJxJIe NHeBeJIuKy BnKpyTkY a6oNoDi6Hni IHcTpyment. 2.3amHITb yuKoJKeHy lamnoChy.BnKopCTOByIe TijbKn lamNoch 3 TmN Jx hapaKTePncTnKaMn, zo Iy uKoJKeHi (3a DetalbHiUdoTexHiHnx DaHnx, HabeD
- 3akpiTe 3axnche npncTOcyBaHHa (fikcaia JIJAXOM 3aunnaHH).
3amHa JAmnoyOK LED*
Bntjka ochaeta cbitIOIOHO CNTeMOIOOCBITHeHH. CbitIOIOI rapaHTyOt b ONTmAlbHe OCBITHeHH, TpIBaIIiHn TepMin cnyx6n n 3aozadXeHH eHepri y npOBHHi 3 TpaNciNnMn lamNooykAmn. Jnla 3amHn cbitIOIOIB 3BepHITbcy y Cepbichy cnyx6y.
In case of damage to the device, it can be replaced by contacting the manufacturer or their service department. This defect is not dangerous.
DISPOSAL
This product bears the selective sorting symbol (WEEE) in accordance with European Directive 2012/19/EC: Waste Electrical and Electronic Equipment (WEEE).
- Available only on some models
Once the product has been disposed of by appropriate means, use sand to prevent potential negative effects on the environment and health that may occur due to improper disposal of your product.
The symbol on the product or in the accompanying documentation indicates that this device should not be disposed of with household waste. It must be handed over to specialized collection centers that deal with the recycling of electrical and electronic equipment. Dispose of the device in accordance with local regulations for recycling and disposal of waste. For further information on recycling, disposal, and reuse of this product, contact your local waste management services, the service for collecting household waste, or the store where you purchased the product.
Faults and remedies
If certain problems occur during the operation of the device, before contacting the service department for assistance, perform the following simple checks.
If the vacuum cleaner does not work:
Check that:
- The power cord is properly plugged into the electrical outlet.
- The dust container is correctly installed.
If the vacuum cleaner sucks poorly:
Check that:
- The hood must be sufficiently ventilated for the amount of extracted air and the kitchen must be sufficiently ventilated to ensure the removal of polluted air. The hood must not be connected to the exhaust duct in the combined ventilation system.
If the hood is used during normal operation:
Check that:
- The hood is not switched off during power supply. Do not use the hood without the lamp.
In case of malfunction, before contacting the service department for help, disconnect the appliance from the power supply by unplugging it from the socket, and then plug it back in. If the malfunction cannot be eliminated, contact the service department for help. Save energy and show the display
Save energy and show the display
Use the hood in the mode that corresponds to the needs of the extracted air; limit the use of the "intensive" mode, if present. Rational use of the hood allows limiting energy consumption and reducing the loss of fresh and conditioned air. - Turn on the hood lighting only during direct observation of the cooking process.
Installation
Models with mechanical push-button panel
HGF9.5AMX/HA
HGF6.5AMX/HA
HGF9.5SAMX/HA
T1
T2
T3
T4
T5
The device must be grounded.
Electric shock hazard
The grounding conductor connected to the grounding terminal of the plug must be connected to the grounding point of the device. If the grounding terminal is missing, or if the plug does not have a grounding terminal, it is necessary to connect the grounding conductor to the grounding point of the device using a separate terminal, so that the device can be safely grounded.
Danger! Do not connect the device to a power outlet that is not properly grounded, and do not use an adapter that does not have a grounding terminal.
Air outlet (for devices with an air outlet)
The air outlet must not be blocked. If the air outlet is blocked, the device may overheat and cause a fire hazard. Do not place any objects over the air outlet.
Do not use the device in a humid environment.
! Do not block the air outlet. ! If the outlet is blocked, the device may overheat. ! Do not cover the outlet with any objects. ! The outlet must be kept clean and free of dust. ! Do not place the device on soft surfaces (such as beds, sofas, carpets, etc.) that could block the outlet. ! Do not place the device near heat sources or in direct sunlight. ! Do not use the device if the outlet is damaged. ! Do not operate the device with wet hands. ! Do not use the device in areas where flammable gases or vapors are present.
Is the device grounded?
! The device must be grounded.
If the grounding conductor is not connected properly, the device may not function correctly.
Warning: If the grounding conductor is not connected, the device may be damaged.
For proper grounding, refer to the instructions provided with the device (see the grounding instructions).

The lamp is equipped with a built-in fuse. The fuse is located in the lamp cap (diameter 150 mm). The fuse protects the lamp against short circuits. The fuse diameter is the same as the lamp cap diameter.
Attention! The lamp fuse must not be replaced; it is permanently sealed.
In case of replacement, the lamp must be turned off and allowed to cool (at least 10°). If the fuse is blown, it must be replaced with a new one.

Water resistance
The lamp is protected against water splashes. The lamp is not suitable for underwater use.
This lamp is not suitable for use with dimmers or electronic switches. The lamp must be installed in a well-ventilated location.
Technical specifications
| Мо德尔 | Биiktiri (см) | Енi (см) | Тереньдiri (сm) | ayaшытагу Тутirиндам. (сm) |
| GLASS 60 cm | 61-82 | 59.8 | 50 | 15/12 |
| GLASS 90 cm | 61-82 | 89.9 | 50 | 15/12 |
| Мо dyeльko dye | Шam(B) | Шam куаты(BТ) | Жалны куат(BТ) |
| HGF 9.5S AB X/HA HGA 9.5S AB X/HA HGA 6.5S AB X/HA | Галoreнд i | 2 x 20 | 185 |
| Модень Кожы | Шam (В) | Шam куаты (Вт) | Жалны куат (Вт) |
| HGF 9.8 AD X/HA | |||
| HGA 9.8 AD X/HA | Галoreнdi | 2 x 20 | 290 |
| HGA 6.8 AD I X/HA | |||
| HGF 6.8 AD X/HA |
| Мо dyeльko dye | Шam(B) | Шam куаты(Bt) | Жалны куат(Bt) |
| HGA 9.5 AM X/HA HGF 9.5 AM X/HA HGA 6.5 AM X/HA HGF 6.5 AM X/HA | Галoreнд i | 2 x 20 | 150 |
| Куаты | kéрneyi | цокои | Өлшемерi | |
| Галoreнд i 25 W | 2 x 25 W | 230 V | G9 | L40xØ14 |
| Галoreнд i 20 W | 2 x 20 W | 12 V | G4 | L30xØ10 |
LED*
Complies with EN 62471 standard, risk group 1

The lamp complies with the following EU directives:
The lamp must be installed at a distance of at least 1 meter from the illuminated surface.
Protection class 2
The lamp must be installed at a distance of at least 2 meters from the illuminated surface.
T4 KblДamdbiK 3
TуIMe 6acbIiFaHda copfblu3-ЖblIaMdIbIka opHaTbIaIbI.
T5 Shamapdbi KOCY/THIPY
CeHcopJIbIK nAHeJIbMeH xa6IbIKTaIfAH MoDeJIbDep
HGA6.5SABX/HA
HGA6.8ABX/HA
HGF9.8ABX/HA
HGA9.8ABX/HA
HGF6.8ABX/HA
HHDF9.7CBX/HA
T1
T2
T3
T4
T5
T6
T1 MoToPdBi TOKTaTy
Copfblw eun TpyfaH Ke3e, TymeHi 6acbIn, 1-ksbldaMdbkTbOpHaTbHb3. Copfblw kymbc icTeN Tpyfanda 6acbInca, on ΘUJEJI.
T2 KblДamdbI K1
TуIMe 6acbIJaHda copfbiU 1-KbJIaMdMbIka opHaTbIaIbI.
T3 KbldaMdbk2
TуIMe 6acblfHaHda copFbIi 2-ЖblДamMbIka opHaTbIaIbI.
T4 KblJaamdbik 3
TуIMe 6acbIiFaHda copfblu3-ЖblIaMdIbIka opHaTbIaIbI.
T5 KyweeTkiu
Tynme 6acblfana copfbix kofapbXkbldAmkbKa opHaTbIaDb.5 MNHyTTaH KeiH, copfbix aIdbIHfbI XbldAmkbKa opalaDb; XbldAmbIK Tymeci baclnca (T2,T3 Hemece T4), copfbix KyweeTKiipexKMIHeH sbIfbn, TaHaIraH XbldAmbIKTbI opHaTaDbI.
T6 Shamapdbi KOCY/ThetaIPy
Copfblw eun TpyraH Ke3Je, TyMeHi 6acbln, 1-xblnDaamblkTbI opHaTbIHbI. Copfblw JxMbic icTeN TpyFaHda 6acblnca, OJI ΘUJEJI.
T2 KblДamdbik -
Tyme 6acblfahda copfbla andbihfbj XbIJaMdbIKKa opanabl.
T3 KblDamDbIK+
When pressed, the button switches to fast mode.
T4 KyweeTkiu
When pressed, the button switches to fast mode; in this mode, the «b» button is active. After 5 minutes, the button switches to fast mode; when the power mode is on, the button (T2 or T3) can also be switched to fast mode by pressing.
T5 Timer
When this button is pressed, the appliance turns off after 5 minutes. The timer shows minutes on the display, and the remaining time. The timer can only be set by pressing the button, not in power mode.
T6 Adding/removing ingredients
Removing ingredients
When the lid is closed, the ingredient is locked.
When the lid is open, the ingredient is unlocked.
If both lids are closed, both ingredients are locked.
In that case, you need to remove the ingredient (A) or the ingredient (B) or both (see section «Technical Service and Maintenance»). The information applies only to the ingredient version.
To remove the ingredient:
Press the T4 button, then the ingredient is unlocked.
If both ingredients are removed at the same time, they must be placed back in the correct position.
Before maintenance, turn off the power and disconnect the power cord.
Filter replacement
To replace the filter, open the front cover, then remove the old filter. Install the new filter in the correct orientation.
Replacing the dust bag
(For models with a dust bag indicator).
Replacing the water filter
(For models with a water filter indicator).
Open the front cover, then remove the filter. In replacement mode, press the filter reset button once; it will turn off the indicator and reset the maintenance counter.
*Only for certain models
Technical maintenance and user maintenance
Warning! If the filter is not cleaned or replaced as required, the appliance may be damaged and the warranty may be voided.
Cleaning the filter
Remove the filter from the appliance and clean it with a soft brush or rinse it under running water. If the filter is heavily soiled, clean it with a mild detergent.
Cleaning the appliance
Clean the inside and outside of the appliance regularly (at least once a month). Use a soft, damp cloth and mild detergent; do not use abrasive cleaners.
Do not use the device if the parts are damaged. Check: If the device is damaged or the water tank is damaged, do not use it. Do not use the device if the parts are damaged. Do not use the device if the motor has come into contact with water or if the device has been dropped on a hard surface.
Water tank service (A)
The water tank is installed on the base of the device; it must be removed and cleaned once a week or when the water temperature is high, and the tank must be cleaned.
To remove the water tank, press the release button
Pull. If the water is hot, the water tank may be hot, but its handle is safe to touch.
Water tank service (B)
The water tank is installed on the base of the device. The water tank can be removed and cleaned according to the instructions in the manual. The handle must be pulled once a week to remove it.
Do not put the water tank in the dishwasher or in the microwave.
Cleaning: Remove the water tank from the base, and clean the water tank with a soft cloth.
Drying: After cleaning the water tank, dry it with a soft cloth and let it air dry completely before reinstalling it on the base.
Troubleshooting
Turn off the device and unplug it. Wait! Let the device cool down before cleaning or storing it.
- Remove the water tank:
Remove the water tank by pulling it upward or by pressing the release button.
2. Clean the water tank. Rinse it with clean water (see the instructions).
Before starting any work, check the device for visible damage.
- Do not operate the device if it is damaged.
Manufacturer's warranty
The manufacturer has the right to characterize the product based on technical specifications. The product's characteristics may change without prior notice. For their use, contact the service center.
Power cable
If the power cable is damaged, it must be replaced by the manufacturer or its service agent or a similarly qualified person in order to avoid a hazard.
Disposal of waste
This product contains electrical and electronic components (WEEE) and falls under the European Directive EC/2012/19. The disposal of waste must be carried out in accordance with local regulations and in an environmentally responsible manner.

The product or its parts must not be disposed of as unsorted municipal waste; they must be collected separately for recycling of electrical and electronic equipment. Please dispose of the product correctly at the end of its life. For more information on collection, take-back, and recycling programs, contact your local authorities, the waste management service, or the point of purchase.
Accessories
If the device malfunctions, contact the service center before making any repairs:
Device malfunction:
The following repairs are required:
The device is working. Do not repair.
Device malfunction:
KeNeci KaFdaIaIapDbI TeKcepiH3:
TaHdaIHaH MOTOp XbIJaMdbIbIbIbIKKaH TyTih MeH 6y KeJIemIH eHdeYre xeTKJIikTi. KpybIyIaayaanyiYuH ac ynde Tnicti BEHTnlaucn 6ap. - KEmip cy3ri KaHBiKnaFaH (Cy3y Hcckacbl).
Kymbcic icten Typran Ke3de, copfbuw ewin KaIaTbIH 6onca:
KeNeci KaFdaIaIapDbI TeKcepiH3:
Kypblfbl Kocblbn Typ. aBbIpbIN KCKblIL KOCblIMaFaH.
Akaynblj Kymbc icteren Jxafdaa, TeHNkaJIbIK KbI3MeT KepceTy opTaIbIFbIHa xa6apnacnac 6ypbH, aIbIPbIH aftTy apKblbl KypblfBbIH TOkTaH KEM derehde 5 ceKHyndKa aftlbH, KaTaNocbIHb. AkaynblKweijmecE, TeHNkaJIbIK KbI3MeT KepceTy opTaIbIFbIHa xa6apnacbIHbI3.
3KoHOMbTe 3HeprnIO n 6epeRrTe OkpykaouyO cpey
- IcnoJb3yIte BbITaKkU, yCTaHaBnBaJcKOpocTb B COOTBeTCTBmCpeaJIbHbIMN NOTpe6HoCTaM; ORpaHnUBaIe NcNoJb3OBAHneФyHKUIN «NOBbIWeHHaR cKOpocTb》(“intensive speed”)prn HaIuyn TaKOBo. IcNoJb3OBAHne BbITaKKn paCuHOHaNbHbIM Cnocobom No3BOJraT OrpaHnUBaTb NOTpe6JeHne 3HeprnN n36eRaTb BeCNoJe3HOJ TpaTbI YnCTOrO IN KOHNIOHNPoBAHHO Bo3dyxa.
- He BkIIOuAte OcBeUeHne BbITaJxKn, KpOme ClyuaeB, KOrJa 3To Heo6XoDnMo DJIa OcBeUeHnBaPouHoi NobEperxHOCTN.
KZ
KZ
Indesit Company S.P.A.
Viale Aristide Merloni,47
60044 Fabriano (AN)
www.hotpoint.eu


- EN
- USER MANUAL
- OPERATING INSTRUCTIONS
- COOKER HOOD
- PT
- GENERAL SAFETY INFORMATION
- SPARE PARTS
- ASSISTANCE
- HELP
- ELECTRICAL HOOK UP
- AIR EXHAUST (FOR DUCTED UNITS)
- FILTER OR DUCTED
- DUCTED VERSION
- FILTER VERSION
- REFERENCE STANDARD
- MODELS WITH MECHANICAL KEYPAD
- T1 MOTOR RESET
- T2 SPEED
- T3 SPEED
- T4 SPEED
- T5 LIGHTS ON/OFF
- MODELS WITH SOFT BUTTON KEYPAD
- T5 BOOSTER
- T6 LIGHTS ON/OFF
- GREASE/ODOUR FILTER WARNINGS
- TO RESET THE FILTER COUNTER
- HOOD CONFIGURATION
- MODELS WITH SOFT BUTTON KEYPAD AND DISPLAY
- MOTOR ON/OFF
- T4 BOOSTER
- T5 TIMER
- CONFIGURING THE HOOD
- DUCTED
- FILTER
- MAINTENANCE AND CARE
- FIRST CLEANING
- PERIODIC CLEANING
- SERVICING THE GREASE FILTER (A)
- SERVICING THE CHARCOAL FILTER (B)
- REPLACING THE BULBS
- REPLACING THE LIGHTS LED
- ELECTRICAL CABLE
- SCRAPPING
- SAVE ENERGY AND RESPECT THE ENVIRONMENT
- TROUBLESHOOTING
- IF THE HOOD DOES NOT OPERATE
- IF THE HOOD IS NOT WORKING EFFECTIVELY
- IF THE HOOD TURNS OFF DURING NORMAL OPERATION
- INSTALLATION
- T1 MOTOR STOP
- T5 LIGHT ON/OFF
- MODELS WITH ELECTRONIC CONTROL
- TECHNICAL MAINTENANCE
- REGULAR CLEANING
- MAINTENANCE OF THE GREASE FILTERS (A)
- MAINTENANCE OF THE CHARCOAL FILTER (B)
- PROCEDURE FOR REPLACING BULBS
- PROCEDURE FOR REPLACING LED BULBS
- MAINS CABLE
- DISPOSAL
- SAVE ENERGY AND PROTECT THE ENVIRONMENT
- MALFUNCTIONS AND HOW TO FIX THEM
- IF THE HOOD DOES NOT WORK
- PRESS THE HOOD RELEASE BUTTON
- IF THE EXTRACTION IS SWITCHED OFF DURING OPERATION
- CLEANING THE GREASE FILTER
- SIGNAL FOR CLEANING THE GREASE FILTER AND CHARCOAL FILTER
- TO CLEAN THE FILTER
- CONFIGURATION OF THE HOOD
- SOFT BUTTON CONTROL PANEL
- T1 PRESS AND HOLD TO ACTIVATE
- EXTRACTION CONFIGURATION
- ΦINBTPYUOUA
- AMIHA JAMNOYOK
- AMHA JAMNOYOK LED
- FAULTS AND REMEDIES
- IF THE VACUUM CLEANER DOES NOT WORK
- IF THE VACUUM CLEANER SUCKS POORLY
- IF THE HOOD IS USED DURING NORMAL OPERATION
- SAVE ENERGY AND SHOW THE DISPLAY
- MODELS WITH MECHANICAL PUSH-BUTTON PANEL
- ELECTRIC SHOCK HAZARD
- AIR OUTLET (FOR DEVICES WITH AN AIR OUTLET)
- IS THE DEVICE GROUNDED
- WATER RESISTANCE
- PROTECTION CLASS
- T4 KBLДAMDBIK
- T5 SHAMAPDBI KOCY/THIPY
- CEHCOPJIBIK NAHEJIBMEH XA6IBIKTAIFAH MODEJIBDEP
- T1 MOTOPDBI TOKTATY
- T2 KBLДAMDBI K
- T3 KBLDAMDBK
- T4 KBLJAAMDBIK
- T5 KYWEETKIU
- T6 SHAMAPDBI KOCY/THETAIPY
- T2 KBLДAMDBIK
- T3 KBLDAMDBIK
- T4 KYWEETKIU
- T6 ADDING/REMOVING INGREDIENTS
- REMOVING INGREDIENTS
- TO REMOVE THE INGREDIENT
- FILTER REPLACEMENT
- REPLACING THE DUST BAG
- REPLACING THE WATER FILTER
- TECHNICAL MAINTENANCE AND USER MAINTENANCE
- CLEANING THE FILTER
- CLEANING THE APPLIANCE
- WATER TANK SERVICE (A)
- WATER TANK SERVICE (B)
- MANUFACTURER'S WARRANTY
- POWER CABLE
- DISPOSAL OF WASTE
- ACCESSORIES
- DEVICE MALFUNCTION
- KYMBCIC ICTEN TYPRAN KE3DE, COPFBUW EWIN KAIATBIH 6ONCA
- KOHOMBTE 3HEPRNIO N 6EPERRTE OKPYKAOUYO CPEY
Brand : HOTPOINT
Model : HGF 6.8 AB X/HA
Category : Kitchen hood