
AVTXL 120 - Washing machine HOTPOINT - Free user manual and instructions
Find the device manual for free AVTXL 120 HOTPOINT in PDF.
| Product type | Front-loading washing machine |
| Brand | HOTPOINT |
| Model | AVTXL 120 |
| Dimensions (W x H x D) | 40 x 85 x 60 cm |
| Wash capacity | 6 kg (max) |
| Maximum spin speed | 1200 rpm |
| Required water pressure | 0.05 - 1 MPa (0.5 - 10 bar) |
| Electrical supply | 220-240 V ~ 50 Hz (see rating plate) |
| Maximum power | See rating plate |
| Wash programmes | Cotton, Synthetics, Delicates, Wool, Rinse, Spin, Drain |
| Options | Super Wash, Easy Iron, Light Soiling, Extra Rinse |
| Settings | Temperature (cold to 90°C), spin speed (0-1200 rpm) |
| Safety | Lid locking during cycle, automatic stop in case of anomaly |
| Routine maintenance | Cleaning the detergent drawer, pump, checking the water inlet hose |
| External cleaning | Damp cloth and mild soap, no solvents or abrasives |
| Drum unlocking | Press the button on the drum (see manual) |
| Noise and vibrations | Level the feet, do not push against walls |
| Energy consumption | Eco programme recommended at 60°C with full load |
| Spare parts | Available from after-sales service or authorized dealer |
| Repairability | Designed to be repaired by an authorized technician |
Frequently Asked Questions - AVTXL 120 HOTPOINT
User questions about AVTXL 120 HOTPOINT
0 question about this device. Answer the ones you know or ask your own.
Ask a new question about this device
Download the instructions for your Washing machine in PDF format for free! Find your manual AVTXL 120 - HOTPOINT and take your electronic device back in hand. On this page are published all the documents necessary for the use of your device. AVTXL 120 by HOTPOINT.
USER MANUAL AVTXL 120 HOTPOINT
Causes / Solutions possibles:
Unpacking and levelling, 14
Electric and water connections, 14-15
The first wash cycle, 15
Technical details, 15
GB
Washing machine description, 16-17
Control panel, 16
How to open and shut the drum, 17
Leds, 17
Starting and Programmes, 18
Briefly: how to start a programme, 18
Programme table, 18
Personalisations, 19
Setting the temperature, 19
Setting the spin cycle, 19
Functions, 19
AVTXL 120
Detergents and laundry, 20
Detergent dispenser, 20
Bleach cycle, 20
Preparing your laundry, 20
Special items, 20
Woolmark Platinum Care, 20
Precautions and advice, 21
General safety, 21
Disposal, 21
Saving energy and respecting the environment, 21
Care and maintenance, 22
Cutting off the water or electricity supply, 22
Cleaning your appliance, 22
Caring for your appliance door and drum, 22
Cleaning the pump, 22
Checking the water inlet hose, 22
Cleaning the detergent dispenser, 2
Troubleshooting, 23
Service, 24
Before calling for Assistance, 24

Hotpoint
ARISTON
!Keep this instruction manual in a safe place for future reference. Should the appliance be sold, transferred or moved, make sure the instruction manual accompanies the washing machine to inform the new owner as to its operation and features.
!Read these instructions carefully: they contain vital information on installation, use and safety.
Unpacking and levelling
Unpacking
- Unpack the washing machine.
- Check whether the washing machine has been damaged during transport. If this is the case, do not install it and contact your retailer.
-
Remove the four protective screws and the rubber washer with the respective spacer, situated on the rear of the appliance (see figure).
-
Seal the gaps using the plastic plugs provided.
- Keep all the parts: you will need them again if the washing machine needs to be moved to another location.
Warning: should the screws be re-used, make sure you fasten the shorter ones at the top.
!Packaging materials are not children's toys.
Levelling
Your machine may make a considerable amount of noise if the two front feet have not been adjusted correctly
- Install the washing machine on a flat sturdy floor, without resting it up against walls, furniture cabinets or other.
- If the floor is not perfectly level, compensate for any unevenness by tightening or
loosening the adjustable front feet (see figure); the angle of inclination, measured according to the worktop, must not exceed 2^ .
Levelling your appliance correctly will provide it with stability and avoid any vibrations, noise and shifting during operation. If it is placed on a fitted or loose carpet, adjust the feet in such a way as to allow enough room for ventilation beneath the washing machine.
Putting your appliance in place and moving it.
If your washing machine is equipped with a special set of retractable wheels you can easy move it. To lower the wheels and thus move the appliance effortlessly, just pull the lever, situated on the left-hand side beneath the base. Once the appliance is in the required position, put
the lever back in place. The washing machine is now firmly in place (see figure).
Electric and water connections
Connecting the water inlet hose
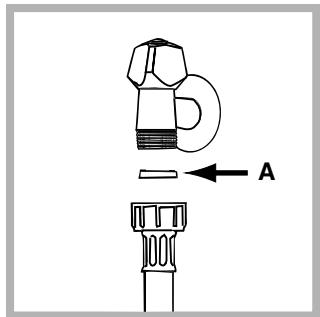
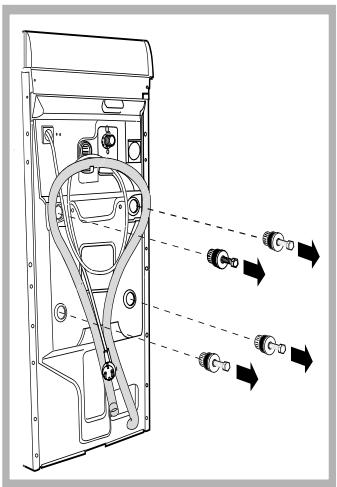
- Insert seal A into the end of the inlet hose and screw the latter onto a cold water tap with a 3/4 gas threaded mouth (see figure).
Before making the connection, allow the water to run freely until it is perfectly clear. - Connect the other end of the water inlet hose to the washing machine, screwing it onto the appliance's cold water inlet, situated on the top right-hand side on the rear of the appliance (see figure).
- Make sure there are no kinks or bends in the hose.
The water pressure at the tap must be within the values indicated in the Technical details table (on the next page).
If the water inlet hose is not long enough, contact a specialist store or an authorised serviceman.
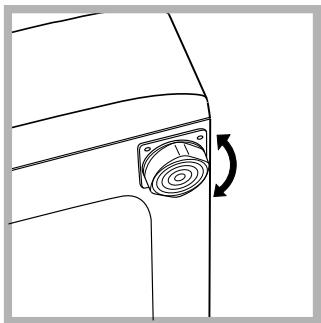
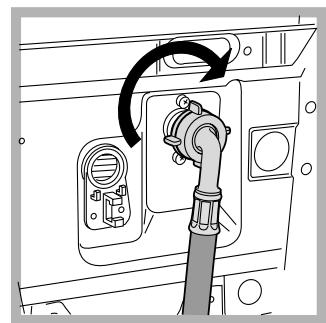
Connecting the drain hose
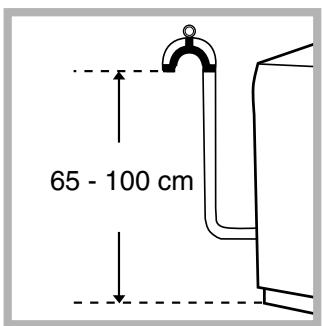
Connect the drain hose, without bending it, to a draining duct or a wall drain situated between 65 and 100~cm from the floor;
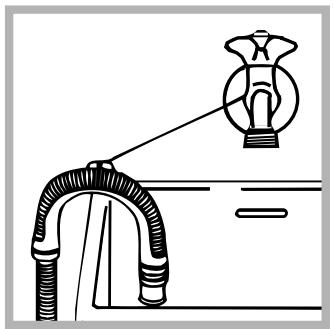
alternatively, place it over the edge of a basin, sink or tub, fastening the duct supplied to the tap (see figure). The free end of the hose should not be underwater.
! We advise against the use of hose extensions; in case of absolute need, the extension must have the same diameter as the original hose and must not exceed 150 cm in length.
Electric connection
Before plugging the appliance into the mains socket, make sure that:
- the socket is earthed and in compliance with the applicable law;
- the socket is able to sustain the appliance's maximum power load indicated in the Technical details table (on the right);
- the supply voltage is included within the values indicated on the Technical details table (on the right);
- the socket is compatible with the washing machine's plug. If this is not the case, replace the socket or the plug.
The washing machine should not be installed in an outdoor environment, not even when the area is sheltered, because it may be very dangerous to leave it exposed to rain and thunderstorms.
! When the washing machine is installed, the main socket must be within easy reach.
! Do not use extensions or multiple sockets.
The power supply cable must never be bent or dangerously compressed.
The power supply cable must only be replaced by an authorised serviceman.
Warning! The company denies all liability if and when these norms are not respected.
The first wash cycle
Once the appliance has been installed, and before you use it for the first time, run a wash cycle with detergent and no laundry, setting the 90^ programme without a pre-wash cycle.
| Technical details | |
| Model | AVTXL 120 |
| Dimensions | 40 cm wide 85 cm high 60 cm deep |
| Capacity | from 1 to 6 kg |
| Electric connections | Please refer to the technical data plate fixed to the machine. |
| Water connections | maximum pressure 1 MPa (10 bar) minimum pressure 0.05 MPa (0.5 bar) drum capacity 42 litres |
| Spin speed | up to 1200 rpm |
| Control programmes according to IEC 60456 directive | programme 3; temperature 60°C; run with a load of 6 kg. |
| CE | This appliance is compliant with the following European Community Directives: - 73/23/CEE of 19/02/73 (Low Voltage) and subsequent amendments - 89/336/CEE of 03/05/89 (Electromagnetic Compatibility) and subsequent amendments - 2002/96/CE |
Washing machine description
GB
Control panel
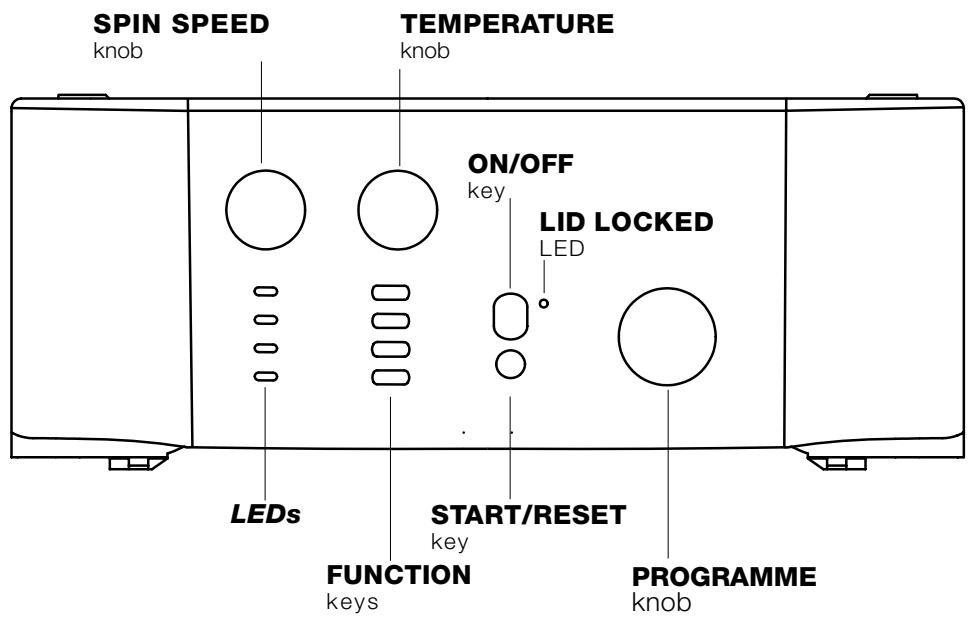
Detergent dispenser to add detergent and fabric softener (see page 20).
LEDs to find out which wash cycle phase is under way.
SPIN SPEED knob to set the spin speed or exclude the spin cycle completely (see page 19).
FUNCTION keys to select the functions available. The button corresponding to the function selected will remain on.
TEMPERATURE knob to set the temperature or the cold wash cycle (see page 19).
ON/OFF key to turn the washing machine on and off.
START/RESET key to start the programmes or cancel incorrect settings.
ON-OFF/LID LOCK led ,to find out whether the washing machine is on (flashing) and if the lid may be opened (see page 17).
PROGRAMME knob to set the programmes (see page 18).
The knob stays still during the cycle.
ON-OFF/LID LOCK led:
If this LED is on, the appliance Lid is locked to prevent it from being opened accidentally; to avoid any damages, you must wait for the lamp to flash before you open the Lid.
! The rapid flashing of the ON-OFF/LID LOCK Led together with the flashing of at least one other LED indicates there is an abnormality, see page 23.
How to open and to close the drum
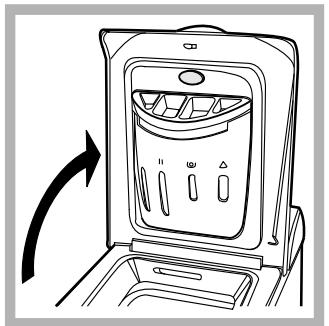
Fig. 1
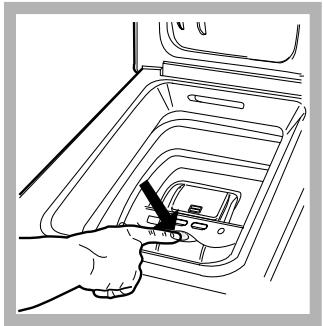
Fig. 2
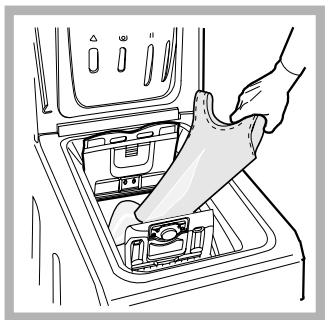
Fig. 3
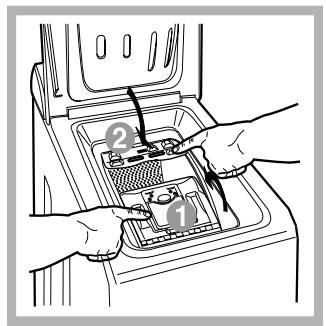
Fig. 4
Leds
The LEDs provide important information.
This is what they can tell you:
Cycle phase under way:
During the wash cycle, the LEDs gradually illuminate on to indicate the cycle phase under way:


Prewash


Wash


Rinse


Spin cycle
Note: during draining, the LED corresponding to the Spin cycle phase will be turned on.
A) Opening (Fig. 1).
Lift the external lid and open it completely.
B) Opening the drum (Soft opening):
With one finger, push the button indicated in fig. 2 and the drum will open delicately.
C) Loading the washing machine. (Fig. 3).
- close the drum fully by first shutting the front door followed by the rear one;
- then ensure the hooks on the front door are perfectly housed within the seat of the rear door;
- after the hooks have clicked into position, press both doors lightly downwards to make sure they do not come loose;
- finally shut the external lid.
Function keys
The FUNCTION KEYS also act like LEDs.
When a function is selected, the corresponding button is illuminated.
If the function selected is incompatible with the programme set, the button will flash and the function will not be enabled.
If you set a function that is incompatible with another function you selected previously, only the last one selected will be enabled.
Briefly: starting a programme
- Switch the washing machine on by pressing button . All the LEDs will light up for a few seconds and the ON-OFF/DOOR LOCK Led will begin to flash.
- Load your laundry into the washing machine, add the detergent and any fabric softener (see page 20) and shut the appliance door.
-
Set the PROGRAMME knob to the programme required.
-
Set the wash temperature (see page 19).
- Set the spin speed (see page 19).
- Start the programme by pressing the START/RESET button. To cancel it, keep the START/RESET button pressed for at least 2 seconds.
- When the programme is finished, the ON-OFF/DOOR LOCK Led will flash to indicate that the appliance door can be opened. Take out your laundry and leave the appliance door ajar to allow the drum to dry thoroughly. Turn the washing machine off by pressing button .
Programme table
| Type of fabric and degree of soil | Programmes | Wash tempe-rature. | Detergent | Fabric softener | Bleaching /option Bleach | Cycle length (minutes) | Description of wash cycle | |
| Pre-wash | Wash | |||||||
Cotton
| Extremely soiled whites (sheets, tablecloths, etc.) | 1 | 90°C | ● | ● | ● | 137 | Pre-wash, wash cycle, rinse cycles, intermediate and final spin cycles | |
| Extremely soiled whites (sheets, tablecloths, etc.) | 2 | 90°C | ● | ● | Delicate/ Traditional | 129 | Wash cycle, rinse cycles, intermediate and final spin cycles | |
| Heavily soiled whites and fast colours | 3 | 60°C | ● | ● | Delicate/ Traditional | 160 | Wash cycle, rinse cycles, intermediate and final spin cycles | |
| Heavily soiled whites and fast colours | 4 | 40°C | ● | ● | Delicate/ Traditional | 78 | Wash cycle, rinse cycles, intermediate and final spin cycles | |
| Slightly soiled whites and delicate colours (shirts, jumpers, etc.) | 5 | 30°C | ● | ● | Delicate/ Traditional | 70 | Wash cycle, rinse cycles, intermediate and final spin cycles |
Synthetics
| Heavily soiled fast colours (baby linen, etc.) | 6 | 60°C | ● | ● | Delicate | 79 | Wash cycle, rinse cycles, anti-crease or delicate spin cycle | |
| Heavily soiled fast colours (baby linen, etc.) | 7 | 50°C | ● | ● | Delicate | 75 | Wash cycle, rinse cycles, anti-crease or delicate spin cycle | |
| Delicate colours (all types of slightly soiled garments) | 8 | 40°C | ● | ● | Delicate | 65 | Wash cycle, rinse cycles, anti-crease or delicate spin cycle | |
| Delicate colours (all types of slightly soiled garments) | 9 | 30°C | ● | ● | 32 | Wash cycle, rinse cycles and delicate spin cycl |
Delicate
| Wool | 10 | 40°C | ● | ● | Delicate | 45 | Wash cycle, rinse cycles and delicate spin cycle | |
| Very delicate fabrics (curtains, silk, viscose, etc.) | 11 | 30°C | ● | ● | 52 | Wash cycle, rinse cycles, anti-crease or draining cycle |
PARTIAL PROGRAMMES
| Rinse | # | • | Rinse cycles and spin cycle | |||||
| Delicate rinse cycle | # | • | Rinse cycles, anti-crease or draining | |||||
| Spin cycle | # | Draining and heavy duty spin cycle | ||||||
| Delicate spin cycle | # | Draining and delicate spin cycle | ||||||
| Draining | # | Draining |
Notes:
- For the anti-crease function: see Easy iron, opposite page. The information contained in the table is purely indicative.
- At the end of the wash cycle, before opening the appliance, wait 3 minutes for the doors of the drum to face upwards.
Special programme
Daily 30^ (programme 9 for Synthetics) is designed to wash lightly soiled garments in a short amount of time: it only lasts 30 minutes and allows you to save on both time and energy. By setting this programme (9 at 30^ ), you can wash different fabrics together (except for woollen and silk items), with a maximum load of 3kg . We recommend the use of liquid detergent.
(1) Setting the temperature
Turn the TEMPERATURE knob to set the wash temperature (see Programme table on page 18).
The temperature can be lowered, or even set to a cold wash (9).
Setting the spin speed
Turn the SPIN SPEED knob to set the spin speed for the programme selected.
The maximum spin speeds for each programme are as follows:
Programmes Maximum spin speed
Cottone
1200 rpm
Synthetics
800 rpm
Wool
600 rpm
Silk
no
The spin speed can be lowered, or the spin cycle can be excluded altogether by selecting symbol 出
The washing machine will automatically prevent you from selecting a spin speed higher than the maximum speed for each programme.
To avoid excessive vibrations, before every spin cycle the machine distributes the load in a uniform manner by continuously rotating the drum at a speed which is slightly faster than the normal washing speed.
When, despite repeated attempts, the load is still not evenly distributed, the machine spins at a lower speed than the set frequency.
If the load is excessively unbalanced, the machine attempts to distribute it instead of spinning.
The balancing attempts may extend the total duration of the cycle, up to a maximum of 10 minutes.
Functions
To enable a function:
- press the button corresponding to the desired function, according to the table below;
- the function is enabled when the corresponding button is illuminated.
Note: The rapid flashing of the button indicates that the corresponding function cannot be selected for the programme set.
| Function | Effect | Comments | Enabled with programmes: |
| Super Wash | Allows for an impeccable wash, visibly whiter than a standard Class A wash. | This function is incompatible with the RAPID function. | 1, 2, 3, 4, 5, 6, 7, 8 |
| Easy iron | This option reduces the amount of creasing on fabrics, making them easier to iron. | When this function is set, programmes 6, 7, 8, 11 and Delicate rinse will end with the laundry left to soak (Anti-crease) and the Rinse cycle phase LED will flash. - to conclude the cycle, press the START/RESET button; - to run the draining cycle alone, set the knob to the relative symbol and press the START/RESET button. | All programmes except for 1, 2, 9, 10 and Draining. |
| Rapid | Cuts the duration of the wash cycle by 30%. | This function is incompatible with the SUPER WASH function. | 1, 2, 3, 4, 5, 6, 7, 8 Rinses |
| Extra Rinse | Increases the efficiency of the rinse. | Recommended when the appliance has a full load or with large quantities of detergent. | 1, 2, 3, 4, 5, 6, 7, 8, and Rinse cycles. |
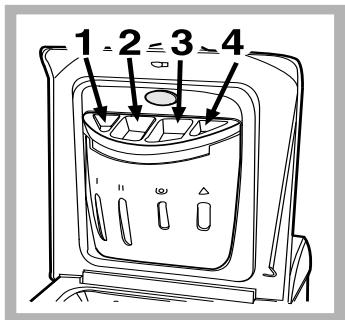
Detergent dispenser
Good washing results also depend on the correct dose of detergent: adding too much detergent won't necessarily make for a more efficient wash, and may
in fact cause build up on the interior of your appliance and even pollute the environment.
Open up the detergent dispenser and pour in the detergent and fabric softener, as follows.
compartment 1: Detergent for pre-wash
compartment 2: Detergent for the wash cycle (powder or liquid)
It is recommended that you place liquid detergent directly into the compartment using the appropriate dosing cup.
compartment 3: Additives (softener, etc.)
When pouring the softener in compartment 3, avoid exceeding the "max" level indicated.
The softener is added automatically into the machine during the last wash. At the end of the wash programme, some water will be left in compartment 3. This is used for the inlet of denser fabric softeners into the machine, i.e. to dilute the more concentrated softeners. Should more than a normal amount of water remain in compartment 3, this means the emptying device is blocked. For cleaning instructions, see page 22.
compartment 4: Bleach
! Do not use hand wash detergent because it may form too much foam.
Bleach cycle
Traditional bleach should be used on sturdy white fabrics, and delicate bleach for coloured fabrics, synthetics and for wool.
When pouring in the bleach, be careful not to exceed the "max" level indicated on compartment 4.
To run the bleach cycle alone, pour the bleach into compartment 4 and set the Extra Rinse function
Preparing your laundry
-
Divide your laundry according to:
-
the type of fabric/the symbol on the label.
-
the colours: separate coloured garments from whites.
-
Empty all pockets and check for loose buttons.
-
Do not exceed the weight limits stated below, which refer to the weight when dry:
Sturdy fabrics: max 6 kg
Synthetic fabrics: max 2.5 kg
Delicate fabrics: max 2 kg
Wool: max 1 kg
How much does your laundry weigh?
1 sheet 400-500 g
1 pillow case 150-200 g
1 tablecloth 400-500 g
1 bathrobe 900-1,200 g
1 towel 150-250 g
Special items
Curtains: fold curtains and place them in a pillow case or mesh bag. Wash them separately without exceeding half the appliance load. Use programme 11 which excludes the spin cycle automatically.
Quilted coats and windbreakers: if they are padded with goose or duck down, they can be machine-washed. Turn the garments inside out and load a maximum of 2 - 3kg , repeating the rinse cycle once or twice and using the delicate spin cycle.
Trainers: remove any mud. They can be washed together with jeans and other tough garments, but not with whites.
Wool: for best results, use a specific detergent, taking care not to exceed a load of 1kg .
Woolmark Platinum Care
As gentle as a hand wash.

WOLMARK PLATINUM CARE
Hotpoint-Ariston sets a new standard of superior performance that has been endorsed by The Woolmark Company with the prestigious Woolmark Platinum Care
brand. Look for the Woolmark Platinum Care logo on the washing machine to ensure you can safely and effectively wash wool garments labelled as "hand wash" (M.0303):
Set programme 10 for all "Hand wash" garments, using the appropriate detergent (max load 1kg ).
! The washing machine was designed and built in compliance with the applicable international safety regulations. The following information is provided for your safety and should consequently be read carefully.
General safety
- This appliance has been designed for non-professional, household use and its functions must not be changed.
- This washing machine should only be used by adults and in accordance with the instructions provided in this manual.
- Never touch the washing machine when barefoot or with wet or damp hands or feet.
- Do not pull on the power supply cable to unplug the appliance from the electricity socket. Pull the plug out yourself.
- Do not open the detergent dispenser while the appliance is in operation.
- Do not touch the drain water as it could reach very high temperatures.
- Never force the washing machine door: this could damage the safety lock mechanism designed to prevent any accidental openings.
- In the event of a malfunction, do not under any circumstances touch internal parts in order to attempt repairs.
Always keep children well away from the appliance while in operation. - The appliance door tends to get quite hot during the wash cycle.
- Should it have to be moved, proceed with the help of two or three people and handle it with the utmost care. Never try to do this alone, because the appliance is very heavy.
- Before loading your laundry into the washing machine, make sure the drum is empty.
Disposal
- Disposing of the packaging material: observe local regulations, so the packaging can be re-used.
- Disposal of old electrical appliances The European Directive 2002/96/EC on Waste Electrical and Electronic Equipment (WEEE), requires that old household electrical appliances must not be disposed of in the normal unsorted municipal waste stream. Old appliances must be collected separately
in order to optimise the recovery and recycling of the materials they contain and reduce the impact on human health and the environment.
The crossed out "wheeled bin" symbol on the product reminds you of your obligation, that when you dispose of the appliance it must be separately collected.
Consumers should contact their local authority or retailer for information concerning the correct disposal of their old appliance.
- Disposing of an old washing machine: before scrapping your appliance, cut the power supply cable and remove the appliance door.
Saving energy and respecting the environment
Environmentally-friendly technology
If you only see a little water through your appliance door, this is because thanks to the latest technology, your washing machine only needs less than half the amount of water to get the best results: an objective reached to respect the environment.
Saving on detergent, water, energy and time
- To avoid wasting resources, the washing machine should be used with a full load. A full load instead of two half loads allows you to save up to 50% on energy.
- The pre-wash cycle is only necessary on extremely soiled garments. Avoiding it will save on detergent, time, water and between 5 and 15% energy.
- Treating stains with a stain remover or leaving them to soak before washing will cut down the need to wash them at high temperatures. A programme at 60^ C instead of 90^ C or one at 40^ C instead of 60^ C will save up to 50 % on energy.
- Use the correct quantity of detergent depending on the water hardness, how soiled the garments are and the amount of laundry you have, to avoid wastage and to protect the environment: despite being biodegradable, detergents do contain ingredients that alter the natural balance of the environment. In addition, avoid using fabric softener as much as possible.
- If you use your washing machine from late in the afternoon until the early hours of the morning, you will help reduce the electricity board's peak load.
- If your laundry has to be dried in a tumble dryer, select a high spin speed. Having the least water possible in your laundry will save you time and energy in the drying process.
Cutting off the water or electricity supply
- Turn off the water tap after every wash. This will limit the wear of your appliance's water system and also prevent leaks.
- Unplug your appliance when cleaning it and during all maintenance operations.
Cleaning your appliance
The exterior and rubber parts of your appliance can be cleaned with a soft cloth soaked in lukewarm soapy water. Do not use solvents or abrasives.
Cleaning the detergent dispenser
Remove the dispenser by raising it and pulling it out (see figure).
Wash it under running water; this operation should be repeated frequently.
Caring for your appliance door and drum
- Always leave the appliance door ajar to prevent unpleasant odours from forming.
Cleaning the pump
The washing machine is fitted with a self-cleaning pump that does not require any maintenance. Sometimes, small items (such as coins or buttons) may fall into the pre-chamber that protects the pump, situated in the lower part of the same.
! Make sure the wash cycle has ended and unplug the appliance.
To recover any objects that have fallen into the pre-chamber:
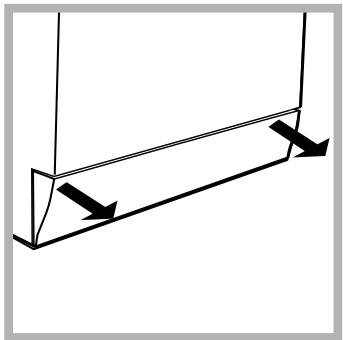
- remove the plinth at the bottom on the front side of the washing machine by pulling from the side with your hands (see figure);
- unscrew the lid rotating it anticlockwise (see figure): a little water may trickle out. This is perfectly normal;
- clean the interior thoroughly;
- screw the lid back on;
- reposition the panel, making sure the hooks are securely in place before you push it onto the appliance.

Checking the water inlet hose
Check the water inlet hose at least once a year. If you see any cracks, replace it immediately: during the wash cycles, water pressure is very strong and a cracked hose could easily split open.
! Never use hoses that have already been used.
How to clean the detergent dispenser
Disassembly:
Press lightly on the large button on the front of the detergent dispenser and pull it upwards (fig. 1).
Cleaning:
Then clean the dispenser under a tap (fig. 3) using an old toothbrush and, once the pair of siphons inserted in the top of compartments 1 and 2 (fig. 4) have been pulled out, check whether the same are not clogged and then rinse them.
Reassembly:
Do not forget to reinsert the pair of siphons into the special housings and then to replace the dispenser into its seat, clicking it into place (fig. 4, 2 and 1).

Fig.1
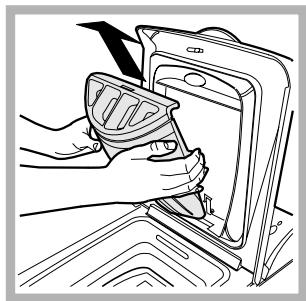
Fig. 2
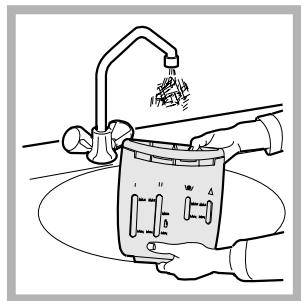
Fig. 3
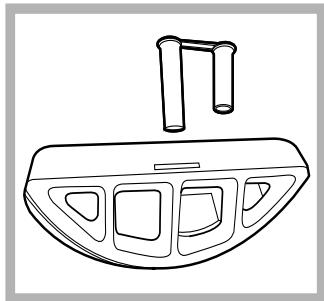
Fig. 4
Your washing machine could fail to work. Before calling for Assistance (see page 24), make sure the problem can't easily be solved by consulting the following list.
Problem
The washing machine won't start.
The wash cycle won't start.
The washing machine fails to load water.
The washing machine continuously loads and unloads water.
The washing machine does not drain or spin.
The washing machine vibrates too much during the spin cycle.
The washing machine leaks.
The ON-OFF/DOOR LOCK Led flashes rapidly at the same time as at least one other LED.
There is too much foam.
Possible causes/Solution:
- The appliance is not plugged into the socket, or not enough to make contact.
- There has been a power failure.
- The appliance Lid is not shut properly. The Lid locked Led flashes.
- The button has not been pressed.
- The START/RESET button has not been pressed.
-
The water tap is not turned on.
-
The water inlet hose is not connected to the tap.
The hose is bent. - The water tap is not turned on.
- There is a water shortage.
- The water pressure is insufficient.
-
The START/RESET button has not been pressed.
-
The drain hose is not fitted between 65 and 100~cm from the floor (see page 15).
- The free end of the hose is underwater (see page 15).
-
The wall drainage system doesn't have a breather pipe. If the problem persists even after these checks, turn off the water tap, switch the appliance off and call for Assistance. If the dwelling is on one of the upper floors of a building, there may be drain trap problems causing the washing machine to load and unload water continuously. In order to avoid such an inconvenience, special anti-drain trap valves are available in shops.
-
The programme does not foresee the draining: some programmes require enabling the draining manually (see page 18).
-
The Easy iron option is enabled: to complete the programme, press the START/RESET button (see page 19).
- The drain hose is bent (see page 15).
-
The drain duct is clogged.
-
When the machine is installed, the locking screws for the oscillating assembly are still in place. Remove the screws (see page 14).
-
The washing machine is not level (see page 14).
-
The washing machine is closed in between furniture cabinets and the wall (see page 14).
-
The water inlet hose is not screwed on correctly (see page 14).
- The detergent dispenser is obstructed (to clean it, see page 22).
-
The drain hose is not secured properly (see page 15).
-
Switch off the machine and unplug the appliance; wait for approximately 1 minute then switch it on again. If the problem persists, contact Assistance.
-
The detergent is not suitable for machine washing (it should bear the definition "for washing machines" or "hand and machine wash", or the like).
- You used too much detergent.
GB
Before calling for Assistance:
- Check whether you can solve the problem on your own (see page 11);
- Restart the programme to check whether the problem has been solved;
- If this is not the case, contact an authorised Technical Service Centre on the telephone number provided on the guarantee certificate.
If the machine has been installed or used incorrectly, you may be charged for the maintenance callout service.
! Always request the assistance of authorised servicemen.
Notify the operator of:
- the type of problem;
- the appliance model (Mod.);
the serial number (S/N);
This information can be found on the data plate situated on the rear of the washing machine.

PYCCKN
Copepkanhe
YctaHObka, 26-27
PacnakOBka N BbipabHbBaHne, 26
IopKIOUeHne K BOOpPoBOHOH N 3JIeKTPnueeckO cETn,26-27
PpO6HbI yNkI cTnpK,27
TexHmYecknX xapaKTeepntKn,27
OnncanHe cTnpaJIbHOJ MaunHbI, 28-29
PanaJIb ynpabJIeHnIa, 28
KaK OTKpbITb 3aKpbITb 6apa6aH,29
NnKaTOpbl,29
3anyck MaunHbI. PporpaMMbl, 30
KpaTKe INHCTpykCnI: POpAdoK 3anysca nporpaMMbl, 30
Ta6nua nporpamM,30
AVTXL 120
PepcoHaJInzauZnA CTnIpkn, 31
Bb6op TemnepaTpybl, 31
Bb6op ckopoctn OTKIMa,31
Функции,31
Mooune cpeicTba n 6eJIbe, 32
PacnpedeIeIteJIb MOIOUxN cpeIcTB, 32
KaK YnCTb paCnpeJeINTeB MOUxN CpeIcTB, 34
UncTka Hacoca, 34
HnKaTopbI COO6aHT NOJb3OBaTeJIb BaxHbIE CBeDeHn.
3NaueHnHnKaToPoB:
Tekyzaa p3a zukla:
B npocece zukla ctnpkn HndkaTopby 6ydyT 3aropatbcra Odn 3a dpyrnM, noka3bBaJ a3y BblnoJIHeHn nporpaMMbl:


PpeBapntbHaTcInpKa


CTnnpka


Полockане


OTXNM
PpmeaHne:B npoecce cInBa 3arOpntc HndkaTOp, COOTBeCTBHyOuNn Unkny OTxIma.
I) OTKPbIBAHNE (pnc.1).
IOnHIMnTe BHeuHIOU KpbIuKy I NOnHocTbIo ee OTKpoIte.
II) OTkpbIbAHne 6apa6aHa (Soft opening -Плавhoe OTkpbIbAHne):
Haxmnte KhoNky, noka3aHHyU Ha pnc. 2, kpbIka 6apa6aHa nnabHo OTKpoETcra.
III) 3AΓPY3KA CTIPAPJIbHOI MAUINHbl (pnc. 3).
IV) 3AKPbIBAHHe (pnc.4).
- 3akpoIte noJIHocTbIO 6apabAH, onycka Chauana nepeHIO IO DBePcU, a 3aTeM 3aDHIIO;
- 3aTeM yIOCTOBepbTecb, YTO KpIOKn IpepeDHei DBepCuToHOOBouJIN B IpeDHa3NaueHHBe MeCt a Ha 3aDHei DBePcE;
- NOCNE TORO, KAK KpIOKN 3aJIeJIKNHJYNCb, HAnKMITE OBe DBePcbl CNeIgKa Bn3, YTO6bI y6eINITbcr OHN 3aKpbITb I NIOTHO;
-И,надоHeц,ЗakpoIte BHeUHIOKpbIiKy.
KhoNk Bb6opa yHKuN
KHONK BbIBOPA ΦYHKUIN TaKxe YBnIOTcN HnIKaTOPAMN.
Pn BbIbope yHKcnn 3aropaetcra COOTBETCTBYIOUa Ka
EcnBb6paHHaФyHKcIgYBJIeTcHecOBMeCTmOc 3aHaHHo nporpAMMoK, KONka 6yDet MnraTb, N TaKaJ ΦyHKcIg He 6yDet aKTINBupObaHa.
Ecni 6yIeT BbIbpaHa yHKUa, HecOBMeCTUMa C dpyroi, paHee BbIbpaHHo fYHKUeN, OCTaHETcB KJIIOueHHo ToIbKO nOcJIeNDra BbIbpaHHa fYHKUa.
KpaTkne nHcTpyKcUn: POpJOk 3aynycka nporpaMMbl
- BkIIOHITe CTnpaJIbHyMoAaMHy, HαKab Ha KHOJky Bce INdIKaTObpI 3arOpTcRa He NcCKOJIbKO CeKyHД, 3aTeM nOracHT, n INdJaKTOp BKJIIOUeHHe/JIOK 3A5JOKIPOBAH NaHET MIRaTb.
- 3arpy3nte 6eIbe B 6apa6aH, 3acbIbTe CTnpaIbHOe BeueCTBO I Do6aBKn (CMOTpnte cTp. 32), 3akpoTe KpbIuKn 6apa6aHa N BHeuHn JIOK.
- Bb6paTb npn nOmoU npKoAaBb6opa IPOrPAMM
HyXHyIO npoPamMy.
- BbIbpaTb Tempepatyp CTnPK (cm. cmp. 31).
- BbI6paTb ckOpocTb OTXIma (cM. cmp. 31).
- 3anyctnte nporpaMMy, Haxab KhoNky IYCK/C5POC (Start/Reset). Дя OTmeHbI 3anycka DepxKte HaxaToH KhoNky IYCK/ C5POC (Start/Reset) B TeueHne 2-x cekyHd.
- No 3aBepseHn nporpaMMbI nHdNkatop BKIOUOYEHNE/ JIOK 3A5JOKNPOBAH 3amraet, cnHaJIIN3npy, yTO MOxHO OTkpblTb JIOK. BbyHyTB 6eJIbe N OCTaBnTb JIOK NOlyOTkpblTbIM dIy cyuKn 6apab6aHa. BbIKNoHTb CTpAlbHyO MaunHy, Haxab KONky
Ta6nua nporpamM
| Type of fabric and degree of soil | Programmes | Wash temperate. | Detergent | Fabric softener | Bleaching /option Bleach | Cycle length (minutes) | Description of wash cycle | |
| Pre-wash | Wash | |||||||
Cotton
| Extremely soiled whites (sheets, tablecloths, etc.) | 1 | 90°C | ● | ● | ● | 137 | Pre-wash, wash cycle, rinse cycles, intermediate and final spin cycles | |
| Extremely soiled whites (sheets, tablecloths, etc.) | 2 | 90°C | ● | ● | Delicate/ Traditional | 129 | Wash cycle, rinse cycles, intermediate and final spin cycles | |
| Heavily soiled whites and fast colours | 3 | 60°C | ● | ● | Delicate/ Traditional | 160 | Wash cycle, rinse cycles, intermediate and final spin cycles | |
| Heavily soiled whites and fast colours | 4 | 40°C | ● | ● | Delicate/ Traditional | 78 | Wash cycle, rinse cycles, intermediate and final spin cycles | |
| Slightly soiled whites and delicate colours (shirts, jumpers, etc.) | 5 | 30°C | ● | ● | Delicate/ Traditional | 70 | Wash cycle, rinse cycles, intermediate and final spin cycles |
Synthetics
| Heavily soiled fast colours (baby linen, etc.) | 6 | 60°C | ● | ● | Delicate | 79 | Wash cycle, rinse cycles, anti-crease or delicate spin cycle | |
| Heavily soiled fast colours (baby linen, etc.) | 7 | 50°C | ● | ● | Delicate | 75 | Wash cycle, rinse cycles, anti-crease or delicate spin cycle | |
| Delicate colours (all types of slightly soiled garments) | 8 | 40°C | ● | ● | Delicate | 65 | Wash cycle, rinse cycles, anti-crease or delicate spin cycle | |
| Delicate colours (all types of slightly soiled garments) | 9 | 30°C | ● | ● | 32 | Wash cycle, rinse cycles and delicate spin cycl |
Delicate
| Wool | 10 | 40°C | ● | ● | Delicate | 45 | Wash cycle, rinse cycles and delicate spin cycle | |
| Very delicate fabrics (curtains, silk, viscose, etc.) | 11 | 30°C | ● | ● | 52 | Wash cycle, rinse cycles, anti-crease or draining cycle |
PARTIAL PROGRAMMES
| Rinse | # | • | Rinse cycles and spin cycle | |||||
| Delicate rinse cycle | # | • | Rinse cycles, anti-crease or draining | |||||
| Spin cycle | # | Draining and heavy duty spin cycle | ||||||
| Delicate spin cycle | # | Draining and delicate spin cycle | ||||||
| Draining | # | Draining |
PpimmeaHne
@ BbI6op ckopoCTn OTXIMa
Bb6op ckopoctn OTKIMa Bb6paHHo nporpaMMbl npon3BOJntc npn nOmoun pykoTkn OTKIM.
Дя pa3ньх nporpamm npeducmaTpnaeTcpa3HЯ MaKcHMaJIbHaЯ ckOPOCTb OTKIMa:
ПPORpaMMbl MaKcIMmaJIbHaЯ ckOpoCTb OTXIma
| XIOnOK | 1200 o6OpOTOB MmHyTy |
| CInHTeTnKa | 800 o6OpOTOB MmHyTy |
| IIePcTb | 600 o6OpOTOB MmHyTy |
| IIeJrk | 6e3 OTXIma |
Ckopoocb otXmMa MoKeT 6bItb yMeHbSeHa NJIu Ke MOxHO COBcEM NCKIHOHTb OTXMM, NOBepHyB pyKoRTKY B IonoJKeHne
MaunHa aBtOMaTnueeCKn He dOnyckaet yCTaHOBky CKOpOCTn OTKIMa, npeBbIshaOuSyo MaKcIMaJIbHyIO CKOpOCTb, npeDyCMOTpeHHyo dJa KaKdoi npopamMbI.
Bo n36eXaHne Ype3MepHbIX Bn6paqun pepeK kaxdbim OTxkIMOM MaunHa paBHomepHo pacpeJeIeT 6JIbe B 6apabae. 3TO npOnxCoNDt 3a cye HnpepeBbHOrO BpaueHnra 6baPbHa co ckOpocTbU, CJIeKa npEByuAIOUeckopocTb CTnPK. Ecnn PocNe HeCKoJbKnx NOnbITOK 6JIbe He paCpeJeJIeTcR paBHomepHO, MaunHa pOn3BOiNT OTKIM C 60nee Hn3KOk CKOpocTbU.
Ipi HeBO3MOXHOCTn 6aHaHCUPOKn MaunHa 3aMeHReT OTKIM Otnepauee 6aHaHCUPOBKn.
Bo3MoXHbIe NOnbITK6aJIaHCINPOBKn MOrTy IpoDnITb O6UyIO pODoJIKHTeJbHOCt bZKJa MaKc. Ha 10 MInHyT.
Функции
Pa3nHbIe yHKcN nCTnPK MaunHbI NO3BOJyOT IOCTnYb XeNaemOy NcTOTbI N 6eN3HbI BaUero 6enB. Iopraok Bblbopa yHKcN:
- HaxaTb KhoNkU HyxHoi yHKUnn B COOTBETCTBUN C npuBeHeHHo HHXe Ta6nuei;
- BKJIIOUeHHe COOTBeTCTBHyOuSeI KHOJKN O3HauaeT, YTO FOYHKUNA kTUBNPOBaHa.
PpIMeHHe: Yactoe MIRAHHe KHOJIKN O3Haayet, yTO daHHaY cyHKJIn He MoKTe 6bItb akTINBIPoBaHa dIa 3aDaHHo IporpaMMbl.
O6hapyKeHHa HeNCpabBHOCTb:
CTnpaIbHaMaunHa He BKJIIOUcaTc.
Lukl ctnpkn He 3anyckaetc.
CTnpaIbHa MaunHa He 3aJIbBaet BODy.
CtnpaIbHa MaunHa HenpepbIBHO 3aJIbBaet N cJINBaET BODy.
CtnpaJIbHaMaIHHaHe npOn3BO-DNT CInB I OTXIM.
CnIbHaBn6paun npn OTxKmE.
IpoTeuKn BOdbl n3 CTnpaJbHoi MaunHbl.
HdNkaTop BKIOUOYEHNE/IOK 3A6JOKIOBOAH qacTo mraet OndOBpeMeHHo CJIIO6bIM dpyrHM HdNkaTOPOM.
N36bIToHoe neHoo6pa3ObaHne.
Bo3MOxHbIe npuHHb / MeToDbI yCTpaHeHn:
Bilka He BCTabHeHa B po3ETky IIN BCTabHeHa pIIOxo, He o6ecneHbA KoHTaKaTa.
B DOME OTKIIOUeHO 3JIeKTPnueCTBO.
- JIIOK IIIOXO 3aKpbIT (Mnraet INHДИKaTOp BLOKINPOBKNJIIOKA).
He6bina haxkata KhONka - He 6bIa Na KaTa KhoNka NyCK/C5P0C (Start/Reset).
3aKpbIT KpaH IODaHu BObl.
3aIINBHOI WJIaHr He IIOJCOEiINHe KKpaHy.
- lIaHr nepexkaT.
3aKpbIT KpaH IODaHu BObl.
B DOME HET BODJI.
- HeioctatoHoe BOIOnpoBOHDHoe daBJIeHne.
- He 6bIa Na KaTa KhoNka NYCK/CBPOC (Start/Reset).
ClnBHOJIJIaHr paCnoJIOXeH HIXe 65 IIN BbIe 100 cm. ot noJa (cM. c. 27).
Koheu cInBHOI IJNaHra nOpyKeH B BOy (cM. c. 27).
- HacteHHbI CnIB He IMeET CnIBHOI Tpy6bl.
EcIn CInBHOI ShaHr BCTpoEH B KaHaIN3aUHIO, IMeIte BBNdy, YTO Ha BepxHIX 3TaJax MoKeT Co3DaBaTbcra CnOHHbI 3oΦeKTe — MaUNHa OJHOBpeMeHHO CInBaET I 3aINBaEt BOy. IJI pNeIDOTbpaueHnI POIo6HOrO 3oΦeKTa yCTaHabINBaETcCneuAIBHy KJIaNaH (aHTNCnOH).
- BbI6paHna nporpamMa He npEduyMcAtpmbaET cNIB BOdbI — dIra HEKOtOpbIX nporpamM Heo6xoDmMo BKJIHOuHTb cNIB BpyHyO (CMc.30).
-
AKTUNBn3npoBaHa DoIOnJHnTeIbHna FyHKnJa IerKa rIaKka: nla 3a-BepWeHn nporpaMMbI HaxMnTe KhoNky PNYCK/C6POC (Start/Reset) (cM. c. 31).
CnBnoIuHaHr nepexkat (cM. c. 27) nn 3acopen.
3acopBkaHaJIIN3aIIN. -
Пи установке CTирально Maшинь 6аразан 6ыл pa3бнокорван Нерразыньно (См. c. 26).
- CtrnpaIbHaMaIiHaPiIOxo BblpOBHeHa (cM. c. 26).
-
3a3op Mekdy MaunHOH n CteHO/Me6bIy HeIOCTaTOUe (cM. c. 26).
-
Плнохозakpenlenзаивоншанг (raикага на концшларна нелnotho 3aTaytaинелрьну установпера пokладka (cM. c. 26).
- PacnpedeJInteJIb MOHUnx CpeICTB 3a6NT OCTaTKAMN MOHUnx CpeICTB (o YnCTKe pacnpedeJInteJIa CM. c. 34).
-
Плохо закpenпен сднвоншалг (cM. c. 27).
-
I3KJIHoye nepaJIHЯТа и ИЗBaIeTe UeIeNcEla OT KOHTaKТa, ИЗУakAnTe OKOJIO 1 MInHyTa И OTHOBЯ BkJIHoyeTe.
Ako Henn3npaBnOCTTa npoIbIjKaba, o6bpHeTe ce KbM CepBn3Ho 06cnykBaHe.
- IcnoIb3yeTcMoIOUe CpeDCTBO, HeNoDxOJaUe DnA aBToMaTuYeCKNX CTnpaJIbHbIX MaunH C ppoHTaJIbHOJ 3aRpy3KoJ.
- Perede03npoBka MOUcero cpeDCTBa.
Ipeed Tem kak o6paTntb8 B ABTopn3ObaHHb CepBnchbI cHTp:
- Y6eɪntecb, yTO Bbl He MoXeTe yCTpaHNTb HEnCnpaBHOCTb CAMOCToTIELBO (cM. c. 35).
3anycntte nporpaMMy NOBTOPOI npOBepKn IcnpaBHOCTH MaunHbl.
B npotNBOM clyuae o6paNTeCb B ABTOpN3OBaHHbI CepBnCHbI ueHtp no TeJefoHy, yka3aHHOMy B rapaHTnHOM DOKymente.
! He noIb3yUmecb ycnyzamu Iuu, He yIOnHMOueHHbIX PpuO38OdumeJem. Ipu pemOHme mpe6yUme uCnoIb3oEAHua opuuaHaJIbHbIX 3aNaChbIX qacmei.
При образецнив АВториЗовнив Сервuchни сентр сообuntе:
TIN HENCIPaBHOCTN;
Homep rapaHTnHOro DOkUMeHTa (cePBnCHOH KNHXKN, CepBnCHOr OePTnOHKaTa n T.I.).
MoJeIb MaunHb (MoJ.) n cepnHbI Homep (S/N), yka3aHHbIe B INΦopMaunHOHou TabJIuKpe, paCnoJIOXeHNo Ha 3aDHe N aHeJIc CTnpaJIbHO MauHbI.

Espanol
Sumario
Instalación, 38-39

WOLUMARK PLATINUM CARE
A\ A\ A\ A\ A\ A\ A\ A\ A\ A\ A\ A\ A\ A\ A\ A\ A\ A\ A\ A\ A\ A\ A\ A\ A\ A\ A\ A\ A\ A\ A\ A\ A\ A\ A\ A\ A\ A\ A\ A\ A\ A\ A\ A\ A\ A\ A\ A\ A\ A\ A bepakolt ruhakat a dob folyamatos, a mosasi sebességnl valamivel gyorsabb forgatasával.
- Causes / Solutions possibles:
- Unpacking and levelling
- Unpacking
- Levelling
- Putting your appliance in place and moving it.
- Electric and water connections
- Connecting the water inlet hose
- Connecting the drain hose
- Electric connection
- The first wash cycle
- Washing machine description
- Control panel
- ON-OFF/LID LOCK led:
- How to open and to close the drum
- Leds
- Cycle phase under way:
- A) Opening (Fig. 1).
- B) Opening the drum (Soft opening):
- C) Loading the washing machine. (Fig. 3).
- Function keys
- Briefly: starting a programme
- Notes:
- Special programme
- Setting the temperature
- Setting the spin speed
- Programmes Maximum spin speed
- Functions
- Detergent dispenser
- compartment 1: Detergent for pre-wash
- compartment 2: Detergent for the wash cycle (powder or liquid)
- compartment 3: Additives (softener, etc.)
- compartment 4: Bleach
- Bleach cycle
- Preparing your laundry
- How much does your laundry weigh?
- Special items
- Woolmark Platinum Care
- As gentle as a hand wash.
- General safety
- Disposal
- Saving energy and respecting the environment
- Environmentally-friendly technology
- Saving on detergent, water, energy and time
- Cutting off the water or electricity supply
- Cleaning your appliance
- Cleaning the detergent dispenser
- Caring for your appliance door and drum
- Cleaning the pump
- Checking the water inlet hose
- How to clean the detergent dispenser
- Disassembly:
- Cleaning:
- Reassembly:
- Problem
- Possible causes/Solution:
- Before calling for Assistance:
- Notify the operator of:
- Copepkanhe
- YctaHObka, 26-27
- OnncanHe cTnpaJIbHOJ MaunHbI, 28-29
- 3anyck MaunHbI. PporpaMMbl, 30
- PepcoHaJInzauZnA CTnIpkn, 31
- Mooune cpeicTba n 6eJIbe, 32
- Tekyzaa p3a zukla:
- KhoNk Bb6opa yHKuN
- KpaTkne nHcTpyKcUn: POpJOk 3aynycka nporpaMMbl
- PpimmeaHne
- @ BbI6op ckopoCTn OTXIMa
- ПPORpaMMbl MaKcIMmaJIbHaЯ ckOpoCTb OTXIma
- Функции
- O6hapyKeHHa HeNCpabBHOCTb:
- Bo3MOxHbIe npuHHb / MeToDbI yCTpaHeHn:
- Sumario
- Instalación, 38-39
Brand : HOTPOINT
Model : AVTXL 120
Category : Washing machine