WAFFLE MAKERS - Kitchen appliance TEFAL - Free user manual and instructions
Find the device manual for free WAFFLE MAKERS TEFAL in PDF.
| Product type | Multi-function waffle maker (waffles, panini, grilling) |
| Dimensions (approx.) | 30 x 20 x 15 cm |
| Weight (approx.) | 2 kg |
| Power supply | Mains 220-240 V, 50/60 Hz, ~1000 W |
| Removable plates | Yes, for waffles, panini, grill |
| Adjustable thermostat | Yes, positions 1 to 4 depending on model |
| Indicator light | Indicates heating and when temperature is reached |
| ThermoSignal | Yes, color change or visual indicator |
| Built-in timer | Yes, with buzzer (on some models) |
| Waffle capacity | 4 waffles per batch |
| Panini capacity | 2 panini |
| Plate material | Non-stick coating |
| Cleaning | Plates dishwasher safe; body with soft sponge |
| Safety | Do not immerse; use handles; hot surface |
| Spare parts | Additional plates available separately |
Frequently Asked Questions - WAFFLE MAKERS TEFAL
User questions about WAFFLE MAKERS TEFAL
0 question about this device. Answer the ones you know or ask your own.
Ask a new question about this device
Download the instructions for your Kitchen appliance in PDF format for free! Find your manual WAFFLE MAKERS - TEFAL and take your electronic device back in hand. On this page are published all the documents necessary for the use of your device. WAFFLE MAKERS by TEFAL.
USER MANUAL WAFFLE MAKERS TEFAL
natural_image
Plated food arrangement on a yellow table with various dishes including sauté, fried chicken, waffles, and cherry tomatoes (no text or symbols visible)natural_image
Illustration of a computer monitor with a grid screen and scrollpad, no text or symbols present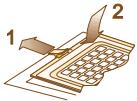
text_image
1 2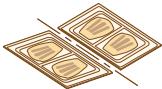
natural_image
Illustration of two rectangular food containers with three side dishes, no text or symbols present.natural_image
Illustration of a mechanical device with a golden body and a small knob (no text or symbols)
text_image
OK OK THERMOSIGNAL
text_image
OK OK THERMOSIGNAL
natural_image
Illustration of a digital timer with '03' display and two buttons (no text or symbols beyond the display)Cuisson, suite
natural_image
Illustration of a mechanical assembly with exploded view and cross-sectional view (no text or symbols)natural_image
Illustration of a mechanical component with an arrow indicating direction (no text or symbols)
natural_image
Illustration of a yellow mechanical component with a brown arrow labeled '2' pointing to its side (no text or symbols on the component itself)natural_image
Illustration of a stylized keyboard or mouse with grid layout (no text or symbols)
text_image
Diagram showing two labeled components (1 and 2) with a tool interacting with a grid-patterned device, likely illustrating a mechanical or electronic process.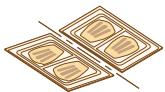
natural_image
Illustration of two rectangular food items with striped patterns, no text or symbols present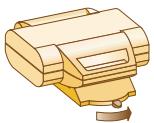
natural_image
Illustration of a mechanical device with a knob and lever (no text or symbols)
text_image
OK THERMOSIGNAL OK THERMOSIGNALAansluiten
Sluit het apparaat.
natural_image
Illustration of a digital timer with '03' display and two buttons (no text or symbols beyond the display)
natural_image
Illustration of a curved architectural structure with window-like elements and an arrow indicating upward motion (no text or symbols)

Tosti's
natural_image
Illustration of a mechanical device with a curved base and a handle, showing an arrow labeled '1' (no text or symbols on the device itself)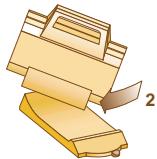
natural_image
Illustration of a mechanical component with a numbered arrow indicating direction (no text or symbols present)natural_image
Illustration of a stylized keyboard or mouse with grid layout (no text or symbols)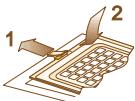
natural_image
Illustration of a mechanical device with two labeled parts (1 and 2), showing a grid-patterned component being inserted or placed on top (no text or symbols beyond labels)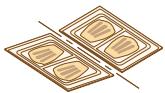
natural_image
Illustration of two rectangular food containers with striped patterns, no text or symbols presentnatural_image
Illustration of a mechanical device with a curved arrow indicating rotation (no text or symbols)text_image
OK OK THERMOSIGNAL
text_image
OK OK THERMOSIGNALnatural_image
Illustration of a curved architectural structure with window-like elements and directional arrows (no text or symbols)

Getoastete Sandwiches
natural_image
Illustration of a mechanical component with a curved arrow indicating rotation (no text or symbols)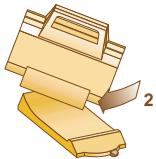
natural_image
Illustration of a stack of paper sheets with a numbered arrow indicating a step (no text or symbols present)Kalbs-Outlet "surprise"
Kochzeit: 6 Minuten
Thank you for purchasing this Tefal appliance. Whatever your model, please read the instructions carefully and keep them to hand.
The safety of this appliance complies with the technical regulations and standards in force at the time.
Installation
Place the appliance on a firm table : do not use it on a soft base.
Keep enough space around the appliance to be able to turn it over easily when cooking waffles.
Do not place the appliance on or near slippery or hot surfaces, never leave the cord hanging over a heat source (cooking plates, gas cooker...).
Open the appliance.
Remove any packaging, stickers or accessories inside and outside the appliance.
Choice of the plates
Depending on model, you can use different sets of plates that you can buy separately.
Depending on model, the fixing "pins" are placed differently on the appliance.
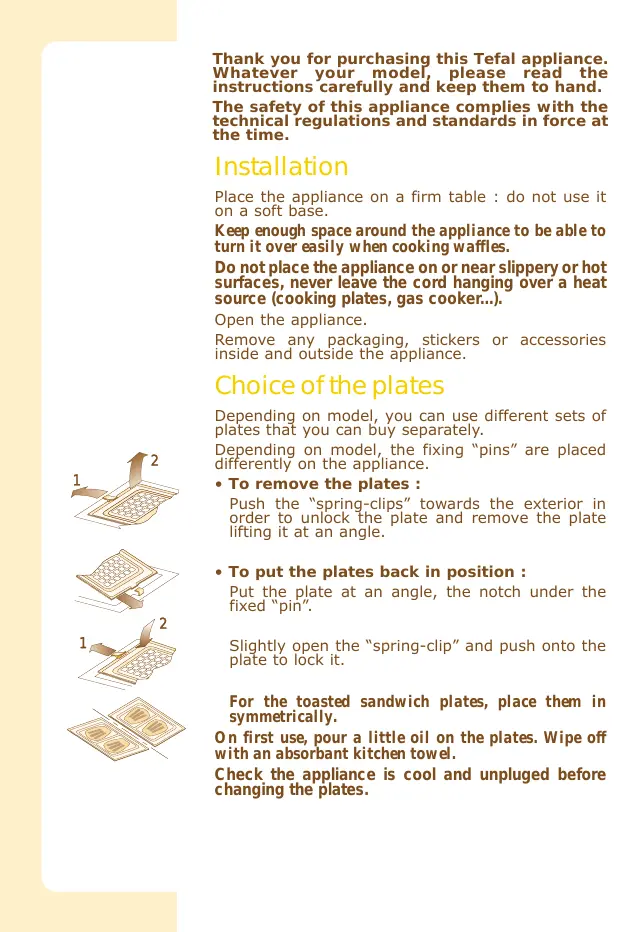
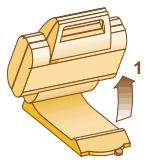
• To remove the plates :
Push the "spring-clips" towards the exterior in order to unlock the plate and remove the plate lifting it at an angle.
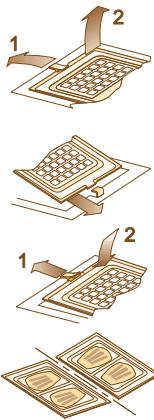
- To put the plates back in position :
Put the plate at an angle, the notch under the fixed "pin".
Slightly open the "spring-clip" and push onto the plate to lock it.
For the toasted sandwich plates, place them in symmetrically.
On first use, pour a little oil on the plates. Wipe off with an absorbant kitchen towel.
Check the appliance is cool and unpluged before changing the plates.
Connection
Close the appliance.
Connect the cord on the appliance (depending on model), then plug into the wall socket: the light comes on.
During first use, the appliance may give off a slight odour and smoke. This is normal.
Check that your electric installation is compatible with the power and the voltage indicated under the appliance.
Never use or plug in the appliance if :
- its power cord is faulty or damaged ;
- the appliance has been dropped;
- it has visible damage or operating faults.
In such cases, to avoid any danger, contact your nearest approved Service Centre. Never take the appliance apart yourself. This will negate the guarantee.
Connect the appliance to a plug with an earth connection.
Models with fixed cord : if the power supply cord is damaged, it must be replaced by the manufacturer or its service agent or a similarly qualified person in order to avoid any risk of danger.
Depending on model, unlock the appliance from its base.
Cooking
Depending on model, set the thermostat to the position of your choice.
Allow the appliance to pre-heat :
- the light goes out when the correct cooking temperature is reached.
and
- depending on model, the Thermosignal indicates that the appliance has reached the correct cooking temperature.
Before cooking.
Ready to start cooking.
Do not touch the hot surfaces of the appliance : use the handles.
Do not leave the appliance switched on while unattended.
natural_image
Illustration of a mechanical device with a curved arrow indicating rotation (no text or symbols)
text_image
OK OK THERMOSIGNAL
text_image
OK OK THERMOSIGNAL
text_image
03°
natural_image
Illustration of a mechanical assembly with exploded view and cross-sectional view (no text or symbols)Cooking, continued
Depending on model, use the timer to control the cooking time.
The button situated on the right side of the screen enables you :
- to set the time by pressing and holding down the button or by pressing the button quickly several times. A small "5" displays at the top and on the right side to indicate the half minutes.
- to stop the timer during countdown or in the case of an error of the selected time, by holding the button down for 2 seconds: the timer is then reset to zero.
• to manually stop the warning signal.
When the cooking time is finished, the timer gives a warning signal and stops automatically after two series of ringing.
The timer indicates the end of cooking time but does not turn the appliance off.
After use
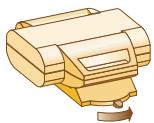
Unplug the cord from the wall socket then, depending on model, remove it from the appliance. Leave the appliance to cool in an open position.
Clean the plates and the base of the appliance with a sponge and washing up liquid.
The plates can be put in the dishwasher. Always re-oil plates after dishwashing.
Do not use scouring pads or hard abrasive powder.
Never immerse the appliance and the cord in water.
Changing the timer battery (depending on model)
If there is a partial or total loss of the display, the battery must be changed.
Push on both pins situated under the handle of the appliance. Unlock and remove the timer.
We recommend you use a flat screwdriver:
Unscrew the round component situated under the timer.
Remove the battery.
To respect the environment, dispose of it at your local waste disposal centre.
TEFAL SA has an ongoing policy of research and development and may modify these products without prior notice.
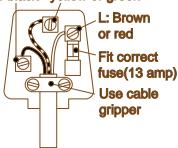
For U.K. users only: additional information and instructions
WIRING INSTRUCTIONS
WARNING : ALL APPLIANCES MUST BE EARTHED.
IMPORTANT : the wires in this lead are coloured in accordance with the following codes.
Green and Yellow : Earth
Blue : Neutral
Brown : Live
Connect the Green/Yellow wire to the terminal in the plug marked "E" (or by the earth symbol) or coloured Green.
Connect the Brown wire to the terminal in the plug marked "L" or coloured Red.
Connect the Blue wire to the terminal in the plug marked "N" or coloured Black.
Seek professional advice if you are unsure of the correct procedure for the above.
ABOUT YOUR FACTORY FITTED PLUG
The cord is already fitted with a plug incorporating an appropriate fuse. If the plug does not fit your socket outlet, see paragraph below. Should you need to replace the fuse in the plug supplied, an appropriately rated approved BS 1362 fuse must be used (refer to electrical specification for fuse rating).
If the plug supplied does not fit your socket outlet, it should be removed from the mains lead and disposed of safely. The flexible cord insulation should be stripped back as appropriate and a suitable alternative plug fitted. The replacement plug must be equipped with an appropriate fuse. If the plug has external access to the fuse (non-rewirable type plug) please note that the fuse cover is an important part of the plug. Please ensure that it is always refitted correctly. If you lose this cover, please do not use the plug. You may contact our helpline for a replacement.
For any problems or queries, please contact our helpline :
0845 602 1454 - UK (calls charged at local rate)
(01) 412 3000 - Ireland
N: Blue E: Green and or black yellow or green
text_image
L: Brown or red Fit correct fuse(13 amp) Use cable gripperToasted sandwiches
Position the toasted sandwich plates.
Set the thermostat (depending on model) on position 2 or 3.
Place the toasted sandwiches on the toasted sandwich plate.
Close the appliance and tighten the handles progressively to firmly seal the slices of bread.
Leave to cook for 3 to 4 minutes depending on your taste.
Ham and cheese toasted sandwich
- 4 slices of bread • 20 g butter • 70 g gruyere cheese • 1 slice thick cooked ham • pepper
Butter the outer surfaces of the slices of bread. Cut the gruyere cheese into thin slices and place half of the cheese on two slices of bread. Place half slice of ham on top and add pepper. Cover with gruyere cheese then join with the other slices of bread.
Cream cheese and onion toasted sandwich
- 4 slices of bread • 20 g butter • 1 small onion • chives • 4 tbsp cream cheese, well drained • 1 tbsp double cream • salt • paprika
Butter the outer surfaces of the slices of bread. Peel and finely chop the onion. Wash the chives and cut into tiny pieces with scissors. In a bowl, mix the onion and the chives with the cream cheese, the double cream, one pinch of salt and half tsp paprika. Fill two slices of bread with the preparation, then cover with the remaining slices.
Roquefort and walnut toasted sandwich
- 4 slices of bread • 30 g butter • 8 walnuts • 50 g Roquefort cheese (or stilton)
Butter the outer surfaces of the slices of bread. Roughly chop the walnuts. Stir them with 10 g butter and the Roquefort cheese. Fill two slices of bread with the preparation, then cover with the remaining slices.
Chocolate and banana toasted sandwich
- 4 slices of bread • 20 g butter • 2 bars of plain chocolate • half banana
Butter the outer surfaces of the slices of bread. On two ot them, place two pieces of chocolate, some banana cut into slices and, once more, two pieces of chocolate. Then cover with the remaining slices of bread.
Waffles
Position the waffle plates.
Set the thermostat (depending on model) on position 3 or 4.
Spear the mixture making sure the entire area is covered but without spilling over the side of the plate.
Close the appliance, wait for 10 seconds then turn the appliance upside down to allow the batter to spread well and to cook evenly. If your appliance is equipped with a base, proceed as follows :
natural_image
Illustration of a mechanical device with a curved arrow indicating rotation (no text or symbols)
natural_image
Illustration of a mechanical device with a numbered arrow indicating component 2 (no text or symbols present)Keep in this position for 2 minutes.
Turn the appliance right side up and leave to cook for a further 2 minutes.
Avoid opening during cooking.
Place the waffles on a cooling tray and wait for 1 minute before eating : they become more crispy.
Traditional waffles
- 300 g plain flour • 1 tbsp baking powder • salt • 75 g caster sugar • 100 g melted butter • 2 eggs • 500 ml milk
Mix the flour and the baking powder in a bowl. Make a hole and add the salt, the sugar, the melted butter and the eggs. Gradually beat in the milk.
Leave the batter to stand for 1 hour. Then cook as above.
Crispy waffles
- 300 g plain flour • 1 tbsp baking powder • 1 pinch of salt • 1 tbsp sugar • 2 eggs • 400 ml milk
Beat the eggs to a frothy consistency. Mix the other dry ingredients in a bowl. Gradually mix in the egg and milk. Beat until a smooth consistency.
Waffles
Waffles made with beer batter
- 330 ml beer • 250 g plain flour • 1 tbsp baking powder • 1 tsp salt • 75 g caster sugar • 50 g melted butter • 4 eggs • 1 tsp lemon juice
Pour the beer into a jug and leave to stand for 5 minutes, until the foam disappears. Mix the flour, the baking powder and the salt. In a large bowl, beat the eggs, the beer, the butter, the sugar and the lemon juice for about 2 minutes. Add the mixture gradually to the flour, one tablespoon at a time. Beat until a smooth consistency.
Crunchy waffles with chocolate sauce and ice cream
- 250 g plain flour • 1 tbsp baking powder • 1 pinch of salt • 2 tsp sugar • 75 g melted butter • 2 eggs • 250 ml milk • 1 glass of Brandy • vanilla ice cream • chocolate sauce
Sift the baking powder, leaving it to stand for 15 minutes in a glass of water with the sugar. Mix this preparation to the beaten eggs and butter. Then add the milk, the flour, the Brandy and the salt until you get a runny consistency.
Leave the batter to stand for 3 hours in a warm room. Then cook as above.
Before serving, add 2 scoops of vanilla ice cream and top it with some chocolate sauce (they can also be eaten with sugar or jam).
Grilling
Position the grill plates.
Set the thermostat (depending on model) on max.
Place the meat on the plates.
Close the appliance and leave to cook according to the recipe and depending on your taste.
Bearnaise tournedos
Cooking time : 3-4 minutes
Per person : • 1 x 120 g tournedos tied up (taken preferably from the fillet) • oil • salt • pepper
Oil the tournedos, season with salt and pepper. Grill for 3 minutes (if you like it rare) or 4 minutes (if you like it well done). Serve with a bearnaise sauce.
Steak with thyme
Cooking time : 3 minutes
Per person : • 1 x 150 g rumpsteak (about 2 cm thick) • half tbsp oil • 1 stem of fresh thyme
Brush over the steak with oil. Remove the thyme leaves and cover each side of the steak with them. Grill for 2 to 3 minutes depending on whether you like it rare or well done. Serve with the garnish of your choice.
Mirabeau steak
Cooking time : 3 minutes
Per person : • about 350 g half steak (3 cm thick) • 2 salted anchovies • 25 g butter • 25 g green olives
Wash the anchovies under running water and remove the backbone. Grill the steak for 2 to 3 minutes depending on whether you like it rare or well done. Just before serving, put the anchovy fillets and a knob of butter on the steak, then surround with green olives. Add pepper to taste.
Veal cutlet "surprise"
Cooking time : 6 minutes
Per person : • 1 veal cutlet • half slice of ham (preferably uncooked) • gruyere cheese • salt • pepper
Cut a slit into the thickness of the veal cutlet. Put inside half the slice of ham and one slice of gruyere cheese. Add salt and pepper. Serve with a thick tomato sauce.
text_image
Diagram illustrating a three-step process of fabric or material processing, with numbered steps and directional arrows indicating movement.Tilslutning
Luk apparatet
natural_image
Illustration of a yellow mechanical device with a curved arrow indicating rotation (no text or symbols)
text_image
OK OK THERMOSIGNAL
text_image
OK OK THERMOSIGNAL
text_image
03°Tilberedning, fortsat
natural_image
Illustration of a kitchen appliance with exploded view and side view (no text or symbols)natural_image
Illustration of a mechanical device with a curved arrow indicating rotation (no text or symbols)