
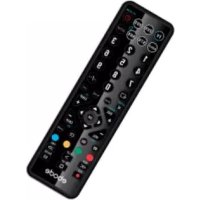
TAKE 6 IR/RF - Remote control EBODE - Free user manual and instructions
Find the device manual for free TAKE 6 IR/RF EBODE in PDF.


| Product Type | Universal infrared and radio frequency remote control |
| Brand | ebode |
| Model | TAKE 6 IR/RF |
| Dimensions (approx.) | 18 x 5 x 2 cm |
| Weight (approx.) | 100 g (with batteries) |
| Power supply | 2 AAA 1.5 V batteries (not included) |
| Infrared range | Approx. 10 m (direct line of sight) |
| Radio frequency range | Up to 30 m (no obstacles) |
| RF frequency | 433 MHz |
| Main functions | Control of TV, set-top box, hi-fi system, DVD player, etc.; IR code learning; RF mode for compatible equipment |
| Number of keys | Approximately 40 keys |
| Material | ABS plastic |
| Color | Black (standard) |
| Care and cleaning | Clean with a soft, dry cloth. Do not use abrasive products or solvents. |
| Safety | Do not expose to moisture, excessive heat, or shocks. Remove batteries if not used for an extended period. |
| Spare parts and repairability | Batteries are commercially available. No spare parts provided. In case of malfunction, contact customer service. |
| General information | Universal remote control compatible with many devices. Programming via built-in codes or learning. Ideal for replacing multiple remotes. |
Frequently Asked Questions - TAKE 6 IR/RF EBODE
User questions about TAKE 6 IR/RF EBODE
0 question about this device. Answer the ones you know or ask your own.
Ask a new question about this device
Download the instructions for your Remote control in PDF format for free! Find your manual TAKE 6 IR/RF - EBODE and take your electronic device back in hand. On this page are published all the documents necessary for the use of your device. TAKE 6 IR/RF by EBODE.
USER MANUAL TAKE 6 IR/RF EBODE
6 in 1 universal remote control
User guide 3
Bedienungsanleitung 14
Gebruiksaanwijzing 26
Användermanual 38
Guide utilisateur 49
Guía del usuario 62
Manual do utilizador 74
Manuale per l'utente 86
TAKE 6 IR+RF
UNIVERSAL REMOTE 6 in1
Button layout

User Guide
General Security Note
Attention: For carefree and safe use of this product, please read this manual and safety information carefully and follow the instructions. Technical manipulation of the product or any changes to the product are forbidden, due to security and approval issues. Please take care to set up the device correctly - consult your user guide. Children should use the device only under adult supervision.
Important: the TAKE 6 must be used according the instructions in this manual and is not suitable for other purposes.
Avoid the following
• strong mechanical wear and tear
- high temperature
- strong vibrations
- high humidity
Please also respect the additional security notes in the various user guide chapters. To ensure correct set up please read the manual and security notes carefully.
Battery install and change
The device may only be used with 2x AAA Alkaline batteries - never try to connect to another power supply. When inserting batteries be sure the right polarity is used. Remove the batteries when the device is not used for a longer period. Make sure that the batteries are not short circuited and are not disposed in fire (danger of explosion). Batteries do not belong in children hands. Don't let batteries lay around openly - they might be swallowed by children or animals. If this happens see a doctor immediately.
Disposal of batteries:
Batteries are special waste and do not belong in general household waste disposal. Leaking or damaged batteries can upon contact with skin cause burning or acid damage – if necessary use suitable gloves. Please dispose of batteries in accordance with local bylaws.
Contents
Quick Start Guide
- Introduction
- Insert the batteries
- Function of the remote's buttons
- Programming
4.1. Manual code entry
4.2.Automatic code search for some well-known brands
4.3. Automatic code search for all brands
4.4. Manual code search
4.5 Learning codes
4.6. Identifying codes found
4.7 Volume Control Punch Through
4.8 ebode / X10 Home Automation Control (optional)
4.9 ebode / X10 IR Link (optional)
-
Troubleshooting
-
Tips & Tricks about learning IR codes to a remote
Quick start guide
a) Put the batteries in
- Open the cover on the back of the TAKE 6
- Insert the 2x AAA Alkaline. Make sure the batteries are
NEW.
b) Program your TAKE 6
-
Turn on the equipment that you wish to control (TV, DVR, DVD, STB, AUX/ [AUDIO]). Please note that with the TAKE 6 you can either select to control an appliance or not a combination of these two.
-
The AUX key allows you to program and control any equipment such as TV, DVR, DVD, CD, STB,
-
Take the code book supplied with the TAKE 6 and find the brand of the equipment you wish to control. E.g. if you have a Thomson TV look for Thomson under the TV section.
-
Press and hold on the key marked "S" (8) until the LED (2) stays permanently on. This takes about 3 seconds. Release the "S key".
-
Press and release the TV, DVR, DVD, STB, AUX, AUDIO, mode key (4), in accordance with the appliance you wish to control.
-
From the code book take the first number corresponding to your equipment and enter the number by pressing the 0-9 key pad (14). Each time you press a key the LED (2) will flash.
-
If the number is correctly entered the LED will turn off. If the number is incorrect then the red LED will flash fast. If incorrect you will need to restart at 4.
Press the POWER key (1). If your equipment switches off you have found the right code. If it does not switch off, you will need to restart from 4.
Sometimes there are several codes that have similar features. If you find that your TAKE 6 does not work for some functions, you may need to try another code.
1. Introduction
The TAKE 6 is designed to control up to 6 devices: TV, DVR, DVD, STB, AUDIO or any other device under AUX mode key (Please note that you can either select to control an appliance or ↗, not a combination of these two.).
The TAKE 6 contains a library of codes that are preprogrammed into the remote control. This library covers nearly all the audio video products on the market today. The codes have to be programmed once before use. This can be done in different ways:
a. Manual entry of one of the codes displayed under the related brand and type of equipment in the attached code book (see 4.1)
b. Automatic code search for some well-known brands (4.2)
c. Automatic code search for all brands (4.3)
d. Manual search through all codes (4.4)
2. Insert the batteries (always use 2x AAA Alkaline batteries)
- Open the cover on the back of the TAKE 6 Remote.
- Insert 2x AAA Alkaline batteries, verify that they are placed correctly with the + on the battery in the same position as marked inside the battery compartment.
- Close the battery compartment carefully.
3. Function of the remote's buttons
[1] POWER (On/Off)
Allows you to switch off the last selected appliance. Some appliances can also be switched on with this button.
[2] LED indicator
The source buttons (TV, DVR, DVD, AUDIO, STB, AUX) are backlit. When you press a button the button of the chosen source will backlit automatically.
[3] MUTE
Allows you to turn on/off the sound. You can control the "Mute" function of your TV even when you are in DVR, DVD or STB mode. No need to select the TV mode.
[4] Source Buttons for TV, DVR, DVD, AUDIO, STB, AUX/
![EBODE TAKE 6 IR/RF - [4] Source Buttons for TV, DVR, DVD, AUDIO, STB, AUX/ - 1](/content/2026/06/1279880/images/506a7ec557ae3c22b84700a1ff00e37b90f8de43d9538b7839124fafa032b6fd.jpg)
These keys allow you to select the appliance you wish to control.
[5] VOLUME +/-
Allows you to control the volume. You can control the volume of your TV even when you are in DVR, DVD or STB mode. No need to select the TV mode.
[6] CHAN +/- or PROG +/-
Select the next or the previous channel of your TV or STB. In DVD mode: next or previous chapter.
[7] OK Confirms menu selection.
[8] Setup Allows you to program your remote before the first use. It also allows you to access to secondary functions of certain A/V appliances (Shift). Press the S key followed by the function key you desire.
[9] Navigation Keys these buttons allow you to navigate into the menu of the
selected device (if the device you selected has such a menu)
[10] Guide
Displays on-screen program or channel guides
[11] Menu Menu On
[12] Exit Menu OFF
[13] -/--
In connection with the numeric keys, this button allows you with some equipment to select directly channels higher than 9. If you are in programming mode - automatic code search - you can confirm the code.
[14] Numeric keys 0 - 9
Work the same way as your original remote.
[15] REW, PLAY, FWD, REC, STOP, PAUSE
REW (rewind)
In DVR, DVD or CD mode: This button works the same way as in your original remote.
IN TV mode: Coloured key (Red), control of videotext or special equipment functions.
PLAY
In DVR, DVD or CD mode: This button works the same way as in your original remote.
IN TV mode: Coloured key (Yellow), control of fasttext or special equipment functions.
FF (fast forward)
In DVR, DVD or CD mode: This button works the same way as in your original remote.
IN TV mode: Coloured key (Blue), control of fasttext or special equipment functions.
REC (record)
This key works the same way as the one on your original remote for your DVR.
In order to avoid a mistake you have to press this key twice to activate this feature.
STOP
In DVR, DVD or CD mode: This button works the same way as in your original remote.
IN TV mode: Coloured key (Green), control of fasttext or special equipment functions.
PAUSE
In DVR, DVD or CD mode: This button works the same way as in your original remote.
IN TV mode: Coloured key (Magenta), control of fasttext or special equipment functions.
[16] A/V Selection of an external source (e.g. SCART input).
[17] INFO Displays on screen information of the selected appliance (when available).
[18] Teletext
Teletext OFF: Stop Teletext / Fasttext.
[19] Function/Colour Buttons
Performs different functions for each appliance.
[20] LEARN
Programming button for learning the functions of your original remote control. See chapter 4.5, Learning codes, for information about programming these codes.
[21] Teletext
Teletext ON: Start/stop Teletext / Fasttext.
4. Programming
To make your remote suitable for your own equipment, you have to program it once. You can do this by entering a code, related to the brand and type of equipment you want to control. You can program any equipment under any MODE key. For example, if you have three videorecorders, you can program videorecorder 1 under DVR, videorecorder 2 under AUX and videorecorder 3 under AUDIO.
4.1. Manual code entry
Take your code book and search for the list matching the equipment you are looking for, e.g. TV or DVR. Next, find the relevant brand (e.g. Sony). Now you will find one or more 4-digit codes. If there is more than one code, it depends on your equipment which code is correct. Generally, the codes are displayed in order of age of the equipment. Older equipment first, younger equipment at the end. Sometimes you will have to try several codes before you find the right code for your equipment.
- Make sure your equipment is switched on (for example TV).
- Press and hold the S (8) key until the LED indicator lights continuously. Release the S key.
- Press and release the mode key (4) of the device you want to control (for example TV).
- Enter the 4-digit code from the Code Book by using the key pad (14). The LED (2) turns off after the last digit is entered. If you entered a wrong code the LED blinks for 3 seconds and then goes off. You have to repeat from step 2.
- Point the remote in the direction of your TV and press the POWER button (1). Your device should turn off. Check other functions (for example for a DVR FF or REW, etc.). If certain functions are not responding, this indicates that the entered code is not the correct one. In that case repeat the above procedure with the next corresponding code of your brand.
- Repeat this procedure from step 1 for the other equipment you want to control (DVR, DVD, STB,...). If your equipment (TV, STB, etc....) does not respond, try the other codes for your brand. If it still doesn't respond, try the manual code search method (4.4 Manual code search).
4.2. Automatic code search for some well-known brands
If your brand is listed hereafter, you can use the brand search method (faster than the "manual" and the "automatic code search").
| BRAND | CODE | BRAND | CODE |
| Philips / Radiola | 1 | Telefunken / Saba / Normende | 4 |
| Akai / Daewoo / JVC / Panasonic / Sharp / Sony / Toshiba | 2 | Grundig / Blaupunkt | 5 |
| Brandt / Thomson | 3 | Nokia / ITT | 6 |
- Turn on the device you want to control.
- Press and hold S (8) until the LED indicator (2) lights steadily. Release S button.
- Press the mode button (4) that matches the equipment you wish to control. The LED (2) blinks once.
- Enter the code corresponding to your brand, point the TAKE 6 Remote in the direction of your equipment, press
CHAN+ (6) once only. Continue to point the TAKE 6 Remote at your equipment until the equipment changes Channel (the remote control sends an IR signal every second. Please wait until your equipment reacts). When your equipment does react, press on the key -/-- (13) to confirm. If you accidentally miss the code, you can stop
the autosearch by pressing CHAN- (6) and by repeatedly pressing this key return to the right code. Press -/-- (13) to confirm.
Remark: if some functions of your equipment don't work, you need to try another code for your brand. The search function starts after the last confirmed code. For example, if it was 030, the search function starts at 031, and it will keep on trying until the last possible code.
4.3 Automatic code search for all brands
When searching an unknown code, you can step through the library automatically (AutoSearch). When your equipment responds, you can stop the searching process and store the code you found. Note: as you can dedicate any appliance (TV, DVD, STB...) to DVR, DVD, CD, STB, AUDIO or AUX key, you need first to enter any 4-digit code for the kind of appliance you wish to control (found in the code book), i.e.: If you want to program a STB under the DVR key, enter ANY STB code found in the code book and then follow the steps below:
- Turn on the device you want to control.
- Press and hold S (8) until the LED indicator (2) lights steadily. Release S button.
- Press the mode button (4) that matches the equipment you wish to control. The LED (2) blinks once.
- Press CHAN+ (6) once. After a few seconds the remote starts stepping through the code library (fast search, 1 code per second). When the device responds, you can press CHAN+ (6) to switch to slow search (1 code per 3 seconds). You can step back by pressing CHAN- (6) (you can step forward by pressing CHAN+ (6) in case you went too far back). As soon as the device responds again, press the -/-- key (13) to store the code you found.
4.4. Manual code search
Note: as you can dedicate any appliance TV, DVR, DVD, STB, AUDIO, AUX, keys, you first need to enter any 4-digit code for the kind of appliance you wish to control (found in the code book), i.e.: If you want to program a STB under the AUX key, enter ANY STB code found in the code book and then follow the steps below:
- Make sure your equipment is switched on.
- Press and hold S (8) until the LED indicator lights steadily. Release S
- Press the mode key (4) that matches the equipment you want to control (for example TV).
- Press CHAN+ (6) repeatedly until the channel changes. If you step past the correct code use CHAN- (6) to go back to the right code.
- When the equipment you want to control reacts, press -/-- (13) to confirm the code.
Note: If your equipment doesn't have CHAN+ you can use PLAY (DVR or DVD) (15) or POWER (1) key. The search starts after the last registered code. If that was 030, the search starts at 031 until the last possible code and then goes from 000 to 029. Note: if certain functions of your equipment can't be controlled you will have to find a different code for your brand.
4.5 Learning codes
Your TAKE 6 Remote contains the codes for most TVs, videos etc. in its code library. If a certain device is not in this library, you can learn the codes for your existing remote control. The library may also contain a code that works for your device, but which misses a few function buttons. You can then select to only learn those buttons (maximum of 150 buttons).
Master clear
You can use the MASTER CLEAR method to clear the learning memory. It is advised to execute a MASTER CLEAR before you start learning any commands.
- Keep the SETUP (8) pressed until the LED stays lit. Release the SETUP (8) button.
- Press the LEARN (20) button twice. The LED will flash every time you press the button.
- Press SETUP (8). The LED will extinguish after a few seconds.
Notes:
- Execute a Master Clear before you start learning (see the method above).
- Make sure both remote controls have full batteries before you start learning codes.
- Make sure you do not move the remote controls when pressing the buttons.
- You cannot learn any commands for the following buttons: Learn, Setup, Guide, Source buttons TV, VCR, CBL, etc, Home Control.
- Experiment by learning two or three buttons first (to test compatibility), before you learn all the buttons of your original remote control.
- When the memory is full, the LED will flash for 3 seconds. You cannot learn any codes when the memory is full. You can, however, erase a mode with codes you stored. You can only erase a full mode.
- By keeping the buttons for the existing remote control pressed for a shorter period, there will be more memory space left for learning codes on the TAKE 6 remote control. This also diminishes the chance that the remote control learns the wrong codes.
- Experiment with the distance between the remote controls if you have problems learning the codes.
- Some remote controls do not have the infrared LED in the centre. Try experimenting by slightly moving the remote controls (sideways or up/down). Tube lighting and bright sunlight can affect the procedure.
- You can only learn the codes for one original remote control per mode, e.g. the codes for your DVD remote control under the DVD button. With some combi devices (e.g. a TV with built-in DVD player) you first have to learn the TV functions in TV mode and then the DVD functions in DVD mode.
Learning the commands
- Point your existing remote control at the TAKE 6 Remote (front to front). Keep a distance of 2,5 cm between the remote controls.
- Press the SETUP (8) button until the LED stays lit. Release the SETUP (8) button.
- Press the Mode button (TV, AUDIO, SAT, etc.) for the device you want to learn. The LED will flash once.
- Press the LEARN (20) button. The LED will flash once.
-
Press the button on the TAKE 6 remote you want to store the new command under. The LED will blink once.
-
Depending on the type of remote control you have, you can use one of two methods:
a. Press the button on the existing remote control you want to learn. Keep this button pressed until the LED on the TAKE 6 Remote extinguishes. If the LED does not extinguish, but starts flashing, you need to use method B. (If you have just tried method A and want to try method B, first repeat step 5).
b. Press the button on the existing remote control you want to learn. Keep this button pressed as long as you would when using the original remote control. - Repeat steps 5 and 6 for every button you want to learn.
- When you have finished learning the buttons, press SETUP (8)
Erasing the commands learned per mode to clear memory space
You can erase the commands learned and saved for each separate function (TV, VCR, etc.):
- Keep the SETUP (8) button pressed until the LED stays lit. Release the SETUP (8) button.
- Press the Mode button of your choice (TV, DVR, etc.). The LED will flash once.
- Press the LEARN (20) button twice.
- Press SETUP (8). The LED will extinguish after a few seconds.
- All commands learned and saved for the selected function have now been erased.
4.6. Identifying codes found
If you don't know the code (for example because you found the code by autosearch) you can identify it as described below:
- Press and hold S (8) until the LED indicator (2) lights steadily. Release S.
- Press the mode key (4) for the equipment you want to identify (DVR, DVD, STB, AUDIO or AUX). The LED blinks once.
- Press again S. The LED blinks once.
- To identify the first digit press each number button from 0 - 9 (14) until the LED blinks. The number you pressed is the first digit of the code.
- Press each number key from 0 - 9 as above to find the second digit.
- Press each number key from 0 - 9 as above to find the third digit.
- Press each number key from 0 - 9 as above to find the fourth digit. When the fourth digit has been found the LED will go off.
4.7 Volume Control Punch Through
The TAKE 6 remote control allows you to select which Mode controls your volume/mute buttons. The volume buttons (5) and Mute (3) can be set for individual control by EACH device Mode or can be set for ALL device Modes to punch-through volume control to one specific single device Mode. The remote is initially set (Factory Default) for control by each specific device Mode.
Adjustment of ALL volume controls to one mode.
You can allocate volume control to one of the modes of the remote control providing that volume control exists on
the corresponding device (e.g. control of TV sound in DVR, DVD, etc... mode).
- Hold down the S (8) key until the LED remains lit.
- Release the S (8) key.
- Press and hold the MUTE (3) key until the LED flashes once, then release the MUTE key.
- Press the required mode key, e.g. TV, corresponding to the device that will control the VOL and MUTE buttons for ALL the device Modes.
- Press and release the MUTE (3) key and the LED turns off.
Adjustment of the volume controls for EACH mode.
You can allocate volume control to be individual for each mode selected, providing that volume control exists on the corresponding device (e.g. control of the television set sound in TV mode, the control of the sound of the STB receiver in STB mode, ...).
- Hold down the S (8) key until the LED remains lit.
- Release the S (8) key.
- Press and hold the MUTE (3) key until the LED flashes once, then release the MUTE key.
- Press the required mode key, e.g. DVD, corresponding to the device that will control its own VOL and MUTE keys.
- Press and release the VOL - (5) key once.
- Press and release the MUTE (3) key once and the LED turns off.
4.8 ebode / X10 Home Automation Control
The TAKE 6 remote control allows you to command all electric appliances you have in your house. Here are some examples that you can do with your TAKE 6 remote using ebode/X10 home automation modules:
- Dim the lights and switch them on and off while watching TV.
- Turn the coffee machine on from your bedroom when you wake up in the morning.
- Turn your lights on at night to scare off intruders when you hear noises.
- Switch on your electric blanket before the movie ends, so you can enjoy a warm bed once the movie is finished.
- Switch everything off with a single press of a button when you go to bed.
ebode / X10 Home Automation: control all electrical appliances with one remote control
The TAKE 6 Remote has two transmitters: an infrared (IR) transmitter and a radio frequency (RF) transmitter. This allows you to operate practically anything. You can operate your TV, video etc. with the infrared (IR) technology. The ebode / X10 radio frequency (RF) technology makes it possible to operate lights and appliances from anywhere in the home.
To control your lights and appliances, you need an IR7203 or ebode / X10 Transceiver module and some ebode / X10 Home Automation Modules, which can simply be plugged in the socket. Extra wires are not necessary. Use a Transceiver Module (available separately) and connect your table lamp or other electrical appliance. Switch on/off: control everything with the TAKE 6. The Transceiver Module converts the RF signals of the TAKE 6 into an ebode / X10 signal that is transferred via the mains power line. All other ebode / X10 modules that are connected to your mains, are also operate able through the TAKE 6 Remote. Ask your dealer for more information.
You can control the ebode / X10 Home Automation Modules as follows:
- Press the ebode / X10 home automation button .
- Use the numerical keys to select the Unit Code of the Module of your choice (1-digit codes do not have to preceded by a '0').
- Press the button of the function you want to execute (see overview below).
ebode / X10 Home Automation functions:
On: CHANNEL +
Off: CHANNEL -
Brighter: VOLUME +
Dim: VOLUME -
All lights on: Power
All units off: Mute
Changing the X10 House Code
The TAKE 6 Remote is set to House Code A by default. In most cases you do not need to change this setting, unless another X10 system in your area causes interference.
- Press the SETUP button until the LED stays lit. Release the SETUP button.
- Press the numerical key(s) for the House Code selected (1=A, 2=B, ..... 16=P).
- Press the -/-- (13) button to confirm the House Code. The LED will extinguish.
Note: The House Code selected must be the same as the House Code used by your Transceiver Module.
4.9 ebode / X10 IR Link RF Receiver
The ebode IR Link RF Receiver (available separately, model code RE10CE) gives you the possibility to control all your audio and video equipment with the TAKE 6 anywhere in your home. The TAKE 6 transmits an RF signal to the IR Link RF Receiver module, which then transforms this signal into an IR signal, which is sent to your device.
Here are some examples of the uses of the IR Link:
- Operate the DVD and satellite receiver from the bedroom, without having to lay any extra cables.
- Turn up the volume of the radio in the living room while you are in the kitchen.
The RF signal travels through walls, ceilings and closet doors. Simply connect the receiver to a wall socket within sight of your equipment: it could not be easier. Ask your dealer about the possibilities.
5. Troubleshooting
The remote doesn't work or loses codes entered
- Confirm with your original remote that the equipment works correctly.
- Make sure that you have pressed the corresponding mode key of the equipment or device that you want to control.
- If the listed code does not work, try the AUTOSEARCH method or enter the next code of that brand.
- Check that the batteries have the correct polarity position.
- The programming of the remote requires 2x AAA Alkaline batteries (new).
- If the LED is lit permanently, in general it will be necessary to replace the batteries.
- Set the remote back to factory default.
How to set the TAKE 6 Remote back to factory default
- Press and hold S (8) until the LED indicator (2) lights steadily. Release S.
- Press and hold \$ (8) until the LED indicator (2) lights steadily. Release S.
- Press and release the 0 key (14) once.
- Press and release the S key (8).
- The LED (2) turns off after few seconds.
6. Tips & Tricks about learning IR codes to a remote
When learning IR codes always test the IR codes directly during the learning process.
In this way you do not need to learn all the codes over and over again.
Please try the following steps when the learned IR code fail to work.
-
Make sure the original remote you are learning the code from has a fresh set of batteries. (preferably Duracell or Energizers)
-
Increase/decrease the distance between the two remotes when learning. (original and URC)
Try for example to double the distance, up to 4 feet is possible.
-
For 'normal' short burst codes, try to 'tap' the button instead of press and holding it.
-
For 'Continuous' codes, try the 'flicker' technique – rapidly tap the button while learning. (approximately 7x per second or faster.)
-
Try the 'Swoop' method, Start form 2' away and then 'swoop' the remote towards the learning remote.
-
Try the 'Flasher' method. Hold an opaque object in front of the remote and remove it then quickly replace it.
-
Try learning the codes to another learning remote first, and then from that remote to the required one.

Bedienungsanleitung
[4] TV, DVR, DVD, STB, AUX, AUDIO/
[9] Navigationstasten
[15] REW, PLAY, FWD, REC, STOP, PAUSE
Schnelllauf zurück
Teletext AUS: Stoppt Teletext.
Teletext AN: Startet/stoppt Teletext.
4. Programmieren
[15] REW, PLAY, FWD, REC, STOP, PAUSE
REW (snel terug)
[15] REW, PLAY, FWD, REC, STOP, PAUSE
REW (spola tillbaks)
[4] TV, DVR, CBL, DVD, CD, DVR, STB, AUX/
[15] REW, PLAY, FWD, REC, STOP, PAUSE
REW (Retour rapide)
[6] CHAN +/- o PROG +/-
[15] REW, PLAY, FWD, REC, STOP, PAUSE
REW (rebobinado)
a) Coloque as baterias
[6] CHAN +/- or PROG +/-
[15] REW, PLAY, FWD, REC, STOP, PAUSE
REW (rebobinar)
[18] Teletext (teletexto)
Teletext OFF: Interrompe o teletexto(Teletext) / Texto Rápido (Fasttext).
[15] REW, PLAY, FWD, REC, STOP, PAUSE
DECLARATION OF CONFORMITY
Hereby, ebode declares that this TAKE6 IR+RF is in compliance with the essential requirements and other relevant provisions of the following Directives:
1) Directive 1999/5/EC of the European Parliament and of the Council of 9 March 1999 on radio equipment and telecommunications terminal equipment and the mutual recognition of their conformity
2) Directive 2004/108/EC of the European Parliament and of the Council of 15 December 2004 on the approximation of the laws of the Member States relating to electromagnetic compatibility
3) Directive 2002/95/EC of the European Parliament and of the Council of 27 January 2003 on the restriction of the use of certain hazardous substances in electrical and electronic equipment
4) Directive 2006/95/EC of the European Parliament and of the Council of 12 December 2006 on the harmonization of the laws of Member States relating to electrical equipment designed for use within certain voltage limits
Technical data and copies of the original Declaration of Conformity are available and can be obtained from ebode electronics: PB 25, NL-4264ZG, the Netherlands.

User Information for Consumer Products Covered by EU Directive 2002/96/EC on Waste Electric and Electronic Equipment (WEEE)
This document contains important information for users with regards to the proper disposal and recycling of ebode products. Consumers are required to comply with this notice for all electronic products bearing the following symbol:
Environmental Information for Customers in the European Union

European Directive 2002/96/EC requires that the equipment bearing this symbol on the product and/or its packaging must not be disposed of with unsorted municipal waste. The symbol indicates that this product should be disposed of separately from regular household waste streams.
It is your responsibility to dispose of this and other electric and electronic equipment via designated collection facilities appointed by the government or local authorities. Correct disposal and recycling will help prevent potential negative consequences to the environment and human health.
For more detailed information about the disposal of your old equipment, please contact your local authorities, waste disposal service, or the shop where you purchased the product.
DECLARATION OF CONFORMITY TO R&TTE DIRECTIVE 1999/5/EC for the European Community, Switzerland, Norway, Iceland and Liechtenstein
Product category: general consumer (category 3).
English: This equipment is in compliance with the essential requirements and other relevant provisions of the European R&TTE Directive 1999/5/EC

- TAKE 6 IR+RF
- UNIVERSAL REMOTE 6 IN1
- USER GUIDE
- GENERAL SECURITY NOTE
- AVOID THE FOLLOWING
- BATTERY INSTALL AND CHANGE
- DISPOSAL OF BATTERIES
- CONTENTS
- QUICK START GUIDE
- PUT THE BATTERIES IN
- NEW
- PROGRAM YOUR TAKE 6
- INTRODUCTION
- INSERT THE BATTERIES (ALWAYS USE 2X AAA ALKALINE BATTERIES)
- FUNCTION OF THE REMOTE'S BUTTONS
- [1] POWER (ON/OFF)
- [2] LED INDICATOR
- [3] MUTE
- [4] SOURCE BUTTONS FOR TV, DVR, DVD, AUDIO, STB, AUX
- [5] VOLUME
- [6] CHAN +/- OR PROG
- [7] OK CONFIRMS MENU SELECTION
- [9] NAVIGATION KEYS THESE BUTTONS ALLOW YOU TO NAVIGATE INTO THE MENU OF THE
- [10] GUIDE
- [11] MENU MENU ON
- [12] EXIT MENU OFF
- [13]
- [14] NUMERIC KEYS 0 - 9
- [15] REW, PLAY, FWD, REC, STOP, PAUSE
- REW (REWIND)
- PLAY
- FF (FAST FORWARD)
- REC (RECORD)
- STOP
- PAUSE
- [18] TELETEXT
- [19] FUNCTION/COLOUR BUTTONS
- [20] LEARN
- [21] TELETEXT
- PROGRAMMING
- MANUAL CODE ENTRY
- AUTOMATIC CODE SEARCH FOR SOME WELL-KNOWN BRANDS
- 4.3 AUTOMATIC CODE SEARCH FOR ALL BRANDS
- MANUAL CODE SEARCH
- 4.5 LEARNING CODES
- MASTER CLEAR
- NOTES
- LEARNING THE COMMANDS
- ERASING THE COMMANDS LEARNED PER MODE TO CLEAR MEMORY SPACE
- IDENTIFYING CODES FOUND
- 4.7 VOLUME CONTROL PUNCH THROUGH
- ADJUSTMENT OF ALL VOLUME CONTROLS TO ONE MODE
- ADJUSTMENT OF THE VOLUME CONTROLS FOR EACH MODE
- 4.8 EBODE / X10 HOME AUTOMATION CONTROL
- EBODE / X10 HOME AUTOMATION: CONTROL ALL ELECTRICAL APPLIANCES WITH ONE REMOTE CONTROL
- YOU CAN CONTROL THE EBODE / X10 HOME AUTOMATION MODULES AS FOLLOWS
- EBODE / X10 HOME AUTOMATION FUNCTIONS
- CHANGING THE X10 HOUSE CODE
- 4.9 EBODE / X10 IR LINK RF RECEIVER
- TROUBLESHOOTING
- THE REMOTE DOESN'T WORK OR LOSES CODES ENTERED
- HOW TO SET THE TAKE 6 REMOTE BACK TO FACTORY DEFAULT
- TIPS & TRICKS ABOUT LEARNING IR CODES TO A REMOTE
- BEDIENUNGSANLEITUNG
- [4] TV, DVR, DVD, STB, AUX, AUDIO
- [9] NAVIGATIONSTASTEN
- SCHNELLLAUF ZURÜCK
- PROGRAMMIEREN
- REW (SPOLA TILLBAKS)
- [4] TV, DVR, CBL, DVD, CD, DVR, STB, AUX
- REW (RETOUR RAPIDE)
- [6] CHAN +/- O PROG
- REW (REBOBINADO)
- COLOQUE AS BATERIAS
- REW (REBOBINAR)
- [18] TELETEXT (TELETEXTO)
- DECLARATION OF CONFORMITY
- USER INFORMATION FOR CONSUMER PRODUCTS COVERED BY EU DIRECTIVE 2002/96/EC ON WASTE ELECTRIC AND ELECTRONIC EQUIPMENT (WEEE)
- ENVIRONMENTAL INFORMATION FOR CUSTOMERS IN THE EUROPEAN UNION
- DECLARATION OF CONFORMITY TO R&TTE DIRECTIVE 1999/5/EC FOR THE EUROPEAN COMMUNITY, SWITZERLAND, NORWAY, ICELAND AND LIECHTENSTEIN
Brand : EBODE
Model : TAKE 6 IR/RF
Category : Remote control