
DVX-1000 - Home Theater System YAMAHA - Free user manual and instructions
Find the device manual for free DVX-1000 YAMAHA in PDF.


| Product type | Home theater system |
| Brand | Yamaha |
| Model | DVX-1000 |
| Dimensions (receiver) | 435 x 151 x 365 mm |
| Weight (receiver) | 8.5 kg |
| Output power | 100 W per channel (6 ohms) |
| Supported audio formats | Dolby Digital, DTS, PCM |
| Disc player | DVD-Video, DVD-R/RW, CD, CD-R/RW |
| Tuner | FM/AM with 30 presets |
| Video inputs | HDMI (x2), component, composite |
| Video outputs | HDMI, component, composite |
| Audio inputs | Optical, coaxial, analog (x2) |
| Power supply | 220-240 V AC, 50/60 Hz |
| Power consumption | 200 W (0.5 W standby) |
| Main features | DVD playback, FM/AM radio, surround amplification, audio settings |
| Maintenance and cleaning | Clean with a soft, dry cloth. Do not use solvents. |
| Safety | Do not expose to moisture, do not block ventilation openings. |
| Spare parts and repairability | Contact an authorized Yamaha after-sales service. |
| General information | Complete manual available for download at notice-facile.com |
Frequently Asked Questions - DVX-1000 YAMAHA
User questions about DVX-1000 YAMAHA
0 question about this device. Answer the ones you know or ask your own.
Ask a new question about this device
Download the instructions for your Home Theater System in PDF format for free! Find your manual DVX-1000 - YAMAHA and take your electronic device back in hand. On this page are published all the documents necessary for the use of your device. DVX-1000 by YAMAHA.
USER MANUAL DVX-1000 YAMAHA
Caution: read this before operating your unit.
1 To assure the finest performance, please read this manual carefully. Keep it in a safe place for future reference.
2 Install this sound system in a well ventilated, cool, dry, clean place with at least 10 cm on the top, 10 cm on the left and right, and 10 cm at the back of DVR-1000 and at least 1 m above, 30 cm behind and on both sides of NX-SW1000 for adequate ventilation. — away from direct sunlight, heat sources, vibration, dust, moisture, and/or cold.
3 Locate this unit away from other electrical appliances, motors, or transformers to avoid humming sounds.
4 Do not expose this unit to sudden temperature changes from cold to hot, nor locate this unit in an environment with high humidity (i.e., a room with a humidifier) to prevent condensation inside this unit, which may cause an electrical shock, fire, damage to this unit, and/or personal injury.
5 Avoid installing this unit in a location where foreign objects may fall onto this unit or where this unit may be exposed to liquid dripping or splashing. On the top of this unit, do not place:
- Other components, as they may cause damage and/or discoloration on the surface of this unit.
- Burning objects (i.e., candles), as they may cause fire, damage to this unit, and/or personal injury.
- Containers with liquid in them, as they may fall, spilling the liquid and causing an electrical shock to the user and/or damage to this unit.
6 Do not cover this unit with a newspaper, tablecloth, curtain, etc. in order not to obstruct heat radiation. If the temperature inside this unit rises, it may cause fire, damage to this unit, and/or personal injury.
7 Do not plug in this unit to a wall outlet until all connections are complete.
8 Do not operate this unit upside-down. It may overheat, possibly causing damage.
9 Do not use excessive force on switches, knobs and/or cords.
10 When disconnecting the power cord from the wall outlet, grasp the plug; do not pull the cord.
11 Do not clean this unit with chemical solvents; this might damage the finish. Use a clean, dry cloth.
12 Use only the voltage specified on this unit. Using this unit with a higher voltage than specified is dangerous and may cause fire, damage to this unit, and/or personal injury. Yamaha will not be held responsible for any damage resulting from use of this unit with a voltage other than as specified.
13 To prevent damage by lightning, keep the power cord out and outdoor antennas disconnected from a wall outlet or the unit during a lightning storm.
14 Do not attempt to modify or fix this unit. Contact qualified Yamaha service personnel when any service is needed. The cabinet should never be opened for any reason.
15 When not planning to use this unit for long periods of time (i.e., vacation), disconnect the AC power plug from the wall outlet.
16 Be sure to read the "Troubleshooting" section on common operating errors before concluding that this unit is faulty.
17 Before moving this unit, press STANDBY/ON to set the unit in standby mode, then disconnect the AC power plug from the wall outlet.
18 Condensation will form when the surrounding temperature changes suddenly. Disconnect the power cable from the outlet, then leave the unit alone.
19 When using the unit for a long time, the unit may become warm. Turn the power off, then leave the unit alone for cooling.
20 Install this unit near the AC outlet and where the AC power plug can be reached easily.
21 The batteries shall not be exposed to excessive heat such as sunshine, fire or like.
22 Excessive sound pressure from earphones and headphones can cause hearing loss.
This unit is not disconnected from the AC power source as long as it is connected to the wall outlet, even if this unit itself is turned off. This state is called the standby mode. In this state, this unit is designed to consume a very small quantity of power.
Laser component in this product is capable of emitting radiation exceeding the limit for Class 1.
WARNING
TO REDUCE THE RISK OF FIRE OR ELECTRIC SHOCK, DO NOT EXPOSE THIS UNIT TO RAIN OR MOISTURE.
CAUTION
Danger of explosion if battery is incorrectly replaced. Replace only with the same or equivalent type.

This symbol mark is according to the EU directive 2002/96/EC.
This symbol mark means that electrical and electronic equipment, at their end-of-life, should be disposed of separately from your household waste.
Please act according to your local rules and do not dispose of your old products with your normal household waste.
This product complies with the radio interference requirements of the European Community.

This product complies with the requirements of the following directives and guidelines: 2006/95/EC + 2004/108/EC
Contents
1. INTRODUCTION
Introduction...... 2
Main unit.... 4
Supplied accessories.... 4
Functional overview 5
Top and front panels (DVR-1000).... 5
Rear panel (DVR-1000).... 6
Rear panel (NX-SW1000)....7
Remote control
(For DVR-1000).... 8
2. PREPARATION
Connections 10
Roles and layout of the speakers.... 10
System connections.... 11
Connecting the speakers.... 11
Other connections 14
Connecting a TV 14
Connecting an HDMI component.... 15
Connecting the FM/AM antennas.... 17
Connecting external AV components ..... 18
Connecting a digital audio component...... 19
Connecting a USB device 19
3. BASIC OPERATION
Getting started 20
Inserting batteries into the remote control .... 20
Using the remote control.... 20
Setting a TV 21
Setting language preferences.... 23
Setting speaker channels 24
4. OPERATIONS
Disc operation.... 25
Playing discs.... 25
Basic playback controls.... 25
Selecting various repeat shuffle functions .... 26
Other operations for video playback (DVD/VCD/SVCD) 27
Playing MP3/WMA/JPEG/DivX® discs..... 29
Special features for picture disc playback..... 30
Using a USB device.... 31
5. ON-SCREEN MENU
DVD setup menu options.... 33
Menu overview.... 33
General setup menu 34
Audio setup menu.... 36
Video setup menu.... 37
Preference setup menu.... 41
6. OTHER FEATURES
Tuner operations.... 44
Tuning radio stations.... 44
Presetting radio stations.... 44
Receiving Radio Data System stations (Europe and Russia models only).... 45
Sound controls.... 47
Using the Virtual Surround function ..... 47
Setting music enhancer.... 47
Night listening mode 48
Adjusting the treble/bass level.... 48
Adjusting the volume level.... 48
Other functions.... 49
Switching to standby mode 49
Dimming the display screen.... 49
Setting the sleep timer 49
Recording on an external AV component ..... 49
7. ADDITIONAL INFORMATION
Troubleshooting.... 50
Glossary.... 53
Specifications.... 55
Index...... 56
APPENDIX
(at the end of this manual) LIST OF LANGUAGE CODES...... i
LASER INFORMATION ...... ii
1
2
3
4
5
6
7
Introduction
Thank you for purchasing this unit. This Owner's Manual explains the basic operation of this unit.
Notes about discs
- This receiver is designed for use with the following discs: DVD-Video, Video CD, Super Video CD, Audio CD, CD-R, CD-RW, DVD+RW, DVD+R, DVD-R, DVD-RW and DVD-RW (VR format).

This receiver can play:
- MP3 and picture (Kodak, JPEG) files recorded on CD-R/RW, DVD-R/RW and DVD+R/RW.
- JPEG/ISO 9660 format
– Maximum 30 character display - D i ®diX on CD-R[W]/DVD+R[W]/DVD-RW
Notes
- CD-R, CD-RW and DVD-RW (VR format) cannot be played unless finalized.
- Some discs cannot be played depending on the recording conditions, such as the PC environment and application software. The characteristics and condition of some discs; materials, scratches, curvature, etc. may result in playback failure.
- Be sure to use only CD-R/RW, DVD-R/RW and DVD+R/RW discs made by reliable manufacturers.
- Do not use any non-standard shaped discs (heart-shaped, etc.).
- Do not use discs with tape, seals, or paste on their surface. Doing so may damage this receiver.
- Do not use discs affixed with labels printed by a commercially available label printer.
Cleaning discs
- When a disc becomes dirty, clean it with a cleaning cloth. Wipe the disc from the center out. Do not wipe in a circular motion.
- Do not use solvents such as benzine, thinner, commercially available cleaners, or antistatic spray intended for analog records.
Avoid high temperatures, moisture, water and dust
- Do not expose the system, batteries or discs to humidity, rain, sand or excessive heat (caused by heating equipment or direct sunlight).
Avoid condensation problem
- The lens may cloud over when the receiver is suddenly moved from cold to warm surroundings, making it impossible to play a disc. Leave the receiver in the warm environment until the moisture evaporates.
Disc care
- Write only on the printed side of a CD-R[W]/DVD+R[W]/DVD-R[W] and only with a soft felt-tipped pen.
- Handle the disc by its edge; do not touch the surface.
Cabinet care
- Use a soft cloth slightly moistened with a mild detergent solution. Do not use a solution containing alcohol, spirits, ammonia, or abrasives.
Choosing a suitable location
- Place the receiver on a flat, hard, and stable surface.
Region codes
The unit is designed to support the Region Management System. Check the region code number on the disc package. If the number does not match the unit's region number (see the table below or the back of the unit), the unit may be unable to play the disc.
| Destination | Region code of DVR-1000 | Playable discs | |
| Europe model |  |  |  |
| Australia model |  |  |  |
| Korea, Asia and Taiwan models |  |  |  |
| Russia model |  |  |  |
Sound field features

Manufactured under license from Dolby Laboratories. "Dolby", "Pro Logic", "MLP Lossless" and the double-D symbol are trademarks of Dolby Laboratories.

“DTS” and “DTS Digital Surround” are registered trademarks of DTS, Inc.


DivX, DivX Ultra Certified, and associated logos are trademarks of DivX, Inc. and are used under license.
“DCDi” is a trademark of Faroudja, a division of Genesis Microchip, Inc.
HDMI, the HDMI logo and High Definition Multimedia Interface are trademarks or registered trademarks of HDMI Licensing LLC.
This product incorporates copyright protection technology that is protected by method claims of certain U.S. patents and other intellectual property rights owned by Macrovision Corporation and other rights owners. Use of this copyright protection technology must be authorized by Macrovision Corporation, and is intended for home and other limited viewing uses only unless otherwise authorized by Macrovision Corporation. Reverse engineering or disassembly is prohibited.

Active Servo Processing Subwoofer System with built-in power amplifier.
This subwoofer system (NX-SW1000) employs Advanced Yamaha Active Servo Technology which Yamaha has developed for reproducing higher quality super-bass sound. This super-bass sound adds a more realistic, theater-in-the-home effect to your stereo system.
■Main unit ■Supplied accessories
DVD receiver (DVR-1000)

Subwoofer (NX-SW1000)

Note
Be sure to connect the power cable of the subwoofer (NX-SW1000) to the AC outlet before you turn on the DVD receiver (DVR-1000). Otherwise, the subwoofer (NX-SW1000) will not be powered correctly.
Front speakers (x2) (NX-P1000)

Indoor FM antenna
AM loop antenna (Asia, Australia, Korea, and Taiwan models only)
Remote control
Batteries (x 2)
Power cable (For DVR-1000)
Power cable (For NX-SW1000: except Europe and Russia models)
Video pin cable (1.4 m)
System control cable (4 m) (For NX-SW1000)
Speaker cables (4 m x 2) (For NX-P1000)


Functional overview
■Top and front panels (DVR-1000)

①System display panel
Shows information about the operational status of the unit.
②PCM/ Digital/DTS indicator
Indicates the format of the audio being played back.
③∨ VOLUME ∧
Adjusts the volume level.
④INPUT
Selects input source or sets the priority level for the audio input signals.
⑤
DVD/CD mode: selects the previous/next track or chapter. Press and hold to fast forward or fast reverse. TUNER mode: tunes the radio preset up/down.
USB mode: selects the previous/next track. Press and hold to fast forward or fast reverse.
⑥□
Exits an operation.
DVD/CD mode: stops disc playback.
TUNER mode: erases a preset radio station in Preset mode if held more than two seconds, or stops preset radio station installation in Auto Preset mode.
USB mode: stops playback.
⑦00
DVD/CD mode: pauses disc playback.
USB mode: pauses playback.
⑧ △
DVD/CD mode: starts disc playback.
USB mode: starts playback.
⑨
Ejects a disc in the DVD receiver.
Note
Do not push the ejected disc when reloading it. To reload the ejected disc, press or , or remove the disc from the disc loading slot fully, then insert it to the disc loading slot once again.
⑩USB terminal
Connect to the USB connector of your USB device (see page 19).
⑪STANDBY/ON
Turns on the DVD receiver, or sets it to the standby mode (see "Turning the auto standby function on/off" on page 35).
⑫Disc loading slot
Insert a disc to be played.
⑬Remote control sensor
Point the remote control towards this sensor.
⑭PHONES jack
Connects headphones.
⑮PORTABLE jack
Connects a portable audio player.
When this input source is selected, "FRONT IN" appears on the system display panel.
■Rear panel (DVR-1000)
(Europe model)

①AC inlet
Connect the supplied power cable.
②COMPONENT VIDEO OUT jacks
Connect to the Y PB/CB PR/CR jacks on your TV (see page 14).
③VIDEO output jack
Connect to the video (composite) jack on your TV (see page 14).
④FM ANT terminal
Connect the FM antenna.
⑤GND and AM ANT terminals
Connect the AM loop antenna.
⑥ SYSTEM CONNECTOR terminal
Connect the subwoofer.
⑦OPTICAL DIGITAL IN jack
Connect to the DIGITAL OUT jack on your digital audio component.
⑧AUX IN jacks
Connect to the AUDIO OUT jacks on your VCR or cassette deck.
⑨LINE OUT jacks
Connect to the AUDIO IN jacks on your VCR.
⑩S VIDEO output jack
Connect to the S-video jack on your TV or VCR.
⑪AV MONITOR OUT terminal
(Europe and Russia models only)
Connect to your TV (see page 14).
⑫HDMI terminal
Connect to the HDMI input terminal of your HDMI component (see page 15).
■Rear panel (NX-SW1000)

① SYSTEM CONNECTOR terminal
Connect to the DVD receiver.
②SPEAKER terminals
Connect to the speakers.
③AC power cord
Connect to a standard AC outlet.

(except Europe and Russia models)(Europe and Russia models)
① SYSTEM CONNECTOR terminal
Connect to the DVD receiver.
②SPEAKER terminals
Connect to the speakers.
③VOLTAGE SELECTOR
Select the voltage according to your region.
④AC inlet
Connect the supplied power cable.
■Remote control (For DVR-1000)

Note
For details on how to use the remote control, see page 20.
①STANDBY/ON( )
Turns on the DVD receiver, or sets it to the standby mode.
②Numeric keypad (0 - 9)
Enters a track/title number of the disc. Enters a number of a preset radio station.
③TREBLE/BASS
Selects the TREBLE (high tone) or BASS (low tone) sound mode. Use the VOLUME control to change the tone level.
④REPEAT
Selects various repeat modes.
FREQ/TEXT
TUNER mode: switches the information display when receiving Radio Data System.
⑤REPEAT A-B
Repeats a specific section on a disc.
⑥
DVD/CD mode: starts disc playback. USB mode: starts playback.
⑦ ON SCREEN
Displays the current status or disc information.
⑧ENTER
Confirms a selection.
⑨SET UP
Enters or exits the system setup menu.
⑩AREA
Select either the WIDE or NARROW listening area (see page 47).
⑪MODE
Select the Virtual Surround mode (see page 47).
⑫ENHANCER
Switches the Enhancer mode on or off (see page 47).
⑬SURROUND
Turns the surround effect on or off (see page 47).
⑭Input selection buttons
Selects the appropriate active source mode. DVD/CD: switches to DVD/CD mode. AUX: switches to ANALOG/FRONT IN/DIGITAL input. TUNER: switches to tuner (FM/AM) input. USB: switches to USB mode. Accesses the contents of the connected USB device or exits from the USB mode (see page 31).
⑮SUBTITLE
Selects a subtitle language.
⑯ANGLE
Selects a DVD disc camera angle (if available).
⑰EJECT()
Ejects a disc in the DVD receiver.
⑱SLEEP
Sets the sleep timer (see page 49).
⑲DIMMER
Selects different levels of brightness for the display panel (see page 49).
⑳NIGHT
Turns the Night listening mode on or off (see page 48).
②1□
Exits an operation.
DVD/CD mode: stops disc playback.
DVD/CD mode: holding down the button will eject the disc.
TUNER mode: erases a preset radio station if held for more than two seconds.
USB mode: stops playback.
⑳PROG
DVD/CD mode: starts programming.
TUNER mode: starts automatic/manual preset programming if held for more than two seconds.
②3SHUFFLE
Plays tracks in random order.
PTY SEEK START
TUNER mode: starts searching for a Radio Data System station.
⑳00
DVD/CD mode: pauses disc playback. USB mode: pauses playback.
PTY SEEK MODE
TUNER mode: sets the DVD receiver to the PTY SEEK mode.
②5
DVD/CD mode: selects the previous/next track or chapter. Press and hold to fast forward or fast reverse. USB mode: selects the previous/next track. Press and hold to fast forward or fast reverse.
√ PRESET ^
TUNER mode: press to select a preset radio station.
⑳MENU
Enters or exits the disc contents menu.
For VCD version 2.0 only:
In stop mode, turns on/off playback control (PBC) mode.
During playback, returns to the main menu.
②7 Cursors ( ◀ / ▷ / △ / ▽ )
Selects movement direction in the menu.
TUNER mode: press left or right to tune the radio
frequency.
TUNER mode: press up or down to select auto tuning.
⑳TOP MENU/RETURN
Returns to the previous menu.
Displays the top-level disc menu (if available).
⑲DIRECT
Switches the video output on or off during audio disc playback.
This function (Audio Direct) is not available for HDMI output.
In the DIRECT mode, the display panel dims to “DIM 2 (40% brightness)”.
③0VOLUME (+/-)
Adjusts the volume level.
③1MUTE
Mutes or restores the volume.
③2AUDIO
Selects an audio language (DVD) or an audio channel (VCD).
③3ZOOM
Enlarges or reduces the TV screen picture.
Connections
■Roles and layout of the speakers
To enjoy quality sounds you need to place the speakers in their appropriate positions and install them correctly.
The following show the recommended layout of the speakers.

For the best possible surround sound, all of the speakers (except the subwoofer) should be placed at the same distance from the listening position.
①Front Speakers (L, R)
Place the front left/right speakers on both sides of your TV at equal distances.
Main roles: Produces front channel (stereo) sounds and effect sounds.
②Subwoofer
Place the subwoofer near a front speaker and turn it slightly toward the center of the room to reduce wall reflections.
Main roles: Produces bass sounds and low frequency (LFE) sounds contained in Dolby Digital or DTS.
Note
To avoid magnetic interference, do not position the front speakers too close to your TV.
Allow adequate ventilation around the DVD receiver and subwoofer.
Bass sounds produced by the subwoofer may be heard differently depending on the listening position and subwoofer location.
To enjoy desired sounds, try to change the location of the subwoofer according to the listening position.
System connections
■Connecting the speakers
Notes
- Do not connect the power cord of the subwoofer and DVD receiver into an AC outlet until all cable connections are completed.
- Be sure to connect the end of the supplied speaker cable (where the red and black cable lengths differ) to the front speaker, and leave some slack.
- Be sure to connect the red cable to the red terminal (subwoofer and front speakers) and the black cable to the black terminal.
![graph TD A["Subwoofer"] -->|DVD receiver| B["Front speaker (R)"] A -->|Subwoofer| C["Front speaker (L)"] B --> D["Front speaker (R)"] C --> E["Front speaker (L)"] style A fill:#f9f,stroke:#333 style B fill:#ccf,stroke:#333 style C fill:#cfc,stroke:#333 style D fill:#fcc,stroke:#333 style E fill:#cff…](/content/2026/06/1277458/images/bd6228f6fecf6b26cf9787400724221090fa790651c28c79d78e203189273e1f.jpg)
Connecting the speaker cables
Notes
- Be sure to connect the end of the supplied speaker cable (where the red and black cable lengths differ) to the front speaker, and leave some slack.
- Be sure to connect the red cable to the red terminal (subwoofer and front speakers) and the black cable to the black terminal.
①Remove approximately 10 mm (0.4 in) of insulation from the end of each speaker cable and then twist the exposed wires of the cable together to prevent short circuits.

②Loosen the knob.

Red: positive (+)
Black: negative (−)
③Insert one bare wire into the hole in the center of each terminal.

④Tighten the knob to secure the wire.

Connecting the subwoofer
Note
Be sure to connect the red cable to the red terminal (subwoofer and front speakers) and the black cable to the black terminal.
①Remove approximately 10 mm (0.4 in) of insulation from the end of each speaker cable and then twist the exposed wires of the cable together to prevent short circuits.

②Loosen the knob.

Red: positive (+)
Black: negative (−)
③Insert one bare wire into the hole on the side of each terminal.

④Tighten the knob to secure the wire.

Connecting the DVD receiver and the subwoofer
Connect the subwoofer to the DVD receiver using the system control cable. Attach one end to the subwoofer and the other to the SYSTEM CONNECTOR terminal at the rear of the DVD receiver.

Notes
- When connecting the system control cable, be sure to insert the plug until it clicks. When disconnecting the system control cable, slide the collar of the plug back to unlock.
- Ensure that the speaker cables are correctly connected. Improper connections may damage the system due to a short-circuit.
- When connecting the speakers, fix the speaker cables in place so that cables do not loosen. If your foot or hand accidentally gets caught on a loose speaker cable, the speaker may fall.
- To prevent unwanted noise, do not place the subwoofer too close to the DVD receiver, AC power adaptor, TV or other sources of radiation.
- Be sure to connect the power cable of the subwoofer (NX-SW1000) to the AC outlet before you turn on the DVD receiver (DVR-1000). Otherwise, the subwoofer (NX-SW1000) will not be powered correctly.
Other connections
■Connecting a TV
Notes
- You only need to make one video connection from the following options (A, B, C, or D), depending on the capabilities of your TV.
- Do not connect the power cords until all cable connections are completed.

COMPONENT VIDEO OUT jacks
Use the component video cables (red/blue/green, not supplied) to connect the DVD receiver's Y P B P R jacks to the corresponding component video input jacks (or the Y Pb/Cb Pr/Cr/ YUV jacks) on your TV.
Progressive scan video quality is only available when using Y PB PR in conjunction with a progressive scan TV.
To activate the progressive scan function see “Progressive function” on page 40.
VIDEO output jack
Use a composite video cable (yellow -supplied) to connect the DVD receiver's VIDEO output jack to the video input jack (or A/V In/Video In/Composite/Baseband jack) on your TV.
S VIDEO output jack
S (separate)-video connections achieve a clearer picture than composite video connections. Use an S-video cable (not supplied) to connect the DVD receiver's
S VIDEO output jack to the S-video input jack (or Y/C or S-VHS jack) on your TV.
AV MONITOR OUT terminal (Europe and Russia models only)
The SCART cable, or "Euro AV cable", supports AV MONITOR OUT signal transmission, providing you with the best possible picture and sound. If your TV has only one terminal for video input, and you want to connect it directly to the DVD receiver, you can use the AV
MONITOR OUT connector. Connect one end of the SCART cable to the AV MONITOR OUT connector and the other end to the SCART connector on your TV.
Notes
- TV channels, if you use AV MONITOR OUT terminal to connect the TV. To use AV MONITOR OUT terminal, make sure to set the DVD receiver's component setting to "RGB" (see page 22).
- When using AV MONITOR OUT terminal to listen to the TV channels, set the DVD receiver's component setting to "RGB" (see page 22).
- S-video signal is not output at AV MONITOR OUT terminal.
■Connecting an HDMI component
HDMI (High-Definition Multimedia Interface) is the first industry-supported, uncompressed, all-digital A/V (audio/video) interface.
By connecting to an HDMI component (such as a TV), you can enjoy standard, enhanced or high-definition video as well as multi-channel digital audio using a single cable. When used in combination with HDCP (High-bandwidth Digital Content Protection), HDMI provides a secure audio/video interface that meets the security requirements of content providers and system operators.
For further information on HDMI, visit the HDMI website at "http://www.hdmi.org/".
![graph TD A["TV"] --> B["HDVI"] B --> C["AV MONITOR OUT, POS/04V"] C --> D["TUNER"] D --> E["DVD receiver"] style A fill:#f9f,stroke:#333 style B fill:#ccf,stroke:#333 style C fill:#cfc,stroke:#333 style D fill:#fcc,stroke:#333 style E fill:#cff,stroke:#333](/content/2026/06/1277458/images/d254075561da3f31972fba7d554f253bd48746bccaa9ad3e1955c2abb141d42d.jpg)
Viewing and Listening to playback from an HDMI component
①Connect HDMI terminal of the DVD receiver to the HDMI input terminal of your HDMI compatible component using a commercially available HDMI cable.
②Select the appropriate audio output from [HDMI AUDIO OUT] in [AUDIO SETUP PAGE] (see page 36).
③Select the appropriate video output from [HDMI VIDEO] in [VIDEO SETUP PAGE] (see page 39).
Notes
- The DVD receiver is not compatible with HDCP-incompatible HDMI or DVI components.
- You need a commercially available HDMI/DVI conversion cable when you connect the DVD receiver to other DVI components.
- When connecting an HDMI component, refer to the instruction manual for the component.
- Do not disconnect or connect the HDMI cable from the DVD receiver or turn off the power of the HDMI/DVI component connected to the HDMI terminal of the DVD receiver while data is being transferred. Doing so may disrupt playback or cause noise.
HDMI audio output
| Audio format Analog output | HDMI AUDIO OUT | |||
| AUTO PCM OFF | ||||
| DVD-Video | Dolby Digital Multi-channel | Multi*1 | Dolby Digital*2,3 | PCM 2-channel Off |
| Stereo | ||||
| Dolby Digital 2-channel | Multi*1/Stereo Dolby Digital | *2 | ||
| DTS Multi-channel | Multi*1 | DTS*2,3 | ||
| Stereo | ||||
| DTS 2-channel Multi | *1/Stereo DTS | *2 | ||
| MPEG Multi-channel | Multi*1 | MPEG*2,3 | ||
| Stereo | ||||
| MPEG 2-channel Multi | *1/Stereo MPEG | *2 | ||
| PCM 2-channel*4 | Multi*1/Stereo PCM 2-channel | |||
| CD/MP3/WMA/DivX® | 2-channel Multi | *1/Stereo PCM 2-channel | ||
| DTS-CD | Multi-channel | Multi*1 | DTS*2,3 | |
| Stereo | ||||
| 2-channel Multi | *1/Stereo DTS | *2 | ||
| VCD 2-channel Multi | *1/Stereo PCM 2-channel | |||
| SVCD | Multi-channel | Multi*1 | MPEG*2,3 | |
| Stereo | ||||
| 2-channel Multi | *1/Stereo MPEG | *2 | ||
*1 The audio output is automatically changed from multi-channel audio signals to downmixed stereo signals.
*2 If the connected HDMI component does not support bitstream signals (Dolby Digital, DTS, and MPEG), the audio output is automatically changed from bitstream signals to PCM signals.
*3 If the connected HDMI component does not support multi-channel audio signals, the audio output is automatically changed from PCM multi-channel signals to PCM stereo signals and 48 kHz/16 bits signals or less.
*4 If the connected HDMI component does not support more than 48 kHz, the audio output is automatically changed to 48 kHz/16 bits signals or less.
Note
You need to set [HDMI AUDIO OUT] (see page 36).
■Connecting the FM/AM antennas

① Connect an AM loop antenna to the AM ANT terminal. Place the AM loop antenna on a shelf or attach it to a stand or wall.
② Connect an indoor FM antenna to the FM ANT terminal. Extend the FM antenna and fix its ends to the wall.
For better FM stereo reception, connect an external FM antenna.
Notes
- Adjust the position of the antennas for optimal reception.
– Position the antennas as far as possible from your TV, VCR or other sources of radiation to prevent unwanted interference.
■Connecting external AV components
If you connect external AV equipment such as a VCR, cassette deck or digital audio component to the following audio terminals on the DVD receiver, you can enjoy those audio sources with the DVD receiver. Also, you can record AV sources played on the DVD receiver using the recording equipment. This section provides some examples of other AV equipment connections. For information on your AV equipment, refer to the manual provided.
![graph TD A["TV"] --> B["1"] B --> C["S-VIDEO IN"] B --> D["VIDEO IN"] C --> E["OUT"] D --> F["IN"] E --> G["VIDEO"] F --> H["ANT IN"] G --> I["S-VIDEO IN"] H --> J["VIDEO OUT (DVD ONLY)"] I --> K["S VIDEO"] L["DVDA Receiver"] --> M["2"] N["DVDA Receiver"] --> O["2"] P["DVDA Receiver"] --> Q["1"]](/content/2026/06/1277458/images/e11a7e336e07563dbc4bf5e7958247ad664a50c09e3ac27e502739d811f27352.jpg)
Viewing and listening to playback
①Connect the DVD receiver's VIDEO output jack to the VIDEO IN jack on your VCR. Or, connect the VCR to the TV as shown.
② Connect the DVD receiver's AUX IN jacks to the AUDIO OUT jacks on your VCR. Before starting operation, press AUX to select "ANALOG" in order to activate the input source.
Using the VCR for recording DVD playback
Some DVDs are copy-protected. You cannot record or dub protected discs using a VCR.
Connect the DVD receiver's VIDEO output jack to the VIDEO IN jack on your VCR. Or, connect the DVD receiver's S VIDEO output jack to the S-VIDEO IN jack on your VCR.
② Connect the DVD receiver's LINE OUT jacks to the AUDIO IN jacks on your VCR. This will allow you to make analog stereo (two channels, right and left) recordings.
■Connecting a digital audio component

Listening to playback
Connect the DVD receiver's OPTICAL DIGITAL IN jack to the DIGITAL OUT jack on a digital audio component. Before starting operation, press AUX repeatedly to select "DIGITAL" in order to activate the input source.
Notes
- You cannot hear or record the MP3-CD playback if you use a digital connection.
- Always refer to the owner's manual of the connected component for complete connection and usage details.
■Connecting a USB device
USB terminal
The DVD receiver has a USB terminal and can access MP3, WMA and AAC files saved on your USB device. Connect the USB terminal on the front panel of the DVD receiver to a USB connector of your USB device.

Notes
- The DVD receiver may not recognize some USB devices.
- For details about the USB features, see "Using a USB device" on page 31.
Getting started
■Inserting batteries into the remote control

①Press on the battery cover and open the cover.
②Insert the two supplied batteries (AA, R06, UM-3) into the battery compartment.
Insert the batteries according to the polarity markings (+ and -).
③Close the battery cover.
To replace the batteries
If the batteries grow old, the effective operation distance of the remote control decreases considerably. If this happens, replace the batteries with two new ones as soon as possible.
Notes
- Do not use an old battery together with new one.
- Do not use different types of batteries (for example, alkaline and manganese) together. Each type of battery has its own characteristics even if they are similar in shape.
- If the batteries run out, immediately remove them from the remote control to prevent an explosion or acid leak.
- Dispose of the batteries according to the regional regulations.
- If a battery starts leaking, dispose of it immediately.
Be careful not to let leaking battery acid come into contact with your skin or clothing. Before inserting new batteries, wipe the compartment clean.
- Replace the batteries within two minutes to preserve the memory in the remote control.
■Using the remote control
Use the remote control within 6 m of the DVD receiver and point it toward the remote control sensor.

①Use the input selection buttons on the remote control to select the mode you wish to control (for example DVD/CD).
→ The selected source mode appears in the display panel.
② Select the desired function (for example, ▷ or ◀◀/ ▷◀).
Notes
- Be careful not to spill liquid on the remote control.
- Be careful not to drop the remote control.
-
Do not leave the remote control in the following places:
-
hot or humid places, such as near a heater or in a bathroom
- extremely cold places
- dusty places
■Setting a TV
Notes
- Make sure you have completed all the necessary connections (see “Connecting a TV” on page 14).
- To return to the previous menu, press.
- To exit from the menu, press SET UP.
- If the settings you have selected are not appropriate, you can reset all settings to the initial factory settings (see “Restoring to the factory defaults” on page 43).
①Press DVD/CD.
→ “DVD/CD” appears in the display panel.
②Turn on the TV and set to the correct video-in channel.
→ You should see the background screen on the TV.
- Usually this channel is between the lowest and highest channels and may be called FRONT, A/V IN or VIDEO. See your TV manual for more details.
- Or, you may go to channel 1 on your TV, then press the Channel down button repeatedly until you see the Video In channel.
- Or, the TV remote control may have a button or switch that chooses different video modes.
Selecting the TV type
In order for a DVD to play on this DVD receiver, the color system of the DVD, the TV and the DVD receiver should match. Before changing the TV system, determine the color system of your TV.
① In DVD/CD mode, press SET UP.
② Press ◀ / ▷ repeatedly to select [VIDEO SETUP PAGE].
③ Press △ / ▽ to highlight [TV TYPE], then press ▷.

④ Press △ / ▽ to highlight one of the options below: PAL – Select this if the connected TV has the PAL color system. It will change the video signal of an NTSC disc and output it to PAL format.
NTSC – Select this if the connected TV has the NTSC color system. It will change the video signal of a PAL disc and output it to NTSC format.
MULTI – Select this if the connected TV is compatible with both NTSC and PAL (multisystem). The output format will be in accordance with the video signal of the disc.
⑤ Select a setting and press ENTER.
– Follow the instructions shown on the TV to confirm the selection (if any).
- If a blank/distorted TV screen appears, wait for 15 seconds for auto recovery to activate.
Selecting color system by using the remote control

①If a disc is inserted, press to eject the disc.
② Press ▷, then press AUDIO.
→ If the default setting of the color system is NTSC, it will be changed to PAL
→ If the default setting of the color system is PAL, it will be changed to NTSC.
Setting the TV display
Set the aspect ratio of the DVD receiver according to the TV you have connected. The format you select must be available on the disc. If it is not, the TV display setting will not affect the picture during playback.
① In DVD/CD mode, press SET UP.
② Press ◀ / ▷ repeatedly to select [VIDEO SETUP PAGE].
③ Press △ / ▽ to highlight [TV DISPLAY], then press ▷.
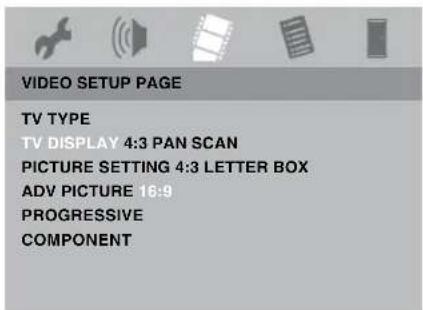
④ Press △ / ▽ to highlight one of the options below:
4:3 PAN SCAN – Select this if you have a conventional TV and want both sides of the picture to be trimmed or formatted to fit your TV screen.
4:3 LETTER BOX – Select this if you have a conventional TV. In this case, a wide picture with black bands on the upper and lower portions of the TV screen will be displayed.
16:9 – Select this if you have a wide-screen TV.
⑤ Select a setting and press ENTER.
Selecting the color system (Europe and Russia models only)
This setting allows you to toggle the video signal output between YUV (Y P B P R or S-Video connections) and RGB (AV MONITOR OUT connections).
Note
AV MONITOR OUT (SCART) connections are only available for Europe and Russia models.
① In DVD/CD mode, press SET UP.
②Press ↗ repeatedly to select [VIDEO SETUP PAGE].
③Press /△ to highlight [COMPONENT], then press ▷.

④Press /△ to highlight one of the options below: YUV – Select this for Y PB PR or S-Video connections.
RGB – Select this for AV MONITOR OUT connections.
⑤ Select a setting and press ENTER.
⑥To return to the previous menu, press .
To exit the menu, press SET UP.
■Setting language preferences
You can select your preferred language settings so that this receiver will automatically switch to your preferred language whenever you load a disc. If the language selected is not available on the disc, the disc's default setting language will be used instead. The OSD (on-screen display) language for the system menu will remain as you set it, regardless of various disc languages.
Notes
- To return to the previous menu, press.
- To exit from the menu, press SET UP.
- If the settings you have selected are not appropriate, you can reset all settings to the initial factory settings (see “Restoring to the factory defaults” on page 43).
On-screen display (OSD) language
① In DVD/CD mode, press SET UP.
②Press / to select [GENERAL SETUP PAGE].
③Press /△to highlight [OSD LANGUAGE],
then press ▷

④Press /△ to select a language and press ENTER to confirm.
Audio, Subtitle and Disc menu languages
① Press □ twice to stop playback (if any), then press SET UP.
②Press ↗ repeatedly to select [PREFERENCE PAGE].
③Press /to highlight one of the options below at a time, then press ▷
- [AUDIO] (disc's soundtrack)
- [SUBTITLE] (disc's subtitles)
- [DISC MENU] (disc's menu)

④Press /to select a language and press ENTER to confirm.
If the language you want is not in the list, then select [OTHERS].
Use the numeric keypad (0-9) on the remote control to enter the 4-digit language code (see “LIST OF LANGUAGE CODES” at the end of this manual”) and press ENTER to confirm.
⑤ Repeat steps ③ and ④ for other settings.
■Setting speaker channels
You can adjust the delay times and volume level for individual speakers. This adjustment lets you optimize the sound of your system to best suit your surroundings and setup.
Notes
- To return to the previous menu, press .
- To exit from the menu, press SET UP.
- If the settings you have selected are not appropriate, you can reset all settings to the initial factory settings (see “Restoring to the factory defaults” on page 43).
①Press / repeatedly to select [AUDIO SETUP PAGE].
②Press /to highlight [SPEAKER], then press ▷.

→ The [SPEAKER] menu appears.
③Press to adjust the setting that best suit your surround sound needs.
You can adjust the volume level for the individual speakers from -6dB to +6dB.

④Press ENTER to confirm.
Note
A test tone will be automatically generated to help you judge the sound level of each speaker.
Disc operation
IMPORTANT!
- If the inhibit icon (or) appears on the TV screen when a button is pressed, the function for that button is not available on the current disc or at the current time.
– DVD discs and players are designed with regional restrictions. Before playing a disc, make sure the disc is for the same zone as your receiver. - Do not insert any objects other than discs into the disc loading slot. Doing so may cause the disc player to malfunction.
■Playing discs
① Press DVD/CD until "DVD/CD" appears in the display panel.
②Turn on the TV power and set to the correct Video In channel (see "Setting a TV" on page 21).
→ You should see the background screen on the TV.
③Insert the disc into the disc loading slot.

④Playback will start automatically.
→ If a disc menu shows on the TV, see “Using the disc menu” on page 27.
→ If the disc is locked by parental control, you must enter your six-digit password (see “Restricting playback with parental control” on page 41).
■Basic playback controls

To pause playback
During playback, press ☐☐.
- To resume normal playback, press ▷.
To select another track/chapter
Press |◀◀ / ▶▶| or use the numeric keypad (0-9) to enter a track/chapter number.
- During repeat playback of a track/chapter, pressing kHz / kHz replays the same track/chapter.
To search backward/forward
Press and hold ◀◀◀ / ▷▶◀ (or ◀◀ / ▷).
- To resume normal playback, press ▷.
- While searching, press |/| (or / ) again to increase the search speed.
To stop playback
Press □.
■Selecting various repeat shuffle functions
Repeat playback
Repeat chapter/title/disc (DVD-Video)
Each time you press REPEAT, the display changes as follows:
![graph TD A["CHAPTER"] --> B["TITLE"] B --> C["DISC"] C --> D["REPEAT OFF"]](/content/2026/06/1277458/images/c28ebae721669f6383f8d1b8637559bd8a1af135296d79eb2b9a00187ea8e34d.jpg)
CHAPTER*: repeats the current chapter.
TITLE*: repeats the current title.
DISC*: repeats the entire disc.
REPEAT OFF: exits repeat mode.
* This feature may not be available with some discs.
Repeat track/disc (except DVD-Video)
Each time you press REPEAT, the display changes as follows:

TRACK: repeats the current track.
DISC: repeats the entire disc.
REPEAT OFF: exits repeat mode.
Note
For VCD, repeat playback is not possible if the PBC mode is selected.
Repeating a section within a chapter/track
① While playing a disc, press A-B at your chosen starting point.
② Press A-B again at your chosen end point.
→ The section will now repeat continuously.
③ To exit the sequence, press A-B.
Shuffle (except VR format disc)
With the Shuffle function, you can play tracks in random order.
- During playback, press SHUFFLE repeatedly to select between SHUFFLE, SHUFFLE REPEAT and SHUFFLE OFF.
→ The selected mode appears in the display for several seconds.
– In SHUFFLE mode, all tracks on the disc currently playing are played in random order.
– In SHUFFLE REPEAT mode, all tracks are played in random order and continuously.
■Other operations for video playback (DVD/VCD/SVCD)

Using the disc menu
Depending on the disc, a menu may appear on the TV screen once you load the disc.
To select a playback feature or item
Use ◀ / ▷ / △ / ▽ or the numeric keypad (0-9) on the remote control, then press ENTER to start playback.
To access or remove the menu
Press MENU on the remote control.
Displaying disc information and the current status
You can display disc information and the disc's current status (for example, title or chapter number, elapsed playing time, audio/subtitle language). A number of operations can be performed without interrupting disc playback.
① During playback, press ON SCREEN.
→ A list of available disc information appears on the TV screen.
DVD

VCD/SVCD

② Press △ / ▽ to view the information and press ENTER to access.
③ Use the numeric keypad (0-9) to enter the number/time or press △ / ▽ to make the selection, then press ENTER to confirm.
→ Playback will change to the chosen time or to the selected title/chapter/track.
Zooming in
This function allows you to enlarge the picture on the TV screen and pan through the enlarged picture.
① During playback, press ZOOM repeatedly to select a different zoom factor.
Use ◀ // to move through the zoomed image.
→ Playback continues.
② Press ZOOM repeatedly to return to the original size.
Resuming playback from the last stopped point
You can resume playback of the last 10 discs, even if the disc was ejected or this receiver's power switched off.
①Load one of the last played 10 discs.
→ "LOAD" appears.
② Press ▷ and the disc will be played back from the last stop point.
To cancel the resume mode
In stop mode, press □ again.
Advancing by frame
① During playback, press □□ on the remote control.
→ Play will pause and sound will be mute.
② Press □ again to select the next picture frame.
③To resume normal playback, press ▷.
Changing sound track language
This operation works only on DVDs (or a connected digital audio component) with multiple language soundtracks, you can change the language while playing a DVD (or a connected digital audio component).
Press AUDIO repeatedly to select the available audio languages.
For VCD - changing the audio channel
Press AUDIO repeatedly to select the available audio channels provided by the disc (STEREO, MONO LEFT, MONO RIGHT or MIX-MONO).
Changing subtitle language (DVD only)
This operation works only on DVDs with multiple subtitle languages, you can change the language you want while playing a DVD.
Press SUBTITLE repeatedly to select from the various subtitle languages.
Viewing from another angle (DVD only)
If the disc contains sequences recorded from different camera angles, this function allows you to view the picture from a number of different angles.
Press ANGLE repeatedly to select the desired angle.
→ Playback changes to the selected angle.
Selecting a title (DVD only)
Some DVDs may contain several titles. If the disc has been recorded with a title menu recorded on it, you can start playback from the selected movie title.
① Press TOP MENU/RETURN.
→ The disc title menu appears on the TV screen.
② Use ◀/▷/ △/ ▽ or the numeric keypad (0-9) to select a play option.
③Press ENTER to confirm.
Playback control (PBC) (VCD only)
PBC playback allows you to play Video CDs interactively, following the menu on the display.
This function can also be accessed via the
'PREFERENCE PAGE' menu (see "PBC" on page 42).
For VCDs with Playback Control (PBC) feature (version 2.0 only)
With playback stopped, press MENU to toggle between 'PBC ON' and 'PBC OFF'.
→ If you select 'PBC ON', the disc menu (if available) will appear on the TV. Use ◀◀◀ / ▶▶◀ or the numeric keypad (0-9) to select a play option and press ENTER to confirm.
→ If you select 'PBC OFF', the VCD will skip the index menu and playback directly from the beginning.
■Playing MP3/WMA/JPEG/DivX ® discs
This receiver can play DivX ® , MP3, WMA and JPEG files on a personally recorded CD-R/RW disc or commercial CD.
Note
You have to turn on your TV and set to the correct Video In channel (see "Setting a TV" on page 21).
①Load the disc.
→ The disc reading time may exceed 30 seconds due to the complexity of the directory/file configuration.
→ The disc menu appears on the TV screen.

② Press △ / ▽ to select a desired folder and press ENTER to open the folder.
③ Press △ / ▽ to select a track/file.
④Press ENTER to confirm.
→ Playback will start from the selected file to the end of the folder.
While the disc menu is displayed, you can:
- Press |/| to select another track/file in the current folder.
- To select another folder from the current disc, press to return to the root menu, then press △ ▽ to make your selection and press ENTER to confirm.
- Press ☐ to pause or ▷ to resume playback.
Notes
- If you press / during playback of JPEG images, the picture rotates.
- For JPEG, this unit is compatible with size of 3072 x 2048 pixels or less. However, some files may not be displayed correctly depending on the aspect ratio of the image.
MP3 disc features
The MP3-CD formats (ISO9660 format) support the following:
- MP3 files must have the extension ".MP3" or ".mp3"
- Max. 30 characters
- Max. nested directory is 8 levels.
- Max. album number is 298.
- Max. track number is 648.
– Supported sampling rates of 32, 44.1, 48/16, 22.05, and 24 kHz
The following features are not supported for MP3 discs:
- The discs that have any types of file other than MP3 and JPEG.
– Chinese filenames and text. - Non-finalized closed discs.
- Discs recorded in UDF format.
Additional note for MP3 disc playback:
- The disc read time may exceed 10 seconds due to the large number of songs compiled onto one disc.
– Multi-session discs are supported.
Downloading MP3 file from the internet or copying songs from your own legal discs is a delicate process.
Playing MP3 music and a JPEG picture simultaneously
①Load an MP3 disc containing both music and picture data. → The disc menu appears on the TV screen.
② Select an MP3 track and press ▷ to start playback.
③During MP3 music playback, select a picture folder from the TV screen and press ▷. → The picture files will be played back until end of the folder.
④ To quit simultaneous playback, press MENU followed by □.
Notes
- It may not be possible to play certain MP3/JPEG/DivX® discs due to the configuration and characteristics of the disc or condition of the recording.
- It is normal to experience an occasional “skip” while listening to your MP3 disc.
- It is normal to experience an occasional pixelation during DivX® playback due to poor clarity of digital contents during internet downloading.
- For multi-session discs with different formats, only the first session will be available.
■Special features for picture disc playback
①Load a picture disc (Kodak Picture CD/JPEG).
→ For Kodak discs, the slide show begins.
→ For JPEG discs, the picture menu appears on the TV screen.
② Press ▷ to start the slideshow.
Note
You have to turn on your TV and set to the correct Video In channel (see "Setting a TV" on page 21).
Preview function
This function shows the content of the current folder or the entire disc.
①During playback, press □. → 12 thumbnail pictures will appear on the TV screen.

② Press |◀◀ / ▶▶| to display the other pictures on the previous/next page.
③ Use ◀/▷/△/▽ to highlight one of the picture and press ENTER to start playback.
④ Press MENU to return to the picture CD menu.
Zooming pictures
① During playback, press ZOOM repeatedly to select a different zoom factor.
② Use ◀ / ▷ / △ / ▽ to move through the zoomed image.
Multi-angle playback
During playback, use ◀ // to rotate/flip the picture on the TV screen.
△ : flips the picture vertically.
▽ : flips the picture horizontally.
: rotates the picture anti-clockwise.
▷ : rotates the picture clockwise.
Scan effect
Press ANGLE repeatedly to choose a different scan effect. → Various scan effects appear in the top left corner of the TV screen.
■Using a USB device
You can play back MP3, WMA and AAC files saved on your supported USB device.
Supported USB devices
The DVD receiver supports USB mass storage class devices (e.g., flash memories, card readers, portable audio players) using FAT12, FAT16 or FAT32 format.
Notes
- Some devices may not work properly even if they meet the requirements.
- If a message saying that the device is not supported appears on the TV screen when you connect the USB device, follow the procedure below.
- Set the DVD receiver to the standby mode, and then turn it on again.
- Disconnect the device when the DVD receiver is in the standby mode, then connect it again and turn on the DVD receiver.
- Connect the AC adapter if the adapter is supplied with the device.
If a message saying that the device is not supported still appears even after you perform this procedure, the device is not playable with the DVD receiver. - If a message saying that the device is not supported (because USB current protection is active) appears on the TV screen, the device is not playable with the DVD receiver because the power consumption of the device is too high.
– The DVD receiver cannot read more than two card reader slots at once, though it can recognize up to six slots. The first slot has priority. - For an external hard disk drive, the DVD receiver is compatible with size of 80 GB or less.
- Do not connect devices other than USB mass storage class devices: USB chargers, USB hubs, PCs, etc.
Playing data files
Yamaha and suppliers accepts no liability for the loss of data saved on the USB devices connected to the DVD receiver. As a precaution, it is recommended that the files are tested after they have been saved on.
①Connect your USB device to the USB terminal of the DVD receiver (see “USB terminal” on page 19).
②Press USB.
The reading time may exceed 30 seconds due to the number of files/folders.
→ The file menu appears on the TV screen.
③Follow the procedure in “Playing MP3/WMA/JPEG/DivX® discs” on page 29.
To exit from the USB mode
Press the input selection button (DVD/CD, AUX or TUNER).
Notes
– In USB mode, the repeat function is not available.
- You cannot access the USB mode while "LOADING" is displayed on the TV screen.
- Some files may not work properly depending on the USB device specification.
– Copyright-protected files (except for WMA files) cannot be played.
- The DVD receiver can display up to 648 files. However, less than 648 files may be displayed if some files are not playable with the DVD receiver.
- If the USB device is partitioned, only the first partition is displayed.
- The DVD receiver can play back files of 2 GB in size or less.
DVD setup menu options
■Menu overview
The bold items/parameters listed below are the default settings.
| Setup page | Menu item | Setting Item/Submenu | Setting item/Parameter | Page |
| GENERAL SETUP PAGE | DISC LOCK LOCK, | UNLOCK 34 | ||
| PROGRAM INPUT | MENU 34 | |||
| OSD LANGUAGE ENGLISH, DANSK, DEUTSCH, ESPAÑOL, FRANÇAIS, ITALIANO, NEDERLANDS, NORSK, POLSKI, PORTUGUÈS, РУССКИЙ, SVENSKA, TÜRKÇE | 35 | |||
| SCREEN SAVER ON, OFF 35 | ||||
| AUTO STANDBY ON, OFF 35 | ||||
| DIVX(R) VOD CODE | (DivX® registration code is displayed) 35 | |||
| AUDIO SETUP PAGE | HDMI AUDIO OUT | AUTO, PCM, OFF | 36 | |
| SPEAKER | SPEAKER VOLUME SETUP (FRONT LEFT) | -6dB to +6dB (0dB) | 36 | |
| (FRONT RIGHT) | -6dB to +6dB (0dB) | |||
| (SUBWOOFER) | -6dB to +6dB (0dB) | |||
| CD UPSAMPLING | OFF, 88.2kHz (X2) | 36 | ||
| LIP SYNC | DELAY TIME | 0 MS to 200 MS | 36 | |
| VIDEO SETUP PAGE | TV TYPE | PAL, NTSC, MULTI | 37 | |
| TV DISPLAY | 4:3 PAN SCAN, 4:3 LETTER BOX, 16:9 | 37 | ||
| PICTURE SETTING | STANDARD, BRIGHT, SOFT | 37 | ||
| PERSONAL (BRIGHTNESS) | -20 to +20 (0) | |||
| (SHARPNESS) | -7 to +7 (0) | |||
| (CONTRAST) | -16 to +16 (0) | |||
| (TINT) | -9 to +9 (0) | |||
| (COLOR) | -9 to +9 (0) | |||
| ADV PICTURE | DCDI | OFF, ON | 38 | |
| GAMMA | -7 to +7 (0) | |||
| CHROMA DELAY | -3 to +3 (0) | |||
| WIDE SCREEN FORMAT | NL STRETCH, 4:3 PILLAR BOX, OFF | |||
| HDMI VIDEO | 480P, 576P, 720P, 1080I, 1080P, AUTO | |||
| TRUE LIFE | 0 to 5 | |||
| DVI OUTPUT RANGE | ENHANCED, STANDARD | |||
| PROGRESSIVE | OFF, ON | 40 | ||
| COMPONENT | YUV, RGB | 40 | ||
| PREFERENCE PAGE | AUDIO | ENGLISH (for [AUDIO] and [DISC MENU]),OFF (for [SUBTITLE]), etc. | 41 | |
| SUBTITLE | ||||
| DISC MENU | ||||
| PARENTAL | 1 KID SAFE, 2 G, 3 PG, 4 PG 13, 5 PGR, 6 R, 7 NC 17, 8 ADULT | 41 | ||
| PBC | ON, OFF | 42 | ||
| MP3/JPEG NAV | WITH MENU, WITHOUT MENU | 42 | ||
| VR LIST | ORIGINAL LIST, PLAY LIST | 42 | ||
| PASSWORD CHANGE | 43 | |||
| DIVX SUBTITLE | GROUP1, GROUP2, GROUP3, GROUP4, GROUP5 | 43 | ||
| DEFAULT | RESET | 43 |
This setup is carried out via the TV, enabling you to customize the DVD receiver to suit your particular requirements.
Notes
- To return to the previous menu, press.
- To exit from the menu, press SET UP.
- If the settings you have selected are not appropriate, you can reset all settings to the initial factory settings (see “Restoring to the factory defaults” on page 43).
■General setup menu
① In DVD/CD mode, press SET UP.
② Press ◀ / ▷ to select [GENERAL SETUP PAGE].
③Press ENTER to confirm.

Locking/Unlocking discs for viewing
Not all discs are rated or coded by the manufacturer of the disc. You can prevent playback of a specific disc by locking the disc. You can lock up to 40 discs on this unit.
① In [GENERAL SETUP PAGE], press △ / ▽ to highlight [DISC LOCK], then press ▷
LOCK
Select this to block playback of the current disc. Subsequent access to a locked disc requires a six-digit password. The default password is '000 000' (see "Changing the password" on page 43).
UNLOCK
Select this to unlock the disc and allow future playback.
② Press △ / ▽ to select a setting and press ENTER to confirm.
Programming disc tracks (except picture CD/MP3/WMA/DivX® discs)
You can playback the contents of a disc in the order you want by programming the tracks to be played. You can store up to 20 tracks.
① Press PROG on the remote control, or in [GENERAL SETUP PAGE], press △ ▽ to highlight [PROGRAM], then press ▷ to select [INPUT MENU].
②Press ENTER to confirm.

To program your favorite tracks/chapters
③ Use the numeric keypad (0-9) to enter a valid track/chapter number.
④ Use ◀/▷/ △/ ▽ to move the cursor to the next position.
If the track number is more than ten, press ▶▷ to open the next page and proceed with programming, or use ◀/▷/ △/ ▽ to highlight [NEXT] on the program menu, then press ENTER.
⑤ Repeat steps ③ and ④ to input another track/chapter number.
To remove a track
⑥ Use ◀/▷/△/▽ to move the cursor to the track you want to remove.
⑦ Press ENTER to remove this track from the program menu.
⑧ To exit the menu, press PROG. Or use ◀/▷/△/▽ to move the cursor to select [EXIT], then press ENTER to confirm.
OSD language
This menu contains various language options for displaying languages on the screen. For details, see “On-screen display (OSD) language” on page 23.
Screen saver
The screen saver helps prevent your TV display from becoming damaged.
① In [GENERAL SETUP PAGE], press △ / ▽ to highlight [SCREEN SAVER], then press ▶
ON
Select this if you wish to turn off the TV screen when play is stopped or paused for more than 15 minutes.
OFF
Select this to disable the screen saver function.
② Press / to select a setting and press ENTER to confirm.
③To return to the previous menu, press .
To exit the menu, press SET UP.
Turning the auto standby function on/off
This function is used to turn on or off the auto standby function.
①In [GENERAL SETUP PAGE], press /△to ▽ highlight [AUTO STANDBY], then press ▶
ON
Select this to set the DVD receiver to the standby mode automatically when disc playback is stopped for more than 30 minutes or when the disc menu is displayed for more than three hours without performing any operation.
OFF
Select this to disable the auto standby function.
② Press △ / ▽ to select a setting and press ENTER to confirm.
DivX®VOD registration code
Yamaha provides you with the DivX®VOD (Video On Demand) registration code that allows you to rent and purchase videos using the DivX®VOD service. For more information, go to www.divx.com/vod.
① In [GENERAL SETUP PAGE], press △ / ▽ to highlight [DIVX(R) VOD CODE], then press ▷ → The registration code appears.
②Press ENTER to exit.
③Use the registration code to purchase or rent the videos from DivX®VOD service at www.divx.com/vod. Follow the instructions and download the video onto a CD-R/RW for playback on this receiver.
Note
All the videos downloaded from DivX®VOD can only be played back on this receiver.
■Audio setup menu
① In DVD/CD mode, press SET UP.
② Press ◀ / ▷ to select [AUDIO SETUP PAGE].
③Press ENTER to confirm.

Setting the HDMI audio
When you connect the DVD receiver to an HDMI compatible component via the HDMI terminal, set the HDMI audio output to match the connected component. For details about the relationship between the audio format and the setting, see “HDMI audio output” on page 16.
①In [AUDIO SETUP PAGE], press /△to ▽
highlight [HDMI AUDIO OUT], then press ▷
AUTO
Select this to set the DVD receiver to the best setting automatically based on the component you have connected via the HDMI terminal.
PCM
Select this to output the decoded multichannel or 2-channel PCM audio signals via the HDMI terminal.
OFF
Select this to turn off the HDMI audio output.
② Press △ / ▽ to select a setting and press ENTER to confirm.
Note
If the monitor/receiver connected to the DVD receiver using HDMI does not support HDMI audio signal input, set this setting to [OFF].
Speaker setup
This menu contains setup options for audio output so that you can set your speakers to reproduce high quality surround sound.
CD upsampling
This feature allows you to convert your music CD to a higher sampling rate using sophisticated digital signal processing for better sound quality.
Note
When the CD upsampling function is activated (or a disc recorded at the sampling rate of 96 kHz is played back), the music enhancer function is not available.
① In [AUDIO SETUP PAGE], press △ / ▽ to highlight [CD UPSAMPLING], then press ▶
OFF
Select this to disable CD-upsampling.
88.2 kHz (X2)
Select this to convert the sampling rate of CDs to twice that of the original.
② Press △ / ▽ to select a setting and press ENTER to confirm.
Lip synchronization
This feature allows you to delay the sound output from the front speakers in order to synchronize it with the video image. This may be necessary when using certain LCD monitors or projectors.
Choices: 0 to 200 ms
① In [AUDIO SETUP PAGE], press △ / ▽ to highlight [LIP SYNC], then press ▷.
② Press ◀ / ▷ to adjust the delay time (between 0 ms and 200 ms) and press ENTER to confirm.
■Video setup menu
① In DVD/CD mode, press SET UP.
② Press ◀ / ▷ to select [VIDEO SETUP PAGE].
③Press ENTER to confirm.

TV type
This menu contains the options for selecting the color system that matches the connected TV. For details, see “Selecting the TV type” on page 21.
Note
When [PROGRESSIVE] is set to [ON] (see page 40), composite video/S-video output depends on the format of the disc.
| Disc format | TV TYPE | Output format | |
| Component video | Composite video/S-video | ||
| NTSC PAL 576p 480i | |||
| NTSC 480p 480i | |||
| MULTI 480p 480i | |||
| PAL PAL 576p 575i | |||
| NTSC 480p 575i | |||
| MULTI 576p 575i | |||
TV display
This menu contains the options for matching the aspect ratio of the receiver to the connected TV. For details, see “Setting the TV display” on page 22.
Picture settings
Note
This receiver comes with three predefined sets of picture color settings and one personal setting that you can define yourself.
① In [VIDEO SETUP PAGE], press △ / ▽ to highlight [PICTURE SETTING], then press ▷
STANDARD
Select this for the standard picture setting.
BRIGHT
Select this to make the TV picture brighter.
SOFT
Select this to make the TV picture softer.
PERSONAL
Select this to personalize your picture color by adjusting the brightness, sharpness, contrast, tint and color (saturation).
② Press / to select a setting and press ENTER to confirm.
③ If you selected [PERSONAL], proceed to step ④. → The [PERSONAL PICTURE SETUP] menu appears.

④ Press / to highlight one of the following options.
BRIGHTNESS
Increase the value to brighten the picture or vice versa. You can adjust the value from -20 to +20. Zero (0) is the average setting value.
SHARPNESS
Increase the value to sharpen the picture or vice versa. You can adjust the value from -7 to +7. Zero (0) is the average setting value.
CONTRAST
Increase the value to sharpen the picture contrast or vice versa. You can adjust the value from -16 to +16. Zero (0) is the average contrast.
TINT
Increase or decrease the value to change the color phase of the picture. You can adjust the value from -9 to +9. Zero (0) is the average setting value.
COLOR
Increase the value to enhance the color in your picture or vice versa. You can adjust the value from -9 to +9. Zero (0) is the average color setting value.
⑤ Press ◀ / ▷ to adjust the setting that best suits your personal preference.
⑥ Repeat steps ④ and ⑤ to adjust other color features if desired.
⑦Press ENTER to confirm.
Note
All picture settings are not available for HDMI output.
Adjusting the advanced picture settings
You can fine-tune the following video parameters. We recommend setting the aspect ratio on your TV if the function is available.
[DCDI]
DCDi (Directional Correction Deinterlacing) computes and tracks the angle of the screen edge to fill in the missing pixel on the TV screen. DCDi optimizes the image quality significantly, especially during the slow motion playback. This function is available for progressive scan output only.
①Select [ADV PICTURE] in [VIDEO SETUP PAGE].
② Press △ / ▽ to highlight [DCDI], then press ▷.
OFF
Select this to disable the DCDi function.
ON
Select this to enable the DCDi function.
③ Press / to select a setting and press ENTER to confirm.
[GAMMA]
Adjust the intensity of the picture non-linearly. A positive value enables you to bring out low level detail in dark scenes, while a negative value emphasizes contrast. This function is not available for HDMI output. You can adjust the value from -7 to +7.
①Select [ADV PICTURE] in [VIDEO SETUP PAGE].
② Press △ / ▽ to highlight [GAMMA], then press ▷.
③ Press ◀/▷ to select a setting and press ENTER to confirm.
[CHROMA DELAY]
The chroma (color) and luminance (brightness) signals are not synchronized. You can adjust the advance delay of the chroma signal to yield a perfectly clear picture. This function is not available for HDMI output.
You can adjust the value from -3 to +3.
①Select [ADV PICTURE] in [VIDEO SETUP PAGE].
② Press △ / ▽ to highlight [CHROMA DELAY], then press ▶
③ Press ◀/▷ to select a setting and press ENTER to confirm.
[WIDE SCREEN FORMAT]
Set the aspect ratio of the projected images on the screen. This function is only available for progressive scan and HDMI output.
①Select [ADV PICTURE] in [VIDEO SETUP PAGE].
② Press △ / ▽ to highlight [WIDE SCREEN
FORMAT], then press ▷
NL STRETCH
Select this to display a 4:3 image on the 16:9 screen with non-linear stretching (center position of screen is stretched less than the sides).
4:3 PILLAR BOX
Select this to display a 4:3 image on the 16:9 screen without stretching.
OFF
No aspect ratio adjustment is made when this option is selected.
③ Press △ / ▽ to select a setting and press ENTER to confirm.
[HDMI VIDEO]
Set the resolution depending on the monitor you are using. This function is only available when you connect the DVD receiver to an HDMI compatible component via the HDMI terminal.
①Select [ADV PICTURE] in [VIDEO SETUP PAGE].
② Press △ / ▽ to highlight [HDMI VIDEO], then press ▷.
480P
480 progressive-scan video
576P
576 progressive-scan video
720P
720 progressive-scan video
1080I
1080 interlace video
1080P
1080 progressive-scan video
AUTO
The resolution is automatically selected to match the component you are using.
③ Press △ / ▽ to select a setting and press ENTER to confirm.
Notes
- For settings other than [AUTO], HDMI video signals may not be output properly if a resolution output setting is not supported by the HDMI component you are using. In this case, follow the steps below to change [HDMI VIDEO] to [480P]. - If a disc is inserted, press eject the disc.
- Press.
- Press AUDIO.
Do not perform this operation while playing back a disc on the DVD receiver.
[TRUE LIFE]
Adjust the intensity of the picture details. A positive value enables you to reproduce the minute signals of video sources.
This function is only available for progressive scan (using the component video jacks) and HDMI output.
You can adjust the value from 0 to 5.
①Select [ADV PICTURE] in [VIDEO SETUP PAGE].
② Press △ / ▽ to highlight [TRUE LIFE], then press ▷.
③ Press ◀/▷ to select a setting and press ENTER to confirm.
[DVI OUTPUT RANGE]
Set the DVI output range to match the connected component. This function is only available when you connect the DVD receiver to an DVI-D-compatible component via the HDMI terminal.
①Select [ADV PICTURE] in [VIDEO SETUP PAGE].
② Press / to highlight [DVI OUTPUT RANGE], then press
ENHANCED
Select this if black and white in the image is not distinct.
STANDARD
Select this if you cannot see the correct image when you select [ENHANCED].
③ Press / to select a setting and press ENTER to confirm.
Progressive function
The progressive scan display present 60 complete frames per seconds, rather than 30 frames per second of interlaced scanning (ordinary normal TV system). With nearly double the number of lines, progressive scan offers higher picture resolution and eliminates bothersome motion artifacts those jagged edge on moving objects.
Note
Before enabling the progressive scan function, you must ensure:
①Turn on your TV progressive scan function (refer to your TV owner's manual).
②You have connected the DVD receiver to your TV using Y PB PR (see “Connecting a TV” on page 14).
① In [VIDEO SETUP PAGE], press △ / ▽ to highlight [PROGRESSIVE], then press ▷.
OFF
Select this to disable progressive scan function.
ON
Select this to enable progressive scan function.
② Press △ / ▽ to select a setting and press ENTER to confirm.
→ Follow the instructions shown on the TV to confirm the selection (if any). - If a blank/distorted TV screen appears, wait for 15 seconds for auto recovery to activate.
Note
If you are changing the setting to OFF by using the remote control, follow the procedure below.
①If a disc is inserted, press to eject the disc.
②Press, then press ANGLE.
Component (Europe and Russia models only)
This setting allows you to toggle the output of the video signal between RGB (on SCART) and Y Pb Pr (YUV).
■Preference setup menu
① Press □ twice to stop playback (if necessary), then press SET UP.
② Press ◀ / ▷ to select [PREFERENCE PAGE].
③Press ENTER to confirm.

Audio, subtitle and disc menus
These menus contain various language options for the audio, subtitle and disc menus recorded on the DVD. For details, see “Audio, Subtitle and Disc menu languages” on page 23.
Restricting playback with parental control
Some DVDs may have a parental level assigned to the complete disc or to certain scenes on the disc. This feature lets you set a playback limitation level. The rating levels are from 1 to 8 and are country dependent. You can prohibit the playing of certain discs that are not suitable for your children, or play alternative scenes for certain discs.
① In [PREFERENCE PAGE], press △ / ▽ to highlight [PARENTAL], then press

② Press △ / ▽ to highlight a rating level for the disc inserted and press ENTER.
③ Use the numeric keypad (0-9) to enter the six-digit password (see “Changing the password” on page 43). → DVDs that are rated above the level you select will not play unless you enter the six-digit password.
Rating explanation
1 KID SAFE
2 G
General audience; recommended as acceptable for viewers of all ages.
3 PG
Parental guidance suggested.
4 PG 13
Material is unsuitable for children under age 13.
5 PGR
6 R
Parental guidance - restricted; recommended that parents restrict children under 17 from viewing, or allow to view only when supervised by a parent or adult guardian.
7 NC 17
Material is unsuitable for children under age 17.
8 ADULT
Mature material; should be viewed only by adults due to the inclusion of graphic sexual material, violence or language.
Notes
– VCD, SVCD, CD have no level indication, so the parental control function has no effect with these types of discs. This also applies to most illegal DVDs.
- Some DVDs are not encoded with a rating though the movie rating may be printed on the disc cover. The rating level feature does not prohibit play of such discs.
PBC
You can set PBC to ON or OFF. This feature is available only on Video CD 2.0 with the playback control (PBC) feature. For details, see “Playback control (PBC)” on page 28.
MP3/JPEG navigator
MP3/JPEG navigator can be set only if the disc was recorded with a menu. It allows you to select different display menus for easy navigation.
① In [PREFERENCE PAGE], press △ / ▽ to highlight [MP3/JPEG NAV], then press ▷
WITH MENU
Select this to display only the folder menu of the MP3/Picture CD.
WITHOUT MENU
Select this to display all the files contained in the MP3/Picture CD.
② Press △ / ▽ to select a setting, then press ENTER to confirm.
Playback VR format discs
There are two ways to play back a VR (Video Recording) format discs: ORIGINAL LIST and PLAY LIST. This feature is not available with non-VR format discs.
① In [PREFERENCE PAGE], press △ / ▽ to highlight [VR LIST], then press ▷The following settings appear:
ORIGINAL LIST
Select this to play the originally recorded titles on the disc.
PLAY LIST
Select this to play the edited version of the disc. This feature is only available when a play list has been created.
② Press △ / ▽ to highlight a setting, then press ENTER to confirm.
③ Press SET UP to close the setup menu.
④ Press ▷. The setting you selected begins to play.
Changing the password
The same password is used for both parental control and disc lock. Enter your six-digit password to play a prohibited disc or if prompted for a password. The default password is '000 000'.
① In [PREFERENCE PAGE], press △ / ▽ to highlight [PASSWORD], then press ▶ to select [CHANGE].

② Press ENTER to enter the 'Password Change Page'.

③ Use the numeric keypad (0-9) to enter your old six-digit password.
- When doing this for the first time, enter '000 000'. - If you forget your old six-digit password, enter '000 000'.
④Enter the new six-digit password.
⑤Enter the new six-digit password a second time to confirm.
⑥Press ENTER to confirm.
→ The new six-digit password is now valid.
Changing the DivX subtitle
If the video downloaded from DivX®VOD has subtitles, you can select its character code.
① In [PREFERENCE PAGE], press △ / ▽ to highlight [DIVX SUBTITLE], then press ▷ to select [GROUP1].
②Press ENTER to confirm.
Notes
- Some discs cannot be played depending on disc characteristics or recording conditions.
– Some external subtitle files may be displayed incorrectly or not at all. - For external subtitle files, the following subtitle format filename extensions are supported (note that these files are not shown within the disc navigation menu): .srt, .sub, .ssa, .smi
– The filename of the movie file has to be repeated at the beginning of the filename for the external subtitle file. - The number of external subtitle files that can be switched for the same movie file is limited to a maximum of ten.
Restoring to the factory defaults
Setting the DEFAULT function will reset all options and your personal settings to the factory defaults, except your password for Parental Control and Disc Lock.
① In [PREFERENCE PAGE], press △ / ▽ to highlight [DEFAULT], then press ▷ to select [RESET].
②Press ENTER to confirm.
→ All settings are reset to the factory defaults.
Tuner operations
Note
Make sure the FM and AM antennas are connected to this receiver.

■Tuning radio stations
① Press TUNER to select "TUNER/FM" or "TUNER/AM".
②Press / briefly on the remote control.
→ "SEARCH" appears. → The next radio station is tuned automatically.
③ Repeat step ② (if necessary) until you find the desired radio station.
④ To tune weak stations, press ◀ / ▷ briefly and repeatedly until the optimal reception is found.
Note
(Europe and Russia models only) While receiving an FM station, the name of the station you selected appears in the system display panel.
■Presetting radio stations
You can store up to 30 preset radio stations (including both FM and AM stations) in the receiver's memory.
Note
The receiver will exit presetting mode if no button is pressed within 20 seconds.
Automatic presetting
You can start automatic presetting by pressing a selected preset number.
① Press TUNER to select "TUNER/FM" or "TUNER/AM".
② Press ◀◀◀/▶▶▶ or use the numeric keypad (0-9) to select a preset number to begin.
③ Press and hold PROG until “AUTO” appears.
→ If a radio station is stored in one of the earlier presets, the same radio station will not store under another preset number.
→ If no preset number is selected, automatic preset will begin from preset (1) and all former presets will be overridden.
Manual presetting
You can choose to store only your favourite radio stations.
①Tune the desired radio station (see “Tuning radio stations” on page 44).
②Press PROG.
③ Press ◀◀◀ / ▶▶◀ to select a preset number.
④Press PROG again to store.
Selecting a preset radio station
Press |◀◀ / ▶▶| or use the numeric keypad (0-9) to select a preset number.
→ The preset number, then radio frequency appears.
Deleting a preset radio station
Press and hold □ on the front panel until "Preset Deleted" starts scrolling.
→ The current preset radio station is deleted.
Setting frequency step (except Europe and Russia models)
The inter-station frequency spacing differs depending on the areas. Set the frequency step according to the frequency spacing in your area.
Choices: AM9kHz/FM50kHz, AM10kHz/FM100kHz
Default setting: AM9kHz/FM50kHz
To change the AM band to 10kHz and the FM band to 100kHz
①Unplug the AC power cord from the DVD receiver and wait at least one minute.
② While pressing and holding INPUT and ▶▶ on the front panel, plug the AC power cord to the DVD receiver.
Note
Repeat the above steps ① to ② to change AM band to 9kHz and FM band to 50kHz.
■Receiving Radio Data System stations (Europe and Russia models only)
The Radio Data System is a data transmission system for FM stations used mainly in the U.K. and Europe. The DVD receiver can receive Radio Data System data such as PS (program service) and PTY (program type) when receiving Radio Data System broadcasting stations.
To select stations by program type (genre)
You can tune Radio Data System stations by selecting a program type (genre) from 31 options. Once you select a program type, the DVD receiver automatically searches for Radio Data System stations broadcasting corresponding program type.

① While receiving an FM, press FREQ/TEXT.
② Press FREQ/TEXT to select the PTY mode.
③Press PTY SEEK MODE.
④ Press PRESET √/∧ to select the program type.
The PTY program type flashes in the display panel.
Program type Descriptions
| NEWS News |
| AFFAIRS Current Affairs |
| INFO Information |
| SPORT Sports |
| EDUCATE Education |
| DRAMA Drama |
| CULTURE Cultures |
| SCIENCE Science |
| VARIED Varied Speech |
| POP M Pop Music |
| ROCK M Rock Music |
| EASY M Easy Listening |
| LIGHT M Light Classics |
| Program type | Descriptions |
| CLASSICS Serious Classics | |
| OTHER M Other Music | |
| WEATHER Weather & Meteorology | |
| FINANCE Finance | |
| CHILDREN Children’s Program | |
| SOCIAL Social Affairs | |
| RELIGION Religion | |
| PHONE IN Phone In | |
| TRAVEL Travel & Touring | |
| LEISURE Leisure & Hobby | |
| JAZZ | Jazz Music |
| COUNTRY | Country Music |
| NATION M | National Music |
| OLDIES | Oldies Music |
| FOLK M | Folk Music |
| DOCUMENT | Documentary |
| TEST | Alarm Test |
| ALARM Alarm | |
⑤Press PTY SEEK START.
The DVD receiver starts searching for the corresponding Radio Data System stations. The DVD receiver stops searching when the selected program type is found. The program name shows up on the display panel.
To cancel PTY SEEK
Press PTY SEEK START again.
To switch the information display of Radio Data System
While receiving Radio Data System, press FREQ/TEXT. Each time you press the button, the information display changes as follows:
PROGRAM SERVICE

Information type
• PROGRAM SERVICE (PS)
Displays the station name.
• PROGRAM TYPE (PTY)
Displays the program type (genre).
Notes
– The available Radio Data System information types vary depending on the station.
- If the signal transmission of the Radio Data System station is too weak, the DVD receiver may not be able to receive Radio Data System information completely.
Sound controls
Note
For proper surround sound, make sure the speakers and subwoofer are connected to this receiver (see “Connecting the subwoofer” on page 12).

■Using the Virtual Surround function
Turning the Virtual Surround function on/off
This function allows you to convert 2.1 channel sound to virtual 5.1 channel surround sound.
Press SURROUND on the remote control to enable the Virtual Surround function.
→ "SURR ON" appears.
To disable the Virtual Surround function
Press SURROUND again.
→ "SURR OFF" appears.
Changing the Virtual Surround area
This function is used to change the Virtual Surround area setting.
With Virtual Surround activated, press AREA on the remote control to select the Virtual Surround area.
NARROW
Select this to sharpen the sound field. The optimal listening area will be limited.
WIDE
Select this to widen the optimal listening area. The sound field will be less focused.
Changing the Virtual Surround mode
This function is used to change the Virtual Surround mode setting.
With Virtual Surround activated, press MODE on the remote control to select the Virtual Surround mode.
MUSIC
Select this for music content.
MOVIE
Select this for movie content.
Adjusting the sound balance
This function adjusts the sound balance according to your listening position to optimize the Virtual Surround effect.
①With Virtual Surround activated, press and hold SURROUND on the remote control.
→ "POS CENT" appears.
② Within three seconds, press VOLUME (+/-) to adjust the sound balance (POS L6, POS L5, POS L4, POS L3, POS L2, POS L1, POS CENT, POS R1, POS R2, POS R3, POS R4, POS R5 or POS R6).
→ If the volume control is not used within three seconds, it will resume its normal volume control function.
Note
The selected sound balance automatically returns to "POS CENT" when you turn off the DVD receiver.
■Setting music enhancer
This function enhances your listening experience by regenerating the missing harmonics in a compression artifact.
Press ENHANCER on the remote control to enable the music enhancer.
→ “ENH ON” appears.
To disable the music enhancer function
Press ENHANCER again.
→ “ENH OFF” appears.
Notes
– The night listening mode and the music enhancer cannot be activated at the same time.
- When the CD upsampling function is activated (or a disc recorded at the sampling rate of 96kHz is played back), the music enhancer function is not available.
■Night listening mode
When night listening mode is activated, high volume output is softened and low volume output raised to an audible level. This is useful for watching your favorite action movie without disturbing others at night.
- Press NIGHT on the remote control to activate the night listening mode.
→ Playback continues at a more even volume and “NIGHT ON” appears in the display panel.
- To restore the volume, press NIGHT again.
→ Playback continues with the full dynamic range of surround sound, and “NIGHT OFF” appears in the display panel.
Notes
- The night listening mode and the music enhancer cannot be activated at the same time.
- When the CD upsampling function is activated (or a disc recorded at the sampling rate of 96kHz is played back), night listening mode is not available.
■Adjusting the treble/bass level
The TREBLE (high tone) and BASS (low tone) features enable you to define the sound-processor settings.
① Press TREBLE or BASS on the remote control.
② Within three seconds, press VOLUME (+/-) to adjust the treble or bass level (-6dB to +6dB, in 1dB increments).
→ If the volume control is not used within three seconds, it will resume its normal volume control function.
■Adjusting the volume level
Use the VOLUME control (or press VOLUME (+/-) on the remote control) to increase or decrease the volume level.
→ “VOL MIN” is the minimum volume level and “VOL MAX” is the maximum volume level.
To mute the volume temporarily
Press MUTE on the remote control.
- Playback continues without sound and "MUTE" appears.
- To restore the volume, press MUTE again or increase/decrease the volume level.
Other functions
■Switching to standby mode
Press STANDBY/ON on the front panel or STANDBY/ON ( ) on the remote control.
→ The display screen goes blank.
■Dimming the display screen
In any active mode, press DIMMER on the remote control to select the desired brightness:
DIM 1: 70% brightness
DIM 2: 40% brightness
DIM OFF: normal brightness
■Setting the sleep timer
The sleep timer switches the receiver to Eco Power standby mode automatically at the preset time.
① Press SLEEP on the remote control until “SLEEP XX” appears in the display panel (XX: 15, 30, 45, 60 or OFF).
②To select the next sleep timer value, continue pressing SLEEP while in sleep timer mode until the desired turn-off time is displayed.
→ “SLEEP” appears in the display panel, except when “SLEEP OFF” is selected.
→ Before the receiver switches to Eco Power standby mode, a countdown of 10 seconds is displayed.
" SLEEP 1 0" → " SLEEP 9".... →
" SLEEP 2 " → " SLEEP 1 "
To cancel the sleep timer
Press SLEEP until "SLEEP OFF" appears.
■Recording on an external AV component
①Connect the external recording component to LINE OUT (see “Connecting external AV components” on page 18).
②Select the source to record from this DVD receiver (DVD/CD, TUNER, AUX or USB) and start playback (if necessary).
③Start recording on the external recording device.
Note
Refer to the owner's manual of the connected component for details.
Troubleshooting
If there is any problem with your Home Theater Sound System, check the following items. If you cannot solve your problem with the following remedies or if your problem is not listed below, turn off and unplug the Home Theater Sound System, then consult the nearest authorized Yamaha dealer or service center.
| Problem Solution | |
| No power Check if the AC power cord is properly connected. | |
| Press STANDBY/ON on the front of the receiver to turn on the power. | |
| No picture Refer to your TV's manual for correct Video In channel selection. Change the TV channel until you see the DVD screen. | |
| Completely distorted picture or black/white picture | If this happens when you are changing the setting of the 'TV TYPE', wait for 15 seconds for auto recovery (see page 21). |
| If this happens when you are turning on the progressive scan feature, wait for 15 seconds for auto recovery (see page 40). | |
| Check the video connection. | |
| Sometimes a small amount of picture distortion may appear. This is not a malfunction. | |
| Clean a disc. | |
| The aspect ratio of the screen cannot be changed even though you have set the TV display | The aspect ratio is fixed on the DVD disc. |
| Depending on the TV, it may not be possible to change the aspect ratio. | |
| No sound or distorted sound Adjust the volume. | |
| Check if the system cable is properly connected. | |
| Check if all speaker cables are properly connected. | |
| Make sure that the audio cables are connected and press the Input selection buttons to select the correct input source (AUX, for example) to choose the equipment that you want to hear through the DVD receiver. | |
| Check if the AC power cord of the subwoofer is properly connected. | |
| Make sure that you use a disc supported by the DVD Player. | |
| No sound or picture | Check that the RGB/SCART cable is connected to the correct device (see "Connecting a TV" on page 14). |
| Sound is too low on one side Check if all cables are properly connected. | |
| Cannot activate some features such as Angles, Subtitles, or multi-language Audio | The features may not be available on the DVD. |
| Changing the language for the sound or subtitle is prohibited on the DVD. | |
| DVD videos cannot be copied with the VCR | Most commercially available DVD's include copy protect features. You cannot make a copy of these DVD's. |
| The disc is ejected without an operation | Make sure that you use a disc supported by the DVD receiver. |
| Not able to select some items in the setup/system menu | Press twice before selecting the setup/system menu. |
| Depending on the disc availability, some menu items cannot be selected. | |
| The DVD receiver does not start playback | Insert a readable disc with the playback side facing down. The DVD-R/DVD+R/DVD-RW/DVD+RW/CD-R/CD-RW/DVD-RW (VR format) must be finalized. |
| Check the disc type, color system (PAL or NTSC) and region code. | |
| Check for any scratches or smudges on the disc. | |
| Press SET UP to turn off the setup menu screen. | |
| You may need to enter the password in order to change the parental control rating level or to unlock the disc for playback. | |
| Moisture has condensed inside the player. Remove the disc and leave the receiver turned on for about an hour. | |
| Sound played on the DVD receiver cannot be recorded with an external recorder | Use proper audio sources. |
| Sounds played on the AV equipment connected to the DVD receiver cannot be recorded with external recording equipment | Connect those equipment to the DVD receiver with analog connections. |
| The volume does not increase or sounds are distorted | Turn on the power of the component connected to the DVD receiver. |
| There is no sound from the subwoofer Make sure the subwoofer is connected correctly. | |
| “SPEAKER ERR” appears in the display panel | Unplug the subwoofer, then make sure the front speakers are connected correctly. |
| Radio reception is poor | If the signal is too weak, adjust the antenna or connect an external antenna for better reception. |
| The remote control does not function properly | Select the source (DVD/CD or TUNER, for example) before pressing the function button (▷, |<|<| / |>). |
| Unable to play DivX® movies Check that the DivX | ® file was encoded in ‘Home Theater’ mode with a DivX® 5.x encoder. |
| The DVD receiver does not work | Disconnect the power cord from the power outlet for a few minutes. Reconnect the power cord and try to operate again as usual. |
| The USB device cannot be recognized Check that the USB device is connected correctly. | |
Troubleshooting
| No picture is displayed when you make HDMI connections (using the HDMI terminals) | Follow the steps below to change [HDMI VIDEO] to [480P].1. Press △ on the front panel or press and hold □ on the remote control to eject the disc.2. Press ▲ on the remote control.3. Press AUDIO on the remote control. |
| A disc cannot be inserted into the DVD receiver | Turn on the DVD receiver and insert the disc after “NO DISC” appears on the display panel. |
| Wait for a while and insert the disc after “NO DISC” appears on the display panel. | |
| Eject the disc from the DVD receiver, and then insert the disc you want to play back after “NO DISC” appears on the display panel. | |
| Press △ or ▷, or remove the disc from the disc loading slot fully and then insert it once again. |
Glossary
AAC (Advanced Audio Coding)
An audio compression scheme defined as part of the MPEG-2/MPEG-4 standard. AAC supports up to 48 channels and generally achieves better sound quality than MP3 at the same bit rate.
Analog
Sound that has not been turned into numbers.
Analog sound varies, while digital sound has specific numerical values. These terminals send audio through two channels, the left and right.
Aspect ratio
The ratio of vertical and horizontal sizes of a displayed image. The horizontal vs. vertical ratio of conventional TVs. is 4:3, and that of wide-screens is 16:9.
Bit
Short for binary digit. Represents the smallest unit of information manipulated on a computer. In audio systems, the bit size determines resolution to digitize analog signals.
The larger the bit size, the larger the dynamic range (the ratio of maximum and minimum frequency level) and the finer the sounds. Generally, an audio CD is 16 bit and DVD audio is 24 bit.
Bit rate
The amount of data used to hold a given length of music; measured in kilobits per second, or kbps. Also, the speed at which you record. Generally, the higher the bit rate, or recording speed, the better the sound quality. However, higher bit rates use more space on a disc.
Component Video
Terminals for inputting or outputting a component video signal. Component video signal consists of three lines, the luminance signal (Y) and two color difference signals ( PB/CB , PR/CR ), which enable to provide high-quality video.
Disc menu
A screen display prepared for allowing selection of images, sounds, subtitles, multi-angles, etc. recorded on a DVD.
DivX
DivX ® is a video compression technology developed by DivX ® Networks, Inc. It compresses digital video data to sizes small enough to be transported over the Internet without reducing the original video quality. You need DivX codec software to play back DivX movies or convert data to the DivX format.
Dolby Digital
Digital surround sound system which is developed by Dolby Laboratories provides completely independent multi-channel audio. With 3 front channels (left, center, and right) and 2 surround stereo channels, Dolby Digital provides five full-range audio channels. With an additional channel especially for bass effects (called LFE, or low frequency effect), the system has a total of 5.1-channels (LFE is counted as 0.1 channel). By using 2-channel stereo for the surround speakers, more accurate moving sound effects and surround sound environment are possible than with Dolby Surround.
Dolby Surround Pro Logic II
It is an improved matrix decoding technology that provides better spatiality and directionality on Dolby Surround programme material; provides a convincing three-dimensional soundfield on conventional stereo music recordings; and is ideally suited to bring the surround experience to automotive sound. While conventional surround programming is fully compatible with Dolby Surround Pro Logic II decoders, soundtracks will be able to be encoded specifically to take full advantage of Pro Logic II playback, including separate left and right surround channels. (Such material is also compatible with conventional Pro Logic decoders).
DTS (Digital Theater Systems)
Digital surround sound system developed by Digital Theater Systems, Inc., which provides 5.1 channel audio (max). With an abundance of audio data, it is able to provide authentic-sounding effects.
HDMI
HDMI (High-Definition Multimedia Interface) is the first industry-supported, uncompressed, all-digital audio/video interface. Providing an interface between any source (such as a set-top box or AV receiver) and an audio/video monitor (such as a digital television), HDMI supports standard, enhanced or high-definition video as well as multi-channel digital audio using a single cable. HDMI transmits all ATSC (Advanced Television Systems Committee) HDTV standards and supports 8-channel digital audio, with bandwidth to spare to accommodate future enhancements and requirements.
When used in combination with HDCP (High-bandwidth Digital Content Protection), HDMI provides a secure audio/video interface that meets the security requirements of content providers and system operators.
For further information on HDMI, visit the HDMI website at “www.hdmi.org/”.
Interlace
The most common type of scanning used in televisions. It divides a screen into even and odd numbered fields for scanning, and then builds an image by combining them
Glossary
into one image (frame).
JPEG (Joint Photographic Experts Group)
A standardized image compression system proposed by the Joint Photographic Experts Group. It can reduce image data sizes to 1 to 10% of their original sizes, and works on digital photographs effectively.
MP3 (MPEG Audio Layer-3)
An audio file compression technology. It can reduce audio data sizes to about 10% of their original sizes while maintaining CD-level audio quality.
MPEG (Moving Pictures Experts Group)
International standard for digital video and audio compression generated by ISO (International Organization for Standardization) and IEC (International Electrotechnical Commission). Includes MPEG-1, MPEG-2, and MPEG-4. MPEG-1 offers VHS level video quality and is often used on video CDs. MPEG-2 offers S-VHS level video quality and is often used on DVDs.
Parental control
Limits Disc play according to the age of the users or the limitation level in each country. The limitation varies from disc to disc; when it is activated, playback will be prohibited if the software's level is higher than the user-set level.
Playback control (PBC)
An on-screen menu recorded on a Video CD or SVCD that enables interactive playback and searching.
Progressive Scan
A method of displaying all scanning lines in a frame at once, reducing flicker noticeable on a larger screen and creating a sharp and smooth image.
Region code
Many DVD discs include a region code so that the copyright owner can control DVD software distribution only to regions where they are ready to distribute. There are six regions codes, which restrict a DVD player to playing a DVD disc with the same region code.
S-video
A terminal for inputting or outputting an S-video signal. S-video signal consists of two lines, the luminance signal (Y) and color signal (C), which enable to provide high-quality video during playback or recording.
Surround
A receiver for creating realistic three-dimensional sound fields full of realism by arranging multiple speakers around the listener.
VR format (Video Recording format)
A DVD video recording format, which allows editing DVD video data recorded onto a disc. You need a VR format compatible player for playback.
Specifications
DVD RECEIVER (DVR-1000)
TUNER SECTION
FM Tuning Range 87.50 to 108.00 MHz
AM Tuning Range
- Europe, Russia, Australia and Korea models
531 to 1602 kHz
- Taiwan and Asia models 531 to 1602 kHz/530 to 1700 kHz
DISC SECTION
Laser Type Semiconductor
Disc Diameter 12 cm
Video Decoding MPEG-1 /MPEG-2/DivX 3.11, 4.x & 5.x/
DivX Ultra
Video DAC 12 bits/108 MHz
Signal System PAL/NTSC
Video Format 4:3/16:9
Composite Video Output 1.0 Vp-p, 75 ohm
S-video Output Y - 1.0 Vp-p, 75 ohm
C - 0.3 Vp-p, 75 ohm
RGB (SCART) Output 0.7 Vp-p, 75 ohm
Component Video Output Y - 1.0 Vp-p, 75 ohm
PB / CB PR / Cr - 0.7 Vp - p, 75 ohm
Audio DAC 24 bits/192 kHz
Frequency Response 4 Hz - 20 kHz (44.1 kHz)
4 Hz - 22 kHz (48 kHz)
4 Hz - 44 kHz (96 kHz)
Audio S/N 100 dB
Distortion 0.0035%
Dynamic Range 90 dB
AUDIO FORMAT
Digital Dolby Digital/DTS/MPEG Compressed Digital
PCM 16,20,24 bits
fs 44.1, 48, 88.2, 96, 176.4, 192 kHz
MP3 (ISO 9660) 24, 32, 56, 64, 96, 128, 256 kbps
fs 16, 22.05, 24, 32, 44.1, 48 kHz
WMA 32 to 192 kbps, mono, stereo
AAC
Full decoding of Dolby Digital and DTS multi-channel sound
Dolby Surround Compatible Downmix from Dolby Digital
multi-channel sound
GENERAL
Power Supply
- Australia model 240 V, 50 Hz
- Europe and Russia models
230 V, 50 Hz
- Taiwan model 110–120 V, 50/60 Hz
- Asia model 220–240 V, 50/60 Hz
- Korea model 220 V, 60 Hz
Power Consumption 26 W (Max.)
0.5 W (Standby)
Frequency Response 20 Hz to 20 kHz/±0.2 dB
Signal-to-Noise Ratio > 100 dB
Input Sensitivity
- SCART In
(Europe and Russia models only)
500 mV
HDMI Output Type A
USB Type A
Dimensions (W x H x D) 435 x 78 (rear)/38 (front) x 208 mm
Weight 3.2 kg
FRONT SPEAKER (NX-P1000)
System 2-way acoustic suspension speaker system
Impedance 6 Ω
Speaker Drivers 11.0cm woofer, magnetic shielding type
+ 2.5cm soft dome tweeter, magnetic shielding type
Frequency Response 100 Hz - 20 kHz (-10dB)
Dimensions (W x H x D) 145 x 262 x 178 mm
Weight 2.9 kg
SUBWOOFER (NX-SW1000)
GENERAL
Power Supply Rating
- Australia model 110-120/220-240V, 50/60Hz
- Europe and Russia models
230 V, 50 Hz
- Taiwan model 110-120/220-240V, 50/60Hz
- Asia model 110-120/220-240V, 50/60Hz
- Korea model 110-120/220-240V, 50/60Hz
Power Consumption 200 W
System Advanced Yamaha Active Servo Technology
6 Ω
Speaker Driver 16cm cone woofer, magnetic shielding type
Frequency Response 35Hz - 100Hz (-10dB)
Input Sensitivity
- AUX In 300 mV
Dimensions (W x H x D) 230 x 477 x 440 mm
Weight 16.0 kg
AMPLIFIER SECTION
Output Power
- Europe and Russia models
L/R 70W+70W (1kHz 0.7% L+R)
90W+90W (1kHz 10% L+R)
Subwoofer 80W (100Hz 0.9%)
100W (100Hz 10%)
- Australia model
- Taiwan model
- Asia model
- Korea model
120/240V
L/R 70W+70W (1kHz 0.9% L+R)
90W+90W (1kHz 10% L+R)
Subwoofer 80W (100Hz 0.9%)
100W (100Hz 10%)
110/220V
L/R 60W+60W (1kHz 0.9% L+R)
75W+75W (1kHz 10% L+R)
Subwoofer 70W (100Hz 0.9%)
90W (100Hz 10%)
Specifications are subject to change without prior notice.
Index
■Numerics
16:9, TV display setting .....22
4:3 LETTER BOX, TV display setting 22
4:3 PAN SCAN, TV display setting .... 22
A
AC inlet, DVR-1000 rear panel .... 6
AC inlet, NX-SW1000 rear panel ..... 7
AC power cord, NX-SW1000 rear panel 7
Angle of view 28
ANGLE, remote control 8
AREA, remote control ....8
Audio language 23
Audio setup menu 36
AUDIO, remote control 9
Auto standby function 35
Automatic presetting ....44
AUX IN jacks, DVR-1000 rear panel .... 6
AV component connection 18
AV MONITOR OUT terminal .....14
AV MONITOR OUT terminal, DVR-1000 rear panel 6
B
Bass level adjustment 48
BRIGHTNESS, picture setting ...... 37
C
CD upsampling 36
CHROMA DELAY, picture setting ..... 39
Color system selection 22
COLOR, picture setting ....38
Component terminal setting ....40
COMPONENT VIDEO OUT jacks .....14
COMPONENT VIDEO OUT jacks, DVR-1000 rear panel 6
Connecting a TV 14
Connecting a USB device 19
Connecting an HDMI component ..... 15
Connecting AV components .....18
Connecting digital audio component ... 19
Connecting FM/AM antennas .....17
Connecting speaker cables ....12
Connecting subwoofer 12
Connecting the speakers 11
CONTRAST, picture setting ....38
D
Data file playback 31
DCDI, picture setting 38
Digital audio component connection ... 19
DIMMER, remote control 9
Dimming the display screen .....49
DIRECT, remote control 9
Disc information 27
Disc loading slot, DVR-1000 front panel 5
Disc menu 27
Disc menu language ......23
Disc operation ......25
Disc playback 25
Displaying disc information .....27
DivX subtitle 43
DivX® disc playback 29
DivX®VOD registration code ......35
DVD receiver ....4
DVI OUTPUT RANGE, picture setting 40
DVR-1000 4
E
EJECT, remote control ....9
ENHANCER, remote control ....8
ENTER, remote control ....8
F
Factory default restore ....43
FM ANT terminal, DVR-1000 rear panel 6
FM/AM antenna connection .....17
FREQ/TEXT, remote control ....8
Front speaker 4, 10
G
GAMMA, picture setting ....38
General setup menu 34
GND and AM ANT terminals, DVR-1000 rear panel 6
■H
HDMI audio setting ....36
HDMI component connection .....15
HDMI terminal, DVR-1000 rear panel 6
HDMI VIDEO, picture setting .....39
■
Input selection buttons, remote control 8
INPUT, DVR-1000 top panel ....5
Inserting batteries, remote control .....20
■J
JPEG disc playback 29
L
Language preferences ......23
Layout of speakers ......10
Layout of subwoofer 10
LINE OUT jacks, DVR-1000 rear panel 6
Lip synchronization ....36
Locking discs 34
■M
Manual presetting ....44
MENU, remote control .....9
MODE, remote control ....8
MP3 disc playback 29
MULTI, TV type selection 21
Multi-angle playback 31
Music enhancer setting 47
MUTE, remote control 9
N
Night listening mode 48
NIGHT, remote control 9
NTSC, TV type selection 21
Numeric keypad, remote control ..... 8
NX-P1000 4
NX-SW1000 4
■0
ON SCREEN, remote control 8
On-screen display language 23
OPTICAL DIGITAL IN jack, DVR-1000 rear panel 6
OSD language 23
P
PAL, TV type selection 21
Parental control 41
Password changing 43
PBC 28
PHONES jack, DVR-1000 front panel 5
Picture settings 37
Playback control 28
Playback resume 27
PORTABLE jack, DVR-1000 front panel 5
Power cable 4
Preference setup menu 41
PRESET, remote control 9
Presetting radio stations 44
Preview 30
PROG, remote control 9
Programming disc tracks 34
Progressive function 40
PTY SEEK MODE, remote control ..... 9
PTY SEEK START, remote control ..... 9
■R
Radio Data System station 45
Radio station 44
Remote control 4,8
Remote control sensor, DVR-1000 front panel 5
Remote control using 20
REPEAT A-B, remote control 8
Repeat playback 26
REPEAT, remote control 8
Resuming playback 27
RGB, color system 22
Roles of speakers 10
■S
S VIDEO output jack 14
S VIDEO output jack, DVR-1000 rear panel 6
Scan effect 31
Screen saver 35
SET UP, remote control ....8
SHARPNESS, picture setting ....37
Shuffle 26
SHUFFLE, remote control .....9
Sleep timer setting 49
SLEEP, remote control .....9
Sound track language ......28
Speaker cable connection .....12
Speaker cables 4
Speaker channel setting 24
Speaker connection ....11
Speaker layout ......10
Speaker setup 36
SPEAKER terminals, NX-SW1000 rear panel ....7
Standby mode 49
STANDBY/ON, DVR-1000 top panel ..5
STANDBY/ON, remote control .....8
Subtitle language ......23
Subtitle language changing .....28
SUBTITLE, remote control ....8
Subwoofer 4
Subwoofer connection .....13
Subwoofer layout ....10
Supplied accessories 4
SURROUND, remote control ....8
SYSTEM CONNECTOR, DVR-1000 rear panel 6
SYSTEM CONNECTOR, NX-SW1000 rear panel ....7
System control cable ....4
System display panel, DVR-1000 top panel ....5
IT
TINT, picture setting ....38
Title selection ......28
TOP MENU/RETURN, remote control 9
Treble level adjustment .....48
TREBLE/BASS, remote control ....8
TRUE LIFE, picture setting ....40
Tuning radio stations ....44
TV connection ....14
TV display setting 22
TV setting 21
TV type selection 21
■U
Unlocking discs ....34
USB device connection .....19
USB device using ....31
USB terminal, DVR-1000 front panel 5
■V
VIDEO output jack 14
VIDEO output jack, DVR-1000 rear panel 6
Video pin cable 4
Video setup menu 37
Viewing angle 28
Virtual Surround function .....47
VOLTAGE SELECTOR, NX-SW1000 rear panel ....7
Volume level adjustment .....48
VOLUME, DVR-1000 top panel .....5
VOLUME, remote control .....9
VR format disc playback ....42
W
WIDE SCREEN FORMAT, picture setting ....39
WMA disc playback 29
■Y
YUV, color system ....22
■Z
ZOOM, remote control .....9
Zooming in 27
Zooming pictures 30
Limited Guarantee for European Economic Area (EEA) and Switzerland
Thank you for having chosen a Yamaha product. In the unlikely event that your Yamaha product needs guarantee service, please contact the dealer from whom it was purchased. If you experience any difficulty, please contact Yamaha representative office in your country. You can find full details on our website (www.yamaha-hifi.com/ or www.yamaha-uk.com/ for U.K. resident).
The product is guaranteed to be free from defects in workmanship or materials for a period of two years from the date of the original purchase. Yamaha undertakes, subject to the conditions listed below, to have the faulty product or any part(s) repaired, or replaced at Yamaha's discretion, without any charge for parts or labour. Yamaha reserves the right to replace a product with that of a similar kind and/or value and condition, where a model has been discontinued or is considered uneconomic to repair.
Conditions
-
The original invoice or sales receipt (showing date of purchase, product code and dealer's name) MUST accompany the defective product, along with a statement detailing the fault. In the absence of this clear proof of purchase, Yamaha reserves the right to refuse to provide free of charge service and the product may be returned at the customer's expense.
-
The product MUST have been purchased from an AUTHORISED Yamaha dealer within the European Economic Area (EEA) or Switzerland.
-
The product must not have been the subject of any modifications or alterations, unless authorised in writing by Yamaha.
-
The following are excluded from this guarantee:
a. Periodic maintenance and repair or replacement of parts due to normal wear and tear.
b. Damage resulting from:
(1) Repairs performed by the customer himself or by an unauthorised third party.
(2) Inadequate packaging or mishandling, when the product is in transit from the customer. Please note that it is the customer's responsibility to ensure the product is adequately packaged when returning the product for repair.
(3) Misuse, including but not limited to (a) failure to use the product for its normal purpose or in accordance with Yamaha's instructions on the proper use, maintenance and storage, and (b) installation or use of the product in a manner inconsistent with the technical or safety standards in force in the country where it is used.
(4) Accidents, lightning, water, fire, improper ventilation, battery leakage or any cause beyond Yamaha's control.
(5) Defects of the system into which this product is incorporated and/or incompatibility with third party products.
(6) Use of a product imported into the EEA and/or Switzerland, not by Yamaha, where that product does not conform to the technical or safety standards of the country of use and/or to the standard specification of a product sold by Yamaha in the EEA and/or Switzerland.
(7) Non AV (Audio Visual) related products.
(Products subject to “Yamaha AV Guarantee Statement” are defined in our website at www.yamaha-hifi.com/ or www.yamaha-uk.com/ for U.K. resident.)
- Where the guarantee differs between the country of purchase and the country of use of the product, the guarantee of the country of use shall apply.
- Yamaha may not be held responsible for any losses or damages, whether direct, consequential or otherwise, save for the repair or replacement of the product.
- Please backup any custom settings or data, as Yamaha may not be held responsible for any alteration or loss to such settings or data.
- This guarantee does not affect the consumer's statutory rights under applicable national laws in force or the consumer's rights against the dealer arising from their sales/purchase contract.
Accord des stations radio.... 44
① Afficheur
→ La lecture continue.
Options: AM 9 kHz/FM 50 kHz, AM 10 kHz/FM 100 kHz
AAC (Advanced Audio Coding)
JPEG (Joint Photographic Experts Group)
| PCM | 16, 20, 24 bits |
| fs 44,1, 48, 88,2, 96, 176,4, 192 kHz | |
| MP3 (ISO 9660) | 24, 32, 56, 64, 96, 128, 256 kbps |
| fs 16, 22,05, 24, 32, 44,1, 48 kHz |
G/D 60 W + 60 W (1 kHz 0.9% G+D) 75 W + 75 W (1 kHz 10% G+D)
Caisson de graves 70 W (100 Hz 0,9%) 90 W (100 Hz 10%)
DVD-Receiver (DVR-1000)

Subwoofer (NX-SW1000)

Hinweis
UKW-Innenantenne
①Netzeingang
Rot: positiv (+)
Schwarz: negativ (−)
AAC (Advanced Audio Coding)
JPEG (Joint Photographic Experts Group)
4 Hz - 22 kHz (48 kHz)
4 Hz - 44 kHz (96 kHz)
Audiosignal-Rauschabstand 100 dB
Verzerrung 0,0035%
fs 16, 22, 05, 24, 32, 44, 1, 48 kHz
WMA
SUBWOOFER (NX-SW1000)
ALLGEMEINES
System Advanced Yamaha Active Servo Technology
6 Ω
STANDBY/ON, DVR-1000 Oberseite ....5
STANDBY/ON, Fernbedienung .....8
Bakpanel (NX-SW1000).... 7
DVD-receiver (DVR-1000)
Subwoofer (NX-SW1000)

Anmärkning
Inomhus FM-antenn
① SYSTEM CONNECTOR-terminal
Anslut till DVD-receivern.
Anmärkningar
CD-uppsampling (CD UPSAMPLING)
AAC (Advanced Audio Coding)
JPEG (Joint Photographic Experts Group)
4 Hz - 22 kHz (48 kHz)
4 Hz - 44 kHz (96 kHz)
fs 16, 22,05, 24, 32, 44,1, 48 kHz
WMA
32 till 192 kbps, mono, stereo
AAC
SUBWOOFER (NX-SW1000)
ALLMÄNT
Strömförsörjning
- Modell till Australien 110-120/220-240 V, 50/60 Hz
System Advanced Yamaha Active Servo Technology
Impedans 6 Ω
CD-uppsampling (CD UPSAMPLING) 36
Radio Data System-station .....45
Radiostation 44
REPEAT A-B, fjärrkontroll ....8
REPEAT, fjärrkontroll ....8
SYSTEM CONNECTOR, DVR-1000 bakpanel ....6
SYSTEM CONNECTOR, NX-SW1000 bakpanel ....7
STANDBY/ON, DVR-1000 ovansida ... 5
STANDBY/ON, fjärrkontroll .....8
SUBTITLE, fjärrkontroll ....8
Subwoofer 4
Subwooferns placering ....10
Subwoofers placering ....10
SURROUND, fjärrkontroll ....8
■T
Teckenfönster, DVR-1000 ovansida .....5
Titelval 28
TV-typ, val ......21
■U
Undertextspråk 23
USB-terminal, DVR-1000 frontpanel ....5
■V
Antenna FM interna
①Terminale SYSTEM CONNECTOR
[INTERV. USCITA DVI]
• TIPO PROGRAMMA (PTY)
AAC (Advanced Audio Coding)
JPEG (Joint Photographic Experts Group)
Playback control (PBC)
DAC video 12 bit/108 MHz
4 Hz - 22 kHz (48 kHz)
4 Hz - 44 kHz (96 kHz)
Audio S/N 100 dB
Distorsione 0,0035%
Intervallo dinamico 90 dB
FORMATO AUDIO
Digitale Digitale compresso Dolby Digital/DTS/MPEG
PCM 16,20,24 bit
fs 44,1, 48, 88,2, 96, 176,4, 192 kHz
MP3 (ISO 9660) 24, 32, 56, 64, 96, 128, 256 kbps
fs 16, 22, 05, 24, 32, 44, 1, 48 kHz
WMA Da 32 a 192 kbps, mono, stereo
AAC
SUBWOOFER (NX-SW1000)
DATI GENERALI
Caratteristiche di
alimentazione
- Modello per l'Australia 110-120/220-240 V, 50/60 Hz
90 W+90 W (1 kHz 10% L+R)
Subwoofer 80 W (100 Hz 0,9%)
100 W (100 Hz 10%)
90 W+90 W (1 kHz 10% L+R)
Subwoofer 80 W (100 Hz 0,9%)
100 W (100 Hz 10%)
110/220V
L/R 60 W+60 W (1 kHz 0,9% L+R)
75 W+75 W (1 kHz 10% L+R)
Subwoofer 70 W (100 Hz 0,9%)
90 W (100 Hz 10%)
REPEAT A-B, telecomando ....8
REPEAT, telecomando 8
SET UP, telecomando ....8
Shuffle 26
SHUFFLE, telecomando 9
STANDBY/ON, pannello superiore DVR-1000 ....5
STANDBY/ON, telecomando ....8
Stazione radio 44
Panel trasero (DVR-1000).... 6
Panel trasero (NX-SW1000).... 7
Mando a distancia (para DVR-1000)...... 8
2.PREPARACIÓN
Conexiones.... 10
①Terminal SYSTEM CONNECTOR
Conecte al receptor DVD.
②Terminales SPEAKER
AAC (Advanced Audio Coding)
JPEG (Joint Photographic Expert Group)
4 Hz - 22 kHz (48 kHz)
4 Hz - 44 kHz (96 kHz)
fs 16, 22, 05, 24, 32, 44, 1, 48 kHz
WMA
32 a 192 kbps, mono, estéreo
AAC
SUBWOOFER (NX-SW1000)
GENERALIDADES
Alimentación
- Modelo de Australia 110-120/220-240 V, 50/60 Hz
90 W + 90 W (1 kHz 10% L + R)
Subgraves 80 W (100 Hz 0,9%)
100 W (100 Hz 10%)
- Modelo de Australia
- Modelo de Taiwán
- Modelo de Asia
- Modelo de Corea
120/240 V
L/R 70 W + 70 W (1 kHz 0,9% L + R)
90 W + 90 W (1 kHz 10% L + R)
Subgraves 80 W (100 Hz 0,9%)
100 W (100 Hz 10%)
110/220 V
L/R 60 W + 60 W (1 kHz 0,9% L + R)
75 W + 75 W (1 kHz 10% L + R)
Subgraves 70 W (100 Hz 0,9%)
90 W (100 Hz 10%)
STANDBY/ON, panel superior del DVR-1000 ....5
SUBTITLE, mando a distancia ....8
VOLUME, panel superior del DVR-1000 ....5
■Y
YUV, sistema de color .....22
■Z
DVD-receiver (DVR-1000)

Subwoofer (NX-SW1000)
Opmerking
①Systeemdisplay
Luisteren
AAC (Advanced Audio Coding)
JPEG (Joint Photographic Experts Group)
Video DAC 12 bits/108 MHz
Signaalsysteem PAL/NTSC
Videoformaat 4:3/16:9
Audio DAC 24 bits/192 kHz
Frequentierespons 4 Hz - 20 kHz (44,1 kHz)
4 Hz - 22 kHz (48 kHz)
4 Hz - 44 kHz (96 kHz)
Audio S/R 100 dB
Vervorming 0,0035%
fs 16, 22,05, 24, 32, 44,1, 48 kHz
WMA
32 tot 192 kbps, mono, stereo
AAC
Volledige decoding van Dolby Digital en DTS multikanaals audio Dolby Surround compatibele terugmenging van Dolby Digital multikanaals geluid
ALGEMEEN
Stroomvoorziening
SUBWOOFER (NX-SW1000)
ALGEMEEN
90 W+90 W (1 kHz 10% L+R)
Subwoofer 80 W (100 Hz 0,9%)
100 W (100 Hz 10%)
90 W+90 W (1 kHz 10% L+R)
Subwoofer 80 W (100 Hz 0,9%)
100 W (100 Hz 10%)
110/220 V
L/R 60 W+60 W (1 kHz 0,9% L+R)
75 W+75 W (1 kHz 10% L+R)
Subwoofer 70 W (100 Hz 0,9%)
90 W (100 Hz 10%)
STANDBY/ON, DVR-1000 bovenpaneel ....5
Stroomkabel 4
Stroomtoevoer, DVR-1000 achterpaneel ....6
Подключение сабвуфера.
Примечание
“SLEEP 10” → “SLEEP 9”.... →
“SLEEP 2” → “SLEEP 1”
Отмена таймера сна
AAC (Advanced Audio Coding)
JPEG (Joint Photographic Expert Group)
CAUTION VISIBLE AND INVISIBLE LASER RADIATION WHEN OPEN, AVOID EXPOSURE TO BEAM
ADVARSEL SYN LIG OG USYN LIG LASERSTRÅLING VED ÅBNING UNDGÅ UDSÄTTE LSE FOR STRÅLING
ADVARSEL SYNLIG OG USYNLIG LASERSTRÅLING NÅR DEKSEL
ÄPNES UNNGÅ EKSPONERING FOR STRÅLEN
VARNING SYN LIG OCH OSYN LIG LASERSTRÅLNING NÄR DENNA DEL ÅR ÖPPN AD BETRAKTA EJ STRÅLEN
VARO ! AVATTAESSA OLET ALTTENA NÄKYVÄLLE JA
NÄKYMÄTTÖMÄLLE LASER SÄTEILYLLE, ÄLÄ KATSO SÄTEESHEN
VORSICHT SICHTBARE UND-UNSICHTBARE LASERSTRAHLUNG
WINN ABDECKUNG GIOFFNET NICHT DEM STRAHL. AUSSETSEN
DANGER VISIBLE AND INVISIBLE LASER RADIATION WHEN OPEN AVOID DIRECT EXPOSURE TO BEAM
ATTENTION RAYONNEMENT LASER VISIBLE ET INVISIBLE EN CAS D'OUVERTURE EXPOSITION DANGEREUSE AU PAISCEAU

LASER SAFETY
This unit employs a laser. Due to possible eye injury, only a qualified service person should remove the cover or attempt to service this device.
DANGER
This unit emits visible laser radiation when open. Avoid direct eye exposure to beam. When this unit is plugged into a wall outlet, do not place your eyes close to the opening of the disc loader and other openings or look inside.
LASER
Type Semiconductor laser GaAlAs
Wave length 650 nm (DVD)
784 nm (VCD/CD)
Output Power 7 mW (DVD/VCD/CD)
Beam divergence 60 degrees
CAUTION
Use of controls or adjustments or performance of procedures other than those specified herein may result in hazardous radiation exposure.
SÉCURITÉ LASER
© 2008 YAMAHA CORPORATION All rights reserved.

- CAUTION: READ THIS BEFORE OPERATING YOUR UNIT
- WARNING
- CAUTION
- CONTENTS
- INTRODUCTION
- PREPARATION
- BASIC OPERATION
- OPERATIONS
- ON-SCREEN MENU
- OTHER FEATURES
- ADDITIONAL INFORMATION
- APPENDIX
- NOTES ABOUT DISCS
- NOTES
- CLEANING DISCS
- AVOID HIGH TEMPERATURES, MOISTURE, WATER AND DUST
- AVOID CONDENSATION PROBLEM
- DISC CARE
- CABINET CARE
- CHOOSING A SUITABLE LOCATION
- REGION CODES
- SOUND FIELD FEATURES
- MAIN UNIT ■SUPPLIED ACCESSORIES
- NOTE
- FUNCTIONAL OVERVIEW
- TOP AND FRONT PANELS (DVR-1000)
- ①SYSTEM DISPLAY PANEL
- ②PCM/ DIGITAL/DTS INDICATOR
- ③∨ VOLUME ∧
- ④INPUT
- ⑤
- ⑥
- ⑦00
- ⑧ △
- ⑨
- ⑩USB TERMINAL
- ⑪STANDBY/ON
- ⑫DISC LOADING SLOT
- ⑬REMOTE CONTROL SENSOR
- ⑭PHONES JACK
- ⑮PORTABLE JACK
- REAR PANEL (DVR-1000)
- (EUROPE AND RUSSIA MODELS ONLY)
- REAR PANEL (NX-SW1000)
- REMOTE CONTROL (FOR DVR-1000)
- ①STANDBY/ON( )
- ②NUMERIC KEYPAD (0 - 9)
- ③TREBLE/BASS
- ④REPEAT
- FREQ/TEXT
- ⑤REPEAT A-B
- ⑦ ON SCREEN
- ⑧ENTER
- ⑨SET UP
- ⑩AREA
- ⑪MODE
- ⑫ENHANCER
- ⑬SURROUND
- ⑭INPUT SELECTION BUTTONS
- ⑮SUBTITLE
- ⑯ANGLE
- ⑰EJECT()
- ⑱SLEEP
- ⑲DIMMER
- ⑳NIGHT
- ②1
- ⑳PROG
- ②3SHUFFLE
- PTY SEEK START
- ⑳00
- PTY SEEK MODE
- ②5
- √ PRESET
- ⑳MENU
- ②7 CURSORS ( ◀ / ▷ / △ / ▽ )
- ⑳TOP MENU/RETURN
- ⑲DIRECT
- ③0VOLUME (+/-)
- ③1MUTE
- ③2AUDIO
- ③3ZOOM
- CONNECTIONS
- ROLES AND LAYOUT OF THE SPEAKERS
- ①FRONT SPEAKERS (L, R)
- ②SUBWOOFER
- SYSTEM CONNECTIONS
- CONNECTING THE SPEAKERS
- CONNECTING THE SPEAKER CABLES
- CONNECTING THE SUBWOOFER
- CONNECTING THE DVD RECEIVER AND THE SUBWOOFER
- OTHER CONNECTIONS
- CONNECTING A TV
- COMPONENT VIDEO OUT JACKS
- VIDEO OUTPUT JACK
- S VIDEO OUTPUT JACK
- AV MONITOR OUT TERMINAL (EUROPE AND RUSSIA MODELS ONLY)
- CONNECTING AN HDMI COMPONENT
- VIEWING AND LISTENING TO PLAYBACK FROM AN HDMI COMPONENT
- CONNECTING THE FM/AM ANTENNAS
- CONNECTING EXTERNAL AV COMPONENTS
- VIEWING AND LISTENING TO PLAYBACK
- USING THE VCR FOR RECORDING DVD PLAYBACK
- CONNECTING A DIGITAL AUDIO COMPONENT
- LISTENING TO PLAYBACK
- CONNECTING A USB DEVICE
- USB TERMINAL
- GETTING STARTED
- INSERTING BATTERIES INTO THE REMOTE CONTROL
- TO REPLACE THE BATTERIES
- USING THE REMOTE CONTROL
- SETTING A TV
- SELECTING THE TV TYPE
- SELECTING COLOR SYSTEM BY USING THE REMOTE CONTROL
- SETTING THE TV DISPLAY
- SELECTING THE COLOR SYSTEM (EUROPE AND RUSSIA MODELS ONLY)
- SETTING LANGUAGE PREFERENCES
- ON-SCREEN DISPLAY (OSD) LANGUAGE
- AUDIO, SUBTITLE AND DISC MENU LANGUAGES
- SETTING SPEAKER CHANNELS
- DISC OPERATION
- IMPORTANT
- PLAYING DISCS
- BASIC PLAYBACK CONTROLS
- TO PAUSE PLAYBACK
- TO SELECT ANOTHER TRACK/CHAPTER
- TO SEARCH BACKWARD/FORWARD
- TO STOP PLAYBACK
- SELECTING VARIOUS REPEAT SHUFFLE FUNCTIONS
- REPEAT PLAYBACK
- REPEAT CHAPTER/TITLE/DISC (DVD-VIDEO)
- REPEAT TRACK/DISC (EXCEPT DVD-VIDEO)
- REPEATING A SECTION WITHIN A CHAPTER/TRACK
- SHUFFLE (EXCEPT VR FORMAT DISC)
- OTHER OPERATIONS FOR VIDEO PLAYBACK (DVD/VCD/SVCD)
- USING THE DISC MENU
- TO SELECT A PLAYBACK FEATURE OR ITEM
- TO ACCESS OR REMOVE THE MENU
- DISPLAYING DISC INFORMATION AND THE CURRENT STATUS
- ZOOMING IN
- RESUMING PLAYBACK FROM THE LAST STOPPED POINT
- TO CANCEL THE RESUME MODE
- ADVANCING BY FRAME
- CHANGING SOUND TRACK LANGUAGE
- FOR VCD - CHANGING THE AUDIO CHANNEL
- CHANGING SUBTITLE LANGUAGE (DVD ONLY)
- VIEWING FROM ANOTHER ANGLE (DVD ONLY)
- SELECTING A TITLE (DVD ONLY)
- PLAYBACK CONTROL (PBC) (VCD ONLY)
- FOR VCDS WITH PLAYBACK CONTROL (PBC) FEATURE (VERSION 2.0 ONLY)
- PLAYING MP3/WMA/JPEG/DIVX ® DISCS
- MP3 DISC FEATURES
- THE MP3-CD FORMATS (ISO9660 FORMAT) SUPPORT THE FOLLOWING
- THE FOLLOWING FEATURES ARE NOT SUPPORTED FOR MP3 DISCS
- ADDITIONAL NOTE FOR MP3 DISC PLAYBACK
- PLAYING MP3 MUSIC AND A JPEG PICTURE SIMULTANEOUSLY
- SPECIAL FEATURES FOR PICTURE DISC PLAYBACK
- PREVIEW FUNCTION
- ZOOMING PICTURES
- MULTI-ANGLE PLAYBACK
- SCAN EFFECT
- USING A USB DEVICE
- SUPPORTED USB DEVICES
- PLAYING DATA FILES
- TO EXIT FROM THE USB MODE
- DVD SETUP MENU OPTIONS
- MENU OVERVIEW
- THIS SETUP IS CARRIED OUT VIA THE TV, ENABLING YOU TO CUSTOMIZE THE DVD RECEIVER TO SUIT YOUR PARTICULAR REQUIREMENTS
- GENERAL SETUP MENU
- LOCKING/UNLOCKING DISCS FOR VIEWING
- LOCK
- UNLOCK
- PROGRAMMING DISC TRACKS (EXCEPT PICTURE CD/MP3/WMA/DIVX® DISCS)
- TO PROGRAM YOUR FAVORITE TRACKS/CHAPTERS
- TO REMOVE A TRACK
- OSD LANGUAGE
- SCREEN SAVER
- ON
- OFF
- TURNING THE AUTO STANDBY FUNCTION ON/OFF
- DIVX®VOD REGISTRATION CODE
- AUDIO SETUP MENU
- SETTING THE HDMI AUDIO
- AUTO
- PCM
- SPEAKER SETUP
- CD UPSAMPLING
- 88.2 KHZ (X2)
- LIP SYNCHRONIZATION
- VIDEO SETUP MENU
- TV TYPE
- TV DISPLAY
- PICTURE SETTINGS
- STANDARD
- BRIGHT
- SOFT
- PERSONAL
- BRIGHTNESS
- SHARPNESS
- CONTRAST
- TINT
- COLOR
- ADJUSTING THE ADVANCED PICTURE SETTINGS
- [DCDI]
- [GAMMA]
- [CHROMA DELAY]
- [WIDE SCREEN FORMAT]
- NL STRETCH
- 4:3 PILLAR BOX
- [HDMI VIDEO]
- 480P
- 576P
- 720P
- 1080I
- 1080P
- [TRUE LIFE]
- [DVI OUTPUT RANGE]
- ENHANCED
- PROGRESSIVE FUNCTION
- COMPONENT (EUROPE AND RUSSIA MODELS ONLY)
- PREFERENCE SETUP MENU
- AUDIO, SUBTITLE AND DISC MENUS
- RESTRICTING PLAYBACK WITH PARENTAL CONTROL
- RATING EXPLANATION
- 1 KID SAFE
- 2 G
- 3 PG
- 4 PG 13
- 5 PGR
- 6 R
- 7 NC 17
- 8 ADULT
- PBC
- MP3/JPEG NAVIGATOR
- WITH MENU
- WITHOUT MENU
- PLAYBACK VR FORMAT DISCS
- ORIGINAL LIST
- PLAY LIST
- CHANGING THE PASSWORD
- CHANGING THE DIVX SUBTITLE
- RESTORING TO THE FACTORY DEFAULTS
- TUNER OPERATIONS
- TUNING RADIO STATIONS
- PRESETTING RADIO STATIONS
- AUTOMATIC PRESETTING
- MANUAL PRESETTING
- SELECTING A PRESET RADIO STATION
- DELETING A PRESET RADIO STATION
- SETTING FREQUENCY STEP (EXCEPT EUROPE AND RUSSIA MODELS)
- TO CHANGE THE AM BAND TO 10KHZ AND THE FM BAND TO 100KHZ
- RECEIVING RADIO DATA SYSTEM STATIONS (EUROPE AND RUSSIA MODELS ONLY)
- TO SELECT STATIONS BY PROGRAM TYPE (GENRE)
- TO CANCEL PTY SEEK
- TO SWITCH THE INFORMATION DISPLAY OF RADIO DATA SYSTEM
- INFORMATION TYPE
- SOUND CONTROLS
- USING THE VIRTUAL SURROUND FUNCTION
- TURNING THE VIRTUAL SURROUND FUNCTION ON/OFF
- TO DISABLE THE VIRTUAL SURROUND FUNCTION
- CHANGING THE VIRTUAL SURROUND AREA
- NARROW
- WIDE
- CHANGING THE VIRTUAL SURROUND MODE
- MUSIC
- MOVIE
- ADJUSTING THE SOUND BALANCE
- SETTING MUSIC ENHANCER
- TO DISABLE THE MUSIC ENHANCER FUNCTION
- NIGHT LISTENING MODE
- ADJUSTING THE TREBLE/BASS LEVEL
- ADJUSTING THE VOLUME LEVEL
- TO MUTE THE VOLUME TEMPORARILY
- OTHER FUNCTIONS
- SWITCHING TO STANDBY MODE
- DIMMING THE DISPLAY SCREEN
- SETTING THE SLEEP TIMER
- TO CANCEL THE SLEEP TIMER
- RECORDING ON AN EXTERNAL AV COMPONENT
- TROUBLESHOOTING
- GLOSSARY
- AAC (ADVANCED AUDIO CODING)
- ANALOG
- ASPECT RATIO
- BIT
- BIT RATE
- COMPONENT VIDEO
- DISC MENU
- DIVX
- DOLBY DIGITAL
- DOLBY SURROUND PRO LOGIC II
- DTS (DIGITAL THEATER SYSTEMS)
- HDMI
- INTERLACE
- JPEG (JOINT PHOTOGRAPHIC EXPERTS GROUP)
- MP3 (MPEG AUDIO LAYER-3)
- MPEG (MOVING PICTURES EXPERTS GROUP)
- PARENTAL CONTROL
- PLAYBACK CONTROL (PBC)
- PROGRESSIVE SCAN
- REGION CODE
- S-VIDEO
- SURROUND
- VR FORMAT (VIDEO RECORDING FORMAT)
- SPECIFICATIONS
- DVD RECEIVER (DVR-1000)
- TUNER SECTION
- DISC SECTION
- AUDIO FORMAT
- GENERAL
- FRONT SPEAKER (NX-P1000)
- SUBWOOFER (NX-SW1000)
- AMPLIFIER SECTION
- INDEX
- NUMERICS
- A
- B
- C
- D
- E
- F
- G
- H
- J
- L
- M
- N
- 0
- P
- R
- S
- IT
- U
- V
- W
- Y
- Z
- LIMITED GUARANTEE FOR EUROPEAN ECONOMIC AREA (EEA) AND SWITZERLAND
- CONDITIONS
- HINWEIS
- ALLGEMEINES
- ANMÄRKNING
- ANMÄRKNINGAR
- CD-UPPSAMPLING (CD UPSAMPLING)
- ALLMÄNT
- T
- [INTERV. USCITA DVI]
- FORMATO AUDIO
- DATI GENERALI
- 2.PREPARACIÓN
- JPEG (JOINT PHOTOGRAPHIC EXPERT GROUP)
- GENERALIDADES
- OPMERKING
- ①SYSTEEMDISPLAY
- LUISTEREN
- ALGEMEEN
- ПОДКЛЮЧЕНИЕ САБВУФЕРА
- ПРИМЕЧАНИЕ
- ОТМЕНА ТАЙМЕРА СНА
- LASER SAFETY
- DANGER
- LASER
- SÉCURITÉ LASER
Brand : YAMAHA
Model : DVX-1000
Category : Home Theater System