
JOLIE - Baby bouncer CHICCO - Free user manual and instructions
Find the device manual for free JOLIE CHICCO in PDF.
| Product Type | Baby Bouncer |
| Brand | Chicco |
| Model | Jolie |
| Maximum supported weight | 9 kg (up to approximately 6 months) |
| Power | 2 LR14-C batteries (not included) for music and vibration unit |
| Main functions | Vibration (2 levels), music (5 relaxing tunes), nature sounds (3 sounds), adjustable volume (2 levels) |
| Adjustments | Backrest recline (2 positions), height-adjustable headrest, fixed or rocking position |
| Safety harness | 5-point restraint system with adjustable waist straps |
| Play bar | Removable, with rotating joint and hanging toys |
| Textile composition | Exterior and padding: 100% polyester; headrest: 50% cotton, 50% polyester |
| Care and cleaning | Removable cover, hand wash cold; do not bleach, tumble dry, iron, or dry clean |
| Safety | Adult supervision required; do not use on elevated surfaces; do not leave unattended; do not use if child can sit up unassisted |
| Assembly | Adult assembly only; check for click-lock fastenings |
| Usage age | From birth to 6 months (up to 9 kg) |
| Standards | Compliant with WEEE directive (2002/96/EC) |
Frequently Asked Questions - JOLIE CHICCO
User questions about JOLIE CHICCO
0 question about this device. Answer the ones you know or ask your own.
Ask a new question about this device
Download the instructions for your Baby bouncer in PDF format for free! Find your manual JOLIE - CHICCO and take your electronic device back in hand. On this page are published all the documents necessary for the use of your device. JOLIE by CHICCO.
USER MANUAL JOLIE CHICCO
natural_image
Illustration of a blue and white helmet device with a 'chisco' label on the front panel (no other text or symbols)• ISTRUZIONI D'USO
• MODE D'EMPLOI
• GEBRAUCHSANLEITUNG
• INSTRUCTIONS FOR USE
• INSTRUCCIONES DE USO
• INSTRUÇÕES PARA A UTILIZAÇÃO
• GEBRUIKSAANWIJZINGEN
• ANVÄNDNINGSINSTRUKTIONER
• NÁVOD K POUŽITÍ
• INSTRUKCIE SPOSOBU UŻYCIA
• ΟΔΗΓΙΕΣ ΧΡΗΣΗΣ
• KULLANIM BİLGİLERİ
• ИНСТРУКЦИЯ ПО ЭКСПЛУАТАЦИИ
• تعليمات الاستعمال

1 PRIMA DELL'USO LEGGERE ATTENTAMENTE LE ISTRUZIONIECONSERVARLEPERINFORMAZIONI FUTURE. IL VOSTRO BAMBINO POTREBBE FARSI MALE SE NON SEGUITE LE ISTRUZIONI.
F LIRE ATTENTIVEMENT CES INSTRUCTIONS
AVANT UTILISATION ET LES CONSERVER
POUR DE FUTURES BESOINS DE REFERENCE.
VOTRE ENFANT RISQUE DE SE BLESSER SI
VOUS NE SUIVEZ PAS CES INSTRUCTIONS.
D VOR DEM GEBRAUCH SÖRGFÄLTIG DIE ANWEISUNGENLESENUNDFÜRZUKUNFTIGES NACHSCHLAGEN AUFBEWAHREN. IHR KIND KÖNNT E SICH WEHTUN, WENN DIESE ANWEISUNGEN NICHT BEFOLGT WERDEN.
GB READ THE INSTRUCTIONS CAREFULLY BEFORE USE AND KEEP THEM FOR FUTURE REFERENCE. YOUR CHILD MAY BE HURT IF YOU DO NOT FOLLOW THE INSTRUCTIONS.
E ANTES DEL USO LEER ATENTAMENTE LAS INSTRUCCIONES Y CONSERVARLAS PARA FUTURASCONSULTAS.SUHIJO PODRIA HACERSE DANO SI NO SE SIGUEN ESTAS INSTRUCCIONES.
P ANTES DA UTILIZAÇÃO, LEIA ATENTAMENTE AS INSTRUÇÕES É CONSERVE-AS PARA CONSULTAS FUTURAS. O SEU FILHO PODERÁ FERIR-SE SE NÃO FOREM SEGUIDAS ESTAS INSTRUÇÕES.
LEES DE INSTRUCTIES VOOR HET GEBRUIK ZORGVULDIG DOOR EN BEWAAR ZE OM ZE LATER TE KUNNEN RAADPLEGEN. UW KIND KAN ZICH BEZEREN ALS U ZICH NIET AAN DEZE INSTRUCTIES HOUDT.
S LÄS ..NOGA DESSA INSTRUKTIONER FÖRE ANVÄNDNINGEN OCH SPARA .. DEM FÖFRAMTIDA BRÜK. DITT BARN KAN GÖRA SIG ILLA OM DU INTE FÖLJER DESSA INSTRUKTIONER.
PŘED POUŽITÍM SI POZORNĚ PROČTĚTE TENTO, NAVOD.AUSCHOVEJTE JEJ PRO PRIPADNE DALSI POUZITÍ. VASE DITE BY SE MOHLO ZRANIT, POKUD SE NEBUDETE RIDITTĚMITO POKYNY.
PL PRZED PRZYSTAPIENIEM DQ UŻYTKOWANIA PRODUKTU PRÓSIMY UWAŻNIE PRZĘCZYTAĆ NINIEJSZA, INSTRUKCJĘ I ZACHOWAĆ JĄ NA PRZYSZŁOŚĆ. NIE PRZESTRZĘGAJĄC ZALECEN INSTRUKCJI, DZIECKO MOŻE WYRZĄDZIC SOBIE KRZYWDE.
GR ΠΡΙΝΑΠΟΤΗΧΡΗΣΗΔΙΑΒΑΣΤΕΠΡΟΣΕΚΤΙΚΑ
ΤΙΣ ΟΔΗΓΙΕΣ ΚΑΙ ΚΡΑΤΗΣΤΕ ΤΙΣ ΓΙΑ ΝΑ ΤΙΣ
ΣΥΜΒΟΥΛΕΥΕΣΤΕ ΣΤΟ ΜΕΛΛΟΝ. ΤΟ ΠΑΙΔΙ
ΣΑΣ ΜΠΟΡΕΙ ΝΑ ΤΡΑΥΜΑΤΙΣΤΕΙ ΑΝ ΔΕΝ
ΤΗΡΕΙΤΕ ΑΥΤΕΣ ΤΙΣ ΟΔΗΓΙΕΣ.
TR KULLANIM ÖNCESİ BU KULLANIM BİLGİLERİNİ DIKKATLICE OKUYUNUZ VE İLERDE REFERANS ALMAK ÜZERE SAKLAYINIZ. BU ONERILERE
UYULMADIĞI TAKDİRDE ÇOCUĞUNUZ YARALANABİLİR.

natural_image
Simple diagram of a curved object with two rounded ends, labeled 'A' in the top-left corner (no text or symbols on the object itself)
natural_image
Diagram of two medical or surgical devices labeled X and Y, connected by tubing (no text or symbols beyond labels)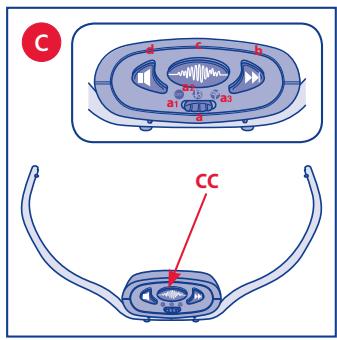

natural_image
Illustration of a blue hairpin with a bow and handle, labeled 'G' in the top-left corner (no text or symbols on the object itself)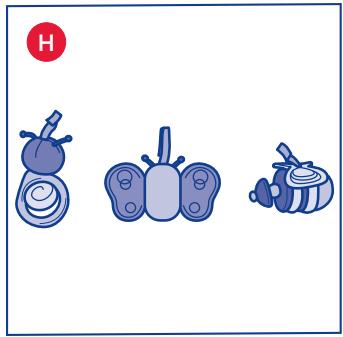
natural_image
Illustration of three stylized vegetables: a leaf, a pepper, and a striped apple, with no text or symbols present.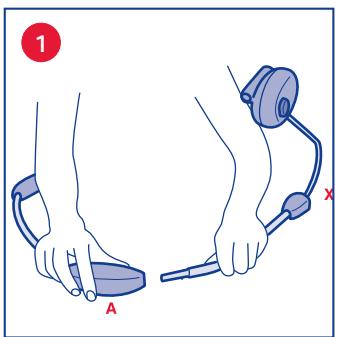


natural_image
Illustration of a blue medical or surgical device with curved connectors and a circular component, no text or symbols present.

natural_image
Diagram of a dome-shaped structure with two red highlighted sections, no text or symbols present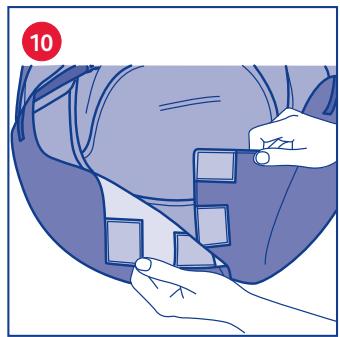
natural_image
Illustration of hands placing square buttons on a dark fabric surface (no text or symbols)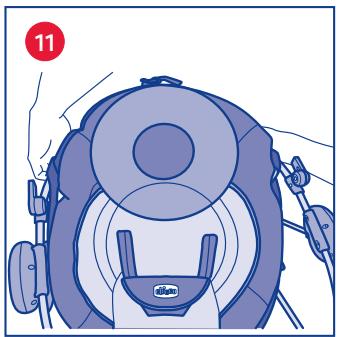
natural_image
Illustration of a person wearing a blue helmet and holding a camera, with no visible text or symbols.
natural_image
Illustration of a person's arm and wrist with a bandage, no text or symbols present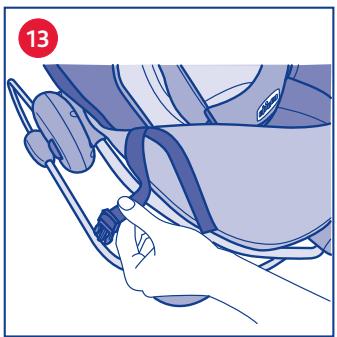
natural_image
Illustration of a hand holding a medical device with a numbered label (13) in the top-left corner, no text or symbols on the device itself.
natural_image
Illustration of a person adjusting a blue bag with a spoon, no text or symbols present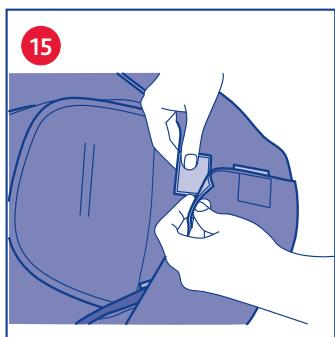
natural_image
Illustration of a person using a medical or surgical tool to adjust or install a component on a purple surface (no text or symbols visible)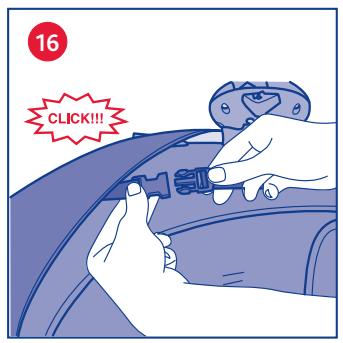
natural_image
Illustration of a backpack with two side panels and a red circular badge labeled '17' (no text or symbols on the backpack itself)
natural_image
Mechanical assembly diagram showing a sewing machine needle inserted into a car wheel (no text or symbols present)
natural_image
Illustration of a car steering wheel with head, dashboard, and gear (no text or symbols)
natural_image
Illustration of a hand holding a blue object with a red circular badge labeled '20' (no text or symbols on the object itself)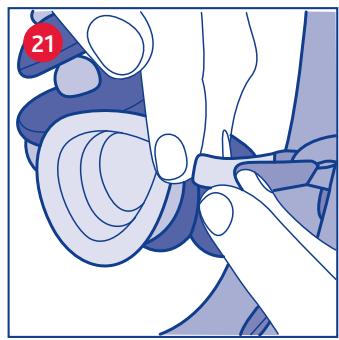
natural_image
Illustration of hands fastening a blue object with a red label '21' (no text or symbols on the object itself)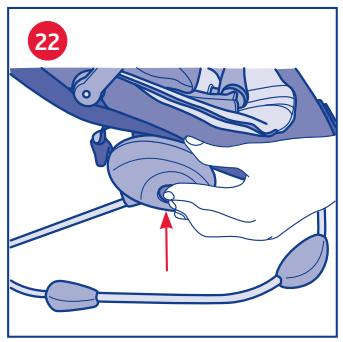

natural_image
Illustration of a blue and gray baby seat with attached straps and a red arrow indicating rotation (no text or symbols)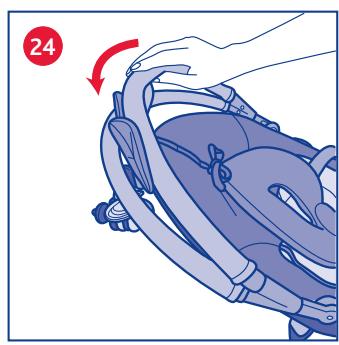
natural_image
Illustration of a hand adjusting a seatbelt with a red arrow indicating rotation (no text or symbols)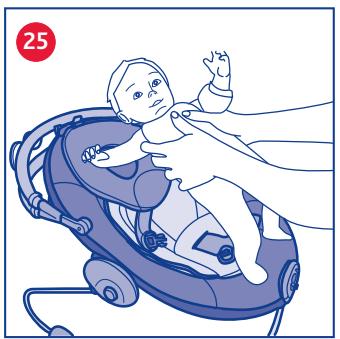
natural_image
Illustration of a baby in a baby car being held by a hand, with no text or symbols present.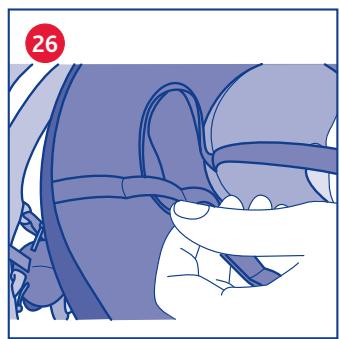
natural_image
Illustration of a hand adjusting a car seatbelt (no text or symbols visible)
natural_image
Illustration of a baby in a stroller inside a vehicle (no text or symbols)
natural_image
Illustration of a person wearing a VR headset inside a blue racing simulator (no text or symbols)I Jolie
IMPORTANTE:
LEGGERE ATTENTAMENTE QUESTO LIBRETTO DI ISTRUZIONI PER NON COMPROMETTERE LA SICUREZZA DEL VOSTRO BAMBI-NO. IMPORTANTE! CONSERVARE QUESTE INFORMAZIONI PER FUTURO RIFERIMENTO. ATTENZIONE: PRIMA DELL'USO RIMUOVERE ED ELIMINARE EVENTUALI SACCHETTI DI PLASTICA E TUTTI GLI ELEMENTI FACENTI PARTE DELLA CONFEZIONE DEL PRODOTTO O COMUNQUE TENERLI LONTANI DALLA PORTATA DEI BAMBINI.
AVVERTENZE
WARNING: BEFORE USE, REMOVE AND DISPOSE OF ALL PLASTIC BAGS AND PACKAGING MATERIALS AND KEEP THEM OUT OF REACH OF CHILDREN.
WARNINGS
- WARNING: Never leave your child unattended in the reclined cradle.
- WARNING: Do not use the reclined cradle once your child can sit unaided, roll over or is able to stand up using his hands, knees and feet.
- WARNING: This reclined cradle is not intended for prolonged periods of sleeping. The reclined cradle does not replace a cot or a bed. Should your child need to sleep, then it should be placed in a suitable cot or bed.
- WARNING: It is dangerous to use the reclined cradle on an elevated surface: e.g. a table, chair, etc.
- WARNING: Always use the restraint system when the child is in the reclined cradle; adjust the length of the straps as necessary.
- WARNING: Never use the toy bar as a handle to carry the reclined cradle.
- WARNING: Age of permitted use: from birth to 9 kg / 19,8 Lbs (6 months).
- WARNING: Do not use the reclined cradle if any parts are broken or missing. Periodically check for worn parts, loose screws, worn or frayed fabrics and immediately replace and damaged parts.
- WARNING: Do not use accessories or spare parts that are not approved by the manufacturer.
- WARNING: This product and all its components must be assembled by adults only.
- WARNING: Do not use the reclined cradle for more than one child at a time.
- WARNING: Never leave the reclined cradle on surfaces which are not perfectly level.
-
WARNING: Do not allow children to play unsupervised near the reclined cradle.
-
WARNING: To prevent the risk of fire, never place the reclined cradle near electrical appliances, gas cookers or other sources of intense heat.
- WARNING: Make sure that the cover is always fitted correctly on the reclined cradle frame.
- WARNING: Never use this reclined cradle to carry a child in motorised vehicles.
- WARNING: Always check that all the components are fitted and assembled correctly.
- WARNING: Do not place the reclined cradle with the child inside near windows or walls, where strings, curtains or other objects may be used by the child to climb out of the highchair, with consequent risk of suffocation and/or choking.
- WARNING: Do not place the reclined cradle near windows or walls, to prevent the child from affecting the stability of the reclined cradle, making it topple over.
- WARNING: Remove your child from the reclined cradle if it needs to be moved.
- WARNING: Do not attach any string to lengthen the toy fasteners on the bar and do not make any knots or loops: This could cause accidental formation of running knots which could lead to strangulation.
- WARNING: This toy must only be used under adult supervision.
- WARNING: Check the toy regularly for signs of wear and damage and to ensure that it is assembled correctly. Should any parts on the toy bar or hanging toy be damaged, do not use them and keep out of reach of children.
SAFETY OF THE ELECTRICAL PARTS
- WARNING: Batteries must only be fitted by an adult.
- WARNING: Use the same or equivalent alkaline batteries as those recommended for the correct functioning of this product. (for the music and vibration box: 2 x LR14-C type batteries).
- WARNING: make sure the batteries are fitted with their poles in the right direction.
- WARNING: Never mix new and old or different types of batteries.
- WARNING: Always keep batteries and tools out of the reach of children.

- WARNING: Do not short-circuit the battery terminals.
- WARNING: Always remove spent batteries from the toy to avoid the danger of leakage from the battery which can damage the product.
- WARNING: Always remove the batteries if the product will not be used for a long period of time
- WARNING: Remove the batteries from the music box before disposing of the product.
- WARNING: Do not burn or dispose of old batteries into the environment. Dispose of them at an appropriate differentiated collection point.
- WARNING: If the batteries happen to leak liquid, replace them immediately, making sure you clean the compartment beforehand; wash your hands thoroughly if you come into contact with any such liquid.
- WARNING: Always dispose of leaking batteries immediately: they can cause burns or other types of injuries.
- WARNING: Do not attempt to recharge non-rechargeable batteries: they might explode.
- WARNING: The use of rechargeable batteries is not recommended as the music box may not work properly.
- WARNING: If using rechargeable batteries, remove them from the toy before recharging them.
- WARNING: Do not leave the product out in the rain; water infiltrations will damage the electronic circuit.
- WARNING: Rechargeable batteries must only be recharged under adult supervision.
CARE AND MAINTENANCE
FABRIC COMPOSITION
• LINING: All new materials. Outer surface: 100% polyester Padding: 100% polyester
- BOOSTER CUSHION: All new materials. 100% polyester outer cover 100% polyester padding.
• HEAD REST: all new materials, outer lining 50% cotton 50% Polyester. Padding 100% Polyester
- WARNING: This product requires periodic maintenance.
- WARNING: The cleaning and maintenance operations must only be carried out by an adult.
- WARNING: Periodically inspect the bouncing cradle to check for broken, torn or missing parts. Do not use the product if there are any signs of wear or damage.
- Please refer to the care label for instructions on how to wash the fabric parts.
The Product has a fully removable lining.

Hand wash in cold water

Do not bleach

Do not use a dryer

Do not iron

Do not dry clean
- Check that the fabric and stitching are in good condition each time you wash it.
- Prolonged exposure to direct sunlight can cause the fabric to fade.
MAINTENANCE
Use a soft damp cloth to clean the toy bar, the hanging wooden toys and the music box.

(GB) THIS PRODUCT COMPLIES WITH EU DIRECTIVE 2002/96/EC.
The crossed bin symbol on the appliance indicates that the product, at the end of its life, must be disposed of separately from domestic waste, either by taking it to a
separate waste disposal site for electric and electronic appliances or by returning it to your dealer when you buy another similar appliance. The user is responsible for taking the appliance to a special waste disposal site at the end of its life. If the disused appliance is collected correctly as separate waste, it can be recycled, treated and disposed of ecologically; this avoids a negative impact on both the environment and health, and contributes towards the recycling of the product's materials. For further information regarding the waste disposal services available, contact your local waste disposal agency or the shop where you bought the appliance.
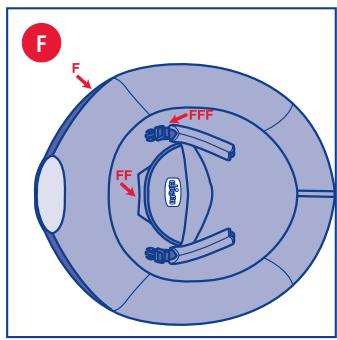
COMPONENTS
A. Front Feet
B. Side feet (X) and (Y) with joints to adjust the tilt angle of the bouncing cradle
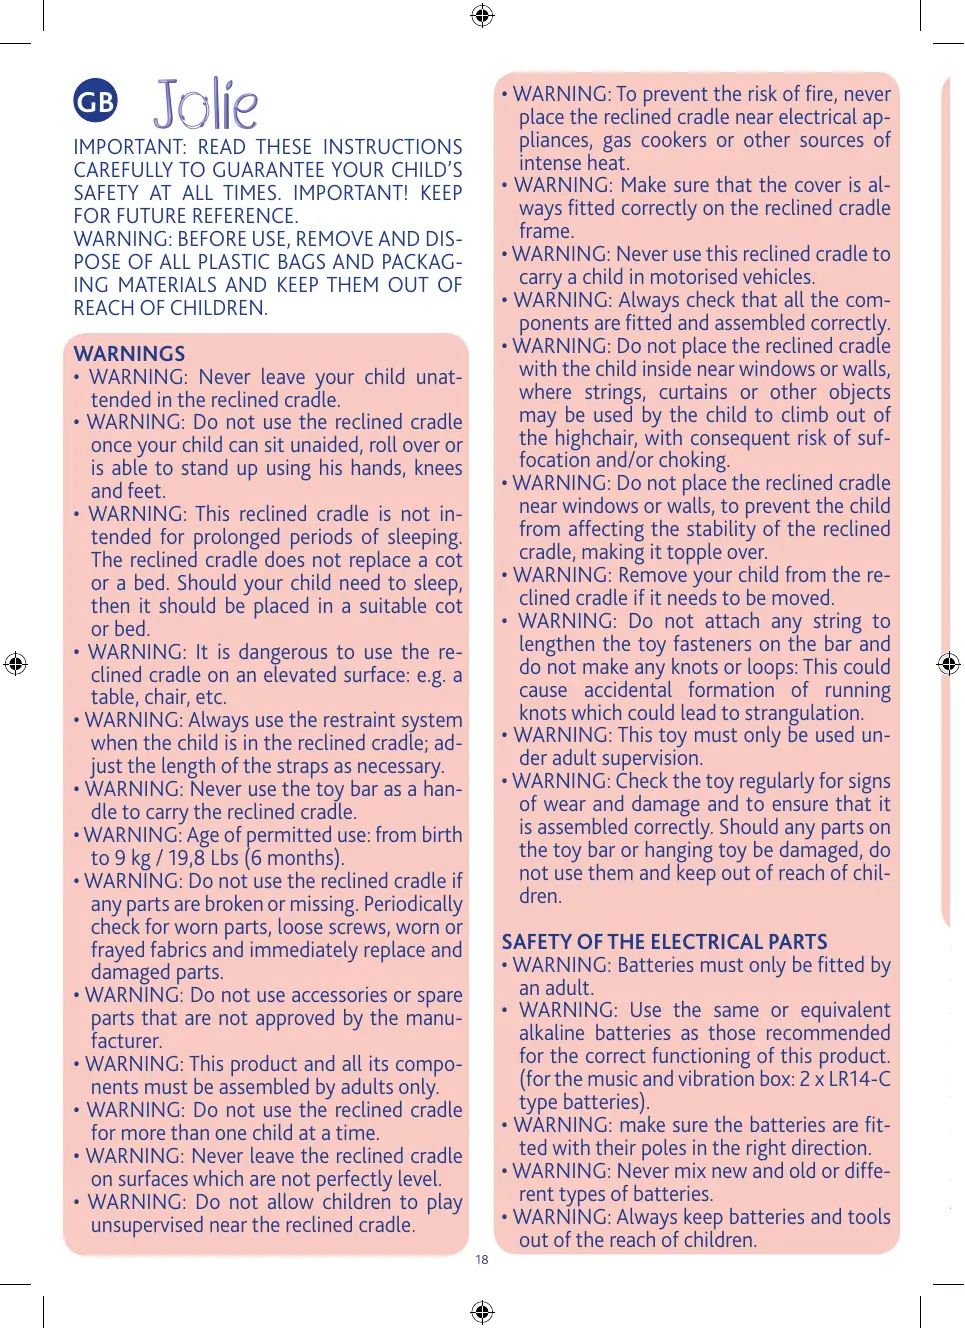
C. Front seat support with music and vibration box
CC. Music and vibration box
a. Menu button:
a.1 Box OFF button
a.2 Relaxing tunes selector (5 tunes)
a.3 Nature sounds selector (3 sounds)
b. Relaxing tunes and nature sounds browse button
c. Vibration button (2 levels)
d. Volume button (2 levels)
D. Rear seat support
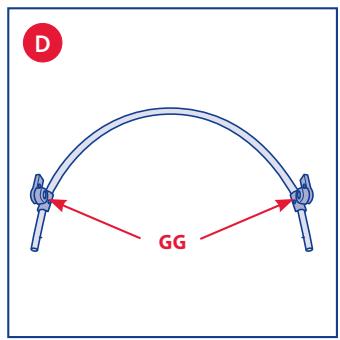
E. Booster cushion; EE. Headrest
F. Seat;
FF. Crotch strap;
FFF. Lap belt
G. Toy bar
GG. Toy bar rotating fixtures
H. Hanging toys
ASSEMBLY
The bouncing cradle requires a quick assembly process before being used.
Remove all the packaging carefully.
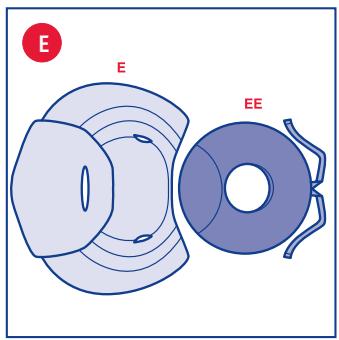
Grasp the front legs (A) and connect them to the side leg X, as shown in diagram no. 1, so that the tilt angle adjuster fixture button is on the outside.
Insert the pin to connect the front legs to the side leg X tube, you will hear it click into place when positioned correctly (diag. 2).
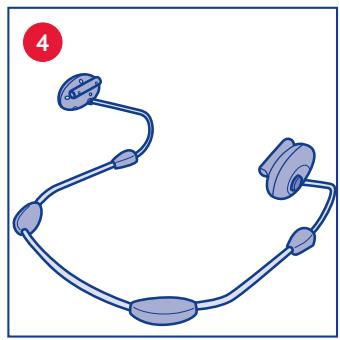
Repeat the above procedure for side leg Y, checking that you hear it click into position correctly (diag. 3). Check that the structure is assembled as shown in diagram 4 and the 2 pins at the base of the front legs are connected properly.
Connect the front seat support (C) to the relative fixtures (diag. 5)
inserting the ends of the frame tubes into the relative slots; you will hear it click into place when positioned correctly (diag. 6).
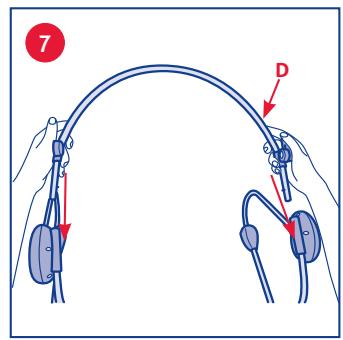
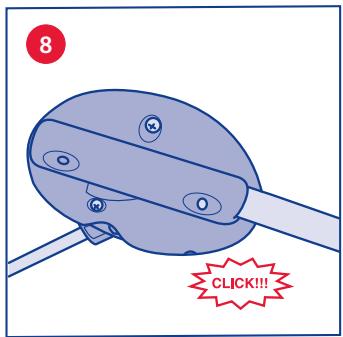
Repeat the same operation for the rear seat support (D), as shown in diagram 7, checking that the pins are securely fastened (diag. 8). You will hear them click into place when positioned correctly.
Check that all four pins are fastened correctly in place.
FITTING AND REMOVING THE FABRIC LINING
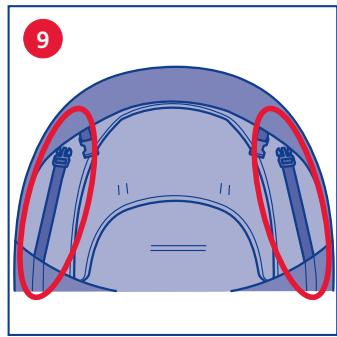
Open the 2 harness straps on the back of the seat (diag. 9) and open the rear velcro fasteners found underneath the seat (diag. 10).
Insert the headrest in the top section of the lining, and slide it down over the rear seat support frame, as shown in diagram 11.
Thread the toy bar support fixtures through the slots in the fabric, as shown in diagram 12.
Check that the velcro fasteners are open correctly (diag. 10), and that the harness straps are positioned outside the frame tube (diag. 13).
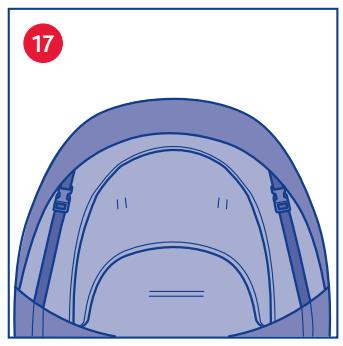
Fit the lining around the music box (diag. 14). Turn the bouncing cradle over to close the velcro fasteners (diag. 15) and connect the two side harness straps, as shown in diagrams 16 and 17.
The fabric lining and booster cushion can be removed from the bouncing cradle to wash them.
To remove the lining, follow the fitting instructions in the reverse order.
TOY BAR
Rotate the toy bar fixtures upwards and insert the toy bar into both side slots (diag. 18), checking they are inserted as far as possible. Once the toy bar is fastened in place, check to make sure its position corresponds to that shown in diagram 19.
To connect the hanging toys, thread the toy tape through the designated slots (diag. 20) and close the velcro fastener as shown in diagram 21.
RECLINING THE BACKREST
To adjust the backrest position, press both buttons on the side fixtures (diag. 22) at the same time and rotate the seat, raising/ lowering it to the desired position.
The seat can be adjusted to 2 different heights (diag. 23).
WARNING: always adjust the backrest without the baby in the bouncing cradle. Before placing your baby in the bouncing cradle, rotate the toy bar backwards (diag. 24) to give you extra room to position your baby comfortably inside the chair (diag. 25).
The headrest can be adjusted to a number of different heights using the tape. Adjust the headrest to the desired height (diag. 26). The bouncing cradle can also be used without the booster cushion.
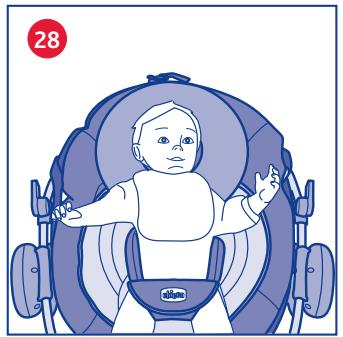
Always fasten the harness restraint straps (FFF) as shown in diagram 27. Check that both straps are fastened in place to guarantee your child's safety (diag. 28). The harness straps (FFF) can be adjusted in length to ensure maximum comfort for your baby.
Return the toy bar to its original position, as shown in diagram 29.
The music and vibration box (CC) is fitted on the front seat support (C).
The box has a number of user push-buttons:
e. Menu button:
a.1 Box OFF button
a.2 Relaxing tune selector (5 different tunes)
a.3 Nature sounds selector (3 sounds)
f. Relaxing tunes and nature sounds browse button
g. Vibration button: starts/stops the vibration function. This button can also be used to select the vibration mode – low or high. The vibration function can be used even when the music box is switched off.
h. Volume adjustment button: This button can also be used to select the volume mode – low or high.
FOR FURTHER INFORMATION:
Chicco UK Ltd
Prospect Close
Lowmoor Road Business Park
Kirkby in Ashfield
Nottinghamshire NG17 7LF

Jolie
PARA MAIS INFORMAÇÕES:
Farsana Portugal, S.A.
(NL) DIT PRODUCT IS CONFORM DE EU-RICHTLIJN 2002/96/EC.
VOOR MEER INFORMATIE:
Pharsana NV
Klantenservice
Maccabilaan 34
(PL) PRODUKT SPEŁNIA
WYMOGI ZARZĄDZENIA EU 2002/96/EC.
بimplementationDefense Defense Defense Defense Defense Defense Defense Defense Defense Defense Defense Defense Defense Defense Defense Defense Defense Defense Defense Defense Defense Defense Defense Defense Defense Defense Defense Defense Defense Defense Defense Defense Defense Defense Defense Defense Defense Defense Defense Defense Defense Defense Defense Defense Defense Defense Defense Defense Defense Defense Defense Defense Defense Defense Defense Defense Defense Defense Defense Defense Defense Defense Defense Defense Defense Defense Defense Defense Defense Defense Defense Defense Defense Defense Defense Defense Defense Defense Defense Defense Defense Defense Defense Defense Defense Defense Defense Defense Defense Defense Defense Defense Defense Defense Defense Defense Defense Defense Defense Defense DefenseDefense Defense Defense Defense Defense Defense Defense Defense Defense Defense Defense Defense Defense Defense Defense Defense Defense Defense Defense Defense Defense Defense Defense Defense Defense Defense Defense Defense Defense Defense Defense Defense Defense Defense Defense Defense Defense Defense Defense Defense Defense Defense Defense DefenseDefenseDefenseDefenseDefenseDefenseDefenseDefenseDefenseDefenseDefenseDefenseDefenseDefenseDefenseDefenseDefenseDefenseDefenseDefenseDefenseDefenseDefenseDefenseDefenseDefenseDefenseDefenseDefenseDefenseDefenseDefenseDefenseDefenseDefenseDefenseDefenseDefenseDefenseDefenseDefenseDefenseDefenseDefenseDefenseDefenseDefenseDefenseDefenseDefenseDefenseDefenseDefenseDefenseDefenseDefenseDefenseDefenseDefenseDefenseDefenseDefenseDefenseDefenseDefenseDefenseDefenseDefenseDefenseDefenseDefenseDefenseDefenseDefenseDefenseDefenseDefenseDefenseDefenseDefenseDefenseDefenseDefenseDefenseDefenseDefenseDefenseDefenseDefenseDefenseDefenseDefenseDefenseDefenseDefenseDefenseDefenseDefenseDefenseDefenseDefense defense defense defense defense defense defense defense defense defense defense defense defense defense defense defense defense defense defense defense defense defense defense defense defense defense defense defense defense defense defense defense defense defense defense defense defense defense defense defense defense defense defense defense defense defense defense defense defense defense defense defense defense defense defense defense defense defense defense defense defense defense defense defense defense defense defense defense defense defense defense defense defense defense defense defense defense defense defense defense defense defense defense defense defense defense defense defense defense defense defense defense defense defense defense defense defense defense defense defense defense defenses, military forces, military forces, military forces, military forces, military forces, military forces, military forces, military forces, military forces, military forces, military forces, military forces, military forces, military forces, military forces, military forces, military forces, military forces, military forces, military forces, military forces, military forces, military forces, military forces, military forces, military forces, military forces, military forces, military forces, military forces, military forces, military forces, military forces, military forces
- I Jolie
- IMPORTANTE:
- AVVERTENZE
- WARNINGS
- SAFETY OF THE ELECTRICAL PARTS
- CARE AND MAINTENANCE
- FABRIC COMPOSITION
- MAINTENANCE
- (GB) THIS PRODUCT COMPLIES WITH EU DIRECTIVE 2002/96/EC.
- COMPONENTS
- ASSEMBLY
- FITTING AND REMOVING THE FABRIC LINING
- TOY BAR
- RECLINING THE BACKREST
- FOR FURTHER INFORMATION:
- Jolie
- PARA MAIS INFORMAÇÕES:
- (NL) DIT PRODUCT IS CONFORM DE EU-RICHTLIJN 2002/96/EC.
- VOOR MEER INFORMATIE:
- (PL) PRODUKT SPEŁNIA
- WYMOGI ZARZĄDZENIA EU 2002/96/EC.
Brand : CHICCO
Model : JOLIE
Category : Baby bouncer