
DEH-P3000IB - Receiver PIONEER - Free user manual and instructions
Find the device manual for free DEH-P3000IB PIONEER in PDF.


| Product Type | Car Stereo Receiver |
| Model | DEH-P3000IB |
| Brand | Pioneer |
| Dimensions (W x H x D) | 7.1 x 2.0 x 7.3 inches (180 x 50 x 185 mm) |
| Weight | Approx. 2.2 lbs (1.0 kg) |
| Power Supply | 12V DC (negative ground) |
| Maximum Power Output | 50 W x 4 channels |
| Continuous Power Output (RMS) | 22 W x 4 channels (1% THD) |
| Playback Formats | CD, CD-R, CD-RW, MP3, WMA |
| Tuner Bands | FM (87.9-107.9 MHz), AM (530-1710 kHz) |
| Preset Stations | 18 FM, 6 AM |
| iPod Direct Control | Yes (via front USB or dedicated cable) |
| Auxiliary Input | Front 3.5mm stereo jack |
| Display | LCD with OEL (Organic Electroluminescent) display |
| Remote Control | Included (wired or wireless? typically wired) |
| Equalizer | 3-Band (Bass, Treble, Loudness) + Preset EQ curves |
| High-Pass Filter | Yes (selectable) |
| Low-Pass Filter | Yes (for subwoofer) |
| Subwoofer Output | RCA preamp output |
| Security | Detachable faceplate |
| Care and Cleaning | Wipe with a soft, dry cloth; avoid solvents |
| Spare Parts & Repairability | Faceplate, wiring harness; service by authorized Pioneer centers |
| Additional Information | Supports CD Text, ID3 tags for MP3/WMA |
Frequently Asked Questions - DEH-P3000IB PIONEER
User questions about DEH-P3000IB PIONEER
0 question about this device. Answer the ones you know or ask your own.
Ask a new question about this device
Download the instructions for your Receiver in PDF format for free! Find your manual DEH-P3000IB - PIONEER and take your electronic device back in hand. On this page are published all the documents necessary for the use of your device. DEH-P3000IB by PIONEER.
USER MANUAL DEH-P3000IB PIONEER
Pleasereadthroughtheseoperatinginstructionssoyouwillknowhowtooperate yourmodelproperly.Afteryouhavefinishedreadingtheinstructions,keepthismanualinasafeplaceforfuturereference.
01 BeforeYouStart
Aboutthisunit5
Visitourwebsite5
Protectingyourunitfromtheft5
-Removingthefrontpanel6
-Attachingthefrontpanel6
Useandcareoftheremotecontrol6
-Installingthebattery6
-Usingtheremotecontrol7
02 Operatingthisunit
What'sWhat8
-Headunit8
-Remotecontrol9
-Displayindication9
BasicOperations10
-PowerON/OFF10
-Selectingasource10
-Adjustingthevolume11
Tuner11
-BasicOperations11
-Storingandrecallingbroadcast frequencies11
-Introductionofadvanced operations12
-Storingthestrongestbroadcast frequencies12
-Tuninginstrongsignals12
Built-inCDPlayer13
-BasicOperations13
-Displayingtextinformationondisc13
-Selectingtracksfromthetracktitle list14
-Selectingfilesfromthefilename list14
-Introductionofadvanced operations14
-Selectingarepeatplayrange15
-Playingtracksinrandomorder15
-Scanningfoldersandtracks15
-Pausing playback15
-UsingcompressionandBMX15
-Usingdisctitlefunctions16
PlayingsongsoniPod17
-BasicOperations17
-Displayingtextinformationon iPod17
-Browsingforasong17
-Introductionofadvanced operations18
-Playingsongsinarandomorder (shuffle)18
-Playingallsongsinarandomorder (shuffleall)19
-Selectingsongsfromalbumlistof currentlyplayingartist19
-Operatingthisunit'siPodfunction fromyouriPod19
-Changingaudiobookspeed19
03 AudioAdjustments
Introductionofaudioadjustments20
Usingbalanceadjustment20
Usingtheequalizer20
-Recallingequalizercurves21
-Adjustingequalizercurves21
-Fine-adjustingequalizercurve21
Adjustingloudness22
Usingsubwooferoutput22
-Adjustingsubwoofersettings22
Usingthehighpassfilter23
Boostingthebass23
Adjustingsourcelevels23
04 InitialSettings
Adjustinginitialsettings24
Settingtheclock24
SettingtheFMtuningstep24
SettingtheAMtuningstep24
Switchingthewarningtone25
Switchingtheauxiliarysetting25
Settingtherearoutputandsubwoofer controller25
SwitchingtheEverScroll26
ActivatingtheBTAUDIOsource26
EnteringPINcodeforBluetoothwireless connection26
DisplayingsystemversionofBluetooth adapterforrepair26
05 OtherFunctions
UsingtheAUXsource28
-AboutAUX1andAUX228
-AUX1source:28
-AUX2source:28
-SelectingAUXasthesource28
-SettingtheAUXtitle28
Turningtheclockdisplayonoroff28
Usingtheexternalunit28
-Selectingtheexternalunitasthe source29
-Basicoperation29
-Usingthefunctionsallocatedto1to6 keys29
-Advancedoperations29
06 Availableaccessories
PlayingsongsonUSBportableaudioplayer/ USBmemory30
-BasicOperations30
-Displayingtextinformationofanaudio file30
-Selectingfilesfromthefilename list30
-Introductionofadvanced operations30
BluetoothAudio31
-BasicOperations31
-Functionandoperation32
-ConnectingaBluetoothaudio player32
-PlayingsongsonBluetoothaudio player32
-Stopping playback32
-DisconnectingaBluetoothaudio player32
-DisplayingBD(BluetoothDevice) address33
BluetoothTelephone33
-BasicOperations33
-Settingupforhands-freephoning33
-Makingaphonecall34
-Takingaphonecall34
-Introductionofadvanced operations34
-Connectingacellularphone35
-Disconnectingacellularphone36
-Registeringaconnectedcellular phone36
-Deletingaregisteredphone36
-Connectingtoaregisteredcellular phone36
-UsingthePhoneBook37
-UsingtheCallHistory38
-Makingacallbyenteringphone number38
-Clearingmemory38
-Settingautomaticrejecting39
-Settingautomaticanswering39
-Switchingtheringtone39
-Echocancelingandnoise reduction39
Multi-CDPlayer39
-BasicOperations39
-UsingCDTEXTfunctions39
-Introductionofadvanced operations39
Contents
-Usingcompressionandbass emphasis40
-UsingITSplaylists41
-Usingdisctitlefunctions42
TVtuner42
-BasicOperations42
-Storingandrecallingbroadcast stations43
-Storingthestrongestbroadcast stationssequentially43
AdditionalInformation
Troubleshooting44
Errormessages44
Handlingguidelineofdiscsandplayer44
DualDiscs45
Compressedaudiofilesonthedisc45
-Exampleofahierarchy46
-Compressedaudiocompatibility46
iPod46
-AbouthandlingtheiPod46
-AboutiPodsettings46
Specifications47
Aboutthisunit

CAUTION
- Donotallowthisunittocomeintocontact withliquids. Electricalshockcouldresult. Also, damagetothisunit, smoke, andoverheatingcouldresultfromcontactwithliquids.
- Keep this manual handy as a reference for operating procedures and precautions.
• Alwayskeepthevolumelowenoughsothat youcanhearsoundsfromoutsidethevehicle. - Protect this unit from moisture.
- If the battery is disconnected, discharged, the preset memory will be erased and must be reprogrammed.
- If this unit does not operate properly, contact your dealer or nearest authorized Pioneer Service Station.
AboutWMA

TheWindowsMedia™logoprintedonthebox indicate that this unit can playback WMA data.
WindowsMediaandtheWindowslogoaretrademarksorregisteredtrademarksofMicrosoft CorporationintheUnitedStatesand/orother countries.
- ThisunitmaynotoperatecorrectlydependingontheapplicationusedtoencodeWMAfiles.
AboutMP3
Supplyofthisproductonlyconveysalicense forprivate,non-commercialuseanddoesnot conveyalicensenorimplyanyrighttouse thisproductinanycommercial(i.e.revenue-generating)realtimebroadcasting(terrestrial, satellite,cableand/oranyothermedia),broadcasting/streamingviinternet,intranetsand/orothernetworksorinotherelectroniccontentdistributionsystems,suchaspay-audioor audio-on-demandapplications.Anindependentlicenseforsuchuseisrequired.Fordetails,pleasevisit http://www.mp3licensing.com.
AboutAAC
ThisunitplaysbackAACfilesencodedby iTunes®. iTunesisaregisteredtrademarkofAppleInc.
iPod® compatibility
Thisunitcancontrolandlistentosongsonan iPod.
- iPodisatrademarkofAppleInc., registeredintheU.S.andothercountries. iPodisaregisteredtrademarkofAppleInc.
- ThisunitsupportsonlyaniPodwithDock Connector.
- WhenusinganiPod,InterfaceCablefor iPod(e.g.,CD-I200)isrequired.
- Formaximumperformance, were recommend that you usethelatestversion of the iPodsoftware.
- OperationsmayvarydependingonthesoftwareversionofiPod.

CAUTION
Pioneeracceptsnoresponsibilityfordataloston theiPodevenifthatdataislostwhileusingthis unit.
Visitourwebsite
Visitusatthefollowingsite: http://pioneer.jp/group/index-e.html
- Weofferthelatestinformationabout PioneerCorporationonourwebsite.
Protectingyourunitfrom theft
Thefrontpanelcanbedetachedtodetertheft.

Important
- Handlegentlywhenremovingorattaching thefrontpanel.
- Avoid subjecting the front panel to excessive shock.
- Keepthefrontpaneloutofdirectsunlightand hightemperatures.
Removingthefrontpanel
1PressDETACHtoreleasethefront panel.
2Grabthefrontpanelandremove.

3Putthefrontpanelintotheprovided protectivecaseforsafekeeping.
Attachingthefrontpanel
1Slidethefrontpaneltotheleftuntil clicks.
Frontpanelandtheheadunitarejointedon theleftside.Makesurethatthefrontpanel hasbeenjointedtotheheadunit.
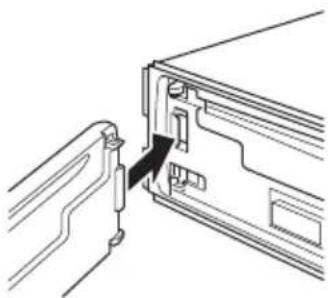
2Presstherightsideofthefrontpanel untilitisfirmlyseated.
■If you can't tattach the front panel to the head units successfully, try again. Front panel maybe damaged if you attach the front panel forcedly.


Useandcareoftheremote control
Installingthebattery
Slidethetrayonthebackoftheremotecontroloutandinsertthebatterywiththeplus(+) andminus(-)polesalignedproperly.
- When using for the first time, pull out the film protruding from the tray.


WARNING
Keepthebatteryoutofthereachofchildren. Shouldthebatterybeswallowed,consultadoc-torimmediately.

CAUTION
• UseoneCR2025(3V) lithium battery.
- Removethebatteryiftheremotecontrolisnot usedforamonthorlonger.
- Thereisadangerofexplosionifthebatteryis incorrectlyreplaced.Replaceonlywiththe sameorequivalenttype.
- Donothandlethebatterywithmetallictools.
- Donotstorethebatterywithmetallicobjects.
- Ifthebatteryleaks,wipetheremotecontrol completelycleanandinstallanewbattery.
- Whendisposingofusedbatteries,comply withgovernmentalregulationsorenvironmentalpublicinstitutions'rulesthatapplyinyour country/area.
BeforeYouStart
Usingtheremotecontrol
Pointtheremotecontrolinthedirectionofthe frontpaneltooperate.
- Theremotecontrolmaynotfunctionproperlyindirectsunlight.

Important
- Donotstoretheremotecontrolinhighttemperaturesordirectsunlight.
- Donotlettheremotecontrolfallontothe floor,whereitmaybecomejammedunderthe brakeoracceleratorpedal.
What's What Headunit

①SRC/OFFbutton
Thisunitisturnedonbyselectingasource. Presstocyclethroughalltheavailable sources.
②DISP/BACK/SCROLLbutton
Presstoselectdifferentdisplays. Pressandholdtoscrollthetextinformation. Presstoreturntothepreviousdisplaywhen operatingthemenu. Pressandholdtoreturntothemainmenu whenoperatingthemenu.
③MULTI-CONTROL
Movetoperformmanualseektuning, fast forward, reverse and track search controls. Alsoused for controlling functions. Turnto increase or decrease the volume.
④ iPodbutton
Presstoswitchthecontrolmodewhile usinganiPod.
⑤Discloadingslot
Insertadisctoplay.
⑥EJECTbutton
PresstoejectaCDfromyourbuilt-inCD player.
⑦CLOCKbutton
Presstochangetotheclockdisplay.
⑧SW/BASSbutton
Presstoswitchtosubwoofersettingmenu. Whenoperatingsubwoofermenu, pressto switchsetting. Pressandholdtoswitchtobassboost menu.
⑨DETACHbutton
Presstoremovethefrontpanelfromthe headunit.
⑩AUX1inputjack(3.5mmstereojack)
Usetoconnectanauxiliarydevice.
⑪RPT/LOCALbutton
Presstoturnrepeatfunctiononoroffwhile usingCDoriPod. Presstoturnlocalfunctiononoroffwhile usingtunerasthesource.
⑫RDM/ × button
Presstoturnrandomfunctiononoroff whileusingCD. WhileusingiPod, pressthisbuttontoshufflealltracks.
⑬BAND/ESCbutton
PresstoselectamongthreeFMbandsand oneAMband. Presstoreturntotheordinarydisplaywhen operatingmenu.
⑭LISTbutton
Presstodisplaythedisctitlelist,tracktitle list,folderlist,filelistorpresetchannellist dependingonthesource.
Operatingthisunit
Remotecontrol
Operationisthesameaswhenusingthebuttonsontheheadunit.

⑮VOLUMEbuttons
Presstoincreaseordecreasethevolume.
⑯MUTEbutton
Presstoturnoffthesound.Toturnonthe sound,pressagain.
⑰ ▲/▼/◄/► buttons
Presstoperformmanualseektuning, fast forward, reverse and track search controls. Alsoused for controlling functions.
⑱AUDIObutton
Presstoselectanaudiofunction.
⑲DISPbutton
Presstoselectdifferentdisplays. Pressandholdtoscrollthetextinformation.
⑳II(pause)button
Presstoturnpauseonoroff.
②1FUNCTIONbutton
Presstoselectfunctions.
②LIST/ENTERbutton
Presstodisplaythedisctitlelist,tracktitle list,folderlist,filelistorpresetchannellist dependingonthesource. Whileintheoperatingmenu,presstocontrolfunctions.
Displayindication

①Maindisplaysection
Displaysband,frequency,elapsed playback timeandothersettings.
•Tuner
Bandandfrequencyaredisplayed.
- Bulit-inCDplayer,iPod,USB,Multi-CD player
Elapsed playbacktimeandliteralinformationaredisplayed.
② ◀indicator
Appearswhenanuppertieroffolderor menuexists.
③ (folder)indicator
Appearswhenoperatinglistfunction.
4▶indicator
Appearswhenalowertieroffolderormenu exists.
⑤ (artist)indicator
Appearswhenthedisc(track)artistnameis displayedonthemaindisplaysection. Appearswhenartistsearchrefinementon iPodbrowsingfunctionisoperated.
6 (disc)indicator
Appearswhenthedisc(album:nameisdisplayonthemaindisplaysection. Appearswhenalbumsearchrefinementon iPodbrowsingfunctionisoperated.
⑦ (song)indicator
Appearswhenthetrack(song)nameisdisplayonthemaindisplaysection. Appearswhensongsearchrefinementon iPodbrowsingfunctionisoperated.
Operatingthisunit
Appearswhensubwooferison.
⑨LOCindicator
Appearswhenlocalseektuningison.
⑩ × (shuffle)indicator
Appearswhenshufflefunctionisonwhile iPodsourceisbeingselected.
⑪F-RPTindicator
Appearswhenfolderrepeatison. Whenrepeatfunctionison, only RPT is displayed.
⑫F-RDMindicator
Appearswhenfolderrandomison. Whenrandomfunctionison, onlyRDMis displayed.
⑬ (loudness)indicator
Appearswhenloudnessison.
14 ○(stereo)indicator
Appearswhentheselectedfrequencyis beingbroadcastinstereo.
15 iPodconnection INDICATOR
AppearswhentheiPodconnectionisbeing selected.
BasicOperations
PowerON/OFF
Turningtheuniton
●PressSRCtoturntheuniton.
Turningtheunitoff
●PressOFFandholduntiltheunitturns off.
Selectingasource
Youcanselectasourceyouwanttolistento. Toswitchtothebuilt-inCDplayer,loadadisc intheunit(refertopage13).
- PressSRCrepeatedlytoswitchbetweenthefollowingsources.
TUNER (tuner)—TELEVISION (television)—COMPACTDISC(built-inCDplayer)—MULTI CD (multi-CD player)—IPOD (iPod)—USB (USB)—EXTERNAL (external unit 1)—EXTERNAL (external unit 2)—AUX1 (AUX1)—AUX2 (AUX2)—BT AUDIO (BTaudio)—TELEPHONE(BTtelephone)

Notes
- Inthefollowingcases,thesoundsourcewill notchange.
—When noun it corresponding to these-lected source is connected.
—Whenthereisnodiscormagazineinthe player.
—WhentheiPodisnotconnectedtothis unit.
—WhenAUX(auxiliaryinput)issettooff (refertopage25).
—WhentheBTAUDIOsourceissettooff (refertoActivatingtheBTAUDIOsource onpage26).
- AUX1issettoonbydefault.TurnofftheAUX1 whennotinuse(refertoSwitchingtheauxiliarysettingonpage25).
Operatingthisunit
- Chargingtheportableaudioplayerusing car'sDCpowersourcewhileconnectingitto AUXinputmaygeneratenoise.Inthiscase, stopcharging.
- ExternalunitreferstoaPioneerproduct(such asonesavailableinthefuture)that,although incompatibleasasource,enablescontrolof basicfunctionswiththisunit.Twoexternal unitscanbecontrolledwiththisunit.When twoexternalunitsareconnected,theexternal unitisautomaticallyallocatedtoexternalunit 1orexternalunit2bythisunit.
- Whenthisunit'sblue/whiteleadisconnected tothevehicle'sauto-antennarelaycontrol terminal,thevehicle'santennaextendshwhen thisunit'ssourceisturnedon.Toretractthe antenna,turnthesourceoff.
Adjustingthevolume
●TurnMULTI-CONTROLtoadjustthe soundlevel.
Tuner
BasicOperations

Important
If you are using this unit in North, Central or South America, reset the AM tuning step (see Setting the AM tuning step on page 24).
- Selectaband
PressBAND.
■ Band can be selected from among FM1, FM2, FM3orAM.
● Manualtuning(stepbystep)
Push MULTI-CONTROL leftor right.
- Seektuning
Pushandhold MULTI-CONTROL leftor right for about one second and release.
■Youcancancelseektuningbypushing MULTI-CONTROLleftorright.
■ If you push and hold MULTI-CONTROL left for right, you can skip stations. Seek tuning starts as soon as you release MULTI-CONTROL.

Note
ListeningAMradiowhileconnectingiPodtothisunitmaygeneratenoise.Inthiscase,disconnectiPodfromthisunitandnoiseisdisappeared.
Storingandrecallingbroadcast frequencies
Youcaneasilystoreuptosixbroadcastfrequenciesforlaterrecall.
- Sixstationsforeachbandcanbestoredin memory.
1PressLIST.
Presetscreenisdisplayed.
2UseMULTI-CONTROLtostorethese- lectedfrequencyinmemory.
Turntochangethepresetnumber.Pressand holdtostore.
■Youcanalsostorethefrequencyinmemory bypushingandholdingMULTI-CONTROLright.
Operatingthisunit
3UseMULTI-CONTROLtoselectthedesiredstation.
Turntochangethestation.Presstoselect.
■Youcanalsochangethestationbypushing MULTI-CONTROLupordown.
■Toreturntotheordinarydisplay,pressBAND orLIST.
■Ifyoudonotoperatethelistwithinabout30 seconds,thedisplayautomaticallyreturnstothe ordinarydisplay.
Introductionofadvanced operations
1PressMULTI-CONTROLtodisplaythe mainmenu.
2UseMULTI-CONTROLtoselect FUNCTION.
Turntochangethemenuoption.Presstose-lect.
3TurnMULTI-CONTROLtoselectthe function.
BSM(beststationsmemory)—LOCAL(local seektuning)

Notes
- Youcanalsoselectthefunctionbypassing FUNCTIONontheremotecontrol.
• To return to the previous display, press BACK.
• Toreturntothemainmenu, pressandhold BACK.
• To return to the ordinary display, press BAND.
Storingthestrongestbroadcast frequencies
BSM(beststationsmemory)letsyouautomaticallystorethesixstrongestbroadcastfrequencies.
1UseMULTI-CONTROLtoselectBSMin thefunctionmenu.
2PressMULTI-CONTROLtoturnBSMon.
Thesixstrongestbroadcastfrequenciesare storedintheorderoftheirsignalstrength.
■Tocancel,pressMULTI-CONTROLagain.
Tuninginstrongsignals
Localseektuningletseyoutuneinonlythose radiostationswithsufficientlystrongsignals forgoodreception.
- PressLOCALrepeatedlytoselectthe desiredsetting.
FM: OFF—LEVEL 1—LEVEL 2—LEVEL 3—LEVEL4
AM:OFF—LEVEL1—LEVEL2
TheLEVEL4settingallowsreceptionofonly thestrongeststations,whilelowersettingslet youreceiveprogressivelyweakerstations.

Note
Youcanalsoperformthisoperationinthemenu thatappearsbyusingMULTI-CONTROL.
Built-inCDPlayer
BasicOperations
- Insertadiscintothediscloadingslot.
Playbackwillautomaticallystart.
- Whenloadingadisc, facethelabelsideof adiscup.
●Ejectadisc
PressEJECT.
- Selectafolder
Push MULTI-CONTROLupordown.
■Youcannotselectafolderthatdoesnothave acompressedaudiofilerecordedinit.
- Selectatrack
Push MULTI-CONTROL leftor right.
●Fastforwardorreverse
Pushandhold MULTI-CONTROL leftor right for about one second and release.
■Whenplayingcompressedaudio,thereisno soundonfastforwardorreverse.
●Returntorootfolder
PressandholdBAND.
■Iffolder01(ROOT)containsnofiles, playback commenceswithfolder02.
● Switchbetweencompressedaudioand CD-DA
PressBAND.
■Thisoperationisavailableonlywhenplaying CD-EXTRAorMIXED-MODECDs.
■ If you have switched between uncompressed audio and CD-DA, playback starts at the first track on the disc.

Notes
- Thebuilt-inCDplayercanplaybackaudioCD andcompressedaudiorecordedonaCD-ROM.(Refertopage45forfilesthatcanbe playedback.)
- Readtheprecautionsfordiscsandplayeron page44.
- Afteradischasbeeninserted, pressSRCto selectthebuilt-inCDplayer.
- Thereissometimesadelaybetweenstarting updiscplaybackandthesoundbeingissued. Whenbeingread,FORMATREADisdisplayed.
- IfanerrormessagesuchasERROR-11isdisplayed,refertoErrormessagesonpage44.
- WhenaCDTEXTdiscisinserted,thediscand tracktitlesautomaticallybegintoscrollinthe display.WhenEverScrollissettoONatthe initialsetting,thediscandtracktitlesscroll continuously.FormoredetailsaboutEver Scroll,refertoSwitchingtheEverScrollon page26.
- Playbackiscarriedoutinorderoffilenumber. Foldersareskippediftheycontainnofiles.(If folder01(ROOT)containsnofiles, playback commenceswithfolder02.)
Displayingtextinformationon disc
- PressDISPtoselectthedesiredtextinformation.
FortitleenteredCD
Playtime—disctitle
ForCDTEXTdiscs
Playtime—disctitle—discartistname—track title—trackartistname
ForWMA/MP3/AACdiscs
Playtime—foldername—filename—track title—artist name—album title—comment—bitrate
ForWAVdiscs
Playtime—foldername—filename—samplingfrequency

Notes
- Youcanscrolltotheleftofthetitlebypassing andholdingDISP.
•AudioCDthatcontainscertaininformation suchastextand/ornumberisCDTEXT. - If specific information is not recorded on a disc, title or name is not displayed.
Operatingthisunit
- DependingontheversionofiTunes usedto writeMP3filesontoadisc,commentinformationmaynotbecorrectlydisplayed. —iTunesisaregisteredtrademarkofApple Inc.
- Depending on the version of Windows Media Player used to encode WMA files, album names and other text information may not be correctly displayed.
- WhenplayingbackVBR(variablebitrate)-recordedWMAfiles,theaveragebitratevalueis displayed.
- WhenplayingbackVBR(variablebitrate)-recordedMP3files, VBRisdisplayedinsteadof bitratevalue.
- Thesamplingfrequencyshowninthedisplay maybeabbreviated.
- When EverScrollissettoONattheinitialsetting.textinformationscrollscontinuouslyin thedisplay.RefertoSwitchingtheEverScroll onpage26.
Selectingtracksfromthetrack titlelist
Tracktitlelistletsyouseethelistoftracktitles onaCDTEXTdiscandselectoneofthemto playback.
1PressLISTtoswitchtothetracktitlelist mode.
2UseMULTI-CONTROLtoselectthedesiredtracktitle.
Turntochangethetracktitle.Presstoplay.
■Youcanalsochangethetracktitlebypushing
MULTI-CONTROLupordown.
■Youcanalsoplaythetrackbypushing
MULTI-CONTROLright.
■Toreturntotheordinarydisplay,pressBAND orLIST.
■Ifyoudonotoperatethelistwithinabout30 seconds,thedisplayautomaticallyreturnstothe ordinarydisplay.
Selectingfilesfromthefile namelist
Filenamelistletsyouseethelistoffilenames (orfoldernames) and select one of them to playback.
1PressLISTtoswitchtothefilenamelist mode.
Namesoffilesandfoldersappearinthedisplay.
2UseMULTI-CONTROLtoselectthedesiredfilename(orfoldername).
Turntochangethenameoffileorfolder.
—whenafileisselected,presstoplay.
—whenafolderisselected, presstoseealist offiles (orfolders) in theseleted folder.
—whenafolderisselected, pressandholdto playasongintheselectedfolder.
■Youcanalsoplaythefilebypushing MULTI-CONTROLright.
■Youcanalsoplayasongintheselectedfolder bypushingandholdingMULTI-CONTROLright.
■Toreturntothepreviouslist(thefolderone levelhigher),pressBACK.Youcanalsoperform thisoperationbypushingMULTI-CONTROLleft.
■Toreturntothetoptieroflist,pressandhold BACK.
■Toreturntotheordinarydisplay,pressBAND orLIST.
■Ifyoudonotoperatethelistwithinabout30 seconds,thedisplayautomaticallyreturnstothe ordinarydisplay.
Introductionofadvanced operations
1PressMULTI-CONTROLtodisplaythe mainmenu.
2UseMULTI-CONTROLtoselect FUNCTION.
Turntochangethemenuoption.Presstose-lect.
3TurnMULTI-CONTROLtoselectthe function.
REPEAT(repeatplay)—RANDOM(random play)—SCAN (scan play)—PAUSE (pause)—COMP/BMX(compressionandBMX)—TITLEINPUT(discitleinput)

Notes
- Youcanalsoselectthefunctionbypassing FUNCTIONontheremotecontrol.
- Toreturntothepreviousdisplay,pressBACK.
- Toreturntothemainmenu, pressandhold BACK.
- Toreturntotheordinarydisplay,pressBAND.
- If you donot operate function except for TITLEINPUT within about 30 seconds, the display automatically return to the ordinary display.
- WhenplayingacompressedaudiodiscorCD TEXTdisc,youcannotswitchtodisctitleinput display.
Selectingarepeatplayrange
- PressRPTrepeatedlytoselectthedesiredsetting.
•DISC—Repeatalltracks
- TRACK-Repeatthecurrenttrack
• FOLDER—Repeat the current folder
■ If you select another folder during repeat play, therepeat play range changestodiscrepeat.
■Performingtracksearchorfastforward/reverseduringTRACK(trackrepeat)changesthe repeatplayrangetodisc/folder.
■WhenFOLDER(folderrepeat)isselected,itis notpossibletoplaybackasubfolderofthat folder.

Note
Youcanalsoperformthisoperationinthemenu thatappearsbyusingMULTI-CONTROL.
Playingtracksinrandomorder
Tracksinaselectedrepeatrangeareplayedin randomorder.
●PressRDMtoturnrandomplayon.
Tracksplayinarandomorder.
■Toturnrandomplayoff, pressRDMagain.

Note
Youcanalsoturnthisfunctiononoroffinthe menuthatappearsbyusingMULTI-CONTROL.
Scanningfoldersandtracks
Scanplaysearchesthesongwithinthese-lectedrepeatrange.
1UseMULTI-CONTROLtoselectSCANin thefunctionmenu.
2PressMULTI-CONTROLtoturnscanplay on.
The first 10 second so each track is played.
3Whenyoufindthedesiredtrackpress MULTI-CONTROLtoturnscanplayoff.
■ Ifthedisplayhasautomaticallyreturned to the playbackdisplay, select SCANagainbyusing MULTI-CONTROL.
■Afterscanningofadisc(folder)isfinished, normalplaybackofthetracksbegins.
Pausing playback
- PressII(pause)ontheremotecontrol toturnpauseon.
Playbackofthecurrenttrackpauses.
■Toturnpauseoff, press || (pause)again.

Note
Youcanalsoturnthisfunctiononoroffinthe menuthatappearsbyusingMULTI-CONTROL.
UsingcompressionandBMX
UsingtheCOMP(compression)andBMX functionsletyouadjustthesound playback qualityofthisunit.
1UseMULTI-CONTROLtoselect COMP/BMXinthefunctionmenu.
Operatingthisunit
2PressMULTI-CONTROLtodisplaythe settingmode.
3UseMULTI-CONTROLtoselectthedesiredsetting.
Turntochangethesetting.
OFF—COMP 1—COMP 2—OFF—BMX 1—BMX2
Usingdistitlefunctions
YoucaninputCDtitlesanddisplaythetitle. ThenexttimeyouinsertaCDforwhichyou haveenteredatitle, thetitleofthatCDisdisplayed.
Enteringdisctitles
Usethedisctitleinputfeaturetostoreupto 48CDtitlesintheunit.Eachtitlecanbeupto 10characterslong.
1PlaytheCDthatyouwanttoentera titlefor.
2UseMULTI-CONTROLtoselect TITLEINPUTinthefunctionmenu.
3PressMULTI-CONTROLtodisplaythe titleinputmode.
4TurnMULTI-CONTROLtoselectaletter ofthealphabet.
■Youcanalsoperformthesameoperationsby pushingMULTI-CONTROLupordown.
5PressMULTI-CONTROLtomovethecur-sortothenextcharacterposition.
6Afterenteringthetitle,pressandhold MULTI-CONTROLtostoreitinmemory.

Notes
-
Titlesremaininmemory,evenafterthediscis removedfromtheunit,andarerecalledwhen thediscisreinserted.
• Afterdatafor48discsarestoredinthememory, dataforanewdiscoverwritestheoldest one. -
Ifyouconnectamulti-CDplayer,youcan inputdisctitlesforupto100discs.
- Whenamulti-CDplayerthatdoesnotsupport disctitlefunctionsisconnected, you cannot enterdisctitlesinthisunit.
PlayingsongsoniPod
FordetailsaboutthesupportediPod,referto iPod® compatibilityonpage5.
YoucanusethisunittocontrolaniPodby usingacable(e.g.,CD-I200),whichissoldseparately.
BasicOperations
●Fastforwardorreverse
Pushandhold MULTI-CONTROL leftor right for about one second and release.
- Selectatrack(chapter)
Push MULTI-CONTROL leftor right.

Notes
- ReadtheprecautionsforiPodonpage46.
- WhileiPodisconnectedtothisunit, PIONEER (or √ (checkmark)) is displayed on the iPod.
- IfanerrormessagesuchasERROR-11isdisplayed,refertoErrormessagesonpage44.
- WhentheignitionswitchissettoACCorON, theiPod'sbatteryischargedwhiletheiPodis connectedtothisunit.
- While the iPodisconnectedtothisunit, the iPodcannotbeturnedonoroff.
- Beforeconnectingthedockconnectorofthis unittotheiPod, disconnecttheheadphones fromtheiPod.
•TheiPodisturnedoffabouttwominutesafter theignitionswitchissettoOFF. - WhenremovingtheiPodfromthisunit,this unitisturnedoff.
Displayingtextinformationon iPod
- PressDISPtoselectthedesiredtextinformation.
Playtime—songtitle—artistname—album title
■IfthecharactersrecordedontheiPodarenot compatiblewiththisunit,thosecharactersare notdisplayed.

Notes
- Youcanscrollthetextinformationtotheleft bypassingandholdingDISP.
- When EverScrollissettoONattheinitialsetting,textinformationscrollscontinuouslyin thedisplay.RefertoSwitchingtheEverScroll onpage26.
Browsingforasong
OperationstocontrolaniPodwiththisunitis designedtobeasclosetotheiPodaspossible tomakeoperationandsongsearcheasy.
- If the characters recorded on the Pod are not compatible with this unit, those characters are not displayed.
1PressLISTtoswitchtothetopmenuof thelistsearch.
2UseMULTI-CONTROLtoselectacategory.
Turntochangethecategory;presstoselect.
PLAYLISTS (playlists)—ARTISTS (artists)—ALBUMS (albums)—SONGS (songs)—PODCASTS (podcasts)—GENRES (genres)—
COMPOSERS(composers)—AUDIOBOOKS (audiobooks)
Listfortheselectedcategoryisdisplayed.
- PressandholdLISTdisplaysthealbumlistof currentselectedartist.(Thisfunctioncanalsobe operatedfromfunctionmenu.)
■Youcanstart playback throughout these selected category bypassing and holding
MULTI-CONTROL.Youcanalsoperformthisoperationbypushingandholding MULTI-CONTROLright.
■Youcanalsochangethecategorybypushing MULTI-CONTROLupordown.
■Youcanalsoselectthecategorybypushing MULTI-CONTROLright.
■Toreturntothepreviouscategory, push MULTI-CONTROLleft.
3Repeatstep2tofindasongyouwant tolistento.
■Toreturntothepreviouscategory(onelevel higher),pressBACK.Youcanalsoperformthis operationbypushingMULTI-CONTROLleft.
■Toreturntothetoptierofcategories, press andholdBACK.
■Toreturntotheordinarydisplay,pressBAND orLIST.
■Ifyoudonotoperatethelistwithinabout30 seconds,thedisplayautomaticallyreturnstothe ordinarydisplay.
Introductionofadvanced operations
1PressMULTI-CONTROLtodisplaythe mainmenu.
2UseMULTI-CONTROLtoselect FUNCTION.
Turntochangethemenuoption.Presstose-lect.
3TurnMULTI-CONTROLtoselectthe function.
REPEAT (repeat play)—SHUFFLE (shuffle)—SHUFFLEALL(shuffleall)—LINKSEARCH (linksearch)—CONTROL(controlmode)—
PAUSE(pause)—AUDIOBOOKSSPEED (audiobookspeed)
Functionandoperation
REPEATandPAUSEoperationisbasicallythe sameasthatofthebuilt-inCDplayer.
FunctionnameOperation
| REPEAT | RefertoSelectingarepeatplay rangeonpage15.However,therepeatplayranges youcanselectaredifferentfrom thatofthebuilt-inCDplayer.The repeatplayrangesoftheiPodare:•ONE-Repeatthecurrent song•ALL-Repeatallsongsinthe selectedlist |
| PAUSE | RefertoPausingplaybackonpage 15. |

Notes
- Youcanalsoselectthefunctionbypassing FUNCTIONontheremotecontrol.
- Toreturntothepreviousdisplay,pressBACK.
- Toreturntothemainmenu, pressandhold BACK.
• To return to the ordinary display, press BAND. - If you donot operate functions within about 30 seconds, the display automatically returns to the ordinary display.
- WhenCONTROLison, onlyCONTROLcan be operated.
Playingsongsinarandom order(shuffle)
1UseMULTI-CONTROLtoselectSHUFFLE inthefunctionmenu.
2PressMULTI-CONTROLtodisplaythe settingmode.
3UseMULTI-CONTROLtoselectthedesiredsetting.
Turntochangethesetting.
- SONGS—Playback songs in the selected list in random order.
- ALBUMS—Playback songs from randomly selected albumin order.
- OFF-Cancelrandomplay.
Playingallsongsinarandom order(shuffleall)
●Presstoturnshuffleallon.
AllsongsontheiPodplayrandomly.
■Toturnshufflealloff, setSHUFFLEinthe
FUNCTIONmenutooff.

Note
Youcanalsoturnthisfunctiononinthemenu thatappearsbyusing MULTI-CONTROL.
Selectingsongsfromalbumlist ofcurrentlyplayingartist
Albumlistofthecurrentlyselectedartistis displayed.Youcanselectanalbumorsong fromtheartistname.
1PressandholdLISTtoturnlinksearch on.
Searchesalbumsoftheartistanddisplaysthe list.
2UseMULTI-CONTROLtoselectanalbum orsongfromthelist.
Formoredetailsabouttheselectingoperation, refertostep2ofBrowsingforasongonpage 17.

Note
Youcanalsoturnthisfunctiononinthemenu thatappearsbyusing MULTI-CONTROL.
Operatingthisunit'siPod functionfromyouriPod
Thisunit'siPodfunctioncanbeoperatedfrom youriPod.Soundcanbeheardfromcar's speaker,andoperationcanbeconductedfrom youriPod.
- Thisfunctioncannotbeusedwithathird generationiPod.
- While this function is in use, even if the ignition key is turned off, iPod is not turned off. Toturnoff power, operatethei Pod.
1PressiPodtoswitchthecontrolmode.
■EachpressingiPodswitchesthecontrol mode.
■Whileusingthisfunction, playtimeandtitles arenotdisplayedonthisunit.
■Evenifthisfunctionisperformed,trackup/downcanbeoperatedfromthisunit.
■Whileusingthisfunction, browsefunction cannotbeoperatedfromthisunit.
2OperatetheconnectediPodtoselecta songandplay.

Note
Youcanalsoturnthisfunctiononoroffinthe menuthatappearsbyusingMULTI-CONTROL.
Changingaudiobookspeed
While listening to an audiobook on a pod, play-backs speed can be changed.
1UseMULTI-CONTROLtoselect AUDIOBOOKSSPEEDinthefunctionmenu.
2PressMULTI-CONTROLtodisplaythe settingmode.
3UseMULTI-CONTROLtoselectthedesiredsetting.
Turntochangethesetting.
- FASTER-Playbackfasterthannormal speed
•NORMAL-Playbackinnormalspeed - SLOWER-Playbackslowerthannormal speed
Introductionofaudio adjustments
1PressMULTI-CONTROLtodisplaythe mainmenu.
2UseMULTI-CONTROLtoselectAUDIO. Turntochangethemenuoption.Presstose- lect.
3TurnMULTI-CONTROLtoselectthe audiofunction.
TurnMULTI-CONTROLtoswitchbetweenthe audiofunctionsinthefollowingorder.
FADER/BALANCE(balanceadjustment)—PRESETEQUALIZER(graphicequalizerrecall)—EQSETTING1(graphicequalizeradjustment)—EQSETTING2(graphicequalizerfine adjustment)—LOUDNESS(loudness)—SWSETTING1(subwooferon/offsetting)—SWSETTING2(subwoofersetting)—HIGHPASSFILTER(highpassfilter)—BASSBOOST(bassboost)—SRCLVADJUST(sourceleveladjustment)
4PressMULTI-CONTROLtodisplaythe settingmodeofeachfunction.
■Push MULTI-CONTROL lefttodisplay the functionselectionmenu.
■PushandholdMULTI-CONTROLlefttodisplaythemainmenu.
5Adjusttheeachfunction.

Notes
- Youcanalsoselecttheaudiofunctionby pressingAUDIOontheremotecontrol.
• To return to the previous display, press BACK. - Toreturntothemainmenu, pressandhold BACK.
- Toreturntotheordinarydisplay,pressBAND.
-
Whenthesubwoofercontrollersettingis PREOUT:REAR, you cannot switch to SWSETTING1(subwooferon/offsetting). (Refertopage25.)
-
YoucanselecttheSWSETTING2onlywhen subwooferoutputisturnedonin SWSETTING1.
- WhenselectingFMasthesource,youcannot switchtoSRCLVADJUST.
- If you donot operate functions within about 30 seconds, the display automatically returns to the ordinary display.
Usingbalanceadjustment
Youcanchangethefader/balancesettingso thatitcanprovidetheideallisteningenvironmentallooccupiedseats.
1UseMULTI-CONTROLtoselect FADER/BALANCE.
2PressMULTI-CONTROLtodisplaythe settingmode.
3PressMULTI-CONTROLtoselectthesesegmentyouwishtoset.
Press MULTI-CONTROL repeatedly to switch between fader and balance.
4TurnMULTI-CONTROLtoadjustspeaker balance.
Front/rearspeakerbalancecanbeadjusted betweenFADF15andFADR15. Left/rightspeakerbalancecanbeadjusted betweenBALL15andBALR15.
■Youcanalsoperformthesameoperationsby pushingMULTI-CONTROLupordown.
■FAD0isthepropersettingwhenonlytwo speakersareused.
■Whentherearoutputsettingis REARSP:SUBW,adjustingthefront/rearspeaker balanceisnoteffective.RefertoSettingtherear outputandsubwoofercontrolleronpage25.
Usingtheequalizer
Theequalizerletsyouadjusttheequalization to match the car's interior acoustic characteristics as desired.
Recallingequalizercurves
Therearesixstoredequalizercurveswhich youcaneasilyrecallatanytime. Hereisalist of the equalizercurves.
DisplayEqualizercurve
| POWERFULPowerful |
| NATURALNatural |
| VOCALVocal |
| CUSTOMCustom |
| FLATFlat |
| SUPERBASSSuperbass |
- CUSTOMisanadjustedequalizercurve thatyoucreate.Ifyoumakeadjustmentsto anequalizercurve,theequalizercurvesettingismemorizedinCUSTOM.
- WhenFLATisselected,nosupplementor correctionismadetothesound.This is useful to check the effect of the equalizer curves by switching alternatively between FLAT and a set equalizer curve.
1UseMULTI-CONTROLtoselect PRESETEQUALIZER.
2PressMULTI-CONTROLtodisplaythe settingmode.
3TurnMULTI-CONTROLtoselectthe equalizer.
■ Youcanalsoperformthesameoperationsby pushingMULTI-CONTROLupordown.
Adjustingequalizercurves
You can adjust the currently selected equalizer curvesetting as desired. Adjusted equalizer curvesettings are memorized in CUSTOM.
1UseMULTI-CONTROLtoselect EQSETTING1.
2PressMULTI-CONTROLtodisplaythe settingmode.
3PressMULTI-CONTROLtoselectthesegmentyouwishtoset.
Press MULTI-CONTROL repeatedly to switch these segment in the following order: L (low)—M (mid)—H (high)
4TurnMULTI-CONTROLtoadjustthe leveloftheequalizationband.
+6 to -6 is displayed as the level is increased or decreased.
■ Youcanalsoperformthesameoperationsby pushingMULTI-CONTROLupordown.
- Youcanthenselectanotherbandandadjust thelevel.
Fine-adjustingequalizercurve
You can adjust the center frequency and the Q factor (curve characteristics) of each currently selected curve band (LOW/MID/HI).
- Ifyoumakeadjustments, CUSTOMcurve isupdated.
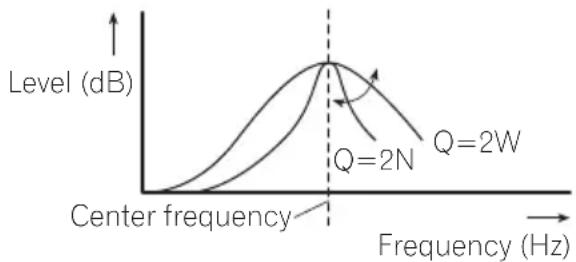
1UseMULTI-CONTROLtoselect EQSETTING2.
2PressMULTI-CONTROLtodisplaythe settingmode.
3PressMULTI-CONTROLtoselectthesegmentyouwishtoset.
Press MULTI-CONTROL repeatedly to switch these segment in the following order:
Band—Frequency—Qfactor
4TurnMULTI-CONTROLtoadjustthese- lectedsegement.
Band
LOW (low)—MID (mid)—HI (high)
Frequency
Low: 40HZ—80HZ—100HZ—160HZ
Mid: 200HZ—500HZ—1KHZ—2KHZ
High: 3KHZ—8KHZ—10KHZ—12KHZ
Qfactor
2N—1N—1W—2W
■Youcanalsoperformthesameoperationsby pushingMULTI-CONTROLupordown.
Adjustingloudness
Loudnesscompensatesfordeficienciesinthe low-andhigh-soundrangesatlowvolume.
1UseMULTI-CONTROLtoselect LOUDNESS.
2PressMULTI-CONTROLtodisplaythe settingmode.
3UseMULTI-CONTROLtoselectthedesiredsetting.
Turntochangethesetting.
LOW (low)—MID (mid)—HIGH (high)—OFF (off)
■Youcanalsoperformthesameoperationsby pushingMULTI-CONTROLupordown.
Usingsubwooferoutput
Thisunitisequippedwithasubwooferoutput whichcanbeturnedonoroff.
Also, phasecan beselected between normal and reverse.
1PressSWtodisplaythesubwoofersettingmode.
PressSWrepeatedlytoswitchbetweenthe subwoofersettingmodesinthefollowing order.
SWSETTING1(subwooferon/offsetting)settingmode—SWSETTING2(subwoofersetting)settingmode
2SelectSWSETTING1settingmode.
3TurnMULTI-CONTROLtoselectthedesiredsetting.
NORMAL(normalphase)—REV(reverse phase)—OFF(subwooferoff)
■Youcanalsoperformthesameoperationsby pushingMULTI-CONTROLupordown.

Note
Youcanalsoswitchtothissettingmodeinthe menuthatappearsbyusingMULTI-CONTROL.
Adjustingsubwoofersettings
Whenthesubwooferoutputison,youcanadjustthecut-offfrequencyandtheoutputlevel ofthesubwoofer.
1PressSWtodisplaythesubwoofersettingmode.
PressSW repeatedlytoswitchbetweenthe subwoofersettingmodesinthefollowing order.
SWSETTING1(subwooferon/offsetting)settingmode—SWSETTING2(subwoofersetting)settingmode
2SelectSWSETTING2settingmode.
3PressMULTI-CONTROLtoselectthesegmentyouwishtoset.
Press MULTI-CONTROL repeatedly to switch these segment in the following order:
Cutofffrequency—Level
4TurnMULTI-CONTROLtoadjustthese- lectedsegement.
Cutofffrequency
50HZ—63HZ—80HZ—100HZ—125HZ
Level
+6 to -24 is displayed as the level is increased or decreased.
■Youcanalsoperformthesameoperationsby pushingMULTI-CONTROLupordown.

Note
Youcanalsoswitchtothissettingmodeinthe menuthatappearsbyusing MULTI-CONTROL.
Usingthehighpassfilter
When you donotwantlowsounds from the subwoofer output frequency rangetoplay from the frontorrearspeakers, turn on the HPF (high pass filter). Only frequencies higher than those in these selected range are output from the frontorrearspeakers.
1UseMULTI-CONTROLtoselect HIGHPASSFILTER.
2PressMULTI-CONTROLtodisplaythe settingmode.
3UseMULTI-CONTROLtoselectthedesiredsetting.
Turntochangethesetting. OFF—50HZ—63HZ—80HZ—100HZ—125HZ
■Youcanalsoperformthesameoperationsby pushingMULTI-CONTROLupordown.
Boostingthebass
Bassboostfunctionbooststhebasslevelof sound.
1PressandholdBASStodisplay BASSBOOSTsettingmode.
2TurnMULTI-CONTROLtoadjustthe level.
0to+6isdisplayedasthelevelisincreasedor decreased.
■Youcanalsoperformthesameoperationsby pushingMULTI-CONTROLupordown.

Note
Youcanalsoswitchtothissettingmodeinthe menuthatappearsbyusing MULTI-CONTROL.
Adjustingsourcelevels
Sourceleveladjustment(SRCLVADJUST)lets youadjustthevolumelevelofeachsourceto preventradicalchangesinvolumewhen switchingbetweensources.
- SettingsarebasedontheFMvolumelevel, whichremainsunchanged.
1 Compare the FM volume level with the level of the source you wish to adjust.
2UseMULTI-CONTROLtoselect SRCLVADJUST.
3PressMULTI-CONTROLtodisplaythe settingmode.
4TurnMULTI-CONTROLtoadjustthe sourcevolume.
SLA+4toSLA-4isdisplayedasthesource volumeisincreasedordecreased.
■Youcanalsoperformthesameoperationsby pushingMULTI-CONTROLupordown.

Notes
• The AM volume level can also be adjusted with source level adjustments.
- Thebuilt-inCDplayerandthemulti-CDplayer aresettothesamesourceleveladjustment volumeautomatically.
- Externalunit1andexternalunit2aresetto thesamesourceleveladjustmentvolume automatically.
Adjustinginitialsettings
1PressOFFandholduntiltheunitturns off.
2PressMULTI-CONTROLandholduntil CLOCKSETappearsinthedisplay.
3TurnMULTI-CONTROLtoselectoneof theinitialsettings.
CLOCKSET(clock)—FMSTEP(FMtuning step)—AMSTEP(AMtuningstep)—
WARNINGTONE(warningtone)—AUX1(auxiliaryinput1)—AUX2(auxiliaryinput2)—
SWCONTROL(rearoutputandsubwoofer controller)—EVERSCROLL(everscroll)—
BTAUDIO(Bluetoothaudio)—
PINCODEINPUT(pincodeinput)—
BTVERINFO(Bluetoothversioninformation)
■Youcanalsoperformthesameoperationsby pushingMULTI-CONTROLupordown.
■Youcanalsoselectthefunctionbypassing
FUNCTIONontheremotecontrol.
■Tocancelinitialsettings,pressBAND.
■ BTAUDIO, PINCODEINPUT and
BTVERINFO can be selected only when Bluetooth adapter (e.g., CD-BTB100) is connected to this unit.
Settingtheclock
Usetheseinstructionstosettheclock.
1UseMULTI-CONTROLtoselect CLOCKSET.
2PressMULTI-CONTROLtodisplaythe settingmode.
■PressBACKtoreturntothepreviousdisplay.
3PressMULTI-CONTROLtoselectthesesegmentoftheclockdisplayyouwishtoset.
EachtimeyoupressMULTI-CONTROL, one segmentoftheclockdisplayisselected.
Hour—Minute
Asyouselectsegmentsoftheclockdisplay, theselectedsegmentblinks.
4TurnMULTI-CONTROLtoputaclock right.
■Youcanalsoperformthesameoperationsby pushingMULTI-CONTROLupordown.
SettingtheFMtuningstep
TheFMtuningstepemployedbyseektuning canbeswitchedbetween100kHz,thepreset step,and50kHz.
- Ifseektuningisperformedin50kHzsteps, stationsmaybetunedinimprecisely.Tune inthestationswithmanualtuningoruse seektuningagain.
1UseMULTI-CONTROLtoselectFMSTEP.
2PressMULTI-CONTROLtodisplaythe settingmode.
3TurnMULTI-CONTROLtoselecttheFM tuningstep.
Turning MULTI-CONTROL will switch the FM tuning step between 50kHz and 100kHz. The selected FM tuning step will appear in the display.
■Youcanalsoperformthesameoperationsby pushingMULTI-CONTROLupordown.

Note
Thetuningstepremainsat50kHzduringmanual tuning.
SettingtheAMtuningstep
TheAMtuningstepcanbeswitchedbetween 9kHz, thepresetstep, and 10kHz. When usingthetunerinNorth, CentralorSouth America, resetthetuningstepfrom9kHz(531 kHz to 1602kHz allowable) to 10kHz (530kHz to 1640kHz allowable).
1UseMULTI-CONTROLtoselect AMSTEP.
2PressMULTI-CONTROLtodisplaythe settingmode.
3TurnMULTI-CONTROLtoselecttheAM tuningstep.
Turning MULTI-CONTROL will switch the AM tuning step between 9 kHz and 10 kHz. These-lected AM tuning step will appear in the display.
■Youcanalsoperformthesameoperationsby pushingMULTI-CONTROLupordown.
Switchingthewarningtone
If the front panel is not detached from the head unit within four second soft turning off the ignition, awarning tones sounds. You can turn off the warning tone.
1UseMULTI-CONTROLtoselect WARNINGTONE.
2PressMULTI-CONTROLtoturnwarning toneon.
■Toturnwarningtoneoff, press MULTI-CONTROLagain.
Switchingtheauxiliarysetting
Auxiliarydevicesconnectedtothisunitcanbe activatedindividually.SeteachAUXsourceto ONwhenusing.Formoreinformationabout connectingorusingauxiliarydevices,referto UsingtheAUXsourceonpage28.
1UseMULTI-CONTROLtoselectAUX1/AUX2.
2PressMULTI-CONTROLtoturnAUX1/AUX2on.
■ToturnAUXoff,pressMULTI-CONTROL again.
Settingtherearoutputand subwoofercontroller
Thisunit'srearoutput(rearspeakerleadsoutputandRCArearoutput)canbeusedforfull-rangespeaker(REARSP:FULL/PREOUT:REAR)orsubwoofer(REARSP:SUBW/
PREOUT:SUBW)connection.Ifyouswitchthe rearoutputsettingtoREARSP:SUBW,you canconnectarearspeakerleaddirectlytoa subwooferwithoutusinganauxiliaryamp. Initially,theunitissetforrearfull-rangespeak-erconnection(REARSP:FULL).Whenrearout-putisconnectedtofullrangespeakers(when REARSP:FULLisselected),youcanconnect theRCAsubwooferoutputtoasubwoofer.In thiscase,youcanselectwhethertousethe subwoofercontroller's(lowpassfilter,phase) built-inPREOUT:SUBWortheauxiliary PREOUT:REAR.
1UseMULTI-CONTROLtoselect SWCONTROL.
2PressMULTI-CONTROLtodisplaythe settingmode.
■PressBACKtoreturntothepreviousdisplay.
3PressMULTI-CONTROLtoselectthesesegmentyouwishtoset.
PressMULTI-CONTROL repeatedly to switch these segment in the following order:
REARSP(rearspeakersetting)—PREOUT (RCAoutputsetting)
4UseMULTI-CONTROLtoselectthedesiredsetting.
Turntochangethesetting.
When REARSP(rearspeakersetting) is selected.
REARSP:SUBW(subwoofer)—REARSP:FULL (full-rangespeaker)
WhenPREOUT(RCAoutputsetting)isselected.
PREOUT:SUBW(subwoofer)—PREOUT:REAR (full-rangespeaker)
■Whennosubwooferisconnectedtotherear output,selectREARSP:FULL.
■Whenasubwooferisconnectedtotherear output,setforsubwooferREARSP:SUBW.

Notes
- Evenifyouchangethissetting,thereisno outputunlessyouturnthesubwooferoutput on(refertoUsingsubwooferoutputonpage 22).
- If you chan get his setting, subwoofer output in the audiomenure turn to the factory settings.
- BothrearspeakerleadoutputsandRCArear outputareswitchedsimultaneouslyinthis setting.
SwitchingtheEverScroll
When Ever ScrollissettoON, recorded textinformationscrollscontinuouslyinthedisplay. SettoOFFify you prefer the information to scroll just once.
1UseMULTI-CONTROLtoselect EVERSCROLL.
2PressMULTI-CONTROLtoturntheEver Scrollon.
■ToturntheEverScrolloff, press
MULTI-CONTROLagain.
ActivatingtheBTAUDIOsource
YouneedtoactivatetheBTAUDIOsourcein ordertouseaBluetoothaudioplayer.
- Youcanonlyoperatethisfunctionwhen Bluetoothadapter(e.g.CD-BTB100)isconnectedtothisunit.
1UseMULTI-CONTROLtoselect BTAUDIO.
2PressMULTI-CONTROLtoturnthe BTAUDIOsourceon.
■ToturntheBTAUDIOsourceoff,press
MULTI-CONTROLagain.
EnteringPINcodefor Bluetoothwirelessconnection
Toconnectyourcellularphonetothisunitvia Bluetoothwirelesstechnology,youneedto enterPINcodeonyourphonetoverifythe connection.Thedefaultcodeis0000,butyou canchangethisinthisfunction.
- WithsomeBluetoothaudioplayers, you may berequired to enter the Bluetooth audioplayerPINcode in advance to this unit for a connection.
- Youcanonlyoperatethisfunctionwhen Bluetoothadapter(e.g.CD-BTB100)isconnectedtothisunit.
1UseMULTI-CONTROLtoselect PINCODEINPUT.
2PressMULTI-CONTROLtodisplaythe settingmode.
■PressBACKtoreturntothepreviousdisplay.
3TurnMULTI-CONTROLtoselectanumber.
■Youcanalsoperformthesameoperationsby pushingMULTI-CONTROLupordown.
4PressMULTI-CONTROLtomovethecur-sortothenextposition.
■Youcanalsoperformthesameoperationsby pushingMULTI-CONTROLright.
5AfterinputtingPINcode(upto4digits),pressandholdMULTI-CONTROL.
PINcodecanbestoredinmemory.

Displayingsystemversionof Bluetoothadapterforrepair
Should this unit connecting Bluetooth adapter fail to operate properly and you consult your dealer for repair, you maybe asked to indicate the system version and Bluetooth module version of the adapter. You can display the versions and confirm them.
InitialSettings
- Youcanonlyoperatethisfunctionwhen Bluetoothadapter(e.g.CD-BTB100)isconnectedtothisunit.
1UseMULTI-CONTROLtoselect BTVERINFO.
2PressMULTI-CONTROLtodisplaythe settingmode.
■PressBACKtoreturntothepreviousdisplay.
3UseMULTI-CONTROLtoselectthedesiredsetting.
Turntochangethesetting.
Systemversion—Bluetoothmoduleversion
■Youcanalsoperformthesameoperationsby pushingMULTI-CONTROLupordown.
UsingtheAUXsource
UptotwoauxiliarydevicessuchasVCRor portabledevices(soldseparately)canbeconnectedtothisunit.Whenconnected,auxiliary devicesareautomaticallyreadasAUXsources andassignedtoAUX1orAUX2.ThererelationshipbetweenAUX1andAUX2sourcesisexplainedbelow.
AboutAUX1andAUX2
Therearetwomethodstoconnectauxiliarydevicestothisunit.
AUX1source:
When connecting auxiliary equipment using a stereominiplugcable
- Insertthestereominiplugintothe inputjackonthisunit.
Thisauxiliarydeviceisautomaticallysetto AUX1.
AUX2source:
When connecting auxiliary equipment using an IP-BUS-RCAInterconnector(soldseparately)
- UseanIP-BUS-RCAInterconnectorsuch astheCD-RB20/CD-RB10(soldseparetely) toconnectthisunittoauxiliaryequipment featuringRCAoutput.
Formoredetails, refertotheIP-BUS-RCAInterconnectorowner's manual. Thisauxiliary device is automatically set to AUX2.
■Youcanonlymakethistypeofconnectionif theauxiliarydevicehasRCAoutputs.
SelectingAUXasthesource
- PressSRCtoselectAUXasthesource.
■Iftheauxiliarysettingisnotturnedon,AUX cannotbeselected.Formoredetails,seeSwitchingtheauxiliarysettingonpage25.
SettingtheAUXtitle
ThetitledisplayedfortheAUX1orAUX2 sourcecanbechanged.
1 After you have selected AUX as the source, use MULTI-CONTROL and select FUNCTION to display TITLE INPUT.
2Enteratitleinthesamewayasthe built-inCDplayer.
Fordetailsconcerningoperation,refertoEnteringdisctitlesonpage16.
Turningtheclockdisplay onoroff
Youcanturntheclockdisplayonoroff.
- Evenwhenthesourcesareoff, theclock displayappearsonthedisplay.
- PressCLOCKtoturntheclockdisplay onoroff.
Each press of CLOCK turnsthe clock display onoroff.
■Theclockdisplaydisappearstemporarily whenyouperformotheroperations,buttheclock displayappearsagainafter25seconds.
Usingtheexternalunit
ExternalunitreferstoaPioneerproduct(such asonesavailableinthefuture)that,although incompatibleasasource,enablescontrolof basicfunctionswiththisunit.Twoexternal unitscanbecontrolledwiththisunit.When twoexternalunitsareconnected,theexternal unitisautomaticallyallocatedtoexternalunit 1orexternalunit2bythisunit.
Basicoperationsoftheexternalunitareexplainedbelow.Allocatedfunctionsaredifferentdependingontheconnectedexternalunit. Fordetailsconcerningfunctions,refertoexternalunit'sowner'smanual.
Selectingtheexternalunitas thesource
- PressSRCtoselectEXTERNALasthe source.
Basicoperation
Functionsallocatedtothefollowingoperationsaredifferentdependingontheconnectedexternalunit.Fordetailsconcerning functions,refertotheconnectedexternal unit'sowner'smanual.
- PressBAND.
●PressandholdBAND.
●PushMULTI-CONTROLleftorright.
●PushandholdMULTI-CONTROLleftor rightforaboutonesecondandrelease.
●PushMULTI-CONTROLupordown.
Using the functions allocated to 1 to 6 keys
1PressLIST.
2UseMULTI-CONTROLtoselect1KEYto6KEY.
Turntochange1KEYto6KEYandpress.
Advancedoperations
1PressMULTI-CONTROLtodisplaythe mainmenu.
2UseMULTI-CONTROLtoselect FUNCTION.
Turntochangethemenuoption.Presstose-lect.
3TurnMULTI-CONTROLtoselectthe function.
FUNC1 (function 1)—FUNC2 (function 2)— FUNC3 (function 3)—FUNC4 (function 4)— AUTO/MANUAL(auto/manual)
- YoucanalsoturnFUNC1onoroffbypassingiPod.
- YoucanalsoturnFUNC2onoroffbypassingRDM/ ×.
- YoucanalsoturnFUNC3onoroffbypassingRPT/LOCAL.

Notes
- Youcanalsoselectthefunctionbypassing FUNCTIONontheremotecontrol.
- Toreturntothepreviousdisplay,pressBACK.
- Toreturntothemainmenu, pressandhold BACK.
- Toreturntotheordinarydisplay, press BAND.
PlayingsongsonUSBportable audioplayer/USBmemory
YoucanusethisunittocontrolaUSBadapter (e.g., CD-UB100), whichissoldseparately. Fordetailsconcerningoperation, refertothe USBadapter'soperationmanual. Thissection providesinformationonUSBportableaudio player/USBmemoryoperationswiththisunit whichdiffersfromthatdescribedintheUSB adapter'soperationmanual.
BasicOperations
- Selectafolder
Push MULTI-CONTROLupordown.
●Fastforwardorreverse
PushandholdMULTI-CONTROLleftorright foraboutonesecondandrelease.
- Selectatrack
Push MULTI-CONTROL leftor right.
●Returntorootfolder
PressandholdBAND.

Notes
- Optimumperformanceofthisunitmaynotbe obtaineddependingontheconnectedUSB portableaudioplayer/USBmemory.
- lffolder01(ROOT)containsnofiles, playback commenceswithfolder02.
- WhentheUSBportableaudioplayer/USB memoryisdisconnectedfromthisunitduring playback,NODEVICEisdisplayed.
- You cannot select a folder that does not have uncompressed audio filerecordedinit.
Displayingtextinformationof anaudiofile
Theoperationisthesameasthatofthebuilt-inCDplayer.
RefertoDisplayingtextinformationondiscon page13.
- If the characters recorded on the audio file are not compatible with this unit, those characters will not be displayed.
Selectingfilesfromthefile namelist
Theoperationisthesameasthatofthebuilt-inCDplayer.(RefertoSelectingfilesfromthefilenamelistonpage14.)
Introductionofadvanced operations
1PressMULTI-CONTROLtodisplaythe mainmenu.
2UseMULTI-CONTROLtoselect FUNCTION.
Turntochangethemenuoption.Presstose-lect.
3TurnMULTI-CONTROLtoselectthe function.
REPEAT(repeatplay)—RANDOM(random play)—SCAN (scan play)—PAUSE (pause)
Functionandoperation
REPEAT, RANDOM, SCAN and PAUSE operations are basically the same as that of the built-in CD player.
FunctionnameOperation
| REPEAT | RefertoSelectingarepeatplay rangeonpage15.However,therepeatplayranges youcanselectaredifferentfrom thatofthebuilt-inCDplayer. The repeatplayrangesoftheUSBportableaudioplayer/USBmemory are:TRACK– Repeat just the currentfileFOLDER–Repeatthecurrent folderALL–Repeatallfiles |
| RANDOM | RefertoPlayingtracksinrandom orderonpage15. |
Availableaccessories
| SCAN | RefertoScanningfoldersand tracksonpage15. |
| PAUSE | RefertoPausingplaybackonpage 15. |

Notes
- Youcanalsoselectthefunctionbypassing FUNCTIONNontheremotecontrol.
• Toreturntothepreviousdisplay, pressBACK. - Toreturntothemainmenu, pressandhold BACK.
• Toreturntotheordinarydisplay, pressBAND. - If you select another folder during repeat play, therepeat play range changesto ALL.
- If you perform track search forward/reversed during TRACK, therepeat play range changesto FOLDER.
- WhenFOLDERisselected, it is not possible to playback asubfolderofthatfolder.
• Afterfileorfolderscanningisfinished,normalplaybackofthefilesbeginsagain.
BluetoothAudio
BasicOperations
If you connect a Bluetooth adapter (e.g. CD-BTB100) to this unit, you can control Bluetooth audioplayers via Bluetooth wireless technology.

Important
- Depending on the Bluetooth audioplayer connected to this unit, the operations available with this unit are limited to the following two levels:
—Lowerlevel: Onlyplayingbacksongson youraudioplayerispossible.
—Higherlevel: Playingback, pausing, selectingsongs, etc., arepossible(alltheoperationsillustratedinthismanual). - SincethereareanumberofBluetoothaudio playersavailableonthemarket,operations withyourBluetoothaudioplayerusingthis unitvaryingreatrange.RefertotheinstructionmanualthatcamewithyourBluetooth
audioplayeraswellasthismanualwhileoperatingyourplayeronthisunit.
• Informationaboutsongs(e.g.theelapsed playingtime,songtitle,songindex,etc.)can-notbedisplayedonthisunit.
- WhileyouarelisteningtosongsonyourBluetoothaudioplayer,refrainfromoperatingon yourcellularphoneasmuchaspossible.If youtryoperatingyourcellularphone,thesignalfromyourcellularphonemaycausenoise onthesongplayback.
- WhenyouaretalkingonacellularphoneconnectedtothisunitviaBluetoothwirelestechnology,songplaybackfromyourBluetoothaudioplayerconnectedtothisunitismuted.
• Evenifwhileyouarelisteningtoasongon yourBluetoothaudioplayerandyouswitchto anothersource, playbackofsongcontinues.
●Fastforwardorreverse
Pushandhold MULTI-CONTROL leftor right for about one second and release.
- Selectatrack
PushMULTI-CONTROLleftorright.

Notes
- Fordetailsconcerningoperation, refertothe Bluetoothadapter'soperationmanual. This sectionprovidesbriefinformationonBluetoothaudioplayeroperationswiththisunit, whichslightlydiffersorisabbreviatedfrom thatdescribedintheBluetoothadapter'soperationmanual.
- EventoughyouraudioplayerdoesnotcontainaBluetoothmodule,youcanstillcontrolitfromthisunitviaBluetoothwirelesstechnology.Tocontrolyouraudioplayerusingthisunit,connectaproductfeaturingBluetoothwirelesstechnology(availableonthemarket)toyouraudioplayerandconnecttheBluetoothadapter(e.g.CD-BTB100)tothisunit.
Functionandoperation
1PressMULTI-CONTROLtodisplaythe mainmenu.
2UseMULTI-CONTROLtoselect FUNCTION.
Turntochangethemenuoption.Presstose-lect.
3TurnMULTI-CONTROLtoselectthe function.
CONNECTIONOPEN(connectionopen)—DISCONNECTAUDIO(disconnectaudio)—PLAY (Play)—STOP (Stop)—PAUSE (pause)—DEVICEINFO(deviceinformation)
■PAUSEisthesameasthatofthebuilt-inCD
player.(RefertoPausingplaybackonpage15.)
■Youcanalsoperformthesameoperationsby pushingMULTI-CONTROLupordown.

Notes
- Youcanalsoselectthefunctionbypassing FUNCTIONnontheremotecontrol.
• To return to the previous display, press BACK. - Toreturntothemainmenu, pressandhold BACK.
- Toreturntotheordinarydisplay, pressBAND.
- IfaBluetoothaudioplayerisnotconnectedto thisunityet, CONNECTIONOPEN and DEVICEINFO appearinthefunctionmenu andotherfunctionsarenotavailable.
- IfaBluetoothaudioplayerisconnectedvia higherlevel, CONNECTIONOPEN does not appear in the function menu and the other functions are available.
- IfaBluetoothaudioplayerisconnectedvia lowerlevel,onlyDISCONNECTAUDIOand DEVICEINFOappearinthefunctionmenu.
- If you donot operate function so other than CONNECTIONOPEN and DISCONNECTAUDIO within about 30 seconds, the display is automatically returned to the ordinary display.
ConnectingaBluetoothaudio player
1UseMULTI-CONTROLtoselect CONNECTIONOPENinthefunctionmenu.
2PressMULTI-CONTROLtoopentheconnection.
ALWAYSWAITING is displayed. This unitis nowonstandbyforconnection from Bluetooth audioplayer. If your Bluetooth audioplayer is set ready for Bluetooth wireless connection, connection to this unitis automatically established.

Note
Beforeyoucanuseaudioplayersyoumayneed toenterthePINcodeintothisunit.Ifyourplayer requiresaPINcodetoestablishaconconnection, lookforthecodeontheplayerorinitsaccompanyingdocumentation.RefertoEnteringPINcode forBluetoothwirelessconnectiononpage26.
PlayingsongsonBluetooth audioplayer
1UseMULTI-CONTROLtoselectPLAYin thefunctionmenu.
2PressMULTI-CONTROLtostartplay-back.
Stopping playback
1UseMULTI-CONTROLtoselectSTOPin thefunctionmenu.
2PressMULTI-CONTROLtostoptheplayback.
DisconnectingaBluetooth audioplayer
1UseMULTI-CONTROLtoselect DISCONNECTAUDIOinthefunctionmenu.
2PressMULTI-CONTROLtodisconnect theBluetoothaudioplayer.
DISCONNECTED is displayed. The Bluetooth audioplayerisnowdiconnected from this unit.
DisplayingBD(Bluetooth Device)address
1UseMULTI-CONTROLtoselect DEVICEINFOinthefunctionmenu.
2PressMULTI-CONTROLtodisplaythe settingmode.
3UseMULTI-CONTROLtoselectthedesiredsetting.
Turntochangethesetting.
DEVICENAME(Devicename)—BDADDRESS
(BD(BluetoothDevice)address)
BluetoothTelephone
BasicOperations
If you use a Bluetooth adapter (e.g. CD-BTB100), you can connect cellular phone features of Bluetooth wireless technology to this unit for hands-free, wireless calls, even while driving.

Important
- Sincethisunitisonstandbytoconnectwith yourcellularphoneviaBluetoothwireless technology, using this unit without running the engine can result in battery drainage.
- Advancedoperationsthatrequireyourattentionsuchasdialingnumbersonthemonitor, usingphonebook,etc.,areprohibitedwhile youaredriving.Whenyouneedtousethese advancedoperations,stopyourvehicleina safeplace.

Notes
• Equalizercurveforthephonesourceisfixed.
- Whenselectingthephonesource,youcan onlyoperateFADER/BALANCE(balanceadjustment)intheaudiomenu.
Settingupforhands-freephoning
Beforeyoucanusethehands-freephoning functionyoumustsetuptheunitforusewith yourcellularphone. Thisentailsestablishinga Bluetoothwirelessconnectionbetween this unitandyourphone, registeringyourphone withthisunit,andadjustingthevolumelevel.
1Connection
Fordetailedinstructionsonconnectingyour phonetothisunitviaBluetoothwirelestechnology,refertoConnectingacellularphoneon page35.
- Yourphones should now be temporarily connected. However, to make best use of the technology, were recommend you register the phoneto this unit.
2Registration
Toregistryourtemporarilyconnectedphone, refertoRegisteringaconnectedcellularphone onpage36.
3Volumeadjustment
Adjusttheearpiecevolumeonyourcellular phoneforcomfort.Whenadjusted,thevolume levelismemorizedinthisunitasthedefault setting.
- Caller'svoicevolumeandringvolumemay varydependingonthetypeofcellularphone.
■ If the difference between the ranging volume and caller's voice volume is big, overall volume level may become unstable.
■ Before disconnecting the cellular phone from this unit, makes sure to adjust the volumeto a proper level. If the volume is muted (zerolevel) on your cellular phone, the volume level of your cellular phoneremains muted even after the cellular phone is disconnected.
Makingaphonecall
Voicerecognition
1PressBANDandholduntilVOICEDIAL appearsinthedisplay.
VOICEDIALappearsinthedisplay.When VOICEDIALONisdisplayed,voicerecognitionfunctionisnowready.
■Ifyourcellularphonedoesnotfeaturevoice recognitionfunction,NOVOICEDIALappearsin thedisplayandopearationisnotavailable.
2 Pronouncethenameofyourcontact.
Takingaphonecall
Answeringorrejectinganincomingcall
●Answeringanincomingcall
Whenacallcomesin, press MULTI-CONTROL.
■YoucanalsoperformthisoperationbypushingMULTI-CONTROLup.
●Endacall
Push MULTI-CONTROL down.
- Rejectinganincomingcall
Whenacallcomesin, push MULTI-CONTROL down.

Notes
- Ifprivatemodeisselectedonthecellular phone,hands-freephoningmaynotbeperformed.
- Theestimatedcalltimeappearsinthedisplay (thismaydifferslightlyfromtheactualcall time).
Operatingacallwaiting
●Answeringacallwaiting
Whenacallcomesin, press MULTI-CONTROL.
■YoucanalsoperformthisoperationbypushingMULTI-CONTROLup.
●Endallcalls
Push MULTI-CONTROLdown.
●Switchbetweencallersonhold PressMULTI-CONTROL.
■YoucanalsoperformthisoperationbypushingMULTI-CONTROLup.
- Rejectingacallwaiting
PushMULTI-CONTROLdown.

Notes
- PushingMULTI-CONTROLdownendsall callsincludingcallswaitingtonline.
• Toendthecall, bothyouandyourcallerneed tohangupthephone.
Introductionofadvanced operations
1PressMULTI-CONTROLtodisplaythe mainmenu.
2UseMULTI-CONTROLtoselect FUNCTION.
Turntochangethemenuoption.Presstose-lect.
3TurnMULTI-CONTROLtoselectthe function.
SEARCHPHONE(searchandconnect)—
CONNECTIONOPEN(connectionopen)—
DISCONNECTPHONE(disconnectphone)—
CONNECTPHONE(connectphone)—
SETPHONE(registeringphone)—
DELETEPHONE(deletephone)—
PHBOOKTRANSFER(phonebooktransfer)—
CLEARMEMORY(clearmemory)—
NUMBERDIAL(callbyenteringnumber)—
REFUSECALLS(automaticrejectsetting)—
AUTOANSWER(automaticanswersetting)—RINGTONE(ringtoneselect)—
AUTOCONNECT(automaticconnectionsetting)—ECHOCANCEL(echocancel)—
DEVICEINFO(deviceinformation)
Ifnotconnectedyet
The following functions cannot be operated.
• DISCONNECTPHONE(disconnectphone)
- SETPHONE(registeringphone)
- CLEARMEMORY(clearmemory)
• NUMBERDIAL(callbyenteringnumber)
Ifconnectedbutnotregisteredyet
The following functions cannot be operated.
- SEARCHPHONE(searchandconnect)
• CONNECTIONOPEN(connectionopen)
• CONNECTPHONE(connectphone) - CLEARMEMORY(clearmemory)
Ifalreadyconnectedandregistered
The following functions cannot be operated.
- SEARCHPHONE(searchandconnect)
• CONNECTIONOPEN(connectionopen)
• CONNECTPHONE(connectphone) - SETPHONE(registeringphone)

Notes
- Youcanalsoselectthefunctionbypassing FUNCTIONontheremotecontrol.
- Toreturntothepreviousdisplay,pressBACK.
- Toreturntothemainmenu, pressandhold BACK.
- Toreturntotheplaybackdisplay, pressBAND.
- DEVICEINFOisthesameasthatoftheBluetoothaudio.(RefertoDisplayingBD(Bluetooth Device)addressonpage33.)
- Ifacellularphoneisconnectedtothisunitvia BluetoothwirelesstechnologywithHSP (HeadSetProfile),CLEARMEMORYand NUMBERDIALcannotbeselected.
- If you donot operate function so other than SEARCHPHONE, CONNECTIONOPEN, CONNECTPHONE, PHBOOKTRANSFER, DISCONNECTPHONE, NUMBERDIAL and CLEAR MEMORY within about 30 seconds, the display automatically return to the ordinary display.
Connectingacellularphone
Searchingforavailablecellularphones
1UseMULTI-CONTROLtoselect
SEARCHPHONEinthefunctionmenu.
2PressMULTI-CONTROLtosearchfor availablecellularphones.
Whilesearching, SEARCHINGflashes.When availablecellularphonesfeaturingBluetooth wirelessstechnologyarefound,devicenameor
NAMENOTFOUND(ifnamescannotbeobtained)isdisplayed.
■ If this unit fail to find any available cellular phones, NOT FOUND is displayed.
3TurnMULTI-CONTROLtoselectadevice nameyouwanttoconnect.
■Youcanalsoperformthesameoperationsby pushingMULTI-CONTROLupordown.
4PressMULTI-CONTROLtoconnectthe selectedcellularphone.
Whileconnecting, CONNECTINGflashes. To completetheconnection, checkthedevice name(PIONEERBTUNIT) and enterthelink codeonyourcellularphone. If the connection is established, CONNECTED is displayed.
■ Thelinkcodeissetto0000asdefault.You canchangethiscodeintheinitialsetting.Refer toEnteringPINcodeforBluetoothwirelessconnectiononpage26.
Usingacellularphonetoinitiatea connection
1UseMULTI-CONTROLtoselect CONNECTIONOPENinthefunctionmenu.
2PressMULTI-CONTROLtoopentheconnection.
ALWAYSWAITINGflashesandtheunitis nowonstandbyforconnectionfromacellular phone.
3Usecellularphonetoconnecttothis unit.
■ Thelinkcodeissetto0000asdefault.You canchangethiscodeintheinitialsetting.Refer toEnteringPINcodeforBluetoothwirelessconnectiononpage26.
Disconnectingacellularphone
1UseMULTI-CONTROLtoselect DISCONNECTPHONEinthefunctionmenu.
Devicenameoftheconnectedphoneappears inthedisplay.
2PressMULTI-CONTROLtodisconnecta cellularphonefromthisunit.
Afterdisconnectioniscompleted, DISCONNECTED is displayed.
Registeringaconnected cellularphone
1UseMULTI-CONTROLtoselect SETPHONEinthefunctionmenu.
2PressMULTI-CONTROLtodisplaythe settingmode.
3TurnMULTI-CONTROLtoselectaregistrationassignment.
P1 (user phone 1)—P2 (user phone 2)—P3 (user phone 3)—G1 (guest phone 1)—G2 (guestphone2)
■Youcanalsoperformthesameoperationsby pushingMULTI-CONTROLupordown.
■Asyouselecteachassignment,youcansee whetherornotaphoneisalreadyregistered.If theassignmentisempty,NODATAisdisplayed. Iftheassignmentisalreadytaken,thedevice nameappears.Toreplaceanassignmentwitha newphone,firstdeletethecurrentassignment. Formoredetailedinstructions,seeDeletingare-gisteredphoneonthispage.
4PressMULTI-CONTROLtoregisterthe currentlyconnectedphone.
When registration is completed, REGCOMPLETED is displayed.
■ If theregistration fails, REGERROR is displayed. In this case, return to step1 and try again.
Deletingaregisteredphone
1UseMULTI-CONTROLtoselect DELETEPHONEinthefunctionmenu.
2PressMULTI-CONTROLtodisplaythe settingmode.
3TurnMULTI-CONTROLtoselectaregistrationassignment.
P1 (user phone 1)—P2 (user phone 2)—P3 (user phone 3)—G1 (guest phone 1)—G2 (guestphone2)
■Youcanalsoperformthesameoperationsby pushingMULTI-CONTROLupordown.
■ If the assignment is empty, NODATA is displayed and operation is not possible.
4PressMULTI-CONTROLtoshowtheconfirmationdisplay.
5TurnMULTI-CONTROLtoselect DELETEOK?:YES.
Thephonebeingdeletedisnowonstandby.
■Tocancel,selectDELETEOK?:NO
6PressMULTI-CONTROLtodeletethe phone.
After the phone is deleted, DELETED is displayed.
Connectingtoaregistered cellularphone
Connectingtoaregisteredphone manually
1UseMULTI-CONTROLtoselect CONNECTPHONEinthefunctionmenu.
2PressMULTI-CONTROLtodisplaythe settingmode.
3TurnMULTI-CONTROLtoselectaregistrationassignment.
P1 (user phone 1)—P2 (user phone 2)—P3 (user phone 3)—G1 (guest phone 1)—G2 (guestphone2)
Availableaccessories
■Youcanalsoperformthesameoperationsby pushingMULTI-CONTROLupordown.
■ If the assignment is empty, NODATA is displayed and operation is not possible.
4PressMULTI-CONTROLtoconnectthe selectedcellularphone.
Whileconnecting, CONNECTING is displayed. After the connection is completed, CONNECTED is displayed.
Connectingtoaregisteredphone automatically
1UseMULTI-CONTROLtoselect AUTOCONNECTinthefunctionmenu.
2PressMULTI-CONTROLtoturnautomaticconnection.
If your cellular phone is ready for Bluetooth wireless connection, connection to this unit is automatically established.
■Toturnautomaticconnectionoff,press MULTI-CONTROLagain.
UsingthePhoneBook
TransferringentriestothePhoneBook
ThePhoneBookcanholdatotalof500entries.300fromUser1,150fromUser2,and50fromUser3.
1UseMULTI-CONTROLtoselect PHBOOKTRANSFERinthefunctionmenu.
2PressMULTI-CONTROLtoshowtheconfirmationdisplay.
TRANSFER:YESappearsinthedisplay.
3PressMULTI-CONTROLtoenterinthe phonebooktransferstandbymode.
4Usecellularphonetoperformphone booktransfer.
Performphonebooktransferusingthecellularphone. Fordetailedinstructions, referto theinstructionmanualthatcamewithyour cellularphone.
■Thedisplayindicateshowmanyentrieshave beentransferredandthetotalnumbertobe transferred.
5DATATRANSFERREDisdisplayed and phonebooktransferiscompleted.
CallinganumberinthePhoneBook

Important
Besuretoparkyourvehicleandapplytheparkingbrakewhenperformingthisoperation.
Afterfindingthenumberyouwanttocallin thePhoneBook,youcanselecttheentryand makethecall.
1PressLISTtodisplaythePhoneBook.
2PressMULTI-CONTROLtodisplay ABCSEARCH.
3TurnMULTI-CONTROLtoselectthefirst letterofthenameyouarelookingfor.
4PressMULTI-CONTROLtodisplayan entry.
ThedisplayshowsthefirstPhoneBookentry starting with that letter (e.g. "Ben", "Brian" and "Burt" when "B" is selected).
5TurnMULTI-CONTROLtoselectanentry youwanttocall.
6PressMULTI-CONTROLtodisplaya phonenumber.
7TurnMULTI-CONTROLtoselectaphone numberyouwanttocall.
■ Ifonephonenumberisenteredinanentry, thisoperationisnotavailable.
■ If you want to go back and select another entry, press BACK.
8PressMULTI-CONTROLtomakeacall.
- PressandholdMULTI-CONTROLtoswitchto phonebookdeletedisplay.Fordetails,referto Clearingmemoryonthenextpage.
UsingtheCallHistory

Important
Besuretoparkyourvehicleandapplytheparkingbrakewhenperformingthisoperation.
The12mostrecentcallsmade(dialled),receivedandmissed,arestoredintheCallHistory.YoucanbrowsetheCallHistoryandcallnumbersfromit.
1PressLISTtodisplaythelist.
2TurnMULTI-CONTROLtoselectalist.
Phonebook—MISSEDCALLS(missedcall)—DIALEDCALLS(dialedcall)—RECEIVEDCALLS(receivedcall)
■FormoredetailsaboutthePhoneBooklist, refertoUsingthePhoneBookontheprevious page.
■ Ifnophonenumbersarestoredinthese- lectedlist, NODATA is displayed.
3PressMULTI-CONTROLtodisplayare-gisterednamelist.
4TurnMULTI-CONTROLtoselectaphone number.
■IfthenumberisalreadyinthePhoneBook, thenameisdisplayed.
■Youcanalsochangethephonenumberby pushingMULTI-CONTROLupordown.
5PressMULTI-CONTROLtomakeacall.
■Foraninternationalcall,pressandhold MULTI-CONTROLtoadd+tothephonenumber.
Makingacallbyentering phonenumber

Important
Besuretoparkyourvehicleandapplytheparkingbrakewhenperformingthisoperation.
1UseMULTI-CONTROLtoselect NUMBERDIALinthefunctionmenu.
2PressMULTI-CONTROLtodisplaythe numberinputscreen.
3TurnMULTI-CONTROLtoselectanumber.
■Youcanalsoperformthesameoperationsby pushingMULTI-CONTROLupordown.
4PressMULTI-CONTROLtomovethecur-sortothenextposition.
■Upto24digitscanbeentered.
5Whenyoucompletedenteringthe number,pressandholdMULTI-CONTROLto makeacall.
Callconfirmationappears.
■Ifa24-digitphonenumberisentered,press MULTI-CONTROL.Andthenpressandhold MULTI-CONTROltomakeacall.
Clearingmemory
1UseMULTI-CONTROLtoselect CLEARMEMORYinthefunctionmenu.
2PressMULTI-CONTROLtodisplaythe settingmode.
3TurnMULTI-CONTROLtoselectanitem. PHONEBOOK(phonebook)—ALL(deleteall memory)—RECEIVED(receivedcallhistory)—DIALLED(dialledcallhistory)—MISSED (missedcallhistory)
■IfyouwanttoclearthePhoneBookand dialled/received/missedcallhistorylist,select ALL.
■Ifguestphoneisconnectedtothisunitvia Bluetoothwirelesstechnology,PHONEBOOK cannotbeselected.
4PressMULTI-CONTROLtodetermine theitemthatyouwanttodelete.
5TurnMULTI-CONTROLtoselect CLEARMEMORY:YES.
Clearingmemoryisnowonstandby.
■Tocancel,selectCLEARMEMORY:NO.
Availableaccessories
6PressMULTI-CONTROLtoclearthe memory.
Whileclearing, CLEARING is displayed. After the data on these selected item is cleared, CLEARED is displayed.
Settingautomaticrejecting
1UseMULTI-CONTROLtoselect REFUSECALLSinthefunctionmenu.
2PressMULTI-CONTROLtoturnautomaticcallrejectionon.
■Toturnautomaticcallrejectionoff,press MULTI-CONTROLagain.
Settingautomaticanswering
1UseMULTI-CONTROLtoselect AUTOANSWERinthefunctionmenu.
2PressMULTI-CONTROLtoturnautomaticansweringon.
■Toturnautomaticansweringfunctionoff, pressMULTI-CONTROLagain.
Switchingtheringtone
1UseMULTI-CONTROLtoselect RINGTONEinthefunctionmenu.
2PressMULTI-CONTROLtoturnthering toneon.
■Toturntheringtoneoff, press MULTI-CONTROLagain.
Echocancelingandnoisereduction
1UseMULTI-CONTROLtoselect ECHOCANCELinthefunctionmenu.
2PressMULTI-CONTROLtoturnechocancelingon.
■Toturnechocancelingoff, press MULTI-CONTROLagain.
Multi-CDPlayer
BasicOperations
Youcanusethisunittocontrolamulti-CD player, which is sold separately.
- Onlyfunctionsdescribedinthismanualare supportedby50-discmulti-CDplayers.
- Thisunitisnotdesignedtooperatedisctitle listfunctionswitha50-discmulti-CDplayer. Forinformationaboutthedisctitlelistfunctions,refertoSelectingdiscsfromthedisc titlelistonpage42.
- Selectadisc
Push MULTI-CONTROLupordown.
●Fastforwardorreverse
Pushandhold MULTI-CONTROL leftor right for about one second and release.
- Selectatrack
Push MULTI-CONTROL leftor right.

Notes
- When multi-CD player completes preparatory operations, READY is displayed.
- IfanerrormessagesuchasERROR-11isdisplayed, refertothemulti-CDplayerowner's manual.
- If there are an odiscsinthemulti-CD player magazine, NODISC is displayed.
UsingCDTEXTfunctions
YoucanusethesefunctionsonlywithaCD TEXTcompatiblemulti-CDplayer. Theoperationisthesameasthatofthebuilt-inCDplayer. RefertoDisplayingtextinformationondiscon page13.
Introduction of advanced operations
YoucanonlyuseCOMP/DBE(compression andDBE)withamulti-CDplayerthatsupports them.
Availableaccessories
1PressMULTI-CONTROLtodisplaythe mainmenu.
2UseMULTI-CONTROLtoselect FUNCTION.
Turntochangethemenuoption.Presstose-lect.
3TurnMULTI-CONTROLtoselectthe function.
REPEAT(repeatplay)—RANDOM(random play)—SCAN (scan play)—PAUSE (pause)—COMP/DBE(compressionandDBE)—
ITSPLAY(ITSplay)—ITSMEMORY(ITSprogramming)—TITLEINPUT(discitleinput)
■Ifyoudonotoperatefunctionsotherthan ITSMEMORYandTITLEINPUTwithinabout30 seconds,thedisplayautomaticallyreturnstothe ordinarydisplay.
■WhenplayingaCDTEXTdisconaCDTEXT compatiblemulti-CDplayer,youcannotswitchto
TITLEINPUT. Thedisctitleisalreadyrecorded on theCDTEXTdisc.
Functionandoperation
REPEAT, RANDOM, SCAN, PAUSE, COMP/DBE and TITLEINPUT operations are basically the same as that of the built-in CD player.
FunctionnameOperation
| REPEAT | RefertoSelectingarepeatplay rangeonpage15.However,therepeatplayranges youcanselectaredifferentfrom thatofthebuilt-inCDplayer.The repeatplayrangesofthemulti-CD playerare:•MCD-Repeatalldiscsinthe multi-CDplayer•TRACK-Repeatjustthecurrenttrack•DISC-Repeatthecurrentdisc |
| RANDOM | RefertoPlayingtracksinrandom orderonpage15. |
| SCAN | RefertoScanningfoldersand tracksonpage15. |
| PAUSE | RefertoPausingplaybackonpage 15. |
| TITLEINPUT | RefertoEnteringdisctitleson page16. |

Notes
- Youcanalsoselectthefunctionbypassing FUNCTIONontheremotecontrol.
- Toreturntothepreviousdisplay,pressBACK.
- Toreturntothemainmenu, pressandhold BACK.
• To return to the ordinary display, press BAND. - If you select other discsduring repeat play, therepeat play range changesto MCD.
- If you perform track search or fast forward/reversed during TRACK, therepeat play range changesto DISC.
- Aftertrackordiscscanningisfinished,normalplaybackofthetracksbeginsagain.
Usingcompressionandbass emphasis
Youcanonlyusethesefunctionswithamulti-CDplayerthatsupportsthem.
COMP(compression)andDBE(dynamicbass emphasis)functionsletsyouadjustthesound playbackqualityofthemulti-CDplayer.
1UseMULTI-CONTROLtoselect COMP/DBEinthefunctionmenu.
■Ifthemulti-CDplayerdoesnotsupport COMP/DBE, NOCOMPisdisplayedwhenyouattempttoselectit.
2UseMULTI-CONTROLtoselectthedesiredsetting.
Turntochangethesetting.
OFF—COMP 1—COMP 2—OFF—DBE 1—DBE2
UsingITSplaylists
ITS(instanttrackselection)letsyoumakea playlistoffavoritetracksfromthemulti-CD playermagazine. After you have added your favoritetrackstotheplaylist, you canturnon ITS playandplayjustthose selections. You can use IT Stoenterand playbackupto 99 tracksperdiscfromupto100 discs (with the disc titles). (With multi-CD players sold before the CDX-P1250 and CDX-P650, upto 24 trackscan bestored in the playlist.)
CreatingaplaylistwithITSprogramming
1PlayaCDthatyouwanttoprogram.
Push MULTI-CONTROLupordowntoselect theCD.
2UseMULTI-CONTROLtoselect ITSMEMORYinthefunctionmenu.
3PressMULTI-CONTROLtodisplaythe settingmode.
4PressMULTI-CONTROLtoselectTRK.
5TurnMULTI-CONTROLtoselectthedesiredtrack.
6PressMULTI-CONTROLtoselect MEMORY.
MEMORYCOMPLETE is displayed and the currently playing selection is added to your playlist.
■IfDELETEisdisplayed,turnMULTI-CONTROL todisplayMEMORY.

Note
Afterdatafor100discsisstoredinmemory, data foranewdiscwilloverwritetheoldestone.
PlaybackfromyourITSplaylist
ITSplayletsyoulistentothetracksthatyou haveenteredintoyourITSplaylist.Whenyou turnonITSplay,tracksfromyourITSplaylist inthemulti-CDplayerbegintoplay.
1Selecttherepeatrange.
2UseMULTI-CONTROLtoselectITSPLAY inthefunctionmenu.
3PressMULTI-CONTROLtoturnITSplay on.
ITSPLAY:ONappearsinthedisplay.Playback beginsofthosetracksfromyourplaylistwithin thepreviouslyselectedMCDorDISCranges.
■IfnotracksinthecurrentrangeareprogrammedforITSplay,thenEMPTYisdisplayed.
■ToturnITSplayoff,pressMULTI-CONTROL again.
ErasingatrackfromyourITSplaylist
YoucandeleteatrackfromyourITSplaylistif ITSplayison.
IfITSplayisalreadyon, skiptostep2. If ITS playisnotalreadyon, use MULTI-CONTROL.
1PlaytheCDwiththetrackyouwantto deletefromyourITSplaylist,andturnITS playon.
RefertoPlaybackfromyourITSplaylistonthis page.
2UseMULTI-CONTROLtoselect ITSMEMORYinthefunctionmenu.
3PressMULTI-CONTROLtodisplaythe settingmode.
4PressMULTI-CONTROLtoselectTRK.
5TurnMULTI-CONTROLtoselectthedesiredtrack.
6PressMULTI-CONTROLtoselect DELETE.
The currently playing selection is erased from your ITS playlist and playback of then next track begins.
■ IfMEMORYisdisplayed,turn
MULTI-CONTROLtodisplayDELETE.
■Iftherearenotracksfromyourplaylistinthe currentrange,EMPTYisdisplayedandnormal playbackresumes.
ErasingaCDfromyourITSplaylist
YoucandeletealltracksofaCDfromyourITSplaylistifITSplayisoff.
1PlaytheCDthatyouwanttodelete.
2UseMULTI-CONTROLtoselect ITSMEMORYinthefunctionmenu.
3PressMULTI-CONTROLtodisplaythe settingmode.
4PressMULTI-CONTROLtoselect DELETE.
AlltracksonthecurrentlyplayingCDaredeletedfromyourplaylist
MEMORYDELETEDisdisplayed.
■IfMEMORYisdisplayed,turn
MULTI-CONTROLtodisplayDELETE.
Usingdistitlefunctions
YoucaninputCDtitlesanddisplaythetitles. Then, youcaneasilysearchforandplayade-sireddisc.
Enteringdisctitles
Usethedisctitleinputfeaturetostoreupto 100CDtitles(withITSplaylist) into themulti-CDplayer. Each title can be upto 10 characters long.
Fordetailsconcerningoperation,refertoEnteringdisctitlesonpage16.
- Titlesremaininthememoryevenafterthe discisremovedfromthemagazine,and arerecalledwhenthediscisreinserted.
- Afterdatafor100discsisstoredinmemory, dataforanewdiscwilloverwritetheoldestone.
Displayingdisctitles
Youcandisplaythetextinformationofany discthathasthedisctitleentered.
Theoperationisthesameasthatofthebuilt-inCDplayer.
RefertoDisplayingtextinformationondiscon page13.
Selectingdiscsfromthedisctitlelist
Disctitlelistletsyouseethelistofdisctitles enteredinthemulti-CDplayerandselectone ofthemtoplayback.
1PressLISTtoswitchtothedisctitlelist modeduringtheplaybackdisplay.
2UseMULTI-CONTROLtoselectthedesireddisctitle.
Turntochangethedisctitle.Presstoplay.
■Youcanalsochangethedisctitlebypushing MULTI-CONTROLupordown.
■Youcanalsoplaythediscbypushing
MULTI-CONTROLright.
■WhenplayingCDTEXTdisc,press
MULTI-CONTROLtoseealistofthetracksinthe selecteddisc.PressBACKorpush
MULTI-CONTROL lefttoreturntothedisclist.
■Toreturntotheordinarydisplay,pressBAND orLIST.
■Ifyoudonotoperatethelistwithinabout30 seconds,thedisplayautomaticallyreturnstothe ordinarydisplay.
■Ifnotitleisenteredforadisc,NODISCTITLE isdisplayed.
■NODISCisdisplayednexttothediscnumber whenthereisnodiscinthemagazine.
TVtuner
BasicOperations
YoucanusethisunittocontrolaTVtuner, whichissoldseparately.
Fordetailsconcerningoperation, refertothe TVtuner'soperationmanual. ThissectionprovidesinformationonTVoperationswiththis unit, whichdiffersfromthatdescribedinthe TVtuner'soperationmanual.
- Selectaband
PressBAND.
- Selectachannel(stepbystep)
Push MULTI-CONTROL leftor right.
- Seektuning
Pushandhold MULTI-CONTROL leftor right for about one second and release.

Notes
• BandcanbeselectedfromTV1orTV2.
- Youcancancelseektuningbypushing MULTI-CONTROLleftorright.
- If you push and hold MULTI-CONTROL left for right, you can skip stations. Seek tuning starts as soon as you release MULTI-CONTROL.
Storingandrecallingbroadcast stations
Youcaneasilystoreupto12broadcaststationsforlaterrecall.
- 12stationsforeachbandcanbestoredin memory.
1PressLIST.
Presetscreenisdisplayed.
2UseMULTI-CONTROLtostorethese- lectedstationinmemory.
Turntochangethepresetnumber.Pressand holdtostore.
■Youcanalsostorethestationinmemoryby pushingandholdingMULTI-CONTROLright.
3UseMULTI-CONTROLtoselectthedesiredstation.
Turntochangethestation.Presstoselect.
■Youcanalsochangethestationbypushing MULTI-CONTROLupordown.
■If you donot operatethelist within about 30 seconds, the display automatically return to the ordinary display.
Storingthestrongestbroadcast stationssequentially
1PressMULTI-CONTROLtodisplaythe mainmenu.
2UseMULTI-CONTROLandselect FUNCTIONtodisplayBSSM.
■Youcanalsoselectthefunctionbypassing FUNCTIONNontheremotecontrol.
3PressMULTI-CONTROLtoturnBSSM on.
SEARCHbeginstoflash. While SEARCH is flashing, the 12 strongest broadcast stations are stored in order from the lowest channel up. When finished, the preset channel lists appears.
■Tocancelthestorageprocess,press MULTI-CONTROLagain.
4UseMULTI-CONTROLtoselectthedesiredstation.
Turntochangethestation.Presstoselect.
■Youcanalsochangetestationbypushing MULTI-CONTROLupordown.
■Toreturntotheordinarydisplay,pressBAND.
■Ifyoudonotoperatethelistwithinabout30 seconds,thedisplayautomaticallyreturnstothe ordinarydisplay.
AdditionalInformation
Troubleshooting
SymptomCauseAction
| iPoddoesn't operatecor-rectly. | Cablesareincorrectlyconnected. | Disconnectthe cablefromiPod.OnceiPodmain menuisdisplayed, connectthecable again.ResettheiPod. |

Errormessages
Whenyoucontactyourdealeroryournearest PioneerServiceCenter,besuretohavethe errormessagerecorded.
Built-inCDPlayer
| MessageCauseAction | ||
| ERROR-11,12, 17,30 | DirtydiscCleandisc. | |
| ERROR-11,12, 17,30 | ScratcheddiscReplacedisc. | |
| ERROR-10,11, 12,15,17,30, A0 | Electricalormechanical | Switchtheignition key,orswitchtoa differentsource, thenbacktothe CDplayer. |
| ERROR-15Theinserteddisc doesnotcontain anydata | Replacedisc. | |
| ERROR-22,23TheCDformat cannotbeplayed back | Replacedisc. | |
| NOAUDIOTheinserteddisc doesnotcontain anyfilesthatcan beplayedback | Replacedisc. | |
| TRKSKIPPED | Theinserteddisc containsWMA filesthatareprotectedbyDRM | Replacedisc. |
| PROTECT | Allthefileson theinserteddisc aresecuredby DRM | Replacedisc. |
| HEAT | Thetemperature ofthisunitisoutsidethenormal operatingrange | Waituntilthe unit'stemperature returnstowithin normaloperating limits. |
iPod
| MessageCauseAction | ||
| ERROR-11Communication failure | Disconnectthe cablefromiPod.OnceiPod main menuisdisplayed, connectthecable again.Reset theiPod. | |
| ERROR-21Oldversionof iPod | UpdatetheiPod version. | |
| ERROR-30iPodfailure | Reset theiPod. | |
| ERROR-A0 | iPod isnot chargedbutoperatescorrectly | Checkiftheconnectioncablefor iPodshortedout (e.g.,notcaughtin metalobjects).Afterchecking, switchtheignition keyordisconnect theiPodandconnectagain. |
| NOSONGS | NosongsTransferthesongs to iPod. | |
| STOP | Nosongsinthe currentlist | Selectalistthat containsthe songs. |

Handlingguidelineof discs andplayer
- Useonlydiscsfeaturingeitheroffollowing twologos.


AdditionalInformation
- Useonlyconventional,fullycirculardiscs. Donotuseshapeddiscs.

- Use12-cmor8-cmCD.Donotusean adapterwhenplaying8-cmCDs.
- DonotinsertanythingotherthanaCDinto theCDloadingslot.
- Donotusecracked, chipped, warped, or otherwisedamageddiscsastheymaydamagetheplayer.
- UnfinalizedCD-R/CD-RWdiscplaybackis notpossible.
- Donottouchtherecordedsurfaceofthe discs.
- Storediscsintheircaseswhennotinuse.
- Avoidleavingdiscsinexcessivelyhotenvir- onmentsincludingunderdirectsunlight.
- Donotattachlabels, writeonorapplychemicalstothesurfaceofthediscs.
- TocleanaCD, wipethediscwithasoft clothoutwardfromthecenter.
- Condensationmaytemporarilyimpairthe player'sperformance.Leaveittoadjustto thewarmertemperatureforaboutone hour.Also,wipeanydumpdiscswithasoft cloth.
- Playbackofdiscsmaynotbepossiblebe causeofdisc characteristics, discformat, recorded application, playbackenvironment, storage conditions, and soon.
- Textinformationmaynotbecorrectlydis-playeddependingontherecordedenvironment.
• Roadshocksmayinterruptdiscplayback. - Read the precautions for discs before using them.
DualDiscs
- DualDiscsaretwo-sideddiscsthathavea recordableCDforaudioononesideanda recordableDVDforvideoontheother.
- SincetheCDsideofDualDiscsisnotphysicallycompatiblewiththegeneralCD
standard, it may not be possible to play the CDsidewith this unit.
- FrequentloadingandejectingofaDual Discmayresultinscratchesonthedisc. Seriousscratchescanleadtoplaybackproblemsonthisunit.Insomecases,aDual Discmaybecomestuckinthediscloading slotandwillnoteject.Topreventthis,we recommendyourefrainfromusingDual Discwiththisunit.
- Pleaserefertotheinformationfromthe discmanufacturerformoredetailedinformationaboutDualDiscs.
Compressedaudiofileson thedisc
- DependingontheversionofWindows MediaPlayerusedtoencodeWMAfiles, albumnamesandothertextinformation maynotbecorrectlydisplayed.
- Dependingonthesoftware(orthoversion ofthesoftware)usedtoencodetheaudio files,thisunitmaynotoperateproperly.
- Theremaybeaslightdelaywhenstarting playbackofWMA/AACfilesencodedwith imagedata.
- ISO9660Level1and2compliant.Romeo andJolietfilesystemsarebothcompatible withthisplayer.
- Multi-session playback is possible.
- Compressedaudiofilesarenotcompatible withpacketwritedatatransfer.
- Only64charactersfromthebeginningcan bedisplayedasafilename(includingthe extensionsuchas.wma,.mp3,.m4aor.wav)orafoldername.
- Folderselectionsequenceorotheroperationmaybealtereddependingontheencodingorwritingsoftware.
- Regardlessofthelengthofblanksection betweenthesongsoforiginalrecording, compressedaudiodiscsplaywithashort pausebetweenensongs.
- Fileextensionssuchas.wma,.mp3,.m4a or.wavmustbeusedproperly.
AdditionalInformation
Exampleofahierarchy

Folder

Compressedaudiofile
![graph TD A["01"] --> B["02"] A --> C["03"] A --> D["04"] A --> E["05"] B --> F["①"] B --> G["②"] C --> H["③"] C --> I["④"] D --> J["⑤"] D --> K["⑥"]](/content/2026/06/1276795/images/51aa1c030f3efb1b3e2b7e965b249562af7bc958cf91541225139a6a051ad60a.jpg)
Level 1 L level 2 L level 3 L level 4
- Thisunitassignsfoldernumbers.Theuser cannotassignfoldernumbers.
- Folderhierarchyisalloweduptoeighttiers. However,appracticalhierarchyoffolderis lessthantwotiers.
- Upto99foldersonadisccanbeplayed back.
Compressedaudiocompatibility
WMA
- Compatible format: WMAencoded by WindowsMediaPlayer
- Bitrate:48kbpsto320kbps(CBR),48kbps to384kbps(VBR)
•Samplingfrequency:32kHzto48kHz - WindowsMediaAudio9Professional, Lossless, Voice: No
MP3
- Bitrate:8kbpsto320kbps
- Samplingfrequency:16kHzto48kHz(32, 44.1,48kHzforeemphasis)
- CompatibleID3tagversion:1.0,1.1,2.2, 2.3,2.4(ID3tagVersion2.xisgivenpriority thanVersion1.x.)
- M3uplaylist:No
- MP3i(MP3interactive),mp3PRO:No
AAC
- Compatible format: AACencoded by iTunes®
•Samplingfrequency:11.025kHzto48kHz
• Transmissionrate:16kbpsto320kbps - AppleLossless:No
WAV
- Compatible format: Linear PCM (LPCM), MSADPCM
- Quantizationbits:8and16(LPCM),4(MS ADPCM)
- Samplingfrequency:16kHzto48kHz (LPCM),22.05kHzto44.1kHz(MSAD-PCM)
iPod
AbouthandlingtheiPod
- DonotleavetheiPodindirectsunlightfor extendedamountsoftime.ExtendedexposuretodirectsunlightcanresultiniPod malfunctionduetotheresultinghighttemperature.
- DonotleavetheiPodinahighttemperature.
- Connectdirectlythedockconnectorcable totheiPodsothatthisunitworksproperly.
- FirmlysecuretheiPodwhendriving.Do notlettheiPodfallontothefloor,whereit maybejammedunderthebrakeor acceleratorpedal.
• Fordetails, refertothei Pod's manuals.
AboutiPodsettings
- You cannot operate theiPodEqualizeron Pioneerproducts. Were recommend that you set theiPodEqualizertooff, before connecting to this unit.
- You cannot set Repeat to off theiPod when using this unit. Even if you set Repeat to off theiPod, Repeats automatically changed to all when connecting theiPod to this unit.
Specifications
General
Ratedpowersource.....14.4VDC
Groundingsystem......Negativetype
Max.currentconsumption
10.0A
Dimensions(W×H×D):
DIN
Continuouspoweroutput...22W×4(50Hzto15000
Hz,5%THD,4Ωload,both
channelsdriven)
Load impedance .... 4 Ω to 8 Ω × 4
4Ω to 8Ω × 2 + 2Ω × 1
Preoutmaxoutputlevel.....2.2V
Equalizer(3-BandParametricEqualizer):
Low
Frequency.....40/80/100/160Hz
QFactor....0.35/0.59/0.95/1.15(+6dB
whenboosted)
Gain....±12dB
Mid
Frequency.....200/500/1k/2kHz
QFactor....0.35/0.59/0.95/1.15(+6dB
whenboosted)
Gain....±12dB
High
Frequency.....3.15k/8k/10k/12.5kHz
QFactor....0.35/0.59/0.95/1.15(+6dB
whenboosted)
Gain....±12dB
HPF:
Frequency.....50/63/80/100/125Hz
Slope....-12dB/oct
Subwoofer(mono):
Frequency.....50/63/80/100/125Hz
Slope....-18dB/oct
Gain....+6dBto-24dB
Phase......Normal/Reverse
Bassboost:
Gain....+12dBto0dB
CDplayer
System....Compactdiscaudiosystem
Usablediscs....Compactdisc
Signal-to-noiseratio....94dB(1kHz)(IEC-Anetwork)
Numberofchannels......2(stereo)
MP3decodingformat......MPEG-1&2AudioLayer3
WMAdecodingformat......Ver.7,7.1,8,9,10,11(2ch audio)
(WindowsMediaPlayer)
AACdecodingformat......MPEG-4AAC(iTunes ® en-
codedonly)(.m4a)
(Ver.7.2andearlier)
WAVsignalformat....LinearPCM&MSADPCM
FMtuner
Frequencyrange.....87.5MHzto108.0MHz
Usable sensitivity .... 8 dBf (0.7 μV/75 Ω, mono, S/N:30dB)
Signal-to-noiseratio....75dB(IEC-Anetwork)
AMtuner
Frequencyrange.....531kHzto1602kHz(9kHz)
530kHzto1640kHz(10
kHz)
Usablesensitivity.....18μV(S/N:20dB)
Signal-to-noiseratio......65dB(IEC-Anetwork)
Infraredremotecontrol
Wavelength....940nm±50nm
Output......typ;12mw/srperInfrared LED

Note
Specificationsandthedesignaresubjecttomodificationswithoutnoticeduetoimprovements.

Contenido
3Coloquelacarátulaenlafundaprotec- toraprovistaparaguardarlademanerase- gura.


ADVERTENCIA
①BotónSRC/OFF
FM: OFF—LEVEL 1—LEVEL 2—LEVEL 3—LEVEL4
AM: OFF—LEVEL 1—LEVEL 2
• CLEARMEMORY(borrarmemoria)
• CLEARMEMORY(borrarmemoria)
2Pressioneoladodireitodopainelfrontalatéoseutotalencaixe.


ADVERTÊNCIA
Mantenhaabateriaforadoalcancedecrianças. Casoelasejaingerida, consulteummédicoimediatamente.

CUIDADO
①BotãoSRC/OFF
FM: OFF—LEVEL 1—LEVEL 2—LEVEL 3—LEVEL4
AM:OFF—LEVEL1—LEVEL2
Visit us on the World Wide Web at
http://pioneer.jp/group/index-e.html
Pioneer Gulf.FZE
http://www.pioneer-uae.com
Pioneer Electronics Australia. Pty.Ltd
http://www.pioneeraus.com.au
Pioneer Electronics Asiacentre.Pte
http://www.pioneer.com.sg
Pioneer (HK) Ltd.
http://www.pioneerhongkong.com.hk
Pioneer High Fidelity Taiwan Co., Ltd.
http://www.pioneer-twn.com.tw
Pioneer International Latin America S.A.
http://www.pioneer-latin.com
PIONEERCORPORATION
4-1,MEGURO1-CHOME,MEGURO-KU
TOKYO153-8654,JAPAN
PIONEERELECTRONICS(USA)INC.
P.O.Box1540, LongBeach, California90801-1540, U.S.A.
TEL:(800)421-1404
PIONEEREUROPENV
Haven1087, Keetberglaan1, B-9120Melsele, Belgium
TEL:(0)3/570.05.11
PIONEERELECTRONICSASIACENTREPTE.LTD.
253AlexandraRoad,#04-01,Singapore159936
TEL:65-6472-7555
PIONEERELECTRONICSAUSTRALIAPTY.LTD.
178-184BoundaryRoad, Braeside, Victoria3195, Australia
TEL:(03)9586-6300
PIONEERELECTRONICSOFCANADA, INC.
300AllstateParkway, Markham, OntarioL3R0P2, Canada
TEL:1-877-283-5901
TEL:905-479-4411
PIONEERELECTRONICSDEMEXICO,S.A.deC.V.
Blvd.ManuelAvilaCamacho13810piso
Col.LomasdeChapultepec,Mexico,D.F.11000
TEL:55-9178-4270
先鋒股份有限公司
總公司:台北市中山北路二段44號13樓
電話:(02)2521-3588
先鋒電子(香港)有限公司
香港九龍尖沙咀海港城世界商業中心
9樓901-6室
電話:(0852)2848-6488
PublishedbyPioneerCorporation.
Copyright©2007byPioneerCorporation.
Allrightsreserved.
- 01 BEFOREYOUSTART
- 02 OPERATINGTHISUNIT
- 03 AUDIOADJUSTMENTS
- 04 INITIALSETTINGS
- 05 OTHERFUNCTIONS
- 06 AVAILABLEACCESSORIES
- CONTENTS
- TVTUNER42
- ADDITIONALINFORMATION
- ABOUTTHISUNIT
- CAUTION
- ABOUTWMA
- ABOUTMP3
- ABOUTAAC
- IPOD® COMPATIBILITY
- VISITOURWEBSITE
- PROTECTINGYOURUNITFROM THEFT
- IMPORTANT
- REMOVINGTHEFRONTPANEL
- ATTACHINGTHEFRONTPANEL
- 2PRESSTHERIGHTSIDEOFTHEFRONTPANEL UNTILITISFIRMLYSEATED
- USEANDCAREOFTHEREMOTE CONTROL
- INSTALLINGTHEBATTERY
- WARNING
- BEFOREYOUSTART
- USINGTHEREMOTECONTROL
- WHAT'S WHAT HEADUNIT
- ①SRC/OFFBUTTON
- ②DISP/BACK/SCROLLBUTTON
- ③MULTI-CONTROL
- ④ IPODBUTTON
- ⑤DISCLOADINGSLOT
- ⑥EJECTBUTTON
- ⑦CLOCKBUTTON
- ⑧SW/BASSBUTTON
- ⑨DETACHBUTTON
- ⑩AUX1INPUTJACK(3.5MMSTEREOJACK)
- ⑪RPT/LOCALBUTTON
- ⑫RDM/ × BUTTON
- ⑬BAND/ESCBUTTON
- ⑭LISTBUTTON
- OPERATINGTHISUNIT
- REMOTECONTROL
- ⑮VOLUMEBUTTONS
- ⑯MUTEBUTTON
- ⑰ ▲/▼/◄/► BUTTONS
- ⑱AUDIOBUTTON
- ⑲DISPBUTTON
- ⑳II(PAUSE)BUTTON
- ②1FUNCTIONBUTTON
- ②LIST/ENTERBUTTON
- ①MAINDISPLAYSECTION
- ② ◀INDICATOR
- ③ (FOLDER)INDICATOR
- 4▶INDICATOR
- ⑤ (ARTIST)INDICATOR
- 6 (DISC)INDICATOR
- ⑦ (SONG)INDICATOR
- ⑨LOCINDICATOR
- ⑩ × (SHUFFLE)INDICATOR
- ⑪F-RPTINDICATOR
- ⑫F-RDMINDICATOR
- ⑬ (LOUDNESS)INDICATOR
- 14 ○(STEREO)INDICATOR
- 15 IPODCONNECTION INDICATOR
- BASICOPERATIONS
- POWERON/OFF
- TURNINGTHEUNITON
- TURNINGTHEUNITOFF
- SELECTINGASOURCE
- PRESSSRCREPEATEDLYTOSWITCHBETWEENTHEFOLLOWINGSOURCES
- NOTES
- ADJUSTINGTHEVOLUME
- TUNER
- SELECTABAND
- ● MANUALTUNING(STEPBYSTEP)
- SEEKTUNING
- NOTE
- STORINGANDRECALLINGBROADCAST FREQUENCIES
- 1PRESSLIST
- 2USEMULTI-CONTROLTOSTORETHESE- LECTEDFREQUENCYINMEMORY
- 3USEMULTI-CONTROLTOSELECTTHEDESIREDSTATION
- INTRODUCTIONOFADVANCED OPERATIONS
- 2USEMULTI-CONTROLTOSELECT FUNCTION
- 3TURNMULTI-CONTROLTOSELECTTHE FUNCTION
- STORINGTHESTRONGESTBROADCAST FREQUENCIES
- 2PRESSMULTI-CONTROLTOTURNBSMON
- TUNINGINSTRONGSIGNALS
- PRESSLOCALREPEATEDLYTOSELECTTHE DESIREDSETTING
- AM:OFF—LEVEL1—LEVEL2
- BUILT-INCDPLAYER
- DISPLAYINGTEXTINFORMATIONON DISC
- SELECTINGTRACKSFROMTHETRACK TITLELIST
- 1PRESSLISTTOSWITCHTOTHETRACKTITLELIST MODE
- 2USEMULTI-CONTROLTOSELECTTHEDESIREDTRACKTITLE
- MULTI-CONTROLRIGHT
- SELECTINGFILESFROMTHEFILE NAMELIST
- 1PRESSLISTTOSWITCHTOTHEFILENAMELIST MODE
- 2USEMULTI-CONTROLTOSELECTTHEDESIREDFILENAME(ORFOLDERNAME)
- SELECTINGAREPEATPLAYRANGE
- PRESSRPTREPEATEDLYTOSELECTTHEDESIREDSETTING
- PLAYINGTRACKSINRANDOMORDER
- ●PRESSRDMTOTURNRANDOMPLAYON
- SCANNINGFOLDERSANDTRACKS
- 1USEMULTI-CONTROLTOSELECTSCANIN THEFUNCTIONMENU
- 2PRESSMULTI-CONTROLTOTURNSCANPLAY ON
- 3WHENYOUFINDTHEDESIREDTRACKPRESS MULTI-CONTROLTOTURNSCANPLAYOFF
- PAUSING PLAYBACK
- PRESSII(PAUSE)ONTHEREMOTECONTROL TOTURNPAUSEON
- USINGCOMPRESSIONANDBMX
- 1USEMULTI-CONTROLTOSELECT COMP/BMXINTHEFUNCTIONMENU
- USINGDISTITLEFUNCTIONS
- ENTERINGDISCTITLES
- PLAYINGSONGSONIPOD
- ●FASTFORWARDORREVERSE
- SELECTATRACK(CHAPTER)
- DISPLAYINGTEXTINFORMATIONON IPOD
- PRESSDISPTOSELECTTHEDESIREDTEXTINFORMATION
- BROWSINGFORASONG
- 1PRESSLISTTOSWITCHTOTHETOPMENUOF THELISTSEARCH
- 2USEMULTI-CONTROLTOSELECTACATEGORY
- COMPOSERS(COMPOSERS)—AUDIOBOOKS (AUDIOBOOKS)
- 3REPEATSTEP2TOFINDASONGYOUWANT TOLISTENTO
- FUNCTIONANDOPERATION
- PLAYINGSONGSINARANDOM ORDER(SHUFFLE)
- PLAYINGALLSONGSINARANDOM ORDER(SHUFFLEALL)
- ●PRESSTOTURNSHUFFLEALLON
- SELECTINGSONGSFROMALBUMLIST OFCURRENTLYPLAYINGARTIST
- 1PRESSANDHOLDLISTTOTURNLINKSEARCH ON
- 2USEMULTI-CONTROLTOSELECTANALBUM ORSONGFROMTHELIST
- OPERATINGTHISUNIT'SIPOD FUNCTIONFROMYOURIPOD
- 1PRESSIPODTOSWITCHTHECONTROLMODE
- 2OPERATETHECONNECTEDIPODTOSELECTA SONGANDPLAY
- CHANGINGAUDIOBOOKSPEED
- 1USEMULTI-CONTROLTOSELECT AUDIOBOOKSSPEEDINTHEFUNCTIONMENU
- 2PRESSMULTI-CONTROLTODISPLAYTHE SETTINGMODE
- 3USEMULTI-CONTROLTOSELECTTHEDESIREDSETTING
- INTRODUCTIONOFAUDIO ADJUSTMENTS
- USINGBALANCEADJUSTMENT
- USINGTHEEQUALIZER
- RECALLINGEQUALIZERCURVES
- 1USEMULTI-CONTROLTOSELECT PRESETEQUALIZER
- 3TURNMULTI-CONTROLTOSELECTTHE EQUALIZER
- ADJUSTINGEQUALIZERCURVES
- 1USEMULTI-CONTROLTOSELECT EQSETTING1
- 3PRESSMULTI-CONTROLTOSELECTTHESEGMENTYOUWISHTOSET
- 4TURNMULTI-CONTROLTOADJUSTTHE LEVELOFTHEEQUALIZATIONBAND
- FINE-ADJUSTINGEQUALIZERCURVE
- 1USEMULTI-CONTROLTOSELECT EQSETTING2
- 4TURNMULTI-CONTROLTOADJUSTTHESE- LECTEDSEGEMENT
- FREQUENCY
- QFACTOR
- ADJUSTINGLOUDNESS
- USINGSUBWOOFEROUTPUT
- ADJUSTINGSUBWOOFERSETTINGS
- LEVEL
- USINGTHEHIGHPASSFILTER
- BOOSTINGTHEBASS
- ADJUSTINGSOURCELEVELS
- ADJUSTINGINITIALSETTINGS
- SETTINGTHECLOCK
- SETTINGTHEFMTUNINGSTEP
- SETTINGTHEAMTUNINGSTEP
- 3TURNMULTI-CONTROLTOSELECTTHEAM TUNINGSTEP
- SWITCHINGTHEWARNINGTONE
- 1USEMULTI-CONTROLTOSELECT WARNINGTONE
- 2PRESSMULTI-CONTROLTOTURNWARNING TONEON
- SWITCHINGTHEAUXILIARYSETTING
- 1USEMULTI-CONTROLTOSELECTAUX1/AUX2
- 2PRESSMULTI-CONTROLTOTURNAUX1/AUX2ON
- SETTINGTHEREAROUTPUTAND SUBWOOFERCONTROLLER
- 1USEMULTI-CONTROLTOSELECT SWCONTROL
- 3PRESSMULTI-CONTROLTOSELECTTHESESEGMENTYOUWISHTOSET
- 4USEMULTI-CONTROLTOSELECTTHEDESIREDSETTING
- WHEN REARSP(REARSPEAKERSETTING) IS SELECTED
- WHENPREOUT(RCAOUTPUTSETTING)ISSELECTED
- SWITCHINGTHEEVERSCROLL
- 1USEMULTI-CONTROLTOSELECT EVERSCROLL
- 2PRESSMULTI-CONTROLTOTURNTHEEVER SCROLLON
- ACTIVATINGTHEBTAUDIOSOURCE
- 1USEMULTI-CONTROLTOSELECT BTAUDIO
- 2PRESSMULTI-CONTROLTOTURNTHE BTAUDIOSOURCEON
- ENTERINGPINCODEFOR BLUETOOTHWIRELESSCONNECTION
- 1USEMULTI-CONTROLTOSELECT PINCODEINPUT
- 3TURNMULTI-CONTROLTOSELECTANUMBER
- 4PRESSMULTI-CONTROLTOMOVETHECUR-SORTOTHENEXTPOSITION
- 5AFTERINPUTTINGPINCODE(UPTO4DIGITS),PRESSANDHOLDMULTI-CONTROL
- DISPLAYINGSYSTEMVERSIONOF BLUETOOTHADAPTERFORREPAIR
- INITIALSETTINGS
- USINGTHEAUXSOURCE
- ABOUTAUX1ANDAUX2
- AUX1SOURCE
- AUX2SOURCE
- SELECTINGAUXASTHESOURCE
- SETTINGTHEAUXTITLE
- TURNINGTHECLOCKDISPLAY ONOROFF
- USINGTHEEXTERNALUNIT
- SELECTINGTHEEXTERNALUNITAS THESOURCE
- BASICOPERATION
- USING THE FUNCTIONS ALLOCATED TO 1 TO 6 KEYS
- ADVANCEDOPERATIONS
- PLAYINGSONGSONUSBPORTABLE AUDIOPLAYER/USBMEMORY
- SELECTAFOLDER
- SELECTATRACK
- ●RETURNTOROOTFOLDER
- DISPLAYINGTEXTINFORMATIONOF ANAUDIOFILE
- AVAILABLEACCESSORIES
- BLUETOOTHAUDIO
- CONNECTINGABLUETOOTHAUDIO PLAYER
- 2PRESSMULTI-CONTROLTOOPENTHECONNECTION
- PLAYINGSONGSONBLUETOOTH AUDIOPLAYER
- STOPPING PLAYBACK
- DISCONNECTINGABLUETOOTH AUDIOPLAYER
- 2PRESSMULTI-CONTROLTODISCONNECT THEBLUETOOTHAUDIOPLAYER
- DISPLAYINGBD(BLUETOOTH DEVICE)ADDRESS
- BLUETOOTHTELEPHONE
- SETTINGUPFORHANDS-FREEPHONING
- 1CONNECTION
- 2REGISTRATION
- 3VOLUMEADJUSTMENT
- MAKINGAPHONECALL
- VOICERECOGNITION
- 1PRESSBANDANDHOLDUNTILVOICEDIAL APPEARSINTHEDISPLAY
- TAKINGAPHONECALL
- ANSWERINGORREJECTINGANINCOMINGCALL
- ●ANSWERINGANINCOMINGCALL
- ●ENDACALL
- REJECTINGANINCOMINGCALL
- OPERATINGACALLWAITING
- ●ANSWERINGACALLWAITING
- ●ENDALLCALLS
- ●SWITCHBETWEENCALLERSONHOLD PRESSMULTI-CONTROL
- REJECTINGACALLWAITING
- IFCONNECTEDBUTNOTREGISTEREDYET
- IFALREADYCONNECTEDANDREGISTERED
- CONNECTINGACELLULARPHONE
- SEARCHINGFORAVAILABLECELLULARPHONES
- 1USEMULTI-CONTROLTOSELECT
- SEARCHPHONEINTHEFUNCTIONMENU
- 2PRESSMULTI-CONTROLTOSEARCHFOR AVAILABLECELLULARPHONES
- NAMENOTFOUND(IFNAMESCANNOTBEOBTAINED)ISDISPLAYED
- 3TURNMULTI-CONTROLTOSELECTADEVICE NAMEYOUWANTTOCONNECT
- 4PRESSMULTI-CONTROLTOCONNECTTHE SELECTEDCELLULARPHONE
- USINGACELLULARPHONETOINITIATEA CONNECTION
- 1USEMULTI-CONTROLTOSELECT CONNECTIONOPENINTHEFUNCTIONMENU
- 3USECELLULARPHONETOCONNECTTOTHIS UNIT
- DISCONNECTINGACELLULARPHONE
- 1USEMULTI-CONTROLTOSELECT DISCONNECTPHONEINTHEFUNCTIONMENU
- 2PRESSMULTI-CONTROLTODISCONNECTA CELLULARPHONEFROMTHISUNIT
- REGISTERINGACONNECTED CELLULARPHONE
- 1USEMULTI-CONTROLTOSELECT SETPHONEINTHEFUNCTIONMENU
- 3TURNMULTI-CONTROLTOSELECTAREGISTRATIONASSIGNMENT
- 4PRESSMULTI-CONTROLTOREGISTERTHE CURRENTLYCONNECTEDPHONE
- DELETINGAREGISTEREDPHONE
- 1USEMULTI-CONTROLTOSELECT DELETEPHONEINTHEFUNCTIONMENU
- 4PRESSMULTI-CONTROLTOSHOWTHECONFIRMATIONDISPLAY
- 5TURNMULTI-CONTROLTOSELECT DELETEOK?:YES
- 6PRESSMULTI-CONTROLTODELETETHE PHONE
- CONNECTINGTOAREGISTERED CELLULARPHONE
- CONNECTINGTOAREGISTEREDPHONE MANUALLY
- CONNECTINGTOAREGISTEREDPHONE AUTOMATICALLY
- 2PRESSMULTI-CONTROLTOTURNAUTOMATICCONNECTION
- USINGTHEPHONEBOOK
- TRANSFERRINGENTRIESTOTHEPHONEBOOK
- 2PRESSMULTI-CONTROLTOSHOWTHECONFIRMATIONDISPLAY
- 3PRESSMULTI-CONTROLTOENTERINTHE PHONEBOOKTRANSFERSTANDBYMODE
- 4USECELLULARPHONETOPERFORMPHONE BOOKTRANSFER
- 5DATATRANSFERREDISDISPLAYED AND PHONEBOOKTRANSFERISCOMPLETED
- CALLINGANUMBERINTHEPHONEBOOK
- 1PRESSLISTTODISPLAYTHEPHONEBOOK
- 2PRESSMULTI-CONTROLTODISPLAY ABCSEARCH
- 3TURNMULTI-CONTROLTOSELECTTHEFIRST LETTEROFTHENAMEYOUARELOOKINGFOR
- 4PRESSMULTI-CONTROLTODISPLAYAN ENTRY
- 5TURNMULTI-CONTROLTOSELECTANENTRY YOUWANTTOCALL
- 6PRESSMULTI-CONTROLTODISPLAYA PHONENUMBER
- 7TURNMULTI-CONTROLTOSELECTAPHONE NUMBERYOUWANTTOCALL
- 8PRESSMULTI-CONTROLTOMAKEACALL
- USINGTHECALLHISTORY
- 1PRESSLISTTODISPLAYTHELIST
- 2TURNMULTI-CONTROLTOSELECTALIST
- 3PRESSMULTI-CONTROLTODISPLAYARE-GISTEREDNAMELIST
- 4TURNMULTI-CONTROLTOSELECTAPHONE NUMBER
- 5PRESSMULTI-CONTROLTOMAKEACALL
- MAKINGACALLBYENTERING PHONENUMBER
- 1USEMULTI-CONTROLTOSELECT NUMBERDIALINTHEFUNCTIONMENU
- 2PRESSMULTI-CONTROLTODISPLAYTHE NUMBERINPUTSCREEN
- 5WHENYOUCOMPLETEDENTERINGTHE NUMBER,PRESSANDHOLDMULTI-CONTROLTO MAKEACALL
- CLEARINGMEMORY
- 4PRESSMULTI-CONTROLTODETERMINE THEITEMTHATYOUWANTTODELETE
- 5TURNMULTI-CONTROLTOSELECT CLEARMEMORY:YES
- SETTINGAUTOMATICREJECTING
- SETTINGAUTOMATICANSWERING
- SWITCHINGTHERINGTONE
- ECHOCANCELINGANDNOISEREDUCTION
- MULTI-CDPLAYER
- USINGCDTEXTFUNCTIONS
- INTRODUCTION OF ADVANCED OPERATIONS
- 1PRESSMULTI-CONTROLTODISPLAYTHE MAINMENU
- USINGCOMPRESSIONANDBASS EMPHASIS
- 1USEMULTI-CONTROLTOSELECT COMP/DBEINTHEFUNCTIONMENU
- 2USEMULTI-CONTROLTOSELECTTHEDESIREDSETTING
- USINGITSPLAYLISTS
- CREATINGAPLAYLISTWITHITSPROGRAMMING
- 1PLAYACDTHATYOUWANTTOPROGRAM
- 2USEMULTI-CONTROLTOSELECT ITSMEMORYINTHEFUNCTIONMENU
- 6PRESSMULTI-CONTROLTOSELECT MEMORY
- PLAYBACKFROMYOURITSPLAYLIST
- 2USEMULTI-CONTROLTOSELECTITSPLAY INTHEFUNCTIONMENU
- 3PRESSMULTI-CONTROLTOTURNITSPLAY ON
- ERASINGATRACKFROMYOURITSPLAYLIST
- 1PLAYTHECDWITHTHETRACKYOUWANTTO DELETEFROMYOURITSPLAYLIST,ANDTURNITS PLAYON
- 3PRESSMULTI-CONTROLTODISPLAYTHE SETTINGMODE
- 5TURNMULTI-CONTROLTOSELECTTHEDESIREDTRACK
- 6PRESSMULTI-CONTROLTOSELECT DELETE
- MULTI-CONTROLTODISPLAYDELETE
- ERASINGACDFROMYOURITSPLAYLIST
- 4PRESSMULTI-CONTROLTOSELECT DELETE
- DISPLAYINGDISCTITLES
- SELECTINGDISCSFROMTHEDISCTITLELIST
- 1PRESSLISTTOSWITCHTOTHEDISCTITLELIST MODEDURINGTHEPLAYBACKDISPLAY
- 2USEMULTI-CONTROLTOSELECTTHEDESIREDDISCTITLE
- TVTUNER
- STORINGANDRECALLINGBROADCAST STATIONS
- 2USEMULTI-CONTROLTOSTORETHESE- LECTEDSTATIONINMEMORY
- STORINGTHESTRONGESTBROADCAST STATIONSSEQUENTIALLY
- 2USEMULTI-CONTROLANDSELECT FUNCTIONTODISPLAYBSSM
- 3PRESSMULTI-CONTROLTOTURNBSSM ON
- 4USEMULTI-CONTROLTOSELECTTHEDESIREDSTATION
- TROUBLESHOOTING
- ERRORMESSAGES
- HANDLINGGUIDELINEOF DISCS ANDPLAYER
- DUALDISCS
- COMPRESSEDAUDIOFILESON THEDISC
- EXAMPLEOFAHIERARCHY
- COMPRESSEDAUDIOCOMPATIBILITY
- WMA
- MP3
- AAC
- WAV
- IPOD
- ABOUTHANDLINGTHEIPOD
- ABOUTIPODSETTINGS
- SPECIFICATIONS
- GENERAL
- CDPLAYER
- FMTUNER
- AMTUNER
- INFRAREDREMOTECONTROL
- CONTENIDO
- ADVERTENCIA
- ①BOTÓNSRC/OFF
- 2PRESSIONEOLADODIREITODOPAINELFRONTALATÉOSEUTOTALENCAIXE
- ADVERTÊNCIA
- CUIDADO
- ①BOTÃOSRC/OFF
- PIONEERCORPORATION
Brand : PIONEER
Model : DEH-P3000IB
Category : Receiver