
POLLY - High chair CHICCO - Free user manual and instructions
Find the device manual for free POLLY CHICCO in PDF.
| Product Type | High chair, convertible |
| Brand | Chicco |
| Model | Polly |
| Recommended Age Range | 6 to 36 months or up to 16.8 kg |
| Maximum Supported Weight | 16.8 kg (37 lb) |
| Seat Height Adjustment | 7 positions |
| Backrest Recline | 3 positions |
| Safety Harness | 5-point (shoulders, waist, crotch) |
| Tray | Removable and adjustable to 3 heights |
| Tray Cover | Removable and dishwasher safe |
| Footrest | 3 adjustable positions |
| Leg Rest | 3 adjustable positions |
| Wheels | 4 wheels with locking brakes |
| Cushion Material | Hand washable fabric (not machine washable) |
| Cleaning | Damp cloth and mild detergent; do not use bleach |
| Lubrication | Dry silicone-based lubricant if necessary |
| Wheel Maintenance | Periodically inspect and clean |
| Warranty | Contact customer service: (877) 424-4226 |
Frequently Asked Questions - POLLY CHICCO
User questions about POLLY CHICCO
0 question about this device. Answer the ones you know or ask your own.
Ask a new question about this device
Download the instructions for your High chair in PDF format for free! Find your manual POLLY - CHICCO and take your electronic device back in hand. On this page are published all the documents necessary for the use of your device. POLLY by CHICCO.
USER MANUAL POLLY CHICCO
natural_image
Line drawing of a baby boom chair with seat, legs, and front panel (no text or symbols)Instructions for Use Instrucciones de uso Mode d'emploi
Failure to follow all warnings and instructions may result in a serious injury or death. For your child's safety, read the labels and the owner's manual before using the product. Keep them for future reference. Your child's safety is your responsibility.
- Never leave child unattended. Always keep child in view while in highchair.
- Prevent serious injury or death from falls or sliding out. Always secure child in the restraint. Always use seat belt.
- Secure your child at all times with the restraint system provided, in either the reclining or upright position.
- The tray is not designed to hold your child in the highchair.
- It is recommended that the highchair be used in the upright position only by children capable of sitting upright unassisted.
- Do not adjust the height or recline of the highchair with your child in it.
- Always lock the wheels when the child is sitting in the highchair, or when the highchair is open but not in use. Do not move highchair with child in it.
- Always place the highchair on a horizontal, stable surface. Never place the highchair near stairs or steps.
- Do not use this highchair for more than one child at a time and do not leave other children playing unattended near the highchair.
- Do not use the highchair if any part is broken, torn, or missing.
- Ensure that all components are correctly fitted and adjusted before use.
- Do not place any heavy bags, packages, or other items on the highchair tray. They may cause the chair to tip over.
- To avoid the danger of suffocation, remove all plastic covers before using the highchair. Immediately destroy the plastic cover to keep it away from babies and children.
- Do not leave the highchair near walls, curtains, or windows, where the child can become tangled, or where a child may be able to use its feet to push against the highchair.
- To avoid the risk of fire, never leave the highchair near sources of strong heat such as open fires, electric heaters, and gas stoves. If the chair is exposed to direct sunlight, wait for it to cool down before placing your child in it.
This highchair is recommended for children up to 36 months old, or for children who weigh less than 37 pounds. This highchair is for children who can sit up unaided.
Do not use accessories, spare parts, and components other than those supplied by the manufacturer.
! WARNING
When opening the highchair, ensure that your child, or other children, are at a safe distance. Ensure that during these operations, the movable parts of the highchair do not come into contact with your child.
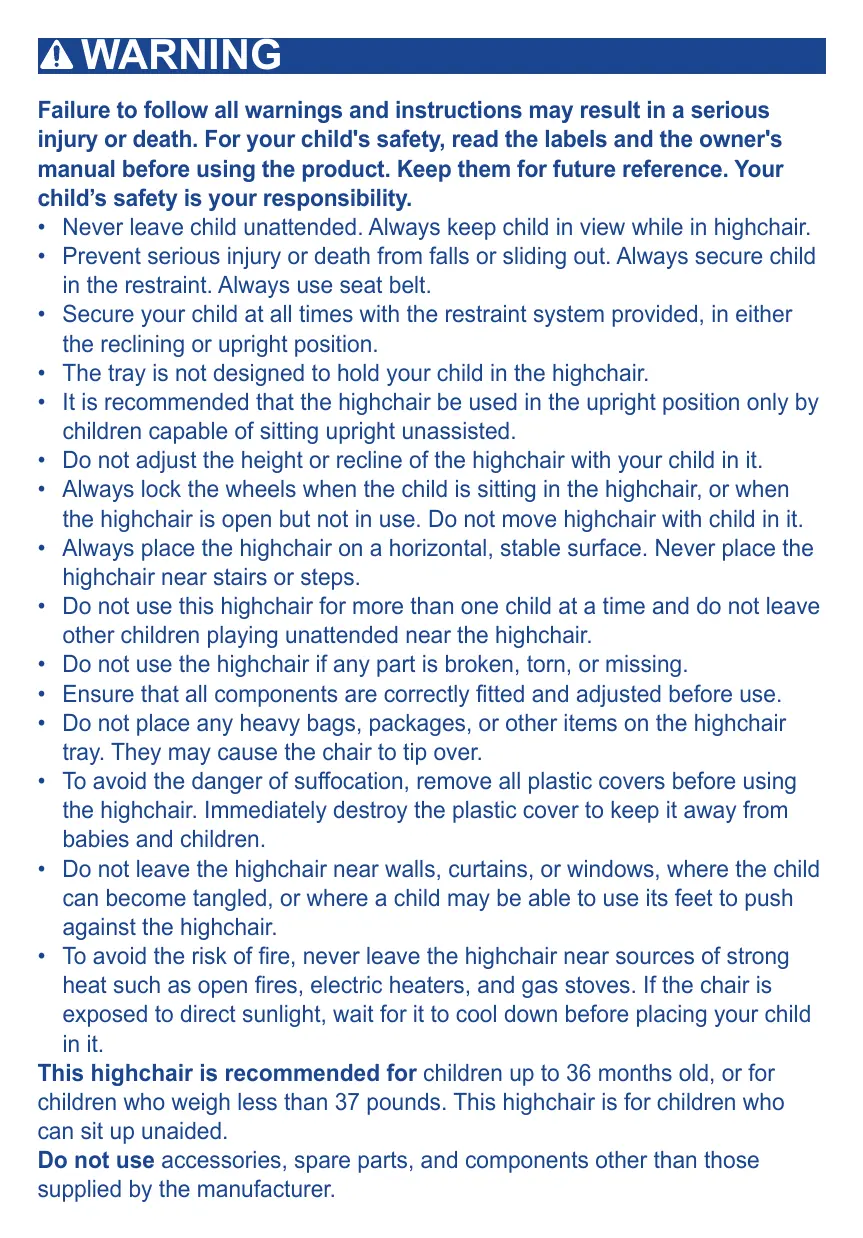
The ends of the front and rear legs have a different shape to avoid errors in the assembly phase.
HOW TO ASSEMBLE / OPEN THE HIGHCHAIR
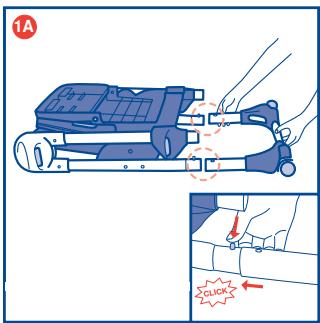
1A. Fix the legs to the highchair frame as shown in diagram 1. Rear legs: keep the two locking buttons located at the base of the frame pressed down and insert the legs. The parts are correctly locked only when the two locking buttons come out from the holes on the legs, and an audible click is heard, signalling that the legs are securely fitted (diagram 1A). 1B. Front legs: keep the two locking buttons, located at the base of the frame, pressed down and insert the legs into the structure. The parts are locked only when the two locking buttons come out from the holes on the legs, and an audible click is heard, signalling that the legs are securely fitted (diagram 1B).
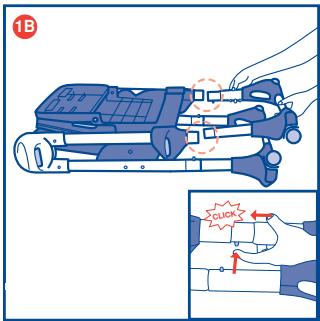
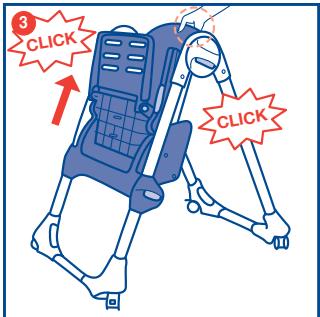
- Stand at the back of the highchair and hold the two side joints, then press the open / close buttons. At the same time, open the Highchair legs using your foot, until an audible click is heard, signalling that the legs are locked in the open position (diagram 2).
INSTRUCTIONS FOR USE
natural_image
Illustration of a hand using a pliers to cut a tool, showing motion arrows (no text or symbols)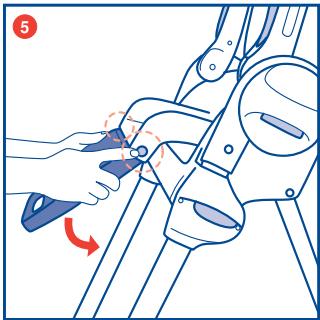
natural_image
Illustration of a hand using a tool to adjust or install a mechanical component, with no visible text or symbols.
-
Raise the seat by holding the upper part of the backrest and pull it upward, until the desired height is reached (diagram 3). The Highchair can be adjusted to 7 height positions.
-
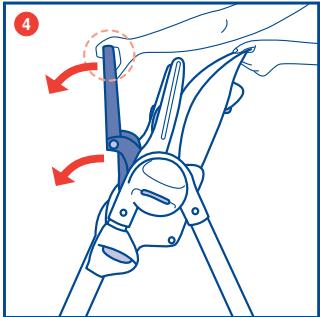
Lower the seat and leg rest with your hands (diagram 4). The seat is fixed to the frame by a fastening device.
-
Press the side adjustment buttons and lower the leg rest in a vertical position (diagram 5).
-
Lower the armrests by pressing the two buttons located at the rear of the armrests (diagram 6)
! WARNING
The armrests must always be maintained in a horizontal position. The armrests can be maintained in a vertical position only when closing the Highchair.
INSTRUCTIONS FOR USE
natural_image
Diagram of a car seatbelt with two seats and four legs, no text or symbols present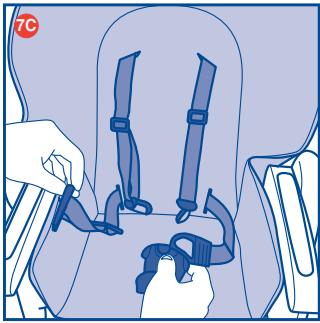
natural_image
Illustration of a person wearing a seatbelt and adjusting a seatbelt buckle (no text or symbols present)
natural_image
Illustration of hands adjusting a seatbelt device (no text or symbols visible)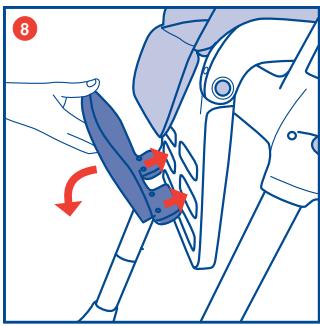
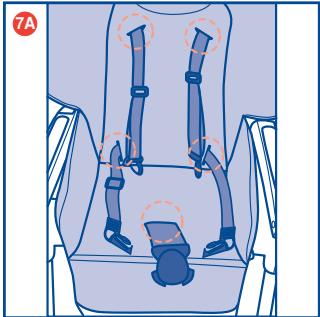
7A. Fit the highchair cover to the highchair seat. Thread the shoulder straps, waist belt and crotch strap through the corresponding openings (diagram 7A).
7B. Insert the clips into the buckle (diagram 7B).
7C. Fit the spring catches into the clips (diagram 7C).
Repeat steps 7A, 7B and 7C with fabric cover (included only on certain models)"
- Insert the footrest, turn it until the use position is reached, and lock it (diagram 8). The footrest can be adjusted to 3 positions.
The child can now be seated in the Highchair.
INSTRUCTIONS FOR USE
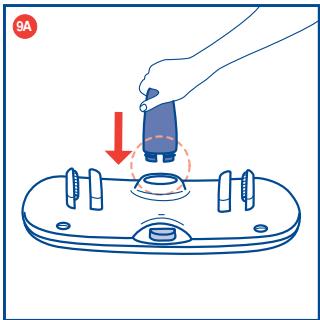
9A & 9B. Fit the rigid crotch strap to the tray (diagram 9A, diagram 9B). The design of the crotch strap attachment only allows one type of assembly operation.
The tray can now be fitted to the Highchair.
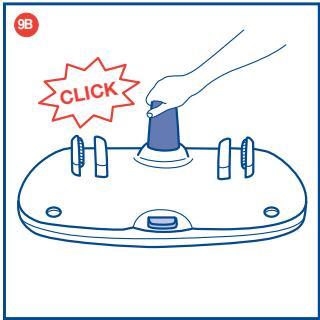
! WARNING
IMPORTANT FOR YOUR CHILD'S SAFETY - Always fit the rigid crotch strap to the tray before fitting the tray to the Highchair. Once the rigid crotch strap has been fitted, it must never be removed.

The use of the safety harness and fabric crotch strap is necessary to guarantee the safety of your child.
The tray alone does not guarantee the safety of your child. Always use the SAFETY HARNESS!
SAFETY HARNESS
The highchair has a 5-point safety harness.
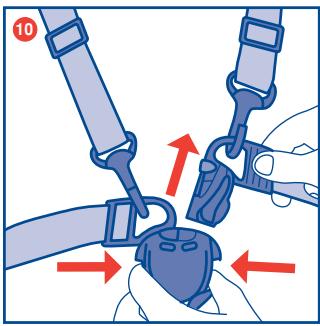
- Release the safety harness (diagram 10)
natural_image
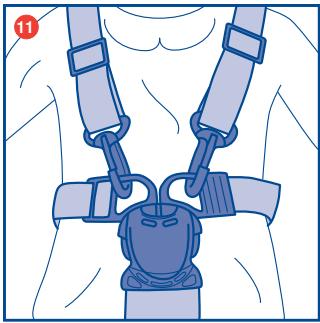
Illustration of a person wearing a full-body medical harness and seatbelt (no text or symbols)- Place the child in the highchair and fasten it with the safety harness (diagram 11)
The safety harness can be adjusted to two height positions.

IMPORTANT FOR YOUR CHILD'S SAFETY - Always fit the rigid crotch strap to the tray before fitting the tray to the Highchair. Once the rigid crotch strap has been fitted, it must never be removed.
FITTING/ADJUSTING THE Tray
The tray can now be fitted to the Highchair.
The tray can be adjusted to 3 positions.
natural_image
Diagram of a seated object with two highlighted areas, no text or symbols present- Hold the tray in your hands (diagram 12).
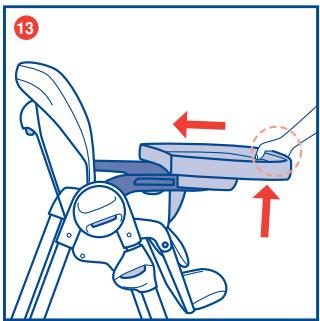
- Insert the armrests in the guides located under the tray while simultaneously pressing the lower locking button (diagram 13).
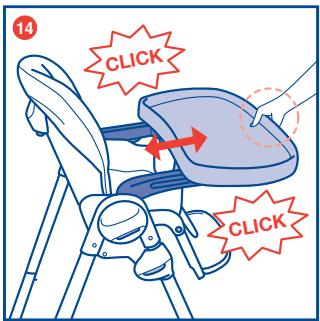
- Move the tray until the desired position is reached and release the button. If the tray is not automatically locked on the armrests, move the tray until a click is heard, signalling that the tray is locked (diagram 14). WARNING: Always ensure that the tray is locked correctly to the armrests before use.
! WARNING
Never leave the tray fitted in a position in which the danger signs are visible on the armrests: IT IS NOT safe!
INSTRUCTIONS FOR USE

natural_image
Illustration of a child's seat with a feathered seat and armrest, showing a hand holding the seat area (no text or symbols)- To remove the tray, pull it in an outward direction while keeping the lower button pressed. (diagram 15).
natural_image
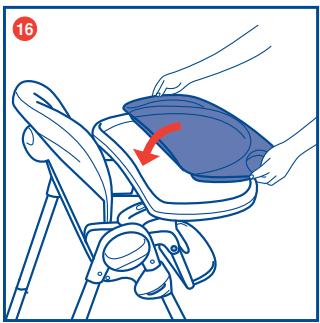
Illustration of a hand placing a blue object onto a chair using a stand, with a red arrow indicating the motion (no text or symbols present)- The Highchair has a tray cover. This can be fixed / removed from the tray by lifting at the handle grips (diagram 16).
WARNING
Always ensure that the tray cover is correctly fitted to the tray during use.
natural_image
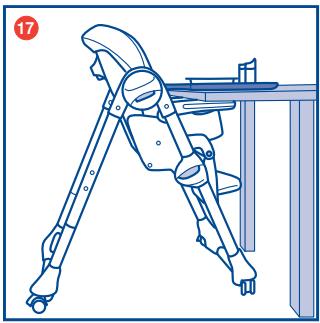
Line drawing of a mechanical device with legs and feet, no text or symbols present- The tray cover can be used as a convenient serving tray if the child eats sitting directly at the table with his/her parents (diagram 17).
ADJUSTING THE HEIGHT OF THE HIGHCHAIR
The Highchair can be adjusted to 7 height positions.
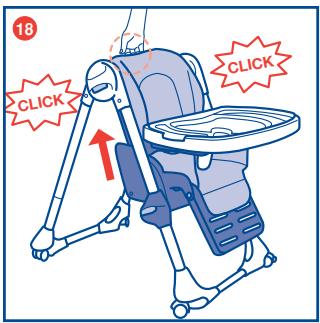
- To raise the seat: Hold the upper part of the backrest and pull it upward, until the desired height is reached (diagram 18).
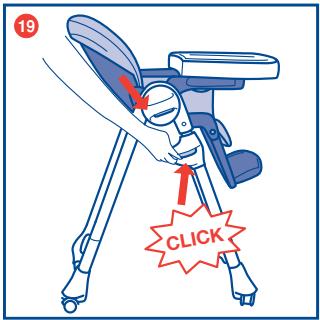
- To lower the seat: Press the two side buttons simultaneously and lower the seat, until the desired height is reached (diagram 19).

Do not move or carry out this operation with the child sitting in the Highchair.
RECLINING BACKREST ADJUSTMENT
The backrest of the Highchair can be adjusted to 3 positions.
INSTRUCTIONS FOR USE

- To adjust the backrest, press the button located at the rear top, recline the backrest until the desired position is reached and release the button, the backrest will lock automatically and an audible click is heard, signalling that it is locked into position (diagram 20).
LEG REST
The leg rest of the Highchair can be adjusted to 3 positions.
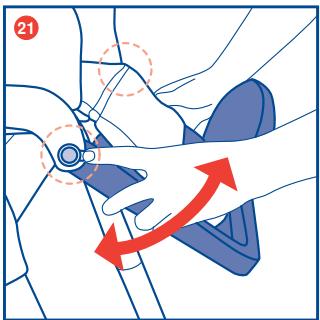
- Press the two side adjustment buttons and recline the leg rest, until the desired position is reached (diagram 21).
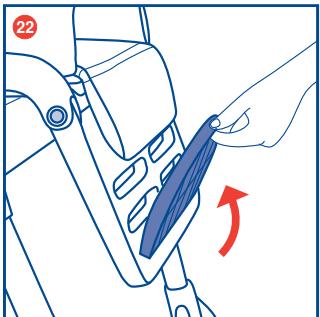
FOOTREST
The footrest of the Highchair can be adjusted to 3 height positions.
natural_image
Line drawing of a hand using a tool to adjust a blue object on a mechanical component (no text or symbols)- From the use position, turn the footrest until it is parallel to the leg rest, and unlock it (diagram 22).
FOOTREST
natural_image
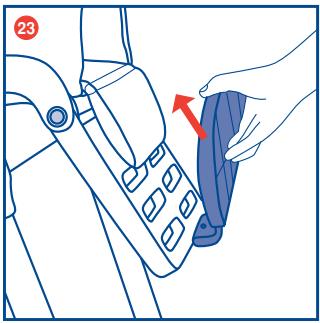
Line drawing of a hand pressing down on a car seatbelt, showing the belt being adjusted (no text or symbols present)- Remove the footrest and fit it at the desired height (diagram 23).
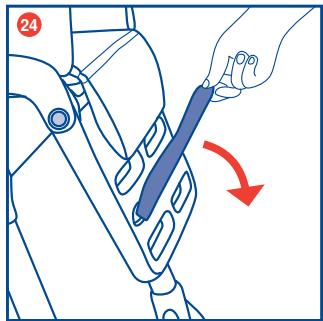
- Turn the footrest until the new desired use position is obtained, and lock it into position (diagram 24).
natural_image
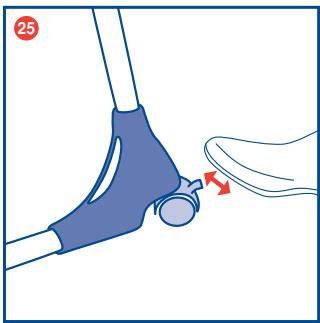
Illustration of a foot and ankle joint with a red arrow indicating movement (no text or symbols)WHEELS AND BRAKES
- To apply the brakes, lower the wheels locking levers. To release the brakes raise the wheels locking levers (diagram 25).
WARNING: Always lock the wheels when the child is sitting in the stationary Highchair, or when the Highchair is open but not in use.
WARNING: Always place the Highchair on a horizontal, stable surface. Never place the Highchair near stairs or steps.

When opening the highchair, ensure that your child, or other children, are at a safe distance. Ensure that during these operations the movable parts of the highchair do not come into contact with your child.
If it is fitted, remove the tray before starting any closing operations.
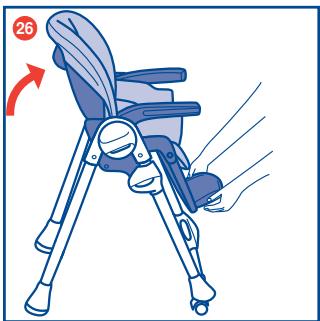
CLOSING THE HIGHCHAIR
natural_image
Illustration of a baby boom chair with a hand operating the seat, showing body positioning and seat number 26 (no text or symbols on the chair itself)- Put the backrest in a vertical position and the leg rest in a down position (diagram 26).
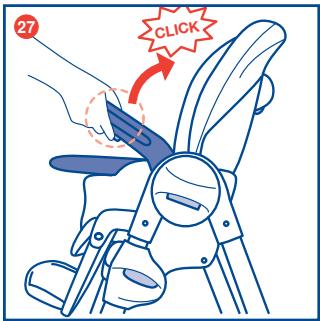
- Raise the armrest in a vertical direction by pressing the buttons located on the lower part of the arm rests, until an audible click is heard (diagram 27).
CLOSING THE HIGHCHAIR

- Lower the seat by pressing the two side buttons at the same time, as shown in the diagram (diagram 28).
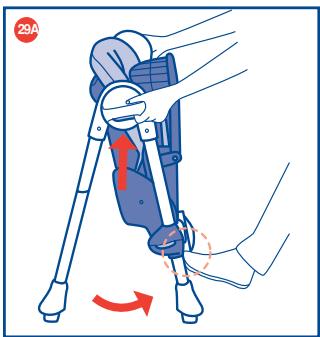
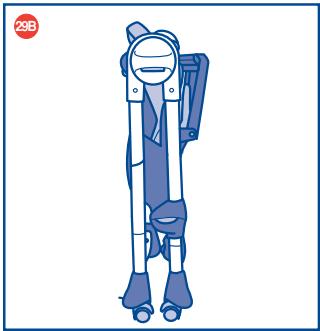
29A & 29B. Press the buttons at the center of the side joints and, at the same time, close the legs of the Highchair using your foot (diagram 29A). WARNING: Check that the frame is closed and the wheels are locked and positioned in a way that the frame can stand for storage (diagram 29B).
natural_image
Illustration of a blue ergonomic device with legs and feet, no text or symbols present
natural_image
Line drawing of a person seated in a seat with a hand adjusting the seat area, no text or symbols presentCLEANING
You can remove the seat pad for cleaning.
To do so, unfasten the restraint harness and pull the seat pad upward. You can spot clean the seat pad with a damp cloth and mild detergent. Do not Machine Wash Seat Pad. Do not use bleach wipes or spray on the pad or plastics. Do not use bleach.
MAINTENANCE
Lubricate only when necessary using a dry silicone based lubricant.
- Clean all plastic parts periodically using a soft damp cloth and mild detergent. Do not use bleach.
- Check the wheels periodically for signs of wear or damage and keep them clean of dust or sand.
- Prolonged exposure to sunlight will cause the fabric to fade.
- Serving tray insert can be washed in the dishwasher. Main tray can be wiped clean using a soft damp cloth and mild detergent.
- Do not use bleach.
- Important for your child's safety do not remove the crotch bar from the tray.
FOR MORE INFORMATION
If you have any questions or comments about this product, or are missing any of the parts. Please do not return this product to the store. Contact us in one of the following ways:
- By phone (toll free): (877)-424-4226
• By fax: (717)-735-0888
• By e-mail: info@chiccousa.com - URL: www.chiccousa.com
- By mail: 1826 William Penn Way Lancaster, PA 17601
Thank You for Buying

natural_image
Illustration of a mechanical device with hands operating it, showing internal components and a close-up view (no text or symbols)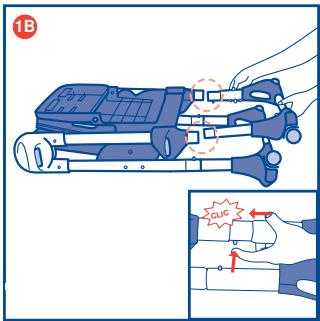


natural_image
Illustration of a hand using a pliers to cut metal parts, showing motion arrows (no text or symbols)
natural_image
Illustration of a hand using a tool to adjust or install a mechanical component, with no visible text or symbols.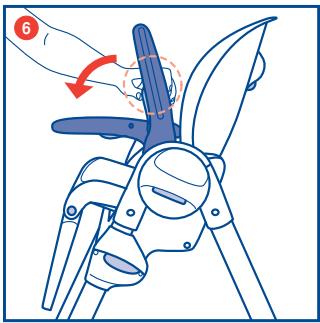
natural_image
Diagram of a car seatbelt with straps and seats, no text or symbols present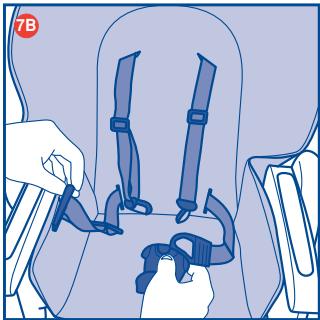
natural_image
Illustration of hands securing a seatbelt in a vehicle seatbelt (no text or symbols)
natural_image
Illustration of hands adjusting a seatbelt device (no text or symbols visible)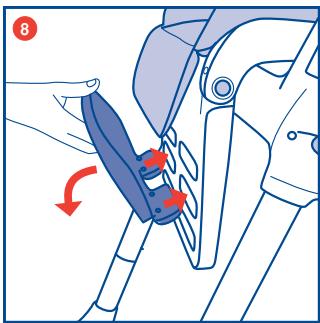
natural_image
Illustration of a person wearing a full-body medical harness and seatbelt (no text or symbols)natural_image
Illustration of a seated object with hands holding a curved handle, no text or symbols presentnatural_image
Line drawing of a baby seat with a hand holding the tray, no text or symbols presentnatural_image
Illustration of hands using a blue device to lift a seatbelt, with a red arrow indicating the load (no text or symbols present)natural_image
Line drawing of a folding chair with legs and seat, no text or symbols presentnatural_image
Line drawing of a hand holding a blue tool interacting with a mechanical component (no text or symbols)natural_image
Line drawing of a hand pressing down on a car seatbelt, with no text or symbols present.natural_image
Illustration of a foot and ankle joint with a red arrow indicating movement (no text or symbols)RUEDAS Y FRENOS
natural_image
Illustration of a child's seatbelt device with a hand operating the seat, showing no text or symbols.natural_image
Illustration of a robotic leg being adjusted using a tripod, with motion arrows indicating movement (no text or symbols)natural_image
Illustration of a person wearing a blue backpack and roller skates, standing upright (no text or symbols)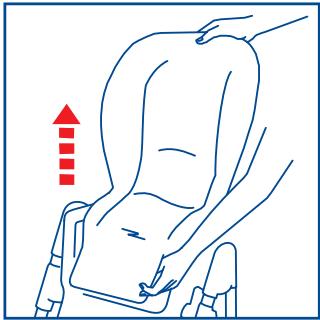
natural_image
Line drawing of a person seated in a seat with a hand adjusting the seat area, no text or symbols presentLIMPIEZA
natural_image
Illustration of a hand using a pliers to handle metal parts, with red arrows indicating motion direction (no text or symbols)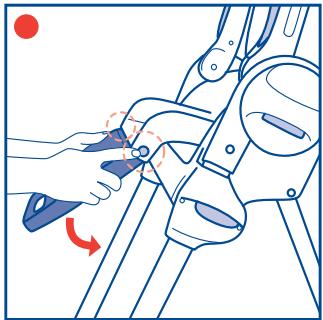
natural_image
Line drawing of a robotic arm with a hand adjusting the grip, showing motion direction (no text or symbols)
natural_image
Diagram of a car seat assembly with four seats and two legs, no text or symbols present
natural_image
Illustration of a person using a seatbelt device to adjust the seat (no text or symbols visible)
natural_image
Illustration of hands adjusting a seatbelt device (no text or symbols visible)
natural_image
Illustration of a hand pressing down on a device with a red arrow indicating downward motion (no text or symbols)MISE EN GARDE
natural_image
Illustration of a person using a seatbelt to adjust the seatbelt, with arrows indicating force direction (no text or symbols present)natural_image
Illustration of a person wearing a full-body safety harness and belt, no text or symbols presentnatural_image
Diagram of a seated object with hands and legs, no text or symbols presentnatural_image
Illustration of a bicycle seatbelt mechanism with red arrows indicating movement or force direction (no text or symbols)natural_image
Illustration of a blue children's seat with a hand holding the seat, showing no text or symbolsnatural_image
Illustration of hands placing a blue object onto a chair using a stand (no text or symbols)natural_image
Line drawing of a bipedal chair with legs and feet, mounted on a table (no text or symbols)natural_image
Line drawing of a hand holding a tool over a vehicle's seat, with a red arrow indicating clockwise motion (no text or symbols)natural_image
Line drawing of a hand pressing down on a car seatbelt, showing the grip and seat area (no text or symbols)natural_image
Illustration of a foot and ankle joint with a red arrow indicating movement or pressure point (no text or symbols)ROULETTES ET FREINS
natural_image
Illustration of a child's seat with legs and feet, showing motion direction (no text or symbols)natural_image
Illustration of a robotic leg being adjusted using a tripod, with motion arrows indicating movement (no text or symbols)natural_image
Illustration of a person wearing a blue and white outfit with roller skates (no text or symbols)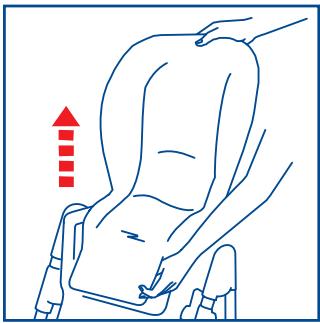
natural_image
Line drawing of a person seated in a seat with a hand pointing upward (no text or symbols)NETTOYAGE
natural_image
Blue square icon with a white baby figure sitting cross-legged (no text or symbols)www.chicco.com

COMO - ITALY