
EMR211 - Weather Station OREGON SCIENTIFIC - Free user manual and instructions
Find the device manual for free EMR211 OREGON SCIENTIFIC in PDF.


| Product Type | Wireless Weather Station |
| Brand | Oregon Scientific |
| Model | EMR211 |
| Dimensions (base station) | Approximately 120 x 80 x 25 mm |
| Weight (base station) | Approximately 150 g (without batteries) |
| Power Supply | 2 AA (LR6) batteries for base station, 2 AA batteries for outdoor sensor |
| Outdoor Sensor | Wireless thermo-hygrometer sensor (range up to 30 m in open area) |
| Display | LCD screen with backlight |
| Indoor Temperature | Measurement range: -10 °C to +60 °C, resolution 0.1 °C |
| Indoor Humidity | Range: 25% to 95%, resolution 1% |
| Outdoor Temperature | Measurement range: -40 °C to +60 °C, resolution 0.1 °C (via sensor) |
| Outdoor Humidity | Range: 25% to 95%, resolution 1% (via sensor) |
| Weather Forecast | Forecast icons: sunny, partly cloudy, cloudy, rainy, snowy |
| Atmospheric Pressure | Display in hPa/mb, trend |
| Radio-Controlled Clock | DCF-77 synchronization (Europe) |
| Additional Functions | Alarm, calendar, moon phase display, feels-like temperature |
| Maintenance and Cleaning | Clean with a soft, slightly damp cloth. Do not use solvents or abrasive products. |
| Safety | Do not expose to extreme temperatures, humidity, or direct sunlight. Use only recommended batteries. |
| Spare Parts and Repairability | Standard commercially available batteries. No spare parts provided. The device is not designed to be repaired by the user. |
| General Information | Transmission frequency: 433 MHz. Compliant with European directives. |
Frequently Asked Questions - EMR211 OREGON SCIENTIFIC
Perform a reset by removing the batteries.
All settings will be erased.
User questions about EMR211 OREGON SCIENTIFIC
0 question about this device. Answer the ones you know or ask your own.
Ask a new question about this device
Download the instructions for your Weather Station in PDF format for free! Find your manual EMR211 - OREGON SCIENTIFIC and take your electronic device back in hand. On this page are published all the documents necessary for the use of your device. EMR211 by OREGON SCIENTIFIC.
USER MANUAL EMR211 OREGON SCIENTIFIC
Weather@Home Thermo Bluetooth-enabled Thermometer
Model: EMR211
USER MANUAL
CONTENTS
Introduction 2
Overview 2
Front view 2
Rear view....2
Remote Sensor (THN132N)....3
Getting started....3
Insert batteries .... 3
Remote sensor....3
Sensor data transmission 4
Temperature....4
Ice warning....4
Reset....4
Connect with your mobile device .... 5
Paring your Thermometer 5
Settings....6
View current readings 7
View history readings....7
Optional sensor for additional information ..... 7
Precautions....8
Specifications 8
About Oregon Scientific 9
EU-Declaration of conformity....9
FCC statement 9
INTRODUCTION
Thank you for selecting our Oregon Scientific™ Weather@Home Bluetooth-enabled Thermometer, which has changeable display on indoor and outdoor temperature.
NOTE Please keep this manual handy as you use your new product. It contains practical step-by-step instructions, as well as technical specifications and warnings you should know about.
OVERVIEW
FRONT VIEW

- Outdoor temperature reading ( ^ C/ ^ F)
-
Sensor channel indicator
-
Sensor reception indicator
- outdoor remote sensor battery low
- Indoor temperature reading (°C/°F)
- indoor remote sensor / main unit battery low
- □ : BLE connection indicator
- Ice alert LED indicator
REAR VIEW
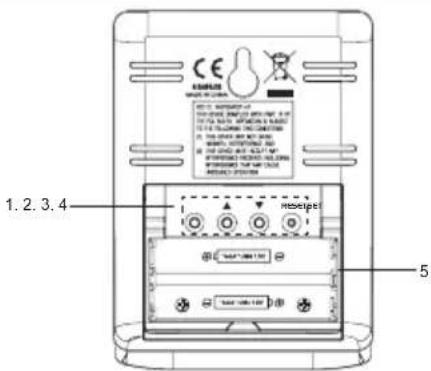
- SET: select temperature unit (°C/°F); pair up Bluetooth function
- Select outdoor channels (1-5); search remote sensor
- :Select outdoor channels (1-5); auto-scan among sensors
- RESET: reset the unit to default settings
- Battery compartment
REMOTE SENSOR (THN132N)
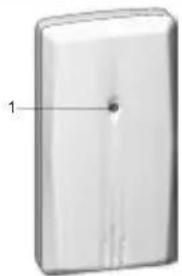
natural_image
Simple 3D diagram of a rectangular object with a central dot and label '1' (no text or symbols on the object itself)
- LED status indicator
- Wall mount hole
- Battery compartment
- RESET hole
- CHANNEL switch
REFERENCE Other supported sensors include models: THGN328N, THGR328N, BTH sensor, THN318N.
GETTING STARTED
INSERT BATTERIES
- Remove the battery compartment.
- Insert the batteries, matching the polarities (+/-).
- Press RESET after each battery change.
| LOCATION | MEANING |
| Outdoor temperature area Outdoor sensor batteries low | |
| Indoor temperature area | Indoor sensor batterieslow / main unit batteries low |
REMOTE SENSOR
The main unit can collect data from up to 5 sensors.
To set up the sensor:
- Open the battery compartment.
- Select a channel then press RESET.
- Close the battery door.
- Place the sensor within 98 ft (30 m) of the main unit using the table stand or wall mount.
TIP Ideal placements for the sensor would be in any location on the exterior of the home at a height of not more than 5 ft (1.5 m); and can shield it from direct sunlight or wet conditions for an accurate reading.

NOTE Use alkaline batteries for longer usage and consumer grade lithium batteries in temperatures below freezing.
SENSOR DATA TRANSMISSION
To search for a sensor:
- Press ▲ or ▼ to select among 5 different outdoor channels of remote sensors.
- Press and hold ▲ for 2 seconds to enforce researching for the selected sensor.
To auto-scan among sensors:
- Press and hold 174 for 2 seconds to enable auto-scan function for all 5 channels. The temperatures will be displayed automatically in sequential order (Channel 1,2,3,4,5)
The sensor reception icon at the front of the main unit shows the status:
| ICON DESCRIPTION | |
| Main unit is searching for sensor(s). | |
| A channel has been found. | |
| The sensor cannot be found. | |
TIP The transmission range may vary depending on many factors. You may need to place the sensor(s) in different locations to get the best result(s).
TEMPERATURE
To select temperature unit:
- Press SET to select °C or °F for temperature readings.
ICE WARNING
ICE ALERT If the channel 1 sensor falls from 37°F to 28°F (3°C to -2°C), LED indicator in the front of the main unit will flash continuously, and will stop flashing once the temperature is out of this range.
- Press and at the same time to deactivate the ice alert warning.
- The ice alert warning will be disable/enable again when the temperature falls again from 37^ F to 28^ F ( 3^ C to -2^ C).
NOTE As ice alert is only applicable to channel 1, to prevent flashing of LED, select channel 2-5 on outdoor sensor.
RESET
Press RESET at the rear of the main unit to return to the default settings.
CONNECT WITH YOUR MOBILE DEVICE
You can remotely set the thermometer and read the weather information through Bluetooth 4.0 using your mobile device with the downloaded application from the Apple Store. To quickly find the application, type 'Weather@Home' as keyword in the search engine.
Ensure your mobile device is compatible with iOS 5 or Android 4.3 with Bluetooth®v4.0.
natural_image
Blank white image with no visible text, symbols, or discernible subjectPAIRING YOUR THERMOMETER
First of all, you need to pair your thermometer with your mobile device. 📄 will flash on the screen of the weather station while pairing and be on after successful pairing.

To pair up a sensor:
At the rear of the main unit, press and hold SET for 2 seconds to enable a pair-up for the main unit.

- Tap to enter SETTINGS screen.
- Tap on STATION area.
- Tap Pair Up. Searching... displays. If you want to cancel the pairing, tap Cancel.
- Once the pairing is successful, it will return to STATION screen.
- Tap on each channel to rename it. (Up to 20 characters including space are allowed). Tap Done if completed. Tap < to exit.
To remove sensor:
To remove any sensor from the weather station, Tap Remove station on STATION screen, all the sensors will be removed at the same time.

To reposition the sensors on screen:
- On STATION screen, tap
- Press and hold at the right side of a sensor. Drag it to your desired position.
- Tap to confirm.
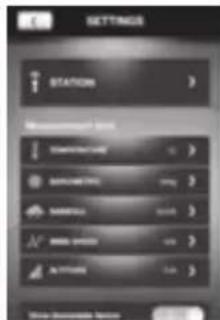
SETTINGS
You can set your weather station through the application, such as measurement units.
The settings are as follows:
- Temperature
• Barometric (not available in EMR211)
• Rainfall (not available in EMR211)
• Wind speed (not available in EMR211)
• Altitude (not available in EMR211)
• Show unavailable sensor
• Automatically sync time
• Show Sea Level Pressure (not available in EMR211)

To select the measurement unit:
- Tap to view the measurement unit options.
- Tap on your desired unit.
- Tap < to go back to the previous screen.

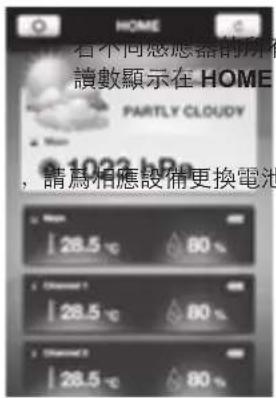
VIEW CURRENT READINGS

You can directly view all the
temperature readings from
different sensors through the
application at a time. The
readings are on the HOME
screen.
NOTE If low battery icon
displays on the screen,
please replace the batteries for
the corresponding device.
To show unavailable sensor:
If the sensor is out of range, the readings are interrupted and - - (dash mode) displays on the screen. If you do not want to show the unavailable sensor:
- On SETTINGS screen, touch and slide the button to right to turn on the function, or sliding to left to turn it off.
To automatically synchronize time:
Time and date on your weather station could be automatically synchronized by your mobile device.
- On SETTINGS screen, touch and slide the button to right to turn on the function, or sliding to left to turn it off.
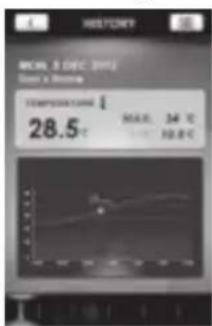
VIEW HISTORY READINGS
You can view history through the application. The history could also be presented in graphs (past 24 hours or past 7 days).
To view the history:
- Tap on your desired sensor area on the screen.
- Tap 1 to select your desired data or tap to sort the data by date.

OPTIONAL SENSOR FOR ADDITIONAL INFORMATION
By applying the sensor (Model: BTH Sensor) at the same time, you can also view the following information using your mobile device.
- Weather Forecast
- Air Pressure
• Outdoor Humidity
USE FUL REFERENCE The optional sensor (Model:
BTH Sensor) can be purchased from Oregon Scientific.
PRECAUTIONS
- Do not subject the unit to excessive force, shock, dust, temperature or humidity.
- Do not cover the ventilation holes with any items such as newspapers, curtains etc.
- Do not immerse the unit in water. If you spill liquid over it, dry it immediately with a soft, lint-free cloth.
- Do not clean the unit with abrasive or corrosive materials.
- Do not tamper with the unit's internal components. This invalidates the warranty.
- Only use fresh batteries. Do not mix new and old batteries.
- Images shown in this manual may differ from the actual display.
- When disposing of this product, ensure it is collected separately for special treatment and not as household waste.
-
Placement of this product on certain types of wood may result in damage to its finish for which Oregon Scientific will not be responsible. Consult the furniture manufacturer's care instructions for information.
-
The contents of this manual may not be reproduced without the permission of the manufacturer.
- Do not dispose old batteries as unsorted municipal waste. Collection of such waste separately for special treatment is necessary.
- Please note that some units are equipped with a battery safety strip. Remove the strip from the battery compartment before first use.
NOTE The technical specifications for this product and the contents of the user manual are subject to change without notice.
NOTE Features and accessories will not be available in all countries. For more information, please contact your local retailer.
SPECIFICATIONS
| TYPE DESCRIPTION | |
| MAIN UNIT | |
| L x W x H | 93 x 68 x 30 mm(3.66 x 2.68 x 1.18 in) |
| Weight 96g (3.39 ounces) include battery | |
| Temperature range -5°C to 50°C (23°F to 122°F) | |
| Signal frequency 433 MHz | |
| Power 2 x AAA batteries | |
| Temperature range for ice alert | 3°C to -2°C |
| REMOTE THERMO SENSOR (THN132N) | |
| L x W x H | 96 x 50 x 22 mm(3.78 x 1.97 x 0.87 in) |
| Weight 62g (2.22 ounces) | |
| Transmission range 30 | m (98 ft) unobstructed |
| Temperature range -20°C to 60°C (-4°F to 140°F) | |
| Power 1 x UM-3 (AA) 1 | 5V batteries |
ABOUT OREGON SCIENTIFIC
Visit our website www.oregonscientific.com to learn more about Oregon Scientific products.
For any enquiry, please contact our Customer Services at info@oregonscientific.com.
Oregon Scientific Global Distribution Limited reserves the right to interpret and construe any contents, terms and provisions in this user manual and to amend it, at its sole discretion, at any time without prior notice. To the extent that there is any inconsistency between the English version and any other language versions, the English version shall prevail.
EU-DECLARATION OF CONFORMITY
Hereby, Oregon Scientific, declares that Weather@Home Thermo Bluetooth-enabled Thermometer (model: EMR211)
is in compliance with the essential requirements and other relevant provisions of Directive 1999/5/EC. A copy of the signed and dated Declaration of Conformity is available on request via our Oregon Scientific Customer Service.

COUNTRIES RTTE APPROVAL COMPLIED
All EU Countries, Switzerland CH
and Norway N
CH
O
FCC STATEMENT
This device complies with Part 15 of the FCC Rules. Operation is subject to the following two conditions: (1) This device may not cause harmful interference, and (2) This device must accept any interference received, including interference that may cause undesired operation.
WARNING Changes or modifications not expressly approved by the party responsible for compliance could void the user's authority to operate the equipment.
NOTE This equipment has been tested and found to comply with the limits for a Class B digital device, pursuant to Part 15 of the FCC Rules. These limits are designed to provide reasonable protection against harmful interference in a residential installation.
This equipment generates, uses and can radiate radio frequency energy and, if not installed and used in accordance with the instructions, may cause harmful interference to radio communications. However, there is no guarantee that interference will not occur in a particular installation. If this equipment does cause harmful interference to radio or television reception, which can be determined by turning the equipment off and on, the user is encouraged to try to correct the interference by one or more of the following measures:
Reorient or relocate the receiving antenna.
Increase the separation between the equipment and receiver.
Connect the equipment into an outlet on a circuit different from that to which the receiver is connected.
Consult the dealer or an experienced radio / TV technician for help.
DECLARATION OF CONFORMITY
The following information is not to be used as contact for support or sales. Please call our customer service number (listed on our website at www.oregonscientific.com), or on the warranty card for this product) for all inquiries instead.
We
Name: Oregon Scientific, Inc.
Address: 10778 SW Manhasset Dr. UNIT B-2 Tualatin, Or 97062 USA
Telephone No.: 1-800-853-8883
Declare that the product
Product No.: EMR211
Product Name: Weather@Home Thermo Bluetooth-enabled Thermometer
Manufacturer: IDT Technology Limited
Address: Block C, 9/F, Kaiser Estate, Phase 1, 41 Man Yue St., Hung Hom, Kowloon, Hong Kong
Weather@Home Bluetooth-Thermometer
Modell: EMR211
BEDIENUNGSANLEITUNG
INHALT
Einführung 2
Übersicht....2
Vorderansicht 2
Rückansicht 2
Sensor (THN132N) 3
Inbetriebnahme....3
natural_image
Simple 3D diagram of a rectangular object with a central dot and label '1' (no text or symbols on the object itself)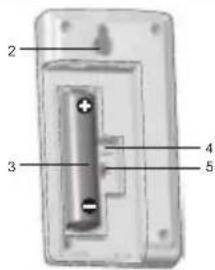
natural_image
Blurred grayscale image with no discernible text, symbols, or identifiable objectsVINCULAR EL TERMÓMETRO
Vincular un sensor:
VER LAS LECTURAS ACTUALES

natural_image
Simple 3D diagram of a rectangular object with a labeled point and internal lines, no text or symbols present.
JUMELAGE DE VOTRE THERMOMÈTRE
AFFICHER LES MESURES EN COURS

EUROPE - DÉCLARATION DE CONFORMITÉ
natural_image
Blurred grayscale image with no discernible text, symbols, or identifiable objectsSINCRONIZZAZIONE DEL TERMOMETRO

VISUALIZZA LDATI CORRENTI

natural_image
Pure architectural or architectural lines without any text, numbers, or symbolsKOPPELEN VAN UW THERMOMETER
line
| Date | Value | |---|---| | Peak | 34.0 | | Min | 10.8 |
OPTIONELE SENSOR VOOR ADDITIONELE INFORMATIE
- SET: selecionar unidade de temperatura (°C/°F); função de emparelhamento Bluetooth
- ▲selecionar canais exteriores (1-5); procurar sensor remoto
-
: seleccionar canais exteriores (1-5); pesquisa automática entre sensores
-
RESET: reconfigurar a unidade para os valores predefinidos
- Compartimento das pilhas
SENSOR REMOTO (THN132N)

natural_image
Plain white surface with a small dark triangular shape in the top-left corner (no text or symbols)Reposicionamento dos sensores no tela:

natural_image
Simple 3D diagram of a rectangular object with a labeled point '1' on its side (no text or symbols beyond the label)
natural_image
Exterior view of a modern office building (no signage)配对您的温度计
配对传感器
恢复屏幕上的传感器:
line
| Time (s) | Temperature (°C) | | :--- | :--- | | 0 | 28.5 | | 1 | 30.0 | | 2 | 31.5 | | 3 | 33.0 | | 4 | 34.5 | | 5 | 36.0 | | 6 | 37.5 | | 7 | 39.0 | | 8 | 40.5 | | 9 | 42.0 | | 10 | 43.5 | | 11 | 45.0 | | 12 | 46.5 | | 13 | 48.0 | | 14 | 49.5 | | 15 | 51.0 | | 16 | 52.5 | | 17 | 54.0 | | 18 | 55.5 | | 19 | 57.0 | | 20 | 58.5 | | 21 | 60.0 | | 22 | 61.5 | | 23 | 63.0 | | 24 | 64.5 | | 25 | 66.0 | | 26 | 67.5 | | 27 | 69.0 | | 28 | 70.5 | | 29 | 72.0 | | 30 | 73.5 | | 31 | 75.0 | | 32 | 76.5 | | 33 | 78.0 | | 34 | 79.5 | | 35 | 81.0 | | 36 | 82.5 | | 37 | 84.0 | | 38 | 85.5 | | 39 | 87.0 | | 40 | 88.5 | | 41 | 90.0 | | 42 | 91.5 | | 43 | 93.0 | | 44 | 94.5 | | 45 | 96.0 | | 46 | 97.5 | | 47 | 99.0 | | 48 | 100.5 | | 49 | 102.0 | | 50 | 103.5 | | 51 | 105.0 | | 52 | 106.5 | | 53 | 108.0 | | 54 | 109.5 | | 55 | 111.0 | | 56 | 112.5 | | 57 | 114.0 | | 58 | 115.5 | | 59 | 117.0 | | 60 | 118.5 | | 61 | 120.0 | | 62 | 121.5 | | 63 | 123.0 | | 64 | 124.5 | | 65 | 126.0 | | 66 | 127.5 | | 67 | 129.0 | | 68 | 130.5 | | 69 | 132.0 | | 70 | 133.5 | | 71 | 135.0 | | 72 | 136.5 | | 73 | 138.0 | | 74 | 139.5 | | 75 | 141.0 | | 76 | 142.5 | | 77 | 144.0 | | 78 | 145.5 | | 79 | 147.0 | | 80 | 148.5 | | 81 | 150.0 | | 82 | 151.5 | | 83 | 153.0 | | 84 | 154.5 | | 85 | 156.0 | | 86 | 157.5 | | 87 | 159.0 | | 88 | 160.5 | | 89 | 162.0 | | 90 | 163.5 | | 91 | 165.0 | | 92 | 166.5 | | 93 | 168.0 | | 94 | 169.5 | | 95 | 171.0 | | 96 | 172.5 | | 97 | 174.0 | | 98 | 175.5 | | 99 | 177.0 | | Note: The data is already in the image as it is not possible to extract or convert from the chart title and the values displayed in the table above the chart.
利用可选传感器获取额外信息
Oregon Scientific Inc.
Tualatin, Oregon USA
欧西亚中国授权制造商
展科电子(深圳)有限公司
制造地:中国深圳宝安臣田工业村

Weather@Home Bluetooth-aktiverad termometer
Modell: EMR211
Användarmanual
INNEHÅLL
Inledning 2
Översikt....2
Vy framifrån....2
Vy bakifrån 2
Fjärrsensor (THN132N) 3
Komma igång....3
FJÄRRSENSOR (THN132N)

natural_image
Simple 3D diagram of a rectangular object with a central dot and label '1' (no text or symbols on the object itself)
natural_image
Exterior view of a modern office building (no signage)
VISA AKTUELLA VÄRDEN

natural_image
Simple 3D diagram of a rectangular object with a central dot and label '1' (no text or symbols on the object itself)配对感器
恢復屏幕上的感應器:

查看當時讀數
- Weather@Home Thermo Bluetooth-enabled Thermometer
- CONTENTS
- INTRODUCTION
- OVERVIEW
- FRONT VIEW
- REAR VIEW
- REMOTE SENSOR (THN132N)
- GETTING STARTED
- INSERT BATTERIES
- REMOTE SENSOR
- To set up the sensor:
- SENSOR DATA TRANSMISSION
- To search for a sensor:
- To auto-scan among sensors:
- The sensor reception icon at the front of the main unit shows the status:
- TEMPERATURE
- To select temperature unit:
- ICE WARNING
- RESET
- CONNECT WITH YOUR MOBILE DEVICE
- PAIRING YOUR THERMOMETER
- To pair up a sensor:
- To remove sensor:
- To reposition the sensors on screen:
- SETTINGS
- The settings are as follows:
- To select the measurement unit:
- VIEW CURRENT READINGS
- To show unavailable sensor:
- To automatically synchronize time:
- VIEW HISTORY READINGS
- To view the history:
- OPTIONAL SENSOR FOR ADDITIONAL INFORMATION
- PRECAUTIONS
- ABOUT OREGON SCIENTIFIC
- EU-DECLARATION OF CONFORMITY
- FCC STATEMENT
- DECLARATION OF CONFORMITY
- Weather@Home Bluetooth-Thermometer
- INHALT
- VINCULAR EL TERMÓMETRO
- Vincular un sensor:
- VER LAS LECTURAS ACTUALES
- JUMELAGE DE VOTRE THERMOMÈTRE
- AFFICHER LES MESURES EN COURS
- EUROPE - DÉCLARATION DE CONFORMITÉ
- SINCRONIZZAZIONE DEL TERMOMETRO
- VISUALIZZA LDATI CORRENTI
- KOPPELEN VAN UW THERMOMETER
- OPTIONELE SENSOR VOOR ADDITIONELE INFORMATIE
- Reposicionamento dos sensores no tela:
- 配对您的温度计
- 配对传感器
- 恢复屏幕上的传感器:
- 利用可选传感器获取额外信息
- Weather@Home Bluetooth-aktiverad termometer
- Modell: EMR211
- Användarmanual
- INNEHÅLL
- FJÄRRSENSOR (THN132N)
- VISA AKTUELLA VÄRDEN
- 配对感器
- 恢復屏幕上的感應器:
- 查看當時讀數
Brand : OREGON SCIENTIFIC
Model : EMR211
Category : Weather Station