
PRO FLIGHT RADIO PANEL - Flight simulation control panel SAITEK - Free user manual and instructions
Find the device manual for free PRO FLIGHT RADIO PANEL SAITEK in PDF.


| Product Type | Flight Simulation Control Panel |
| Brand | SAITEK |
| Model | PRO FLIGHT RADIO PANEL |
| Dimensions (approx.) | 15 x 10 x 5 cm |
| Weight (approx.) | 300 g |
| Power | USB (5 V, 500 mA) |
| Software Compatibility | Microsoft Flight Simulator X (FSX) |
| Operating Systems | Windows XP, XP64, Vista |
| Main Functions | Control of COM1/COM2, NAV1/NAV2, ADF, DME, XPDR frequencies |
| Display | Two-line LED screen (active and standby) |
| Mode Selection Knob | Radio channel selection (COM, NAV, ADF, DME, XPDR) |
| Tuning Knob | Adjust standby frequencies (outer: whole numbers, inner: decimals) |
| ACT/STBY Button | Toggle between active and standby frequency |
| Mounting | Mounting bracket included, compatible with Saitek Pro Flight Yoke System |
| Connection | USB |
| Care and Cleaning | Clean with a soft, dry cloth. Do not use solvents. |
| Safety | Do not expose to moisture or liquids. Disconnect during prolonged non-use. |
| Spare Parts and Repairability | No user-serviceable parts. Contact Saitek technical support. |
| Warranty | 2 years (subject to conditions) |
| General Information | Complies with Canadian NMB-003 standard. Manufacturer: Mad Catz Interactive Asia. |
Frequently Asked Questions - PRO FLIGHT RADIO PANEL SAITEK
User questions about PRO FLIGHT RADIO PANEL SAITEK
0 question about this device. Answer the ones you know or ask your own.
Ask a new question about this device
Download the instructions for your Flight simulation control panel in PDF format for free! Find your manual PRO FLIGHT RADIO PANEL - SAITEK and take your electronic device back in hand. On this page are published all the documents necessary for the use of your device. PRO FLIGHT RADIO PANEL by SAITEK.
USER MANUAL PRO FLIGHT RADIO PANEL SAITEK
Pro Flight Radio Panel
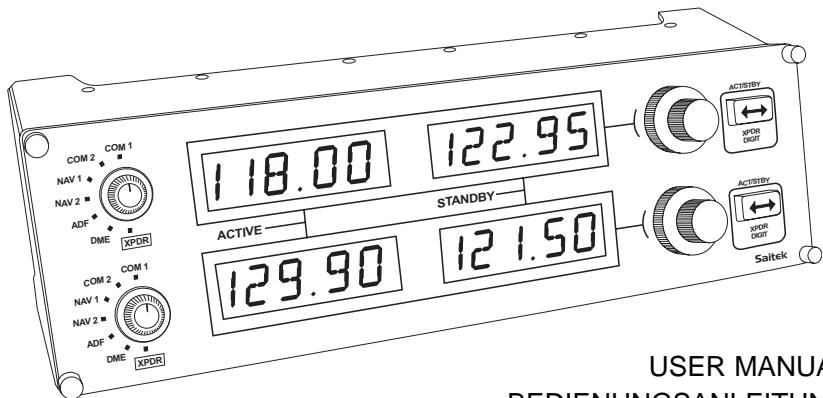
USER MANUAL
BEDIENUNGSANLEITUNG
GUIDE D'UTILISATION
MANUALE D'USO
MANUAL DEL USUARIO
SAITEK PRO FLIGHT RADIO PANEL
Congratulations on buying the Saitek Pro Flight Radio Panel. The radio panel interacts with Microsoft Flight Simulator X to control the cockpit radio stack communications and navigation frequencies.
Installing the Pro Flight Radio Panel
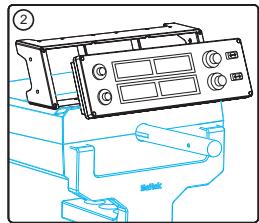
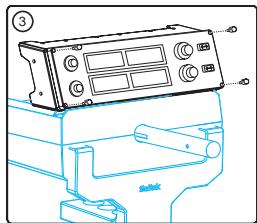
Fix the radio panel to the supplied mounting bracket. Insert the screws through the holes at the corners of the panel into the bracket behind and tighten. If you already own a Saitek Pro Flight Yoke System, you can mount the panel and bracket on top of the yoke unit using the screws provided.

Installation for users of Windows XP, XP64 and Vista
- With your computer switched on, close down any programs that are currently running and plug the USB cable of your panel into one of your PC's free USB ports. A dialogue window will open on your windows task bar saying your PC is installing drivers. Please note that the LED screen will not light up until the panel software is installed.
- Insert the Installation CD into your CD or DVD drive. If the CD does not run automatically, select Start from the Windows® Taskbar, then Run and type D:\Setup.exe and click OK - where D:\ is letter of your disc drive. For Vista users, if you receive the "User Account Control" prompt, click continue.
- For XP users, when the setup wizard screen appears, click "Next" to continue. For Vista users, when prompted "Do you want to run this program from Saitek?" and "Do you always want to run this program from Saitek?", click "Yes". After reading
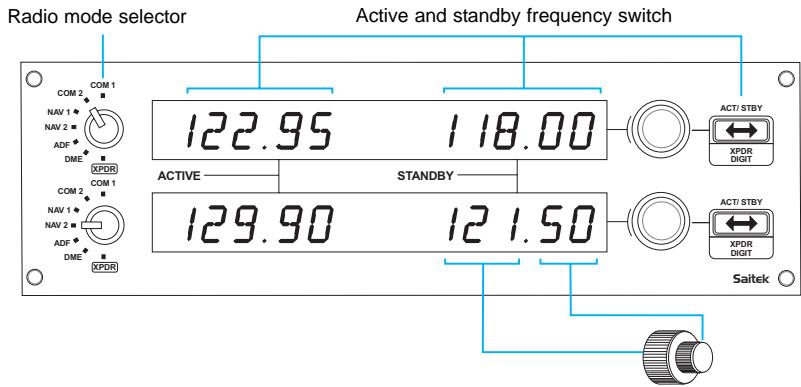
Outer rotary adjusts standby frequency by increments of 1, inner rotary adjusts decimals
the Disclaimer, select the "I accept the terms of the Disclaimer" option and click "Next" to continue.
- The following screen will say "Driver setup is installing Direct Output".
- Once the driver installation has finished, click "Finish" to exit the installation process.
- You can now run a test application by going to Windows Start/Programs/Saitek/Pro Flight Multi Panel/ or open Microsoft FS X. When you open the test application or FS X the display of your panel will light up.
Note: If you install a Saitek X52 Pro after having installed a Pro flight panel, the panel's Direct Output file will be overwritten. If this happens, please reinstall the panel software.
Using the Saitek Pro Flight Radio Panel
The Saitek Pro Flight Radio Panel allows you to adjust the communications and navigation frequencies on your aircraft's radio stack for communicating with air traffic control or selecting VOR beacons or NDBs for navigation.
Com1 and Com2
Nav1 and Nav2
ADF
DME
XPDR
Communications channels 1 and 2
Navigation channels 1 and 2
Automatic Direction Frequency receiver
Distance Measuring Equipment
Transponder frequency code
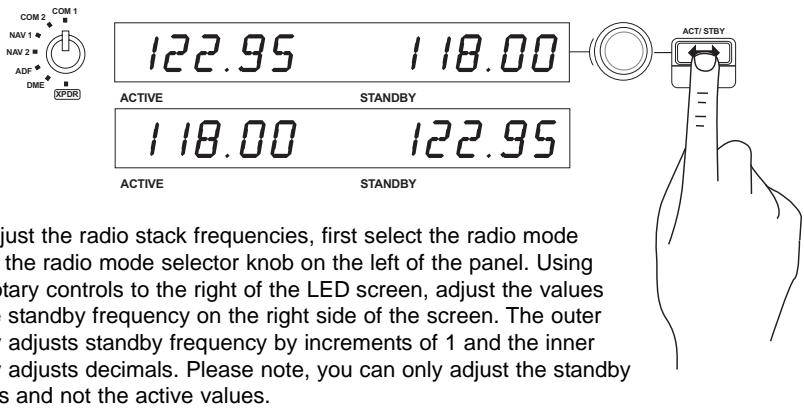
To make the standby values active, press the ACT/STBY switch to the right of the panel. The standby values you have input will now move from the standby section of the screen to the active section and vice versa.
Adjusting the XPDR code
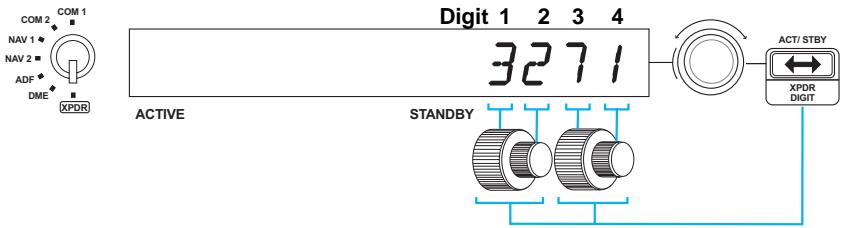
To adjust the transponder squawk code, first select XPDR on the radio mode selector knob on the left of the panel. Turn the outer rotary to adjust digit 1 and the inner rotary to adjust digit 2. To adjust digits 3 and 4, press the ACT/STBY button to the right of the unit and adjust digit 3 by turning the outer rotary and digit 4 by turning the inner rotary.

ADF
DME

XPDR
Troubleshooting
The radio panel controls are automatically configured to interact with FS X software. When you open Microsoft FSX you will be asked "Do you trust this driver from Saitek?" Click "Yes". You will then be asked "Do you always want to load this plugin when launching Flight Sim X?" Again, click "Yes".
If your FS X software does not recognise the radio panel, unplug the USB cable and plug it back in. If FS X appears not to load, this is because it is waiting for a prompt. To
view the prompt window, select it either by pressing Alt + tab or by clicking on the prompt on the Windows task bar. The prompt reads "Microsoft Flight Simulator security warning : will happen once after install". Click Run and when asked "would you like to designate this module?", click yes and FS X will continue to load.
The Pro Flight Radio panel will not register automatically if you have installed the panel before installing FS X. To register the Pro Flight radio Panel with FS X, click on the "Launch the Flightsim X plugin manually" icon to re-run the program.
Technical Support
Nearly all the products that are returned to us as faulty are not faulty at all - they have just not been installed properly.
If you experience any difficulty with this product, please first visit our website www.saitek.com. The technical support area will provide you with all the information you need to get the most out of your product and should solve any problems you might have.
If you do not have access to the internet, or if the website cannot answer your question, please contact your local Saitek Technical Support Team. We aim to offer quick, comprehensive and thorough technical support to all our users so, before you call, please make sure you have all the relevant information at hand.
To find your local Saitek Technical Support Center, please see the separate Technical Support Center sheet that came packaged with this product.
Conditions of Warranty
- Warranty period is 2 years from date of purchase with proof of purchase submitted.
- Operating instructions must be followed.
- Specifically excludes any damages associated with leakage of batteries. Note: Batteries can leak when left unused in a product for a period of time, so it is advisable to inspect batteries regularly.
- Product must not have been damaged as a result of defacement, misuse, abuse, neglect, accident, destruction or alteration of the serial number, improper electrical voltages or currents, repair, alteration or maintenance by any person or party other than our own service facility or an authorized service center, use or installation of non-Saitek replacement parts in the product or the modification of this product in
any way, or the incorporation of this product into any other products, or damage to the product caused by accident, fire, floods, lightning, or acts of God, or any use violative of instructions furnished by Saitek plc.
- Obligations of Saitek shall be limited to repair or replacement with the same or similar unit, at our option. To obtain repairs under this warranty, present the product and proof of purchase (eg, bill or invoice) to the authorized Saitek Technical Support Center (listed on the separate sheet packaged with this product) transportation charges prepaid. Any requirements that conflict with any state or Federal laws, rules and/or obligations shall not be enforceable in that particular territory and Saitek will adhere to those laws, rules, and/or obligations.
- When returning the product for repair, please pack it very carefully, preferably using the original packaging materials. Please also include an explanatory note.
IMPORTANT: To save yourself unnecessary cost and inconvenience, please check carefully that you have read and followed the instructions in this manual.
This warranty is in Lieu of all other expressed warranties, obligations or liabilities. ANY IMPLIED WARRANTYES, OBLIGATIONS, OR LIABILITIES, INCLUDING BUT NOT LIMITED TO THE IMPLIED WARRANTYES OF MERCHANTABILITY AND FITNESS FOR A PARTICULAR PURPOSE, SHALL BE LIMITED IN DURATION TO THE DURATION OF THIS WRITTEN LIMITED WARRANTY. Some states do not allow limitations on how long an implied warranty lasts, so the above limitations may not apply to you. IN NO EVENT SHALL WE BE LIABLE FOR ANY SPECIAL OR CONSEQUENTIAL DAMAGES FOR BREACH OF THIS OR ANY OTHER WARRANTY, EXPRESS OR IMPLIED, WHATSOEVER Some states do not allow the exclusion or limitation of special, incidental or consequential damages, so the above limitation may not apply to you. This warranty gives you specific legal rights, and you may also have other rights which vary from state to state.

This symbol on the product or in the instructions means that your electrical and electronic equipment should be disposed at the end of its life separately from your household waste. There are separate collection systems for recycling in the EU.

For more information, please contact the local authority or your retailer where you purchased the product.
FCC Compliance and Advisory Statement
Warning: Changes or modifications to this unit not expressly approved by the party responsible for compliance could void the user's authority to operate the equipment. This device complies with Part 15 of the FCC Rules. Operation is subject to the following two conditions:
- This device may not cause harmful interference, and;
- This device must accept any interference received, including interference that may cause undesired operation.
NOTE: This equipment has been tested and found to comply with the limits for a Class B digital device, pursuant to Part 15 of the FCC Rules. These limits are designed to provide reasonable protection against harmful interference in a residential installation. This equipment generates, uses and can radiate radio frequency energy and, if not installed and used in accordance with the instructions, may cause harmful interference to radio communications. However, there is no guarantee that interference will not occur in a particular installation. If this equipment does cause harmful interference to radio or television reception, which can be determined by turning the equipment off and on, the user is encouraged to try to correct the interference by one or more of the following measures:
Reorient or relocate the receiving antenna;
- Increase the separation between the equipment and receiver;
- Connect the equipment into an outlet on a circuit different from that to which the receiver is connected;
- Consult the dealer or an experienced radio/TV technician for help.
Saitek Industries, 2295 Jefferson Street, Torrance, CA 90501, USA
Canada ICES-003
Operation is subject to the following two conditions:
- This device may not cause interference, and;
- This device must accept any interference, including interference that may cause undesired operation of the device.
This Class B digital apparatus complies with Canadian ICES-003.
ADF Ricevitore Automatic Direction Frequency
DME Distance Measuring Equipment
JcIeJIg jgjgSaiTeK Pro Flight Radio Panel
gjSJlLalglll 5 JgoggJg jaiy
Saaitek Pro Flight Radio Panel
Game Controllers Game Controllers Control Panel 日 _ 日
aLJI Saitek Pro Flight Radio Panel
Mad Catz Europe Limited
31 Shenley Pavilions,
Chalkdell Drive,
Shenley Woods.
Milton Keynes,
Bucks MK5 6LB
Germany
Mad Catz inc.
7480 Mission Valley Rd
Suite 101
San Diego, CA 92108-4406
Mad Catz is a publicly traded company on the TSX/AMEX, symbol MCZ.
Help center call numbers:
+1 800 659 2287 (USA)
+1 619 683 2815 (USA)
+44 (0)1454 451900 (UK)
Made in China/ Fabrique en China
www.saitek.com
www.madcatz.com
Saitek®
Pro Flight Radio Panel
www.saitek.com
Version 1.1
16/04/09
PZ69
44


- Pro Flight Radio Panel
- SAITEK PRO FLIGHT RADIO PANEL
- Installing the Pro Flight Radio Panel
- Installation for users of Windows XP, XP64 and Vista
- Using the Saitek Pro Flight Radio Panel
- Adjusting the XPDR code
- Troubleshooting
- Technical Support
- Conditions of Warranty
- FCC Compliance and Advisory Statement
- Canada ICES-003
- Germany
- Saitek®
Brand : SAITEK
Model : PRO FLIGHT RADIO PANEL
Category : Flight simulation control panel