
Pro Flight Rudder Pedals - Flight simulator SAITEK - Free user manual and instructions
Find the device manual for free Pro Flight Rudder Pedals SAITEK in PDF.
| Product type | Rudder pedals for flight simulator |
| Brand | Saitek |
| Model | Pro Flight Rudder Pedals |
| Compatibility | PC Windows 7, 8, 8.1, 10 (32 and 64-bit) |
| Connectivity | PS/2 port to Pro Flight Yoke, USB via integrated hub |
| Power supply | Via USB port (5V) |
| Axes | 1 rudder axis, 2 differential brake axes (toe brakes) |
| Main functions | Rudder control, left and right brakes, tension adjustment |
| Included software | Saitek ST Software programming software (download) |
| Additional features | Rugged construction, non-slip pads, 2 m cable |
| Maintenance and cleaning | Clean with a soft, dry cloth. Do not use harsh products. |
| Safety | Do not expose to moisture, do not use within 9 m of a water source. Do not disassemble. |
| Spare parts and repairability | Contact Mad Catz technical support for any repairs or spare parts. |
| Warranty | 2 years limited (Europe and North America) |
| General information | Made in China. ©2016 Mad Catz. All rights reserved. |
Frequently Asked Questions - Pro Flight Rudder Pedals SAITEK
User questions about Pro Flight Rudder Pedals SAITEK
0 question about this device. Answer the ones you know or ask your own.
Ask a new question about this device
Download the instructions for your Flight simulator in PDF format for free! Find your manual Pro Flight Rudder Pedals - SAITEK and take your electronic device back in hand. On this page are published all the documents necessary for the use of your device. Pro Flight Rudder Pedals by SAITEK.
USER MANUAL Pro Flight Rudder Pedals SAITEK
FIP DIGITAL LCD DISPLAY

RUDDER PEDALS WITH TOE BRAKES

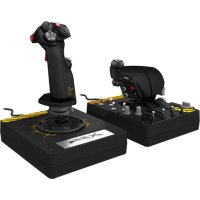
PERFECT PARTNERS

ENGLISH
GETTING STARTED
INTRODUCTION 6
INSTALLATION 6
IMPORTANT INFORMATION 8
ST PROGRAMMING SOFTWARE
FRANÇAIS
DÉMARRAGE
INTRODUCTION 19
INSTALLATION 19
INFORMATION IMPORTANTE 21
ST PROGRAMMING SOFTWARE
DEUTSCH
ERSTE SCHRITTE
EINUHRUNG
SOFTWAREINSTALLATION
WICHTIGE INFORMATIONEN 35
ST PROGRAMMING SOFTWARE
ITALIANO
AVVIO 44
INTRODUZIONE 46
INSTALLAZIONE 46
INFORMAZIONI IMPORTANTI 48
ST PROGRAMMING SOFTWARE
ESPANOL
PRIMEROS .PASOS
INTRODUICION 59
INSTALACION
INFORMATION .IMPORTANT
ST PROGRAMMING SOFTWARE
GETTING STARTED: YOKE

Accurate time and stopwatch function to time each leg of your flight. Display also indicates which programming mode is selected.
Detachable lever knobs to configure any combination of throttle, flaps, mixture or prop pitch.
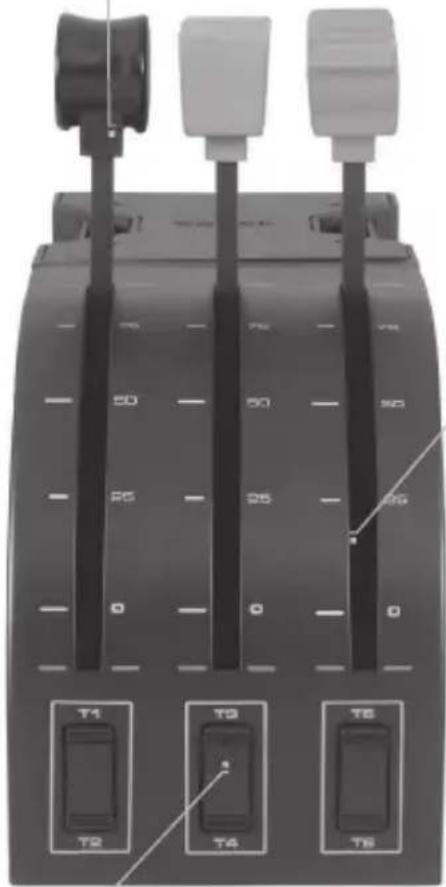
LEVERS
Smooth-travel levers with 0 button detent
THREE 2-WAY ROCKER SWITCHES
INTRODUCTION
Congratulations on buying the Saitek Pro Flight Yoke System. The Pro Flight Yoke features realistic controls configurable for all the major flight simulation software to make your flying experiences more realistic.
FEATURES:
8-way point of view hat switch
- 6 × 2 -way rocker switches
- 2x Single-function buttons
3-position mode switch
- ST Programming Software (ST) allows gamers to configure their controls to suit their preferred gaming style, and to save the configurations as personal profiles.
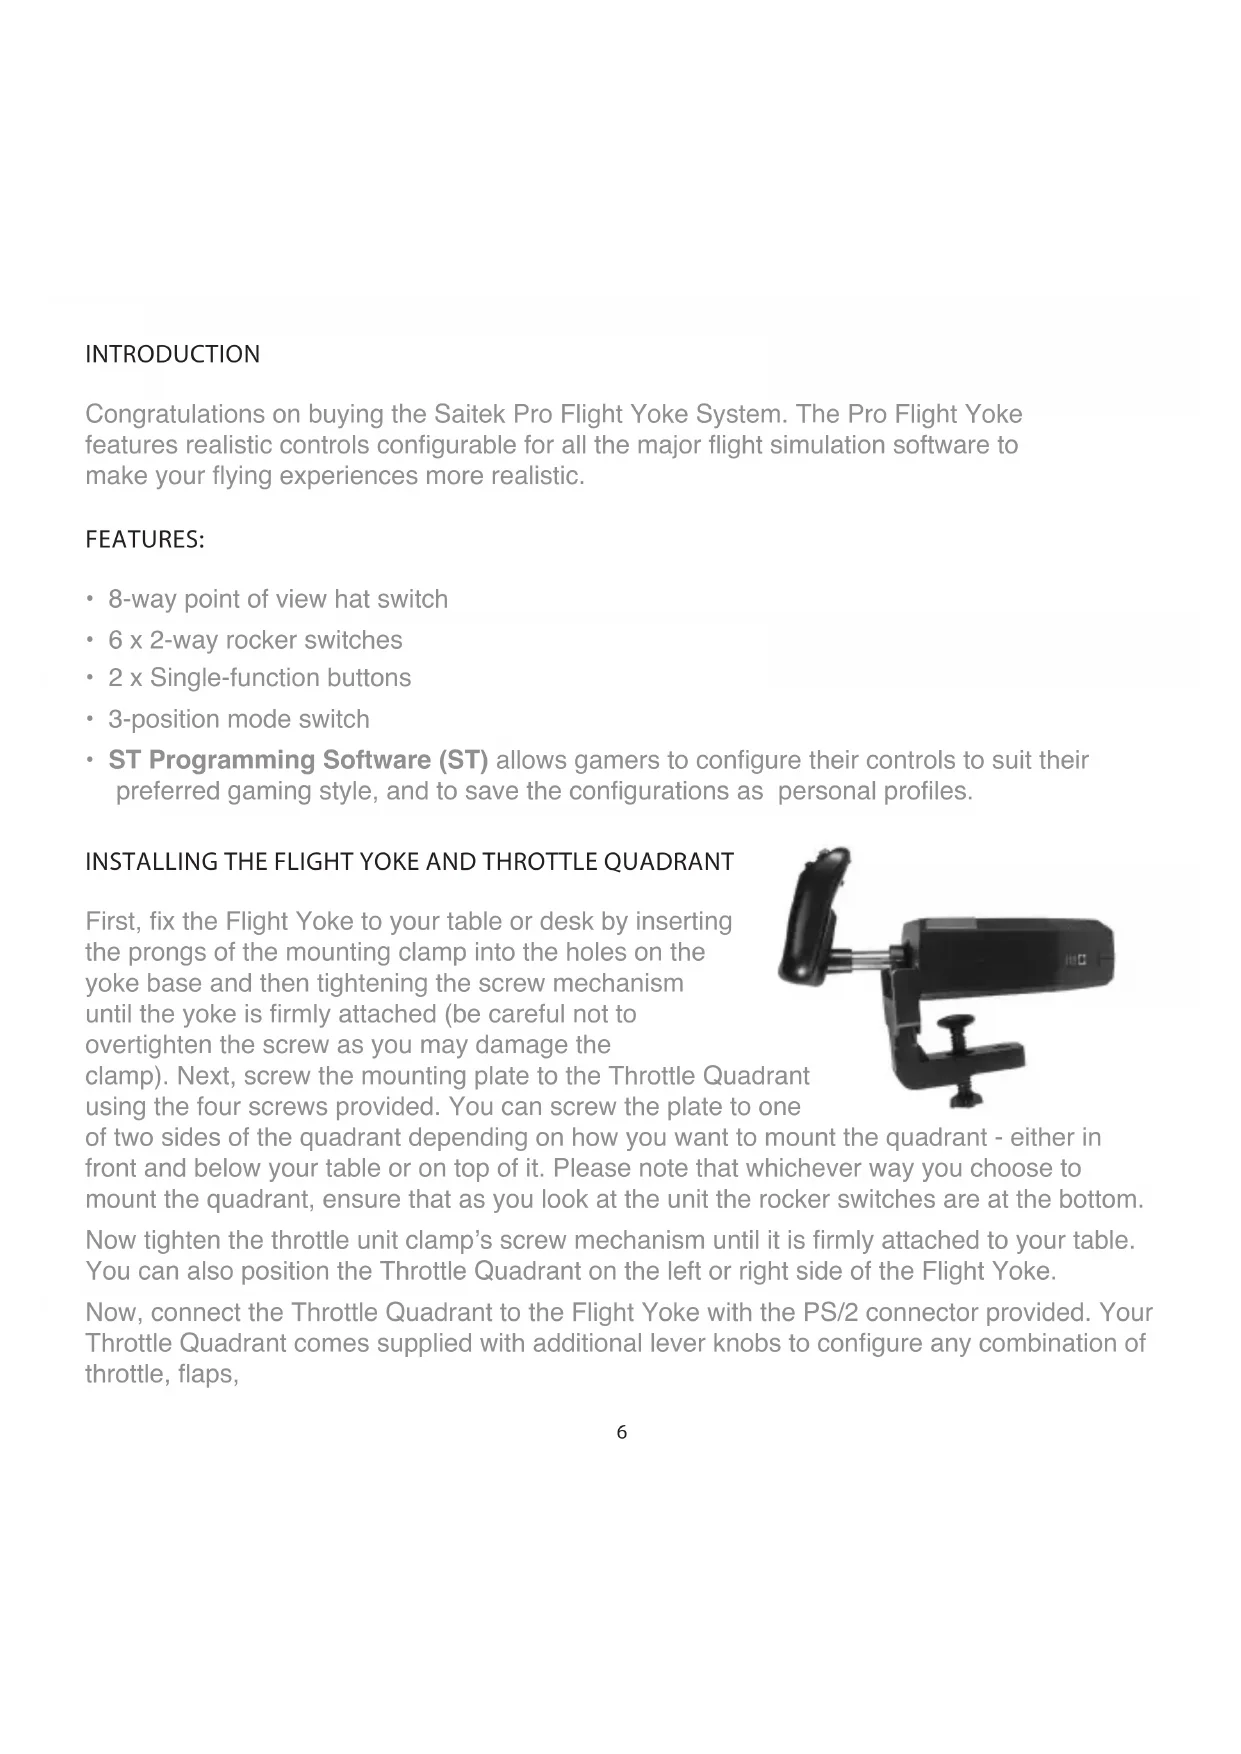
INSTALLING THE FLIGHT YOKE AND THROTTLE QUADRANT
First, fix the Flight Yoke to your table or desk by inserting the prongs of the mounting clamp into the holes on the yoke base and then tightening the screw mechanism until the yoke is firmly attached (be careful not to overtighten the screw as you may damage the
clamp). Next, screw the mounting plate to the Throttle Quadrant using the four screws provided. You can screw the plate to one

of two sides of the quadrant depending on how you want to mount the quadrant - either in front and below your table or on top of it. Please note that whichever way you choose to mount the quadrant, ensure that as you look at the unit the rocker switches are at the bottom.
Now tighten the throttle unit clamp's screw mechanism until it is firmly attached to your table. You can also position the Throttle Quadrant on the left or right side of the Flight Yoke.
Now, connect the Throttle Quadrant to the Flight Yoke with the PS/2 connector provided. Your Throttle Quadrant comes supplied with additional lever knobs to configure any combination of throttle, flaps,
mixture or prop pitch and you can also buy additional quadrants to link together for more complex multi-engined aeroplane configurations. Use the integrated USB Hub on the side of the Pro Flight Yoke to easily connect other parts of the Saitek Pro Flight range of products, such as additional Pro Flight ThrottleQuadrants, Pro Flight Rudder Pedals or other peripherals.

INSTALLATION FOR WINDOWS® 8, 8.1, 7, AND VISTA. INCLUDES ALL 32- AND 64-BIT VERSIONS
IMPORTANT: PLEASE INSTALL DRIVERS BEFORE INSTALLING SOFTWARE
DRIVER INSTALLATION
- Visit Saitek.com to download the latest drivers and software for your operating system.
- With device disconnected, follow the onscreen instructions to complete the installation.
- At the Driver Setup screen, only when prompted, insert USB cable into one of your computer's USB ports, then click Next.
- At the Driver Setup screen, click Next to test your controller.
- When the Saitek Controller screen appears, test the controls to verify device operation. After the test, click OK.
SOFTWARE INSTALLATION
- In the Software Setup screen, click Next and a pop-up box will ask if you "want to trust software from Saitek." Click yes, then click Next.
- After installation, you have the option to Run Profile Editor, which will show you the programming environment. To skip the Profile Editor now, uncheck the box and click Finish to complete installation.
IMPORTANT INFORMATION
Driver updates
From time to time there may be updates to the driver and programming software for this product. You can check for the latest software updates by visiting the Saitek website (www. saitek.com) and clicking on Downloads. A drop-down menu will appear. Select Drivers and Software.
Enabling your controller in the game
Most games support game controllers, but typically default to the mouse and keyboard until you go into the option menu within the game. The first time you start a game after installing your controller, go to the options menu within the main menu of the game and make sure your controller is set up correctly. If you are having trouble working out how to do this, or if you're unsure whether the game itself supports game controllers, then please refer to the user manual of that game for more help.
PROGRAMMING YOUR SAITEK PRO FLIGHT YOKE AND THROTTLE QUADRANT WITH SAITEK ST SOFTWARE
The Saitek Pro Flight Yoke System's buttons, controls and axes correspond to commonly used functions in Microsoft FS9 and FSX according to the tables below. As with any software, if you wish to change the function of a button or control, you will need to change the settings of the game software.
CONFIGURING YOUR SAITEK PRO FLIGHT YOKE AND THROTTLE QUADRANT FOR MICROSOFTFLIGHT SIMULATOR 9 AND FSX
The Saitek Pro Flight Yoke System's buttons, controls and axes correspond to commonly used functions in Microsoft FS9 and FSX according to the tables below. As with any software, if you wish to change the function of a button or control, you will need to change the settings of the game software.
Once you have done this, simply find the command that you want to assign to your controller from the list of commands, click it and then click the Change Assignment button. A window will appear asking you to move the part of your controller that you want to assign to that command - press/move the button/axis that you want to assign to that command and then click OK.
Tip: You may find that when you assign the levers on the quadrant to a command, that they don't appear to work when you test them in the game. If this happens then you must look in the Sensitivities screen (Flight Simulator 2004) or the Calibration tab of the Controls screen (Flight Simulator X) of the game, select the axis command in the list there and ensure that the Sensitivity isn't set too low (set the horizontal sensitivity slider control to around 70% ).
PROGRAMMING YOUR SAITEK PRO FLIGHT YOKE AND THROTTLE QUADRANT WITH SAITEK ST SOFTWARE
Introducing Saitek ST software programming software
Saitek ST software Programming Software is the software Saitek supplies to configure your Saitek controller for enhanced functionality. ST delivers a powerful set of features, allowing you to program your device with the ultimate configuration for total interaction. Despite a level of sophistication previously unseen in the market, and because of the Saitek ST software inside, the software remains simple and intuitive to use.
For a complete guide on how to program your Saitek controller, visit the Saitek website at www.saitek.com or look at the help tab on your programming software menu.
Features of ST programming software:
- Quick and easy setup in any game
- Personalize the controller settings for your favorite games
- Configure your controller with an on-screen 3D model and interface
- Multiple setup option for each controller - ideal if a controller is used by several people and you need more than one profile per device
- Program special moves with sophisticated timing features
- Special game setups available as 'Profiles' from the Saitek website
Download the latest version of Saitek ST software software from the Saitek website

FUNCTION OVERVIEW
FLIGHT YOKE CONTROLS AND CORRESPONDING FUNCTIONS IN MICROSOFT FLIGHT SIMULATOR
| Function | Default function in FS9 and FSX | |
| Yoke axis X axis Ailerons | ||
| Y axis Elevator | ||
| Main Buttons Button 1 Brakes (apply/release) | ||
| T1 (button 3) Elevator trim down | ||
| T2 (button 4) Elevator trim up | ||
| T3 (button 5) Flaps retract incrementally | ||
| T4 (button 6) Flaps extend incrementally | ||
| T5 (button 7) Knee board display/hide | ||
| T6 (button 8) Landing gear up/down | ||
| Button 2 Views (cycle) | ||
| POV Panoramic viewing | ||
| Other Controls Mode switch | Switches Mode when using Sai-tek ST programming software | |
| Clock Buttons Function Clock / stopwatch swap | ||
| Start/Stop Start/stop stopwatch | ||
| Reset Reset stopwatch | ||
FUNCTION OVERVIEW

QUADRANT CONTROLS AND CORRESPONDING FUNCTIONS IN MICROSOFT FLIGHT SIMULATOR
| Function Default function in FS9 and FSX | ||
| Quadrant Axis Z | axis Throttle | |
| Rx axis Flaps | ||
| Ry axis Spoiler | ||
| Axis buttons Z | button Assignable in game | |
| Rx button Assignable in game | ||
| Ry button Assignable in game | ||
| Toggle switches | T1 (button 15) Assignable in game | |
| T2 (button 16) Assignable in game | ||
| T3 (button 17) Assignable in game | ||
| T4 (button 18) Assignable in game | ||
| T5 (button 19) Assignable in game | ||
| T6 (button 20) Assignable in game | ||
HOW TO ASSIGN PRO FLIGHT YOKE CONTROLS TO FLIGHT SIMULATOR FUNCTIONS
If you wish to change the controls or set up the additional buttons that have not been assigned by Flight Simulator automatically, then you must use the Assignments (Flight Simulator 2004) or Controls (Flight Simulator X) screen within the game. This is accessed from the Settings menu within the game.
When you access the Assignments/Controls screen in Flight Simulator, ensure that the Saitek Pro Flight Yoke is selected in the option labelled Joystick Type. If you wish to reassign any of the axes on your controller, (the yoke itself or the levers on the throttle quadrant) you must select Joystick Axes (Flight Simulator 2004) or Control Axes (Flight Simulator X) at the top of the window. If you wish to reassign any of the buttons on your controller, you must first select the Buttons/Keys tab at the top of the window.
What is a Profile?
A Profile is a custom setup for improved gameplay - consisting of a set of commands that are pre-assigned to the buttons or axes of your controller. Pre-written Profiles are available on the Product Companion Disk that accompanies this device or on the Saitek Website - www.saitek.com. (Please check the website for new or improved Profiles, which are added regularly).
How do I program my controller?
After getting to know your controller, you can start creating your own personal Profiles with the Saitek ST software programming software. This software has virtually unlimited programming capabilities and allows you to customize the controller to your exact gaming needs.
The Profile Editor allows you to program the buttons on your controller to perform different actions within your games - this is especially useful if the game you are using does not have its own screen that allows reconfiguring of your buttons.
Getting Started
- Double-click on the Saitek ST software icon the install left on your desktop.
- In the Profile Editor, choose the control to which you wish to assign a keyboard command. You do this by left-clicking on the control's cell in the control list on the right of the screen.
- With the cursor flashing, type in the key commands and then click on the green tick mark when complete.
- Repeat this procedure for all the buttons you would like to program and then click File, Save at the top of the Profile Editor window.
- Give the profile a name (it is recommended you name it after the game for which the profile is intended) and then click Save.
- To enable the profile either click the blue Profile Now icon at the top of the Profile Editor or right-click on the controller icon in your taskbar and select the name of the profile from the pop-up list of options.
- You will notice that when a profile is loaded that the controller icon in your taskbar has a green square behind it, indicating that a profile is currently loaded. If you wish to unload a profile simply right-click on the controller icon and click Clear Profile from the pop-up list of options.
If you require more detailed assistance with using the ST Programming Software, click on Help at the top of the Profile Editor and then Manual.
2-YEAR LIMITED WARRANTY
Mad Catz warrants this product to be free from defects in materials and workmanship for the warranty period. This non-transferable, two- (2) year limited warranty is only to you, the first end-user purchaser. If a defect covered by this warranty occurs AND you provide proof of purchase, Mad Catz, at its option, will repair or replace the product at no charge.
The Mad Catz two- (2) year limited warranty is available to North American and European customers. Your sole and exclusive remedy is repair or replacement of your Mad Catz product. In no event shall Mad Catz liability exceed the original purchase price of the product. This warranty does not apply to: (a) normal wear and tear or abusive use; (b) industrial, professional or commercial use; (c) if the product has been tampered with or modified.
NORTH AMERICA AND EUROPE
To receive warranty service, you must:
- Obtain a Return Authorization Number from Mad Catz Technical Support via ONE of the following methods:
a. Submit a Ticket at http://support.madcatz.com
b. Call the Mad Catz Tech Support Center nearest you:
- North America: 1-800-659-2287 (USA) or 1-619-683-2815 (outside USA)
United Kingdom: 01633 928072
- Europe (outside UK): +44(0) 1633 883110
- France: 01 82 88 01 80
- Germany: 089-21094818
- Spain: 93 181 63 94
Once you have your unique Return Authorization Number, do the following:
- Ship the product to Mad Catz at your expense for service.
- Enclose a copy of the original sales receipt showing a purchase date.
- Enclose a full return address with daytime and evening phone numbers.
TECHNICAL SUPPORT
Online Support: http://support.madcatz.com
North American telephone, available Monday through Friday (excluding holidays):
1-800-659-2287 (USA only) or 1-619-683-2815 (outside USA).
United Kingdom telephone, available Monday through Friday (excluding bank holidays): 01633 928072.
European telephone (outside UK), available Monday through Friday (excluding bank holidays): +44(0) 1633 883110.
CAUTIONS
- Use this unit only as intended.
- To prevent fire or shock hazard, do not expose this unit to rain or moisture. Do not use within 30^ of any water such as swimming pools, bathtubs, or sinks.
- To avoid electrical shock, do not disassemble. Refer servicing to qualified personnel only.
- Never insert objects of any kind, other than authorized items, into the product as they may touch dangerous voltage points or short out parts that could result in fire or electrical shock.
- Stop using this unit immediately if you begin to feel tired or if you experience discomfort or pain in your hands and/or arms while operating the unit. If the condition persists, consult a doctor.
- Do not attempt to operate the unit in any way except with your hands. Do not bring the unit in contact with your head, face, or near the bones of any other part of your body.
- Avoid prolonged use of this unit. Take breaks every 30 minutes.
- Route all cords so that they are not likely to be walked on or tripped over. Make sure that cords are not placed in a position or areas where they may become pinched or damaged.
- Do not wrap cords around any part of anyone's body.
- Do not allow children to play with cords.
- This product contains small parts that may cause choking if swallowed. Not intended for use by children under 3 years of age.
EU DECLARATION OF CONFORMITY:
As required, certain of these products have been tested and conform to the requirements of the European Union Directives 2002/95/EC, 2002/96/EC, and 2004/108/EC. Authorized signatory of the manufacturer is Mad Catz, Inc., 10680 Treena Street, Suite 500, San Diego, CA 92131.
DÉMARRAGE: YOKE

- En la pantalla Instalacion del software, haz tic en Siguente y un cuadro emergente te preguntar si "deseas confiar en el software de Saitek." Haz tic en si, y a continuacion en Siguente.
- Tras la instalación,SEO,SEO,SEO,SEO,SEO,SEO,SEO,SEO,SEO,SEO,SEO,SEO,SEO,SEO,SEO,SEO,SEO,SEO,SEO,SEO,SEO,SEO,SEO,SEO,SEO,SEO,SEO,SEO,SEO,SEO,SEO,SEO,SEO,SEO,SEO,SEO,SEO,SEO,SEO,SEO,SEO,SEO,SEO,SEO,SEO,SEO,SEO,SEO,SEO,SEO, SEO, SEO, SEO, SEO, SEO, SEO, SEO, SEO, SEO, SEO, SEO, SEO, SEO, SEO, SEO, SEO, SEO, SEO, SEO, SEO, SEO, SEO, SEO, SEO, SEO, SEO, SEO, SEO, SEO, SEO, SEO, SEO, SEO, SEO, SEO, SEO, SEO, SEO, SEO, SEO, SEO, SEO
INFORMATION IMPORTANTE
2016 Mad Catz, Inc. 10680 Treena Street, Suite 500, San Diego, CA 92131 U.S.A. Mad Catz, Saitek, the Pro Flight logo, the Saitek logo and the Mad Catz logo are trademarks or registered trademarks of Mad Catz Interactive, Inc., its subsidiaries and affiliates. The shape and design of this product are a trade dress of Mad Catz Interactive, Inc., its subsidiaries and affiliates. Microsoft, Windows, and the Windows logos are trademarks of the Microsoft group of companies. This product is not sponsored, endorsed or approved by Microsoft. All other trademarks or registered trademarks are the property of their respective owners. Made in China. All rights reserved. Product features, appearance and specifications may be subject to change without notice. Please retain this information for future reference.


- FIP DIGITAL LCD DISPLAY
- RUDDER PEDALS WITH TOE BRAKES
- PERFECT PARTNERS
- ENGLISH
- FRANÇAIS
- DEUTSCH
- ITALIANO
- ESPANOL
- GETTING STARTED: YOKE
- LEVERS
- INTRODUCTION
- FEATURES:
- INSTALLING THE FLIGHT YOKE AND THROTTLE QUADRANT
- DRIVER INSTALLATION
- SOFTWARE INSTALLATION
- IMPORTANT INFORMATION
- Driver updates
- Enabling your controller in the game
- PROGRAMMING YOUR SAITEK PRO FLIGHT YOKE AND THROTTLE QUADRANT WITH SAITEK ST SOFTWARE
- CONFIGURING YOUR SAITEK PRO FLIGHT YOKE AND THROTTLE QUADRANT FOR MICROSOFTFLIGHT SIMULATOR 9 AND FSX
- Introducing Saitek ST software programming software
- Features of ST programming software:
- FLIGHT YOKE CONTROLS AND CORRESPONDING FUNCTIONS IN MICROSOFT FLIGHT SIMULATOR
- FUNCTION OVERVIEW
- QUADRANT CONTROLS AND CORRESPONDING FUNCTIONS IN MICROSOFT FLIGHT SIMULATOR
- HOW TO ASSIGN PRO FLIGHT YOKE CONTROLS TO FLIGHT SIMULATOR FUNCTIONS
- What is a Profile?
- How do I program my controller?
- Getting Started
- 2-YEAR LIMITED WARRANTY
- NORTH AMERICA AND EUROPE
- TECHNICAL SUPPORT
- CAUTIONS
- EU DECLARATION OF CONFORMITY:
- DÉMARRAGE: YOKE
- INFORMATION IMPORTANTE
Brand : SAITEK
Model : Pro Flight Rudder Pedals
Category : Flight simulator