
WMH 800 - Weather Station OREGON SCIENTIFIC - Free user manual and instructions
Find the device manual for free WMH 800 OREGON SCIENTIFIC in PDF.


| Product Type | Weather Station |
| Brand | Oregon Scientific |
| Model | WMH 800 |
| Dimensions (main unit) | Approximately 158 x 26 x 158 mm (6.2 x 1.0 x 6.2 in) |
| Weight (main unit) | Approximately 200 g (7.0 oz) without batteries |
| Power Supply | Main unit: 2 x UM-3 (AA) 1.5V batteries; Optional AC adapter |
| Indoor Temperature Range | -5°C to 50°C (23°F to 122°F) |
| Indoor Humidity Range | 25% to 95% RH |
| Outdoor Temperature Range (with sensor) | -30°C to 60°C (-22°F to 140°F) |
| Outdoor Humidity Range (with sensor) | 25% to 95% RH |
| Wind Speed Range | 0 to 50 m/s (0 to 112 mph) |
| Wind Direction | 16 points |
| Rainfall Measurement | 0 to 999.9 mm (0 to 39.37 in) |
| Radio Controlled Clock | DCF-77 (Germany) / MSF-60 (UK) / WWVB-60 (US) |
| Wireless Range (outdoor sensor) | Up to 100 m (328 ft) in open area |
| Number of Outdoor Sensors Supported | Up to 3 |
| Display Type | LCD with backlight |
| Cleaning Instructions | Wipe with a soft, dry cloth. Avoid water and cleaning agents. |
| Safety | Keep away from heat sources and water. Do not expose to direct sunlight for extended periods. |
| Spare Parts Availability | Sensors and adapters available from Oregon Scientific support |
Frequently Asked Questions - WMH 800 OREGON SCIENTIFIC
User questions about WMH 800 OREGON SCIENTIFIC
0 question about this device. Answer the ones you know or ask your own.
Ask a new question about this device
Download the instructions for your Weather Station in PDF format for free! Find your manual WMH 800 - OREGON SCIENTIFIC and take your electronic device back in hand. On this page are published all the documents necessary for the use of your device. WMH 800 by OREGON SCIENTIFIC.
USER MANUAL WMH 800 OREGON SCIENTIFIC
Slim Multi-days Weather Station
Model: WMH800
User Manual
Slim Multi-days Weather Station
Model: WMH800WMH800
USER MANUAL
CONTENTS
Introduction 2
Overview 2
LCD display 2
Back view 3
Stand 3
Remote sensor .... 3
Getting started 4
Set up remote sensor .... 4
Set up main unit 4
Set up stand 4
Data transmission 4
Sensor 4
Weather information display 5
Regional weather information 5
Local temperature and humidity 6
Weather warning message 6
Clock 6
To manually set clock 7
Alarm 7
To set alarm 7
To activate / deactivate alarm 7
To silence alarm 7
Display contrast 7
Backlight 7
Reset 7
Mounting / placing of unit 7
Specifications 8
Precautions 8
About Oregon Scientific 9
EU-Declaration of conformity 9
INTRODUCTION
Thank you for selecting the Oregon Scientific™ Slim Multidays Weather Station (WMH800).
This wireless weather station is capable of receiving weather information from the whole of Europe. European countries and cities are user-selectable, allowing users to conveniently display up-to-date weather forecasts of the selected European city.
Moreover, the built-in and external remote sensors record indoor / outdoor temperature and indoor humidity from your home environment and displays this alongside regional data.
NOTE Please keep this manual handy as you use your new product. It contains practical step-by-step instructions, as well as technical specifications and warnings you should know about.
OVERVIEW
LCD DISPLAY
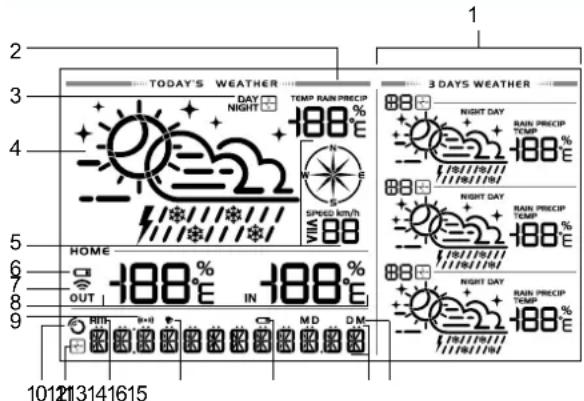
- Next 3-day regional weather forecast with day / night temperature and amount of precipitation (user selected city)
- Amount of precipitation
- Indicates which weather data is displayed (Day / Night)
- Today's regional weather forecast
- Wind speed and direction
- : sensor batteries low
- OUT: outdoor sensor reception status
- Local indoor / outdoor temperature and indoor humidity
- ((●)): alarm time is displayed
- Ⓞ: clock signal reception indicator
- ☐: weather information signal reception indicator
- AM: indicate AM / PM
- ▶: daily alarm is On
-
: batteries low in main unit and stand
-
Country name / city name / clock / daily alarm / calendar/ message
- MD / DM : calendar format (month-day or day-month)
BACK VIEW

- SNOOZE / LIGHT: activate snooze function; turn on backlight
- Wall mount hole
- MODE: toggle between time / calendar and message display; set clock
- ALARM: activate / deactivate alarm; set alarm
- / increase / decrease value of the setting; display next / previous country / city; initiate sensor search
- °C / °F: select temperature unit
- RESET: reset unit to default settings
- Battery compartment
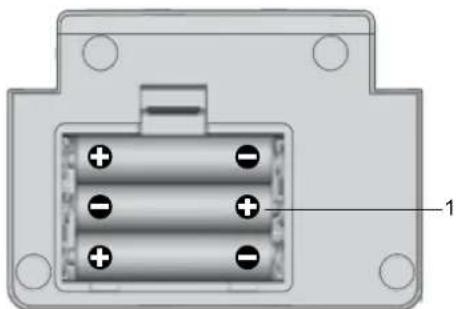
STAND
natural_image
Diagram of a mechanical component with four pins and mounting holes (no text or symbols)- Battery compartment
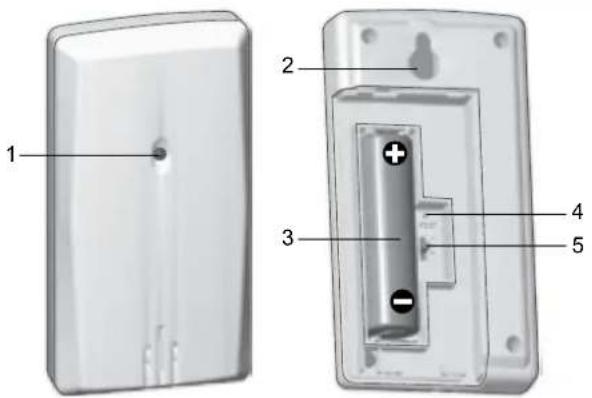
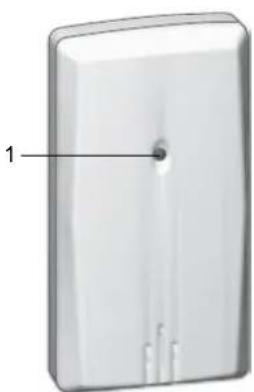
REMOTE SENSOR

- LED status indicator
- Wall mount hole
-
Battery compartment
-
RESET hole
- CHANNEL switch
GETTING STARTED
SET UP REMOTE SENSOR
- Slide open the battery door.
- Insert battery, matching the polarities (+ / -).
- Select channel then press RESET.
- Close the battery door.
TIP Use alkaline batteries for longer usage and consumer grade lithium batteries in temperatures below freezing.
SET UP MAIN UNIT
NOTE Set up the remote sensor before installing the main unit.
- Remove the battery compartment cover.
- Insert the batteries, matching the polarities.
- Press RESET after each battery change.
NOTE Batteries should not be exposed to excessive heat such as sunshine or fire.
SET UP STAND
TIP By placing the unit on the stand, the main unit is able to run on the additional batteries located in the stand.
- Remove the battery compartment cover.
- Insert the batteries, matching the polarities.
DATA TRANSMISSION
SENSOR
To search for a sensor:
Press and hold ⋆ + together.
For best results:
- Place the sensor within 30 m of the main unit.
- Position the sensor so that it faces the main unit, minimizing obstructions such as doors, walls and furniture.
- Place the sensor out of direct sunlight and moisture.
- Place the sensor in a location with a clear view to the sky, away from metallic / electronic objects.
- Position the sensor close to the main unit during cold winter months as below-freezing temperatures may affect battery performance and signal transmission.
The remote sensor reception icon will show the following status:
| ICON DESCRIPTION | |
| Main unit is searching for sensor(s). | |
| A channel has been found. | |
| OUT | The sensor cannot be found. |
NOTE The main unit will search only for already registered sensor or new sensor reset within the last 30 minutes. If unit failed to synchronise with remote sensor, reset the sensor or try selecting a different channel (and press RESET) before manually forcing another search.
TIP The transmission range may vary depending on many factors. You may need to experiment with various locations to get the best results.
WEATHER INFORMATION DISPLAY
REGIONAL WEATHER INFORMATION
NOTE Due to timing of the transmission of weather data, it may take up to 24 hours to get a valid signal.
This unit displays the current and next 3-day* weather information of a user-selected regional city. □ indicates strong signal reception of weather information.
* 4-day weather information (current and next 3-days) is not available for all cities. Please refer to 'Geographical coverage' addendum sheet for a list of cities and the available forecasts for each city.
| ICON LOCATION DESCRIPTION | ||
| Clock / Alarm / Calendar / Message area | Some cities' data are received | |
| Today's Weather / Regional Weather area | Data for the selected city received in the past 48 hours | |
| Clock / Alarm / Calendar / Message area | Most cities' data are received | |
| Today's Weather / Regional Weather area | Data for the selected city received in the past 24 hours | |
| (blinking) | Clock / Alarm / Calendar / Message area | During signal testing, no signal synchronised |
| Today's Weather / Regional Weather area | Data for the selected city received in the past 48 hours, with message | |
| (blinking) | Clock / Alarm / Calendar / Message area | During signal testing, signal synchronised |
| Today's Weather / Regional Weather area | Data for the selected city received in the past 24 hours, with message | |
| No icon | Clock / Alarm / Calendar / Message area | No information received |
| Today's Weather / Regional Weather area | No valid data for the selected city |
To select a country:
- Press and hold MODE.
- Press 🎨 or 🔍 toggle through the list of cities.
- Press MODE to confirm selection.
To select a city (within a selected country):
Press or
For current weather information, the unit will display the weather forecast icon, day / night temperature, amount of precipitation and wind speed / direction.
For the next 3-day weather information, the unit will display the weather forecast icon, day / night temperature and amount of precipitation.
NOTE The table below lists the weather forecast icons and their respective meanings.
| Day-time icon Meaning Night-time icon | ||
 | Sunny / Clear |  |
| [A07X] | Partly cloudy |  |
 | Cloudy | [TCAA] |
 | Foggy |  |
 | Drizzle |  |
 | Rainy | [OCK2] |
 | Deluge | [OSCC] |
 | Sultry |  |
 | Sleet |  |
 | Snow shower |  . . |
LOCAL TEMPERATURE AND HUMIDITY
Display of local temperature and humidity toggles automatically.
NOTE When the temperature is out of range, "HH.H" and "LL.L" will be displayed until the temperature is within range again.
WEATHER WARNING MESSAGE
When there is a weather warning message, it is automatically displayed in a scrolling manner and toggled with clock / calendar.
To review messages:
Press MODE repeatedly.
CLOCK
This product is designed to synchronize its clock automatically with a clock signal:
• DCF-77 signal of Frankfurt, Germany
• HBG-75 signal of Prangins, Switzerland
NOTE Reception takes 2-10 minutes. If the signal is weak, it can take up to 24 hours to get a valid signal. If signal reception is unsuccessful, place your unit next to a window.
Clock signal reception indicator:
| STRONG SIGNAL WEAK / NO SIGNAL | |
TO MANUALLY SET CLOCK
- Press and hold MODE.
- Press / to change setting options. The settings order is: country, city, display contrast, +/-1 time zone, 12/24 hour format, hour, minute, year, month-day / day-month, month, day and language.
- Press MODE to confirm.
NOTE The language options are English (E), German (D), French (F), Italian (I) and Spanish (S).
NOTE If the clock signal is valid, you are unable to manually set the time.
ALARM
TO SET ALARM
- Press ALARM to enter Alarm mode.
((•)) indicates in Alarm mode. - Press and hold ALARM to enter settings.
- Press ⚡️ / to set hour and minute.
- Press ALARM to confirm.
- Press MODE to return to clock display.
TO ACTIVATE / DEACTIVATE ALARM
- Press ALARM to enter Alarm mode.
((•)) indicates in Alarm mode. - Press ALARM repeatedly to activate or deactivate alarm. ▼ indicates alarm is On.
- Press MODE to confirm and return to clock display.
TO SILENCE ALARM
- Touch SNOOZE / LIGHT to snooze alarm for 8 minutes OR
- Press any key to turn the alarm off and activate it again after 24 hours.
DISPLAY CONTRAST
You can adjust the clarity level of the display. Press and hold MODE until "CONTR" is shown, then select from 0 (lowest) to 15 (highest) by pressing 🎨/ 🎨 for your preferred level of display contrast. Press MODE to confirm.
BACKLIGHT
Touch SNOOZE / LIGHT to activate backlight for 8 seconds (only when connected to stand).
RESET
Press RESET to return to the default settings.
MOUNTING / PLACING OF UNIT
To mount onto a wall:
Use the hole located at the back of the unit.
TIP Leave a small gap between the wall and the unit to prevent unit from heating up. Insufficient ventilation may distort indoor temperature / humidity readings.
To place on horizontal surface, such as desk:
Align unit with the stand. Place unit downwards and tilt slightly backwards to allow unit to lean on the stand.
SPECIFICATIONS
| MAIN UNIT | |
| Dimensions (L x W x H) 142 x 10 x 125 mm | |
| Weight 150 g without battery | |
| Temperature range -5°C to 50°C | |
| Humidity range 25% to 90% | |
| Power 2 x CR2032 batteries |
STAND
| Dimensions (L x W x H) 90 x 65 x 65 mm |
| Weight 56 g without battery |
| Power 3 x UM-4 (AAA) batteries |
REMOTE THERMO SENSOR (THN132N)
| Dimensions (L x W x H) 50 | x 29 x 95 mm |
| Weight 50 g without battery | |
| Temperature range -20°C to 60°C | |
| Signal frequency 433 MHz | |
| Transmission range 30 m | unobstructed |
| Transmission period | Approximately every 60 seconds |
| Number of channels 3 | |
| Power 1 x UM-3 (AA) 1.5V | battery |
PRECAUTIONS
- Do not subject the unit to excessive force, shock, dust, temperature or humidity.
- Do not cover the ventilation holes with any items such as newspapers, curtains etc.
- Do not immerse the unit in water. If you spill liquid over it, dry it immediately with a soft, lint-free cloth.
- Do not clean the unit with abrasive or corrosive materials.
- Do not tamper with the unit's internal components. This invalidates the warranty.
- Only use fresh batteries. Do not mix new and old batteries.
- Images shown in this manual may differ from the actual display.
- When disposing of this product, ensure it is collected separately for special treatment and not as normal household waste.
- Placement of this product on certain types of wood may result in damage to its finish for which Oregon Scientific will not be responsible. Consult the furniture manufacturer's care instructions for information.
- The contents of this manual may not be reproduced without the permission of the manufacturer.
- Do not dispose old batteries as unsorted municipal waste. Collection of such waste separately for special treatment is necessary.
- Please note that some units are equipped with a battery safety strip. Remove the strip from the battery compartment before first use.
NOTE The technical specifications for this product and the contents of the user manual are subject to change without notice.
NOTE Features and accessories will not be available in all countries. For more information, please contact your local retailer.
ABOUT OREGON SCIENTIFIC
Visit our website (www.oregonscientific.com) to learn more about Oregon Scientific products.
If you're in the US and would like to contact our Customer Care department directly, please visit: www2.oregonscientific.com/service/support.asp
For international inquiries, please visit: www2.oregonscientific.com/about/international.asp
EU-DECLARATION OF CONFORMITY
Hereby, Oregon Scientific, declares that this Slim multi-days weather station (model: WMH800) is in compliance with the essential requirements and other relevant provisions of Directive 1999/5/EC. A copy of the signed and dated Declaration of Conformity is available on request via our Oregon Scientific Customer Service.



COUNTRIES RTTE APPROVED COMPLIED
All EU countries, Switzerland and Norway CH N
natural_image
Diagram of a mechanical connector with four pins and mounting holes (no text or symbols)SENSOR TÉRMICO REMOTO (THN132N)
natural_image
Diagram of a mechanical connector with four pins and mounting holes (no text or symbols)- Batteriefach
FUNKSENDEEINHEIT
SO SCHALTEN SIE DEN ALARM STUMM
natural_image
Diagram of a mechanical component with four pins and mounting holes (no text or symbols)- Compartiment des piles
SONDE SANS FIL

EUROPE – DÉCLARATION DE CONFORMITÉ
natural_image
Diagram of a mechanical connector with three pins and mounting holes (no text or symbols)- Vano batterie
SENSORE REMOTO

natural_image
Diagram of a mechanical component with three pins and mounting holes (no text or symbols)- Batterijvak
BUITENSENSOR

WEERSINFORMATIESCHERM
REGIONALE WEERSINFORMATIE
WEERWAARSCHUWINGSBERICHTEN
natural_image
Diagram of a mechanical connector with four pins and mounting holes (no text or symbols)Para rever as mensagens:
natural_image
Diagram of a mechanical component with four pins and mounting holes (no text or symbols)- Batterifack
FJÄRRSENSOR
natural_image
White rectangular device with a central dot and labeled component '1' (no text or symbols on the body)
© 2010 Oregon Scientific. All rights reserved.
300102613-00001-10
- Slim Multi-days Weather Station
- Model: WMH800WMH800
- USER MANUAL
- CONTENTS
- INTRODUCTION
- OVERVIEW
- GETTING STARTED
- SET UP REMOTE SENSOR
- SET UP MAIN UNIT
- SET UP STAND
- DATA TRANSMISSION
- SENSOR
- For best results:
- WEATHER INFORMATION DISPLAY
- REGIONAL WEATHER INFORMATION
- To select a country:
- LOCAL TEMPERATURE AND HUMIDITY
- WEATHER WARNING MESSAGE
- CLOCK
- TO MANUALLY SET CLOCK
- ALARM
- TO SET ALARM
- TO ACTIVATE / DEACTIVATE ALARM
- TO SILENCE ALARM
- DISPLAY CONTRAST
- BACKLIGHT
- RESET
- MOUNTING / PLACING OF UNIT
- To mount onto a wall:
- To place on horizontal surface, such as desk:
- PRECAUTIONS
- ABOUT OREGON SCIENTIFIC
- EU-DECLARATION OF CONFORMITY
- COUNTRIES RTTE APPROVED COMPLIED
- FUNKSENDEEINHEIT
- SO SCHALTEN SIE DEN ALARM STUMM
- SONDE SANS FIL
- EUROPE – DÉCLARATION DE CONFORMITÉ
- SENSORE REMOTO
- WEERSINFORMATIESCHERM
- REGIONALE WEERSINFORMATIE
- WEERWAARSCHUWINGSBERICHTEN
Brand : OREGON SCIENTIFIC
Model : WMH 800
Category : Weather Station