
VT-1514 BK - Coffee maker Vitek - Free user manual and instructions
Find the device manual for free VT-1514 BK Vitek in PDF.


| Product Type | Automatic drip coffee maker |
| Brand | Vitek |
| Model | VT-1514 BK |
| Color | Black |
| Capacity | 10 cups (1.25 L) |
| Power | 850 W |
| Voltage | 220-240 V, 50/60 Hz |
| Dimensions (W x D x H) | 22.0 x 18.0 x 30.0 cm |
| Weight | 1.5 kg |
| Water Tank | Removable, transparent with level indicator |
| Filter Type | Permanent mesh filter (reusable) or paper filter No. 4 |
| Brewing Functions | Auto shut-off, keep warm plate, anti-drip system |
| Indicators | Power on light, water level markings |
| Carafe | Glass carafe with lid and handle, 10-cup capacity |
| Cleaning & Maintenance | Descale regularly with vinegar or citric acid solution; wash carafe and filter basket after each use |
| Safety Features | Auto shut-off when brew cycle ends; non-slip feet; cool-touch handle |
| Spare Parts Availability | Replacement carafe and filter basket available from Vitek service centers |
| Warranty | 1 year limited warranty |
Frequently Asked Questions - VT-1514 BK Vitek
User questions about VT-1514 BK Vitek
0 question about this device. Answer the ones you know or ask your own.
Ask a new question about this device
Download the instructions for your Coffee maker in PDF format for free! Find your manual VT-1514 BK - Vitek and take your electronic device back in hand. On this page are published all the documents necessary for the use of your device. VT-1514 BK by Vitek.
USER MANUAL VT-1514 BK Vitek
Рис. 1
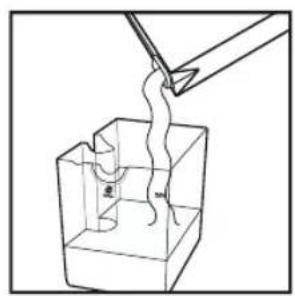
Рис. 2
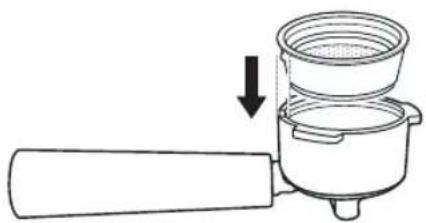
Рис. 3

Рис. 4

Рис. 5

Рис. 6

Рис. 7
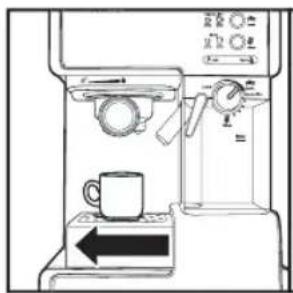


Рис. 8

Рис. 9
ENGLISH
COFFEE MAKER ESPRESSO/ CAPPUCCINO / LATTE
Description
- Cup warming tray
- Cappuccinator pipe
- Pull-out drip tray
- Pull-out tray lid
- Drip tray
- Drip tray lid
- Milk tank lid
- Cappuccinator pipe angle adjustment bar
- Frothed milk supply (intensity) knob
- Milk intake pipe
- Milk tank
- Control panel
- Coffee maker body
- On/Off button (I/O)
- Water tank lid
- Removable water tank
- Filter holder handle
- Filter clamp
- Filter holder
- Filter for one espresso cup
- Filter for two espresso cups
- Ground coffee measuring spoon with tamper
Control panel
-
Espresso button
-
Cappuccino button
-
Latte button
Attention!
- For additional protection it is reasonable to install a residual current device (RCD) with nominal operation current not exceeding 30 mA. To install RCD contact a specialist.
Safety measures
Read these instructions carefully before using the unit. Keep this instruction during the whole operation period.
Mishandling the unit can lead to its breakage and cause harm to the user or damage to his/her property.
Always observe the main safety measures when using electric appliances, namely:
- Read this instruction manual carefully.
- Use the coffee maker according to its intended purpose only.
- Make sure that the mains voltage corresponds to the voltage specified on the unit body.
• Use the socket with reliable grounding contact.
- In order to avoid fire do not use adapters for connecting the unit to the mains.
- Do not switch the coffee maker on if the water tank is empty.
• Use only the accessories supplied.
- Before switching the unit on, make sure that all removable parts are installed properly.
- Do not touch hot parts and surfaces of the coffee maker.
- Be careful while operating with outgoing steam.
- Do not remove the filter holder during coffee maker operation.
- Place the unit on a flat steady surface.
- To avoid fire, electric shock or physical injuries do not immerse the electric cord, the plug or the coffee maker body into water or other liquids.
- Unplug the coffee maker if you don't use it and before cleaning.
- To disconnect the coffee maker from the mains switch it off by pressing the button (14) and then remove the power plug from the socket.
- Do not let the power cord hang over the edge of the table and touch hot surfaces.
- Do not place the coffee maker on hot surfaces.
- Do not use the coffee maker outdoors.
- Do not leave the coffee maker in places with the temperature below 0°C.
- For children safety reasons do not leave polyethylene bags, used as a packaging, unattended.
- Attention! Do not allow children to play with polyethylene bags or film. Danger of suffocation!
- Do not allow children to use the unit as a toy.
- Do not leave the operating unit unattended; be especially careful if children or disabled persons are near the operating unit.
- This unit is not intended for usage by children or disabled persons unless they are given all the necessary instructions by a person who is responsible for their safety on safety measures and information about danger that can be caused by improper usage of the unit.
- Do not use the coffee maker if the power cord or the plug is damaged, if the unit mal-
ENGLISH
functions or if there are other damages in the unit.
- Do not repair the coffee maker by yourself; always apply to the authorized service center.
• Make sure that the unit is switched off.
- Attention! Before using the coffee maker for the first time remove the red rubber plug from the water tank (16).
- Before using the coffee maker for the first time, wash all removable parts with warm water and dry them.
- Before switching the unit on, make sure that the mains voltage corresponds to the voltage specified on the unit body.
- Remove the water tank (16), fill it with cold water till the MAX mark and install it back to its place (pic. 1).
- Remove the milk tank (11), fill it with cold water till the MAX mark as well and install it back to its place (pic. 2).
- Select one of the coffee filters (20 or 21), and insert it into the holder (19), matching the ledge on the filter with the hole on the holder (19) and turn the filter clockwise/anticlockwise (pic. 3, 4).
- Install the filter holder into the coffee maker. Holder ledges (19) should match the groves on the boiler (pic. 5) and then turn the filter holder handle (17) to the right till bumping (pic. 6, 7).
- Place a corresponding cup on the respective tray (3 or 5) and turn the cappuccinator pipe (2) to the cup using the bar (8) (pic. 8).
- Insert the power plug into the mains socket.
- Switch the coffee maker on by pressing the button (14), the illumination of the buttons (23, 24 and 25) on the control panel will start flashing.
- When the illumination stops flashing, press and hold the espresso button (23) for 3 seconds. Let the water run for 80-90 seconds.
- Press the button (23) once again to switch water supply off.
- Select the washing mode "Cleaning" by turning the frothed milk supply knob (9).
- Then press and hold the cappuccino button (24) for 3 seconds. Let the water run for 80-90 seconds.
- Press the button (24) once again to switch water supply off.
- The illumination of control buttons will light up constantly, that means that the unit is ready for operation and the boiler is clean.
Attention!
- Do not remove the filter holder (19) during the unit operation.
- Do not remove the filter holder (19) immediately after preparing coffee as there is redundant water and steam pressure inside, let the coffee maker cool down completely.
- To remove the filter holder (19) turn the handle to the left and remove the holder.
Choosing the appropriate cup
| Drink Estimated | volume of the ready product | |
| Espresso One cup | Two cups | 30-40 ml70-80 ml |
| Cappuccino | One cup | 170 ml280 ml |
| Two cups | ||
| Latte | One cup | 340 ml |
| Two cups | 430 ml | |
Note:
- The cups should be preliminary heated up, to do this, put the cups on the tray (1) while water heats up in the boiler.
Making espresso
• Make sure that the unit is switched off.
- Remove the water tank (16), fill it with cold water and install back to its place (pic. 1).
- Select one of the coffee filters (20 or 21), and insert it into the holder (19), matching the ledge on the filter with the hole on the holder (19) and turn the filter clockwise/anticlockwise (pic. 3, 4).
- Add ground coffee into the filter: 2 full measuring spoons - to make two coffee cups and 1 full spoon - to make one coffee cup, make even and slightly tamp the ground coffee with the back side of the measuring spoon (22).
ENGLISH
• Install the filter holder into the coffee maker. Holder ledges (19) should match the groves on the boiler (pic. 5) and then turn the filter holder handle (17) to the right till bumping (pic. 6, 7).
- Place a corresponding cup on a respective tray (3 or 5) and turn the cappuccinator pipe (2) to the cup using the bar (8) (pic. 8).
- Insert the power plug into the mains socket.
- Switch the coffee maker on by pressing the button (14), the illumination of the buttons (23, 24 and 25) on the control panel will start flashing.
Note: If you don't use the unit for 15 minutes, it will switch to the stand-by mode automatically for safety reasons (boiler heating is switched off, the illumination of control buttons goes out). Press any control button to switch back the operating mode.
- When the control buttons stop flashing, press the espresso button (23) once to make one coffee cup (30-40 ml).
Note: Illumination of the button (23) stops flashing before the others - it is normal. - Press the button (23) twice to make two cups of espresso.
- Press and hold the button (23) for 3 seconds to make espresso at your discretion. The unit can make up to 150 ml espresso and then will be switched off.
- At your discretion you can switch the coffee supply off by pressing the button (23) again.
Note: Repeated making of coffee should be performed after at least 5 min interval.
Making cappuccino
Attention! Be careful not to get burns by the outgoing steam.
• Make sure that the unit is switched off.
- Remove the water tank (16), fill it with cold water and install back to its place (pic. 1).
- Remove the milk tank (11), fill it with milk as well and install back to its place (pic. 2).
- Add ground coffee into the filter: 2 full measuring spoons - to make two coffee cups and 1 full spoon - to make one coffee cup, make even and slightly tamp the ground coffee with the back side of the measuring spoon (22).
• Install the filter holder into the coffee maker. Holder ledges (19) should match the groves
on the boiler (pic. 5) and then turn the filter holder handle (17) to the right till bumping (pic. 6, 7).
- Place a corresponding cup on the respective tray (3 or 5) and turn the cappuccinator pipe (2) to the cup using the bar (8) (pic. 8).
- Insert the power plug into the mains socket.
- Switch the coffee maker on by pressing the button (14).
- The illumination of the buttons (23, 24 and 25) on the control panel will start flashing.
- Select the "Cappuccino" mode by turning the frothed milk supply knob (9).
Note: If you don't use the unit for 15 minutes, it will switch to the stand-by mode automatically for safety reasons (boiler heating is switched off, the illumination of control buttons goes out). Press any control button to switch back the operating mode.
- When the control buttons stop flashing, press the cappuccino button (24) once to make one cup of cappuccino.
- Press the button (24) twice to make two cups of cappuccino.
Making latte
Attention! Be careful not to get burns by the outgoing steam.
• Make sure that the unit is switched off.
- Remove the water tank (16), fill it with cold water and install back to its place (pic. 1).
- Remove the milk tank (11), fill it with milk as well and install back to its place (pic. 2).
- Add ground coffee into the filter: 2 full measuring spoons - to make two coffee cups and 1 full spoon - to make one coffee cup, make even and slightly tamp the ground coffee with the back side of the measuring spoon (22).
- Install the filter holder into the coffee maker. Holder ledges (19) should match the groves on the boiler (pic. 5) and then turn the filter holder handle (17) to the right till bumping (pic. 6, 7).
- Place a corresponding cup on the respective tray (3 or 5) and turn the cappuccinator pipe (2) to the cup using the bar (8) (pic. 8).
- Insert the power plug into the mains socket.
- Switch the coffee maker on by pressing the button (14).
ENGLISH
- The illumination of the buttons (23, 24 and 25) on the control panel will start flashing.
- Select the "Latte" mode by turning the frothed milk supply knob (9).
Note: If you don't use the unit for 15 minutes, it will switch to the stand-by mode automatically for safety reasons (boiler heating is switched off, the illumination of control buttons goes out). Press any control button to switch back the operating mode. - When the control buttons stop flashing, press the latte button (25) once to make one cup of latte.
- Press the button (25) twice to make two cups of latte.
Making frothed milk
You can make necessary amount of frothed milk anytime. You can use the frothed milk for making hot chocolate, macchiato, chai tea etc.
- Press and hold the button (24) for 3 seconds to make frothed milk.
- You can switch this function off by pressing the button (24) again at your discretion.
- It is important that milk for making frothed milk is fresh and without additives, i.e. so-called long storage milk is not suitable for this purpose. Take usual whole milk with fat content from 4 to 6%, cream fat content should be not less than 10%.
- In case there is some milk or cream left in the tank (11) after making coffee, you can remove the milk tank and put it in the fridge (pic. 9).
How to make a good espresso
- Use fresh ground coffee for “espresso” coffee makers.
- Make even and slightly tamp the ground coffee in the filter (20 or 21), you can do it with the back side of the measuring spoon (22).
- Coffee strength depends on the quality and grinding of coffee beans. If coffee is pouring out too long, this means the coffee powder is too fine or it is tamped too strongly.
Cleaning of the cappuccinator pipe and the milk tank
Attention! Clean the cappuccinator pipe after every use.
- Make sure that there is enough water in the water tank (16).
- Clean the cappuccinator pipe (2) right after milk or cream frothing - put the corresponding cup on the tray (5) and turn the cappuccinator pipe (2) to the cup using the bar (8).
- Set the frothed milk supply (intensity) knob (9) to the «Cleaning» position.
- Press and hold the button (25) for 3 seconds to activate cleaning mode. Cleaning cycle takes about 30 seconds. Pour out the water and the rest of milk from the cup.
- Remove the milk tank from the unit body and remove the lid (7).
- Slightly pull the cappuccinator pipe angle adjustment bar and remove it.
- Remove the milk intake pipe (10).
- Wash all the details and the lid itself with warm water and dry them thoroughly.
- You can wash the milk tank in a dish washing machine.
• Install the cappuccinator pipe and the milk intake pipe back to its place.
Descaling
For effective operation of the coffee maker we recommend removing scale every 2-3 months and more often when using “hard” water.
• Make sure that the unit is switched off.
- Make citric acid solution: 2 teaspoons and 1 l of water and pour this solution into the water tank (16). Install the water tank (16) back to its place.
- Remove the milk tank (11), fill it with cold water till the MAX mark as well and install back to its place (pic. 2).
- Select one of the coffee filters (20 or 21), and insert it into the holder (19), matching the ledge on the filter with the hole on the holder (19) and turn the filter clockwise/anticlockwise (pic. 3, 4).
• Install the filter holder into the coffee maker. Holder ledges (19) should match the groves on the boiler (pic. 5) and then turn the filter holder handle (17) to the right (pic. 6, 7).
- Place the corresponding cup on the respective tray (3 or 5) and turn the cappuccinator pipe (2) to the cup using the bar (8) (pic. 8).
- Insert the power plug into the mains socket.
- Switch the coffee maker on by pressing the button (14), the illumination of the buttons
ENGLISH
(23, 24 and 25) on the control panel will start flashing.
- When the control buttons stop flashing, press the espresso button (23) twice.
- Repeat the boiler cleaning procedure with small intervals till there is no citric acid solution in the tank.
- After finishing of the cleaning process fill the tank (16) with water and repeat this procedure 2-3 times to wash off the rest of citric acid or descaling reagent.
Note:
- To remove scale you can use special scale removers, strictly following the instructions on their usage.
Cleaning
- Cleaning the filters (20, 21): you can wash the filters in a dish washing machine. If the openings are blocked with the ground cof-
fee remnants, you can clean the filters with a small brush.
- Wipe the coffee maker body with a soft damp cloth. Do not use metal brushes or abrasives.
- Do not immerse the coffee maker body into water or other liquids.
- Wash the removable parts of the coffee maker with warm water and a soft detergent.
Drip trays
- Remove the lid from the tray, remove the tray and pour out water, put the tray back to its place, put the grid on the tray.
- If necessary, wash the trays and the lids with water and soft detergent, then rinse and dry.
Troubleshooting
Technical specifications
| Failure Cause Solution | ||
| The unit cannot be switched on | No voltage in the socket.The plug is not completely inserted into the socket. | Make sure that the socket is operating.Check whether the plug is completely inserted into the socket. |
| Water leaks from the lower part of the unit | The water tray is overfilled. Pour out | water from the tray. |
| Coffee leakage from the filter holder | Loose connection of filter and boiler gasket, ground coffee got on the edges of the filter. | Clean the edges of the filter. |
| Coffee has a foreign smell | Wrong process of scale removal in the boilerImproper storage of coffee | See chapters«Before using the unit», «Descaling» and repeat described process several times.Use fresh ground coffee.Keep coffee in a dry cool place. |
| Steam doesn't froth the milk | Low temperature of the outgoing steam.The container is too big or of improper size.You used skimmed milk | Froth milk only after the illumination of control buttons stops flashing.Use narrow high container for frothed milk.Use only whole milk with fat content 4-6%. |
| All indicators and control buttons illumination flash. | The water tank (16) is empty. | Fill the water tank (16) with water. |
ENGLISH
Removable water tank volume: 1.65 L
Power supply: 220-240 V, \~ 50 Hz
Power consumption: 1050–1238 W
The manufacturer preserves the right to change the design and the specifications of the unit without a preliminary notification.
Unit operating life is 5 years
Guarantee
Details regarding guarantee conditions can be obtained from the dealer from whom the appliance was purchased. The bill of sale or receipt must be produced when making any claim under the terms of this guarantee.

This product conforms to the EMC-Requirements as laid down by the Council Directive 89/336/EEC and to the Low Voltage Regulation (73/23 EEC)
DEUTSCH
KAFFEEMASCHINE FÜR ESPRESSO/ CAPPUCCINO/LATTE
Beschreibung
• Sut olish naychasini (10) oling.
• Qopqoq qismlari bilan qopqoqning o'zini iliq nd suvda yuving, yaxshilab quriting.
- Sut idishini idishi yuvadigan mashinada yuvish mumkin.
- Kapuchino tayyorlovchi naycha bilan sut olish naychasini joyiga biriktirib qo'ying.
Ўзбек
Quyqani tozalash
Qahva qaynatgich samarali ishlashi uchun har 2-3 oyda quyqasini tozalab turish kerak, «qattiq» suv ishlatilsa bundan ham kamroq vaqtda tozalanadi.
A production date of the item is indicated in the serial number on the technical data plate. A serial number is an eleven-unit number, with the first four figures indicating the production date. For example, serial number 0606xxxxxxx means that the item was manufactured in June (the sixth month) 2006.
DE



- ENGLISH
- COFFEE MAKER ESPRESSO/ CAPPUCCINO / LATTE
- DESCRIPTION
- CONTROL PANEL
- ATTENTION
- SAFETY MEASURES
- NOTE
- MAKING ESPRESSO
- MAKING CAPPUCCINO
- MAKING LATTE
- MAKING FROTHED MILK
- HOW TO MAKE A GOOD ESPRESSO
- CLEANING OF THE CAPPUCCINATOR PIPE AND THE MILK TANK
- DESCALING
- CLEANING
- DRIP TRAYS
- TROUBLESHOOTING
- TECHNICAL SPECIFICATIONS
- DEUTSCH
- KAFFEEMASCHINE FÜR ESPRESSO/ CAPPUCCINO/LATTE
- BESCHREIBUNG
- ЎЗБЕК
- QUYQANI TOZALASH
- DE
Brand : Vitek
Model : VT-1514 BK
Category : Coffee maker