16260007 - Bread maker Melissa - Free user manual and instructions
Find the device manual for free 16260007 Melissa in PDF.


| Product Type | Bread Maker |
| Brand | Melissa |
| Model | 16260007 |
| Dimensions (H x W x D) | 35 cm x 30 cm x 25 cm |
| Weight | 4.5 kg |
| Power Supply | 220-240 V, 50-60 Hz, 600 W |
| Bread Capacity | Up to 1 kg (2 lb) |
| Number of Programs | 12 preset programs |
| Programs | Basic, French, Whole Wheat, Sweet, Gluten-Free, Dough, Jam, Cake, Quick, Ultra-Fast, Sandwich, Bake |
| Crust Control | 3 settings (light, medium, dark) |
| Timer Delay | Up to 13 hours |
| Keep Warm Function | Yes, up to 1 hour after baking |
| Display | LED digital display |
| Viewing Window | Transparent lid for monitoring |
| Material | Stainless steel body, non-stick bread pan |
| Safety Features | Non-slip feet, cool-touch handle, automatic shut-off |
| Cleaning and Maintenance | Wipe exterior with damp cloth; wash bread pan, kneading paddle, and measuring tools in warm soapy water |
| Spare Parts | Bread pan, kneading paddle, measuring cup, measuring spoon |
| Included Accessories | Bread pan, kneading paddle, measuring cup, measuring spoon, user manual |
| Warranty | 2 years |
Frequently Asked Questions - 16260007 Melissa
User questions about 16260007 Melissa
0 question about this device. Answer the ones you know or ask your own.
Ask a new question about this device
Download the instructions for your Bread maker in PDF format for free! Find your manual 16260007 - Melissa and take your electronic device back in hand. On this page are published all the documents necessary for the use of your device. 16260007 by Melissa.
USER MANUAL 16260007 Melissa
natural_image
White rice cooker with digital display and control buttons (no visible text or symbols)SE Bakmaskin 2
DK Bagemaskine 10
NO Brødbakemaskin....18
FI Leipäkone 26
UK Bread maker 34
DE Brotbackmaschine 42
PL Robot do pieczenia pieczywa ....50
RU Хлебопекарное устройство....58
SE
INTRODUKTION
FÖRBEREDA BAKMASKINEN

KLARGJ∅RE BR∅DBAKEMASKINEN
Hver eneste brødbakemaskin blir kontrollert på fabrikken, men av hensyn til sikkerheten bør du kontrollere at brødbakemaskinen ikke er blitt skadet under transport når du pakker den ut hjemme. Hvis du har mistanke om at brødbakemaskinen er skadet, skal du kontakte butikken der du kjøpte den. Ikke bruk brødbakemaskinen før den er kontrollert av en autorisert fagperson.
Før du bruker brødbakemaskinen, skal du forsikre deg om at du har fjernet all emballasje, både utvendig og innvendig.
LEIPÄKONEEN VALMISTELEMINEN
To get the best out of your new breadmaker, please read through these instructions carefully before using it for the first time. Pay particular attention to the safety measures. We also recommend that you keep the instructions for future reference, so that you can remind yourself of the functions of the breadmaker.
IMPORTANT SAFETY MEASURES
- The breadmaker may only be used for its original purpose.
• T his breadmaker is not suitable for commercial or outdoor use.
- Do not use the breadmaker if the cord or plug is damaged, if it is not functioning properly, or if it has been damaged by a heavy impact or similar.
- The breadmaker may only be connected to 230 V, 50 Hz.
- Do not block or cover the ventilation openings on the breadmaker.
- Do not switch the breadmaker on when it is empty.
- The breadmaker or cord must not be submerged in water or any other liquid. Do not use the appliance if your hands are wet or damp.
- The breadmaker and cord must not be exposed to strong heat, direct sunlight, humidity, sharp edges or similar.
- Do not allow the cord to hang over the edge of the counter, and keep it away from hot objects and naked flames.
- Only use accessories recommended by the manufacturer.
- N ever leave the breadmaker unattended when in use and keep an eye on children.
- T he baking pan, heating element and baking chamber become very hot during baking. Do not touch them before they have cooled down completely!
- Remove the plug from the socket after use, when cleaning or replacing accessories or if the breadmaker does not function normally. Switch the breadmaker off using the START/STOP button before unplugging it.
- A void pulling the cord when removing the plug from the socket. Instead, hold the plug.
• N ever try to repair the breadmaker yourself.
- If the breadmaker, cord or plug needs to be repaired, it should be taken to an authorised service centre. If the appliance is subjected to unauthorised repairs, the guarantee will become void. Contact your retailer if the repairs fall under the terms of the guarantee.
- Lid
- Carrying handle
- Baking chamber
- Heating element
- Cord and plug
- Control panel
- Kneading paddle
- Baking pan
- Display
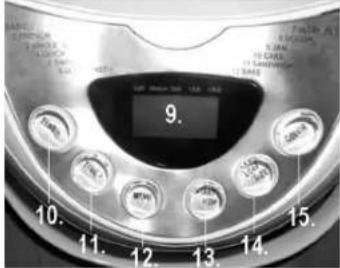
Buttons on the control panel:
-
TIME- (time setting down)
-
TIME+ (time setting up)
-
MENU (programme)
-
START/STOP
-
LOAF SIZE
-
COLOUR (crust)

Each individual breadmaker is checked at the factory, but for safety's sake, after unpacking the breadmaker, you should check carefully that it has not been damaged during transport. If it appears that the breadmaker has been damaged, you must contact the shop where you bought it, and do not use it until it has been checked by an authorised specialist.
Before using the breadmaker, you should check that you have removed all packaging from it both inside and out.
Before using your breadmaker for the first time
The non-stick coating on the baking pan must be cleaned before use.
- Remove the baking pan (8) from the baking chamber (3) by turning it anti-clockwise slightly and lifting it out.
- C lean the baking chamber, heating element (4) and baking pan.
- Plug in. A long beep is heard and the display (9) shows 1 3:00. This means that the breadmaker is set to programme 1, and the cooking time is 3 hours.
- G r ease the inside of the baking pan with butter or oil and place it in the baking chamber (must be twisted into place).
- P r ess the MENU (12) button repeatedly until the display shows 12 1:00 (programme 12, cooking time 1 hour), and switch on the breadmaker using the START/STOP button (13). The breadmaker begins to bake.
- Allow the baking pan to bake empty for about 10 minutes.
- Switch off the breadmaker by pressing and holding the START/STOP button for approximately 3 seconds until you hear a beep. The breadmaker has now been switched off. Open the lid and allow the baking pan to cool. Note that the display is reset to 1 3:00 when the breadmaker is switched off.
- C lean the baking chamber, heating element and baking pan again.
The buttons on the control panel (6) have the following functions:.
BUTTON FUNCTION
TIME- (10) and TIME+ (11) Used to set the timer function. Does not function in programmes 6 and 7.
MENU (12) Switches between the breadmaker's 12 programmes. The number of the current programme is shown on the display.
| START/STOP (13) | Starts or stops the selected programme. Press and hold the button for approximately 1 second to start the programme and for approximately 3 seconds to stop the programme. |
| LOAF SIZE (14) | Used to specify the bread size. You can choose between 1.0 lb (around 500 g) and 1.5 lb (around 750 g), depending on how many ingredients are placed in the baking pan. (The recipes in the "Recipes" section contain quantities for both bread sizes). The selected setting is shown by means of an arrow on the display. Please note! This button does not function in programmes 4, 6, 7, 8, 9,10 and 12. |
| COLOR (15) | Used to select how dark the bread crust will be. The button switched between Light, Medium and Dark. The selected setting is shown by means of an arrow on the display. Please note! This button does not function in programmes 8-12. |
The breadmaker's programmes
The breadmaker contains the following programmes. The programmes and programme numbers are on the lid so they are easy to find when you are using the breadmaker.
No. Name Use Duration
| 1 | BASIC | Kneading, proving and baking of basic bread | 3 t |
| 2 | FRENCH | Kneading, proving and baking with a longer proving time | 3 t 50 m |
| 3 | WHOLE WHEAT | Kneading, proving and baking of whole wheat bread | 3 t 40 m |
| 4 | QUICK | Kneading, proving and baking with baking powder | 1 t 40 m |
| 5 | SWEET | Kneading, proving and baking of cake or sweet bread | 2 t 55 m |
| 6 | ULTRA FAST I | Kneading, proving and baking of 500 g bread in a short time | 0 t 58 m |
| 7 | ULTRA FAST II | Kneading, proving and baking of 750 g bread in a short time | 0 t 58 m |
| 8 | DOUGH | Kneading and proving of up to 650 g of dough, no baking | 1 t 30 m |
| 9 | JAM | Kneading, proving and baking of cake with baking powder | 1 t 20 m |
| 10 | CAKE | Kneading, proving and baking of cake with baking powder | 2 t 50 m |
| 11 | SANDWICH | Kneading, proving and baking of sandwich bread | 3 t |
| 12 | BAKE | Baking without kneading and proving | 1 t |
Tips!
Ingredients
Yeast
- The best results are achieved with dried yeast. Use a fast-acting dried yeast when using programmes 6 and 7.
- If fresh yeast is used, the yeast must be dissolved in liquid before it is mixed with the other ingredients. Please note! If fresh yeast is used, the timer function cannot be used, as the proving starts immediately.
- Y east is best used at a temperature of around 37irc C. Fermentation starts when the yeast comes into contact with liquid.
Seeds
- Seeds, grains, nuts or similar increase the nutritional value of the bread and improve its taste.
Flour
- Any flour type with a high gluten content can be used. The type of flour selected determines the consistency, appearance and taste of the bread. Wheat flour rises most, while rye flour and bolted flour rise least.
- To make baking easier, try using a bread mix to which you only have to add water and yeast. Please note! If the bread is made from a ready-made mixture, no more than 650 g flour should be used.
- When the flour is mixed with water, gluten is formed, and the bread becomes airy. The higher the gluten content of the flour, the bigger the bread.
Salt
- Salt activates fermentation and makes the dough flexible.
Button/oil
- Button or oil gives the bread a rounded, full taste and makes it flexible.
Sugar
- Sugar promotes proving and makes the bread sweet and tasty. It also makes the bread soft and the surface brown.
• Y ou can also use honey instead of sugar.
Liquid
- Water, milk or curdled milk products can be used for baking. Milk improves the taste and results in a crispy crust, but if milk only is used, the bread will be a little smaller.
Baking advice
If the bread is to be baked immediately
- The liquid must be lukewarm (around 37ircC ), so fermentation starts immediately.
- Grains for granary bread should be boiled for a few minutes to soften them.
• Y ou can also use fresh yeast instead of dried yeast.
• C akes should be baked immediately.
If bread is baked using the timer function
- The liquid should be at room temperature.
- Ensure that the yeast does not come into contact with the liquid otherwise the fermentation will start too early – pour the liquid into the baking pan and place the yeast on top.
- Seeds or grains for granary bread do not need to be boiled but can be soaked in liquid.
Tips
- Never fill the baking pan with ingredients completely, as the dough will expand as it rises.
- If you have a ready-made dough, it can be baked in the machine without kneading and proving (use programme 12).
- If you want to mix a dough (e.g. for buns or pizza) for baking in an ordinary oven, you can use programme 8.
- The breadmaker is best suited for baking bread, but it is also possible to bake cakes, preferably without too much fat. Try your own recipes or ready-made cake mixes.
Operating the breadmaker
- Remove the baking pan, and fit the kneading paddle in the baking pan (unless you use programme 12, when the dough is not kneaded).
- Place the ingredients in the baking pan.
- The ingredients must be at room temperature (18-23°C) and must be added in the order given in the recipe!
- Dried yeast must be added last and placed in a small depression in the flour.
- Sugar, salt and other spices should be distributed evenly over the rest of the ingredients.
- Place the baking pan in the baking chamber.
- Close the lid.
- Plug in.
- Select the required programme and bread size and crust colour, if required.
- Set the timer function, if required (see below).
- Press the START/STOP button. The colon in the display flashes and the programme starts.
- Baking consists of the following processes: kneading/resting, proving, baking and keeping warm after baking has finished.
- During kneading, the breadmaker will buzz as the kneading paddle rotates. This is perfectly normal.
- If you have set the timer function, the programme will start once the timer has stopped (see below). The colon in the display flashes will continue to flash.
- If you have selected programme 1, 2, 3, 5 or 11, the breadmaker beeps several times, the second time it kneads in order to indicate that fruit or nuts, etc. can be added.
- During baking, steam can rise from the ventilation openings in the lid. This is perfectly normal.
- Do not open the lid before baking ends as this may affect the quality of the bread, particularly its ability to rise.
- Once the programme has finished, the breadmaker beeps once. The breadmaker then keeps the bread warm for 1 hour, after which 10 beeps are heard and the breadmaker switches off. You can stop the breadmaker's keep-warm function before the hour has passed by pressing and holding the START/STOP button for approximately 3 seconds.
- Open the lid and remove the baking pan. Important! The baking pan is very hot after baking! Always use an oven glove or similar when removing the baking pan and do not place it on a surface that may be damaged by the heat.
- Remove the plug from the socket.
- Please note that the kneading paddle may stick to the bread when you remove it from the baking pan!
- Important! Only use plastic or wooden utensils when releasing the bread from the baking pan, as the non-stick coating may be damaged if you use metal utensils.
Using the timer function
The breadmaker can be set to start with a delay. For instance you can set it in the evening to start early the next morning. Press TIME+ to increase the delay by 10 minutes and TIME- to reduce it by 10 minutes. Enter the time required up until the bread has finished baking.
EXAMPLE:
It is currently 9 pm and you want the bread to finish baking at 7 am the next morning. This is a difference of 10 hours, so press TIME+ until 10.00 is shown on the display, and then press Start.
- Important! Do not use perishable ingredients such as milk or eggs when using the timer function.
Warning messages
Message
Meaning
H:HH The display shows this message when you start the breadmaker if the temperature in the baking chamber is too high. Stop the breadmaker, open the lid and allow the breadmaker to cool for 10-20 minutes.
E:EE The display shows this message when you start the breadmaker if the temperature sensor is faulty. Take the appliance to an authorised service centre.
FOR UNITED KINGDOM ONLY
Plug wiring:
This product is fitted with a BS 1363 13-amp plug. If you have to replace the fuse, only those that are ASTA or BSI approved to BS1362 and with a rated current of 13 amps should be used. If there is a fuse cover fitted,
this cover must be refitted after changing the fuse. If the fuse cover is lost or damaged, the plug must not be used. You must also check if the socket outlets in your home fit with the plug of the appliance. If the socket outlet in your home does not fit with the plug, the plug must be removed and disposed of safely as insertion of the plug into the socket is likely to cause electric hazard. A replacement plug should be wired according to following description.
Important
This appliance must be earthed. The wires in the cord set are coloured thus:
BLUE- Neutral, Brown-Live, Green& Yellow-earth (For detachable plug only)
As the colours of the wires in the mains lead of this appliance may not correspond with the coloured markings identifying the terminals in your plug, proceed as follows:
The wire that is coloured Green& Yellow must be connected to the terminal in the plug that is marked with the letter E or by the earth symbol, or coloured green& yellow.
The wire that is coloured blue must be connected to the terminal that is marked with the letter N or coloured black.
The wire that is couloured brown must be connected to the terminal that is marked with the letter L or coloured red.
RECIPES
To start with follow the quantities specified in the recipes below, and be particularly careful with the quantity of flour and liquid. Follow the procedure in the "Operating the breadmaker" section.
Feel free to experiment with the recipes. Follow the advice in "Tips". Programmes 1 and 3 are suitable for most common bread types.
Bread type Ingredients Bread size Programme Remarks
1.5 lb 1.0 lb
| White bread | Water | 280 ml | 180 ml | 2 | |
| Salt | 1 tsp | 3/4 tsp | |||
| Sugar | 1 tbsp | 3/4 tbsp | |||
| Durum flour | 120 g | 80 g | |||
| Wheat flour | 750 ml | 500 ml | |||
| Yeast | 1,5 tsp | 1,5 tsp | |||
| French bread | Water | 280 ml | 190 ml | 1 | |
| Salt | 1 tsp | 1 tsp | |||
| Vegetable oil | 3/4 tbsp | 1 tbsp | |||
| Wheat flour | 680 ml | 500 ml | |||
| Durum flour | 80 ml | 60 ml | |||
| Sugar | 1 tbsp | 1 tbsp | |||
| Yeast | 1,5 tsp | 1,5 tsp | |||
| Raisin loaf with nuts | Water or milk | 280 ml | 180 ml | 1 (5) | Add the nuts and raisins after the first kneading when the signal is heard. If programme 5 is used, you must not use the 1.5 lb bread size |
| Butter or margarine | 25 g | 18 g | |||
| Salt | 0,5 tsp | 0,5 tsp | |||
| Sugar | 1 tbsp | 1 tbsp | |||
| Wheat flour | 680 ml | 450 ml | |||
| Yeast | 1,5 tsp | 1,5 tsp | |||
| Raisin | 50 g | 35 g | |||
| Chopped walnuts | 50 g | 20 g | |||
| Italian bread | Water | 290 ml | 190 ml | 11 | |
| Salt | 1 tsp | 1 tsp | |||
| Vegetable oil | 3/4 tbsp | 2/3 tbsp | |||
| Sugar | 1 tbsp | 1 tbsp | |||
| Wheat flour | 665 ml | 416 ml | |||
| Corn flour | 80 g | 50 g | |||
| Yeast | 1,5 tsp | 1,5 tsp | |||
| Oat bread | Water | 280 ml | 180 ml | 1 | |
| Butter or margarine | 20 g | 15 g | |||
| Salt | 1 tsp | 1 tbsp | |||
| Brown sugar | 1 tbsp | 1 tbsp | |||
| Finely-ground oatmeal | 120 g | 80 g | |||
| Wheat flour | 580 ml | 375 ml | |||
| Yeast | 1,5 tsp | 1,5 tsp | |||
| Buttermilk bread | Buttermilk | - | 180 ml | 2 | May only be baked in the 1.0 lb bread size as the bread will otherwise be too big. |
| Salt | 1 tsp | ||||
| Sugar | 1 tbsp | ||||
| Wheat flour | 500 ml | ||||
| Yeast | 1,5 tsp | ||||
| Full milk French bread | Milk | - | 180 ml | 1 | May only be baked in the 1.0 lb bread size as the bread will otherwise be too big. |
| Butter or margarine | 20 g | ||||
| Salt | 1 tsp | ||||
| Sugar | 1 tsp | ||||
| Wheat flour | 500 ml | ||||
| Yeast | 1,5 tsp |
Bread type Ingredients Bread size Programme Remarks
1.5 lb 1.0 lb
| Coarse wheat bread | Water | 360 ml | 290 ml | 1 | |
| Butter or margarine | 25 g | 20 g | |||
| Salt | 1 tsp | 1 tsp | |||
| Sugar | 1 tsp | 1 tsp | |||
| Wheat flour | 375 ml | 250 ml | |||
| Coarse wheat flour | 375 ml | 250 ml | |||
| Yeast | 2 tsp | 2 tsp | |||
| Raisin bread | Water | 280 ml | 180 ml | 5 | Add the nuts and raisins after the first kneading when the signal is heard. |
| Butter or margarine | 25 g | 15 g | |||
| Salt | 0,5 tsp | 0,5 tsp | |||
| Honey | 2 tbsp | 1 tbsp | |||
| Wheat flour | 750 ml | 500 ml | |||
| Yeast | 1,5 tsp | 1,5 tsp | |||
| Raisins/dried fruit | 50 g | 40 g | |||
| Potato bread | Water or milk | 260 ml | 170 ml | ||
| Butter or margarine | 20 g | 25 g | |||
| Eggs | 1 | 1 | |||
| Boiled, mashed potatoes | 120 g | 80 g | |||
| Salt | 1 tsp | 1 tsp | |||
| Sugar | 1,5 tbsp | 1 tbsp | |||
| Wheat flour | 665 ml | 440 ml | |||
| Yeast | 2 tsp | 2 tsp | |||
| Wholemeal bread | Water | 280 ml | 180 ml | 2 | The dried sourdough improves the consistency of the bread |
| Salt | 1 tsp | 1 tsp | |||
| Dried sourdough | 20 g | 15 g | |||
| Wheat flour | 750 ml | 500 ml | |||
| Sugar | 1 tbsp | 3/4 tbsp | |||
| Yeast | 1,5 tsp | 1,5 tsp | |||
| Graham bread | Water | 270 ml | 170 ml | 3 | |
| Salt | 1 tsp | 1 tsp | |||
| Butter or margarine | 20 g | 15 g | |||
| Honey | 1 tbsp | 1 tbsp | |||
| Vinegar | 3/4 tsp | 3/4 tsp | |||
| Graham flour | 750 ml | 500 ml | |||
| Yeast | 2 tsp | 2 tsp | |||
| Onion bread | Water | 290 ml | 180 ml | 1 | |
| Salt | 1 tsp | 1 tsp | |||
| Sugar | 1,5 tbsp | 1 tbsp | |||
| Fried onions | 30 g | 20 g | |||
| Wheat flour | 750 ml | 500 ml | |||
| Yeast | 1,5 tsp | 1,5 tsp | |||
| Apple cake with nuts | Eggs | 1 | - | ||
| Milk | 80 ml | ||||
| Oil | 2 tbsp | 4 | |||
| Sugar | 125 ml | ||||
| Peeled, grated apple | 250 ml | ||||
| Chopped walnuts | 125 ml | ||||
| Wheat flour | 500 ml | ||||
| Bicarbonate of soda | 1 tsp | ||||
| Baking powder | 1 tsp | ||||
| Salt | 0,5 tsp | ||||
| Grated nutmeg | 0,5 tsp | ||||
| Cinnamon | 0,5 tsp |
Bread type Ingredients Bread size Programme Remarks
1.5 lb 1.0 lb
| Banana cake with nuts | Milk | 120 ml | - | 4 | |
| Oil | 4 tbsp | ||||
| Ripe, mashed bananas | 250 ml | ||||
| Eggs | 2 | ||||
| Sugar | 125 ml | ||||
| Brown sugar | 125 ml | ||||
| Chopped walnuts | 125 ml | ||||
| Wheat flour | 500 ml | ||||
| Baking powder | 2 tsp | ||||
| Salt | 2 tsp | ||||
| Five-grain bread | Water | 270 ml | 180 ml | 3 | |
| Butter or margarine | 15 g | 10 g | |||
| Salt | 1 tsp | 2/3 tsp | |||
| Sugar | 1,5 tbsp | 1 tbsp | |||
| Vinegar | 1 tbsp | 2/3 tbsp | |||
| Coarse wheat flour | 580 ml | 330 ml | |||
| Five-grain mix | 190 ml | 250 ml | |||
| Yeast | 1,5 tsp | 1,5 tsp | |||
| Bavarian wholemeal bread | Water | 250 ml | 170 ml | 3 | |
| Coarse wheat flour | 580 ml | 330 ml | You can also use coriander, fennel or aniseed instead of caraway. | ||
| Rye flour | 165 ml | 165 ml | |||
| Boiled, mashed potatoes | 100 g | 60 g | |||
| Caraway | 0,5 tsp | 0,5 tsp | |||
| Yeast | 2 tsp | 2 tsp | |||
| Corn bread | Water | 270 ml | 150 ml | 3 | |
| Coarse wheat flour | 160 ml | 125 ml | |||
| Rye flour | 160 ml | 125 ml | |||
| Coarse rye flour | 30 g | 20 g | |||
| Spelt flour | 30 g | 20 g | |||
| Buckwheat flour | 25 g | 20 g | |||
| Sunflower seeds | 35 g | 20 g | |||
| Pumpkin seeds | 35 g | 20 g | |||
| Linseed | 1 tbsp | 2/3 tbsp | |||
| Sesame seeds | 1 tbsp | 2/3 tbsp | |||
| Salt | 1 tsp | 1 tsp | |||
| Honey | 1 tbsp | 2/3 tbsp | |||
| Yeast | 2 tsp | 2 tsp | |||
| Spelt bread | Buttermilk | 300 ml | 200 ml | Open the lid before the final proving and moisten the dough with a little lukewarm water. | |
| Spelt flour | 330 ml | 250 ml | |||
| Rye flour | 250 ml | 160 ml | |||
| Coarse spelt flour | 250 ml | 160 ml | |||
| Sunflower seeds | 50 g | 40 g | |||
| Salt | 1 tsp | 1 tsp | |||
| Sugar | 1 tbsp | 1 tbsp | |||
| Yeast | 2 tsp | 2 tsp | |||
| Yoghurt bread | Water or milk | 180 ml | 120 ml | ||
| Yoghurt | 120 ml | 80 ml | |||
| Salt | 1 tsp | 1 tsp | |||
| Sugar | 1 tbsp | 1 tbsp | |||
| Vinegar | 3/4 tbsp | 3/4 tbsp | |||
| Coarse wheat flour | 750 ml | 500 ml | |||
| Yeast | 1,5 tsp | 1,5 tsp | |||
| Bran bread | Water | 270 ml | 180 ml | ||
| Butter or margarine | 25 g | 18 g | |||
| Salt | 1 tsp | 1 tsp | |||
| Sugar | 1 tbsp | 1 tbsp | |||
| Wheat bran | 50 g | 40 g | |||
| Wheat seeds | 1 tbsp | 1 tbsp | |||
| Coarse wheat flour | 750 ml | 500 ml | |||
| Yeast | 1,5 tsp | 1,5 tsp |
Bread type Ingredients Bread size Programme Remarks
1.5 lb 1.0 lb
| Coarse wheat bread | Water | 270 ml | 170 ml | 3 |
| Salt | 1 tsp | 1 tsp | ||
| Honey | 1 tbsp | 1 tbsp | ||
| Coarse wheat flour | 750 ml | 500 ml | ||
| Yeast | 1,5 tsp | 1,5 tsp | ||
| Wheat bread | Water | 270 ml | 180 ml | 3 |
| Salt | 1 tsp | 1 tsp | ||
| Vegetable oil | 1 tbsp | 1 tbsp | ||
| Honey | 3/4 tsp | 3/4 tsp | ||
| Beet syrup | 3/4 tsp | 3/4 tsp | ||
| Coarse wheat flour | 750 ml | 500 ml | ||
| Gluten flour | 3/4 tbsp | 3/4 tbsp | ||
| Yeast | 1,5 tsp | 1,5 tsp | ||
| Beer bread | Water | 150 ml | 100 ml | 1 |
| Beer | 150 ml | 100 ml | ||
| Coarse wheat flour | 180 g | 120 g | ||
| Buckwheat flour | 135 g | 80 g | ||
| Spelt flour | 135 g | 80 g | ||
| Salt | 1 tsp | 1 tsp | ||
| Sesame seeds | 35 g | 20 g | ||
| Yeast | 1,5 tsp | 1,5 tsp |
CLEANING
When cleaning the breadmaker, you should pay attention to the following points:
- Switch off the breadmaker, remove the plug from the wall socket and allow the breadmaker to cool down before cleaning.
-
Never use scouring powder, steel scourers or other strong cleaning agents to clean the interior or exterior surfaces of the breadmaker, as they may scratch the surfaces. The baking pan's non-stick coating will not work if it is scratched or cracked.
-
I instead use a cloth dampened with water, and add detergent if the breadmaker is very dirty.
- If the kneading paddle is difficult to remove, you can pour a little water into the baking pan and allow it to stand.
BEFORE GOING TO A REPAIR CENTRE
If you have problems baking, please review the following points before calling a repair engineer.
If the results are still not good enough, you should contact a repair engineer.
Problem Possible solution
| The bread does not rise | Use a flour type that rises well. Whole wheat grain flour and rye flour do not rise as much as other flour varieties.Use flour with a high gluten content.Use fresh dried yeast, add the yeast last and keep it away from liquid, salt and sugar.Use more liquid (around 30 ml).The ingredients have been incorrectly weighed out or there are ingredients missing.Use less salt.Ensure the ingredients are at room temperature. |
The bread sinks in the middle Reduce the liquid content in the dough.
Add 1/2 teaspoon of salt or 1 tablespoon of flour
The bread rises too much and Use 1/2 teaspoon less yeast. sticks to the lid Use smaller quantities of all ingredients.
Use 1 teaspoon less water.
Use 1/4 teaspoon more salt.
The bread is not baked through Reduce the liquid content in the dough.
Use extra kneading if the flour is coarse. Stop the breadmaker after the first kneading and proving and start from the beginning, as if it was new bread. This makes the dough airier.
The bread is too heavy or has an uneven surface Add more water. Store the flour in an airtight container.
The bread has too many holes Reduce the liquid content in the dough. Use 1/8 teaspoon less yeast.
The bread is not salty enough Use 1/4 teaspoon more salt.
ENVIRONMENTAL TIPS
Once any electronic product is no longer functional, it should be disposed of in such a way as to cause minimum environmental impact, in accordance with the regulations of your local authority. In most cases you can take such products to your local recycling station.
GUARANTEE TERMS
The guarantee does not apply:
- if the above instructions are not followed
- if the appliance has been interfered with
- if the appliance has been mishandled, subjected to rough treatment, or has suffered any other form of damage
- if faults have arisen as a result of faults in your electricity supply.
Due to the constant development of our products in terms of function and design, we reserve the right to make changes to the product without prior warning.
IMPORTER
Adexi Group
We cannot be held responsible for any printing errors.
DE
EINLEITUNG
- SE
- INTRODUKTION
- FÖRBEREDA BAKMASKINEN
- KLARGJ∅RE BR∅DBAKEMASKINEN
- LEIPÄKONEEN VALMISTELEMINEN
- IMPORTANT SAFETY MEASURES
- Before using your breadmaker for the first time
- BUTTON FUNCTION
- The breadmaker's programmes
- Tips!
- Ingredients
- Yeast
- Seeds
- Flour
- Salt
- Button/oil
- Sugar
- Liquid
- Baking advice
- Tips
- Operating the breadmaker
- Using the timer function
- EXAMPLE:
- Warning messages
- Message
- Meaning
- FOR UNITED KINGDOM ONLY
- Plug wiring:
- Important
- RECIPES
- CLEANING
- BEFORE GOING TO A REPAIR CENTRE
- ENVIRONMENTAL TIPS
- GUARANTEE TERMS
- IMPORTER
- DE
- EINLEITUNG
Brand : Melissa
Model : 16260007
Category : Bread maker