
0760 AA - Pressure washer SKIL - Free user manual and instructions
Find the device manual for free 0760 AA SKIL in PDF.


| Product Type | High Pressure Cleaner |
| Brand | Skil |
| Model | 0760 AA |
| Maximum Pressure | 130 bar |
| Water Flow | 6 L/min |
| Motor Power | 1400 W |
| Power Supply | 230 V ~ 50 Hz |
| Net Weight | 8 kg |
| Dimensions (L x W x H) | 300 x 300 x 900 mm |
| High Pressure Hose Length | 6 m |
| Motor Type | Induction Electric |
| Main Features | Lance with rotating nozzle, detergent tank, auto shut-off |
| Sound Level (LpA) | 75 dB(A) |
| Included Accessories | Variable jet nozzle, washing brush, garden hose connector |
| Detergent Tank Capacity | 1 L |
| Safety | Thermal circuit breaker, trigger lock |
| Maintenance and Cleaning | Clean nozzles regularly, drain after use, store frost-free |
| Spare Parts Available | Hose, lance, nozzles, seals, motor |
Frequently Asked Questions - 0760 AA SKIL
User questions about 0760 AA SKIL
0 question about this device. Answer the ones you know or ask your own.
Ask a new question about this device
Download the instructions for your Pressure washer in PDF format for free! Find your manual 0760 AA - SKIL and take your electronic device back in hand. On this page are published all the documents necessary for the use of your device. 0760 AA by SKIL.
USER MANUAL 0760 AA SKIL
natural_image
Black SKIL air purifier device with control buttons and ventilation slots (no visible text or symbols on body)

GB ORIGINAL INSTRUCTIONS 6
F NOTICE ORIGINALE 9
D ORIGINALBETRIEBSANLEITUNG 12
NL ORIGINELE GEBRUIKSAANWIJZING 15
S BRUKSANVISNING I ORIGINAL 18
DK ORIGINAL BRUGSANVISNING 21
N ORIGINAL BRUKSANVISNING 23
FIN ALKUPERÄISET OHJEET 26
E MANUAL ORIGINAL 29
(P) MANUAL ORIGINAL 32
I ISTRUZIONI ORIGINALI 35
H EREDETI HASZNÁLATI UTASÍTÁS 38
CZ PÚVODNÍM NÁVODEM K POUŽÍVÁNÍ 41
TR ORİJINAL İŞLETME TALİMATI 44
PL INSTRUKCJA ORYGINALNA 47
RU ПОДЛИННИК РУКОВОДСТВА
ПО ЭКСПЛУАТАЦИИ 50
UA ОРИГІНАЛЬНА ІНСТРУКЦІЯ
З ЕКСПЛУАТАЦІЇ 54
GR ΠΡΩΤΟΥΠΟ ΟΔΗΓΙΩΝ ΧΡΗΣΗΣ 57
RO INSTRUCTIUNI DE FOLOSIRE
ORIGINALE 60
BG ОРИГИНАЛНО РЪКОВОДСТВО
ЗА ЕКСПЛОАТАЦИЯ 63
SK PÔVODNÝ NÁVOD NA POUŽITIE 67
HR ORIGINALNE UPUTE ZA RAD 70
SRB ORIGINALNO UPUTSTVO ZA RAD 72
SLO IZVIRNA NAVODILA 75
EST ALGUPÄRANE KASUTUSJUHEND 78
LV ORIGINĀLĀ LIETOŠANAS PAMĀCĪBA 80
LT ORIGINALI INSTRUKCIJA 83
МК ИЗВОРНО УПАТСТВО ЗА РАБОТА 86
AL UDHËZIMET ORIGJINALE 89
AR دليل الاستعمال 99
④ RAHENMAI AUSLI 97
www.skil.com

① 0760

②


natural_image
Simple line drawing of an open book with a circled number 3 above it, no text or symbols present.



11

natural_image
Line drawing of a Skil electric shaver with attached cable and power outlet (no text or symbols)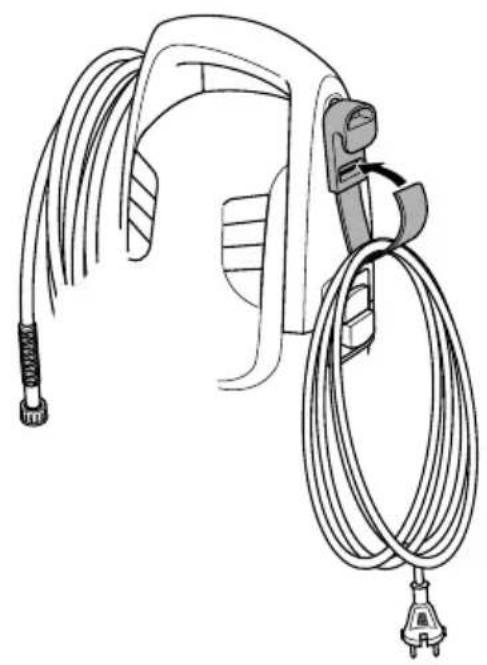
natural_image
Line drawing of a car charging plug with attached cable (no text or symbols)
natural_image
Line drawing of a hand holding a handheld device (no text or symbols)
natural_image
Line drawing of a coiled hose with attached clamp (no text or symbols)12

GB
High-pressure washer 0760
INTRODUCTION
- This tool has been designed for cleaning areas and objects outside the house, vehicles and boats
- This tool is intended for domestic use only and is not designed to operate with water from sources other than a watertap
• This tool is not intended for professional use - Read this instruction manual carefully before use and save it for future reference ③
- Pay special attention to the safety instructions and warnings; failure to follow these may result in serious injury
- Check whether the packaging contains all parts as illustrated in drawing ②
- When parts are missing or damaged, please contact your dealer
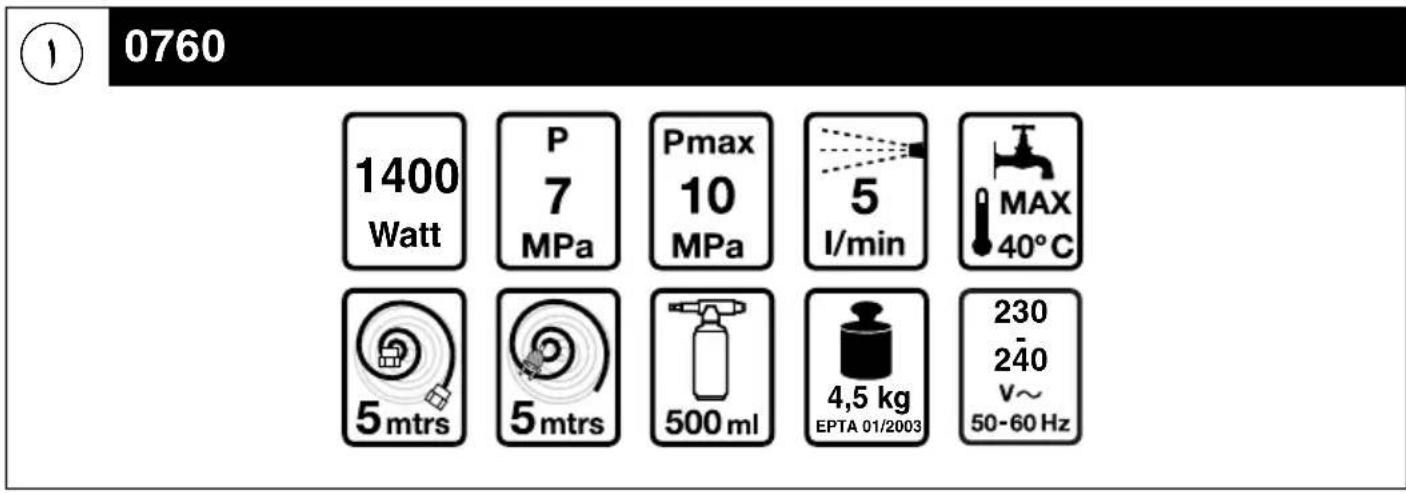
TECHNICAL SPECIFICATIONS ①
Working pressure (P) 7 MPa
Maximum working pressure (Pmax) 10 MPa
Inlet pressure 0 - 0,6 MPa
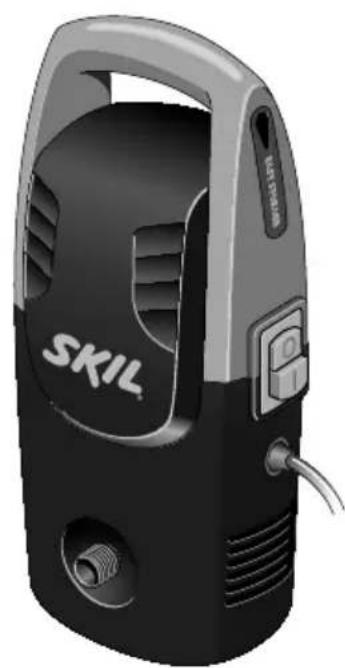
TOOL ELEMENTS ②
A Trigger lock
B Trigger
C Inlet connector
D Water inlet
E Water filter
F Mains switch
G Spraying nozzle
H Detergent bottle
J Detergent nozzle
K Spray lance
L Hand gun
M Cleaning needle
N Storage rail (screws not supplied)
P Storage strap (2)
Q High-pressure hose
R Water outlet
S Ventilation slots
T Connection for storage straps
SAFETY
GENERAL
- Use the tool and its accessories in accordance with this instruction manual and in the manner intended for the tool; use of the tool for operations, different from those normally expected to be performed by the tool, could result in a hazardous situation
-
Never draw in solvent-containing liquids, undiluted acids or solvents (e.g. petrol, paint thinners, heating oil); these liquids produce a highly flammable, explosive and toxic sprayed vapour and they also corrode the tool components
-
Only use the tool when the ambient temperature is between 0°C and 40°C
- Start working only when tool and operating equipment are in perfect condition and safe to operate
- Be aware of the kickback forces that occur when starting the high-pressure washer; hold hand gun and spray lance firmly and take a secure stance
- Never clamp the trigger in position during operation
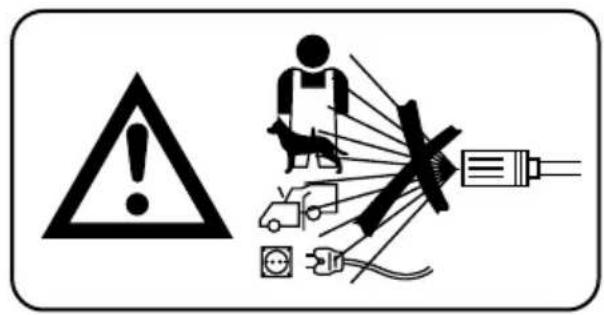
- Never direct the water jet towards other people, animals, live electrical equipment or the tool itself ④
- Never leave the tool unattended while the motor is running
- Do not operate the tool in potentially explosive locations
- Always switch off tool, disconnect plug from power source, and ensure there is no water pressure in tool and hand gun before adjusting, cleaning or changing accessories
PERSONAL SAFETY
- This tool is not intended for use by persons (including children) with reduced physical, sensory or mental capabilities, or lack of experience and knowledge, unless they have been given supervision or instruction concerning use of the tool by a person responsible for their safety
- Ensure that children do not play with the tool
- Wear suitable protective clothing to protect against splashing water
- Do not use the tool with other persons in the vicinity unless they wear protective clothing
- Do not spray materials containing asbestos and other materials which contain substances which are hazardous to your health
- Only clean tyres/tyre valves from a minimum distance of 30 cm to prevent damaging them (damaged vehicle tyres may lead to fatal accidents)
- Do not direct the water jet against yourself or others in order to clean clothes or footwear
WATER SUPPLY
- Only use the high-pressure hose and coupling supplied with the tool
- Replace a damaged high-pressure hose immediately (with identical specifications)
- Do not kink or drive a motor vehicle over the high-pressure hose
- Do not expose the high-pressure hose to sharp edges or corners
- Ensure that all connecting hoses have properly sealed joints
- Be aware that the sprayed water generated by the tool is not drinkable
- According to the applicable regulations, the tool must never be used on the drinking water net without a system separator ⑤; use a suitable system separator as per EN 12729 type BA
ELECTRICAL SAFETY
- Always check that the supply voltage is the same as the voltage indicated on the nameplate of the tool (tools with a rating of 230V or 240V can also be connected to a 220V supply)
-
Connect the tool via a fault current (FI) circuit breaker with a triggering current of 30 mA maximum
-
Ensure that all current-conducting components in the working area are protected against splashed water
- Keep cord connections dry and off ground
- Inspect the cord periodically and have it replaced by a qualified person, if damaged
- Do not run over, crush or pull the (extension) cord
- Protect the (extension) cord from heat, oil and sharp edges
- Only use an extension cord which is intended for outdoor use and equipped with a watertight plug and coupling-socket
- Use completely unrolled and safe extension cords with a capacity of 16 Amps (U.K. 13 Amps)
- Only use extension cords with a maximum length of 20 metres (1,5 mm ^2 ) or 50 metres (2,5 mm ^2 )
- Inspect the extension cord periodically and replace it, if damaged (inadequate extension cords can be dangerous)
- Never touch the mains plug with wet hands
- Always switch off tool and disconnect plug from power source if the power supply cord or the extension cord is cut, damaged or entangled (do not touch the cord before disconnecting the plug)
- When connecting a new plug, pay attention to the following (U.K. only):
- plugs and sockets conforming to BS 4243 or BS 196 should be used wherever practicable
- domestic pattern plugs to BS 1363 are not recommended, but if their use is essential, those which have barriers or moulded channels inside should be selected, so that, if the earth continuity conductor is pulled out of its terminal, it is unlikely to be able to touch the phase terminal of the fuse carrier
- domestic pattern plugs to BS 546 should not be used
- the wiring of the plug should leave more slack in the earth continuity conductor than in the other cores, so that it is not the first core to be pulled out of its terminal, should the cord grip fail
- plugs which have good grips capable of maintaining a firm hold on the cable sheath should be selected
- in general, additional means should be provided to relieve stress on cable terminations in the plug (for example, additional cable clamps should be fitted or a substantial chain could be used to tether the machine to a fixed point)
- plugs and sockets situated near the work site or outdoors should be to class IP 55 of BS 5490 to provide adequate protection against ingress of water, etc. and cable entries require effective sealing
- rubber shrouds should be provided over cable glands
- drip-proof (class IP X2 of BS 5490) plugs and sockets to BS 4343 are suitable for use indoors where the plug is away from the water spray area where the appliance is in use
USE
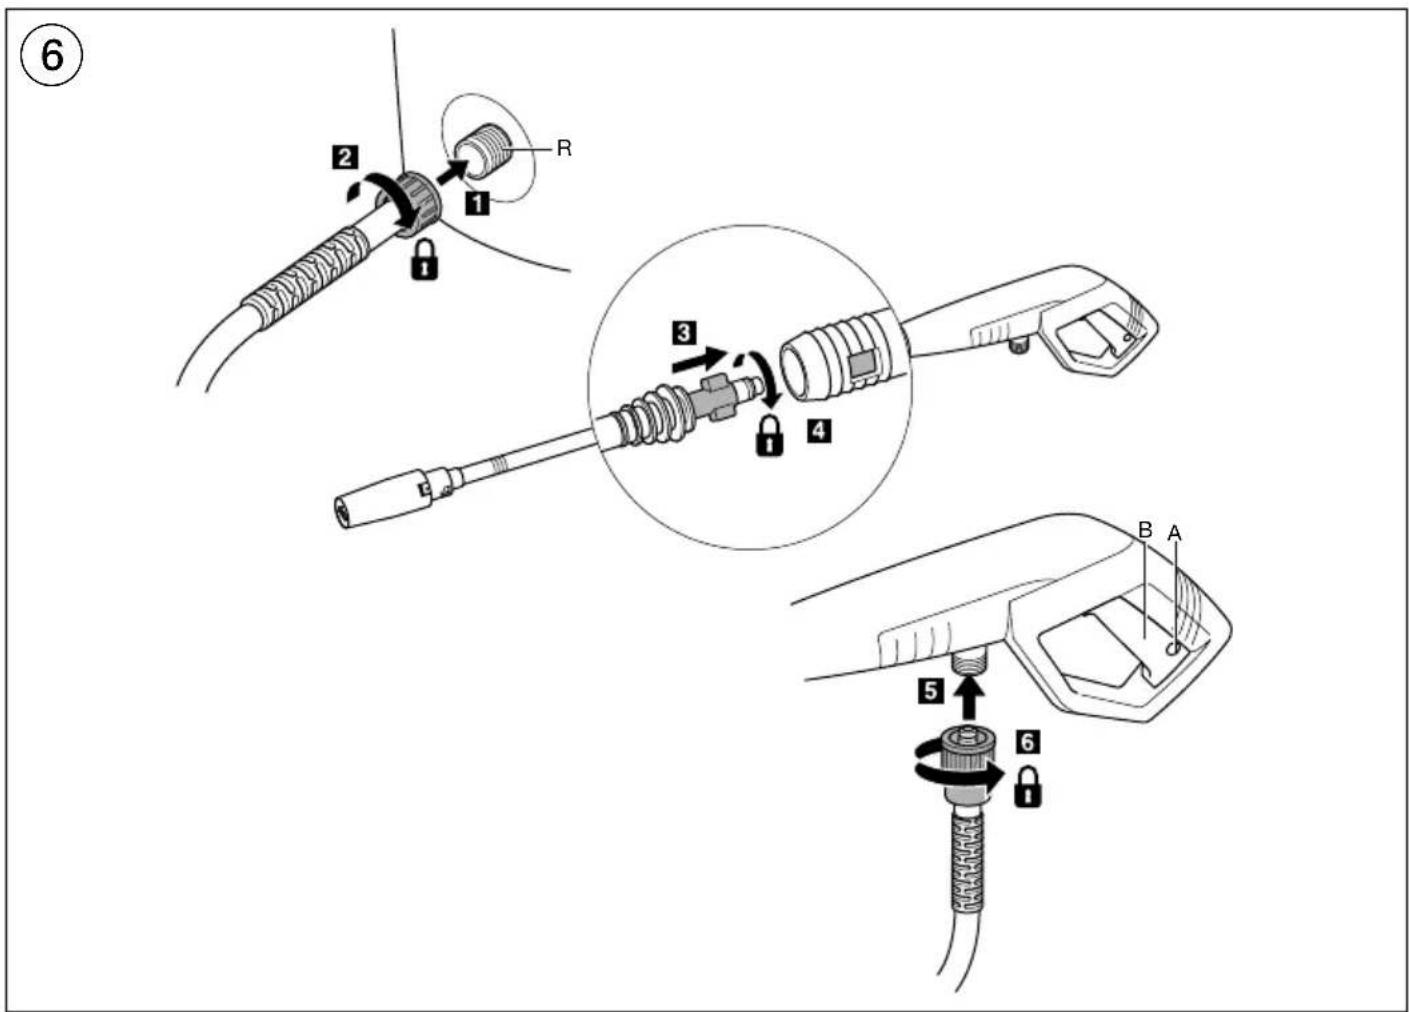
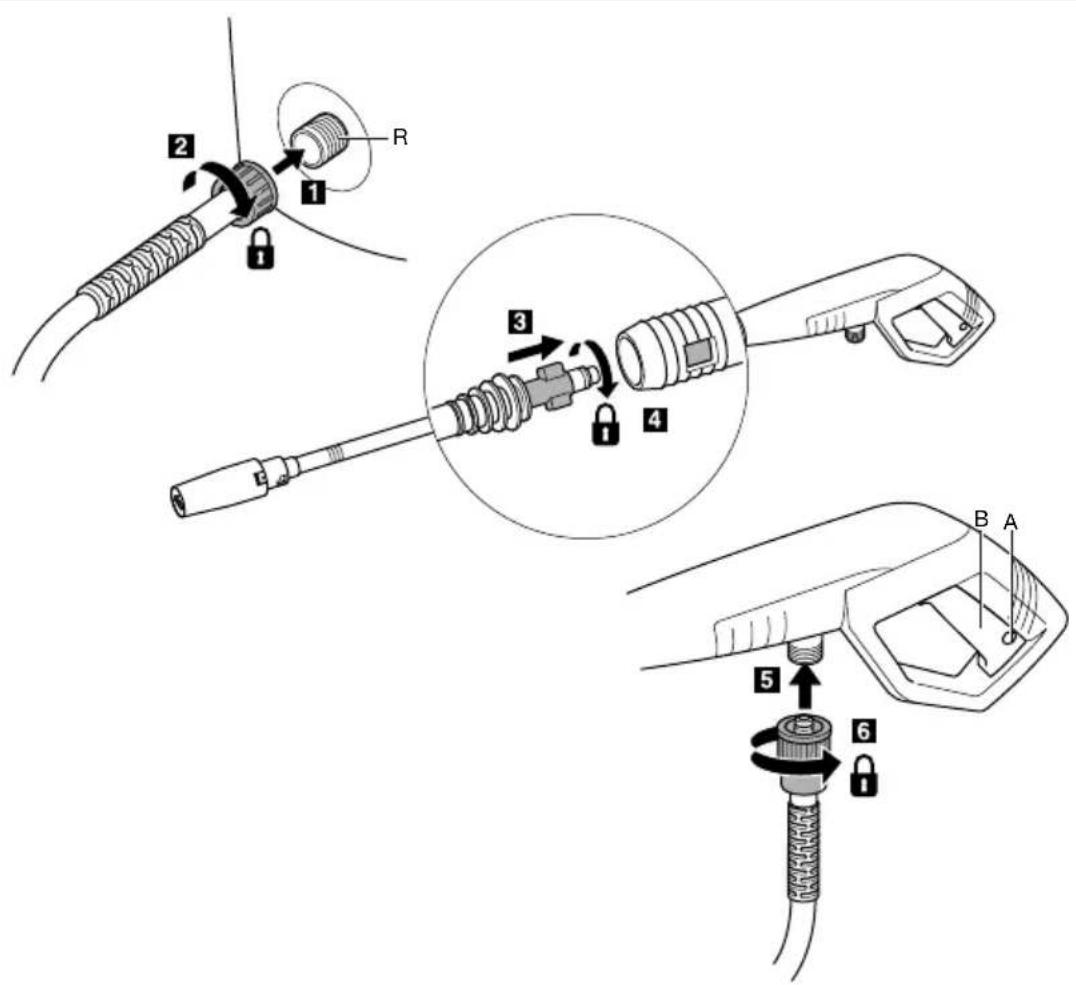
- Assembly instructions ⑥
- the sequence of the numbers appearing in the drawing corresponds with the sequence of the steps to be followed for assembling the high-pressure washer
-
as a safety precaution press trigger lock A to avoid that trigger B is activated accidentally
-
Connection to water supply ⑦
- screw inlet connector C onto water inlet D
! never use inlet connector C without water filter E - attach water supply hose (not supplied) to water tap and inlet connector C
! ensure that the temperature of the incoming water does not exceed 40^ C (on a hot day run the water until it cools down before connecting to water tap)
- Operating the tool ⑧
- ensure that the tool is placed on a solid base and in vertical position
- connect the tool to the mains supply (ensure that mains switch F is in the off-position)
- open water tap
- press trigger lock A to release trigger B
- fully press trigger B to release any trapped air from the tool or the water supply hose
- release trigger B and press trigger lock A
- switch on the tool by pressing button "I" of mains switch F
- after switching on the motor starts running for a few seconds until maximum pressure is reached
- press trigger lock A, point spraying nozzle G at the area to be washed and then pull trigger B
- switch between a concentrated jet of water and a wide spray by turning nozzle G
- upon release of trigger B the motor stops running after a few seconds when maximum pressure is reached
- switch off the tool by pressing button "O" of mains switch F
- close water tap
- fully press trigger B until there is no more water pressure in the tool
- after use press trigger lock A to avoid that trigger B is activated accidentally
! disconnect plug from power source and ensure that the cutting blade has stopped rotating
- disconnect water supply hose from tool and water tap
• Use of detergent bottle ⑨
! ensure that trigger is locked and mains switch is in the off-position
- unscrew bottle H from detergent nozzle J and fill it with biodegradable detergent suitable for high-pressure washer application (the use of other detergents or chemicals may adversely affect the safety of the tool)
! do not use undiluted detergents
- screw filled bottle H onto detergent nozzle J
- remove lance K from hand gun L and mount detergent nozzle J instead as illustrated
- press trigger lock A, point detergent nozzle J at the area to be washed and then pull trigger B
! detergent does not come out under high pressure
APPLICATION ADVICE
- When using detergent bottle H
! read the detergent label for additional instructions
- always wet the object first
- apply detergent to the object from the bottom up
- give the detergent time to work, but never leave it to dry
- rinse from top and work downwards
- For more tips see www.skil.com
MAINTENANCE / SERVICE
• This tool is not intended for professional use
- Before maintenance always switch off tool, ensure there is no water pressure in tool and hand gun, disconnect plug from power source, and disconnect tool from water supply
- Always keep tool and cord clean (especially ventilation slots S ②)
- do not use water, solvents or polishes
- regularly clean spraying nozzle G using cleaning needle M ⑩ (remove spray lance K from hand gun L first)
- Regularly check for worn or damaged components and have them repaired/replaced when necessary
-
Cleaning water filter
-
remove water filter E ② from inlet connector C ② with long nose pliers
- rinse it clean and put it back (replace it when damaged)
! never use the tool with a damaged water filter
- Storage ⑪
- store the tool out of reach of children in a location where the ambient temperature will not exceed 40^ C or drop below 0^ C
- do not place other objects on top of the tool
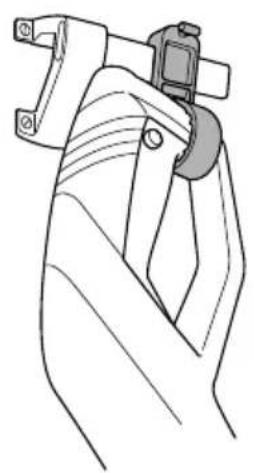
- securely mount storage rail N on the wall with 4 screws (not supplied) and horizontally leveled
- use storage rail N and storage straps P as illustrated
- If the tool should fail despite the care taken in manufacturing and testing procedures, repair should be carried out by an after-sales service centre for SKIL power tools
- send the tool undismantled together with proof of purchase to your dealer or the nearest SKIL service station (addresses as well as the service diagram of the tool are listed on www.skil.com)
TROUBLESHOOTING
- The following listing shows problem symptoms, possible causes and corrective actions (if these do not identify and correct the problem, contact your dealer or service station)
! switch off the tool and disconnect the plug before investigating the problem
★ Spray is not consistent
- nozzle partly blocked -> clean nozzle
★ Motor does not start or stops suddenly
- power supply socket faulty -> use another socket
- plug not connected -> connect plug
- thermal protection switched off the motor -> let the tool cool down for 5 minutes
★ Motor is running but spray is poor
- nozzle completely blocked -> clean nozzle
- water filter clogged -> clean water filter
- air in the pump -> ensure that water inlet connector is securely fitted
- inadequate water supply -> check that water tap is fully open
ENVIRONMENT
- Do not dispose of electric tools, accessories and packaging together with household waste material (only for EU countries)
- in observance of European Directive 2002/96/EC on waste of electric and electronic equipment and its implementation in accordance with national law, electric tools that have reached the end of their life must be collected separately and returned to an environmentally compatible recycling facility
- symbol ⑫ will remind you of this when the need for disposing occurs
CE DECLARATION OF CONFORMITY
- We declare under our sole responsibility that this product is in conformity with the following standards or standardized documents: EN 60335, EN 61000, EN 55014 in accordance with the provisions of the directives 2006/95/EC, 2004/108/EC, 2006/42/EC, 2000/14/EC, 2011/65/EU
• Technical file at: SKIL Europe BV (PT-SEU/ENG1), 4825 BD Breda, NL
Operations & Engineering
Olaf Dijkgraaf
Approval Manager

SKIL Europe BV, 4825 BD Breda, NL
02.01.2013
C€10
NOISE/VIBRATION
- Measured in accordance with EN 60704-1 the sound pressure level of this tool is 81 dB(A) and the sound power level 93 dB(A) (standard deviation: 2.2 dB), and the vibration < 2.5 m/s ^2 (hand-arm method; uncertainty K = 1.5 m/s ^2 )
- Measured in accordance with 2000/14/EC the guaranteed sound power level LWA is lower than 97 dB(A) (conformity assessment procedure according to Annex V)
- The vibration emission level has been measured in accordance with a standardised test given in EN/ISO/5349; it may be used to compare one tool with another and as a preliminary assessment of exposure to vibration when using the tool for the applications mentioned
- using the tool for different applications, or with different or poorly maintained accessories, may significantly increase the exposure level
- the times when the tool is switched off or when it is running but not actually doing the job, may significantly reduce the exposure level
! protect yourself against the effects of vibration by maintaining the tool and its accessories, keeping your hands warm, and organizing your work patterns
F
Laveur haute pression 0760
INTRODUCTION
Operations & Engineering
Olaf Dijkgraaf
Approval Manager

SKIL Europe BV, 4825 BD Breda, NL
02.01.2013
C€10
BRUIT/VIBRATION
★ Sproeinevel is inconsistent
Operations & Engineering
Olaf Dijkgraaf
Approval Manager


SKIL Europe BV, 4825 BD Breda, NL
02.01.2013
C€10
LJUD/VIBRATION
Operations & Engineering
Olaf Dijkgraaf
Approval Manager

SKIL Europe BV, 4825 BD Breda, NL
02.01.2013
C€10
ST∅J/VIBRATION
VEDLIKEHOLD / SERVICE
Operations & Engineering
Approval Manager

SKIL Europe BV, 4825 BD Breda, NL
C€10
02.01.2013
ST∅Y/VIBRASJON
Operations & Engineering
Approval Manager

SKIL Europe BV, 4825 BD Breda, NL
02.01.2013
C€10
RUIDOS/VIBRACIONES
Operations & Engineering
Olaf Dijkgraaf
Approval Manager


SKIL Europe BV, 4825 BD Breda, NL
02.01.2013
C€10
RUÍDO/VIBRAÇÕES
Operations & Engineering
Approval Manager
SKIL Europe BV, 4825 BD Breda, NL
02.01.2013
C€10
Operations & Engineering
Olaf Dijkgraaf
Approval Manager


SKIL Europe BV, 4825 BD Breda, NL
02.01.2013
C€10
ZAJ/REZGÉS
Operations & Engineering
Olaf Dijkgraaf
Approval Manager

SKIL Europe BV, 4825 BD Breda, NL
02.01.2013
C€10
HLUČNOSTI/VIBRACÍ
Operations & Engineering
Olaf Dijkgraaf
Approval Manager


SKIL Europe BV, 4825 BD Breda, NL
02.01.2013
C€10
GÜRÜLTÜ/TİTREŞIM
Operations & Engineering
Olaf Dijkgraaf
Approval Manager


SKIL Europe BV, 4825 BD Breda, NL
02.01.2013
C€10
HAŁASU/WIBRACJE
Operations & Engineering
Olaf Dijkgraaf
Approval Manager


SKIL Europe BV, 4825 BD Breda, NL
02.01.2013
C€10
Operations & Engineering
Olaf Dijkgraaf
Approval Manager


SKIL Europe BV, 4825 BD Breda, NL
02.01.2013
C€10
ШУМ/ВІБРАЦІЯ
Operations & Engineering
Olaf Dijkgraaf
Approval Manager

SKIL Europe BV, 4825 BD Breda, NL
02.01.2013
C€10
ZGOMOT/VIBRATII
Operations & Engineering
Olaf Dijkgraaf
Approval Manager
SKIL Europe BV, 4825 BD Breda, NL
02.01.2013
C€10
HLUKU/VIBRÁCIÁCH
Operations & Engineering
Olaf Dijkgraaf
Approval Manager

SKIL Europe BV, 4825 BD Breda, NL
02.01.2013
C€10
BUCI/VIBRACIJAMA
- Mjereno prema EN 60704-1 prag zvučnog tlaka ovog električnog alata iznosi 81 dB(A) a jakost zvuka 93 dB(A) (standardna devijacija: 2,2 dB), a vibracija < 2,5 m/s ^2 (postupkom na šaci-ruci; nesigurnost K = 1,5 m/s ^2 )
- Pri mjerenju izvedenom u skladu s 2000/14/EC zajamčena razina buke LWA manja je od 97 dB(A) (postupak vrednovanja usklađenosti prema Dodatku V)
- Razina emitiranja vibracija izmjerena je sukladno normiranom testu danom u EN/ISO/5349; ona se može koristiti za usporedbu jedne alatke s drugom, te preliminarnu procjenu izloženosti vibracijama pri uporabi alatke za navedene namjene
Operations & Engineering
Olaf Dijkgraaf
Approval Manager
SKIL Europe BV, 4825 BD Breda, NL
02.01.2013
BUKA/VIBRACIJE
- Mereno u skladu sa EN 60704-1 nivo pritiska zvuka ovog alata iznosi 81 dB(A) a jačina zvuka 93 dB(A) (normalno odstupanje: 2,2 dB), a vibracija < 2,5 m/s ^2 (mereno metodom na šaci-ruci; nesigurnost K = 1,5 m/s ^2 )
- Garantovani nivo jačine zvuka LWA, izmeren u skladu sa 2000/14/EC niži je od 97 dB(A) (postupak ocene usaglašenosti prema Dodatku V)
- Nivo emisije vibracija izmeren je u skladu sa standardizovanim testom datim u EN/ISO/5349; on se može koristiti za upoređenje jedne alatke sa drugom, kao i za preliminarnu procenu izloženosti vibracijama pri korišćenju ove alatke za pomenute namene
- korišćenje alatke u drugačije svrhe ili sa drugačijim ili slabo održavanim nastavcima može značajno povećati nivo izloženosti
- vreme kada je alatka isključena ili kada je uključena, ali se njome ne radi, može značajno smanjiti nivo izloženosti
! zaštitite se od posledica vibracija održavanjem alatke i njenih nastavaka, održavajući Vaše ruke toplim i organizovanjem Vaših radnih obrazaca
SLO
Operations & Engineering
Olaf Dijkgraaf
Approval Manager

SKIL Europe BV, 4825 BD Breda, NL
02.01.2013
C€10
HRUP/VIBRACIJA
APKALPOŠANA / APKOPE
Operations & Engineering
Olaf Dijkgraaf
Approval Manager


SKIL Europe BV, 4825 BD Breda, NL
02.01.2013
C€10
TROKSNIS/VIBRĀCIJA
Operations & Engineering
Approval Manager

SKIL Europe BV, 4825 BD Breda, NL
02.01.2013
C€10
ZHURMA/VIBRIMI
Operations & Engineering
Olaf Dijkgraaf
Approval Manager


SKIL Europe BV, 4825 BD Breda, NL
C€10
02.01.2013
صدا/ارتعاشات


natural_image
Simple line drawing of an open book with a circular icon above it (no text or symbols)




natural_image
Black SKIL brand air purifier device with control panel and cable (no visible text or symbols)


- ① 0760
- ②
- GB
- High-pressure washer 0760
- INTRODUCTION
- TECHNICAL SPECIFICATIONS ①
- TOOL ELEMENTS ②
- SAFETY
- GENERAL
- PERSONAL SAFETY
- WATER SUPPLY
- ELECTRICAL SAFETY
- USE
- APPLICATION ADVICE
- MAINTENANCE / SERVICE
- TROUBLESHOOTING
- ENVIRONMENT
- CE DECLARATION OF CONFORMITY
- NOISE/VIBRATION
- F
- Laveur haute pression 0760
- BRUIT/VIBRATION
- LJUD/VIBRATION
- ST∅J/VIBRATION
- VEDLIKEHOLD / SERVICE
- ST∅Y/VIBRASJON
- RUIDOS/VIBRACIONES
- RUÍDO/VIBRAÇÕES
- ZAJ/REZGÉS
- HLUČNOSTI/VIBRACÍ
- GÜRÜLTÜ/TİTREŞIM
- HAŁASU/WIBRACJE
- ШУМ/ВІБРАЦІЯ
- ZGOMOT/VIBRATII
- HLUKU/VIBRÁCIÁCH
- BUCI/VIBRACIJAMA
- BUKA/VIBRACIJE
- SLO
- HRUP/VIBRACIJA
- APKALPOŠANA / APKOPE
- TROKSNIS/VIBRĀCIJA
- ZHURMA/VIBRIMI
Brand : SKIL
Model : 0760 AA
Category : Pressure washer