
PT-042 - Waterproof camera case OLYMPUS - Free user manual and instructions
Find the device manual for free PT-042 OLYMPUS in PDF.
| Product type | Waterproof camera housing |
| Brand | Olympus |
| Model | PT-042 |
| Compatible cameras | μ 1020 / Stylus 1020 / μ 1010 / Stylus 1010 |
| Maximum depth | 40 meters |
| Body material | Transparent polycarbonate |
| Lens window | FL glass |
| Button loops and shafts | Stainless steel |
| Lens ring diameter | 62 mm |
| Dimensions (L × H × D) | 138 × 100 × 104 mm (excluding protrusions) |
| Weight | 455 g (without camera or accessories) |
| Power supply | Olympus LI-50B lithium-ion battery (not included) |
| Seal gasket | Replaceable silicone gasket (POL-042) |
| Silicone grease included | White cap tube (PSOLG-1/2/3) |
| Included accessories | Wrist strap, silica gel, gasket removal tool, LCD screen cover |
| Main functions | Shutter release, zoom, mode buttons, flash and focus |
| Maintenance and cleaning | Rinse with pure water after use, dry in shade, grease the gasket regularly |
| Safety | Do not exceed 40 m, check waterproofing before each dive, replace the gasket once a year |
| Spare parts available | Gasket (POL-042), silicone grease (PSOLG-1/2/3), silica gel (SILCA-5S), LCD screen cover (PFUD-07) |
Frequently Asked Questions - PT-042 OLYMPUS
User questions about PT-042 OLYMPUS
0 question about this device. Answer the ones you know or ask your own.
Ask a new question about this device
Download the instructions for your Waterproof camera case in PDF format for free! Find your manual PT-042 - OLYMPUS and take your electronic device back in hand. On this page are published all the documents necessary for the use of your device. PT-042 by OLYMPUS.
USER MANUAL PT-042 OLYMPUS
Thank you for buying the Underwater Case PT-042.
Please read this instruction manual carefully and use the product safely and correctly. Please keep this instruction manual for reference after reading it.
- Wrong use may cause damage to the camera inside the Case due to water leakage, and repair may not be possible.
Before use, perform an advance check as described in this manual.
The PT-042 Underwater Case is designed for 1020/Stylus 1020/ 1010/Stylus 1010. In this manual, 1020/Stylus 1020 is used for all the camera illustrations.
Introduction
- Unauthorized copying of this manual in part or in full, except for private use, is prohibited. Unauthorized reproduction is strictly prohibited.
- OLYMPUS IMAGING CORP. shall not be responsible in any way for lost profits or any claims by third parties in case of any damage occurring from improper use of this product.
- OLYMPUS IMAGING CORP. shall not be responsible for damage, lost profits, etc. caused by loss of image data because of defects, disassembly, repair or modification of this product by people other than third parties specified by OLYMPUS IMAGING CORP. or for other reasons.
Please read the following items before use
This Case is a precision device designed for use at a water depth within 40m . Please handle it with sufficient care.
- Please use the Case correctly after sufficient understanding of the contents of this manual in regard to handling of the Case, checks before use, maintenance, and storage after use.
- OLYMPUS IMAGING CORP. shall in no way be responsible for accidents involving immersion of a digital camera in water. In addition, expenses incurred for damage of internal materials or loss of recorded contents due to water entering the camera will not be compensated.
- OLYMPUS IMAGING CORP. shall not pay any compensation for accidents (injuries or material damage) at the time of use.
- PTBK-01 cannot be used.
For safe use
This instruction manual uses various pictographs for correct use of the product and to prevent danger to the user and other persons as well as property damage. These pictographs and their meanings are shown below.
| △WARNING | This indicates contents for which the possibility of human death or severe injury in case of handling under disregard of this indication can be assumed. |
| △CAUTION | This indicates contents for which the possibility of human injury or the possibility of material damage in case of handling under disregard of this indication can be assumed. |
WARNING
① Keep this product out of the reach of babies, infants, and children. There is the possibility of occurrence of the following types of accidents.
- Injury by dropping onto the body from a height.
- Injury from parts of the body getting caught in parts which open and close.
- Swallowing of small parts. Please consult a physician immediately if any parts have been swallowed.
- Triggering of the flash in front of the eyes may cause permanent vision impairment etc.
② Do not store with a battery in the digital camera housed in this product. Storage with a battery inserted may lead to leakage of the battery liquid and fire.
③ If leakage of water should occur with a camera installed in this product, quickly remove the battery from the camera. There is the possibility of ignition and explosion from generation of hydrogen gas.
This product is made of resin. There is the possibility that injuries may be caused when it becomes broken because of strong impact with a rock or other hard objects. Please handle it with sufficient care.
⑤ The silica gel and the silicone grease for this product are not edible.
CAUTION
① Do not disassemble or modify this product. This may cause water leakage or trouble. In case of disassembly or modification by persons other than those appointed by OLYMPUS IMAGING CORP, the guarantee shall not apply.
② Do not place this product at locations with abnormally high or abnormally low temperatures or at locations with extreme temperature changes. The product may deteriorate.
③ Opening and closing at locations with much sand, dust, or dirt may impair the waterproof characteristic and cause water leakage. This should be avoided.
This product has been designed and manufactured for use at a water depth within 40m . Please note that diving to a depth in excess of 40 m may cause permanent deformation or damage to the Case and the camera inside the Case or may lead to water leakage.
⑤ Jumping into the water with the Case in your pocket or in your hand, throwing the Case from a boat or ship into the water, and other rough handling may cause water leakage. Please handle with sufficient care, when handing it over from hand to hand etc.
If the camera on the inside should become wet because of water leakage etc., immediately wipe off all moisture and confirm the operation.
⑦ Please remove the O-ring when traveling by air. Otherwise air pressure may make it impossible to open the Case.
⑧ For safe use of the digital camera in this product, please read the "Instruction Manual" for the digital camera carefully.
⑨ When sealing this product, take sufficient care that no foreign matter gets caught at the O-ring and the contact surfaces.
Batteries
- Use only an Olympus lithium-ion rechargeable battery (LI-50B) with the camera.
- Take care that the battery electrodes do not become wet. This may cause trouble or accidents.
- Carefully read the instruction manual for the camera about other cautions regarding batteries.
Setting the underwater shooting scene mode
- The 1020/Stylus 1020/ 1010/Stylus 1010 cameras incorporate several shooting scene modes for underwater shooting, including wide-angle and macro modes. Simply select the mode that's most appropriate for the scene you are shooting. For details, see "5. Underwater Shooting According to the Scene Type" (P.24) of this manual.
- For details on mode setting, refer to the digital camera's operation manual.
For Prevention of Water Leakage Accidents
When water leakage occurs while this product is being used, repair of the camera housed in this product may become impossible. Please observe the following cautions for use.
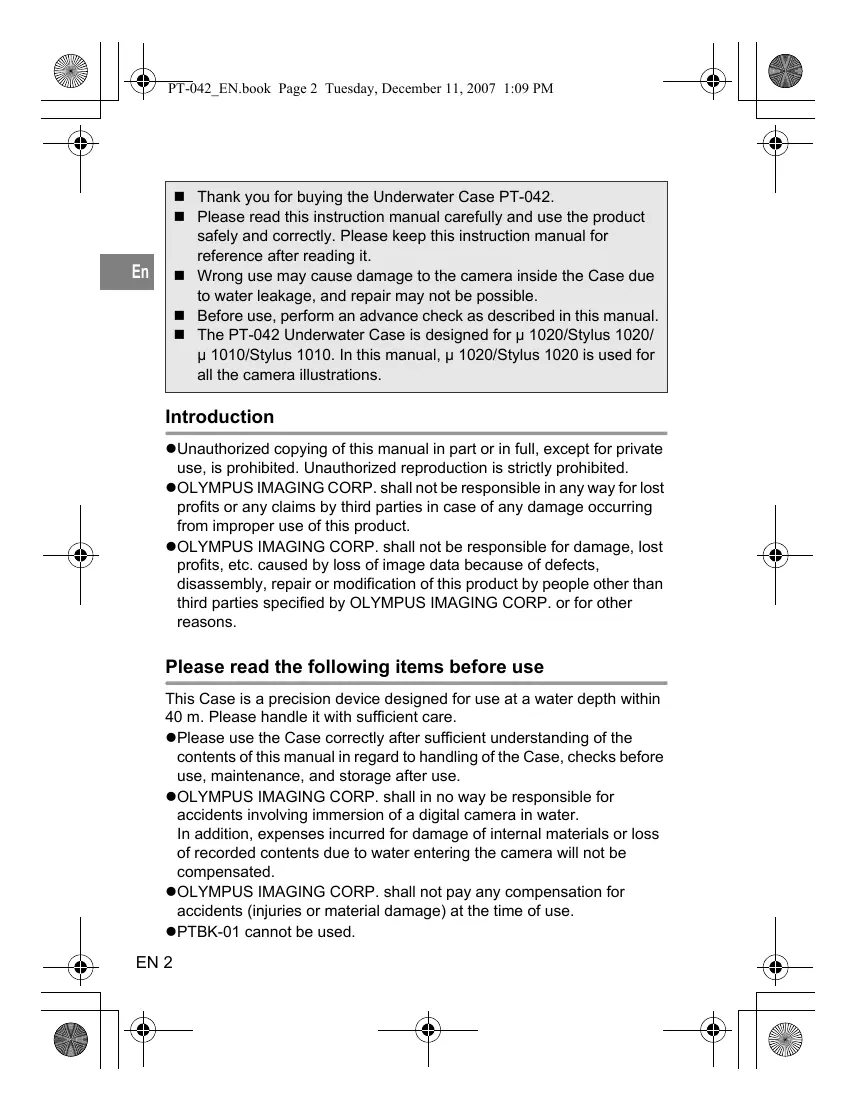
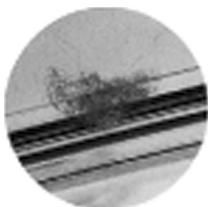
① When sealing this product, make sure that no hairs, fibers, sand particles or other foreign matter stick not only to the O-ring, but also to the contact surface (front cover). Even a single hair or a single grain of sand may cause water leakage. Please check with special care.
Examples of foreign matter sticking to the O-ring
Hair
Fibers
Grains of sand
② The O-ring is a consumable part. Please replace it at least once a year with a new one. Before each use, perform the proper maintenance.
Deterioration of the O-ring will accelerate according to the use conditions and the storage conditions. Immediately replace the O-ring with a new one if it is damaged, cracked, or has lost its elasticity.
④ During O-ring maintenance, clean the inside of the O-ring groove and confirm the absence of dirt, dust, sand, and other foreign matter.
⑤ Apply the specified silicone grease to the O-ring.
The waterproof function is not effective when the O-ring is not installed correctly. When installing the O-ring, take care that it does not project from the groove and that it is not twisted. Also, when sealing the Case, close the lid after confirming that the O-ring has not come out of the groove.
This product is an airtight construction made of plastic (polycarbonate). When it is left for a long time in a car, on a boat, at the beach, or at other places reaching a high temperature, or when it is subjected for a long time to uneven external force, it may be deformed and the waterproof function may be lost. Pay sufficient attention to temperature control. Also do not place heavy objects onto the product during storage or transport, and avoid unreasonable storage.
⑧ When the O-ring contact surface is pressed strongly from the outside of the Case, or when the Case is twisted, the waterproof function may be lost. Take care not to exert excessive force.
(9) Please use the Case only after performing the advance test and the final check.
If you should notice drops of water or other signs of water leakage while taking pictures, immediately stop the dive, remove any water from the camera and the product, test according to the item "Final check", and confirm whether leakage has occurred or not.
Handling the Product
-
Use or storage of the product at the following locations may cause defective operation, defects, trouble, damage, fire, internal clouding, or water leakage. This should be avoided.
-
Locations reaching high temperatures such as those under direct sunlight, in an automobile, etc.
- Locations with open fire
Water depths in excess of 40m - Locations subject to vibrations
- Locations with high temperature and humidity or with severe temperature changes
-
Locations with volatile substances
-
This product is made of polycarbonate resin with excellent impact resistance, but it may be damaged by scraping against rocks etc. It also may break when it hits hard objects or is dropped.
-
This product is not a case to soften impacts to the camera inside the product. When this product with a digital camera inside it is subjected to impacts or heavy objects are placed onto it, the digital camera may become damaged. Please handle it with sufficient care.
-
When the product is not used for a long time, the waterproof performance may drop because of deterioration of the O-ring etc. Before use, always perform the advance test and the final check.
- Do not apply excessive force to the tripod seat or the accessory mount.
- When a flash is used while the Case is being used, shadows may appear at the edges of the picture. This is especially notable when taking pictures in macro mode on the wide-angle side. Please use a flash after image confirmation.
- Do not use the following chemicals for cleaning, corrosion prevention, prevention of fogging, repair or other purposes. When these are used for the Case directly or indirectly (with the chemicals in vaporized state), they may cause cracking under high pressure or other problems.
| Chemicals which cannot be used | Explanation |
| Volatile organic solvents, chemical detergents | Do not clean the Case with alcohol, gasoline, thinner or other volatile organic solvents or with chemical detergents etc. Use pure water or lukewarm water. |
| Anticorrosion agent | Do not use anticorrosion agents. The metal parts use stainless steel or brass. Wash with pure water. |
| Commercial defogging agents | Do not use commercial defogging agents. Always use the specified desiccant silica gel. |
| Grease other than specified silicone grease | Use only the specified silicone grease for the silicone O-ring, as otherwise the O-ring surface may deteriorate and water leakage may occur. |
| Adhesive | Do not use adhesive for repairs or other purposes. When repair is required, please contact a dealer or a service station of OLYMPUS IMAGING CORP. |
- Do not perform operations other than specified in this instruction manual, do not remove or modify parts other than specified, and do not use parts other than specified.
Any troubles in taking pictures or with the equipment resulting from the above actions shall be outside the guarantee.
- OLYMPUS IMAGING CORP. shall in no way be responsible for accidents involving immersion of a digital camera in water.
- OLYMPUS IMAGING CORP. shall not pay any compensation for accidents (injuries or material damage) at the time of use.
Contents
Introduction 2
Please read the following items before use. 2
For safe use 3
Batteries 4
Setting the underwater shooting scene mode 5
For Prevention of Water Leakage Accidents 5
Handling the Product 6
1.Preparations. 10
Check the contents of the package. 10
Names of the parts 11
Install the strap. 12
Master the basic operation 12
Holding the Case 12
How to Press the Shutter Lever. 13
How to Switch the Shooting Mode. 13
How to Use the Zoom Buttons 13
How to Use the POWER Button 14
- Advance Check of the Case 15
Advance test before use 15
Advance Test. 15
- Install the digital camera. 16
Check the digital camera. 16
Battery Confirmation 16
Confirmation of the Remaining Number of Pictures to be
Taken 16
Remove the hand strap from the digital camera. 16
Prepare the camera. 16
Applicable Digital Cameras 16
Turn on the digital camera. 16
Check the camera's operation. 17
Open the Case. 17
Load the digital camera. 17
Insertion of silica gel 18
Make sure the camera is loaded properly. 18
Seal the Case. 19
Check the operation of the loaded camera. 19
Confirm the shooting scene and shooting mode. 20
Mounting and removing the lens cap. 20
Installation and removal of the LCD hood. 21
Installation 21
Removal 21
Perform the final checks. 21
Visual Inspection 21
Final Test (Water Leakage Test) 22
- Taking Pictures Under Water 23
How to use the hand strap. 23
Taking pictures. 23
Confirm the picture on the LCD monitor. 23
Press the shutter lever gently. 23
Cautions when using the flash 23
- Underwater Shooting According to the Scene Type.....24
Underwater shooting modes 24
1 Underwater Wide-Angle 1 24
_2 Underwater Wide-Angle 2 24
Underwater Macro 24
How to select the shooting scene 25
Locking AF during underwater shooting 25
- Handling After Shooting 26
Wipe off any waterdrop 26
Take out the digital camera 27
Wash the Case with pure water. 28
Dry the Case. 28
- Maintaining the Waterproof Function 29
Remove the O-ring. 29
Removal of the O-ring 29
Remove any sand, dirt, etc. 30
Install the O-ring. 31
How to Apply Grease to the O-ring. 31
Replace consumable parts 32
- Appendix 33
Q & A on the use of the PT-042 33
Specifications 38
1. Preparations
Check the contents of the package.
En
Check that all accessories are in the box.
Contact your dealer if accessories are missing or damaged.
(Check that the O-ring is normal)
Instruction manual (this manual)
OLYMPUS distributor list
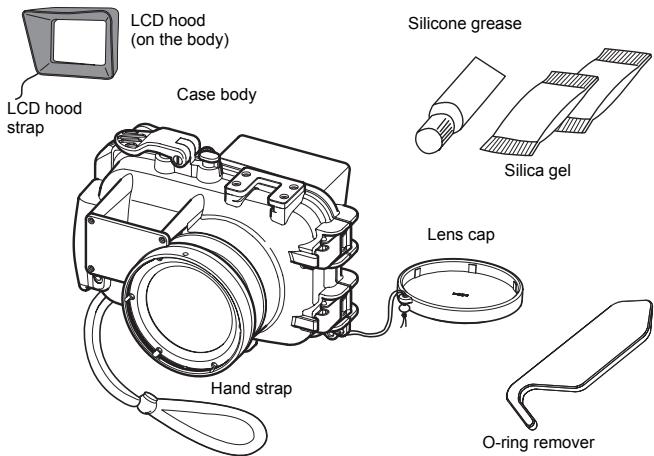
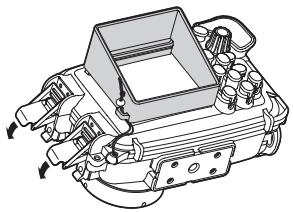
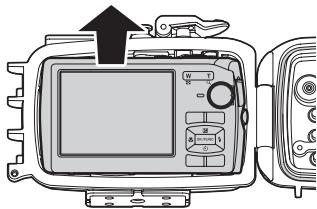
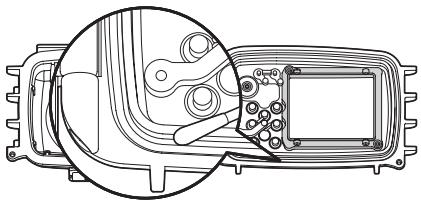
Names of the parts
① Palm grip
② Diffuser
③ Shutter lever
④ POWER button
⑤ Accessory mount
⑥ Front lid
⑦Buckle hook
Buckle lock/unlock lever
Lens cap strap
Lens cap
Lens window
Lens ring
13 Hand strap
14 Hand strap ring
15 Loading guide rails
16 LCD inner hood
17 O-ring
18 Tripod seat
Light shield hood
② LCD hood
*② button/arrow pad
*22 MENU button
^*23 Zoom buttons
*24 Mode dial knob
*25 button/arrow pad
*26 button
*⑦ button/arrow pad
^28 OK/FUNC button
*29 button
^30 AFL button (^1)/ arrow pad
(^1) (During Underwater Wide-Angle 1 or Underwater Macro shooting mode, the down arrow pad functions as the AF LOCK button.)
③ DISP.按钮
② LCD monitor window
③ Rear lid
④ LCD hood strap
Silicone grease (White cap)
Silica gel
37 O-ring remover
Note:
The Case operation parts marked by * corresponds to the operation parts of the digital camera. When the operation parts of the Case are operated, the corresponding functions of the digital camera will operate. For details of the functions, refer to the instruction manual for the digital camera.
Install the strap.
Install the strap on the Case body.
Installation illustration
Installation completed
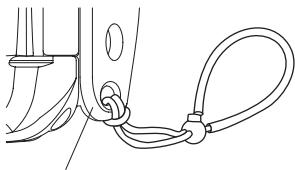
Hand strap ring
CAUTION:
Please install the strap correctly as shown above. OLYMPUS IMAGING CORP. shall bear no responsibility for damage etc. caused by dropping the Case because of incorrect installation of the strap.
Master the basic operation.
Please master the basic operation of the Case before taking pictures.
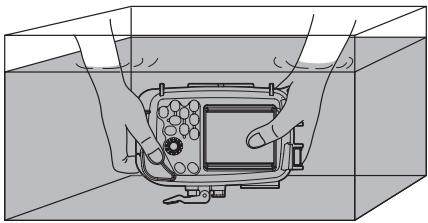
Holding the Case
Hold the Case securely with both hands, keep your elbows close to your body, and hold the Case so that you can confirm the picture on the LCD monitor of the digital camera through the LCD monitor window of the Case.
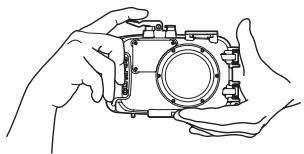
Good example
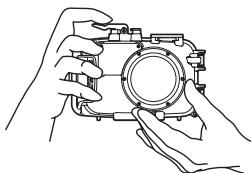
Bad example
CAUTION:
- Do not exert excessive force onto the lens window or the lens ring.
- Take care not to put your fingers etc. over the lens window and the flash diffuser.
How to Press the Shutter Lever
When pressing the shutter lever, press it gently to prevent camera shake.
Note:
For more detailed information on operating the shutter button on the camera, please consult the digital camera's instruction manual.
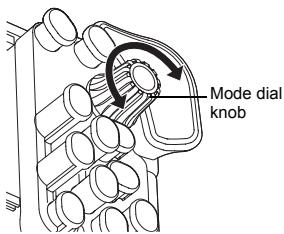
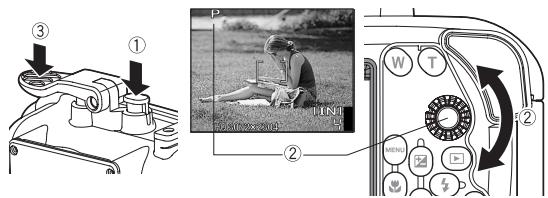
How to Switch the Shooting Mode
To switch the shooting mode of the digital camera, turn the mode dial knob on this Case.
Confirm the shooting mode on the LCD monitor.
How to Use the Zoom Buttons
Zoom operation is possible by operating the zoom buttons of this Case corresponding to the zoom buttons of the digital camera in the Case.

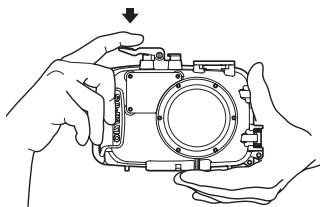
How to Use the POWER Button
Press the POWER button to turn the camera ON/OFF.
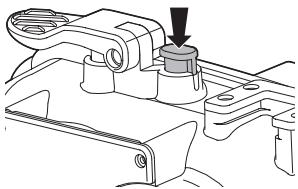
POWER button
CAUTION:
To save battery power, the camera automatically goes into sleep mode and the monitor turns off if there is no operation when the camera is turned on. No picture is taken even if the shutter lever is fully pressed in this mode.
Operate the zoom buttons or other buttons to restore the camera from sleep mode before taking a picture. If the camera is left for 15 minutes, it automatically turns off. Press POWER button to turn the camera on.
For details, refer to your digital camera's instruction manual.
2. Advance Check of the Case
Advance test before use
This Case has been the subject of thorough quality control for the parts during the manufacturing process and thorough function inspections during the assembly. In addition, a water pressure test is performed with a water pressure tester for all products to confirm that the performance conforms to the specifications.
However, depending on the carrying and storage conditions, the maintenance status, etc., the waterproof function may be damaged. Before diving, always perform the following advance test, and the final test after installation of the camera.
Advance test
① Before installing the digital camera in the Case, immerse the empty Case to the intended water depth to confirm that there is no water leakage.
② Main causes of water leakage are as follows.
- The O-ring has not been installed.
- A part of the O-ring or the entire O-ring is outside the specified groove.
- O-ring damage, cracks, deterioration or deformation
- Sand, fibers, hair or other foreign matter sticking to the O-ring, the O-ring groove or the O-ring contact surface on the front lid
- Damage to the O-ring groove or the O-ring contact surface on the front lid
- Catching of the strap, silica gel, etc. when closing the Case Perform the test after the above causes have been eliminated.
CAUTION:
- The most suitable method for checking water leakage is to immerse the Case to the intended water depth. When this is difficult, water leakage also can be checked at a shallow depth with no water pressure. Do not feel that this is troublesome, but perform this test.
- If a leak is detected in normal handling during testing, do not use the Case and contact Olympus.
3. Install the digital camera
Check the digital camera.
Check the digital camera before loading it in the Case.
Battery confirmation
The flash is used very frequently during underwater shooting.
Make sure that you have enough remaining battery power.
Note:
In order to avoid losing shutter chances due to an exhausted battery, you should always replace a battery with a fully charged battery before each dive.
Confirmation of the remaining number of pictures to be taken
Confirm that the image storage has a sufficient remaining number of pictures to be taken.
Remove the hand strap from the digital camera.
When a strap is attached to the digital camera, the hand strap must be removed.
CAUTION:
- When a digital camera is loaded without removing the strap, the strap may get caught between the Case lids and may cause water leakage.
- When removing the strap, handle the digital camera with sufficient care. OLYMPUS IMAGING CORP. shall not be responsible for damage caused by dropping the camera etc.
Prepare the camera.
Applicable digital cameras
This product (PT-042) is designed exclusively for use with the μ 1020/ Stylus 1020/μ 1010/Stylus 1010 digital camera.
Turn on the digital camera.
To save battery power, the camera automatically goes into sleep mode and the monitor turns off if there is no operation when the camera is turned on. No picture is taken even if the shutter lever is fully pressed in this mode. Operate the zoom buttons or other buttons to restore the camera from sleep mode before taking a picture. If the camera is left for 15 minutes, it automatically turns off. Press POWER button to turn the camera on.
Check the camera's operation.
Check if the camera functions normally as described in its instruction manual. After checking, press the camera's POWER button to turn it OFF.
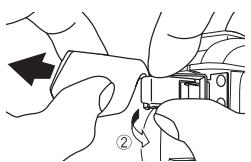
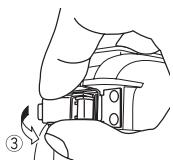
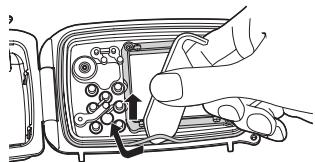
Open the Case.
Use the provided O-ring remover as described below.
① Insert the hook section below the buckle lock/unlock lever.
② Slowly pull the O-ring remover.
③ If the O-ring remover is not available, push the buckle lock/unlock lever from the left and right with your thumb and index finger, and pull up the lever gently.
Load the digital camera.
① Confirm that the digital camera is OFF.
Gently insert the digital camera into the Case.
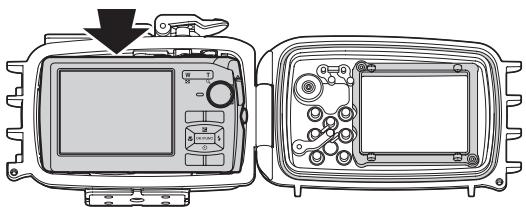
CAUTION:
If the digital camera is not inserted properly, it may not be possible to seal the case so that it is airtight. Alternatively, some controls may become inoperable. Note that imperfect sealing may result in water leakage.
Insertion of silica gel
Before sealing the Case, insert the silica gel bag provided for prevention of fogging between the bottom of the camera and the Case.
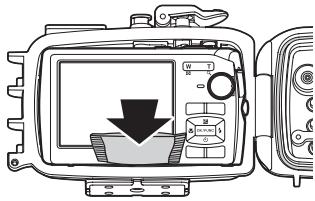
Pay attention to the orientation
CAUTION:
- Insert the silica gel all the way at the specified location and with the specified orientation. When the orientation is not correct, the silica gel bag will be caught when the Case is sealed and water leakage will occur.
- If the Case is sealed without inserting the silica gel fully, the silica gel bag will be caught by the O-ring and water leakage will occur.
- Once silica gel has been used, the moisture absorption performance will be impaired. Always replace the silica gel when the Case is opened and closed.
Make sure the camera is loaded properly.
Check the following points before sealing the Case.
- Is the digital camera loaded properly?
- Is the mode dial set to "SCN"?
- Is silica gel inserted all the way at the specified location?
- Is the O-ring attached properly to the opening on the Case?
- Is there any dirt or foreign matter on the O-ring or the O-ring contact surface on the front lid?
- Is the waterproof function maintenance performed?
Seal the Case.
Close the rear lid gently (so that the O-ring does not slip out of the groove), hook the buckle on the edge of the rear lid, and tilt the buckle lock/unlock lever in the direction of the arrow to seal the Case hermetically.
CAUTION:
- Seal the Case by turning both buckle lock levers down in arrow direction. When one of the buckles is left open, the Case will not be sealed and water leakage will occur.
- Close the rear lid of the Case so that the LCD hood and the lens cap strap don't catch. If they catch, water leaks may result.
Check the operation of the loaded camera.
After sealing the Case, check that the camera functions normally.
① Push the POWER button on the Case and confirm that the camera turns ON/OFF.
② Turn the mode dial on the Case and confirm that the camera mode switches properly.
- Check if the correct mode is being switched from the LCD monitor.
③ Press the shutter lever on the Case and confirm that the camera shutter releases.
- Also operate other control buttons on the Case and confirm that the camera functions properly.
CAUTION:
If the camera does not function properly, reinstall the digital camera following the procedures of "Check the digital camera." (P.16) of this manual.
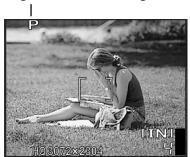
Confirm the shooting scene and shooting mode.
When using the Case, the current camera shooting scene and shooting mode can be confirmed on the camera's LCD monitor.
Shooting scene/Shooting mode
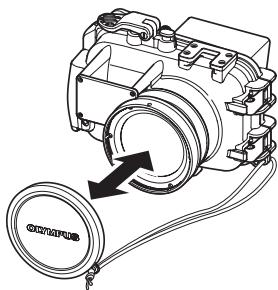
Mounting and removing the lens cap.
Fit the lens cap onto the lens ring as shown in the figure. Be sure to remove the lens cap before shooting.
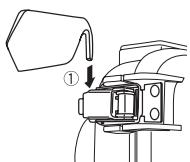
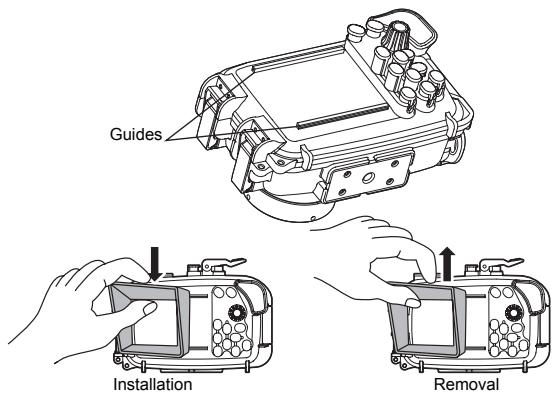
Installation and removal of the LCD hood.
Installation
Strongly push the mounting projections of the LCD hood as shown in the figure into the guides above and below the LCD monitor window.
Removal
Remove the mounting projections of the LCD hood from the guides above and below the LCD monitor window by widening the LCD hood.
Perform the final checks.
Visual Inspection
After sealing the Case, check the sealing part of front and rear lid visually to confirm that the O-ring is not twisted or out of the groove and that no foreign matter has been caught. Also check that the Case is not broken or cracked.
CAUTION:
Hairs, fibers, and other narrow items are not very apparent, but they may cause entry of water. In addition, pay special attention to breaks and cracks on the Case.
Final test (water leakage test)
The final test after loading the camera is explained below. This is the only way to eliminate worry about possible entry of water! Always perform this test. It can be performed easily in a water tank or a bathtub. The required time is about five minutes.
| Simple water immersion test | Explanatory image | Hints | |
| 1 | Place the Case slowly into the water. | As the Case is transparent, waterdrops entering into it can be confirmed easily. | |
| 2 | At first, immerse the Case for only three seconds. | In case of trouble with the O-ring, three seconds are enough for water to enter. Are there air bubbles coming out between the lids? Please check carefully. | |
| 3 | Check that no water has entered into the Case. | Remove the Case from the water and check that no water has accumulated at the bottom of the Case. Is there any water trickling down? | |
| 4 | Next, immerse the Case for 30 seconds. | Check carefully for air bubbles! Do not perform any operation yet, but just observe. | |
| 5 | Check that no water has entered into the Case. | Remove the Case from the water and check that no water has accumulated at the bottom of the Case. Perform very careful confirmation. | |
| 6 | Next, check by immersing for three minutes. | Check carefully for air bubbles! Try operation of the all buttons, levers and dials. Check carefully for air bubbles! If there is still no entry of water, everything is OK! | |
| 7 | This is the final check. Has the silica gel become moist? | This is very important! Has the silica gel become moist? Please check carefully! As the inside can be seen, the inspection for entry of water also can be made easily! | |
| 8 | Now everything is all right. | Now everything is all right! HAVE A NICE DIVE! |
- The PT-042 is not provided with a balance weight.
4. Taking Pictures Under Water
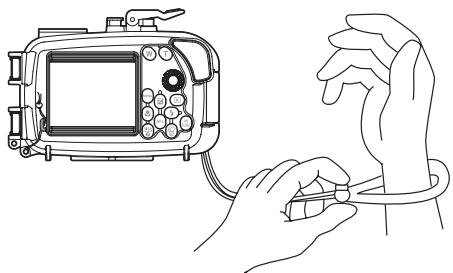
How to use the hand strap
Pass your hand through the hand strap provided and adjust the length with the stop button.
Taking pictures.
Confirm the picture on the LCD monitor.
This Case uses the LCD monitor to confirm the picture.
Press the shutter lever gently.
Hold the Case securely with both hands and press the shutter lever gently to prevent camera shake.
Cautions when using the flash
When taking macro pictures on the wide-angle side, the flash light may be missing in some parts or the light volume may not be uniform.
During underwater shooting, shooting conditions (water clarity, suspended matter, etc.) can have a significant effect on the range of the flash.
Always check your pictures on the LCD monitor after shooting.
5. Underwater Shooting According to the Scene Type
The camera incorporates the following shooting scene modes. Select the one best suited to the underwater scene you are shooting.
Underwater shooting modes
Underwater Wide-Angle 1
Suitable for shooting a scene that extends across a wide range such as a school of fish swimming through the water. Background blues are vividly reproduced.
2 Underwater Wide-Angle 2
Suitable for shooting a large, fast moving subject such as a dolphin or manta ray. In many dolphin-watching locations, use of a flash is not permitted to avoid frightening the dolphins. Although this mode was originally designed to work without the flash, it can also be enabled if required, for example when shooting a manta ray.
Underwater Macro
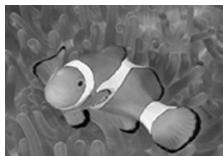
Suitable for close-up shooting of small fish and other underwater creatures. Natural colors of the underwater are accurately reproduced. Red tones can be enhanced by using the flash.
(Examples)


CAUTION:
When the Underwater Wide-Angle 1 or Underwater Macro scene mode is selected, you can easily lock the focus position (AF lock operation) by pressing the down arrow pad (AFL button) on the rear of the protector. When the focus is locked, the AF lock indicator (AFL) appears on the top right of the LCD monitor screen of the camera.
How to select the shooting scene
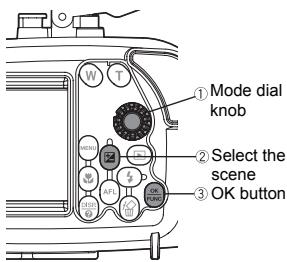
Set the mode dial (①) on the Case to set the camera's shooting mode to SCN, and press the up/down arrow pad (②) to select Underwater Wide-Angle 1, Underwater Wide-angle 2 or Underwater Macro. Then press the OK button (③) to enter the selection.
To switch to a different underwater shooting mode, press the MENU button on the Case, press the down arrow pad, select SCN on the LCD monitor, and press the OK button. Then press the arrow pad to select the desired underwater shooting mode from the LCD monitor display, and press the OK button to enter the selection.
Locking AF during underwater shooting
When Underwater Wide-Angle 1 or Underwater Macro is selected, the down arrow pad (AFL button) on the case functions as the AF LOCK button. Pressing the button once activates the AF lock mode. With focus locked, you can concentrate on operating the shutter whenever a perfect picture opportunity arises.
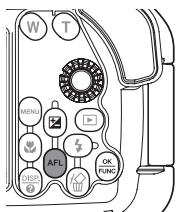
Functions as the AF LOCK button in the
Underwater Wide-Angle 1 and Underwater Macro modes.
Note:
To cancel the AF lock status, press the down arrow pad (AFL button) again.
6. Handling After Shooting
Wipe off any waterdrop.
After completing the shooting and returning to land, wipe off any waterdrop sticking to the Case. Use air or a soft cloth not leaving any fibers to thoroughly wipe any waterdrop etc. from the joint between the front and rear lid, the shutter lever, the palm grips, and the buckle.

CAUTION:
- When waterdrops remain between the front and the rear lid, they may spill to the inside when the Case is opened. Take special care to wipe off all waterdrops.
- When opening the Case, take sufficient care that no water will drip from your hair or body onto the Case and the camera.
- Before opening the Case, make sure that your hands or gloves are free of sand, fibers, etc.
- Do not open or close the Case at locations where there is water spray or sand. When this cannot be avoided because you have to exchange the battery or the image storage, place a sheet in a shelter where there is no water spray or sand.
- Take care not to touch the digital camera or the battery with hands wet with sea water.
Note:
Moisten a towel etc. in advance with pure water and keep it in a plastic bag, so that you can wipe the salt from your hands and fingers before handling the camera.
Take out the digital camera.
Open the Case carefully and take the digital camera out.
CAUTION:
- Always place the opened Case with the O-ring side facing up. If the Case is placed with the O-ring side facing down, dirt or other foreign matter may get on the O-ring or the O-ring contact surface and may cause water leakage during the next dive.
- For details on storage of pictures and other details, refer to the digital camera's operation manual.
Wash the Case with pure water.
After use, seal the Case again after taking out the camera and wash it sufficiently in pure water as soon as possible. After using in sea water, it is important to immerse it for a fixed time in pure water to remove any salt.
CAUTION:
- Water leakage may occur when a high water pressure is partially applied. Before washing the Case with water, take out the digital camera from it.
- Operate the shutter lever and various buttons of this product in pure water to remove salt adhering to the shaft. Do not disassemble for cleaning.
- Drying the Case with salt adhered may impair the function. Always wash off any salt after use.
Dry the Case.
After washing with pure water, use a clean cloth to wipe off any waterdrops. Be sure to use a cloth free of salt residue that doesn't leave any loose fibers. Dry the Case completely at a well ventilated location in the shade.
CAUTION:
- Do not use hot air from a hair dryer or the like for drying and do not expose the Case to direct sunlight, as this may accelerate deterioration and deformation of the Case and deterioration of the O-ring, leading to leakage of water.
- When wiping the Case, take care not to cause scratches.
7. Maintaining the Waterproof Function
Whenever you open the rear lid of the Case, always be sure to perform the O-ring maintenance operation as described below.
Remove the O-ring.
Open the Case and remove the O-ring from the Case.
Removal of the O-ring
① Insert the O-ring remover between the O-ring and the O-ring groove.
② Slip the tip of the inserted O-ring remover below the O-ring. (Be careful not to scratch the O-ring groove with the tip of the O-ring remover.)
Hold the O-ring with your fingertips after it has come out of the groove and remove it from the Case.
Remove any sand, dirt, etc.
After visually checking that dirt has been removed from the O-ring, checks for sand and other foreign matter adhered, damage and cracks can be done by squeezing the entire circumference of the O-ring lightly with your fingertips.
Remove any foreign matter adhered to the O-ring groove using a lint-free clean cloth or cotton swab. Also remove any sand or dirt adhered to the O-ring contact surface on the front lid of the case.
CAUTION:
- Maintenance of the waterproof functions is required even before using this product underwater for the first time.
- When a mechanical pencil or a similar sharp object is used to remove the O-ring or to clean the inside of the O-ring groove, the Case and the O-ring may be damaged and water leakage may occur.
- When the O-ring is checked with the fingertips, take care not to stretch the O-ring.
- Never use alcohol, thinner, benzene or similar solvents or chemical detergents to clean the O-ring. When such chemicals are used, the O-ring may be damaged or its deterioration will be accelerated.
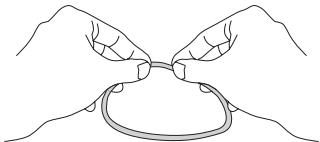
Install the O-ring.
Confirm that no foreign matter is adhered, apply a thin coat of the grease provided to the O-ring, and fit the O-ring into the groove. At this point, confirm that the O-ring does not stick out from the groove.
How to apply grease to the O-ring
| 1 | Apply the exclusive lubricant to each O-ring. | Make sure that your fingers and the O-ring are free of dirt, and squeeze about 5 mm of lubricant onto a finger. (5 mm is the most appropriate amount.) | |
| 2 | Spread the lubricant all over the O-ring. | Apply the lubricant with three fingers and spread it over the ring. Be careful not to use force as this may stretch the O-ring. | |
| 3 | Check that the O-ring is free of scratches or unevenness. | After spreading the lubricant, check visually and by touch that the O-ring is not scratched and that its surface is flat. If it is damaged in any way, be sure to replace it with a brand-new O-ring. | |
| 4 | Apply lubricant on the O-ring contact surface. | Use the lubricant remaining on the fingers to clean and lubricate the case's contact surface. |
CAUTION:
- Always perform maintenance of the waterproof function even when the Case has been opened to exchange the battery or the image storage during shooting. Neglecting this maintenance may cause water leakage.
- When the Case is not to be used for a long time, remove the O-ring from the groove to prevent deformation of the O-ring, apply a thin coat of silicone grease, and store it in a clean plastic bag or the like.
- Drying the Case with salt adhered may impair the function. Always wash off any salt after use.
Replace consumable parts.
- The O-ring is a consumable part. Regardless of the number of times the Case is used, it is recommended that the O-ring be replaced with a new one at least once a year.
- Deterioration of the O-ring is accelerated by the use conditions and the storage conditions. Replace the O-ring even before a year has passed if it shows signs of damage, crack or loss of elasticity.
Note:
Please use genuine Olympus silicone grease, silica gel and O-ring. These consumable parts can also be purchased at an Olympus service station.
Q & A on the use of the PT-042
Q1: What digital camera models can be used with this product?
A1: This product (PT-042) is designed exclusively for use with the 1020/Stylus 1020/ 1010/Stylus 1010 digital camera.
Q2: What cautions must be observed when loading the digital camera into the Case?
A2: Pay special attention to the following items when loading the camera into the Case.
① Make sure that the digital camera has enough battery power left. Battery power is used up very quickly underwater due to frequent flash use.
② Check the remaining number of pictures on the image storage. Please use a card with a sufficient remaining number in order to reduce the number of times the Case has to be opened and closed.
③ Remove the strap from the digital camera. When the camera is loaded without removing the strap, the strap may get caught when the Case is sealed and this will cause water leakage.
④ Turn off the camera.
⑤ Before sealing the Case, confirm that the O-ring has been installed properly in the groove on the rear lid of the Case.
⑥ Confirm that the O-ring and the O-ring contact surface on the front lid are free of dirt, hairs and other foreign matter.
⑦ Insert the silica gel for defogging. Please use silica gel for the Olympus Case.
Q3: What cautions must be observed when using and storing the Case?
A3: Pay special attention to the following items.
① When the O-ring contact surface is pressed strongly from the outside of the Case, or when the Case is twisted, the waterproof function may be impaired and water leakage may occur.
② When the Case is used, left or stored at the following locations, defective operation or trouble may occur. This should be avoided.
- Places where the Case can reach high temperature under direct sunlight or in a car, places with extremely low temperature and places with extreme temperature variations
- Locations with open fire
- Locations with volatile substances
- Locations subject to vibrations
③ In case of the following handling with a camera loaded into the Case, the Case and/or the loaded camera may malfunction or may be damaged. This should be avoided.
- Hitting other objects
- Dropping
- Placing heavy objects on top of the Case
④ When the Case is not used for a long time, trouble may occur due to formation of mold. Before use, confirm the operation of all operation parts and perform the advance test and the final test.
Q4: What cautions must be observed when opening and closing the Case?
A4: Pay special attention to the following items.
① Do not open and close the Case at locations where there is water spray or sand.
② Wipe off all waterdrops from the gap between the front lid and the rear lid and around projections and recesses such as the buckles. Failure to do so may result in waterdrops in the Case when opening.
③ When opening the Case, take care that no water will drip from your hair or body into the Case or onto the camera.
④ When the Case is open, check that no sand, fibers or other foreign matter is adhered to the O-ring and the O-ring contact surface on the front lid.
⑤ Do not touch the camera or the image storage with your hands wet with sea water.
If you detect waterdrops or other signs of water leakage while shooting, immediately end the dive, perform the water leakage test again, and confirm that there is no leakage. If the camera is wet, wipe off any moisture and check the operation.
Q5: How should the Case be handled after use?
A5: After use, take out the camera as soon as possible and wash the Case with pure water. In case of use in the ocean, it is effective to immerse the Case for a certain time in pure water to remove any salt. Operate the buttons and levers under water to turn the shafts and wash off any salt. After washing, use a dry cloth without any salt on it to wipe off any moisture and dry the Case in the shade. Do not use hot air from a hair dryer or the like and do not dry the Case under direct sunlight. Exposure to high temperature or direct sunlight may cause deformation, discoloration or breakage of the Case and deterioration of the O-ring. Wipe the inside of the Case with a soft cloth not causing any fibers. Remove the O-ring, wipe off any salt, sand, dust, etc., and also clean the O-ring groove and the O-ring contact surface in the same way and then dry them. When an object with a sharp tip is used to remove the O-ring from the groove, the O-ring may be damaged and water leakage may occur. Always use the O-ring remover provided.
Q6: How should I take pictures under water?
A6: Please observe the following items for shooting under water.
① Fix the protector with the hand strap provided to your wrist.
② When you place a finger onto the lens window, the finger will appear in the photo. Pay attention to the position of your fingers when holding the Case.
③ Hold the Case securely with both hands and press the shutter lever gently to prevent camera shake.
④ Check the image you want to shoot by viewing the digital camera's LCD monitor through the Case's LCD monitor window, and start shooting. In order to avoid losing shutter chances due to an exhausted battery, you should always replace a battery with a fully charged battery before each dive.
Q7: How can I check for water leakage?
A7: For confirmation, perform the advance test and the final test after loading the camera. The advance test with immersing the Case without the camera to the intended use depth to check for water leakage is the most accurate test, but when this is difficult, it is safer to perform this test even at a depth of 1 m or in a bathtub. The final test also can be performed in a bathtub or a bucket.
Q8: What are the causes for entry of water?
A8: The main causes for the entry of water are shown below. Please check with special care.
① The O-ring has not been installed.
② The O-ring is partly or completely outside the groove.
③ Damage, deterioration or deformation of the O-ring
④ Sand, fibers, hair or other foreign matter on the O-ring
⑤ Sand, fibers, hair or other foreign matter on the O-ring groove or the O-ring contact surface
Catching of the strap, the bag of silica gel, etc. when sealing the Case
⑦ Throwing the Case from a boat into the water, jumping with the Case into the water, or other sudden application of strong forces onto the Case. When entering the water, hand the Case over gently or avoid impacts in other ways.
Q9: What are the important points for O-ring maintenance?
A9: Pay special attention to the following items.
(1) Never use alcohol, thinner, benzene or similar organic solvents or chemical detergents to clean the O-ring. When such chemicals are used, the O-ring may be damaged or its deterioration will be accelerated.
② Use the genuine Olympus silicone grease (white cap). The grease (red cap) used for previous Cases up till PT-008 and the grease from other companies are not suitable for this silicone O-ring. The use of such grease may cause deterioration of the surface and impairment of the waterproof function.
In order to avoid deformation of the O-ring when the Case is not used for a long time, remove the O-ring from the Case, apply a thin coat of the special grease, and store the O-ring in a clean plastic bag. For reuse, confirm that the O-ring is free of damage and cracks, that it has sufficient elasticity, that the surface is free of stickiness and other abnormalities, and use it after applying a thin coat of the special grease. Excessive application of grease does not improve the waterproof function or the permissible withstand pressure. It will cause sand and dust to adhere more easily. A thin, uniform coat produces the best result.
The O-ring is a consumable part. Replace it at least once a year.
Deterioration of the O-ring is accelerated by the use conditions and the storage conditions. Replace the O-ring immediately with a new one if it shows signs of damage, crack or loss of elasticity.
Q10: What are the important points for Case maintenance?
A10: Pay special attention to the following items.
(1) Never use the following chemicals for cleaning, corrosion protection, defogging, repair or other purposes.
- Never use alcohol, thinner, benzene or similar volatile organic solvents or chemical detergents to clean the Case. Pure water or lukewarm water is sufficient for cleaning.
- Do not use anticorrosion agents on the metal parts. The metal parts are made of aluminum, brass or stainless steel. Cleaning with pure water is sufficient.
- Do not use commercial defogging agents. Always use the genuine Olympus defogging silica gel.
- Do not use adhesive for repairs or other purposes. When repair is required, please contact a service station of our company or your dealer.
Q11: Please tell me about repairs.
A11: When repair is required, please contact a service station of our company or your dealer. Do not try to repair, disassemble or modify the Case yourself. Repair, disassembly or modification by you or third parties not authorized by Olympus invalidates the guarantee.
Q12: What are the model names of the accessories for the PT-042?
A12: The following accessories are being sold.
① O-ring for the PT-042 body (POL-042): This is a silicone rubber O-ring packing to be installed in the PT-042 body to make it waterproof. O-rings for other Case models cannot be used.
② Silicone grease (PSOLG-1/2/3): This is a grease for silicone O-ring maintenance.
③ Silica gel (SILCA-5S): This is a desiccant used to prevent fogging of the glass parts of the Case. The quantity is five bags.
④ LCD hood (PFUD-07): This hood is installed on the LCD monitor window of the Case to facilitate the viewing of the LCD monitor of the camera.
- Please contact your dealer or a service station of our company when replacement is required. Replacement will be made against payment.
- The PT-042 is not provided with a balance weight.
Specifications
| Compatible models | Olympus digital camera μ 1020/Stylus 1020/μ 1010/Stylus 1010 |
| Pressure resistance | Depth of up to 40 m |
| Main materials | Body: Transparent polycarbonate Buckles: Stainless steel Grip/Shutter lever/Operation buttons: Polycarbonate Lens window: FL glass Operation button shafts: Stainless steel |
| Diameter of lens ring | ∅62 mm |
| Dimensions | Width 138 mm x height 100 mm x thickness 104 mm (projections not included) |
| Weight | 455 g (camera and accessories not included) |
- We reserve the right to change the external appearance and the specifications without notice.
OLYMPUS IMAGING CORP.
Shinjuku Monolith, 3-1 Nishi-Shinjuku 2-chome, Shinjuku-ku, Tokyo, Japan
OLYMPUS IMAGING AMERICA INC.
3500 Corporate Parkway, P.O. Box 610, Center Valley, PA 18034-0610, U.S.A. Tel. 484-896-5000
Technical Support (USA)
24/7 online automated help: http://www.olympusamerica.com/support
Phone customer support: Tel. 1-888-553-4448 (Toll-free)
Our phone customer support is available from 8 am to 10 pm
(Monday to Friday) ET
http://olympusamerica.com/contactus
Olympus software updates can be obtained at: http://www.olympusamerica.com/digital
OLYMPUS IMAGING EUROPA GMBH
Premises: Wendenstrasse 14-18, 20097 Hamburg, Germany
Tel: +49 40-23 77 3-0 / Fax: +49 40-23 07 61
Goods delivery: Bredowstrasse 20, 22113 Hamburg, Germany
Letters: Postfach 10 49 08, 20034 Hamburg, Germany
European Technical Customer Support:
Please visit our homepage http://www.olympus-europa.com
or call our TOLL FREE NUMBER*: 00800 - 67 10 83 00
for Austria, Belgium, Denmark, Finland, France, Germany, Italy, Luxemburg, Netherlands, Norway, Portugal, Spain, Sweden, Switzerland, United Kingdom
- Please note some (mobile) phone services providers do not permit access or request an additional prefix to +800 numbers.
For all European Countries not listed and in case that you can't get connected
to the above mentioned number, please make use of the following
CHARGED NUMBERS: +49 180 5 - 67 10 83 or +49 40 - 237 73 4899
Our Technical Customer Support is available from 9 am to 6 pm MET (Monday to Friday)
Shinjuku Monolith, 3-1 Nishi-Shinjuku 2-chome, Shinjuku-ku, Tokyo, Japan
OLYMPUS IMAGING AMERICA INC.
3500 Corporate Parkway, P.O. Box 610, Center Valley, PA 18034-0610, Etats-Unis Tel. 484-896-5000
Geeignete Digitalk cameras
Shinjuku Monolith, 3-1 Nishi-Shinjuku 2-chome, Shinjuku-ku, Tokyo, Japan
OLYMPUS IMAGING AMERICA INC.
3500 Corporate Parkway, P.O. Box 610, Center Valley, PA 18034-0610, USA. Tel. 484-896-5000
2Gran angular submarine 25
Shinjuku Monolith, 3-1 Nishi-Shinjuku 2-chome, Shinjuku-ku, Tokyo, Japan
奥林巴斯(上海)映像销售有限公司
| 회지화학목gil | 선명 |
| 회발성 유기용내, 화학제獄 | 체이斯를 힘ко울, 가을리,회발성 유기용내화 화학제獄등으로 채既有지마신지.개고한울이내 지지군한울로드 출본심에 채既有심이가能夠 Niger다. |
| 부식상지제 | 부식상지제를 사용HZ지마신지.본체이斯의 기 수부본은 StEtAnlReS StTell 끼는 출금로에 이류어 지有關消息称.울을 이용해 출본심에 채既有심 에相關于 채既有심에 사용하심지.leg 을 사용하심지.leg |
| 서RIA재거제 | 서RIA재거제를 사용HZ지마신지.leg leg 을 사용하심지.leg |
| 정해지 힘리원운울제 이 와의운울유 | 심리원운울제만 사용HZ지마신지.leg leg toes seel O-류 fla front by the Nup of the Nup in the Nup of the Nup in the Nup of the Nup in the Nup in the Nup in the Nup in the Nup in the Nup in the Nup in the Nup in the Nup in the Nup in the Nup in the Nup in the Nup in the Nup in the Nup in Nup in Nup in Nup in Nup in Nup in Nup in Nup in Nup in Nup in Nup in Nup in Nup in Nup in Nup in Nup in Nup in Nup in Nup in Nup in Nup 在 Nup 在 Nup 在 Nup 在 Nup 在 Nup 在 Nup 在 Nup 在 Nup 在 Nup 在 Nup 在 Nup 在 Nup 在 Nup 在 Nup 在 Nup 在 Nup 在 Nup 在 Nup 在 Nup 在 Nup in Nup in Nup in Nup in Nup in Nup in Nup in Nup in Nup in Nup in Nup in Nup in Nup in Nup in Nup in Nup in Nup in Nup in Nup in Nup In Nup In Nup In Nup In Nup In Nup In Nup In Nup In Nup In Nup In Nup In Nup In Nup In Nup In Nup In Nup In Nup In Nup In Nup In Nup In Nup in Nup in Nup in Nup in Nup in Nup in Nup in Nup in Nup in Nup in Nup in Nup in Nup in Nup in Nup in Nup in Nup in Nup in Nup in Nup INL INL INL INL INL INL INL INL INL INL INL INL INL INL INL INL INL INL INL INL INL INL INL INL INL INL INL INL INL INL INL INL INL INL in INL INL INL INL INL INL INL INL INL INL INL INL INL INL INL INL INL INL INL INL INL INL INL INL INL INL INL INL INL INL INL INL INL |
kaMelraKaKerJIeUfAuaJxHcOoHdHzHJcHJcHJcHJcHJcHJcHJcHJcHJcHJcHJcHJcHJcHJcHJcHJcHJcHJcHJcHJcHJcHJcHJcHJcHJcHJcHJcHJcHJcHJcHJcHJcHJcHJcHaJIeUaUaUaUaUaUaUaUaUaUaUaUaUaUaUaUaUaUaUaUaUaUaUaUaUaUaUaUaUaUaUaUaUaUaUaUaUaUaUaUaUaUaUaUaUaUaUaUaUaUaUaNnNnNnNnNnNnNnNnNnNnNnNnNnNnNnNnNnNnNnNnNnNnNnNnNnNnNnNnNnNnNnNnNnNnNnNnNnNnNnNnNnNnNnNnNnNnNnNnNnNnNn NnnNNnnNNnnNNnnNNnnNNnnNNnnNNnnNNnnNNnnNNnnNNnnNNnnNNnnNNnnNNnnNNnnNNnnNNnnNNnnNNnnNNnnNNnnNNnnNNnnNNnnNNnnNNnnNNnnNNnnNNnnNNnnNNnnNNnnNNnnNNnnNNnnNNnnNNnnNNnnNNnnNNnnNNnnNNnnNNnnNNnnNNnnNNnnNNnnNNnnNNnn NNNNNNNNNNNNNNNNNNNNNNNNNNNNNNNNNNNNNNNNNNNNNNNNNNNNNNNNNNNNNNNNNNNNNNNNNNNNNNNNNNNNNNNNNNNNNNNNNNNNNNNNNNNNNNNNNNNNNNNNNNNNNNNNNNNNNN
卡雷拉的主静態態試驗。
整2:KaiIsGnEeHnEeHnEeHnEeHnEeHnEeHnEeHnEeHnEeHnEeHnEeHnEeHnEeHnEeHnEeHnEeHnEeHnEeHnEeHnEeHnEeHnEeHnEeHnEeHnEeHnEe
Shinjuku Monolith, 3-1 Nishi-Shinjuku 2-chome, Shinjuku-ku, Tokyo, Japan
A/S1408253769000000000000000000000000000000000000000000
TEL.02-2135-3577 FAX.02-2135-3504
中号A/S士T 26-3
TEL.02-754-1341 FAX.02-754-1343
A/S/
TEL.02-711-7906-7 FAX.02-716-7907
合A/S电T
TEL.02-443-5200 FAX.02-400-1460
A/S新T 181-1202
TEL.02-458-9175 FAX.02-458-4592
183-10
TEL.032-543-3581 FAX.032-543-3588
六原A/S新T
TEL.031-269-0089 FAX.031-269-8440
日A/SSELKIO 13309J 108
TEL.031-905-8626 FAX.031-904-9077
608-27
TEL.033-241-4501 FAX.033-241-7501
月月月月月A/S电电月月月月月月月月月月月月月月月月月月月月月月月月月月月月月月月月月月月月月月月月月月月月月月月月
TEL.062-232-3360 FAX.062-232-3350
1
TEL.042-254-1110 FAX.042-257-4312
朝阿朝阿A/S电T 馮朝南日朝安士神部
TEL.041-567-4001 FAX.041-568-4002
大国大国中A/S/电电电电电电电电电电电电电电电电电电电电电电电电电电电电电电电电电电电电电电电电电电电电电电电电电电电电电电电电电电电电电电电电电电电电电电电电电电电电电电电电电电
TEL.053-716-7163 FAX.053-716-7170
A/S
TEL.053-426-8430 FAX.053-256-4586
丰社丰社中公A/S电口丰社社中公国
TEL.051-256-3760 FAX.051-256-3762
A/S 849-1-00
TEL.051-809-2600 FAX.051-807-1245
上A/S1641-1
TEL.052-274-8882 FAX.052-271-7447
Door To Door
ACKB A/S
Olympus登高,早登水龙之国境中能遑遑之徒吾者,何以施其正国歌之士民自尊默地蕃贝社是普日士却安会自