
Pure Run 10.0 - Treadmills TUNTURI - Free user manual and instructions
Find the device manual for free Pure Run 10.0 TUNTURI in PDF.


| Product Type | Motorized Treadmill |
| Brand | Tunturi |
| Model | Pure Run 10.0 |
| Dimensions (L x W x H) | 180 x 80 x 140 cm |
| Device Weight | 80 kg |
| Max. User Weight | 130 kg |
| Power Supply | 220-240 V ~ 50 Hz |
| Motor Power | 3.0 CHP |
| Maximum Speed | 20 km/h |
| Incline Range | 0-15 % |
| Running Surface | 140 x 50 cm |
| Display | LCD display with backlight |
| Display Functions | Time, distance, calories, speed, incline, heart rate |
| Training Programs | 12 preset programs |
| Heart Rate Sensor | Integrated hand pulse sensors and chest strap (optional) |
| Safety | Magnetic safety key with tether |
| Folding | Yes (foldable with gas strut) |
| Transport Wheels | Yes, for easy transportation |
| Noise Level | < 65 dB (normal operation) |
| Maintenance and Cleaning | Lubricate belt every 3 months, clean with a damp cloth |
| Spare Parts and Repairability | Available via Tunturi customer service, repairable by an authorized technician |
| Warranty | 2 years (parts and labor) |
Frequently Asked Questions - Pure Run 10.0 TUNTURI
User questions about Pure Run 10.0 TUNTURI
0 question about this device. Answer the ones you know or ask your own.
Ask a new question about this device
Download the instructions for your Treadmills in PDF format for free! Find your manual Pure Run 10.0 - TUNTURI and take your electronic device back in hand. On this page are published all the documents necessary for the use of your device. Pure Run 10.0 by TUNTURI.
USER MANUAL Pure Run 10.0 TUNTURI
natural_image
Technical line drawing of a treadmill with visible frame, handle, and side panel (no text or symbols)
RUN 10.0 3


RUN 10.0 5

natural_image
Mechanical component diagram showing a lever mechanism with a red arrow indicating motion direction (no text or symbols)D3

natural_image
Technical line drawing of a treadmill with blue control panel and red directional arrows indicating motion (no text or symbols)


natural_image
Mechanical component diagram showing a red arrow indicating rotation or force direction (no text or symbols present)
RUN 10.0 7
8 RUN 10.0
G
TREADMILL
Welcome to the world of Tunturi Fitness!
Thank you for purchasing this piece of Tunturi equipment. Tunturi offers a wide range of professional fitness equipment, including crosstrainers, treadmills, exercise bikes, rowers and vibration plates. The Tunturi equipment is suitable for the entire family, no matter what fitness level. For more information, please visit our website www.tunturi.com
Safety warnings

WARNING
- Read the safety warnings and the instructions. Failure to follow the safety warnings and the instructions can cause personal injury or damage to the equipment. Keep the safety warnings and the instructions for future reference.

WARNING
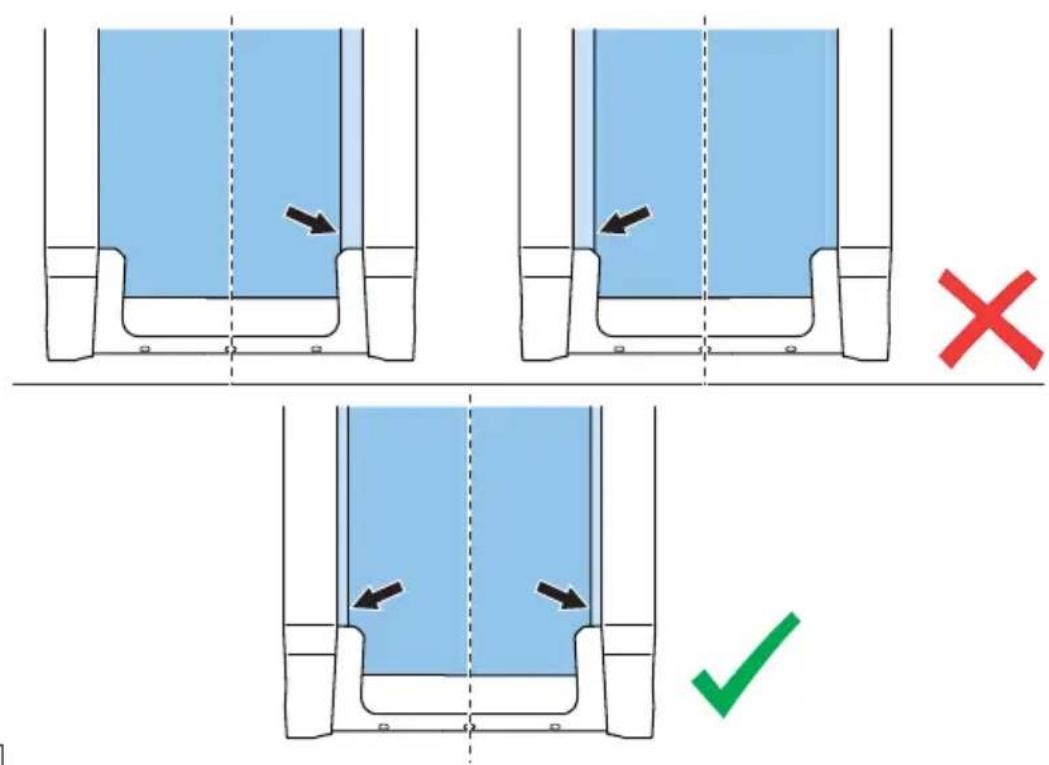
- Heart-rate monitoring systems may be inaccurate. Over-exercise may result in serious injury or death. If you feel faint, stop exercising immediately. For the correct position on the running belt see illustration D4.
- The equipment is suitable for domestic and professional use only (e.g. hospitals, fire stations, hotels, schools etc.). Max. usage is limited to 6 hrs a day. The equipment is not suitable for full commercial use (e.g. large gyms).
- The use of this equipment by children or persons with a physical, sensory, mental or motorial disability, or lack of experience and knowledge can give cause to hazards. Persons responsible for their safety must give explicit instructions or supervise the use of the equipment.
- Before starting your workout, consult a physician to check your health.
- If you experience nausea, dizziness or other abnormal symptoms, immediately stop your workout and consult a physician.
-
To avoid muscular pain and strain, start each workout by warming up and finish each workout by cooling down. Remember to stretch at the end of the workout.
-
The equipment is suitable for indoor use only. The equipment is not suitable for outdoor use.
- Only use the equipment in environments with adequate ventilation. Do not use the equipment in draughty environments in order not to catch a cold.
- Only use the equipment in environments with ambient temperatures between 10 °C and 35 °C. Only store the equipment in environments with ambient temperatures between 5 °C and 45 °C.
- Do not use or store the equipment in humid surroundings. The air humidity must never be more than 80%.
- Only use the equipment for its intended purpose. Do not use the equipment for other purposes than described in the manual.
- Do not use the equipment if any part is damaged or defective. If a part is damaged or defective, contact your dealer.
- Keep your hands, feet and other body parts away from the moving parts.
- Keep your hair away from the moving parts.
- Wear appropriate clothing and shoes.
- Keep clothing, jewelry and other objects away from the moving parts.
- Make sure that only one person uses the equipment at a time. The equipment must not be used by persons weighing more than 150 kg (330 lbs).
- Do not open equipment without consulting your dealer.
Electrical safety
Description (fig. A)
Your treadmill is a piece of stationary fitness equipment used to simulate walking or running without causing excessive pressure to the joints.
| 1 Running belt | 9 Jogwheel |
| 2 Side handlebar | 10 Support foot |
| 3 Hand pulse sensor | 11 Transport wheel |
| 4 SPEED +/- button | 12 Console |
| 5 INCLINE +/- button | 13 Master power switch |
| 6 Safety key slot | 14 Circuit breaker |
| 7 Safety key | 15 Mains cable connection |
| 8 Safety key clip |
Fasteners (fig. C)
16 Screw (M8*60L)
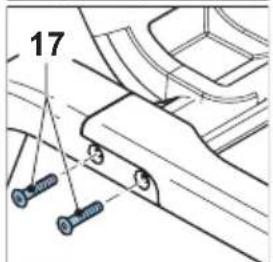
17 Screw (M8*15L)
Package contents (fig. B & C)
- The package contains the parts as shown in fig. B.
- The package contains the fasteners as shown in fig. C. Refer to the section "Description".

NOTE
– If a part is missing, contact your dealer.
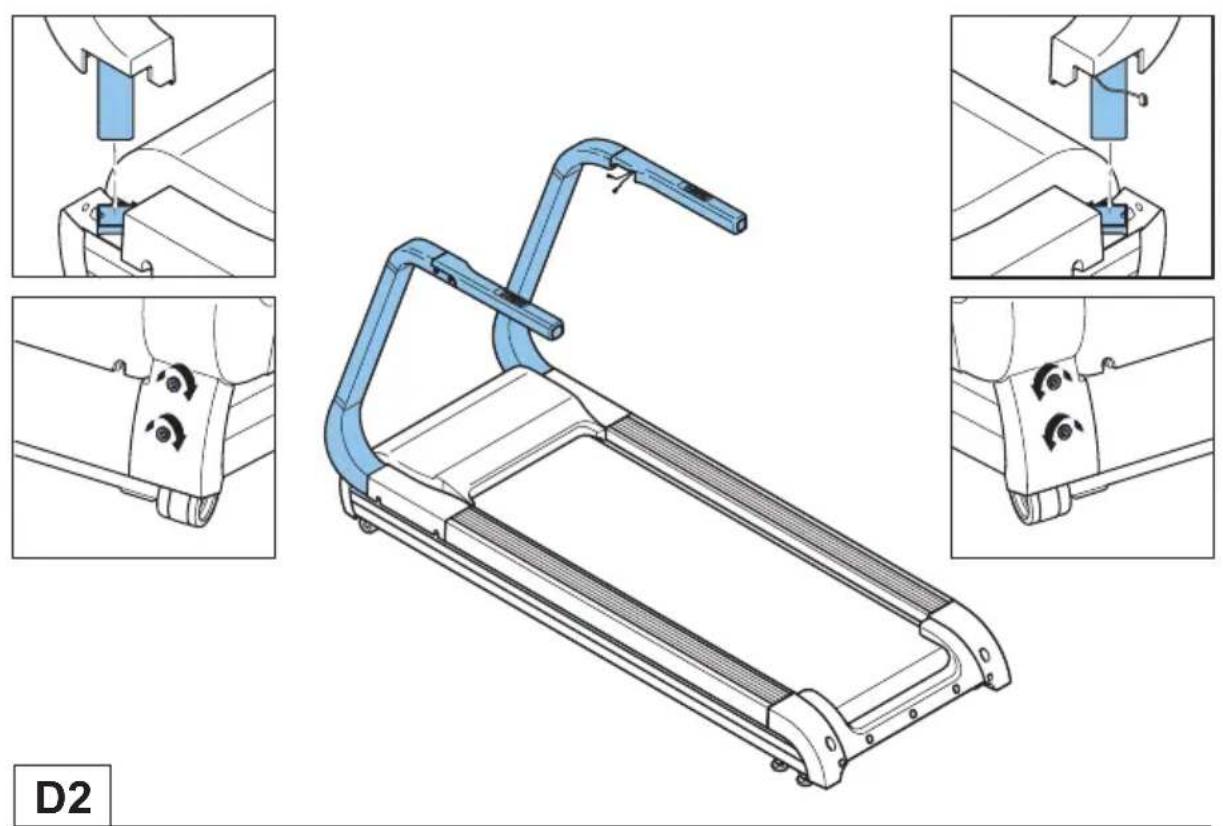
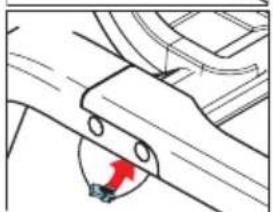
Assembly (fig. D)

WARNING
- Assemble the equipment in the given order.
- Carry and move the equipment with at least two persons.

CAUTION
- Place the equipment on a firm, level surface.
- Place the equipment on a protective base to prevent damage to the floor surface.
- Allow at least 200 cm of clearance behind the equipment, 100 cm in front of the equipment and 100 cm on the sides of the equipment.
- Refer to the illustrations for the correct assembly of the equipment.
Workouts
The workout must be suitably light, but of long duration. Aerobic exercise is based on improving the body's maximum oxygen uptake, which in turn improves endurance and fitness. You should perspire, but you should not get out of breath during the workout.
To reach and maintain a basic fitness level, exercise at least three times a week, 30 minutes at a time. Increase the number of exercise sessions to improve your fitness level. It is worthwhile to combine regular exercise with a healthy diet. A person committed to dieting should exercise daily, at first 30 minutes or less at a time, gradually increasing the daily workout time to one hour. Start your workout at low speed and low resistance to prevent the cardiovascular system from being subjected to excessive strain. As the fitness level improves, speed and resistance can be increased gradually. The efficiency of your exercise can be measured by monitoring your heart rate and your pulse rate.
Pulse rate measurement (hand pulse sensors)
The pulse rate is measured by sensors in the handlebars when the user is touching both sensors at the same time.

WARNING
- Heart rate monitoring systems may be inaccurate. Over exercise may result in serious injury or death. If you feel faint stop exercising immediately.
Most accurate pulse measurement is achieved when the skin is slightly moist and constantly touching the hand pulse sensors. If the skin is too dry or too moist, the pulse rate measurement might become less accurate.

NOTE
- Do not use the hand pulse sensors in combination with a heart rate chest belt.
- If you set a heart rate limit for your workout, an alarm will sound when it is exceeded.
Heart rate measurement (heart rate chest belt)
The most accurate heart rate measurement is achieved with a heart rate chest belt. The heart rate is measured by a heart rate receiver in combination with a heart rate transmitter belt. Accurate heart measurement requires that the electrodes on the transmitter belt are slight moist and constantly touching the skin. If the electrodes are too dry or too moist, the heart rate measurement might become less accurate.

WARNING
- If you have a pacemaker, consult a physician before using a heart rate chest belt.

CAUTION
- If there are several heart rate measurement devices next to each other, make sure that the distance between them is at least 2 meter.
- If there is only one heart rate receiver and several heart rate transmitters, make sure that only one person with a transmitter is within transmission range.

NOTE
- Do not use a heart rate chest belt in combination with the hand pulse sensors.
- Always wear the heart rate chest belt under your clothes directly in contact with your skin. Do not wear the heart rate chest belt above your clothes. If you wear the heart rate chest belt above your clothes, there will be no signal.
- If you set a heart rate limit for your workout, an alarm will sound when it is exceeded.
- The transmitter transmits the heart rate to the console up to a distance of 1,5 meter. If the electrodes are not moist, the heart rate will not appear on the display.
- Some fibers in clothes (e.g. polyester, polyamide) create static electricity which can prevent accurate heart rate measurement.
- Mobile phones, televisions and other electrical appliances create an electromagnetic field which can prevent accurate heart rate measurement.
Maximum heart rate (during training)
The maximum heart rate is the highest heart rate a person can safely achieve through exercise stress. The following formula is used to calculate the average maximum heart rate: 220 - AGE. The maximum heart rate varies from person to person.

WARNING
- Make sure that you do not exceed your maximum heart rate during your workout. If you belong to a risk group, consult a physician.
| Category Heart rate zone Explanation | ||
| Beginner 50-60% of maximum heart rate | Suitable for beginners, weight-watchers, convalescents and persons who have not exercised for a long time. Exercise at least three times a week, 30 minutes at a time. | |
| Advanced 60-70% of maximum heart rate | Suitable for persons who want to improve and maintain fitness. Exercise at least three times a week, 30 minutes at a time. | |
| Expert 70-80% of maximum heart rate | Suitable for the fittest of persons who are used to long-endurance workouts. | |
Use
Master power switch
The equipment is equipped with a master power switch to shut down the equipment completely.
To start the equipment:
- Insert the mains plug into the equipment.
- Insert the mains plug into the wall socket.
- Set the master power switch to the on position.
To stop the equipment:
- Set the mains power switch to the off position.
- Remove the mains plug from the wall socket.
- Remove the mains plug from the equipment.
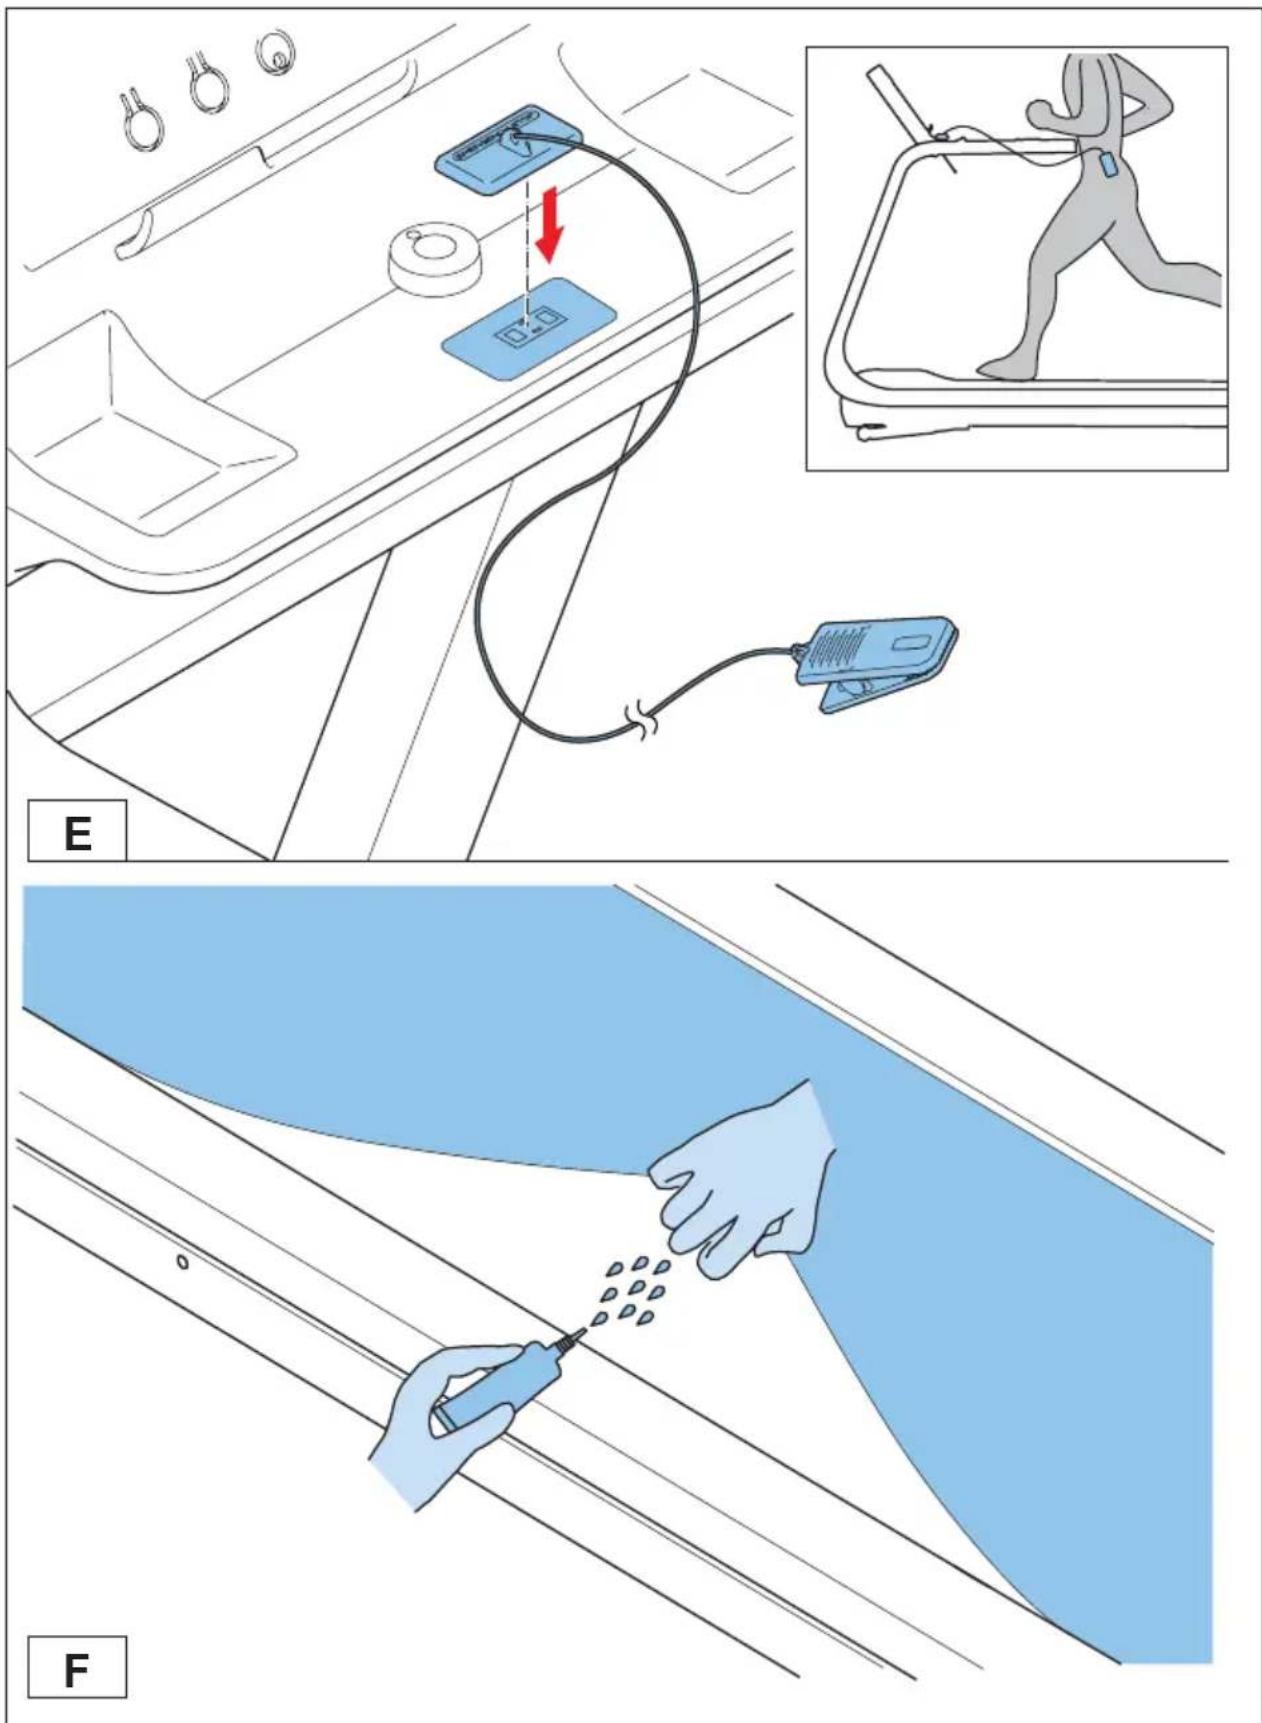
Safety key (fig. E)
The equipment is equipped with a safety key that must be properly inserted into the console to start the equipment. If you remove the safety key from the console, the equipment will stop immediately.
- Insert the safety key into the slot in the console.
- Make sure that the clip of the safety key is properly attached to your clothing. Make sure that the clip is not removed from your clothing before the safety key is removed from the console.
Circuit breaker
The equipment is equipped with a circuit breaker that interrupts the circuit when the electricity load is above the maximum capacity. When this occurs, the circuit breaker must be pressed.

WARNING
- Before pressing the circuit breaker, remove the mains plug from the equipment.
If the equipment shuts down, proceed as follows to restart the equipment:
- Remove the mains plug from the equipment.
- Press the circuit breaker to restart the equipment.
- Insert the mains plug into the equipment.
Adjusting the support feet
The equipment is equipped with 4 support feet. If the equipment is not stable, the support feet can be adjusted.
- Turn the support feet as required to put the equipment in a stable position.
- Tighten the locknuts to lock the support feet.
Console

1 Display 9 QUICK START / SELECT button
2 LANGUAGE button 10 WORKOUT PROGRAM button
3 WORKOUT TYPE button 11 WORKOUT TRIP button
4 USER button 12 OWN TRAINING button
5 WORKOUT PROFILE button 13 FITNESS TEST button
6 INTERNET button 14 HEART RATE CONTROL button
7 MEDIA button 15 SCENERY TOUR button
8 SETTINGS button
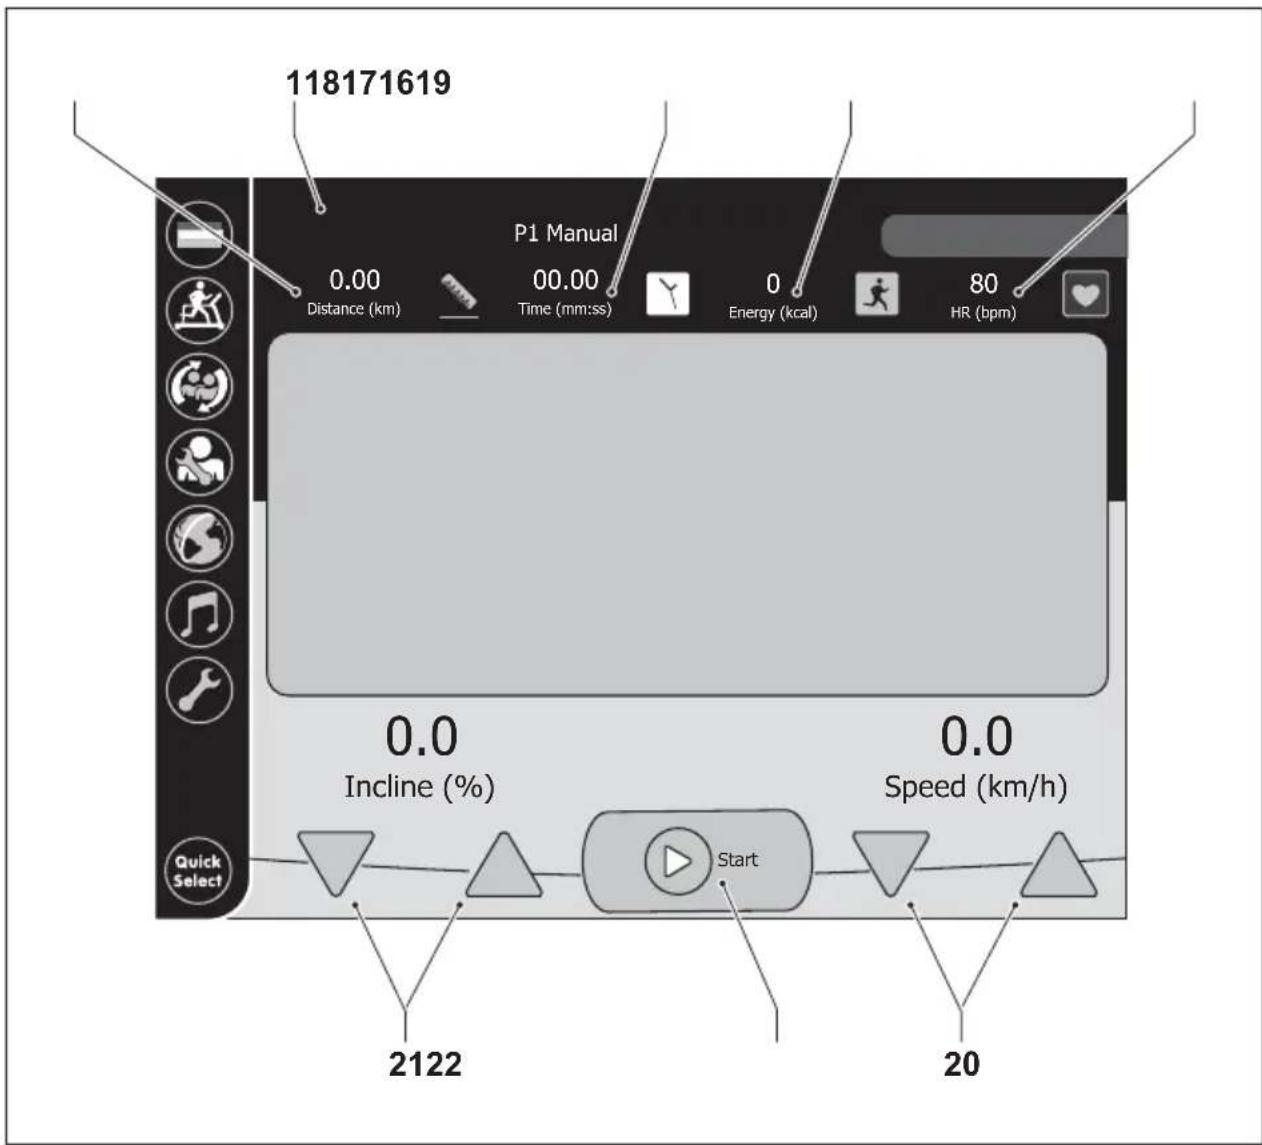
1 Display
16 Distance indicator
17 Time indicator
18 Energy indicator
19 Pulse indicator
20 SPEED +/- buttons
21 INCLINE +/- buttons
22 START/STOP button
PAUSE/RESUME button

CAUTION
- Keep the console away from direct sunlight.
- Dry the surface of the console when it is covered with drops of sweat.
- Do not lean on the console.
- Only touch the display with the tip of your finger. Make sure that your nails or sharp objects do not touch the display.

NOTE
- The console switches to standby mode when the equipment is not used for 10 minutes (default). The time before the console switches to standby mode can be enabled and disabled under SETTINGS > POWER MANAGEMENT. The time can be set between 5 and 60 minutes.
Explanation of buttons
| Button Explanation | |
| LANGUAGE Touch the button to select the language. | |
| WORKOUT TYPE Touch the button to go to the workout menu.Menu items: WORKOUT PROGRAM / WORKOUT TRIP / OWN PROGRAM / SCENERY TOUR / HEARTRATE CONTROL / FITNESS TEST. | |
| USER Touch the button to go to the user menu. | |
| WORKOUT PROFILE Touch the button to see the workout profile of the last workout.You can also edit the user settings by touching the EDIT USER button: sex, age, height, weight, heart rate limit, maximum speed. | |
| INTERNET Touch the button to browse the internet (WiFi only).The Flash Player allows for streaming audio and video. | |
| MEDIA Touch the button to open the media player. The console recognises music and movies which are stored on your USB stick.Supported formats: MP3 / WAV / WMP (audio); MPEG-1 / MPEG-4 / AVI / DivX (video). | |
| SETTINGS Touch the button to change specific settings.Menu items: WIFI / DATE/TIME / BRIGHTNESS / VOLUME / ABOUT / POWER MANAGEMENT. | |
| QUICK START Touch the button to start the workout without manual settings. | |
| QUICK SELECT Touch the button to quick set the incline to 0, 3 or 5%or set the speed to 0, 3, 5, 8 and 12 km/h.During workout using internet or the media player, this button changes into a red arrow. Touch the button to go back to the workout settings. | |
Explanation of menu items
Refer to the section "Training menu".
User menu
The console can store a maximum of 100 users.
Creating a user
- Touch the USER button.
- Touch the CREATE USER button.
-
Enter your name. Touch OK to confirm.
-
Set the user information:
-
GENDER: Touch the button to set your sex.
- AGE: Touch the +/- buttons to set your age.
- HEIGHT: Touch the +/- buttons to set your height.
- WEIGHT: Touch the +/- buttons to set your weight.
- MAX. HR: Touch the +/- buttons to set the heart rate limit (max. bpm).
The heart rate limit is calculated automatically ("220 - age" for men; "226 - age" for women). -
MAX. SPEED: Touch the +/- buttons to set the maximum speed.
-
Set the display units:
-
MASS UNIT: Touch the button to set the units for weight: KG / LB.
- LENGTH UNIT: Touch the button to set the units for length: KM/M/CM / MI/FT/IN.
- ENERGY UNIT: Touch the button to set the units for energy: CALORIE / JOULE.
- Touch OK to confirm.
Selecting a user
- Touch the USER button.
- Touch a USER PROFILE button to select the user.
Editing a user
- Touch the USER button to go to the user menu.
- Select the user. Refer to the section "Selecting a user".
- Touch the WORKOUT PROFILE button.
- Touch the EDIT USER button to edit user data. Refer to the section "Creating a user".
Deleting a user
- Touch the USER button to go to the user menu.
- Select the user. Refer to the section "Selecting a user".
- Touch the WORKOUT PROFILE button.
- Touch the DELETE USER button to delete the current user.
User log
- Touch the USER button to go to the user menu.
- Select the user. Refer to the section "Selecting a user".
- Touch the WORKOUT PROFILE button. The display shows the data of the last training session of the current user.
- Touch the CLEAR LOG button to clear the user log.
Training menu
QUICK START
You can start your workout immediately by pressing the QUICK START button.
- Touch the QUICK START button.
- Touch the START button to start the workout. If you have set target values, the values start to count up or count down.
- Manually change the speed and the incline during the workout:
- SPEED: Touch the +/- buttons to increase or decrease the speed by 0.1 km/h (0.1 mph) at a time. Touch QUICK SELECT to select a preset value.
- INCLINE: Touch the +/- buttons to increase or decrease the incline by 0.5% at a time. Touch QUICK SELECT to select a preset value.
- Touch the PAUSE/STOP button to pause the workout.
- Touch the RESUME button to resume te workout.
- Touch one of these buttons to stop the workout: LANGUAGE / WORKOUT TYPE / USER / WORKOUT PROFILE / SETTINGS. Touch OK to confirm.
- Touch the START/STOP button to start the equipment.
WORKOUT PROGRAM
The program contains 5 preset training profiles.
- Touch the WORKOUT TYPE button.
- Touch the WORKOUT PROGRAM button.
- Touch the arrow buttons to select a training profile. Touch OK to confirm.
-
Touch the corresponding menu item to set the time or the distance.
-
Touch the +/- buttons to change the value for the selected menu item. Touch OK to confirm.
- Touch the START button to start the workout. If you have set target values, the values start to count up or count down.
- Manually change the speed and the incline during the workout:
- SPEED: Touch the +/- buttons to increase or decrease the speed by 0.1 km/h (0.1 mph) at a time. Touch QUICK SELECT to select a preset value.
- INCLINE: Touch the +/- buttons to increase or decrease the incline by 0.5% at a time. Touch QUICK SELECT to select a preset value.
- Touch the PAUSE/STOP button to pause the workout.
- Touch the RESUME button to resume te workout.
- Touch one of these buttons to stop the workout: LANGUAGE / WORKOUT TYPE / USER / WORKOUT PROFILE / SETTINGS. Touch OK to confirm.
WORKOUT TRIP
The program contains 3 preset training profiles.
- Touch the WORKOUT TYPE button.
- Touch the WORKOUT TRIP button.
- Touch the arrow buttons to select a training profile. Touch OK to confirm.
- Touch the corresponding menu item to set the distance.
- Touch the +/- buttons to change the value for the selected menu item. Touch OK to confirm.
- Touch the START button to start the workout. If you have set target values, the values start to count up or count down.
- Manually change the speed and the incline during the workout:
- SPEED: Touch the +/- buttons to increase or decrease the speed by 0.1 km/h (0.1 mph) at a time. Touch QUICK SELECT to select a preset value.
- INCLINE: Touch the +/- buttons to increase or decrease the incline by 0.5% at a time. Touch QUICK SELECT to select a preset value.
- Touch the PAUSE/STOP button to pause the workout.
- Touch the RESUME button to resume te workout.
- Touch one of these buttons to stop the workout: LANGUAGE / WORKOUT TYPE / USER / WORKOUT PROFILE / SETTINGS. Touch OK to confirm.
OWN TRAINING

NOTE
- You can only create an own training when the distance is longer than 100 metres and the time is more than 300 seconds.
The console can store a maximum of 100 workouts. You can only save workouts after selecting a user.
You can repeat a previously saved workout (RERUN) or compete against a previously saved workout (RACING).
- Touch the WORKOUT TYPE button.
- Touch the OWN TRAINING button.
- Touch the arrow buttons to select a training profile. Touch OK to confirm.
- Touch RERUN or RACING.
RERUN:
- Set the heart rate control mode: COMBINATION / SPEED / ELEVATION.
- Touch the corresponding menu item to set the time or the distance.
- Touch the +/- buttons to change the value for the selected menu item. Touch OK to confirm.
- Touch the START button to start the workout. If you have set target values, the values start to count up or count down.
RACING: Touch the START button to start the workout. If you have set target values, the values start to count up or count down.
-
Manually change the speed and the incline during the workout:
-
SPEED: Touch the +/- buttons to increase or decrease the speed by 0.1 km/h (0.1 mph) at a time. Touch QUICK SELECT to select a preset value.
-
INCLINE: Touch the +/- buttons to increase or decrease the incline by 0.5% at a time. Touch QUICK SELECT to select a preset value.
-
Touch the PAUSE/STOP button to pause the workout.
- Touch the RESUME button to resume te workout.
- Touch one of these buttons to stop the workout: LANGUAGE / WORKOUT TYPE / USER / WORKOUT PROFILE / SETTINGS. Touch OK to confirm.
SCENERY TOUR
The program contains 3 preset training profiles.
-
Touch the WORKOUT TYPE button.
-
Touch the SCENERY TOUR button.
- Touch the arrow buttons to select a training profile. Touch OK to confirm.
- Touch the corresponding menu item to set the distance.
- Touch the +/- buttons to change the value for the selected menu item. Touch OK to confirm.
- Touch the START button to start the workout. If you have set target values, the values start to count up or count down.
- Manually change the speed and the incline during the workout:
- SPEED: Touch the +/- buttons to increase or decrease the speed by 0.1 km/h (0.1 mph) at a time. Touch QUICK SELECT to select a preset value.
- INCLINE: Touch the +/- buttons to increase or decrease the incline by 0.5% at a time. Touch QUICK SELECT to select a preset value.
- Touch the PAUSE/STOP button to pause the workout.
- Touch the RESUME button to resume te workout.
- Touch one of these buttons to stop the workout: LANGUAGE / WORKOUT TYPE / USER / WORKOUT PROFILE / SETTINGS. Touch OK to confirm.
HEART RATE CONTROL
The program contains 5 preset training profiles.
- Touch the WORKOUT TYPE button.
- Touch the HEART RATE CONTROL button.
- Set the heart rate control mode: COMBINATION / SPEED / ELEVATION.
- Touch the corresponding menu item to set the time or the distance.
- Touch the +/- buttons to change the value for the selected menu item. Touch OK to confirm.
- Touch the START button to start the workout. If you have set target values, the values start to count up or count down.
- Manually change the speed and the incline during the workout:
- SPEED: Touch the +/- buttons to increase or decrease the speed by 0.1 km/h (0.1 mph) at a time. Touch QUICK SELECT to select a preset value.
- INCLINE: Touch the +/- buttons to increase or decrease the incline by 0.5% at a time. Touch QUICK SELECT to select a preset value.
- Touch the PAUSE/STOP button to pause the workout.
- Touch the RESUME button to resume te workout.
- Touch one of these buttons to stop the workout: LANGUAGE / WORKOUT TYPE / USER / WORKOUT PROFILE / SETTINGS. Touch OK to confirm.
FITNESS TEST
The equipment has two fitness tests. The fitness tests require the use of a heart rate chest belt.
2 KM WALK TEST: The test measures your fitness level on the basis of your heart rate level during the exercise and the time you need to complete the 2 km distance. The test is preceded by a 3-minute warm-up period. It is recommended to continue walking slowly after the test, so that your heart rate smoothly returns to normal. The console will shows an estimate of your maximum oxygen uptake capacity.
COOPER TEST: The test measures your fitness level on the basis of the distance you run in 12 minutes: the longer the distance, the better your fitness level. The test is preceded by a 3-minute warm-up period. It is recommended to continue walking slowly after the test, so that your heart rate smoothly returns to normal. The console will shows an estimate of your maximum oxygen uptake capacity.
1. Touch the WORKOUT TYPE button.
2. Touch the FITNESS TEST button.
3. Select 2 KM WALK TEST or COOPER TEST. Touch OK to confirm.
4. Touch the START button to start the workout. If you have set target values, the values start to count up or count down.
5. Manually change the speed and the incline during the workout:
- SPEED: Touch the +/- buttons to increase or decrease the speed by 0.1 km/h (0.1 mph) at a time. Touch QUICK SELECT to select a preset value.
- INCLINE: Touch the +/- buttons to increase or decrease the incline by 0.5% at a time. Touch QUICK SELECT to select a preset value.
- Touch the PAUSE/STOP button to pause the workout.
- Touch the RESUME button to resume te workout.
- Touch one of these buttons to stop the workout: LANGUAGE / WORKOUT TYPE / USER / WORKOUT PROFILE / SETTINGS. Touch OK to confirm.
Cleaning and maintenance

WARNING
- Before cleaning and maintenance, remove the mains plug from the wall socket.
-
Do not use solvents to clean the equipment.
-
Do not block the ventilation openings. Keep the ventilation openings clear from dust, dirt and other obstructions.
- Clean the equipment with a soft, absorbent cloth after each use.
- Clean the visible parts of the equipment with a vacuum cleaner with a small suction nozzle
- Regularly check that all screws and nuts are tight.
Lubrication (fig. F)
The running belt must be checked for lubrication once per 2 months, based on the average use of 60 minutes per day.

WARNING
- Before lubrication, remove the mains plug from the wall socket.

CAUTION
- Only lubricate the running belt if necessary. If you apply too much lubricant, the running belt will slip easily due to lack of friction.
- Stand steadily on the running belt.
- Take hold of the front handlebar and push the running belt with your feet so that it slides back and forth. The running belt must move smoothly and evenly without making sound.
- If the running belt does not move smoothly and evenly or if the running belt does not move at all, touch the underside of the running belt with your fingertips to check the lubrication:
- If you feel lubrication or your fingertips are shiny, there is sufficient lubrication on the running belt.
- If you do not feel lubrication or your fingertips are dusty or rough, use a large spoon to apply a silicon lubricant (15-20 ml) in the middle of the running deck under the running belt and let the equipment operate at 5 km/h for at least 5 minutes.
- After lubrication, do not fold the equipment before having done a workout for 20 minutes with a speed of at least 5km / h . The lubricant will be spread evenly over the running belt.
Aligning the running belt (fig. G)
The running belt must run in the center of the rollers. If the running belt is pushed to one side, the running belt must be aligned using the adjustment bolts at the rear of the equipment.

CAUTION
- Make sure that the running belt is aligned correctly to prevent damage to the edges of the running belt.
- Set the mains power switch to the on position.
- Set the speed to 5 km/h.
- If the running belt runs in the center of the rollers, the running belt is aligned correctly.
- If the running belt drifts to the left, turn the left adjustment bolt 1/4 turn clockwise and the right adjustment bolt 1/4 turn counterclockwise.
- If the running belt drifts to the right, turn the right adjustment bolt 1/4 turn clockwise and the left adjustment bolt 1/4 turn counterclockwise.
- Repeat the last 2 steps until the running belt is aligned to the centre.
Adjusting the running belt tension
The running belt tension must be adjusted when it starts to slip on the rollers. The running belt tension must be adjusted using the adjustment bolts at the rear of the equipment.

CAUTION
- Make sure that the running belt is aligned correctly to prevent damage to the edges of the running belt.
- Set the mains power switch to the on position.
- Set the speed to 5 km/h.
- Turn both adjustment bolts 1/4 turn clockwise an equal amount of times.
-
Slow down the running belt by holding onto the side handlebars and braking as you walk.
-
If the running belt slips, turn both adjustment bolts 1/4 turn clockwise and repeat the test.
- If the belt keeps slipping after several tests, contact the dealer.
Defects and malfunctions
Despite continuous quality control, defects and malfunctions caused by individual parts can occur in the equipment. In most cases, it will be sufficient to replace the defective part.
- If the equipment does not function properly, immediately contact the dealer.
- Provide the model number and the serial number of the equipment to the dealer. State the nature of the problem, conditions of use and purchase date.
Error codes
If the display shows an error code (marked with "E" + number), restart the equipment and check whether the display still shows the error code. If the display still shows the error code, immediately contact the dealer.
Transport and storage

WARNING
- Before cleaning and maintenance, remove the mains plug from the wall socket.
- Carry and move the equipment with at least two persons.
- Make sure that there are no other persons or objects under the equipment.
- When folding the folding the equipment, make sure that you hear the equipment lock into position to prevent the equipment from dropping back down.

CAUTION
- Before folding the equipment, make sure that the incline is 0% . If the incline is not 0% , folding will damage the mechanism.
- Move the equipment and carefully put the equipment down. Place the equipment on a protective base to prevent damage to the floor surface. Move the equipment carefully over uneven surfaces. Do not move the equipment upstairs using the wheels, but carry the equipment by the handlebars.
- Store the equipment in the upright position. Store the equipment in a dry place with as little temperature variation as possible.
Technical data
| Parameter Unit of | measurement | Value |
| Mains voltage V | AC | 230 |
| Mains voltage (North America) V | AC | 110 |
| Mains frequency Hz 50 | ||
| Motor HP 3.5 | ||
| Speed km/h | mph | 0.8-220.5-13.7 |
| Incline % 0-12 | ||
| Length cm | inch | 20882 |
| Width cm | inch | 8232 |
| Height cm | inch | 14557 |
| Weight kg | lbs | 140300 |
| Max. user weight kg | lbs | 150330 |
Warranty
The product has a warranty from the date of delivery (to be documented by invoice or delivery note). Further information on warranty terms can be obtained from your local dealer. The warranty terms may vary from one country to another. Damages caused by normal wear, overloading or improper handling are excluded from the warranty. Damages caused by material or manufacturing faults are covered by the warranty and will repaired or replaced at no cost.
Declaration of the manufacturer
Tunturi Fitness BV declares that the product is in conformity with the following standards and directives: EN 957 (SA), EMC, LVD, 2009/125/CE. The product therefore carries the CE label.
10-2012
Tunturi Fitness BV
P.O. Box 60001
1320 AA Almere
The Netherlands
Disclaimer
© 2012 Tunturi Fitness BV
All rights reserved.
The product and the manual are subject to change. Specifications can be changed without further notice.
LAUFBAND
© 2012 Tunturi Fitness BV
© 2012 Tunturi Fitness BV
© 2012 Tunturi Fitness BV
© 2012 Tunturi Fitness BV
© 2012 Tunturi Fitness BV
© 2012 Tunturi Fitness BV
16 Ruuvi (M8*60L) 17 Ruuvi (M8*15L)
© 2012 Tunturi Fitness BV
For contact information for other countries check our website:
www.tunturi.com
- TREADMILL
- Safety warnings
- WARNING
- Electrical safety
- Description (fig. A)
- Fasteners (fig. C)
- Package contents (fig. B & C)
- NOTE
- Assembly (fig. D)
- CAUTION
- Workouts
- Pulse rate measurement (hand pulse sensors)
- Heart rate measurement (heart rate chest belt)
- Maximum heart rate (during training)
- Use
- Master power switch
- To start the equipment:
- To stop the equipment:
- Safety key (fig. E)
- Circuit breaker
- Adjusting the support feet
- Explanation of menu items
- User menu
- Creating a user
- Selecting a user
- Editing a user
- Deleting a user
- User log
- Training menu
- QUICK START
- WORKOUT PROGRAM
- WORKOUT TRIP
- OWN TRAINING
- RERUN:
- SCENERY TOUR
- HEART RATE CONTROL
- FITNESS TEST
- Cleaning and maintenance
- Lubrication (fig. F)
- Aligning the running belt (fig. G)
- Adjusting the running belt tension
- Defects and malfunctions
- Error codes
- Transport and storage
- Warranty
- Declaration of the manufacturer
- Disclaimer
- LAUFBAND
Brand : TUNTURI
Model : Pure Run 10.0
Category : Treadmills