iElements - Docking Station SONORO - Free user manual and instructions
Find the device manual for free iElements SONORO in PDF.

User questions about iElements SONORO
0 question about this device. Answer the ones you know or ask your own.
Ask a new question about this device
Download the instructions for your Docking Station in PDF format for free! Find your manual iElements - SONORO and take your electronic device back in hand. On this page are published all the documents necessary for the use of your device. iElements by SONORO.
USER MANUAL iElements SONORO
natural_image
Black electronic device with digital display and circular button, no visible text or symbols on bodysonoro audio GmbH
Unter Goldschmied 6
50667 Köln
Germany
info@sonoro-audio.com
www.sonoro-audio.com
06/10
— 8.4 Equalizer (Bass/Treble)
natural_image
Black electronic device with digital display and circular control knob, no visible text or symbols on bodysonoro audio GmbH
Unter Goldschmied 6
50667 Cologne
Germany
info@sonoro-audio.com
www.sonoro-audio.com
06/10
The manufacturer works continuously on the further development of all types and models.
We therefore point out that changes to the form, configuration and technology of the supplied product may be possible at any time. For this reason it is not possible to make any claims on the basis of the data, figures or descriptions contained in this operating manual.
This document may not be reproduced, photocopied or translated either wholly or in part without the written consent of the manufacturer.
All rights expressly reserved according to copyright law.
Subject to change without notice.
iPod® is a registered trademark of Apple Inc., registered in the USA and other countries.
Apple is not responsible for the function of this device or its compliance with safety directives.
Content
1. Preliminary notes 5
2. Safety instructions 5
2.1 Symbols in this manual 5
2.2 Intended use 6
2.3 Children and persons with impaired faculties 6
2.4 Power supply 6
2.5 Batteries 7
2.6 Transport 7
2.7 Ambient conditions 7
2.8 Use of headphones 8
2.9 Defects 8
2.10 Cleaning 9
2.11 Disposal 9
3. Supplied items 10
4. Unpacking the device and getting started 10
4.1 Unpacking the device 10
4.2 Activating the battery 11
4.3 Connecting the power supply 11
4.4 Connecting the antenna 12
4.5 Connecting headphones 13
5. Operating elements and connections 14
6. Setting the basic functions 16
6.1 Switching on 16
6.2 Switching off 16
6.3 Volume 16
7. Radio operation 17
7.1 Selecting a frequency band 17
7.2 Scanning stations 17
7.3 Presetting radio stations 17
7.4 Selecting a preset station 18
8. Settings 18
8.1 Time 18
8.2 Alarm 19
8.3 Automatic switch-off 20
8.4 Equaliser (Bass/Treble) 20
8.5 Dimmer 21
8.6 LED illuminated ring 21
Content
9. Connections 21
9.1 Headphones 21
9.2 Aux-in 22
9.3 Antennas 22
9.4 Anti-theft lock 22
9.5 Power supply 23
9.6 iPod (eDock optional) 23
10. Troubleshooting 24
11. Technical data 25
12. Warranty 27
1. Preliminary notes
Thank you for deciding to purchase a sonoro iElements.
This instruction manual provides all information you need for trouble-free and safe operation of the device.
Please read this manual carefully before using the device.
Keep the manual in a safe place.
If you give the device to a third party, always enclose the manual.
Non-compliance with the specifications of this manual can result in serious injury and damage to the device.
We do not accept any liability for damage caused by non-compliance with this instruction • manual.
Pay special attention to the "Safety instructions" section.
The figures in this manual serve to illustrate instructions and are always featured in front of the descriptions to which they refer.
We wish you many hours of pleasure with this product!
2. Safety instructions
2.1 Symbols in this manual
Important safety instructions are highlighted. Always pay attention to these instructions to prevent accidents and damage to the device:

text_image
! ! iDANGER!
Warns against health risks and potential risk of injury.
WARNING!
Warns against potential damage to the device or other equipment.
NOTE!
Points out tips and information which can be of help to you.
2.2. Intended use
The device is only sold for private use. It is not suitable for commercial applications.
This device is exclusively designed for the following functions:
Playback of radio stations•
Audio playback from an iPod®, charging function for the iPod®
Audio playback from external devices connected through the AUX socket
Any other use is not in keeping with the intended purpose of the device and is not permitted.
We do not accept any liability for damage resulting from use of the device which is contrary to its intended purpose.
2.3 Children and persons with impaired faculties
Never leave the device unsupervised and never use it in the vicinity of children or persons • who are unable to assess possible dangers.
Any persons (including children) who are unable to use the device safely due to their • physical, sensory or mental faculties or lack of experience or knowledge are not permitted to use this device without the supervision of or instruction by a responsible person. Keep it in an inaccessible place.
Do not let children play with the packaging material as it poses a suffocation risk.
— 2.4 Power supply
The device is run with electrical power. For this reason there is a potential risk of electric shock. Pay particular attention to the following:
Never touch the mains plug with wet hands.
If you remove the mains plug from the mains socket, always pull the plug itself. • Never pull the cable, it could break.
- Ensure constant and unobstructed access to the mains socket to which the device is connected so that it can be disconnected immediately in the event of an emergency.
Ensure that the mains cable is never kinked, trapped or driven over. Always position the cable so that it cannot be tripped over or reached by children.
Only use extension cables which are designed for the power consumption of the device.
Keep the device away from rain and moisture and any heat sources.
Only use the device if the voltage on the rating plate of the device and the mains plug • corresponds with the voltage of your mains socket. Incorrect voltage can irreparably damage the device.
To prevent a fire hazard, disconnect the device completely from the power supply if you do not use the device for a prolonged period of time. To this purpose remove the mains plug from the mains socket.
2.5 Batteries
Remove the batteries from the battery compartment as soon as they are empty or if you do not intend to use the device for a prolonged period of time.
- Never dispose of any batteries in an open fire and never expose them to high temperatures.
Never attempt to recharge normal batteries. Never attempt to open or short-circuit the • batteries. Risk of explosion!
- Liquid discharged from the batteries when they are used incorrectly can cause skin irritation. If you come in contact with the liquid, wash it off with generous amounts of water. If the liquid gets into your eyes, never rub your eyes, but rinse them straight away with water for 10 minutes and contact a doctor immediately.
2.6 Transport
To prevent damage to the inserted medium, remove it from the device before transport or • shipping.
When transporting the device in a car, store it in a safe place and ensure that it cannot • injure passengers.
If you send the device by mail, pack it in its original packaging. To this purpose always • keep the original packaging.
2.7 Ambient conditions
Safe operation of the device is only ensured if it is used under suitable ambient conditions. To this purpose observe the following:
Protect the device against the effects of the weather. Never use the device outdoors and never place it where it is exposed to strong sunlight.
Never place the device on or near heat and fire sources such as burning candles, cooker plates, ovens etc.
- Position the device so that sufficient air circulation is ensured. This will prevent heat accumulating inside the device. Always keep the device at a minimum distance of 10 cm from other equipment or walls.
Protect the device against mechanical shocks and place it on firm surfaces.
Protect the device against the effects of the weather, moisture and high temperatures • (e.g. direct sunlight).
Protect the device against dripping water and splashes. Never place a container of liquid • next to or on the device.
Never insert/remove the battery in a potentially explosive environment (e.g. petrol filling • stations, fuel reloading areas, fuel storage areas, areas in which the air contains chemicals or explosive particles/dust (e.g. flour dust or metallic powder) as well as in areas in which you are instructed to switch off your car engine). Risk of explosion!
2.8 Using headphones
• Always lower the volume of the device before you use the headphones.
Only increase the volume to the required level when the headphones are fitted correctly. When you are using the headphones, never set an excessively high volume. If you hear a continuous or background noise (ringing) in your ears, lower the volume or stop using the headphones.
Even if your headphones are designed in such a way that you can still perceive external • noises, never set the volume to a level that stops you hearing your surroundings.
2.9 Defects
If the device should be defective, never try to carry out repairs yourself.
If the mains plug, the adapter or the mains cable of the device is damaged, it must be replaced by the manufacturer or the customer service department to prevent the risk of electric shock.
If liquids have penetrated the device or it has been damaged in any other way, it must be • inspected by an authorised specialist. Disconnect the device from the power supply and contact an authorised specialist.
2.10 Cleaning
Only clean the outside of the device with the supplied cloth or another dry, soft cloth. • Never use aggressive cleaning agents or solvents to clean the device, as these corrode its surface.
If the device is badly soiled, wipe it with a slightly moistened cloth and dry it immediately • with a dry, soft cloth.
2.11 Disposal
It is not permitted to dispose of devices marked with this symbol with the household waste. They must be taken to a collection and recycling point for electrical and electrotechnical devices.
Normal and rechargeable batteries can contain heavy metals and must be treated as toxic waste. Dispose of all batteries at a municipal collection point or have them disposed of by a specialist company.
Please bear in mind that this device is subject to the Waste Electrical and Electronic Equipment Directive (WEEE) 2002/96/EC regarding the reduction of electronic waste.
Therefore please note that you are not permitted to dispose of your device with your household waste.
Information and advice regarding the disposal of old devices can be • obtained from your local administration, the waste disposal authorities or the retailer from which you purchased this product.

You can dispose of your device free of charge at municipal collection points.
By disposing of old devices correctly you prevent environmental damage and do not • endanger your health.
3. Supplied items
The sonoro iElements is supplied with a number of accessories which you need for receiving radio signals or for connecting additional devices.
sonoro iElements (with case)•
Mains adapter•
FM antenna•
AM antenna•
Cleaning cloth•
Gloves•
Instruction manual•
4. Unpacking the device and getting started
Only connection cables and external devices that are designed for this product in terms of safety, electromagnetic compatibility and shielding quality may be used in conjunction with the device. This device fulfils all relevant standards and directives with respect to CE conformity. If the device is modified without the agreement of the manufacturer, compliance with these standards and directives is no longer guaranteed. Only use accessories specified by the manufacturer.

DANGER!
The packaging is not a toy! Risk of suffocation!
There is a risk of suffocation if the packaging is used for playing. Keep the packaging in a place which is inaccessible to children and persons who cannot assess the dangers.
— 4.1 Unpacking the device
All parts of the device are supplied in a cardboard box.
- Unpack the device and all accessories and check the content to ensure that all parts are included and intact.

NOTE!
If you discover any transport damage, contact your dealer immediately.
- Place the device in a suitable location. Always comply with the safety instructions regarding the ambient conditions in section 2.
4.2 Activating the battery
Your iElements has an integrated battery for buffering the time in the event of a power failure. The battery was isolated from the electrical circuit with red plastic film at the factory to prolong its service life. Please remove this film before using your iElements for the first time.

DANGER!
Risk of injury if batteries are handled incorrectly!
Batteries must be handled with great care.
- Remove the batteries from the battery compartment as soon as they are empty or if you do not intend to use the device for a prolonged period of time.
- Never dispose of any batteries in an open fire or expose them to high temperatures.
- Never attempt to recharge normal batteries. Risk of explosion! Never attempt to open or short-circuit the batteries.
- Liquid discharged from the batteries when they are used incorrectly can cause skin irritation. If you come in contact with the liquid, wash it off with generous amounts of water. If the liquid gets into your eyes, never rub your eyes, but rinse them straight away with water for 10 minutes and contact a doctor immediately.
4.3 Connecting the power supply
The device is supplied with power by means of the supplied mains adapter.

DANGER!
Risk of injury if handled incorrectly!
Risk of electric shock if the mains adapter is handled incorrectly.

WARNING!
Risk of damage to equipment in the event of incorrect voltage connection!
Connection ratings which exceed the maximum permissible values of the device can cause irreparable damage.
- Only use the mains adapter supplied with the device.
-
Only run the device if the voltage indicated on the mains adapter complies with the rating of your mains socket.
-
Insert the plug of the mains adapter into the 12V=2A DC socket on the back of the device.
-
Insert the mains plug into a mains socket.
— 4.4 Connecting the antenna
The sonoro iElements has an integrated antenna for receiving radio signals in the FM frequency range. If the reception at the installation site of the device is not satisfactory or if you wish to receive more FM or AM stations, connect the supplied FM or AM antenna or a suitable house antenna.
FM antenna or house antenna
- Insert the supplied FM antenna or your house antenna into the FM antenna connection on the back of the device.
- Change the position of the FM switch from INT to EXT.
- Adjust the supplied FM antenna so that optimum reception is ensured.

NOTE!
If no external antenna is connected to the FM socket, the switch should be set to INT to guarantee the best possible reception with the internal antenna.
AM antenna
- Insert the supplied AM antenna into the AM antenna socket on the back of the device.
- Adjust the supplied AM antenna so that optimum reception is ensured.
4.5 Connecting headphones
Headphones with a 3.5 mm jack plug (not supplied) can be connected to the device.

DANGER!
Risk of injury if headphones are used incorrectly!
Incorrect use of headphones can cause severe accidents and damage your health.
- When you are using the headphones, never set an excessively high volume.
-
Even if your headphones are designed in such a way that you can still perceive external noises, never set the volume to a level that stops you hearing your surroundings.
-
Before you connect the headphones, adjust the volume to the minimum setting.
To this purpose press the VOL- button. - Insert the headphone jack plug into the headphone socket on the back of the device.
- Slowly increase the volume. To this purpose press the Vol+ button.
The controls of the sonoro iElements enable fast and simple access to all functions.
5. Operating elements and connections
iElements front view:

text_image
2 3 4 6 7 - sonoro 1 51 touch sensor: On/Off, FM/AM/iPod/Aux
2 Display
3 << (Back) Station scan, navigation
4 + Increase volume, increase levels
5 - Lower volume, decrease levels
6 Menu button Activate menu, confirm entries
7 << (Forwards) Station scan, navigation
iElements rear view:
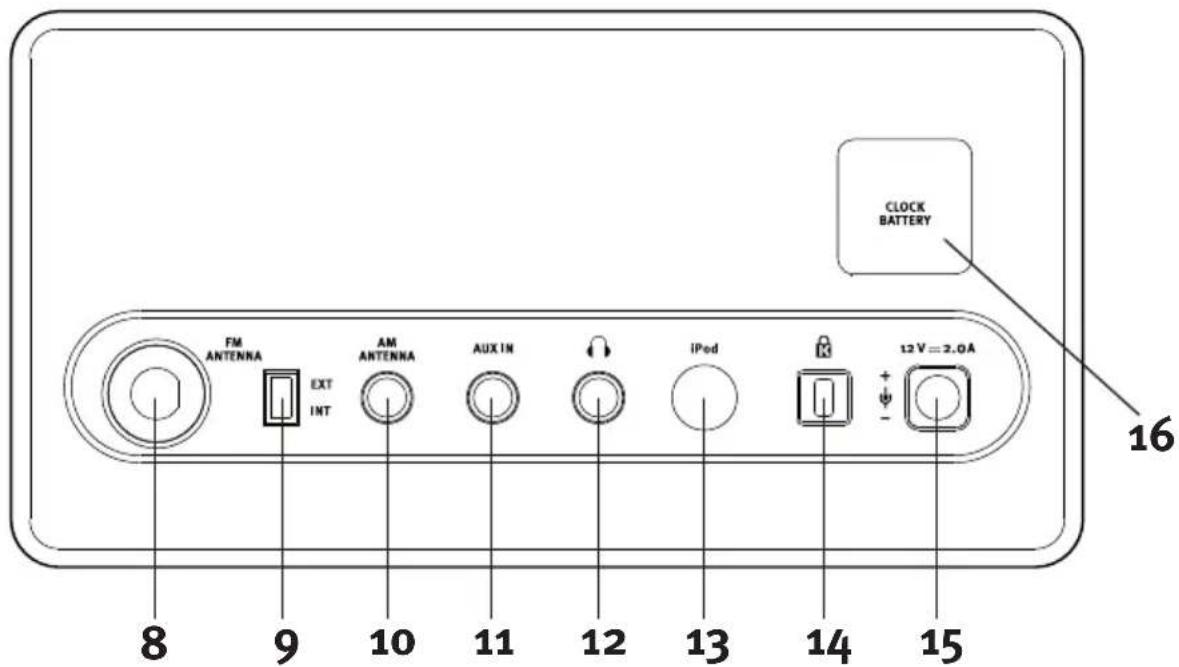
text_image
CLOCK BATTERY FM ANTENNA EXT INT AM ANTENNA AUX IN 12 IPed 12 V=2.0A 16 8 9 10 11 12 13 14 158 FM ANTENNA Connection for the FM antenna
9 EXT INT Antenna selection switch
10 AM ANTENNA Socket for the AM antenna
11 AUX IN Connection for external audio devices
12 Headphone socket
13 iPod Socket for external iPod
14 KConnection for anti-theft lock
15 12V=2.0A Mains adapter socket
16 CLOCK BATTERY Battery cover
® eDock docking station
6. Setting the basic functions
6.1 Switching the device on
Touch the ⬆ symbol on the front of the device. Your iElements is equipped with a touch sensor at this point. That means that a light touch is sufficient. After it is switched on, the most recently used music mode (FM radio, AM radio, iPod, Aux) is activated, the music slowly fades in and the LED illuminated ring feature is activated.

NOTE!
You can deactivate the LED illuminated ring feature in the settings of your iElements. Refer to section 8.6 for details. Your iElements can also switch on automatically. Refer to section 8.2 for information on using the alarm function.
— 6.2 Switching the device off
Touch and hold 📁 on the front of the device about two seconds to switch off your device. GOOD-BYE appears on the display, followed by the time, and the controls lighting is slowly turned off.

NOTE!
Your iElements can also switch off automatically after a certain time. Refer to section 8.3 for information on using the automatic switch-off feature.
6.3 Volume
When the device is switched on, you can increase the volume of your iElements with the + button and lower it with the – button. The display shows the selected volume. You can set the volume from VOL MIN (mute) to VOL MAX in 30 stages.

DANGER!
Never use your iElements at an excessively high volume level. If you listen to the device at an excessively high volume for long periods of time, you endanger your hearing. Also refer to the safety instructions in section 2.
7. Radio operation
7.1 Selecting the frequency band
When your iElements has been switched on, it will start in the last selected playback mode.
By repeatedly pressing the ⏻ symbol you can switch between the playback modes (FM radio, AM radio, iPod, Aux).
In FM radio mode you can receive FM radio stations and in the AM radio mode you can receive AM radio stations. For further information on Aux or iPod, please refer to sections 9.2 or 9.6.

NOTE!
The FM frequency band is between 87.5 MHz and 108.0 MHz on VHF band II. The AM frequency band is between 522 kHz and 1620 kHz (Europe) and between 520 kHz and 1710 kHz (USA).
7.2 Scanning stations
If you have selected a frequency range (FM radio or AM radio), you can search for stations with the << and >> buttons.
Pressing and holding one of these buttons briefly activates an automatic scan in the corresponding direction. If a strong station signal is located, the automatic scan stops and the radio station is played.
You can fine-tune the station frequency by briefly pressing the << and >> buttons.
If you do not change the station frequency setting for approx. 10 seconds, the time appears on the display instead of the station frequency.

NOTE!
Make sure that the antenna is properly connected and that the antenna selection switch is set correctly. It is not possible to receive a station in the AM range unless the supplied AM antenna is connected.
7.3 Presetting stations
Your iElements can save up to 10 stations per frequency band in the preset memory.
If you have found a station that you would like to save, press the menu button to access the menu. Now press the << or >> button until MEM SET appears on the display.
Next select one of the memory presets from p 0 to p 9 with the + and - buttons. The subsequent message FREE or USED informs you whether the memory preset is still free or if you have already assigned it. You can also re-assign previously assigned memory presets.
Confirm your selection with the menu button. P 0...9 SAVED appears on the display.
If you would like to cancel your selection, simply do not press any button for approx. 5 seconds. Your iElements then returns from the menu to regular playback mode.

NOTE!
Your iElements has an integrated memory so that your stations will remain saved even if you disconnect the device from the power supply.
7.4 Selecting a preset station
Your iElements can save up to 10 stations per frequency band in the preset memory.
If you would like to listen to a preset station, switch on your iElements, select the desired frequency band by pressing the ⏻ symbol and activate the menu with the menu button.
The MEM CALL function appears on the display and when you have again confirmed your selection with the menu button, you can select one of the memory presets P 0 to P 9 with the + and - buttons. The assigned station frequency is displayed behind the memory preset.
If the memory preset has not yet been assigned, the message FREE is then displayed.
When you have selected the station you would like to listen to, your iElements plays the saved station.
If you would like to cancel the selection of a station, simply do not press any button for approx. 5 seconds. Your iElements then returns from the menu to regular playback mode.

NOTE!
Your iElements leaves the works without any preset stations. For this reason all presets are marked as FREE.
8. Settings
— 8.1 Time
If your iElements is switched off or if you have not pressed a button for a prolonged period of time when it is switched on, the time is shown on the display. You can have the time displayed in a 24 hour format (e.g. 21:20) or in a 12 hour format (e.g. 9:20pm).
To set the time, switch off your iElements. Press the menu button once, select the time menu item with the << and >> buttons and confirm your selection with the menu button. You then have the option of selecting either the 24 hour format (24 HR) or the 12 hour format (12 HR) with the + and - buttons.
After you have confirmed your selection with the menu button, you can switch between the settings of hours and minutes with the << and >> buttons (the selection flashes) and set the correct values with the + and - buttons. Finally confirm your selection by pressing the menu button again.

NOTE!
AM means “ante meridiem” and refers to all times from midnight until 11:59 in the morning. PM means “post meridiem” and refers to all times from noon until 23:59 at night.
8.2 Alarm
Your iElements can wake you up with a radio station or a pleasant alarm tone. You can set the volume of the alarm and use the so-called snooze function.
You can set the alarm when the iElements is switched on as well as when the device is switched off. In both cases press the menu button and then use the << and >> buttons to navigate through the options until ALARM appears on the display. Confirm your selection by pressing the menu button.
Now you can activate the alarm (ALM ON) or deactivate it (ALM OFF) with the + and - buttons and confirm your selection with the menu button. If you select ALM OFF, the setting is cancelled. You can recognise an active alarm by the small alarm symbol on the display.
When you have selected ALM ON, you can set the wake-up time. This is selected in the same way as setting the display time with the +/- and <</>> buttons. Confirm your selection with the menu button.
SOURCE then appears on the display and you can decide which signal you would like to be woken by. The frequency ranges FM and AM as well as an alarm tone (BEEP) are available. Make your selection with the << and >> buttons and confirm it with the menu button. If you select a radio station, you can use the stations you have saved in the presets. Use the + and - buttons to select from the 10 memory presets 0...9 for each frequency band.
VOLUME then appears on the display and you can select the alarm volume of your signal source with the + and - buttons. As soon as the alarm starts, the volume is slowly increased until it reaches the level you have selected. When you confirm your selection with the menu button, the alarm has been set. ALARM ON appears on the display.

NOTE!
When setting the alarm time, please pay attention to the selected time format. You can recognise an active alarm by the alarm symbol on the display. Before using this function for the first time, test the different alarm volumes to find a level that is suitable for you. If you have connected a device to the headphones socket, please note that the alarm tone will only be output through this device. This means, for example, that you may not be able to hear the alarm if the headphones have slipped. Please make sure that you switch off the alarm, for example, if you go on holiday.
You can switch off an active alarm by pressing the menu button for approximately two seconds. The alarm will stop and the small alarm symbol on the display stops flashing. If you want to temporarily suppress an active alarm rather than turning it off, you can use the snooze function. Briefly press the menu button once when the alarm is activated. SNOOZE then appears on the display and you can use the + and – buttons to set the number of minutes after which the alarm should be switched on again. The default setting is 5 minutes. Once you have made your selection, please confirm it with the menu button. The small alarm symbol on the display continues to flash and is reactivated after the time you have set. If you
would like to cancel the snooze function ahead of time, press the menu button for approx. two seconds until the device switches off automatically.
— 8.3 Automatic switch-off
If you would like to fall asleep to the music of your iElements, the device can switch off after a specified time. (sleep timer function)
If you would like to activate this function, press the menu button, use the << and >> buttons to select the SLEEP menu item and confirm again with the menu button. The symbol ST appears on the display. (sleep timer)
If the automatic switch-off function has already been set, the remaining time is displayed. You can set the switch-off time in one-minute increments with the << and >> buttons. You can set the switch-off time in 5 or 15 minute increments with the + and - buttons. Confirm your selection with the menu button.
You can select 5 to 90 minutes. If you select OFF, the automatic switch-off function is deactivated. Shortly before your iElements switches off, information on the remaining time is shown on the display. One minute before the device switches off, your iElements slowly starts to fade out the audio output.
— 8.4 Equaliser (Bass/Treble)
You can adjust the sound of your iElements to your personal taste or your surroundings. You can adjust both the bass and treble to seven different levels.
When your iElements is switched on, press the menu button and then select the BASS or TREBLE menu item with the << and >> buttons. Confirm your selection with the menu button. Depending on the selected menu item, you can then change the bass or treble setting of your iElements. You can select a value between -3 and +3 with the + and - buttons. A positive value means that low or high frequencies are increased, depending on whether you have selected BASS or TREBLE. A negative value indicates a decrease in the corresponding frequencies.
8.5 Dimmer
You can also adjust the brightness of the display to your requirements.
When your iElements is switched on, press the menu button and then select the DIMMER menu item with the << and >> buttons. You can select one of three brightness settings with the + and - buttons; DIM LO, DIM MI and DIM HI. DIM LO is the darkest setting and DIM HI the brightest setting.
8.6 LED illuminated ring
Your iElements features an LED illuminated ring with the buttons << and >>. This lights up as soon as you switch on your iElements and goes out when you switch off your device. You can also completely deactivate the LED illuminated ring feature.
To change the LED illuminated ring, press the menu button once while the iElements is switched on. Then select the LIGHT menu item with the << and >> buttons. You can then set the brightness of the LED illuminated ring of your iElements with the + and - buttons. You can select either very bright (HIGH), normal (MID) and weak lighting (LOW). To deactivate the LED illuminated ring, select (OFF).
9. Connections
9.1 Headphones
You can connect headphones to the headphone socket with a 3.5 mm jack plug. Take care not to confuse the headphone socket with the Aux-In socket.

DANGER!
Avoid using the headphones at a continuously high volume. There is the risk of permanent damage to your hearing! Take special care that children do not turn the volume up too high.
9.2 Aux-In
You can connect an external device to the Aux-In connection and enjoy the music from this device (such as e.g. an MP3 player) through your iElements with its excellent sound quality. To this purpose connect your external device with a connection cable (not supplied) to the 3.5 mm jack socket. Take care not to confuse the headphone socket with the Aux-In socket.

NOTE!
The device that you use has to output audio data through a 3.5 mm jack socket. The headphone output of an MP3 player or the line output of a computer are suitable for connecting to your iElements, for example. Also refer to the specifications in the Technical Data, section 11.
9.3 Antennas
Your iElements can receive stations in the FM and AM frequency range. The integrated antenna can be sufficient for the reception of FM stations under good reception conditions. If you would like to use the integrated antenna, please set the antenna selection switch to "INT".
If you would like to improve the reception, either connect the provided cable antenna to the "FM antenna" socket or connect your house antenna to the same socket of your iElements.

NOTE!
If you have a cable connection, you can connect the antenna socket of your iElements to your antenna outlet with a standard coaxial cable and receive the cable radio signal. This coaxial cable is not supplied.
If you would like to receive stations from the AM frequency range, connect the supplied AM loop antenna. To this purpose insert the 3.5 mm jack plug of the antenna into the "AM antenna" socket of your iElements. Take care not to confuse the connections on the back of the device.
— 9.4 Anti-theft lock
To protect your iElements against theft, your device features a connection for a Kensington lock. Any lock which is compatible with a Kensington lock can be connected.

NOTE!
This lock is not supplied.
9.5 Power supply
Your iElements is supplied with power by the supplied mains adapter. First connect the supplied mains adapter into the mains socket and then connect the adapter plug into the "DC 12V" socket of your iElements.

NOTE!
Only use the supplied mains adapter and comply with the safety instructions in section 2.
9.6 iPod (eDock optional)
Your iElements features a socket for connection to an iPod® eDock docking station which is available as an optional accessory.

NOTE!
Please refer to the instructions of the user manual supplied in the eDock packaging for details on operation.
- Place the iPod® on the docking station, iElements then automatically switches to iPod® mode and starts playback.
- The text IPOD appears on the display. The battery of the iPod ^® is also charged at the same time.

NOTE!
Press and hold the menu button in iPod® mode to switch to menu mode. You can then access the ALARM, SLEEP, BASS, TREBLE, DIMMER and LIGHT functions with the << and >> buttons.

NOTE!
When you switch to another mode, iPod ^® playback is stopped. When you switch back to iPod ^® mode, iPod ^® playback is automatically resumed at the point it was stopped.
- In iPod® mode press the << button to activate the iPod® menu function. The text IPODMENU appears on the display. Then press the + or - button to navigate upwards or downwards. Confirm your selection by pressing the menu button. After approx. 6 seconds the + and - buttons are once more available for adjusting volume + and -.
You can operate the iPod ^® with the buttons on the device.
The buttons correspond to the following iPod® buttons:
| Function iPod | ® | iElements |
| Open menu selection Menu << | ||
| Switch to the next higher menu level Menu << | ||
| Switch to the previous menu item (upwards) Click | wheel + | |
| Switch to the next menu item (downwards) Click | wheel - | |
| Select menu item Menu button Menu button | ||
| Start track Start/pause Menu button | ||
| Play next track Forward/Fast | forward | >> |
| Stop/continue playback Start/pause Menu button | ||
| Stop playback Start/pause |
10. Troubleshooting
Faults can occur on all electrical devices. This does not necessarily mean that the device is defective. Use the information in the following table to see if you can remedy the fault yourself.
| Fault Possible cause | Remedy | |
| The device does not switch on | The mains adapter is not correctly connected | Connect the mains adapter correctly (refer to section 2.4 "Power supply"). |
| No sound | Volume is set to minimum | Increase the volume (refer to section 6.3 "Volume"). |
| Headphones are connected | Remove the headphones from the socket. | |
| Different mode is selected | Select the correct mode (refer to section 7.1 "Selecting the frequency band"). | |
| Poor FM reception quality | The station signal is too weak for the internal antenna | Connect the external FM antenna (refer to section 4.4 "Connecting the antenna"). |
| The antenna selection switch is set incorrectly | Set the antenna selection switch to the correct position (refer to section 4.4 "Connecting the antenna"). | |
| The FM antenna is not correctly positioned | Change the position of the FM antenna. | |
| Fault Possible cause Remedy | ||
| Poor AM reception quality | AM antenna is not connected | Connect the AM antenna (refer to section 4.4 "Connecting the antenna"). |
| The AM antenna is not correctly positioned | Change the position of the AM antenna. | |
| Alarm does not work | Alarm is not switched on Switch | the alarm on (refer to section 8.2 "Alarm"). |
| Alarm volume is set to minimum | Increase the volume (refer to section 8.2 "Alarm"). | |
| Headphones are connected R | remove the headphones from the socket. | |
11. Technical data
| Display 8 digit VFD display | |
| Internal battery supply 3 V lithium battery (IEC code: CR2032) | |
| Power consumption during stand-by operation | approx. 2 W |
| Dimensions approx. 210 x 130 x 120 mm | |
| Weight without mains adapter | approx. 1,600 g |
AUX-IN
| Max. input voltage 250 mV eff. | |
| Input impedance 22 kOhm |
MAINS ADAPTER
| Model number VA24*-120200 | |
| Input 100-240 V~ AC, 0.7 A, 50-60 Hz | |
| Output 12 V DC, 2.0 A | |
| Dimensions approx. 81.5 x 49.5 x 48,5 mm | |
| Weight approx. 200 g | |
* for different national versions (e.g. A for USA, B for Europe, C for UK, E for Australia). Subject to technical modifications!
Declaration of Conformity
Manufacturer: sonoro audio GmbH
We hereby declare that on the basis of its design and construction the sonoro iElements meets the fundamental requirements of the EMC
Directive 2004/108/EC and the Low Voltage Directive 2006/95/EC, including any changes applicable at the time of this declaration.

FCC declaration on compliance with regulations
This device complies with the specifications of part 15 of the FCC Regulations. Operation of the device is subject to both following regulations:
(1) This device cannot emit any negative interference and
(2) This device must absorb any received interference, including interference which can result in unintended operation.

Interference with radio and TV signals
This equipment has been tested and found to comply with the electromagnetic emissions limits for a Class B digital device, pursuant to Part 15 of the FCC Rules. These limits are designed to ensure appropriate protection against negative interference during operation in living areas. This device generates and uses and can also emit electromagnetic energy. If it is not installed and used in compliance with the instructions, it can cause negative interference in the reception of radio or TV signals. There is, however, no guarantee that no interference is caused at a specific location. If the device actually causes interference in the reception of radio or TV signals which can occur when the devices are switched on and off, the user is advised to eliminate this interference by means of one of the following measures:
- Increasing the distance between the device and the receiver.
- Connecting the device to a different socket so that the device and the receiver are connected to two different branch circuits.
- Ask your dealer or an experienced radio or TV technician for assistance.
Any changes or modifications which were not expressly approved by sonoro audio GmbH could invalidate the authorisation of the user for operation of the device.
The full conformity declaration is available from support@sonoro-audio.com
12. Warranty
The following applies to a warranty claim without restricting your legal rights:
Warranty claims can only be lodged within a maximum period of two years from the date • of purchase (1 year for USA).
Within this warranty period we will remedy all defects resulting from material or manufacturing faults free of charge, either by repairing or replacing the device as we deem appropriate.
Please contact your specialist dealer or send the defective device along with the warranty • card and proof of purchase to the service address. No new warranty period begins if the device is repaired or replaced. The warranty period of two years (1 year for USA) from the date of purchase is applicable.
Damage resulting from improper use, normal wear and tear and defects that only • insignificantly affect the value or usability of the device are excluded from the warranty. If any person other than the technicians at the service address authorised by us has interfered with the device, the warranty is also void.
iElements
Warranty card
AU-4501
Last name
First name
Street
Post code and city
Phone
Serial number
Description of defects
Signature of purchaser
iElements
Mode d'emploi

natural_image
Black electronic device with digital display and circular control knob, labeled 'sonoro' (no additional text or symbols visible)sonoro audio GmbH
Unter Goldschmied 6
50667 Cologne
Allemagne
info@sonoro-audio.com
www.sonoro-audio.com
06/10
6.1 Activer 16
6.2 Désactiver 16
6.3 Volume 16
natural_image
Black electronic device with digital display and rotary knob, no visible text or symbols on bodysonoro audio GmbH
Unter Goldschmied 6
50667 Colonia
Germania
info@sonoro-audio.com
www.sonoro-audio.com
06/10
natural_image
Black electronic device with digital display and rotary knob, no visible text or symbols on bodysonoro audio GmbH
Unter Goldschmied 6
D-50667 Köln
Duitsland
info@sonoro-audio.com
www.sonoro-audio.com
06/10
8.4 Equalizer (Bass/Treble)
natural_image
Black electronic device with digital display and rotary knob, no visible text or symbols on bodysonoro audio GmbH
Unter Goldschmied 6
50667 Köln
Tyskland
info@sonoro-audio.com
www.sonoro-audio.com
06/10
natural_image
Black electronic device with digital display and rotary knob, no visible text or symbols on bodysonoro audio GmbH
Unter Goldschmied 6
50667 Colonia
Alemania
info@sonoro-audio.com
www.sonoro-audio.com
06/10