KCA-CM50 - Audio accessory KENWOOD - Free user manual and instructions
Find the device manual for free KCA-CM50 KENWOOD in PDF.

| Product Type | Control module for SIRIUS satellite and HD Radio receiver |
| Brand | KENWOOD |
| Model | KCA-CM50 |
| Supply Voltage | 14.4 V DC (11 ~ 16 V) |
| Current Consumption | 0.5 A |
| Dimensions (W × H × D) - Control Unit | 154 × 43 × 17 mm |
| Dimensions (W × H × D) - Fixing Trim Plate | 188 × 58 × 18 mm |
| Weight - Control Unit | 220 g |
| Remote Control Batteries | 2 AAA batteries (supplied for verification) |
| Main Functions | Control of SIRIUS satellite and HD Radio tuner, channel memory, search, scan, information display (channel name, title, artist, etc.), remote control |
| Maintenance and Cleaning | Wipe with a soft dry cloth or silicone cloth after turning off the unit. Do not use thinner, alcohol, or solvent. |
| Safety | Negative ground 12 V DC, do not open the case, use only specified fuse rating, avoid short circuits |
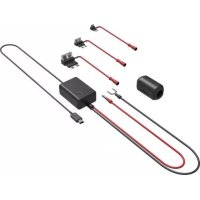
| Supplied Accessories | Mounting piece (20×60 mm, 20×40 mm), trim plate, screws, Velcro tapes |
| Compatibility | Works with compatible KENWOOD SIRIUS and HD Radio tuners |
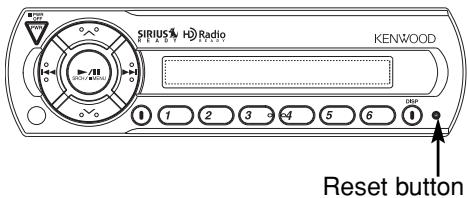
| Reset | Reset button available on the control unit |
Frequently Asked Questions - KCA-CM50 KENWOOD
User questions about KCA-CM50 KENWOOD
0 question about this device. Answer the ones you know or ask your own.
Ask a new question about this device
Download the instructions for your Audio accessory in PDF format for free! Find your manual KCA-CM50 - KENWOOD and take your electronic device back in hand. On this page are published all the documents necessary for the use of your device. KCA-CM50 by KENWOOD.
USER MANUAL KCA-CM50 KENWOOD
Take the time to read through this instruction manual.
Familiarity with installation and operation procedures will help you obtain the best performance from your digital radio controller.
For your records
Record the serial number, found on the back of the unit, in the spaces designated on the warranty card, and in the space provided below. Refer to the model and serial numbers whenever you call upon your KENWOOD dealer for information or service on the product.
Model KCA-CM50 Serial number
Contents
Safety Precautions 3
SilRius satellite radio tuner features 4
Power
Switching Seek Mode
Selecting the Preset Band
Channel Preset Memory
Preset Tuning
Channel Scan
Channel Search
Direct Access Tuning
Switching Display
Text Scroll
HD Radio tuner features 7
Power
Tuning
Receive Mode
Station Preset Memory
Auto Memory Entry
Preset Tuning
Direct Access Tuning
Switching Display
Text Scroll
Menu system 10
Menu system
Text Scroll
SIRIUS ID (ESN)
Tuning Mode
Basic Operations of remote. 12
Installation 14
Accessories
Installation Procedure
Connecting Wires to Terminals
Installation
Troubleshooting guide 17
Specifications 18
WARNING
Take the following precautions to prevent fire and avoid personal injury:
- When extending the ignition wire, battery wire, or ground wire, use 0.75mm^2 (AWG18) or larger automotive grade wire to avoid wire deterioration or damage to the covering.
- Check that no metal objects (coins, tools, etc.) are left inside the unit to avoid short circuits.
- If you smell or see smoke, turn the power off immediately and consult your Kenwood dealer.
- Do not touch the liquid crystal fluid if the LCD is damaged or broken due to shock. The liquid crystal fluid may be dangerous to your health or even fatal.
If the liquid crystal fluid from the LCD contacts your body or clothing, wash it off with soap immediately.
CAUTION
Take the following precautions to keep the unit in proper working order.
- Be sure the unit is connected to a 12V DC power supply with a negative ground connection.
- Do not open the top or bottom cover.
-
Do not install the unit in places it is exposed to direct sunlight, high heat or humidity, water may splash over it, or dust exists.
-
When replacing a fuse, only use a new one with the prescribed rating. Using a fuse with the wrong rating may cause your unit to malfunction.
- To prevent a short circuit when replacing a fuse, first disconnect the wiring harness.
NOTE
- If you have difficulty in installing this unit in your vehicle, contact your Kenwood dealer.
- If it doesn't seem to be working properly, first press the Reset button. If the malfunction persists, consult your Kenwood dealer.
- Some car stereos cause the sound of the tuner to make for a moment when an engine is activated.
- Do not use your own screws. Use only the screws provided. If you use the wrong screws, you could damage the unit.
Cleaning the Unit
If the front panel gets dirty, turn off the power and wipe the panel with a dry silicon cloth or soft cloth.
CAUTION
Do not use hard cloths or paint thinner, alcohol, or other volatile solvents. These may damage external surfaces or remove indicator characters.
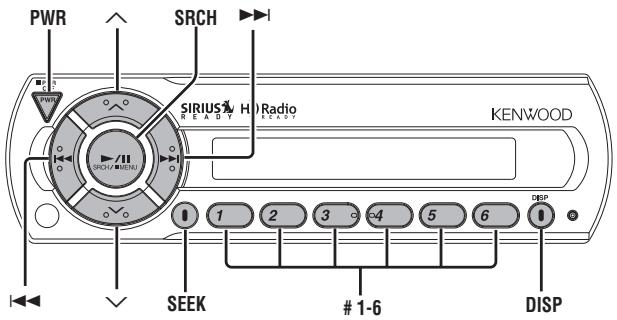
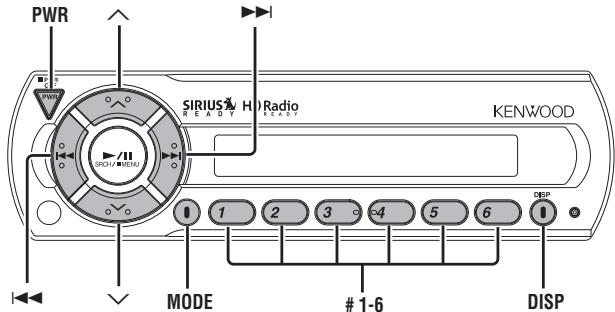
Power
Turning ON the Power
Press the [PWR] button.
Turning OFF the Power
Press the [PWR] button for at least 1 seconds.

You need to subscribe to SIRIUS to receive the service by SIRIUS Satellite Radio. Consult SIRIUS if "CALL 888-539 SIRIUS TO SUBSCRIBE" appears.
- It may take a little time to start receiving after you selected the SIRIUS source.
- If the signal receiving fails, "ACQUIRING SIGNAL" appears.
Switching Seek Mode
Sets the seeking mode.
Press the [SEEK] button.
Each time the button is pressed the Seek mode switches as shown below.
Display
Operation
| "SEEK 1" | Normal manual seeking control. |
| "SEEK 2" | Search in order of the channels in the Preset memory. |

This function cannot be used in the category and channel search mode.
Selecting the Preset Band
Press the [] button.
Each time the button is pressed the preset band switches between the SR1,SR2,SR3,and SR4.
Channel Preset Memory
Putting the channel in the memory.
1 Select the preset band Press the [ ] button.
2 Select the channel to put in the memory Press the [i<or [ ] button.
3 Put the channel in the memory Press the [#1] - [#6] button for at least 2 seconds.
The preset number display blinks.
On each band, 1 channel can be put in the memory on each [#1] — [#6] button.

Only the channel number is stored. Category information is not stored.
Preset Tuning
Calling up the channels in the memory.
1 Select the preset band Press the [A] button.
2 Call up the channel Press the [#1] - [#6] button.
Channel Scan
Scanning for the channel you want to listen to.
1 Start Channel Scan
Press the [SEEK] button for at least 1 second. "SCAN" indicator is ON.
2 Release it when the channel you want to listen to is received Press the [SEEK] button for at least 1 second.
Channel Search
A channel is searched within the selected category.
1 Enter Channel Search mode Press the [SRCH] button.
2 Select the Category Press the [ ] or [ ] button.
3 Select the Channel Press the [i<or [b] button.
Canceling Channel Search Press the [SRCH] button.

You cannot operate this unit until all the Category information is acquired.
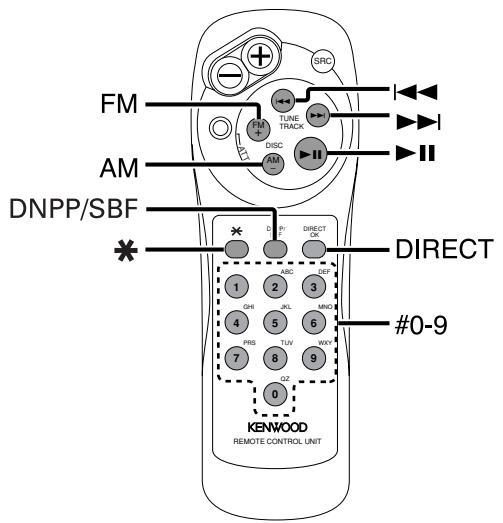
Direct Access Tuning (Function of remote)
Entering the channel and tuning.
1 Enter Direct Access Tuning mode
Press the [DIRECT] button on the remote.
2 Enter the channel number
Press the number buttons.
3 Do Channel Search
Press the [口 口 ] or [ 口 ] button.
Canceling Direct Access Tuning
Press the [DIRECT] button on the remote.

- If you make no button operation for 10 seconds, the Direct Access Tuning mode is automatically canceled.
- You can set up to Channel number 223.
- If there is no signal in the input Channel, "NO CHANNEL" appears.
- If you cannot receive any signal in the input Channel due to a bad condition on radio wave or another problem, "ACQUIRING SIGNAL" appears.
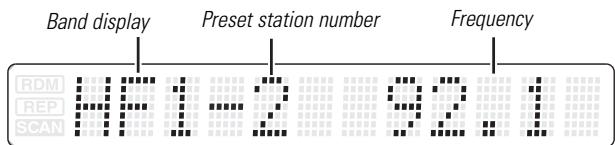
Switching Display
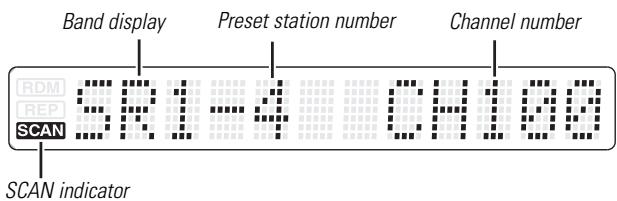
You can display various kinds of text data transmitted from broadcasting stations by switching as follows.
Press the [DISP] button.
Each time the button is pressed the display switches as shown below.
Information
Display
| Channel Number | |
| Channel Name | "CHANNEL NAME" |
| Song Title | "SONG" |
| Artist Name | "ARTIST" |
| Category Name | "C CATEGORY" |
| Composer Name | "COMPOSER" |

If text cannot be displayed, Channel Number will be shown.
Text Scroll
Scrolling the displayed text.
Press the [DISP] button for at least 1 second.
Power
Turning ON the Power
Press the [PWR] button.
Turning OFF the Power
Press the [PWR] button for at least 1 seconds.
Tuning
Selecting the station.
1 Select the HA band
Press the [ ] button.
Select the HF band
Press the [] button.
Each time the [] button is pressed it switches between the HF1, HF2, and HF3 bands.
2 Tune up or down band
Press the [i] or [▶] button.

Using
- When "Digital" has been set with
Receive Mode
Sets the receive mode.
Press the [MODE] button.
Each time the button is pressed the Receive mode switches as shown below.
Receive mode Display Operation
| Auto mode | "Auto" | Analog broadcasts and digital broadcasts will be switched automatically. When both are being transmitted, the digital broadcast will have priority. |
| Digital | "Digital" | Digital broadcasts only. |
| Analog | "Analog" | Analog broadcasts only. |

- Even in the "Auto" setting, an analog broadcast will be received during the reception of a ball game mode (non-delayed broadcast program).
- When this button is pressed once, the current Receive Mode is displayed. When it is pressed again, the Receive Mode is switched over to another.
On each band, 1 station can be put in the memory on each [#1] — [#6] button.
Auto Memory Entry
Putting a station with good reception in the memory automatically.
1 Select the band for Auto Memory Entry
Press the [] or [] button.
2 Open Auto Memory Entry
Press the [MODE] button for at least 2 seconds.
When 6 stations that can be received are put in the memory Auto Memory Entry closes.

The receiving method can be switched with the setting of
Station Preset Memory
Putting the station in the memory.
1 Select the band
Press the [] or [] button.
2 Select the frequency to put in the memory
Press the [i] or [▶] button.
3 Put the frequency in the memory
Press the desired [#1] — [#6] button for at least 2 seconds.
The preset number display blinks.
Preset Tuning
Calling up the stations in the memory.
1 Select the band
Press the [] or [] button.
2 Call up the station
Press the desired [#1] — [#6] button.

When the preset broadcast station is transmitting either an analog broadcast or a digital broadcast, the sound will not be output unless the broadcast mode matches the setting of
Direct Access Tuning (Function of remote)
Entering the frequency and tuning.
1 Select the band
Press the [FM] or [AM] button.
2 Enter Direct Access Tuning mode
Press the [DIRECT] button on the remote.
"-- - - " is displayed.
3 Enter the frequency
Press the number buttons on the remote.
Example:
Desired frequency Press button
| 92.1 MHz (FM) | [0], [9], [2], [1] |
| 810 kHz (AM) | [0], [8], [1], [0] |
Canceling Direct Access Tuning
Press the [DIRECT] button on the remote.
Switching Display
When you are listening to the HD Radio, you can switch over the display information as follows.
Press the [DISP] button.
Each time the button is pressed the display switches as shown below.
Information Display
| Station Name | "STATION" |
| Song title | "SONG" |
| Artist nam | "ARTIST" |
| Album name | "ALBUM" |
| Genre | "GENRE" |
| Receive Frequency | "FREQUENCY" |

Displayed information except "FREQUENCY" are shown only when you receive text in digital broadcasting. If text cannot be displayed, frequency will be shown.
Text Scroll
Scrolling the displayed text.
Press the [DISP] button for at least 1 second.

RDM 111111111111111111111111111
Menu System
The Menu system basic operation method is explained here. The reference for the Menu items and their setting content is after this operation explanation.
1 Enter Menu mode
Press the [MENU] button for at least 1 second. "MENU" is displayed.
2 Select the menu item
Press the [] or [] button.
3 Set the menu item
Press the [I] or [▶] button.
You can continue by returning to step 2 and setting other items.
4 Exit Menu mode
Press the [MENU] button.

When other items that are applicable to the basic operation method above are displayed afterwards their setting content chart is entered.
Text Scroll
Setting the displayed text scroll.
| Display | Setting |
| "SCROLL AUTO" | Repeats scroll. |
| "SCROLL MANU" | Scrolls when the display changes. |

The texts scrolled are shown below.
- Channel Name/ Song title/ Artist name/Composer name/ Category name
- Station Name/ Song title/ Artist name/ Album name/ Genre
SIRIUS ID (ESN)
SIRIUS ID (Electronic Serial Number) is displayed.
Tuning Mode
Sets the tuning mode.
| Tuning mode | Display | Operation |
| Auto seek | "SEEK AUTO1" | Automatic search for a station. |
| Preset station seek | "SEEK AUTO2" | Search in order of the stations in the Preset memory. |
| Manual | "SEEK MANU" | Normal manual tuning control. |
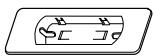
Loading and Replacing the battery
Use two "AAA" batteries.
Slide the cover while pressing downwards to remove it as illustrated.
Insert the batteries with the + and - poles aligned properly, following the illustration inside the case.
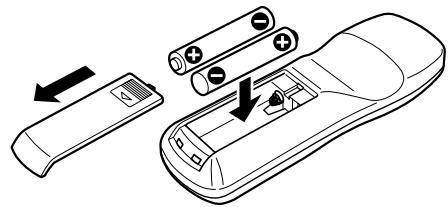
WARNING
Store unused batteries out of the reach of children. Contact a doctor immediately if the battery is accidentally swallowed.

- The provided batteries are intended for use in operation checking, and their service life may be short.
- When the remote controllable distance becomes short, replace both of the batteries with new ones.
- A portion of the operations may not be possible, depending on the unit that is connected.

Do not set the remote on hot places such as above the dashboard.
In SIRIUS source
[FM] buttons
Select the band.
Each time the [FM] button is pressed it switches between the
SR1, SR2, SR3, and SR4 bands.
[←] / [▶] buttons
Tune up or down the channels.
[#0]—[#9] buttons
Press buttons [#1] — [#6] to recall preset channels.
[DIRECT] button
Enters and cancels the
[▶II] button
Enters and cancels the
[*] buttons
Enters the
[DNPP]/[SBF] button
Each time the button is pressed the display switches.
For the display switching order refer to
In HD Radio source
[AM] buttons
Select the HA band.
[FM] buttons
Select the HF band.
Each time the [FM] button is pressed it switches between the HF1, HF2, and HF3 bands.
[←] / [▶] buttons
Tune up or down band.
[#0]—[#9] buttons
Press buttons [#1] — [#6] to recall preset stations.
[DIRECT] button
Enters and cancels the
[*] buttons
Enters the
[DNPP]/[SBF] button
Each time the button is pressed the display switches.
For the display switching order refer to
Accessories
External view
Number of items
①
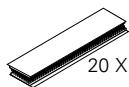
20× 60mm (13/16 × 2-3/8 in.)
(2)

20X40mm(13/16x1-9/16in.) 1
(3)
1
(4)

3

The use of any accessories except for those provided might result in damage to the unit. Make sure only to use the accessories shipped with the unit, as shown above.
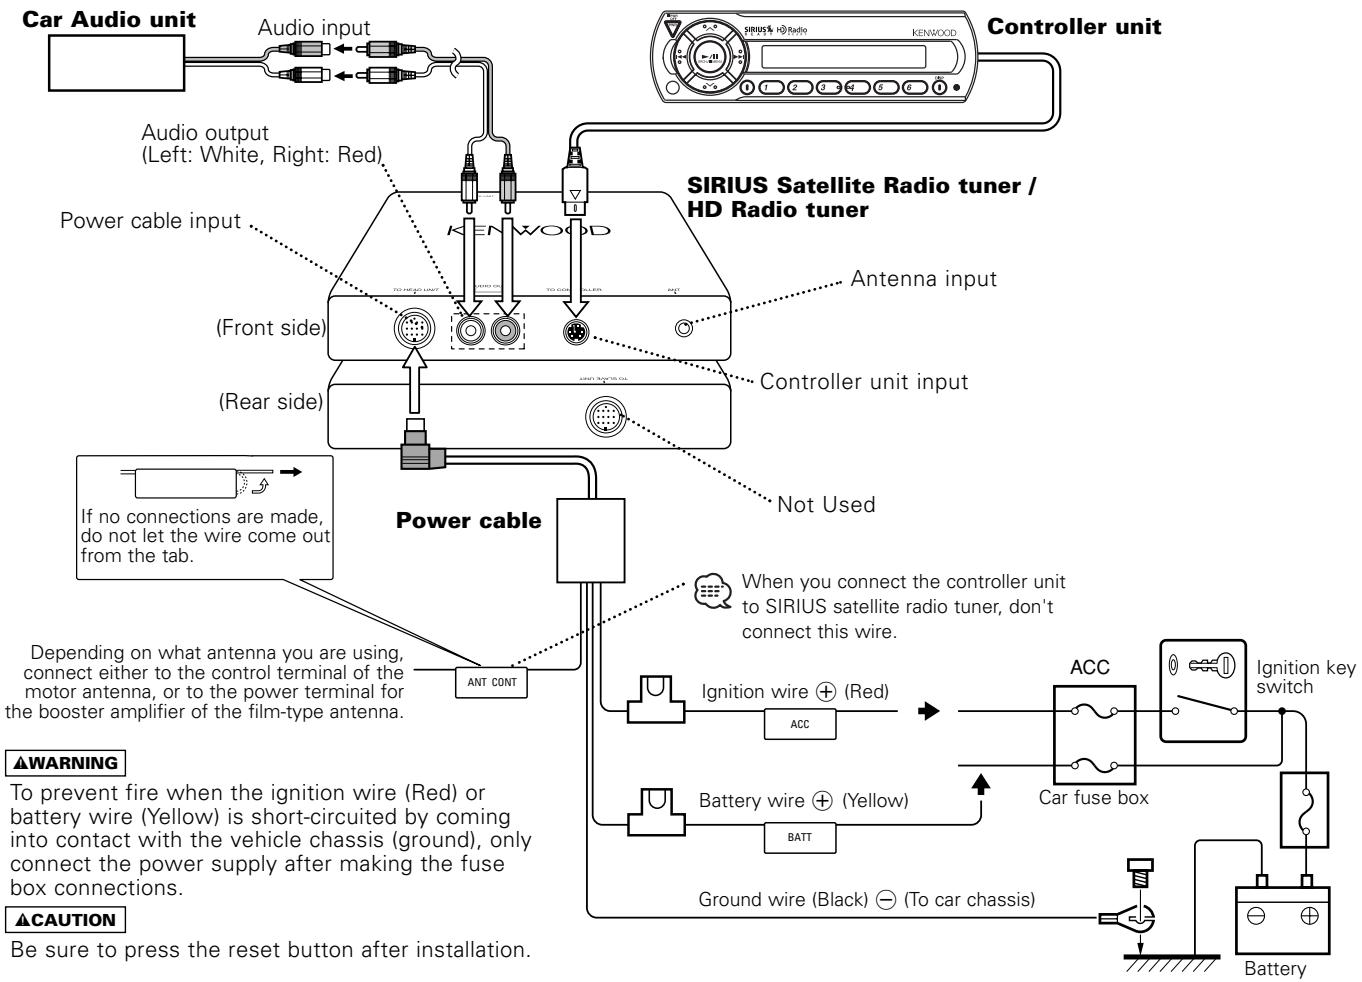
Installation Procedure
- To prevent a short circuit, remove the key from the ignition and disconnect the battery.
- Make the proper input and output wire connections for each unit.
- Connect the wiring harness wires in the following order: ground, battery, ignition.
- Install the unit in your car.
- Reconnect the battery.
- Press the reset button.
WARNING
When drilling a hole in the car chassis to install the unit, check first that nothing is on the other side.
CAUTION
- If the fuse blows, first make sure the wires aren't touching to cause a short circuit, then replace the old fuse with one with the same rating.
- Do not let unconnected wires or terminals touch metal on the car or anything else conducting electricity. To prevent a short circuit, do not remove the caps on the ends of the unconnected wires or the terminals.
- After the unit is installed, check whether the brake lamps, blinkers, wipers, etc. on the car are working properly.
- Insulate unconnected wires with vinyl tape or other similar material.
Installation
Installation of Controller unit
- Installation without using the trim mount plate ③
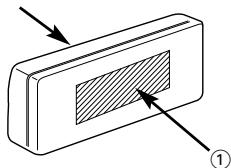
Controller unit
Attach one strip of Velcro to the slanted-line of the controller units as shown to the left, and attach the other strip of Velcro to the parts where you wish to attach the controller units. Then, put velcro together and install the controller units.
- Installation using the trim mount plate ③
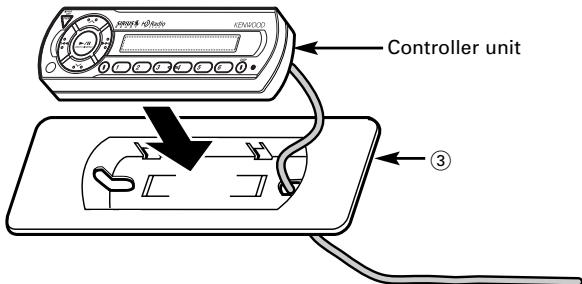
Pass the wire from the controller unit through the hole on the trim mount plate and push fit the controller unit into the trim mount plate until it locks.
CAUTION
- Be sure not to place the unit on such place as where it is exposed to direct sunlight and temperature eventually rises. It results in the deformation of the case.
- Depending on the installing location, the controller unit may not be able to receive the signals from the remote controller unit (Option). Install them after confirming that the signals can be received.
- Install the unit in such a way that it does not disturb driving.
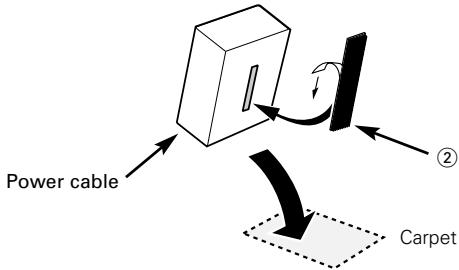
Installation of Power cable
What might seem to be a malfunction in your unit may just be the result of slight misoperation or miswiring. Before calling service, first check the following table for possible problems.
SIRIUS source
? The power does not turn ON.
The fuse has blown.
After checking for short circuits in the wires, replace the fuse with one with the same rating.
No ACC position on vehicle ignition.
Connect the same wire to the ignition as the battery wire.
The SIRIUS satellite radio tuner is not connected properly.
Connect the SIRIUS satellite radio tuner directly to this unit.
? Nothing happens when the buttons are pressed.
The computer chip in the unit is not functioning normally.
Press the Reset button on the controller unit (page 3).
? No sound can be heard, or the volume is low.
The input/output wires or wiring harness are connected incorrectly.
Reconnect the input/output wires and/or the wiring harness correctly. See the section on
? No broadcast can be received
The SIRIUS antenna is not connected.
Connect it properly.
No subscription is established.
Subscribe to SIRIUS.
? No sound is heard even though the information concerning the SIRIUS satellite radio tuner is displayed.
The microcomputer does not function correctly.
Press the Reset button of the controller unit.(Page 3)
The system is not connected properly.
Connect the system properly. See
HD Radio source
? The power does not turn ON.
The fuse has blown.
After checking for short circuits in the wires, replace the fuse with one with the same rating.
No ACC position on vehicle ignition.
Connect the same wire to the ignition as the battery wire.
? Nothing happens when the buttons are pressed.
The computer chip in the unit is not functioning normally.
Press the Reset button on the controller unit (page 3).
? No sound can be heard, or the volume is low.
The input/output wires or wiring harness are connected incorrectly.
Reconnect the input/output wires and/or the wiring harness correctly. See the section on
- The preset broadcast station is not transmitting in the mode that was set with
Please set
In digital AM broadcasting, receive mode switches between stereo and monaural too often.
Receiving condition is bad or unstable. Stereo is chosen when receiving condition is good, and it switches to monaural when the condition becomes bad.
? Radio reception is poor.
The car antenna is not extended.
Pull the antenna out all the way.
The antenna control wire is not connected.
Connect the wire correctly, referring to the section on
Troubleshooting Guide
The messages shown below display your systems condition.
ANTENNA ERR: The antenna is not connected correctly.
Make sure the antenna is connected correctly and then turn OFF/ON the SIRIUS source or Controller unit.
TUNER ERROR: Broadcast cannot be received due to an error in this unit.
Turn OFF/ON the SIRIUS source or Control unit, or press the reset button on the Controller unit.
ESN ERROR: The ESN (Electronic Serial Number) is not registered in SIRIUS satellite radio tuner unit.
Consult your nearest service center.
Specifications
Specifications subject to change without notice.
General
Operating Voltage. 14.4 V (11 ~ 16 V)
Current consumption 0.5 A
Size (W× H× D)
Controller unit. 154× 43× 17mm
$$ (6 - 1 / 1 6 \times 1 - 1 1 / 1 6 \times 1 1 / 1 6 \text {i n .}) $$
Trim mount plate 188 × 58 × 18 mm
$$ (7 - 3 / 8 \times 2 - 5 / 1 6 \times 1 1 / 1 6 \text {i n .}) $$
Weight
Controller unit 220 g (0.49 lbs)