BM35 - Bread maker INVENTUM - Free user manual and instructions
Find the device manual for free BM35 INVENTUM in PDF.

User questions about BM35 INVENTUM
0 question about this device. Answer the ones you know or ask your own.
Ask a new question about this device
Download the instructions for your Bread maker in PDF format for free! Find your manual BM35 - INVENTUM and take your electronic device back in hand. On this page are published all the documents necessary for the use of your device. BM35 by INVENTUM.
USER MANUAL BM35 INVENTUM
natural_image
Line drawing of a medical device connected to a wall-mounted electrical outlet (no text or symbols present)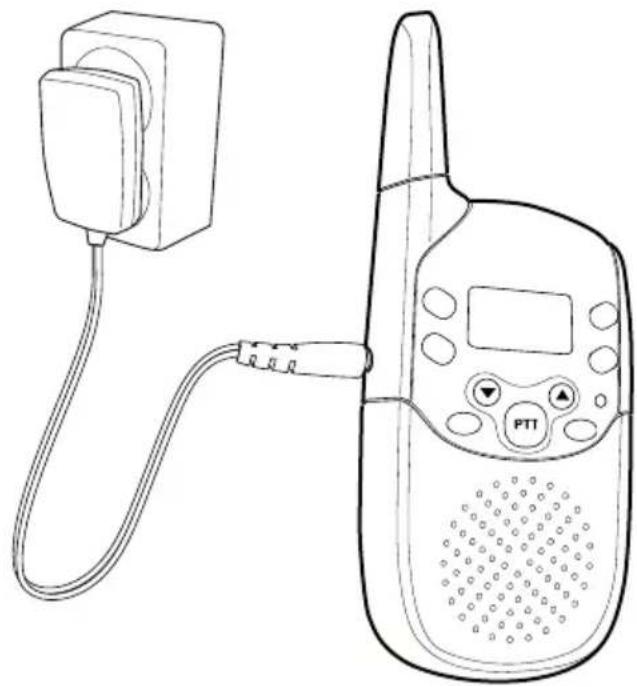
natural_image
Line drawing of a walkie-talkie device connected to a power plug (no text or symbols)2

text_image
1 0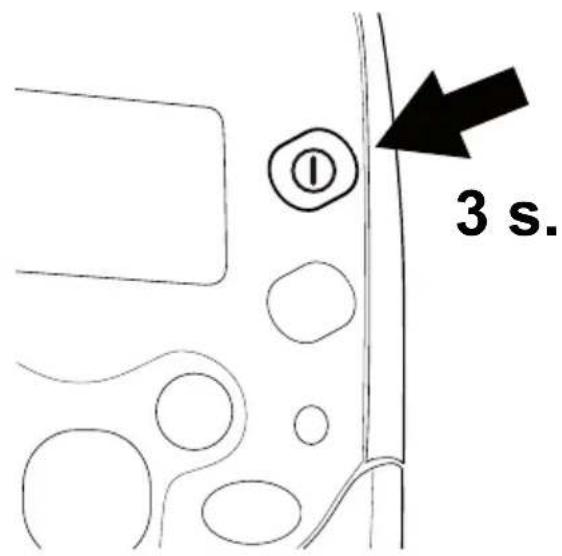
text_image
3 s.3
natural_image
Simple line drawing of a device with a screen and a battery, no text or symbols present.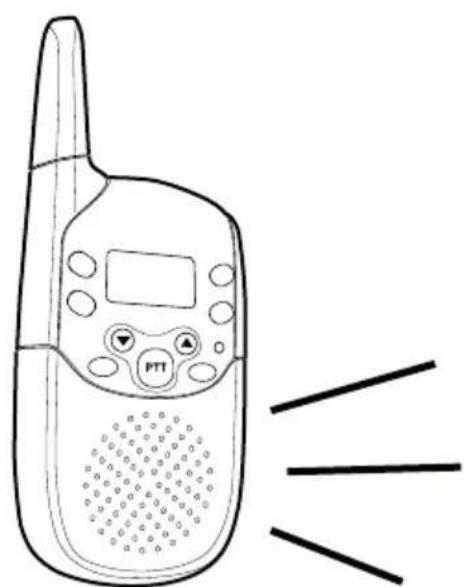
natural_image
Line drawing of a walkie-talkie with a digital display and control panel, emitting sound waves (no text or symbols)doro bm35

text_image
Tx M 88:88 Ac Beep Auto Mon MENU ① ② ③ ④ ⑤ ⑥ ⑦ ⑧ ⑨ ⑩ ⑪ ⑫ ⑬ SCAN VOX DCM 88:88 15 14 PTT 13Svenska
1 Scroll UP Button
2 Menu button
3 Microphone
4 External microphone socket (not in use)
5 On/Off
6 Setting for sound activation
7 Scroll DOWN Button
8 Headset socket
9 Light
10 Charging socket
11 Channel lock
12 Volume control/scroll buttons
13 Walkie talkie/PMR functions
14 Menu button
15 On/Off
Norsk
text_image
THIS SIDE UPBabyenhet

Declaration of conformity
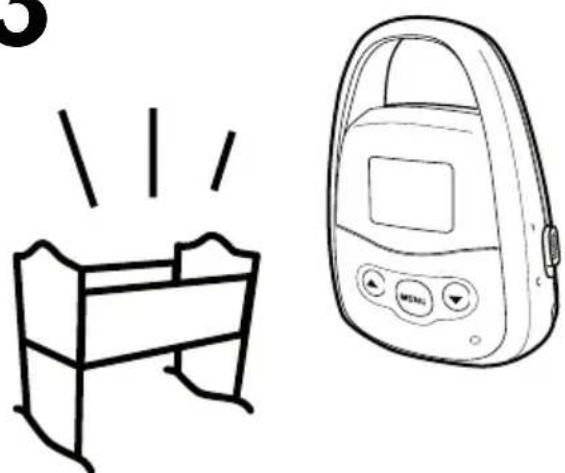
The Baby Monitor is intended for indoor use to monitor a baby from a nearby location. Please remember that a monitor is no substitute for supervision – always ensure you can reach your baby within a few seconds should the need arise.
The Baby Monitor only transmits sounds to the parent unit when sounds that exceed the preset level, such as the baby crying, are heard close to the baby unit. (see below). Place the baby unit near to and with the front facing the child.
Ensure that the baby unit is out of the child's reach; never place the baby unit in the cot or pram!
To avoid acoustic feedback do not place the baby and parent units too close to each other.
Advanced versions, e.g. +1, have multiple parent units/handsets and can be used as walkie talkies (PMR) as well, or to monitor two children simultaneously, see the instructions that begin on Page 5.
Connection
Parent Unit (♀)
-
Remove the battery cover as illustrated and insert the battery with plus/minus as shown.
-
Connect the parent unit's mains adapter to and the mains wall socket.
-
Press down ① until a tone is heard and the parent unit is activated.
-
Charge until the battery indicator stop signalling.
-
Unplug the mains adapter and the parent unit is ready for use.

text_image
THIS SIDE UPBaby Unit

- Connect the baby unit's mains adapter to the mains wall socket.
- Set the control on the unit's right side in position 1.
- Adjust sensitivity using the control on the back (A=least sensitive....H=most sensitive) by talking quietly into the baby unit at the same time as someone else listens to the parent unit.
Please note!
The parent unit must be charged for 24 hours before it is used for the first time.
The recharging system used in this model may result in it becoming warm. This is normal and will not damage the equipment.
Do not place the baby or parent units close to other electrical equipment such as computers, computer screens, telecom equipment, fans, etc. This is to minimize the risk of any interference. Do not place the units in places where they will be exposed to direct sunlight or other major heat sources!
Only use original batteries in the parent unit. The guarantee does not cover any damage caused by incorrect batteries.
Battery Information
The symbol 📄 in the display indicates when it is time to recharge the battery. When the battery is running low, the indicator will flash.
On the parent unit the sections are turned off one by one as the power goes down.
Fully-charged batteries (14 hours charging) will last for approx. 48 hours of normal use or approx. 2 hours of continuous transmission.
These operation times apply at normal room temperature. Because batteries only have a certain lifespan it is quite normal that operating time will decrease somewhat compared to the specifications when the baby monitor is used regularly.
Channels
The baby monitor has eight channels each with 38 sub channels. This gives a total of 304 different channel combinations. The parent unit and baby unit must be tuned to the same channel and sub channel in order to work. As transmission is open there is a risk of interception and we recommend that sub channel 0 is NOT selected as this will allow communication from all 38 sub channels. Other electronic equipment can interfere with transmission. If interception or interference does occur, change the channels on both the units or select another sub channel.
Parent Unit
- Press ≡ The relevant channel flashes (large number).
- Scroll to the desired channel using ▲/▼.
- Press ≡. The relevant sub channel flashes (little number in upper right corner).
- Scroll to the desired setting using ▲/▼.
- Wait a few seconds until the display returns to standby mode.
Baby Unit
- Press MENU. [H] is shown on the display.
- Scroll to the desired channel using ▲/▼.
- Press MENU. ☐ is shown in the display.
- Scroll to the desired sub channel using ▲/▼.
- Wait a few seconds until the display returns to standby mode.
Range
In ideal conditions (no obstacles between the units) the range can reach up to 3 km.
Volume Control (Parent Unit)
On standby the volume can be adjusted using ▲/▼.
Belt clip (Parent Unit)
The equipment includes a belt clip which is fitted to the back of the handset. The belt clip enables the handset to be attached to a belt, waistband or similar. You can remove the clip by lifting the small tab and pushing the clip upwards.
Key Beep (Parent Unit)
The sound heard when you press the buttons can be switched on or off here.
- Press w repeatedly until ⊥□ is displayed.
- Scroll to the desired setting using ▲/▼ (□F=off, □n=on).
- Press PTT.
Channel Lock (Parent Unit)
This function locks the channels and the volume on the parent unit to prevent unintentional usage of some buttons (≡and ▲/▼).
- Press 0m until the display shows the key symbol.
- Cancel the key lock by holding 0m pressed until the symbol in the display disappears.
Turning the Parent Unit On/Off
Press and hold the Ⓐ button for a few seconds to turn the parent unit on or off.
Sound activation / adjustable sensitivity (VOX) Baby Unit
By using the VOX sensitivity adjustment you are able to select the level of sound transmitted from the baby unit to the parent unit. This is useful to filter normal or quite sounds ‘in the room’ but still hear important or crying noises to suit your preference.
Test different settings for sensitivity for the most effective use:
A = Least Sensitive H = Most Sensitive.
Safety Signal (Baby Unit)
Using this function, a beep is sent every 30 seconds (in standby) from the baby monitor so that you know that the right channel/sub channel has been set and that the range has not been exceeded. The display shows Beep when the function is active.
- Press MENU repeatedly until Beep is displayed.
- Scroll to the desired setting using ▲/▼ (□F=off, □n=on).
- Wait a few seconds until the display returns to standby mode.
Automatic Monitoring (Baby Unit)
You can activate a function that monitors for five seconds every five minutes.
The display shows Auto Mon when the function is active.
- Press MENU repeatedly until Auto Mon is displayed.
- Scroll to the desired setting using ▲/▼ (□F=off, □n=on).
- Wait a few seconds until the display returns to standby mode.
Activity Signal (Baby Unit)
The activity signal is an additional aid to get your attention when sounds are heard in the vicinity of the baby unit. This function sends a tone sequence to the parent unit when the baby unit is activated (ie. by the baby crying).
The display shows · when the function is activated.
- Press MENU repeatedly until [R and •] are shown.
- Scroll to the desired setting using ▲/▼ (□F=off, □n=on).
Turning the Baby Unit On/Off
Use the control on the right side of the baby unit to turn it on/off.
Versions with Multiple Parent Units (+1, +2 etc.)
With two or more parent units (referred to as handsets below) this product can be used as a walkie talkie as well. The following description explains how two handsets can communicate with each other. It is also possible to use one of the handsets as a baby unit which means that more than one child can be monitored at the same time, see Page 7.
To communicate
- Make sure that you use the same channel and sub channel, see Page 3.
- Press and hold PTT (Push To Talk) while you speak.
- If nobody answers, send a ring signal by pressing .
Please note!
If the handsets are unable to communicate it may be because you are using different channels or sub channels, the battery is running low or the handsets are too far apart.
Paging
You can scan all channels to locate one that is transmitting. If a signal is found, the display shows the channel number and the signal is heard for a few seconds.
Press PTT to stop at the right channel.
During searching, battery power consumption is significantly higher than normal.
- Press ≡ and ▲ at the same time. The display starts searching among the channels.
- Disconnect the function by pressing ≡.
Monitor function
If the signal is weak, the monitor function can be used.
- Press for at least five seconds.
- Disconnect the function by pressing PTT.
Sound Activation (VOX)
This unit can be used without having to press the PTT button to transmit. By setting the correct level, the equipment can determine in an instant whether you are speaking or if the sound level in the room is normal.
Test different settings for sensitivity. Even with a very accurate setting, there is unfortunately always a slight risk that noise from the surroundings may activate the transmitter, or that the first word won't be heard completely. The latter problem can be solved by calling out the name before every message.
The transmitting function is shut off two seconds after you have finished speaking. The display shows VOX when the function is active. If the handset transmits by itself, i.e. it is set too sensitively, press ≡ to be able to interrupt temporarily to change the setting.
- Press repeatedly until VOX is displayed.
- Scroll to the desired setting using ▲/▼. (□F=off, 1=least sensitive....3=most sensitive).
- Press PTT.
Handset as Baby Unit (to monitor two children)
Versions that have more than one handset can be used to monitor more than one child. For this purpose, one of the handsets is used as a baby unit.
- Turn down the volume to the minimum using ▼ on the handset that is being used as the baby unit.
- Set sound activation (VOX) as above on the handset being used as a baby unit.
Please note!
Make sure that you use the same channel and sub channels on all units.
Call melody
The call melody sent from the handset can be set at various different levels ( F = off ).
- Press ≡ repeatedly until □ is displayed.
- Scroll to the desired setting (1 -5) using ▲/▼.
- Press PTT.
Termination tone (Roger tone)
You can activate a tone sequence which is heard when you release the PTT button. This can be used as a reminder to the other person that you have finished talking and are waiting for a response.
- Press ≡ repeatedly until □ is displayed.
- Scroll to the desired setting using ▲/▼ (□F=off, □n=on).
- Press PTT.
Key Beep
The sound heard when you press the buttons can be switched on or off here.
- Press ≡ repeatedly until ⊥□ is displayed.
- Scroll to the desired setting using ▲/▼ (□F=off, □n=on).
- Press PTT.
Searching two channels (Dual Watch)
You can enter a different channel for simultaneous listening using the usual main channel.
- Press repeatedly until DCM is displayed.
- Scroll to the desired channel using ▲/▼ (□F=off). Press ≡.
- Scroll to the desired sub channels using ▲/▼. Press ≡.
- Press PTT.
Declaration of conformity
Doro hereby declares that the product Doro BM35 conforms to the essential requirements and other relevant regulations contained in the Directives 1999/5/EC and 2002/95/EC.
A copy of the manufacturer's declaration is available at www.doro.com/dofc
Troubleshooting
The unit does not activate despite being switched on
- Do the batteries require recharging?
- Are the batteries inserted correctly?
Acoustic Feedback
- The units are too close to each other.
No sound in handset (parent unit)
- Has the same channel and transfer code been selected for both units?
- Turn up the volume.
- Adjust the level for sound activation (VOX).
- Move the units closer to each other (within range).
Guarantee
This product is guaranteed for a period of 12 months from the date of purchase. In the unlikely event of a fault occurring during this period, please contact the place of purchase. Proof of purchase is required for any service or support needed during the guarantee period. This guarantee shall not apply to a fault caused by an accident or a similar incident or damage, liquid ingress, negligence, abnormal usage, wrong batteries, non-maintenance or any other circumstances on the user's part. Furthermore, this guarantee shall not apply to a fault caused by a thunderstorm or any other voltage fluctuations.
UK
If you cannot resolve the fault using the faultfinder section, technical support is available by email on tech@doro-uk.com or via a premium rate telephone number 0905 895 0854 (calls cost 50 pence at time of print). Further contact details are available on our website: www.doro-uk.com
Plassering og bruk
text_image
THIS SIDE UPBabyenhet

Tastelyd (foreldreenhet)
Specific Absorption Rate (SAR)
text_image
THIS SIDE UPBabyenhed

natural_image
Symbol of a trash bin crossed out by two diagonal lines (no text or numbers present)text_image
THIS SIDE UPtext_image
THIS SIDE UPModule bébé

text_image
THIS SIDE UPUnidad del bebé

text_image
THIS SIDE UPNadajnik

natural_image
Symbol of a trash bin crossed with a diagonal line and a horizontal bar below (no text or labels)ODCINEK GWARANCYJNY NR 1
MODEL: doro bm35
pieczęć sklepu
ODCINEK GWARANCYJNY NR 2
pieczęć sklepu
MODEL: doro bm35
numer fabryczny
ODCINEK GWARANCYJNY NR 3
pieczęć sklepu
ODCINEK GWARANCYJNY NR 4
MODEL: doro bm35
numer fabryczny
pieczęć sklepu
ODCINEK GWARANCYJNY NR 5
MODEL: doro bm35
numer fabryczny
pieczęć sklepu
text_image
THIS SIDE UPBabyeenheid