
BM50 - Bread maker INVENTUM - Free user manual and instructions
Find the device manual for free BM50 INVENTUM in PDF.
| Product type | Bread machine |
| Brand | Inventum |
| Model | BM50 |
| Programs | 12 automatic programs (Normal, Sweet, French, Cake, Rapid, Dough, Whole Wheat, Bake Only) |
| Capacity | 500 g of bread |
| Timer | Programmable up to 13 hours |
| Crust control | 3 levels: Light (Low), Medium (Mid), Dark (Hi) |
| Display | Digital screen with program and time indicators |
| Bread pan | Non-stick coating, removable |
| Kneading blade | Removable, non-stick coating |
| Keep warm | Automatic up to 60 minutes after baking |
| Audible signal | For adding ingredients (raisins, nuts, etc.) during program |
| Functions | Kneading, rising, baking, keep warm |
| Safety | Overheat protection (display H:HH), automatic shut-off |
| Cleaning | Exterior: damp cloth; interior: damp cloth; pan and blade: hand wash, do not put in dishwasher |
| Included accessories | Bread pan, kneading blade, spoon and measuring cup |
| Warranty | 24 months |
| After-sales service | Inventum Group BV (Netherlands) and IES Import Electronic Service GmbH (Germany) |
| Included recipes | 7 recipes in the manual (white bread, whole wheat bread, wheat bread, honey bread, raisin and walnut bread, sunflower bread, cake) |
Frequently Asked Questions - BM50 INVENTUM
User questions about BM50 INVENTUM
0 question about this device. Answer the ones you know or ask your own.
Ask a new question about this device
Download the instructions for your Bread maker in PDF format for free! Find your manual BM50 - INVENTUM and take your electronic device back in hand. On this page are published all the documents necessary for the use of your device. BM50 by INVENTUM.
USER MANUAL BM50 INVENTUM
natural_image
White InVentilum bread maker with open lid and golden kernel, no visible text or symbols on the device itself.GebrUiksaanWiJZinG
instrUction manUaL
GebraUchsanLeitUnG
mode d'emploi
NEDERLANDS

Legislation requires that all electrical and electronic equipment must be collected for reuse and recycling. Electrical and electronic equipment marked with the symbol indicating separate collection of such equipment must be returned to a municipal waste collection point.
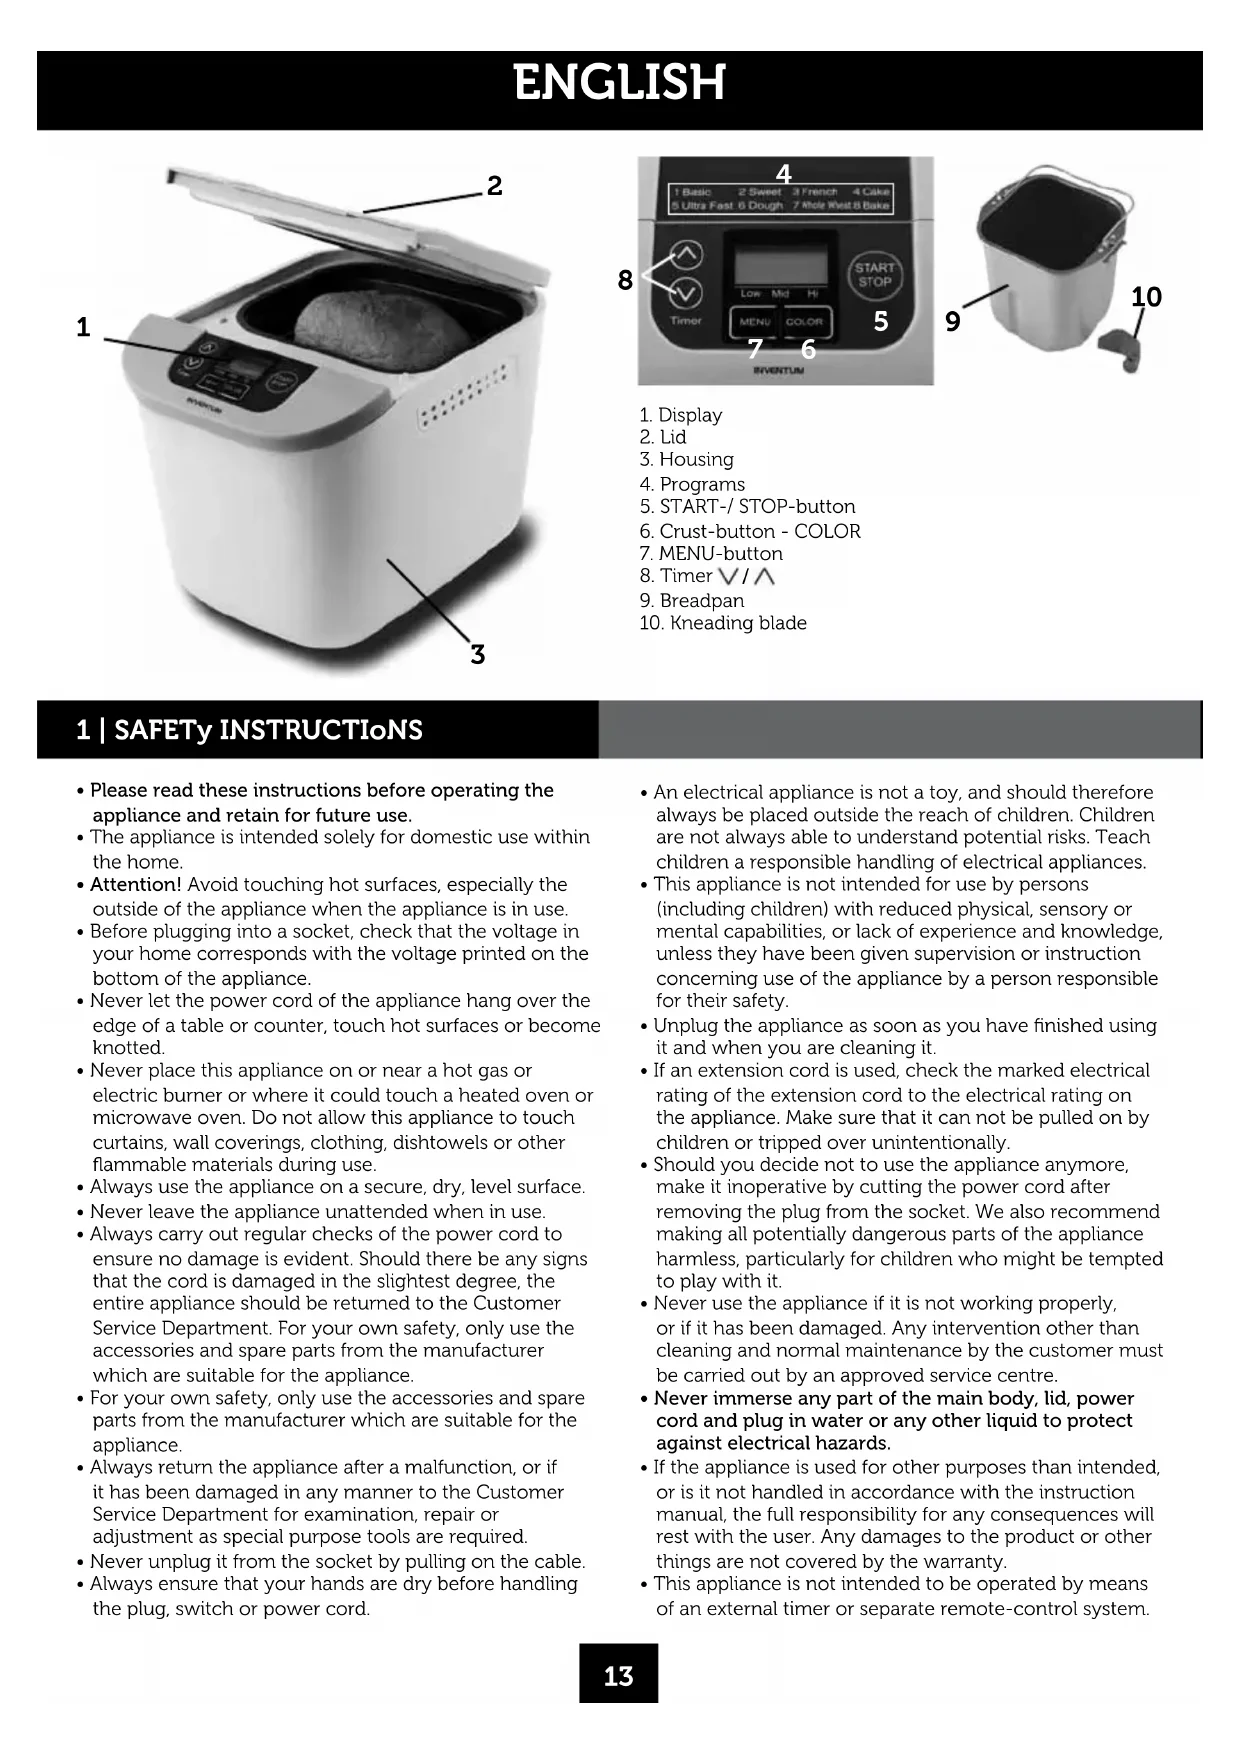
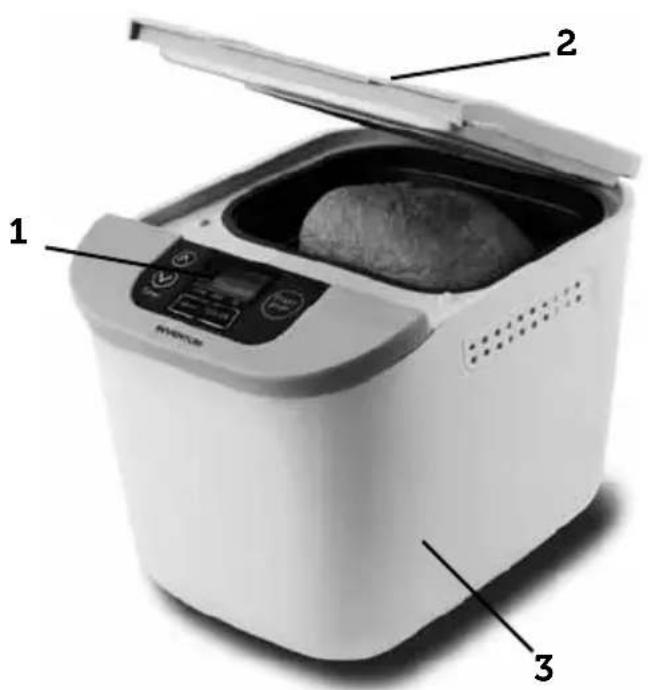
Description of the appliance page 13
1. Safety instructions page 13
2. Before first use page 14
3. The art of baking page 14
4. The ingredients page 14
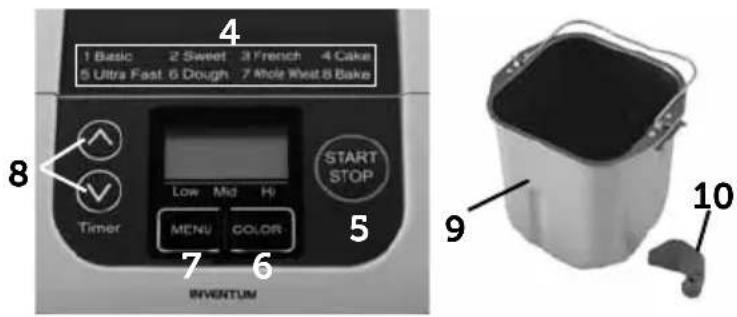
5. The display page 15
- Errors in the display page 15
- Programs page 15
- Baking bread page 15
- How to use the timer page 16
- Tips for baking bread page 16
- Problems that may occur page 17
- Frequently asked questions page 17
- Cleaning & maintenance page 19
- Recipes page 19
Guarantee & after sales Service page 42
DEUTSCH

1 | SAFETY INSTRUCTIONoNS
- Please read these instructions before operating the appliance and retain for future use.
- The appliance is intended solely for domestic use within the home.
- Attention! Avoid touching hot surfaces, especially the outside of the appliance when the appliance is in use.
- Before plugging into a socket, check that the voltage in your home corresponds with the voltage printed on the bottom of the appliance.
- Never let the power cord of the appliance hang over the edge of a table or counter, touch hot surfaces or become knotted.
- Never place this appliance on or near a hot gas or electric burner or where it could touch a heated oven or microwave oven. Do not allow this appliance to touch curtains, wall coverings, clothing, dishtowels or other flammable materials during use.
• Always use the appliance on a secure, dry, level surface. - Never leave the appliance unattended when in use.
- Always carry out regular checks of the power cord to ensure no damage is evident. Should there be any signs that the cord is damaged in the slightest degree, the entire appliance should be returned to the Customer Service Department. For your own safety, only use the accessories and spare parts from the manufacturer which are suitable for the appliance.
- For your own safety, only use the accessories and spare parts from the manufacturer which are suitable for the appliance.
- Always return the appliance after a malfunction, or if it has been damaged in any manner to the Customer Service Department for examination, repair or adjustment as special purpose tools are required.
-
Never unplug it from the socket by pulling on the cable.
• Always ensure that your hands are dry before handling the plug, switch or power cord. -
An electrical appliance is not a toy, and should therefore always be placed outside the reach of children. Children are not always able to understand potential risks. Teach children a responsible handling of electrical appliances.
- This appliance is not intended for use by persons (including children) with reduced physical, sensory or mental capabilities, or lack of experience and knowledge, unless they have been given supervision or instruction concerning use of the appliance by a person responsible for their safety.
- Unplug the appliance as soon as you have finished using it and when you are cleaning it.
- If an extension cord is used, check the marked electrical rating of the extension cord to the electrical rating on the appliance. Make sure that it can not be pulled on by children or tripped over unintentionally.
- Should you decide not to use the appliance anymore, make it inoperative by cutting the power cord after removing the plug from the socket. We also recommend making all potentially dangerous parts of the appliance harmless, particularly for children who might be tempted to play with it.
- Never use the appliance if it is not working properly, or if it has been damaged. Any intervention other than cleaning and normal maintenance by the customer must be carried out by an approved service centre.
- Never immerse any part of the main body, lid, power cord and plug in water or any other liquid to protect against electrical hazards.
- If the appliance is used for other purposes than intended, or is it not handled in accordance with the instruction manual, the full responsibility for any consequences will rest with the user. Any damages to the product or other things are not covered by the warranty.
-
This appliance is not intended to be operated by means of an external timer or separate remote-control system.
-
The largest bread that can be made in this machine is 1.0Lb (500 g). So follow the recipes in this instruction manual for the maximum quantities of flour and yeast that may be used.
- If the power cord of this appliance is damaged, it must be replaced by the manufacturer, the manufacturer's customer service or a similarly qualified person to avoid associated dangers.
2 | BEFORE FIRST USE
Before you use the appliance for the first time, please do as follows: Carefully unpack the appliance and remove all the packaging material. Keep the material (plastic bags and cardboard) out of reach of children. Check the appliance after unpacking for any damage, possible from transportation. In the box you will find the breadmaker, the instruction manual, the breadpan and the kneadingblade. Place the appliance on a stable and heat resistant surface. Wipe the housing of the appliance only with a damp cloth and rinse the breadpan and kneadingblade with warm water. Thoroughly dry the parts.
The breadpan and kneadingblade have a non-stickcoating that is why you may never clean these parts with detergents, a brush or sponge. Only use a damp cloth and water. That is enough to keep everything clean. When you plug in the appliance for the first time, the breadmaker will give a hard beep and the display shows "3:00". The breadmaker is ready for use. Note: the new appliance can give off a bit of smoke at the first use, this is perfectly normal and causes no harm to the appliance.
3 | THE ART of BAkING
The quality of the bread you make in the breadmaker depends on a lot of factors. The more you use the breadmaker, the faster you learn these factors and how to influence the result. The breadmaker, relatively easy to use, requires a correct dosage of the ingredients. We advise you to use a kitchenscale which weighs per grams.
The breadmaker gives you a choice between the different programs. Select the program that is suitable for the type of bread you want to make, or otherwise indicated in the recipe.
Put the yeast on top of the flour and as the last ingredient, preventing it to come in contact with the salt, sugar and water and/or milk. Make sure that your ingredients are fresh. Check the freshness of the yeast by dissolving 1 teaspoon of sugar in half a cup of water and add 1 teaspoon of yeast. After a few minutes the mixture should bubble and then you'll know that the yeast is fresh. Check the dough during the kneading. After approx. 5 to 10 minutes it should look like a smooth, elastic round ball. Add 1 tablespoon of water when the dough is lumpy or add 1 tablespoon of flour when the dough is too wet.
Make sure that you add the ingredients, including the water, in the order indicated in the manual and check if they are room temperature. Take the butter and the yeast out of the refrigerator on time.
Sometimes the bread can rise too fast. If the
roomtemperature or the temperature of the ingredients is too high it can cause the bread to rise too fast.
After baking bread, let the breadmaker cool down for 15-20 minutes, before baking another bread.
4 | THE INGREDIENTS
The most important factors for baking good bread are the quality, the freshness and the correct amount of ingredients.
Flour
Flour is the most important ingredient for baking bread. The weight of the flour varies from type to type. That is why it is necessary to weigh the right amount with a kitchenscale. Advice: when you buy flour check the package. It should say that it is suitable for baking bread.
Gluten
Gluten is a network of elastics strands, which interlock to trap the gas produced by yeast.
Yeast
Without yeast the bread will not rise. Yeast needs liquid, sugar and warmth to grow and rise. Dried yeast has been used in all the recipes in this instruction book. Before using dried yeast always check the use by date, as stale yeast will prevent the bread from rising. Some yeast's are more active in hot climates. So it is possible that you have to use less than what is written in the recipes.
Salt
Salt does not only give flavour to the bread, but also regulates the activity of the yeast, toughens the dough and prevents the bread from rising too fast.
Butter/oil
Butter or oil adds flavour and retains the moisture of the bread. Butter or oil must have room temperature before adding.
Sugar
Sugar provides sweetness and flavour, browns the crust and produces food for the yeast. Regular white sugar, brown sugar of honey may be used. Note: Never use sugar cubes because it may cause damage to the non-stick coating of the breadpan.
Liquids
Liquids includes water, milk and egg. DO NOT use any perishable liquids with the timer. You can replace the total amount of water with milk. Milk makes the bread softer and tastier. Eggs increase the nutritional value of the bread. They help with flavour, tenderness and are usually used in the sweeter type of breads. The amount and temperature of liquids is extremely important. It is allright to open the machine to check the consistency of the dough. Do this after about 5 to 10 minutes of kneading. The dough should be a smooth, round elastic ball. If it is too dry, add liquid 12 to 1 tablespoon at a time; too wet, add 1 tablespoon of flour at a time. With a normal room temperature, 21^ , you should use lukewarm water: cold water does not activate the yeast and too hot water activates it too strongly.
Other ingredients
Fruits and nuts etc. are added later. When the first knead is complete, the machine will sound short beeps, indicating it's time to add other ingredients (fruits, nuts, etc.). If added before this stage, excessive kneading will cause the ingredients to break down, rather than hold
their shape. Be careful not to use ingredients which are too big and too hard. They can cause damage to the non-stick coating.
5 | THE DISpLAy
MENU-button
Press this button to select one of the automatic programs available. These settings are listed on the last page of this manual. Every time you press this button you will hear a beep and the number of the program changes. The program is shown on the display. This breadmaker has 12 programs (see: Programs).
START- and STOPbutton
With this button you can either start or stop the program.
TIP: If you have chosen the wrong program, you can alter this by pressing the stop-button for a few seconds.
You can reset the breadmaker with the correct program.
START: to start a program, press the button and you will hear a beep. The colon in the time on the display will blink and the time starts to countdown.
STOP: to stop a program, press the button for a few seconds until you hear a beep. The sound confirms that you have stopped the program.
Color-button
Press the color-button to select one of the three crust colour settings available for the bread settings only; light, medium or dark.
TIP: If you try a recipe for the first time, we advise you use crust colour medium.
Timer (V/∧)
For use when setting the timer to delay baking. By pressing the buttons «,» and «», the time will move up or down in 10 minutes increments to preset the programmable timer. See: How to use the preset timer.
ON/OFF?
| How to check if the machine is working or if the program is running? | If the colon blinks, the program is running. |
| If the colon is steady, the program has stopped. |
6 | ERRoRS IN THE DISpLAy
When, after switching on the breadmaker, the display says "H:HH", it means that the temperature of the breadmaker is still too high. Open the lid and leave the breadmaker to cool down before you bake another bread. When the display says EE0 or EE1, unplug the breadmaker and contact the service department.
7 | pRoGRAMS
1: Basic This program is mostly used for baking a white bread.
2: Sweet For preparing "sweet" breads like bread with raisins and nuts.
3: French The bakingtime with this program is longer than with the normal program which gives the bread a harder crust.
4: Cake For preparing a bread made with bakingpowder instead of yeast. Breads made with this program will be less high and more compact. The timer cannot be used with this program because of the immediate activity of the bakingpowder. If you want to make cake with this program we advise you to put all the ingredients in the breadpan. Select the program and before you press start, stir the ingredients with a wooden spoon. This increases the kneading.
5: Ultra-Fast You can use this program for baking a white bread in short amount of time. The bread will be smaller then a bread baked with the normal program.
6: Dough With this program you can make dough for buns, pizza or any other recipe with needs dough. The dough will not be baked. A signal sounds, indicating that the dough is ready and can be removed from the breadpan.
7: Whole wheat This program is used for preparing bread made from heavier flours, such as whole wheat-, wheat- and multi-grainbread. These flours need more time kneading and rising. The bread will generally be smaller because the flour is heavier.
8: Bake With this program you can bake-off ready-made-dough. This program is only for baking. The program is preset at 60 minutes. Follow the instructions on the package of the ready-made-dough. You can also heat up a baked bread.
8 | BAKING BREAD
Step 1: Open the lid and remove the breadpan by turning it a quarter to the left and pull it straight up with the handle.
Step 2: Place the kneading blade on the drive shaft in the middle of the breadpan. If the kneading blade is not seated correctly, ingredients may not be mixed and kneaded properly. Before inserting the kneading blade ensure that there are no crumbs attached to the shaft inside the breadpan or inside the hole in the kneading blade.
Step 3: Put the ingredients into the breadpan in the following order:
- First half of the flour
-
Water/milk
-
Butter/oil
- Eggs - if necessary
- The remaining flour
- Sugar (place the sugar on one side)
- Salt (place the salt on the other side)
- Yeast (place the yeast in the center)
Attention: The yeast may not come in contact with the water. The possibility exists that the water will activate the yeast before the ingredients are kneaded properly.
Step 4: Wipe down the outside of the breadpan to remove spillage. Place the breadpan in the breadmaker and turn it a quarter to the right making sure the breadpan stands firmly into position.
Step 5: Close the lid.
Step 6: Put the plug into a socket. The display shows program 1 - time "3:05".
Step 7: Select the right program with the MENU-button.
Step 8: With the COLOR-button you can select the colour of the crust. You can select light (Low), medium (Mid) or dark (Hi). The selected crust will be shown at the bottom of the display with a "Δ".
Step 9: Set the timer with the timer-buttons ( ∨ / ∧). See also: "How to use the preset timer".
Step 10: Press the START-button. The colon will now blink, indicating that the program is activated.
You can find an overview of the exact times on the last page of the English manual.
The time which is shown in the display is given in hours and minutes. For example: Program 1, Basic, crustcolour medium takes 3 hours and 5 minutes.
During the kneading process a "beep-signal" sounds: after this "beep-signal" you can add extra ingredients such as dried currants, nuts or other products. Open the lid, add the ingredients, close the lid and the kneading process will proceed. Attention: Let currants, raisins and nuts steep before adding and dry them with a kitchen towel. Make sure that the ingredients are not too large or too sharp, otherwise they can damage the non-stick coating of the breadpan.
Step 11: When the bread is finished baking, the breadmaker will sound double "beeps" and display will read "0:00". Press the STOP button and hold it for several seconds. The breadmaker will beep again to confirm that you have de-activated the program. Unplug the breadmaker and open the lid. Remove the breadpan with ovenmitts as it is very hot! Leave the bread in the breadpan to cool off for 10 to 15 minutes. Turn the breadpan upside down and shake to loosen. Never place the bread and the breadpan on the outside of the breadmaker or on a plastic tablecloth. Attention: the aluminum breadpan can not stand beating, knocking on the counter and pushing and/or squeezing on the sides. After baking the hot breadpan is weak and must not be loaded on mechanically.
When the bread does not loosen immediately, carefully turn on the bottom of the
driveshaft until the bread loosens.
If you remove the bread from the breadmaker and the kneading blade stays in the bread, carefully remove it.
Leave the bread to cool on a wire rack and remove the kneading blade afterwards with your fingers. Make sure that the
kneadingblade is cooled down. It is
recommendable to cut the bread after 15 to 20 minutes.
Extra: If you do not wish or are not able to remove the bread immediately, the breadmaker will automatically go into a "keep warm" setting, holding the temperature of the bread for up to 60 minutes. This is not included in the total time of the program.
9 | How To USE THE TIMER
If you wish to use the timer, you must set the timer before you press the START-button.
Important: do not use the timer if you use perishable ingredients.
Follow the first 8 steps of the chapter "Baking bread", then; after you have selected the right program and the right crust colour, press on the timer-buttons to increase or decrease the time on the display. See the chapter "The display".
= 10 minutes to
V = 10 minutes off
The time shown on the display is the total amount of processing time. The timer can be programmed up to 13 hours.
For example: The present time is 9:00am and you want the bread to be ready at 6:30pm. It is 9 hours and 30 minutes from now until 6:30pm. You should therefore set the timer with the "^button to 9 hours and 30 minutes - "9:30". The breadmaker will now run the program and make sure that the bread is ready on the time you want.
10 | TIpS FoR BAKING BREAD
- Do check use by dates on ingredients and make sure they are at room temperature.
- Do add ingredients to the breadpan in the order stated in the recipe.
- Do use fresh ingredients.
- Do add the yeast as the last ingredient. Place the yeast in a small hole in the center of the flour. It may not come in contact with salt, sugar and water (milk).
- Tip: Check the freshness of the yeast by dissolving 1 teaspoon of sugar in half a cup of water and add 1 teaspoon of yeast. After a few minutes the mixture should bubble, then you'll know that the yeast is fresh.
- Tip: After approx. 5 to 10 minutes after starting kneading you can check the dough. The dough should be a smooth, elastic, round ball. Open the lid and touch the top of the ball of dough carefully with your fingers. Watch out, because the kneadingblade is still turning. If
the dough sticks to the breadpan, the dough is too wet. If it does not stick to your fingers at all, the dough is too dry.
- Tip: Salt restrains the activity of the yeast and sugar boosts the activation. If, by any change, you may not use one of these two ingredients, because of a diet, you must take out the otherone. You will get bread without salt and sugar.
- Leave the breadmaker to cool down for 10 to 20 minutes before you use it again.
- Different types of bread have another structure and size because the used ingredients differ. Some breads can be more solid and smaller than others. This is normal.
- It is possible with some recipes that you have to adjust the proportions. By that we mean: the amount of yeast or the amount of flour or the amount of water. Never adjust them at the same time. This will take no effect. The adjustment can be necessary in connection with:
- quality and specific gravity of the flour
- temperaturedifferences of the surroundings
- freshness of the ingredients.
- The bread you bake, contains no preservatives so therefore it is perishable. When you keep it airtight, after you have let it cool down, you can store the bread for a few days. The bread can also be frozen for up to one month.
11 | pRoBLEMS THAT MAy oCCUR
Different factors can cause the bread to fail. We will set a few examples below of bad results and solutions.
The bread has collapsed
- If your bread has collapsed on all sides, the dough was too wet. Add less water. When you use preserved fruits or vegetables, drain them first and dry them before using. They are soaked and contain too many fluids. You can also use a lighter flour.
- Overrise is also a possibility. Usually this is because the ingredients are not in balance. The dough has risen too much and can only collapse. Add less yeast, 1 or 2 grams. Too many liquids is also possible. It is possible that you are using flour that needs less water than the recipe states. The next time add 10 to 20 ml. less water.
The bread is not baked enough in the middle
- If the inside of the bread is not well baked, the flour you used may be the cause. This usually happens with heavy flours, such as whole wheat or rye. Try to use an extra kneadingcycle when you use one of these flours. Once the breadmaker has finished the first kneading-cycle, de-activate the program. Set the program again and press start. The breadmaker will start kneading again and the dough will have more air in it.
- You can also set the crust on dark, which make the bake-off temperature a little higher.
The bread has run over
- If your bread rises more then normal, you have used too much yeast. Check if you used the right amount and the right type of yeast.
- Too much sugar can over-activate the yeast. Use less sugar and also be careful with dried fruits or honey. Try
to add less water, 10 to 20 ml. Remember that a too small amount of fluid restrains the yeast.
- The use of very fine grinded flour can also cause the bread to rise too much. These flours do not need as much yeast as other types of flours.
The bread is too dry
- Use less flour or add 1 tablespoon of liquid.
When the breadmaker is mixing heavy dough or when it uses longer kneadingtimes, it is possible that the breadmaker slightly shakes on the kitchencounter. Make sure that the breadmaker is placed on a stable surface, not to close near the edge.
Flat breads
- When you use flour grinded by a mill or whole wheat flour, it is possible that the top of bread is flat.
- If the bread did not rise at all, check the use by date of the yeast. Did you forget to add the yeast? If the bread has only risen a little, check the use by date of the yeast.
- The activation of the yeast is restrained by too cold or too warm water.
- Checked the used amount of salt. Make sure you did not add too much.
12 | FREQUENTLy ASkED QUESTIoNS
Question: Why does the shape and height of the bread differ?
Answer: The shape and height of the bread depend on the room temperature, the quality and amount of the ingredients.
Question: Why did the bread not rise?
Answer: Forgot to add the yeast, too small amount of yeast or old yeast cause the bread not to rise and stay "flat".
Question: How does the timer work?
Answer: The timer can not be set under 1:40 hours or over 13 hours. The timer needs a minimum off 1 hours and 40 minutes to finish all necessary processes. The ingredients can perish when they stay in the breadmaker over 13 hours without being cooked. For further explanations, see chapter "How to use the preset timer".
Question: Why can I not add extra ingredients to the basic ingredients?
Answer: To give the dough and/or the bread the right shape and to let it rise properly, the dried currants and others should be added later. There is a chance that the ingredients are being squashed during the kneading-process. They can stick together and then they will not be evenly divided in the dough. Add the extra ingredients only after the first "beep". You may not add extra ingredients when you use one of the fast programs.
Question: Can water be replaced by fresh milk?
Answer: Yes - but not when using the preset timer and use the same amount of liquids that the recipe states.
Question: I can not get the bread out of the breadpan, what can I do?
Answer: This can be caused by two problems. The non-stickcoating of your breadpan is worn out or the bread has not yet cooled down. If the non-stickcoating is worn out, we advise you to buy a new breadpan. To find out what the exact problem is, we advise the following: as soon as the breadmaker has finished, take out the breadpan with the bread and let it cool down for 15 to 20 minutes. Turn the breadpan upside down and slowly shake out the bread. Leave the bread to cool for another 15 minutes on a wire rack before you cut it.
Question: There is a margin on the kneadingblade. What causes this and how can I prevent this?
Answer: The non-stickcoating at the inside on the kneading blade is thick, soft and not completely hardened. The final hardening happens at first operation of the machine. Because of the pressure, which is being put on the kneadingblade during kneading, the non-stickcoating will become thinner and harder, which causes more space to become between the kneadingblade and the driveshaft in the breadpan. This process will happen in the first few weeks of operation. This is fully normal.
Question: The kneadingblade remains in the bread after removing the bread out of the breadpan. Is this normal?
Answer: It is perfectly normal that the kneadingblade sticks in the bread. If this would not be the case, there would be a large hole in the bread after removing it out of the breadpan. Now the bread will first cool down and therefore become more solid, before the kneadingblade is removed. The hole in the bread will in this case be much smaller. During the first few operations, it could happen that the kneadingblade remains in the breadpan, this is because of the question above.
Question: How can I clean the inside of the breadmaker when the dough has run over?
Answer: You can clean the inside of the breadmaker with a ovencleaner. Make sure that you protect the heating element. You can clean the heating element by letting the breadmaker, without content, finish a complete program, once or twice. The heating element will burn clean.
Question: Because of a diet I am not allowed to eat bread with sugar. Is it possible to make a sugarfree bread in this machine?
Answer: Yes, this is possible. You can leave out the sugar from the basic-recipe. When doing this, you should leave out the salt from the recipe also.
Question: My bread collapses, when changing from rising to baking. What is the problem?
Answer: This could be caused by two problems. Either you have used too much yeast or too much water. In most cases the problem is caused by too much water. The recipes in the instruction manual are basic-recipes. It could happen for example that the flour needs less water then stated. We advise you to use 10 to 20 ml. less water. The problem should now be solved.
Question: When I bake a bread with raisins, all the raisins are at the bottom. What can I do to solve this?
Answer: The dough is probably to compact and cannot divide the raisins properly. Add 10 to 20 ml. of water to the basic-recipe, causing the dough to be more flexible and the raisins to divide better amongst the dough. Please make sure that the raisins themselves are not too wet.
Question: The crust is sometimes light and sometimes dark?
Answer: You can set this yourself with the button "crust" (= korst). For a light crust set the breadmaker on light (Low), for a dark crust set the breadmaker on dark (Hi).
Question: What has happened when the bread is so high that is touches the lid?
Answer: You have used too much yeast and/or sugar, which causes more gas inside the bread and too much rising.
Question: Why is not allowed to make bread with fruit with the program "fast-superfast"?
Answer: The time for rising is less with this program and when you use more ingredients, it influences the bakingtime which causes a bad result if you use such a program with these ingredients, like fruit.
Question: The breadmaker is kneading slower when making a heavy bread?
Answer: This is normal when you use these recipes. It does not cause a problem for the machine, but it is advisable to add one tablespoon of fluids.
Before you take the bread away for repairs
You keep getting bad results
We advise to make one bread with a ready-made breadmix. You only have to add water and butter. When you get a good result, it means that your breadmaker has no problem and you should check the freshness of the ingredients. If you get a bad result you can consult with your supplier.
Attention: when you use a ready-made mixture, you must take in account the amount of the mixture. Most ready-made mixtures are for making a loaf of 800 grams. This breadmaker is suited for a loaf of 500 grams. You must adapt the amounts.
The breadmaker does not work
- Is it activated?
- The temperature is too high
The bread is collapsed/The center is moist
- The bread was left too long in the breadpan after baking.
- Too much water or too much yeast is used.
Smoke is coming from the airvents
- Maybe ingredients spilled on the heating element.
The top of the bread is cracked and brown
- Too much flour, yeast or sugar.
The bread is too small
- Not enough flour, yeast, sugar or water
- Use of whole wheat or flour with chemical yeast.
- Use of bad yeast.
- Use of flour or yeast that has passed the using date.
The bread is not well baked
- Stop-button was pressed after activation.
- The lid was opened during baking.
Part of the bread is still covered with flour
- Not enough water.
Bread badly shaped
- Not enough flour.
- Not enough water.
Bread baked too hard
- Too much sugar.
- Crust-setting on dark.
13 | CLEANING & MAINTENANCE
Before cleaning your Inventum breadmaker, remove the plug from the socket and allow the unit to cool completely.
Outside
Clean the housing and the lid of the breadmaker with a damp cloth and warm soapy water or a stainless steel cleanser. Remove the breadpan before cleaning. Do not use abrasives! Never immerse the appliance, power cord or plug in water or any other liquids.
Inside
The inside of the breadmaker can be cleaned with a damp cloth. Attention: careful not to touch the heating element. This is very delicate.
Breadpan and kneadingblade
The breadpan and kneadingblade can be cleaned with warm water and a soft cloth. Be careful not to damage the non-stickcoating.
If you can't remove the kneadingblade, fill the breadpan half with lukewarm water and let it sit for no more than 10 minutes. Then carefully remove the kneadingblade and proceed with cleaning the breadpan.
Never use any detergents, harsh cleaners (brush or sponge), abrasives or steel wool. Never wash the breadpan or kneadingblade in the dishwasher.
14 | RECIpES
Tip! When you use a coarse type of flour, it is possible that you need to use less water then stated in the recipes. Because a coarse type of flour can soak up less fluids.
White bread
White flour 350 gr.
Water 210 ml
Butter/oil 5 gr.
Sugar 5 gr.
Salt 5 gr.
Dried yeast 4 gr.
Program: Basic or Ultra-Fast
Whole wheat bread
Whole wheat flour 350 gr.
Water 225 ml
Butter/ oil 5 gr.
Sugar 5 gr.
Salt 5 gr.
Dried yeast 4 gr.
Program: French or Whole wheat
Wheat bread
Whole wheat flour 200 gr.
White flour 150 gr.
Water 210 ml
Butter/ oil 5 gr.
Sugar 5 gr.
Salt 5 gr.
Dried yeast 4 gr.
Program: French or Whole wheat
Milkbread
White flour 350 gr.
Milk 210 ml
Butter/ oil 5 gr.
Sugar 5 gr.
Salt 5 gr.
Dried yeast 4 gr.
Program: Basic
Multi-grain bread
Multi-grain flour 350 gr.
Water 225 ml
Butter/ oil 5 gr.
Sugar 5 gr.
Salt 5 gr.
Dried yeast 4 gr.
Program: French or Whole wheat
Bread with honey
White flour 350 ml
Water 210 ml
Butter/ oil 5 gr.
Honey ^* 5 gr.
Salt 5 gr.
Dried yeast 6 gr.
* Preferably use liquid honey.
Program: Basic, French or Whole wheat
Bread with raisins and nuts
White flour 320 gr.
Eggs * 1
Water * 200 ml
Butter/ oil 15 gr.
Sugar 5 gr.
Salt 5 gr.
Dried yeast 5 gr.
Extra ingredients:
Raisins 150 gr.
Nuts 50 gr.
Program: Sweet
Attention: First soak the raisins and if necessary the nuts, otherwise they take out all the fluids from the dough.
Add the extra ingredients after the first beep-signal.
* First you must put an egg in a measuring cup and then fill it up to 200 ml with water.
Bread with sunflower seeds
White flour 350 gr.
Water 210 ml
Butter/ oil 5 gr.
Sugar 5 gr.
Salt 5 gr.
Dried yeast 4 gr.
Extra ingredients:
Sunflower seeds 50 gr.
Program: Sweet
Cake
Flour for cake 250 grams
Butter 200 grams
Put the ingredients in the breadpan. Set the breadmaker and before you press start, stir the ingredients with a wooden spoon. This enhances the kneading process.
Dough for buns
White flour 400 gr.
Egg yolk * 1
Water * 250 ml
Butter/ oil 15 gr.
Sugar 8 gr.
Salt 8 gr.
Dried yeast 11 gr.
Program: Dough
1 extra egg (beaten) to smear on the buns.
* The amount of fluids (water and beaten eggs together) should be approx. 250 ml.
Process: Take the dough out of the breadmaker when the beep sounds. Devide the dough in buns. Place them on a slightly oiled baking tray. Leave the dough to rise for about 40 minutes. Smear the beaten egg on every bun. Bake them in a oven at ± 200°C in 15 to 20 minutes or when they are coloured goldenbrown.
If you wish to make a glutenfree bread, check out the website:
www.celiac.com
Every kind of glutenfree flour needs its own recipe.
Program overview BM50
Program Timer 1e Rest 2e Rising 1 Rising 2 Baking Keep warm Beep signal*
| kneading | kneading | |||||||||
| 1 | BASIC | 13:00-3:05 | 10m | 30m | 13m | 42m | 40m | 50m | 60m | 2:17 |
| 2 | SWEET | 13:00-2:55 | 11m | 15m | 14m | 35m | 40m | 50m | 60m | 2:13 |
| 3 | FRENCH | 13:00-3:40 | 11m | 40m | 15m | 39m | 50m | 65m | 60m | 2:39 |
| 4 | CAKE | 1:20 | 15m | 5m | - | - | - | 50m | 60m | 2:27 |
| 5 | ULTRA FAST | 1:18 | 15m | - | - | - | 25m | 38m | 60m | 2:49 |
| 6 | DOUGH | 13:00-1:40 | 10m | 10m | 10m | 30m | 40m | - | - | - |
| 7 | WHOLE WHEAT | 13:00-3:30 | 11m | 30m | 15m | 42m | 50m | 62m | 60m | 2:44 |
| 8 | BAKE | 0:10-1:00 | - | - | - | - | - | 0:10-1:00 | 60m | - |
Timer: 13:00 hours is the maximum timedelay you can set and the time mentioned after that is the total time of the duration of the program. Rest: the breadmaker will not do anything and the dough will rise a little.
Keep warm: the breadmaker will keep the bread warm for another 60 minutes.
*The beep-signal is the time shown on the display for adding extra ingredients. A beep will sound on that time.
(m = minuten)
DEUTSCH
12 | QUESTIONS QUI SoNT SoUvENT poSÉES
- This product is guaranteed for a period of 2 years from the date of purchase against mechanical and electrical defect.
- Guarantee can only be given if proof of purchase (e.g. till receipt) can be shown. Therefore keep it in a safe place. The guarantee period starts at date of purchase.
- Guarantee is not valid in case of:
- normal wear;
- damage through misuse use or when the instructions were not followed correctly;
- lack of maintenance;
- not following the operation- and safety instructions;
- incompetent montage or repairs made by yourself or others;
- using accessories and spare parts which are not suitable for the appliance;
for assessment by our technical department.
• The guarantee is not valid for:
- normal wear - such as bread pan and kneading blade; - (interchangeable) signal- and controllamps
for assessment by our technical department.
Return to your supplier of send the appliance, including a copy proof of purchase and description of the complaint, stamped to:
Inventum Group BV
Generatorstraat 17
3903 LH VEENENDAAL
THE NETHERLANDS
Website: www.inventum.eu
IES Import Electronic Service GmbH
Lembekstrasse 36
22529 Hamburg
GERMANY
When the guarantee is no longer valid or when the period of guarantee has passed, we will charge any costs that flow out of an assessment and/or repairing.
On request we will supply a statement before repairing. Without requesting a statement, we assume that you, by sending the appliance, automatically order to repair the appliance.
A guarantee period of two months is valid for repairs done by our technical department and the used spare parts, counting from the repairdate. When a malfunction occurs within this period which directly flows out of the repairs and the used spare parts, the consumer has the right of repairs without any costs.
GARANTIE & SERvICE


- NEDERLANDS
- DEUTSCH
- | SAFETY INSTRUCTIONoNS
- | BEFORE FIRST USE
- | THE ART of BAkING
- | THE INGREDIENTS
- Flour
- Gluten
- Yeast
- Salt
- Butter/oil
- Sugar
- Liquids
- Other ingredients
- | THE DISpLAy
- MENU-button
- START- and STOPbutton
- Color-button
- Timer (V/∧)
- | ERRoRS IN THE DISpLAy
- | pRoGRAMS
- | BAKING BREAD
- | How To USE THE TIMER
- | TIpS FoR BAKING BREAD
- | pRoBLEMS THAT MAy oCCUR
- The bread has collapsed
- The bread is not baked enough in the middle
- The bread has run over
- The bread is too dry
- Flat breads
- | FREQUENTLy ASkED QUESTIoNS
- Before you take the bread away for repairs
- You keep getting bad results
- The breadmaker does not work
- The bread is collapsed/The center is moist
- Smoke is coming from the airvents
- The top of the bread is cracked and brown
- The bread is too small
- The bread is not well baked
- Part of the bread is still covered with flour
- Bread badly shaped
- Bread baked too hard
- | CLEANING & MAINTENANCE
- Outside
- Inside
- Breadpan and kneadingblade
- | RECIpES
- White bread
- Whole wheat bread
- Wheat bread
- Milkbread
- Multi-grain bread
- Bread with honey
- | QUESTIONS QUI SoNT SoUvENT poSÉES
- GARANTIE & SERvICE
Brand : INVENTUM
Model : BM50
Category : Bread maker