
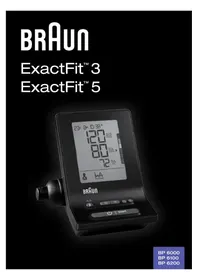
BP4600 ExactFit 3 - Sphygmomanometer BRAUN - Free user manual and instructions
Find the device manual for free BP4600 ExactFit 3 BRAUN in PDF.
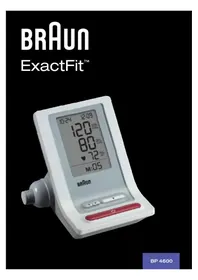


| Product type | Upper arm blood pressure monitor |
| Brand | Braun |
| Model | BP4600 ExactFit 3 |
| Measurement method | Oscillometric |
| Pressure measurement range | 0 to 300 mmHg |
| Pulse measurement range | 40 to 199 beats/min |
| Pressure accuracy | ± 3 mmHg |
| Pulse accuracy | ± 5% max |
| Inflation | Automatic (Deluxe) |
| Deflation | Automatic valve |
| Display | LCD (systolic, diastolic, pulse) |
| Memory | 32 measurements with date and time |
| Cuff size | Small/Medium: 23–33 cm; Large/Extra Large: 33–43 cm arm circumference |
| Power supply | 4 AA (LR6) alkaline batteries 1.5 V |
| Battery life | Approx. 300 measurements (twice daily) |
| Auto-off | After 1 minute of inactivity |
| Weight (without batteries) | 290 g |
| Operating temperature | +10 °C to +40 °C, < 85% RH |
| Storage temperature | −20 °C to +60 °C, < 85% RH |
| Classification | Internally powered, type BF, IPX0 |
| Included accessories | Cuff with tube, 4 batteries, instruction manual, storage case |
| Care and cleaning | Dry or slightly damp cloth; no solvents |
| Warranty | See warranty statement in the after-sales booklet |
Frequently Asked Questions - BP4600 ExactFit 3 BRAUN
User questions about BP4600 ExactFit 3 BRAUN
0 question about this device. Answer the ones you know or ask your own.
Ask a new question about this device
Download the instructions for your Sphygmomanometer in PDF format for free! Find your manual BP4600 ExactFit 3 - BRAUN and take your electronic device back in hand. On this page are published all the documents necessary for the use of your device. BP4600 ExactFit 3 by BRAUN.
USER MANUAL BP4600 ExactFit 3 BRAUN
This product is manufactured by Kaz Europe SA under a license to the 'Braun' trademark. 'Braun' is a registered trademark of Braun GmbH, Kronberg, Germany.

Product description
Fig. 1
BP4600MR-CEME
P/N 31IM4600194
07SEP11
GB English
Intended use of Braun ExactFit 3
Braun upper arm blood pressure monitor has been developed for accurate and comfortable blood pressure measurements. The measuring accuracy of Braun's upper arm blood pressure monitor was tested at the time of manufacture and was proven by clinical research in accordance with AAMI/ANSI-SP10.
What you should know about blood pressure
Blood pressure constantly changes throughout the day. It rises sharply in the early morning and declines during the late morning. Blood pressure rises again in the afternoon and finally drops to a low level at night. Also, it may vary in a short period of time. Therefore, readings from successive measurements can fluctuate.

Blood pressure readings taken from a healthy 31-year-old male, measured at 5-minute intervals
Blood pressure measured in a doctor's office only provides a momentary value. Repeated measurements at home better reflect one's actual blood pressure values under everyday conditions.
Moreover, many people have a different blood pressure when they measure at home, because they tend to be more relaxed than when in the doctor's office. Regular blood pressure measurements taken at home can provide your doctor with valuable information on your normal blood pressure values under actual «everyday» conditions.
The World Health Organisation (WHO) has set up the following standard blood pressure values when measured at resting pulse:
Blood pressure (mmHg) Normal Mild hypertension Severe hypertension
SYS = systole (upper value) up to 140 140-180 over 180
DIA = diastole (lower value) up to 90 90-110 over 110

• To ensure accurate measuring results, carefully read the complete use instructions. - This product is intended for household use only. Keep product and batteries away from children. - People suffering from cardiac arrhythmia, vascular constriction, arteriosclerosis in extremities, diabetes or users of cardiac pacemakers should consult their doctor before measuring their blood pressure themselves, since deviations in blood pressure values may occur in such cases. - If you are under medical treatment or taking any medication, please consult your doctor first. - The use of this blood pressure monitor is not intended as a substitute for consultation with your doctor.
Product description
- LCD display
- Start/stop button ⏻
- Memory button M
- Set button
- Mode button
- Battery compartment cover
- Hose port
- Connector
- Hose
- Arm cuff 1.4X AA alkaline batteries (1.5V)
Inserting batteries
- Remove the battery compartment cover at the bottom of the unit and insert 4 AA LR6 ALKALINE batteries with correct polarity (see symbol in the battery compartment).
- Note: Always re-set Date and Time after replacing new batteries to make sure the measurement results are stored with correct date and time.
- Only discard empty batteries. They should not be disposed of in the household waste, but at appropriate collection sites or at your retailer.
Key rules for accurate blood pressure measurement
• Always take readings at the same time of day, ideally in the morning and evening, under the same conditions. - Do not measure within 30 minutes after smoking, drinking coffee or eating. • Take off wrist watch and jewelry before fitting the cuff on the measuring arm. - While taking a measurement sit down, relax, keep still, and do not move or speak. - Wrap the cuff snugly around your arm. The cuff must be at heart level. - Do not vibrate the unit during measurement, or the proper measurement will not be achieved. • Perform measurement quietly in a relaxed position. - Sit in a chair with your feet flat on the floor. - Do not wrap the cuff over jacket or sweater sleeve or measurement cannot be done. - Remove tight-fitting clothing from your left arm. - Do not in any way twist the arm cuff.
Fig. 2
Fig. 3
;
- Do not inflate the monitor's cuff when it is not wrapped around the arm.
- Do not attempt to disassemble or change any parts of the monitor including the cuff.
- Do not drop the product or put it through strong impact. • The device is not supposed to be used if your arm has any wound or injury.
Choosing the right cuff
For accurate measurement, it is important to choose the correct size cuff which best fits your upper arm. Choose the cuff size according to your arm circumference and make sure the bottom of the cuff is 2~3 cm above your elbow.
- Small/Medium cuff = 23~33 cm arm circumference • Large/XLarge cuff = 33~43 cm arm circumference
Applying the arm cuff
- Slide the end of the arm cuff furthest from the tube through the metal ring to form a loop. The smooth cloth should be on the inside of the cuff.
Fig. 4
Fig. 5
Fig. 6
- If the cuff is positioned correctly, the Velcro will be on the outside of the cuff and the metal ring will not touch the skin. (Fig. 4)
- Put your left arm through the cuff loop. The bottom of the cuff should be approximately 2-3 cm above the elbow. The tube should lie over the brachial artery on the inside of the arm. (Fig. 5)
Fig. 7
Fig. 8
- Pull the cuff so that the top and bottom edges are tightened around your arm. (Fig. 6)
- When the cuff is positioned properly, press the Velcro firmly against the pile side of the cuff.
- This cuff is suitable for use if the < > mark falls within the < > marked by two arrows when the cuff is tightened around your arm. (Fig. 7)
- Sit on a chair and place your arm on the table so that the cuff is at the same level as your heart. (Fig. 8)
Display
Setting month, date and time
a. Press (5) button ("month" starts flashing)
Press Ⓑ▲ (4) button to set the correct month (1,2,3,...12)
b. Press Ⓐ (5) button again ("date" starts flashing)
Press Ⓤ▲ (4) button to set the correct date (1,2,3,...31)
c. Press Ⓐ (5) button again ("hour" starts flashing)
Press Ⓣ▲ (4) button to set the correct hour (1,2,3,...,12)
d. Press Ⓐ (5) button again ("minute" starts flashing)
Press (3) button to set the correct minute (0,1,2,3,...59)
e. Press ⊕(5) button again to lock in time settings. Digits will stop flashing.
Taking a measurement
- Wrap the cuff around the arm (see "Applying the arm cuff" section).
- Sit upright on the chair to have a correct posture.
- Press the (2) button. All elements of the display indicate '888' during the first 3 seconds. (Fig. 9) The measuring blood pressure symbol will then flash on the display and the air pressure will automatically pump up to certain pressure level and start measurement. Do not move or talk in the midst of taking blood pressure measurement.
- After the air pressure has increased, it will slowly decrease. When the pulse is detected, the HEART RATE symbol ♥ will start flashing. After taking blood pressure measurement, the product will turn off automatically after 1 minute.
Memory function
Your blood pressure monitor can store the latest readings of 32 measurements.


Storing measurement data
After each blood pressure measurement, the systolic pressure, diastolic pressure, pulse rate and the time & date of the specific day will be automatically stored. Memory #01 is always the most recent one. Once the memory is full, the oldest values will be overwritten.
Recalling stored readings
- Press "Memory" (3) button, M:00 will appear on the display if there is no data stored in the memory. If there is data stored in the memory, the latest recorded set of measurement which is the systolic pressure, diastolic pressure, pulse rate, and the recording time and date and M:01 will appear on the display for 1 minute.
- Press the "Memory" (3) button again to read the next line of stored data. The data called up on the display with 2-digit memory number (ex. M:02).
- Press the "Start/Stop" (2) button to exit the memory mode.
Erasing data
- Press the "Memory" (3) button into memory mode.
- Press and hold the "Mode" (5) button and then press the "Set" (4) button, all the stored data will be erased and CLR will show on screen.
- To check if the data was erased, press the "Memory" (3) button, no data should show up on screen, but date, time and M:00.
Low battery indicator
When the low battery indicator shows on the display, it means the battery is low and the four batteries need to be replaced with alkaline LR6 (AA) batteries.
Calibration
This product has been calibrated at the time of manufacture. If used according to the use instructions, periodic recalibration is not required. If at any time, you question the measuring accuracy, please contact an authorized Service Centre (see package insert for a local Service Centre).
Manufacturing date is given by the LOT number on the back of the product. The three numbers after LOT represent the day of the year of manufacture, and the two last digits represent the year of manufacture. An example: LOT 25010KYD – this product has been manufactured on the 250th day of the year 2010.
Storage and cleaning
• Always keep the unit in the carrying case after its use. - Do not put the item directly under sunlight, in high temperature, or in humid and dusty places. - Do not store in extremely low (less than -20°C) or high (more than 60°C) temperatures. - Use a piece of cloth with water or mild cleansing agent to clean the case, and then use a piece of dry cloth to wipe it dry. Use a piece of dry cloth to wipe the cuff when it is dirty. - Do not use any strong cleansers to clean it. - When the unit is not to be used for a long time, remove the batteries (batteries may leak or cause harm).


What to do if .....
| Problem Reason | Solution | |
| Heart rate symbol | Appears In the measurement condition and flashes when pulse is detected. | • Measurement in progress, remain quiet. |
| Low battery indicator | Appears when the battery voltage is excessively low or the positions of the batteries are incorrect. | • Replace all four batteries with new ones. Insert the batteries in the correct positions. Be aware of +/- positions. |
| Measuring error | Appears when the accurate blood pressure and pulse could not be obtained. | • Press “Start/Stop” button again and remeasure.• Check if cuff is wrapped according to instructions.• Check that there are no kinks in tube.• Check palm if exerting effort.• Check if talking or moving during measurement.• Check if posture is correct. |
Specifications
Method of measurement: Oscillometric
Model number: BP4600
Range of measurement: Pressure 0~300 mmHg
Pulse: 40~199 beats/minute
Accuracy: Pressure +/- 3 mmHg
Pulse: +/- 5% max.
Inflation Deluxe automatic
Exhaust Automatic exhaust valve
Display Liquid crystal display – systolic, diastolic, pulse rate
Sets of memory 32 sets
Cuff size • Small/Medium cuff = 23~33 cm arm circumference
• Large/XLarge cuff = 33~43 cm arm circumference
Operating temperature +10 °C ~ +40 °C, less than 85% R.H.
Storage temperature
-20 °C ~ +60 °C, less than 85% R.H.
Unit weight
290g (without batteries)
Power supply
Alkaline battery: 4 x AA (LR6)
Battery life
300 times measurement (twice a day measurement)
Auto power off
Whenever not used for 1 minute
Accessories
4 batteries, arm cuff with tube, instruction manual,
pouch, carton box

IMPORTANT
Read the operating instructions.

Classification:
- Internally powered equipment
• Type BF equipment
- IPX0
- Not suitable for use in the presence of flammable anaesthetic mixture with air,
oxygen or nitrous oxide
• Continuous operation with short-time loading

Operating temperature

Storage temperature

This product conforms to the provisions of the EC directive 93/42/EEC (Medical Device Directive). This device conforms to the following standards:
- EN 60601-1: 1990 + A1: 1993 + A2: 1995 + A13: 1996 General requirements for safety.
• EN 60601-1-2: 2001 - Electromagnetic compatibility requirements and tests.
• EN1060-1: 1995 + A1: 2002 - Non-invasive sphygmomanometers- General
requirements
• EN1060-3: 1997 + A1: 2005 - Non-invasive sphygmomanometers- supplementary
requirements for electromechanical blood pressure measuring systems.
• EN1060-4: 2004 - Non-invasive sphygmomanometers- Test procedures to
determine the overall system accuracy of automated non-invasive
sphygmomanometers.
MEDICAL ELECTRICAL EQUIPMENT needs special precautions regarding EMC. For detailed description of EMC requirements please contact an authorized local Service Centre (see package insert).
Portable and mobile RF communications equipment can affect medical electrical equipment.

Please do not dispose of the product in the household waste at the end of its useful life. Disposal can take place at your local retailer or at appropriate collection points provided in your country.
Guarantee
See warranty statement inside the Kaz Customer Service Centre booklet.
UK only:
This guarantee in no way affects your rights under statutory law.
CZ Czech
- EN 60601-1: 1990 + A1: 1993 + A2: 1995 + A13: 1996 General requirements for safety.
- EN 60601-1-2: 2001 – Requirements for electromagnetic compatibility and tests.
- EN1060-1: 1995 + A1: 2002 – Non-invasive sphygmomanometers - General requirements.
- EN1060-3: 1997 + A1: 2005 – Non-invasive sphygmomanometers - supplementary requirements for electromechanical blood pressure measuring systems.
- EN1060-4: 2004 – Non-invasive sphygmomanometers - Test procedures to determine the overall system accuracy of automated non-invasive sphygmomanometers.
- GB ENGLISH
- INTENDED USE OF BRAUN EXACTFIT
- WHAT YOU SHOULD KNOW ABOUT BLOOD PRESSURE
- PRODUCT DESCRIPTION
- INSERTING BATTERIES
- KEY RULES FOR ACCURATE BLOOD PRESSURE MEASUREMENT
- CHOOSING THE RIGHT CUFF
- APPLYING THE ARM CUFF
- SETTING MONTH, DATE AND TIME
- TAKING A MEASUREMENT
- MEMORY FUNCTION
- STORING MEASUREMENT DATA
- RECALLING STORED READINGS
- ERASING DATA
- LOW BATTERY INDICATOR
- CALIBRATION
- STORAGE AND CLEANING
- SPECIFICATIONS
- IMPORTANT
- CLASSIFICATION
- GUARANTEE
- UK ONLY
- CZ CZECH
Brand : BRAUN
Model : BP4600 ExactFit 3
Category : Sphygmomanometer