
Click Smart 820 - Camera LOGITECH - Free user manual and instructions
Find the device manual for free Click Smart 820 LOGITECH in PDF.


| Product Type | Digital camera + webcam |
| Brand | Logitech |
| Model | ClickSmart 820 |
| Image Sensor | CCD, 1/3.2 inch, 2.1 megapixels (1700 x 1235), 24-bit color |
| Lens | Fixed focus, aperture f/2.8 and f/4.0 |
| Viewfinder | Virtual, magnification 0.34 |
| Shutter | Electronic, self-timer 10-sec delay |
| Flash Modes | Auto flash, flash fill; range 3-7 ft (0.9-2.1 m) |
| LCD Monitor | 1.5 inch, 280 x 220 pixels, 256K colors |
| Storage Media | Internal NAND flash; optional SmartMedia card (not included) |
| Image Format | Photos: JPEG; Videos: AVI |
| Photo Resolution | 1600 x 1200 pixels |
| Video Resolution | 320 x 240 pixels |
| Microphone | PC cam mode: 400 Hz-22.05 kHz; DSC video: 400 Hz-8 kHz; dynamic range 50 dB |
| Power Source | 4x AAA alkaline or Ni-MH rechargeable |
| Operating Temperature | 32° to 104°F (0° to 40°C) |
| Weight | 6.4 oz (181.4 g) excluding batteries and memory card |
| Dimensions (H x L x W) | 3.35 x 4.50 x 2.01 in (85 x 114.30 x 50.94 mm) |
| Key Features | QuickSend, QuickSync, 2X digital zoom, live preview, review mode, video with sound, webcam function |
| Self-timer | 10-second delay |
| White Balance | Incandescent, fluorescent, halogen, overcast, D65, horizon, daylight noon, morning light, sunset |
Frequently Asked Questions - Click Smart 820 LOGITECH
User questions about Click Smart 820 LOGITECH
0 question about this device. Answer the ones you know or ask your own.
Ask a new question about this device
Download the instructions for your Camera in PDF format for free! Find your manual Click Smart 820 - LOGITECH and take your electronic device back in hand. On this page are published all the documents necessary for the use of your device. Click Smart 820 by LOGITECH.
USER MANUAL Click Smart 820 LOGITECH
natural_image
Illustration of a digital camera with a stylized face design and control buttons (no text or symbols visible)© 2003 Logitech. All Rights Reserved. Logitech, the Logitech logo, and other Logitech marks are owned by Logitech and may be registered. All other trademarks are the property of their respective owners. Logitech assumes no responsibility for any errors that may appear in this manual. Information contained herein is subject to change without notice. Part Number: 623091-0403
FCC Compliance and Advisory Statement. This hardware device complies with Part 15 of the FCC Rules. Operation is subject to the following two conditions: 1) this device may not cause harmful interference, and 2) this device must accept any interference received, including interference that may cause undesired operation. This equipment has been tested and found to comply with the limits for a Class B digital device, pursuant to Part 15 of the FCC Rules. These limits are designed to provide reasonable protection against harmful interference in a residential installation. This equipment generates, uses, and can radiate radio frequency energy and, if not installed or used in accordance with the instructions, may cause harmful interference to radio communications. However, there is no guarantee that interference will not occur in a particular installation. If this equipment does cause harmful interference to radio or television reception, which can be determined by turning the equipment off and on, the user is encouraged to try to correct the interference by one or more of the following measures: 1) reorient or relocate the receiving antenna; 2) increase the separation between the equipment and the receiver; 3) connect the equipment to an outlet on a circuit different from that to which the receiver is connected; 4) consult the dealer or an experienced radio/TV technician for help. Any changes or modifications not expressly approved by the party responsible for compliance could void the user's authority to operate the equipment. Where shielded interface cables have been provided with the product or specified additional components or accessories elsewhere defined to be used with the installation of the product, they must be used in order to ensure compliance with FCC regulations.
Canadian DOC Statement. This digital device does not exceed the Class B limits for radio noise emissions from digital apparatus specified in the interference-causing equipment standard entitled "Digital Apparatus," ICES-003 of the Department of Communications.
This device complies with RSS-210 of Industry and Science Canada. Operation is subject to the following two conditions: 1) this device may not cause interference, and 2) this device must accept any interference, including interference that may cause undesired operation of the device.
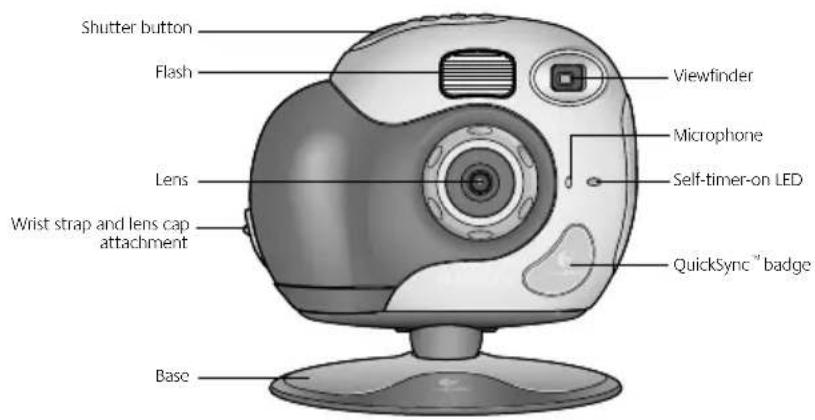
Life is easy with your Logitech ^® ClickSmart ^® 820 digital camera plus webcam!
Take spontaneous digital pictures with up to 2.1 megapixels of resolution, or make fun videos with sound. Preview and review what the camera sees on a color LCD monitor. Use QuickSend™ to tag your creations right on the LCD monitor for automatic e-mail to family and friends.
Your images are stored in either the camera's internal memory or on an optional SmartMedia™ card (not included with the camera). Later, download your images to the computer using QuickSync™.
For video instant messaging or online video chat, simply connect the camera to your computer. Then launch the Logitech camera software that is included with your product.


2 Getting Ready
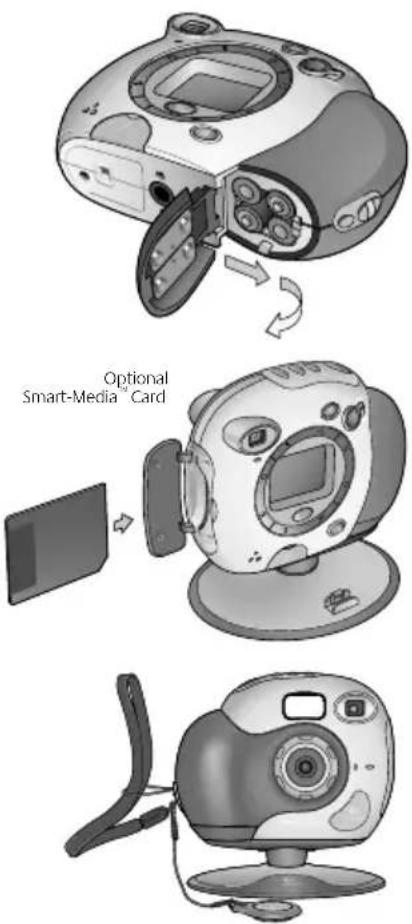
- Insert the four AAA alkaline camera batteries.
- Optional: Insert a SmartMedia™ memory card (not included with the camera) into the memory card slot. Be sure the memory card is correctly positioned with the card's metal contacts facing away from you, as shown in the picture. Push the card all the way in and close the door. If the SmartMedia door is slightly ajar after you close it, the memory card is not correctly positioned. (To remove the memory card, open the door and press on the card to eject it.)
- Insert the wrist strap and lens cap.
- Install the Logitech camera software using your computer's CD-ROM drive. Follow the on-screen instructions. (The camera language defaults to English, but you can change it during software installation.)
3 Taking Pictures and Videos
- Press the Power button to turn on the camera.
- To take a picture, set the Picture/Video switch to "Picture." Then press the Shutter button to take a picture. If the lens cap is left on, the camera emits a warning sound and the Lens-cap-on icon appears on the camera display.
- For videos, set the Picture/Video switch to "Video." Then press and hold the Shutter button to take a video. The Video-on LED blinks green to indicate the camera is recording. (This LED will blink more rapidly when the camera begins to run out of memory.) Release the Shutter button to stop recording. When not in use, the camera turns itself off after two minutes to conserve battery power. To switch the camera off, press the Power button.
2 English
4
Button Ring Functions
Digital Zoom Button.
Applies a 2X digital zoom to the preview image on the LCD monitor, causes subsequently captured pictures to be recorded at a 2X digital zoom setting (not available for video), and when this button is pressed again, returns camera to normal operation.
Live Preview Button.
Displays a live preview for 20 seconds on the LCD monitor.
Review Mode Button.
Activates Review Mode on the LCD monitor in which the most recently captured picture or video appears. An image is displayed for 20 seconds.
Status Button.
Displays current camera settings (see Section 5, "LCD Monitor Icons").
Speaker On/Off Button.
Turns camera sound on or off.
Scroll Buttons.
Provides review, on the LCD monitor, of captured pictures and videos. Also allows navigation through a list of options on a menu screen.
Select Button.
Selects a name from the QuickSend™ menu.
Delete Button.
Removes the picture shown on the LCD monitor.
QuickSend™ Button.
Tags the picture shown on the LCD monitor for automatic e-mailing.
English
5
LCD Monitor Icons

English
6 Tagging Pictures for QuickSend™
QuickSend ^™ allows you to tag pictures in your camera so later you can easily download them to a Logitech web site while notifying others via e-mail that your pictures are ready for viewing on the web site. After installing the camera software, use the QuickSend Registration wizard to set up your Logitech web site account and to specify the e-mail address and alias of every person who you would like to notify at some future time. When you are done, you will upload the aliases to the camera so they will be available when you tag your pictures. Refer to the online help system for more information about QuickSend. To tag pictures in your camera, follow these steps:
- Press either the Scroll or Review Mode button to display an image in the camera's LCD monitor.
- Use the Scroll buttons to review your pictures.
- When you have the picture you want in the LCD monitor, press the QuickSend button to display the QuickSend Menu screen. Select the people who will be notified of this picture's presence on the Logitech web site.
- Use the Scroll buttons to highlight the alias of the person to be notified and the Select button to choose the alias. You can select more than one alias per picture.
- Press the QuickSend button to return to the LCD monitor. Repeat steps 2 - 4 to tag additional pictures.
7 Getting Images into the PC
- Turn on the computer.
- Open the cover protecting the USB connector on the camera.
- Place the camera on its stand.
- Plug the USB cable into the camera. Plug the other cable end into a USB port on the computer.

-
If there are images in your camera, the QuickSync™ downloading program launches. Note that the QuickSync™ badge lights up after new images have been taken. It blinks when images are downloaded to the computer.
-
Choose one of these options:
-
Download the images to my computer. This option transfers your images to the Gallery section of the software. After the transfer, you are given the option to delete the images in the camera. (See the online help system for more information about viewing your images while downloading.)
- Delete the images without copying them.
- Cancel. Retains the images in the camera. The images are not deleted nor are they downloaded to the computer.
If you have tagged pictures using the QuickSend button, the camera will download these tagged images to the Logitech web site, but before doing so, it will give you an opportunity to review them. Refer to the online help system for more information about using QuickSend.
8
Camera Tips
- Fill the viewfinder with your subject, place your subject within the viewfinder's crop marks, and hold the camera steady for extra time to prevent blurry images.
- Use the Live Preview button to compose your picture on the LCD monitor, or view your video as you shoot it.
-
When taking pictures, try using the Digital Zoom button to zoom in on your subject.
-
Avoid subjects of extreme contrast that have both deep shadows and harsh highlights (e.g., when the sun is directly behind your subject). Avoid taking videos in very dim light; your video will be too dark.
- The flash range for your camera is between 3 and 7 feet (0.9 to 2.1 meters). Make sure your subject is within the flash range.
- Use the Review Mode button to see, on the camera's LCD monitor, what you have captured. Use the Delete button to remove unwanted images to free up camera memory.
- Buy optional SmartMedia™ Cards for more in-camera storage for your pictures and videos.
- Obtain free software updates. Your Logitech camera software automatically checks the Logitech web site and downloads the newest version of the software.
- Get more Information about sharing your pictures and videos and using your camera for video instant messaging in the online help system. To access help from within the Logitech camera software, click the Help button. A drop-down list box displays. Select "My Logitech Pictures Help" to launch the help system. For additional information about Logitech QuickCam Web cameras, as well as other Logitech products, please visit www.logitech.com.
9
Camera and Battery Warnings!
- Don't expose the camera to extremes of cold or heat. Operating temperature is between 32^ to 104^ ( 0^ to 40^ ).
- Don't immerse the camera in water.
- Avoid touching the LCD monitor.
- Remember that when the camera is set to auto-flash, the camera batteries are drained more quickly.
- If the camera detects that its internal memory is defective for any reason, it will automatically re-format the internal memory. All stored images and videos in the camera will be lost. Internal memory defects may occur due to camera damage from environmental factors, such as the camera being exposed to extreme heat or cold. Memory defects may also be caused by computer error when the camera is connected to the computer's USB port.
- Use only SmartMedia™ memory cards. Avoid touching the metal contacts on the card.
- When the batteries are low, it's best to change them. If your batteries leak, use normal precaution and follow the battery manufacturer's recommendations. When replacing batteries, you may use alkalines or other battery types, such as rechargeable nickel metal hydride (Ni-MH) batteries. But do not mix battery types. Discard all used batteries according to the battery manufacturer's instructions. Exercise care when handling batteries. When batteries are misused, they may explode or leak, causing burns and personal injury. When you are not using your camera for long periods of time, remove the batteries and store them in a dry place at normal room temperature.
Warranty
This product comes with a limited two-year warranty. For more information, please read the Product Warranty section found in the how-to guide located on the Logitech software CD.
Logitech camera products are intended to be used in a lawful manner. Certain uses of digital PC camera products may be prohibited by local laws in some countries or states, such as the surreptitious recording of audio and/or video communications for certain purposes. If you have any question about whether a proposed use of your product is lawful, you should consult a local legal authority before proceeding.
Specifications
| Image Sensor Type: | CCD, Size: 1/3.2 inch (1/5.6 mm), Resolution: 2.1 megapixels (1700 x 1235), Color depth: 24 bit |
| Lens Type: | fixed focus, Aperture: auto selectable f-stops: 2.8 and 4.0 |
| Viewfinder Type: | Virtual, Magnification: 0.34 |
| Shutter Type: | electronic, Self-timer: shutter activation after 10-sec. delay |
| White Balance Lighting Conditions: | incandescent light, IncA, fluorescent light, halogen light, overcast, D65, horizon, daylight at noon, morning light, and sunset. |
| Flash Flash Modes: | auto flash and flash fill, Range: 3 to 7 feet (0.9 to 2.1 meters) |
| LCD Monitor Type: | LCD, Size: 1.5 inch, Resolution: 280 x 220 pixels, Colors: 256K colors (six bits each RGB) |
| Storage Media | NAND flash memory, optional SmartMedia" |
| Image Format Pictures: | JPEG, Videos: AVI |
| Image Resolution | 1600 x 1200 Pictures: 480 pixels, Videos: 320 x 240 pixels |
| Microphone | Frequency Response: PC cam mode: 400 Hz to 22.05 kHz +/-1 dB and DSC Video clips: 400 Hz to 8 kHz +/-1dB, Dynamic Range: 50 dB |
| Power Source | 1.5-volt AAA alkaline, 1.2-volt AAA Ni-MH rechargeable |
| Operating Temperature | 32° to 104° F (0° to 40°C), relative humidity between 10 to 90% (non-condensing) |
| Weight and Dimensions Weight: | 6.4 oz. (181.4 g) excluding batteries and memory card Height: 3.35 in (85 mm), Length: 4.50 in(114.30 mm), Width: 2.01 in (50.94 mm) |
1 Bienvenido
Bouton QuickSend™.
Logitech® Addresses and Telephone Numbers
| Country | Address | InfolineProduct Information | HotlineTechnical Help |
| EUROPEAN, MIDDLE EASTERN & AFRICAN HEADQUARTERS LOGITECH Europe S.A. | Moulin-du-ChocCH 1122 Romanel-sur-Morges | +41 (0)21 863 54 00 EnglishFAX +41 (0) 21 863 54 02 | +41 (0) 21 863 54 01 EnglishFAX +41 (0) 21 863 54 02 |
| CORPORATE HEADQUARTERS LOGITECH Inc. | 6505 Kaiser DriveUSA Fremont, CA 94555 | (800) 231-7717 | +1 702 269 3457 |
| ASIAN PACIFIC HEADQUARTERS LOGITECH Far East Ltd. | #2 Creation Road IVScience-Based - Industrial ParkROC Hsinchu, Taiwan | +886 (2) 27466601 x2206 | |
| AUSTRALIALOGITECH Australia Computer Peripherals Pty Ltd. | Level 2, 633 Pittwater RoadAUS Dee Why NSW 2099, Australia | +61 (02) 9804 6968+61 (02) 9972 3561 | |
| CANADASales & Marketing Office | 5025 Orbitor Dr., Bldg. 6, Suite 200CDN Mississauga, ON L4W 4Y5 | (800) 231-7717 | +1 702 269 3457 |
| JAPANLOGICOOL Co. Ltd. | Ryoshin Ginza East Mirror Bldg.,7F 3-15-10 GinzaChuo-ku, Tokyo, Japan 104-0061 | +81 (3) 3543 2122FAX +81 (3) 3543 2911 | |
| In LATIN AMERICA ANDTHE CARIBBEAN | Contact your local authorized distributor, or call our Customer SupportHotline in the USA | +1 702 269 3457 | |

Logitech
Logitech® on the world wide web: www.logitech.com
©2003 Logitech. All rights reserved. Logitech, the Logitech logo, and other Logitech marks are owned by Logitech and may be registered. All other trademarks are the property of their respective owners. Logitech assumes no responsibility for any errors that may appear in this manual. Information contained herein is subject to change without notice.
Part number: 623091-0403
- Getting Ready
- Taking Pictures and Videos
- English
- 4
- Button Ring Functions
- Digital Zoom Button.
- Live Preview Button.
- Review Mode Button.
- Status Button.
- Speaker On/Off Button.
- Scroll Buttons.
- Select Button.
- Delete Button.
- QuickSend™ Button.
- 5
- LCD Monitor Icons
- English
- Tagging Pictures for QuickSend™
- Getting Images into the PC
- 8
- Camera Tips
- 9
- Camera and Battery Warnings!
- Warranty
- Bienvenido
- Bouton QuickSend™.
Brand : LOGITECH
Model : Click Smart 820
Category : Camera