
PX1215E-1NAC - Computer Mouse TOSHIBA - Free user manual and instructions
Find the device manual for free PX1215E-1NAC TOSHIBA in PDF.
| Product Type | Rechargeable wireless optical pen-style mouse |
| Brand | TOSHIBA |
| Model | PX1215E-1NAC |
| Connection Technology | 2.4 GHz wireless with USB receiver |
| Optical Resolution | 1000 dpi |
| Number of Buttons | 2 independent buttons + laser pointer |
| Laser Pointer | Yes, with Page Up and Page Down functions in Presentation mode |
| Power Supply | Built-in rechargeable lithium battery, charges via USB port (cable included) |
| Battery Life | 3-step power saving function |
| Transmission Distance | 10 meters |
| Receiver Dimensions | 57 mm x 18 mm x 9 mm |
| Minimum System Requirements | Windows 2000 or XP with USB port |
| Maintenance and Cleaning | Clean the casing with a slightly damp soft cloth |
| Safety | Do not disassemble, avoid extreme heat (>45°C) and cold (<5°C), do not expose to flame |
| Spare Parts and Repairability | No user-serviceable parts. Do not disassemble |
| Warranty | 1 year on rechargeable battery, 1 year limited on other parts and labor |
| General Information | Compliant with FCC Class B, CE, R&TTE Directive 99/5/EC |
Frequently Asked Questions - PX1215E-1NAC TOSHIBA
User questions about PX1215E-1NAC TOSHIBA
0 question about this device. Answer the ones you know or ask your own.
Ask a new question about this device
Download the instructions for your Computer Mouse in PDF format for free! Find your manual PX1215E-1NAC - TOSHIBA and take your electronic device back in hand. On this page are published all the documents necessary for the use of your device. PX1215E-1NAC by TOSHIBA.
USER MANUAL PX1215E-1NAC TOSHIBA
E-Mouse User Manual PX1215E-1NAC
Before operating the unit, please read this instruction thoroughly, and retain it for future reference.

This product contains an internal rechargeable Lithium battery and is not user-serviceable. Please observe the following safety guide to avoid potential harm to the user, the surrounding, and the product:
- Do not expose the product to extreme heat or flame. The built-in battery may leak or even explode when exposed to extreme heat.
- Keep the product dry and never immerse it into water or any liquid.
Use the product in the temperature between 10^ and 40^ (50°F and 104°F). The built-in battery will be permanently damaged if exposed to extreme heat (over 45^ / 113^ ) or extreme cold (under 5^ / 40^ ).
Use only the supplied USB charging cable to charge the battery.
Do not disassemble the product under any circumstances. - Stop using the product immediately in the event that the product feels hot or battery leakage occurs. Call the service center immediately if any of the conditions occurs.
Please observe the radio device regulation of the local authority and turn off the power (put the device in Hibernation Mode) in places where radio transmission is not allowed. (Refer to the Hibernation Mode On/Off Section in the Operation Section for detail.)
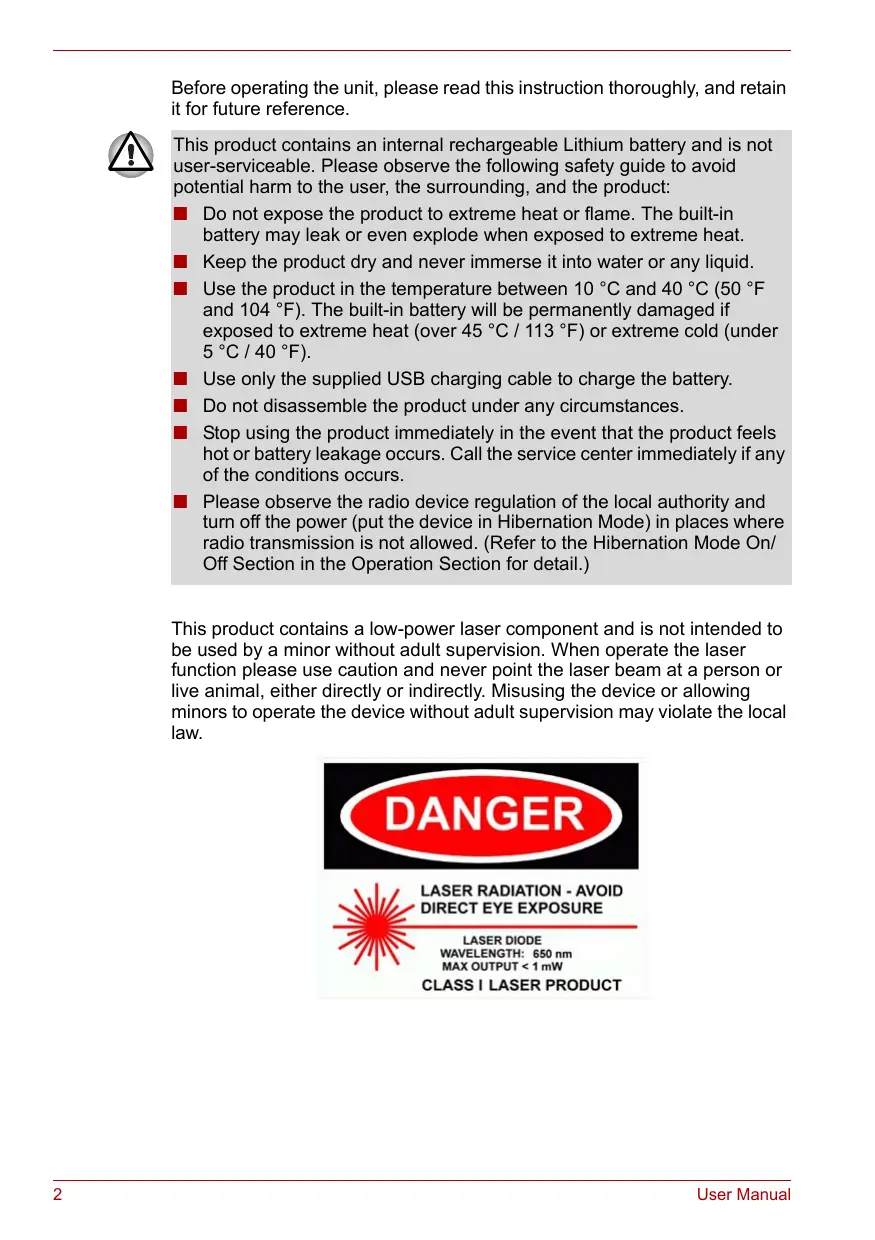
This product contains a low-power laser component and is not intended to be used by a minor without adult supervision. When operate the laser function please use caution and never point the laser beam at a person or live animal, either directly or indirectly. Misusing the device or allowing minors to operate the device without adult supervision may violate the local law.


LASER RADIATION - AVOID
DIRECT EYE EXPOSURE
LASER DIODE
WAVELENGTH: 650 nm
MAX OUTPUT < 1 mW
CLASS I LASER PRODUCT
FCC Compliance (FCC ID: TDGVM200RF)
The equipment has been tested and found to comply with the limits for a Class B Digital Device, pursuant to part 15 of the FCC Rules. These limits are designed to provide reasonable protection against harmful interference in a residential installation. This equipment generates, uses and can radiate radio frequency energy and, if not installed and used in accordance with the instruction, may cause harmful interference to radio communication. However, there is no guarantee that interference will not occur in a particular installation. If this equipment dose causes harmful interference to radio or television reception, which can be determined by turning the equipment off and on, the user is encouraged to try to correct the interference by one or more of the following measures:
Reorient or relocate the receiving antenna.
Increase the separation between the equipment and receiver.
- Connect the equipment into an outlet on a circuit different from that to which the receiver is connected.
Consult the dealer or an experienced radio/TV technician for help.
The user should not modify or change this equipment without written approval from Toshiba. Modification could void authority to use this equipment.

The changes or modifications not expressly approved by the party responsible for compliance could void the user's authority to operate the equipment.
To comply with the FCC RF exposure compliance requirements, this device and its antenna must not be co-located or operating to conjunction with any other antenna or transmitter.
CE
This device complies with the essential requirements of the European Council Directive listed below:
99/5/EC Radio & Telecommunication Terminal Equipment (R&TTE) Directive
Canada - Low Power License-exempt Radio Communication Device (RSS-210)
a. Common Information
Operation is subject to the following two conditions:
- This device may not cause interference, and
- This device must accept any interference, including interference that may cause undesired operation of the device.
b. Operation in 2.4 GHz band
To prevent radio interference to the licensed service, the device is intended to be operated indoors and installed outdoor is subject to licensing.
PARTS IDENTIFICATION
Channel Select Button A
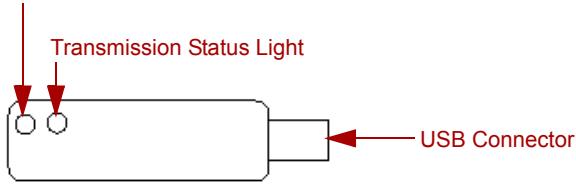
Dongle Receiver
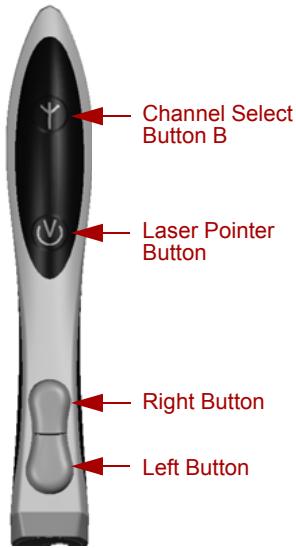
E-Mouse Front View
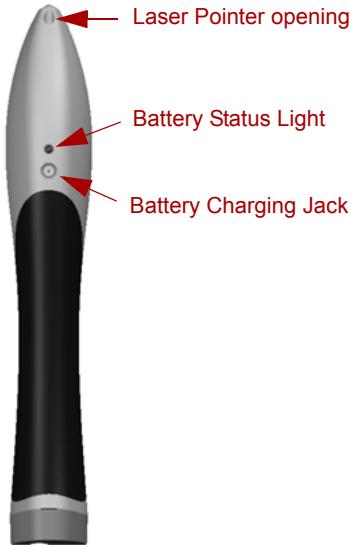
E-Mouse Rear View

USB Charging Cable
| USB Connector | Plug into the USB port of the computer. |
| Transmission Status Light | Displays the wireless transmission status. |
| Channel Select Button A | Press down once to activate wireless channel selection. |
| Channel Select Button B | Hold down the Channel Select Button B and press down any of the Mouse Buttons once to set wireless channel. |
| E-Mouse Right Button | Performs the mouse right button function. Performs the Page Up function in the Presenter Mode |
| E-Mouse Left Button | Performs the mouse left button function Performs the Page Down function in the Presenter Mode |
| Battery Status Light | Battery status indicator. Battery Low: Flashing Battery Charging: On Battery Full: Off (Remark A) |
| Connector A | Connects to the USB port to charge battery. |
| Connector B | Connects to the Battery Charging Jack to charge battery. |
| Battery Charging Jack | Receptacle of Connector B. |
| Laser Pointer Button | Press down in the Presenter Mode to turn on the Laser Pointer. |
Remark A: When the battery power is extremely low the Battery Status Light will be turned off.
HARDWARE SETUP
A. Charging Up the Battery
For safety reasons, the battery was partially charged in the factory before packing. You may want to charge up the battery before using the device.
- Insert Connector B of the USB Charging Cable into the Battery Charging Jack.
- Insert Connector A of the USB Charging Cable into a USB port. When the battery is charging the Battery Status Light stays on.
- Wait until the Battery Status Light turns off and remove the USB Charging Cable. The normal charging time should be 2 to 3 hours if a dedicated USB port is used. Charging time will be longer if a non-powered USB hub is used. (Remark B)
- Repeat Steps 1 to 3 when the battery is flashing. You can keep on using the device during charging; however, the charging time will be extended. (Remark C)
Remark B: Use a dedicated USB port or a powered USB Hub for fastest charging.
Remark C: Lithium batteries do not have memory effect and can be partially charged.
B. Installing the Device
- Turn on your computer, if it is not already on.
- Turn on your E-Mouse by pressing down both the left button and the right button for 10 seconds, if it is not already on. (Remark D)
- Connect the Dongle Receiver to a USB port. A message "wireless pen mouse (2.4 GHz)" should appear on your computer screen. Allow the automatic set up process to complete and the messages to disappear. (Remark E)
- Press down the Channel Select Button A on the Dongle Receiver once and the Transmission Status Light should start flashing.
- Hold down the Channel Select Button B and press down any of the Mouse Buttons once and release. Wait for the Transmission Status Light to turn off, the installation is completed.
- After the first successful installation, your Dongle Receiver and E-Mouse are permanently matched. You DO NOT need to repeat Steps 4 and 5 even when you take your E-Mouse to a different computer.
- Repeat steps 4 and 5 to re-establish the transmission channel setting when needed.
Remark D: For safety reasons, your E-Mouse was shipped with the power turned off. Please turn on the power before using it the first time.
OPERATION
A. Adjusting the Mouse Speed Setting
On Windows Computer:
Click on Start/Settings/Control Panel from the root Window Frame to bring up the Control Panel and click on the Mouse icon to bring up the Mouse Setting Pane. Adjust the Speed Setting (using the slider) to the 14 position from the slow end. Turn off the Acceleration function if it is available. Save the setting and exit the Control Panel.
B. Using the Device
- We suggest the first-time users to start with the "lap-style". That is, hold the E-Mouse like a pen and put your holding fist on your lap.
- Keep the bottom of your fist on your lap and rest your elbow firmly against your body or a stable object. Use the device as if you were making a drawing on your lap to control the pointer movement on the computer screen.
- Adjust the mouse speed setting as needed (Refer to subsection A of the OPERATION Section) to make the pointer control operation as comfortable as possible.
- Once you are used to the operation, you can try the E-Mouse on the desk top or any other surfaces.
C. 3-Stage Power Save Feature
Your E-Mouse has a built-in 3-stage power save feature to maximize the battery usage. If it stays idle for more than a second, the LED dims and the E-Mouse goes into Stage One Power Save Mode. In Stage One, the motion sensor and the buttons remain operational. If the E-Mouse remains idle for 5 minutes in Stage One Power Save Mode, the LED starts flashing and the E-Mouse enters Stage Two Power Save Mode. In this mode, the motion sensor and the buttons remain operational.
If the E-Mouse remains idle for 60 minutes in Stage Two Power Save Mode, the LED turns off and the E-Mouse enters Stage Three Power Save Mode. In this mode the motion sensor is turned off but the buttons remain operational.
Remark F: Clicking the mouse button in any Power Save mode will bring the E-Mouse to the normal Mouse Mode immediately.
D. Turning Power On/Off
To turn off the power of the handheld unit, press down the Left Button and the Right Button at the same time for 10 seconds and wait for the Blue LED to turn off.
To turn on the power of the handheld unit, press down the Left Button and the Right Button at the same time for 10 seconds and wait for the Blue LED to turn on.
You DO NOT have to reinstall the device or reset the communication channel between the handheld device and the receiver after turning off the power.
E. Using the Laser Presenter Function
Hold down the Channel Select Button B and press down the Laser Pointer Button once will put the E-Mouse into the Presenter Mode. In the Presenter Mode, the Blue LED is turned off, the Right Button becomes the Page Up button, and the Left Button becomes the Page Down button.
Hold down the Channel Select Button B and press the Laser Pointer Button once again will switch the E-Mouse back to the Mouse Mode.
PRODUCT CARE
There are no user-serviceable parts in this product and you should not disassemble it under any circumstances without proper training/ authorization. Following the safety guidelines in the Safety Caution Section and this product should last for a long time. Occasional cleaning with a slightly damped soft towel on the outside will help keep its appearance in good condition.
PRODUCT SPECIFICATIONS
2.4 GHz RF technology based rechargeable 2 button pen-style USB wireless optical mouse.
Laser presenter with Page Up and Page Down functions.
System Requirements
Windows 2000 or XP with a USB port,
Dongle Receiver
USB 1.1 interface
Dimension: 57mm× 18mm× 9mm
E-Mouse
1000 true optical Dot-Per-Inch resolution
Blue LED
2 independent mouse buttons
Built-in rechargeable Li battery
10 meter / 30 feet transmission distance
Built-in 3-stage power-saving feature
Laser presenter with Page Up and Page Down functions.
TROUBLESHOOTING
| Symptom | Cause/Solution |
| System does not recognize the USB Receiver. | System does not meet product requirement. -> Upgrade system or move to a different computer. |
| USB port is malfunction. -> Use a different USB port. | |
| E-Mouse does not light up. | Battery power is too low. -> Charge up the battery. |
| E-Mouse is still in Presenter Mode. -> Wait for 10 seconds. | |
| E-Mouse is in Stage Three Power Save Mode. -> Click on the button once. | |
| Power is turned off -> Press down both buttons for 10 seconds to turn power on. | |
| Mouse Pointer does not move. | Work surface is reflective. -> Use a non-reflective work surface. |
| Battery power is too low. -> Charge up the battery. | |
| Communication setting on the E-Mouse may be changed. -> Reset the transmission setting. (See Hardware Setup, Sec. B) | |
| E-Mouse LED is off. -> Fix the LED problem. (Symptom 2) | |
| E-Mouse tilt angle too big. -> Make sure the focus line is in contact with the work surface. | |
| Battery does not charge. | Charging cable is not properly connected. -> Reconnect the cable. |
| USB port is malfunction. -> Use a working USB port. | |
| Power does not turn on. | Battery too low. -> Charge up the battery first. |
| Power does not turn off. | Mouse is in Presenter Mode. -> Hold down the Channel Select Button B and press the Laser Pointer Button once to switch back to the Mouse Mode. |
WARRANTY
This product comes with a 1-year warranty on the rechargeable battery and a 1-year limited warranty covering all other parts and craftsmanship from the day of purchase. This warranty does not cover normal wear and tear, theft, loss or damages caused by intentional or unintentional negligence from the user, by foreign violence or by nature. Battery failure due to exposure to extreme heat or cold or other negligence is not covered.
ENVIRONMENTAL AWARENESS
Please dispose of the packing material properly. Please dispose of the device properly when the product life is over. Littering is bad for the environment and may violate the local law.
HEALTH AWARENESS
Your health is important. Prolong use of any muscle in a repetitive fashion is likely to cause health problem and may develop permanent injuries. Experts suggest that frequent change of positions and taking micro-breaks may reduce your risk of developing repetitive stress injuries.
CONTACT INFORMATION
Toshiba Europe GmbH
Hammfelddamm 8
41460 Neuss
Germany
Hotline: 02 08/59 99 74 0
Waste Electrical and Electronic Equipment (WEEE-Directive)
Following information is only for EU-member states:
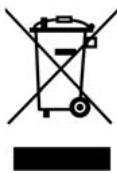
The use of the symbol indicates that this product may not be treated as household waste. By ensuring this product is disposed of correctly, you will help prevent potential negative consequences for the environment and human health, which could otherwise be caused by inappropriate waste handling of this product. For more detailed information about recycling of this product, please contact your local city office, your household waste disposal service or the shop where you purchased the product.
Assistance technique : 02 08/59 99 74 0
CLASS I LASER PRODUCT