X-HM21-K - Audio System PIONEER - Free user manual and instructions
Find the device manual for free X-HM21-K PIONEER in PDF.

| Product Type | Audio system with CD player, FM/AM tuner, built-in amplifier |
| Dimensions (main unit) | 215 mm (W) x 95 mm (H) x 315 mm (D) |
| Weight (main unit) | 2.0 kg |
| Speaker dimensions (S-HM21) | 130 mm (W) x 211.5 mm (H) x 240 mm (D) per speaker |
| Speaker weight (S-HM21) | 2.0 kg each |
| Power supply | AC 220-240 V, 50/60 Hz |
| Power consumption (operation) | 30 W (X-HM21) |
| Power consumption (standby) | 0.5 W max |
| Output power | 15 W + 15 W (RMS, 1 kHz, 10% THD, 8 Ω) |
| Supported audio formats | CD audio, MP3, WMA (CD-R/RW and USB devices) |
| Input sources | CD, Tuner FM/AM, USB, iPod/iPhone/iPad (X-HM21), AUX (mini-jack), LINE |
| Special features | Sleep timer, alarm, equalizer, P.BASS, bass/treble adjustment, mute |
| USB port | 5 V, 2.1 A (X-HM21); compatible with iPod/iPhone/iPad and USB flash drives |
| RDS | Radio Data System with program type search |
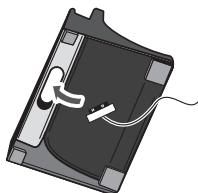
| Included accessories | Remote control, AAA batteries (x2), AM loop antenna, FM wire antenna, power cord, iPad dock (X-HM21), warranty card, manual |
| Maintenance and cleaning | Soft dry cloth or slightly dampened with diluted neutral detergent; do not use solvents |
| Safety | Do not expose to water or rain; leave 25 cm above, 10 cm at the rear, 5 cm on each side for ventilation; no open flames |
| Repairability | Contact authorized Pioneer service center; spare parts available according to applicable legislation |
Frequently Asked Questions - X-HM21-K PIONEER
User questions about X-HM21-K PIONEER
0 question about this device. Answer the ones you know or ask your own.
Ask a new question about this device
Download the instructions for your Audio System in PDF format for free! Find your manual X-HM21-K - PIONEER and take your electronic device back in hand. On this page are published all the documents necessary for the use of your device. X-HM21-K by PIONEER.
USER MANUAL X-HM21-K PIONEER
Discover the benefits of registering your product online at http://www.pioneer.co.uk (or http://www.pioneer.eu).
Operating Instructions
Mode d'emploi
Bedienungsanleitung
This equipment is not waterproof. To prevent a fire or shock hazard, do not place any container filled with liquid near this equipment (such as a vase or flower pot) or expose it to dripping, splashing, rain or moisture.
D3-4-2-1-3_A1_En
WARNING
To prevent a fire hazard, do not place any naked flame sources (such as a lighted candle) on the equipment.
D3-4-2-1-7a_A1_En
VENTILATION CAUTION
When installing this unit, make sure to leave space around the unit for ventilation to improve heat radiation (at least 25cm at top, 10cm at rear, and 5cm at each side).
WARNING
Slots and openings in the cabinet are provided for ventilation to ensure reliable operation of the product, and to protect it from overheating. To prevent fire hazard, the openings should never be blocked or covered with items (such as newspapers, table-cloths, curtains) or by operating the equipment on thick carpet or a bed.
D3-4-2-1-7b*A1_En
Operating Environment
Operating environment temperature and humidity: +5^ to +35^ (+41^ to +95^) less than 85% RH (cooling vents not blocked)
Do not install this unit in a poorly ventilated area, or in locations exposed to high humidity or direct sunlight (or strong artificial light)
D3-4-2-1-7c*A1En
WARNING
Store small parts out of the reach of children and infants. If accidentally swallowed, contact a doctor immediately.
D41-6-4_A1_En
This product is for general household purposes. Any failure due to use for other than household purposes (such as long-term use for business purposes in a restaurant or use in a car or ship) and which requires repair will be charged for even during the warranty period.
K041_A1_En
CAUTION
The oSTANDBY/ON switch on this unit will not completely shut off all power from the AC outlet. Since the power cord serves as the main disconnect device for the unit, you will need to unplug it from the AC outlet to shut down all power. Therefore, make sure the unit has been installed so that the power plug can be easily unplugged from the AC outlet in case of an accident. To avoid fire hazard, the power cord should also be unplugged from the AC outlet when left unused for a long period of time (for example, when on vacation).
D3-4-2-2-2a*A1_EN
CAUTION
This product is a class 1 laser product classified under the Safety of laser products, IEC 60825-1:2007.
CLASS 1 LASER PRODUCT
D58-5-2-2a_A1_En
POWER-CORD CAUTION
Handle the power cord by the plug. Do not pull out the plug by tugging the cord and never touch the power cord when your hands are wet as this could cause a short circuit or electric shock. Do not place the unit, a piece of furniture, etc., on the power cord, or pinch the cord. Never make a knot in the cord or tie it with other cords. The power cords should be routed such that they are not likely to be stepped on. A damaged power cord can cause a fire or give you an electrical shock. Check the power cord once in a while. When you find it damaged, ask your nearest PIONEER authorized service center or your dealer for a replacement.
S002*A1_EN
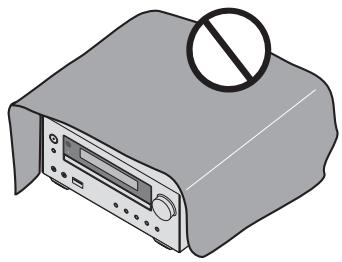
Do not install your speakers overhead on the ceiling or wall. The grill is designed to be detachable, and as such it may fall and cause damage or personal injury if installed overhead.
SGK004_A1_En
Information for users on collection and disposal of old equipment and used batteries
(Symbol for equipment)

Symbol examples) for batteries


Pb
These symbols on the products, packaging, and/or accompanying documents mean that used electrical and electronic products and batteries should not be mixed with general household waste.
For proper treatment, recovery and recycling of old products and used batteries, please take them to applicable collection points in accordance with your national legislation.
By disposing of these products and batteries correctly, you will help to save valuable resources and prevent any potential negative effects on human health and the environment which could otherwise arise from inappropriate waste handling.
For more information about collection and recycling of old products and batteries, please contact your local municipality, your waste disposal service or the point of sale where you purchased the items.
These symbols are only valid in the European Union.
For countries outside the European Union:
If you wish to discard these items, please contact your local authorities or dealer and ask for the correct method of disposal.
K058a_A1_En
Thank you for buying this Pioneer product.
Please read through these operating instructions so that you will know how to operate your model properly. After you have finished reading the instructions, put them in a safe place for future reference.
Contents
01 Before you start
What's in the box 5
Loading the batteries in the remote control 5
Using the remote control 5
02 Part names and functions
Remote control 6
Speaker system 7
Front panel 8
Display 9
03 Connections
Speaker connection 10
Connecting antennas 11
Using external antennas. 11
Plugging in 11
04 Getting started
To turn the power on 12
Setting the clock 12
General control 12
Input function. 12
Display brightness control 12
Volume auto setting. 12
Volume control. 12
Muting. 12
Sound controls 13
Equalizer 13
P.BASS control 13
Bass/treble control 13
Setting the wake-up timer 13
Calling the wake-up timer 14
Cancelling the wake-up timer. 14
Using the wake-up timer. 14
Using the sleep timer 14
Using Headphones 14
05 iPod/iPhone/iPad playback (X-HM21 only)
Confirming what iPod/iPhone/iPad models are
supported 15
Connecting your iPod/iPhone/iPad 15
Connecting iPod/iPhone/iPad using supplied
stand 15
Playing iPod/Phone/iPad 16
06 Disc playback
Playing discs or files 17
Advanced CD or MP3/WMA disc playback 18
Direct track search 18
Repeat play. 18
Random play 18
Programmed play (CD or MP3/WMA) 19
About downloading MP3/WMA 19
About folder playback order 19
Specify the folder to play. 20
Switch the display contents 20
07 USB playback
Playing USB storage devices 21
Repeat play. 21
Random play 21
Specify the folder to play. 22
Switch the display contents 22
Playing in the desired order (Programmed Play) 22
08 Using the tuner
Listening to the radio broadcasts 23
Tuning. 23
Saving station presets. 23
To recall a memorised station 24
To scan the preset stations. 24
To erase entire preset memory. 24
Using the Radio Data System (RDS) 24
An introduction to RDS. 24
Searching for RDS programs 24
Information provided by RDS. 25
Using the Auto Station Program Memory (ASPM). 25
Notes for RDS operation. 25
09 Other connections
Connecting auxiliary components 26
10 Additional information
Troubleshooting 27
Playable discs and formats 29
Regarding copy protected CDs 29
Supported audio file formats 29
Cautions on use 29
When moving this unit 29
Place of installation. 29
Do not place objects on this unit 30
About condensation 30
Cleaning the product. 30
Cleaning the lens. 30
Handling discs 30
Storing 30
Cleaning discs 30
About specially shaped discs 30
About iPod/iPhone/iPad 31
Restoring all the settings to the defaults 31
Specifications 32
Chapter 1: Before you start
What's in the box
Please confirm that the following accessories are in the box when you open it.
Remote Control
Power cord
AM antenna cable
FM wire antenna
- AAA batteries (R03) x 2
- iPad stand (X-HM21 only)
Warranty card
- Operating instructions (this document)
Loading the batteries in the remote control
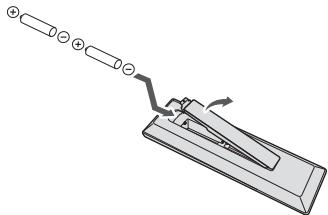
1 Open the rear lid and load the batteries as illustrated below.
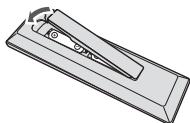
2 Close the rear lid.
CAUTION
- When inserting the batteries, make sure not to damage the springs on the battery's terminals. This can cause batteries to leak or over heat.
- Do not use any batteries other than the ones specified. Also, do not use a new battery together with an old one.
- When loading the batteries into the remote control, set them in the proper direction, as indicated by the polarity marks ( and ).
WARNING
- Do not heat batteries, disassemble them, or throw them into flames or water.
- Batteries may have different voltages, even if they are the same size and shape. Do not use different types of batteries together.
- To prevent leakage of battery fluid, remove the batteries if you do not plan to use the remote control for a long period of time (1 month or more). If the fluid should leak, wipe it carefully off the inside of the case, then insert new batteries. If a battery should leak and the fluid should get on your skin, flush it off with large quantities of water.
- When disposing of used batteries, please comply with governmental regulations or environmental public institution's rules that apply in your country/area.
Do not use or store batteries in direct sunlight or other excessively hot place, such as inside a car or near a heater. This can cause batteries to leak, overheat, explode or catch fire. It can also reduce the life or performance of batteries.
Using the remote control
The remote has a range of about 7m at an angle of about 30^ from the remote sensor.

Keep in mind the following when using the remote control:
- Make sure that there are no obstacles between the remote and the remote sensor on the unit.
- Remote operation may become unreliable if strong sunlight or fluorescent light is shining on the unit's remote sensor.
- Remote controllers for different devices can interfere with each other. Avoid using remotes for other equipment located close to this unit.
- Replace the batteries when you notice a fall off in the operating range of the remote.
Chapter 2:
Part names and functions
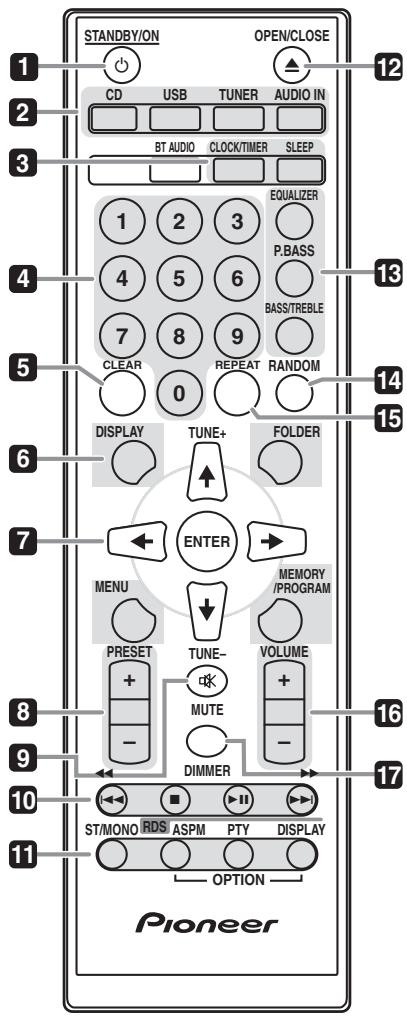
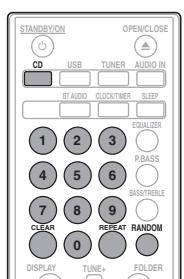
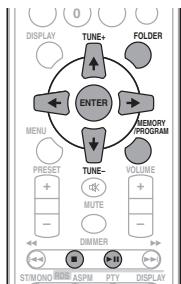
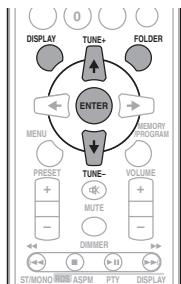
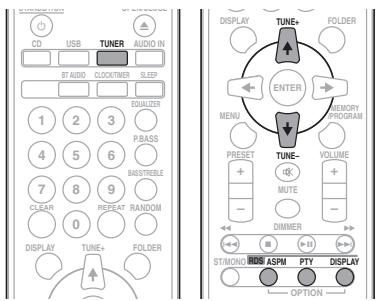
Remote control
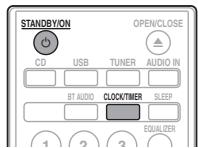
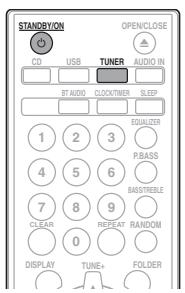
1 STANDBY/ON
Switches the receiver between standby and on (page 12).
2 Input function buttons
Use to select the input source to this receiver (pages 16, 17, 21, 23, 26).
3 CD Receiver control buttons CLOCK/TIMER
Use for setting the clock, as well as for setting and checking the timers (page 12).
SLEEP
See Using the sleep timer on page 14.
4 Numeric buttons (0 to 9)
Use to enter the number (page 18).
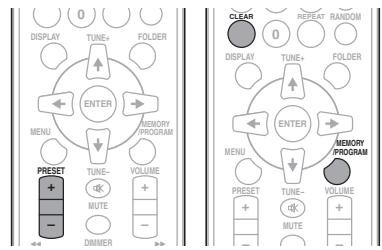
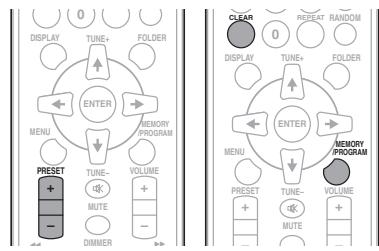
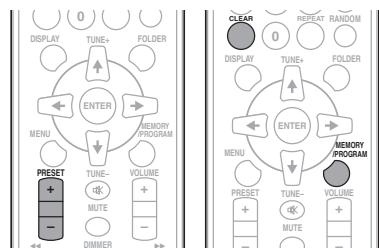
5 CLEAR
Use to clear the programmed play (page 19).
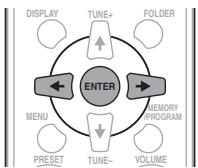
6 CD Receiver control buttons DISPLAY
Press to change the display for songs playing back from CD or USB (page 20).
FOLDER
Use to select the folder of the MP3/WMA disc or USB mass storage device (page 19).
MENU
Use to access the menu.
MEMORY/PROGRAM
Use to memory or program the MP3/WMA disc (page 19).
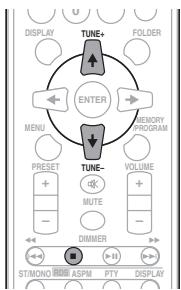
7 / / / (TUNE + / - ), ENTER
Use to select/switch system settings and modes, and to confirm actions.
Use TUNE + / - can be used to find radio frequencies (page 23).
8 PRESET + / -
Use to select preset radio stations (page 24).
9 MUTE
Mutes/unmutes the sound (page 12).
10Playback control buttons
Use to control each function after you have selected it using the input function buttons (page 17).
11 Tuner control buttons ST/MONO
Use to switch the sound mode between stereo and monaural. (page 23)
RDS ASPM
Use to search for RDS Auto station program memory (page 24).
RDS PTY
Use to search for RDS program types (page 24).
RDS DISPLAY
Press to change the RDS display for information mode (page 24).
12 OPEN/CLOSE
Use to open or close the disc tray (page 17).
13 Sound control buttons
Adjust the sound quality (page 13).
14 RANDOM
Randomize order of track playback from a CD, iPod or USB (page 18).
15 REPEAT
Press to change the repeat play setting from a CD, iPod or USB (page 18).
16 Volume control buttons
Use to set the listening volume (page 12).
17 DIMMER
Dims or brightens the display. The brightness can be controlled in four steps (page 12).

- The BT AUDIO button is not available for this unit.
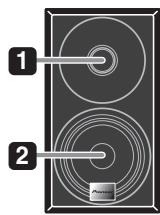
Speaker system
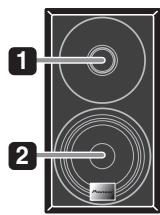
1 Tweeter
2 Woofer
3 Bass Reflex Duct
Important
- Speaker grille cannot be removed. (X-HM11)
- Make sure nothing comes into contact with the speaker diaphragms when you remove the speaker grilles. (X-HM21)
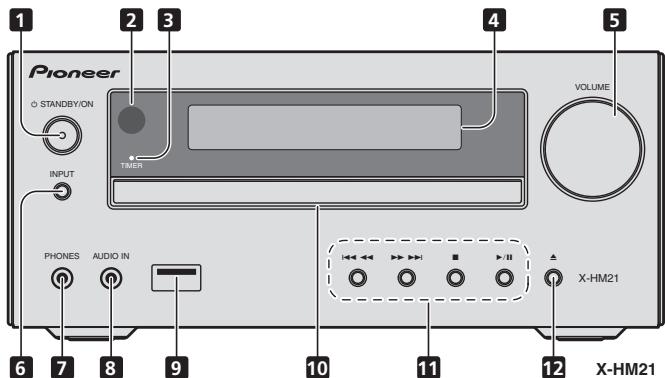
Front panel
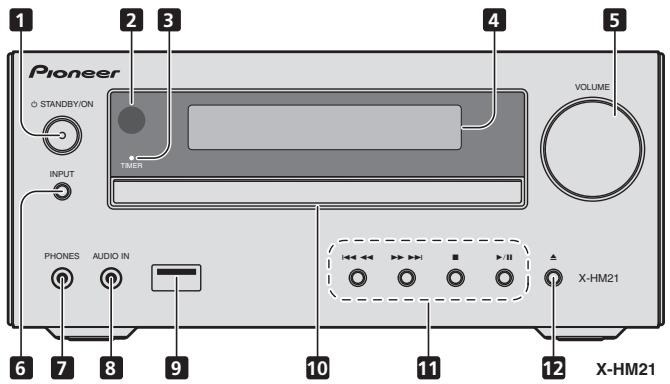
1 STANDBY/ON button
Switches the receiver between standby and on (page 12).
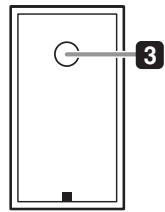
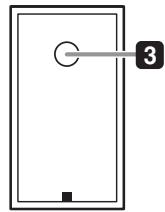
2 Remote sensor
Receives the signals from the remote control.
3 TIMER indicator
Lights when the unit power is off but when the timer setting is activated.
4 Character display
See Display on page 9.
5 Volume control
Use to set the listening volume (page 12).
6 INPUT button
Selects the input source.
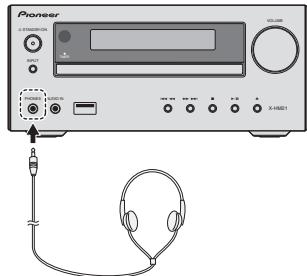
7 Headphone socket
Use to connect headphones. When the headphones are connected, there is no sound output from the speakers (page 14).
8 AUDIO IN socket
Use to connect an auxiliary component using a stereo minjack cable (page 26).
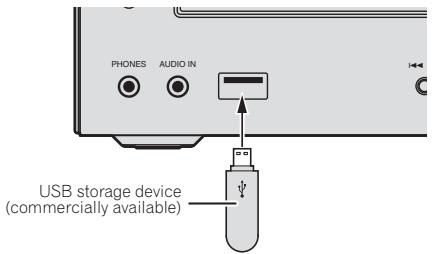
9 USB terminal (X-HM21)
Use to connect your USB mass storage device or Apple iPod/ iPhone/iPad as an audio source (page 21).
USB terminal (X-HM11)
Use to connect your USB mass storage device as an audio source (page 21).
10 Disc tray
Place the disc, label side up (page 17).
11Playback control buttons
Select the desired track or file to be played back. Stop current playback. Stop playback or resume playback from the point where it was paused.
12 Disc tray open/close button
Use to open or close the disc tray (page 17).
Display
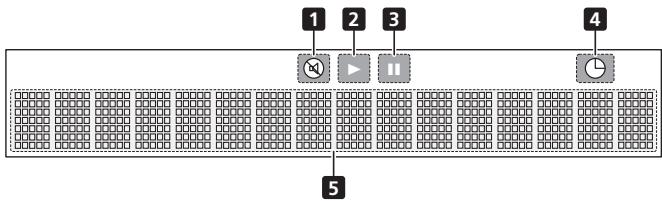
1 Lights when the sound is muted.

The mute icon will be displayed in red.
2 Start playback.
3 Pause playback.
4 Timerfun
5 Character display Displays various system information.
Chapter 3:
Connections

CAUTION
- Be sure to turn off the power and unplug the power cord from the power outlet whenever making or changing connections.
- Connect the power cord after all the connections between devices have been completed.
Speaker connection
- Push open the tabs and insert exposed wire.
- Connect the black wire to (-) terminal, and the red wire to the (+) terminal.
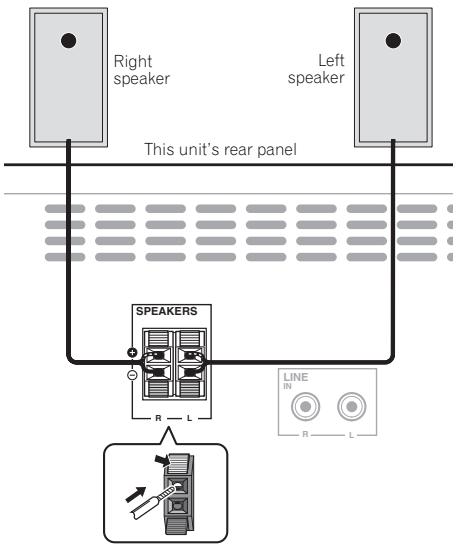

CAUTION
- These speaker terminals carry HAZARDOUS LIVE voltage. To prevent the risk of electric shock when connecting or disconnecting the speaker cables, disconnect the power cord before touching any uninsulated parts.
- Do not connect any speakers other than those supplied to this system.
-
Do not connect the supplied speakers to any amplifier other than the one supplied with this system. Connection to any other amplifier may result in malfunction or fire.
-
Do not attach these speakers to the wall or ceiling. They may fall off and cause injury.
- These speakers are magnetically shielded. However, depending on the installation location, color distortion may occur if the speaker system is installed extremely close to the screen of a television set. If this happens, turn off the television set, and then turn it on after 15 to 30 minutes. If the problem persists, move the speaker system away from the television set.
- Make sure that the speaker cable cores do not become exposed and make contact with other cable cores. This may cause malfunction of the product.
- Do not allow the speaker cable core to come into contact with the receiver body.
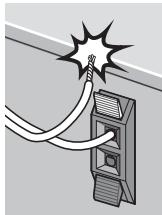
- If the speaker cable core comes into contact with any metal portion of the receiver's body, it may damage the speakers and cause smoke and fire. Insert speaker cables securely into the terminals and check that the cable does not come out of easily.

Note
- There is no difference between L and R speakers.
Connecting antennas
Connect the AM loop antenna and the FM wire antenna as shown below. To improve reception and sound quality, connect external antennas (see Using external antennas below).
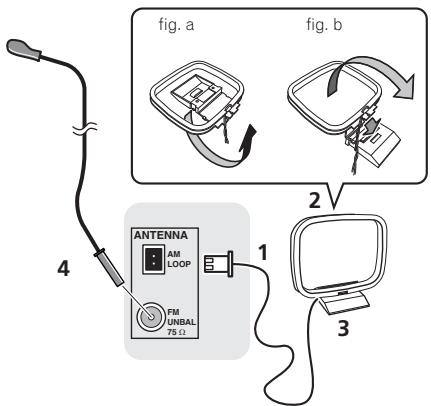
1 Connect the AM antenna wires.
Hold the terminal part of the wire when connecting.
2 Fix the AM loop antenna to the attached stand.
To fix the stand to the antenna, bend in the direction indicated by the arrow (fig. a) then clip the loop onto the stand (fig. b).
3 Place the AM antenna on a flat surface and in a direction giving the best reception.
4 Connect the FM wire antenna into the FM antenna socket.
For best results, extend the FM antenna fully and fix to a wall or door frame. Don't drape loosely or leave coiled up.
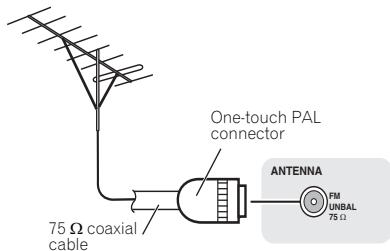
Using external antennas
To improve FM reception
Use a PAL connector (not supplied) to connect an external FM antenna.
Plugging in
CAUTION
- Do not use any power cord other than the one supplied with this unit.
- Do not use the supplied power cord for any purpose other than that described below.
Before making or changing the connections, switch off the power and disconnect the power cord from the AC outlet. After you've finished making all connections, plug the unit into an AC outlet.

Chapter 4:
Getting started
To turn the power on
Press the STANDBY/ON to turn the power on.
After use:
Press the STANDBY/ON to enter the power stand-by mode.

Note
- In standby mode, if iPod/iPhone/iPad is connected, the unit turns charge mode.
Setting the clock
1 Press STANDBY/ON to turn the power on.
2 Press CLOCK/TIMER on the remote control.
"CLOCK" is shown on the main display.
3 Press ENTER.
4 Press / to set the day, then press ENTER.
5 Press / to set the hour, then press ENTER.
6 Press / to set the minute, then press ENTER to confirm.
7 Press ENTER.
To confirm the time display:
Press the CLOCK/TIMER. The time display will appear for about 10 seconds.
To readjust the clock:
Perform "Setting the clock" from step 1.

Note
- When power supply is restored after unit is plugged in again or after a power failure, reset the clock.
General control
Input function
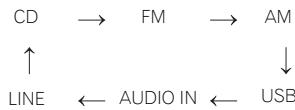
When the INPUT on main unit is pressed, the current function will change to different mode. Press the INPUT repeatedly to select desired function.

X-HM21
X-HM11
Display brightness control
Press DIMMER to dims the display brightness. The brightness can be controlled in four steps.
Volume auto setting
If you turn off and on the main unit with the volume set to 31 or higher, the volume starts at 30 and sets in to the last set level.
Volume control
Turn the VOLUME on the unit or press VOLUME +/- on the remote control to increase or decrease the volume.
CAUTION
- The sound level at a given volume setting depends on speaker efficiency, location, and various other factors. It is advisable to avoid exposure to high volume levels. Do not turn the volume on to full at switch on. Listen to music at moderate levels. Excessive sound pressure from earphones and headphones can cause hearing loss.
Muting
The volume is muted temporarily when pressing the MUTE on the remote control. Press again to restore the volume.
Sound controls
Equalizer
When the EQUALIZER is pressed, the current mode setting will be displayed. To change to a different mode, press the EQUALIZER repeatedly until the desired sound mode appears.

P.BASS control
When the power is first turned on, the unit will enter the P.BASS mode which emphasises the bass frequencies. To cancel the P.BASS mode, press the P.BASS on the remote control.
Bass/treble control
Press the BASS/TREBLE, then press / / / to adjust the bass or treble.

Simultaneous operation of EQUALIZER, P.BASS and BASS/TREBLE is not possible. Only the functions that you have selected will be active.
If you select one of three functions, features that are not selected will be set as follows.
1 If you change the settings of P.BASS (ON/OFF).
- EQUALIZER:FLAT
BASS/TREBLE:BASS=0,TREBLE=0
2 If you change the settings of EQUALIZER.
P.BASS:OFF
BASS/TREBLE:BASS=0,TREBLE=0
3 If you change the settings of BASS/TREBLE.
P.BASS:OFF
- EQUALIZER:FLAT
Setting the wake-up timer
Used to change the existing timer setting, or to set a new timer.
1 Press STANDBY/ON to turn the power on.
2 Press and hold CLOCK/TIMER.
3 Press / to select "ONCE" or "DAILY", then press ENTER.
ONCE - Works once only at a preset time.
DAILY - Works at the preset time on a preset day.
4 Press / to select "TIMER SET", then press ENTER.
5 Press / to select the timer playback source, then press ENTER.
- CD, FM, AM, USB/iPod, USB, AUDIO IN and LINE can be selected as the playback source.
6 Press / to select the timer day, then press ENTER.
7 Press / to set the hour, then press ENTER.
8 Press / to set the minute, then press ENTER.
- Set the time to finish as in steps 7 and 8 above.
9 Adjust the volume press VOLUME + / - , then press ENTER.
10 Press STANDBY/ON to enter the power standby mode.
- The TIMER indicator lights up.
Calling the wake-up timer
An existing timer setting can be reused.
1 Follow steps 1 to 3 in "Setting the wake-up timer".
2 Press / to select "TIMER ON", then press ENTER.
Cancelling the wake-up timer
Turn off the timer setting.
1 Follow steps 1 to 3 in "Setting the wake-up timer".
2 Press / to select "TIMER OFF", then press ENTER.
Using the wake-up timer
1 Press STANDBY/ON to turn the power off.
2 At the wake-up time, this unit will turn on automatically and play the selected input function.

Note
- If at the wake-up time an iPod/iPhone/iPad is not connected to the unit or a disc is not inserted, the unit will be turned on but will not play back the track.
Some discs may not be played automatically at the wake-up time. - When setting the timer set at least one minute between the start and end time.
Using the sleep timer
The sleep timer switches off the unit after a specified time so you can fall asleep without worrying about it.
1 Press SLEEP repeatedly to select a switch off time.
Choose between 10 min, 20 min, 30 min, 60 min, 90 min, 120 min, 150 min, 180 min or OFF. The newly set value displays for 3 seconds, and then the setting is completed.

Note
- The sleep timer can be set by pressing SLEEP while the remaining time is displayed.
Using Headphones
Insert the headphone's jack plug into the connector.
When the headphones are connected, there is no sound output from the speakers.
- Do not turn the volume on to full at switch on and listen to music at moderate levels. Excessive sound pressure from earphones and headphones can cause hearing loss.
- Before plugging in or unplugging the headphone, reduce the volume.
- Be sure your headphone has a 3.5 ~mm diameter plug and impedance between 16 and 50 . The recommended impedance is 32 .
Audio from the iPod/iPhone/iPad cannot be heard via the headphones connected to the unit. "HP MUTE" will be displayed if you connect the headphones when the iPod/iPhone/iPad function is selected.
Chapter 5:
iPod/iPhone/iPad playback (X-HM21 only)
Merely by connecting your iPod/iPhone/iPad to this unit, you can enjoy high-quality sound from your iPod/iPhone/iPad. Playback setting for iPod/iPhone/iPad music can be performed from this unit or the iPod/iPhone/iPad itself.
Confirming what iPod/iPhone/iPad models are supported
The iPod/iPhone/iPad playable on this unit are shown below.
| iPod/iPhone/iPad | USB Terminal (Audio only) |
| iPod nano 3G/4G/5G/6G/7G | ✓ |
| iPod touch 1G/2G/3G/4G/5G | ✓ |
| iPhone 5 | ✓ |
| iPhone 4S | ✓ |
| iPhone 4 | ✓ |
| iPhone 3GS | ✓ |
| iPhone 3G | ✓ |
| iPhone | ✓ |
| iPad mini | ✓ |
| iPad (4th generation) | ✓ |
| iPad (3rd generation) | ✓ |
| iPad 2 | ✓ |
| iPad | ✓ |
Note
- Pioneer does not guarantee that this unit plays iPod/ iPhone/iPad models other than the ones specified.
- Some functions may be restricted depending on the model or software version.
- iPod/iPhone/iPad is licensed for reproduction of noncopyrighted materials or materials the user is legally permitted to reproduce.
- Features such as the equalizer cannot be controlled using this system, and we recommend switching the equalizer off before connecting.
- Pioneer cannot under any circumstances accept responsibility for any direct or indirect loss arising from any inconvenience or loss of recorded material resulting from iPod/iPhone/iPad failure.
-
For detailed instructions on using the iPod/iPhone/iPad, please refer to the manual supplied with the iPod/ iPhone/iPad.
-
This system has been developed and tested for the software version of iPod/iPhone/iPad indicated on the website of Pioneer (http://pioneer.jp/homeav/support/ios/eu/).
- Installing software versions other than indicated on the website of Pioneer to your iPod/iPhone/iPad may result in incompatibility with this system.
- This unit cannot be used to record CD, tuner or other content on an iPod/iPhone/iPad.
Connecting your iPod/iPhone/iPad
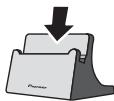
Connecting iPod/iPhone/iPad using supplied stand
1 Connect the iPod/iPhone/iPad cable to the unit.
2 Pass the iPod/iPhone/iPad cable through the bottom of the stand and connect it to the iPod/ iPhone/iPad.
3 Set the iPod/iPhone/iPad on the stand.

Playing iPod/Phone/iPad
1 Connect your iPod/iPhone/iPad.
- If an iPod/iPhone/iPad is connected while the unit is turned on, playback of the iPod/iPhone/iPad will not begin.
2 Press USB as the input source.
"USB/iPod" is shown on the main display.
3 When the recognition is completed, will begin playing automatically.
- The available iPod/iPhone/iPad playback controls from the unit are / , / , / .
- In the following case, operate your iPod/iphone/iPad directly:
- Searching a file by artist name or genre.
- Playing in the repeat or random mode.

CAUTION
- When your iPod/iPhone/iPad is connected to this unit and you wish to operate the iPod/iPhone/iPad directly, be sure to steady the iPod/iPhone/iPad with the other hand to prevent malfunctions due to faulty contacts.

Note
- For detailed instructions on using the iPod/iPhone/iPad, please refer to the manual supplied with the iPod/ iPhone/iPad.
- iPod/iPhone/iPad recharging occurs whenever an iPod/iPhone/iPad is connected to this unit. (This function is supported in standby mode as well.)
- When input is switched from USB/iPod to another function, iPod/iPhone/iPad playback is temporarily stopped.

Important
If this unit cannot play your iPod/iPhone/iPad, perform the following troubleshooting checks:
- Check whether the iPod/iPhone/iPad is supported by this unit.
- Reconnect the iPod/iPhone/iPad to the unit. If this doesn't seem to work, try resetting your iPod/iPhone/iPad.
- Check that iPod/iPhone/iPad software is supported by the unit.
If the iPod/iPhone/iPad cannot be operated, check the following items:
- Is the iPod/iPhone/iPad connected correctly? Reconnect the iPod/iPhone/iPad to the unit.
- Is the iPod/iPhone/iPad experiencing a hangup? Try resetting the iPod/iPhone/iPad, and reconnect it to the unit.
Chapter 6:
Disc playback
This system can play back a standard CD, CD-R/RW in the CD format and CD-R/RW with MP3 or WMA files, but cannot record on them. Some audio CD-R and CD-RW discs may not be playable due to the state of the disc or the device that was used for recording.
MP3:
MP3 is a form of compression. It is an acronym which stands for MPEG Audio Layer 3. MP3 is a type of audio code which is processed by significant compression from the original audio source with very little loss in sound quality.
- This system supports MPEG-1/2 Audio Layer 3 (Sampling rates: 8kHz to 48kHz ; Bit rates: 64 kbps to 384 kbps).
- During VBR file playback, time counter in the display may differ from its actual playback time.
WMA:
WMA (Windows Media Audio) files are Advanced System Format files that include audio files which are compressed with Windows Media Audio codec. WMA is developed by Microsoft as an audio format file for Windows Media Player.
- This system supports WMA (Sampling rates: 32 kHz/44.1 kHz/48 kHz; Bit rates: 64 kbps to 320 kbps).
- During VBR file playback, time counter in the display may differ from its actual playback time.
Playing discs or files
1 Press STANDBY/ON to turn the power on.
2 Press CD on the remote control or INPUT repeatedly on the main unit to select CD input.
3 Press OPEN/CLOSE to open the disc tray.
4 Place the disc on the disc tray, label side up.
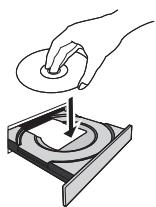
5 Press OPEN/CLOSE to close the disc tray.
6 Press /II to start playback.
After the last track is played, the unit will stop automatically.
CAUTION
- Do not place two discs in one disc tray.
- Do not play discs of special shapes (heart, octagon, etc). It may cause malfunctions.
- Do not push the disc tray whilst it is moving.
- If the power fails whilst the tray is open, wait until the power is restored.
- Be sure to place 8cm disc in the middle of the disc tray.

Note
- Due to the structure of the disc information, it takes longer to read an MP3/WMA disc than a normal CD (approximately 20 to 90 seconds).
- When the beginning of the first track is reached during fast reverse, the unit will enter the playback mode (only for CD).
- Rewritable multi-session discs with unfinished writing, can still be played.
- If TV or radio interference occurs during CD operation, move the unit away from the TV or radio.

Tip
- When no operation has done in CD mode and the audio file is not played for more than 30 minutes, the power will automatically turn off.
Various disc functions
| Function | Main unit | Remote control | Operation |
| Play | →↑ | →↑ | Press in the stop mode. |
| Stop | → | → | Press in the playback mode. |
| Pause | →↑ | →↑ | Press in the playback mode. Press ➔/↓ to resume playback from the paused point. |
| Track up/down | ←←←→ | ←← | Press in the playback or stop mode. If you press the button in the stop mode, press ➔/↓ to start the desired track. |
| Fast forward/reverse | ←←←→ | ←← | Press and hold down in the playback mode. Release the button to resume playback. |
Advanced CD or MP3/WMA disc playback
Direct track search
By using the numeric buttons, the desired tracks on the current disc can be played.
Use the numeric buttons on the remote control to select the desired track whilst playing the selected disc.

Note
- A track number higher than the number of tracks on the disc cannot be selected.
To stop playback:
Press ■.
Repeat play
Repeat play can play one track, all tracks or a programmed sequence continuously.
To repeat one track:
Press REPEAT repeatedly until "REPEATONE" appears. Press ENTER.
To repeat all tracks:
Press REPEAT repeatedly until "REPEAT ALL" appears. Press ENTER.
To repeat desired tracks:
Perform steps 1 to 5 in "Programmed play (CD or MP3/WMA)" section on next page and then press REPEAT repeatedly until "REPEAT ALL" appears. Press ENTER.
To cancel repeat play:
Press REPEAT repeatedly until "REPEAT OFF" appears. Press ENTER.

Note
After performing repeat play, be sure to press Otherwise, the disc will play continuously.
- During repeat play, random play is not possible.
Random play
The tracks on the disc can be played in random order automatically.
To random play all tracks:
Press RANDOM repeatedly until "RANDOM ON" appears. Press ENTER.
To cancel random play:
Press RANDOM repeatedly until "RANDOM OFF" appears. Press ENTER.

Note
- If you press the during random play, you can move to the track selected next by the random operation. On the other hand, the does not allow you to move to the previous track. The beginning of the track being played will be located.
- In random play, the unit will select and play tracks automatically. (You cannot select the order of the tracks.)
- During random play, repeat play is not possible.
Programmed play (CD or MP3/WMA)
You can choose up to 32 selections for playback in the order you like.
1 Whilst in the stop mode, press MEMORY/PROGRAM on the remote control to enter the programming save mode.
2 Press or the numeric buttons on the remote control to select the desired tracks.
3 Press ENTER to save folder and track number.
4 Repeat steps 2 to 3 for other folder/tracks. Up to 32 tracks can be programmed.
- If you want to check the programmed tracks, press MEMORY/PROGRAM.
- If you make a mistake, the last programmed tracks will be canceled by pressing CLEAR.
5 Press /II to start playback.
To cancel the programmed play mode:
To cancel the programmed play, press twice on the remote control. The display will show "PRG CLEAR" and all the programmed content will be cleared.
Adding tracks to the program:
Press the MEMORY/PROGRAM. Then follow steps 2 to 3 to add tracks.
Note
- When a disc is ejected anything programmed is cleared.
- If you press the STANDBY/ON to enter the standby mode or change the function from CD to another, the programmed selections will be cleared.
- During the program operation, random play is not possible.
About downloading MP3/WMA
There are many music sites on the internet that you can download MP3/WMA music files. Follow the instructions from the website on how to download the music files. You can then play back these downloaded music files by burning them to a CD-R/RW disc.
- Your downloaded song/files are for personal use only. Any other usage of the song without owner's permission, is against the law.
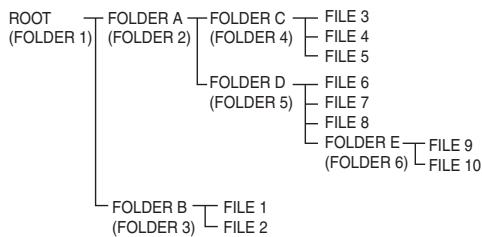
About folder playback order
If MP3/WMA files are recorded in several folders, a folder number will be set to each folder automatically.
These folders can be selected by the FOLDER on the remote control. If there is no supported file formats inside the selected folder, the folder is skipped and the next folder will be selected.
Example: How the folder numbers are assigned if MP3/WMA format files are recorded are as shown below.
1 ROOT folder is set as FOLDER 1.
2 As for folders inside ROOT folder (FOLDER A and FOLDER B), the folder which is recorded earlier on the disc will be set as FOLDER 2 and FOLDER 3.
3 As for folder inside FOLDER A (FOLDER C and FOLDER D), the folder which is recorded earlier on the disc will be set as FOLDER 4 and FOLDER 5.
4 FOLDER E that is inside FOLDER D will be set as FOLDER 6.
- The folder and file order information which is recorded on the disc depends on the writing software. There maybe possibilities that this unit will playback the files not according to our expected playback order.
- From a disc with MP3/WMA files up to 255 folders and 999 files (including non playable files) can be read.
Specify the folder to play
To specify the folder to play, perform the following steps.
1 Press CD, and load an MP3/WMA disc.
2 Press FOLDER, and press ↑/↓ to select desired playback folder.
3 Press ENTER.
Playback will start from the first song of the selected folder.
Even if it is stopped, it is possible to press / , to select a folder.
Switch the display contents
1 Press DISPLAY.
If the title, artist and album name has been written to the file, that information will be displayed. (The unit can only display alphanumeric characters. Non-alphanumeric character are displayed as **.
Number of track, playback time display
Title/Artist/Album display

File type display

Number of folder/track display

Note
Copyright protected WMA files" or "Unsupported files cannot be played back. In these case the files will be skipped automatically.
- There may be cases where no information can be displayed.
- Displaying title, artist and album name is only supported for MPs files.
Chapter 7:
USB playback
Playing USB storage devices
It is possible to listen to two-channel audio using the USB interface on the front of this receiver.
- Pioneer does not guarantee that any file recorded on a USB storage device will play or that power will be supplied to a USB storage device. Also note that Pioneer will accept no responsibility whatsoever for loss of files on USB storage devices caused by connection to this unit.
1 Press USB as the input source.
"USB/iPod" is shown on the main display.
2 Connect the USB storage device.
The number of folders or files stored on the connected USB storage device appear on the main display automatically.
- This receiver does not support a USB hub.
- If an iPod/iPhone/iPad is connected to the unit, the unit will automatically begin charging it.
3 When the recognition is completed, press / to start playback.
- When changing to a different input source, stop the USB memory playback first before changing.
4 Disconnect USB storage device from the USB terminal.
Turn the power off before removing the USB storage device.
Note
- USB flash drive that supports USB 2.0 can be used.
- This unit may not recognize a USB storage device, play files or supply power to a USB storage device. For details, see When a USB storage device is connected on page 28.
- When a USB storage device is not playing and no operations have been performed for more than 30 minutes, the unit will automatically power off.
Repeat play
Repeat play can play one track, all tracks or a programmed sequence continuously.
To repeat one track:
Press REPEAT repeatedly until "REPEAT ONE" appears. Press ENTER.
To repeat all tracks:
Press REPEAT repeatedly until "REPEAT ALL" appears. Press ENTER.
To repeat desired tracks:
Perform steps 1 to 5 in "Programmed play (CD or MP3/WMA)" section on next page and then press REPEAT repeatedly until "REPEAT ALL" appears. Press ENTER.
To cancel repeat play:
Press REPEAT repeatedly until "REPEAT OFF" appears. Press ENTER.

Note
- After performing repeat play, be sure to press. Otherwise, the file of USB storage device will play continuously.
During repeat play, random play is not possible.
Random play
The file of USB storage device can be played in random order automatically.
To random play all tracks:
Press RANDOM repeatedly until "RANDOM ON" appears. Press ENTER.
To cancel random play:
Press RANDOM repeatedly until "RANDOM OFF" appears. Press ENTER.

Note
- If you press the during random play, you can move to the track selected next by the random operation. On the other hand, the does not allow you to move to the previous track. The beginning of the track being played will be located.
- In random play, the unit will select and play tracks automatically. (You cannot select the order of the tracks.)
- During random play, repeat play is not possible.
Specify the folder to play
To specify the folder to play, perform the following steps.
1 Press USB, and connect the USB storage device.
2 Press FOLDER, and press / to select desired playback folder.
3 Press ENTER.
Playback will start from the first song of the selected folder.
Even if it is stopped, it is possible to press / , to select a folder.
Switch the display contents
The unit can display the information recorded in the USB storage device. For details, see Switch the display contents on page 20.
Playing in the desired order (Programmed Play)
The unit can play folders stored on a USB storage device in the desired order. For details, see Programmed play (CD or MP3/WMA) on page 19.
Chapter 8:
Using the tuner
Listening to the radio broadcasts
The following steps show you how to tune in to FM and AM radio broadcasts using the automatic (search) and manual (step) tuning functions. Once you are tuned to a station you can memorize the frequency for recall later. See Saving station presets below for more on how to do this.
Tuning
1 Press the STANDBY/ON to turn the power on.
2 Press TUNER repeatedly to select desired frequency band (FM or AM).
3 Press TUNE +/- on the remote control to tune in to the desired station.
Automatic tuning:
Press and hold TUNE +/- , scanning will start automatically and the tuner will stop at the first receivable broadcast station.
Manual tuning:
Press the TUNE +1- repeatedly to tune in to the desired station.
Note
- When radio interference occurs, automatic tuning may stop automatically at that point.
Automatic tuning will skip weak signal stations. - To stop the automatic tuning, press.
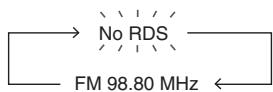
- When an RDS (Radio Data System) station is tuned in, the frequency will be displayed first. Finally, the station name will appear.
Full auto tuning can be achieved for RDS stations using Auto Station Program Memory (ASPM) mode, see page 25.
To receive an FM stereo transmission:
- Press ST/MONO to select stereo mode and "AUTO" will be displayed.
Improving poor FM reception:
1 Press ST/MONO repeatedly to select MONO.
This will change the tuner from stereo to mono and usually improve the reception.
Saving station presets
If you often listen to a particular radio station, it's convenient to have the receiver store the frequency for easy recall whenever you want to listen to that station (Preset tuning). This saves the effort of manually tuning in each time. This unit can memorize up to 45 stations.
(FM 30 stations/AM 15 stations)
1 Tune to a station you want to memorize.
See Tuning above for more on this.
2 Press MEMORY/PROGRAM.
The preset number will flash.
3 Press PRESET + / - to select the preset channel number.
4 Press MEMORY/PROGRAM to store that station in memory.
If the preset number has changed from flashing to lighting, before the station is memorised, repeat the operation from step 2.
- Repeat steps 1 to 4 to set other stations, or to change a preset station. When a new station is stored in the memory, the station previously memorised for that preset channel number will be erased.

Note
- The backup function protects the memorised stations for a few hours should there be a power failure or the AC power cord become disconnected.
To recall a memorised station
1 Press PRESET + / - to select the desired station.
To scan the preset stations
The stations saved in the memory can be scanned automatically. (Preset memory scan)
1 Press and hold PRESET + / -
The preset number will appear and the programmed stations will be tuned in sequentially, for 5 seconds each.
2 Press PRESET + / - again when the desired station is located.
To erase entire preset memory
1 Press TUNER on the remote control.
2 Press CLEAR until "MEMORY CLEAR" appears.

Note
All stations will be erased.
Using the Radio Data System (RDS)
An introduction to RDS
Radio Data System (RDS) is a system used by most FM radio stations to provide listeners with various kinds of information—the name of the station and the kind of show they're broadcasting, for example.
One feature of RDS is that you can search by type of program. For example, you can search for a station that's broadcasting a show with the program type, JAZZ.
You can search the following program types:
News-News
Current Affairs - Current Affairs
Information - General Information
Sport-Sport
Education - Educational
Drama - Radio plays, etc.
Cultures - National or regional culture, theater, etc.
Science - Science and technology
Varied Speech - Usually talk-based material, such as quiz shows or interviews.
Pop Music - Pop music
Rock Music - Rock music
Easy Listening - Easy listening
Light Classics M - 'Light' classical music
Serious Classics - 'Serious' classical music
Other Music - Music not fitting above categories
Weather & Metr - Weather reports
Finance - Stock market
reports, commerce, trading, etc.
Children's Progs - Programs for children
Social Affairs - Social affairs
Religion - Programs concerning religion
Phone In – Public expressing their views by Phone
Travel & Touring - Holiday type travel rather than traffic announcements
Leisure & Hobby - Leisure interests and hobbies
Jazz Music-Jazz
Country Music - Country music
National Music - Popular music in a language other than English
Oldies Music - Popular music from the '50s and 60s
Folk Music - Folk music
Documentary - Documentary
Alarm Test - Broadcasting when testing emergency broadcast equipment or receivers.
Alarm - Alarm!
Searching for RDS programs
You can search a program type listed above.
1 Press TUNER on the remote control.
- RDS is only possible in the FM.
2 Press RDS PTY on the remote control.
"SELECT" will appear for about 6 seconds.
3 Press / to select the program type you want to hear.
Each time the button is pressed, the program type will appear. If the button is held down, the program type will appear continuously.
4 Whilst the selected program type is displayed (within 6 seconds), Press RDS PTY again.
After the selected program type has been lit for 2 seconds, "SEARCH" will appear, and the search operation will start.

Note
-
If the display has stopped flashing, start again from step 2. If the unit finds a desired program type, the corresponding channel number will be lit for about 8 seconds, and then the station name will be displayed.
-
If you want to listen to the same program type of another station, press the RDS PTY whilst the channel number or station name is flashing. The unit will look for the next station.
- If no station can be found, "NOT FOUND" will appear for 4 seconds.
Information provided by RDS
Each time the RDS DISPLAY is pressed, the display will switch as follows:

When tuning in to a station other than an RDS station or to an RDS station which sends weak signal, the display will change in the following order:
Using the Auto Station Program Memory (ASPM)
Whilst in the ASPM operation mode, the tuner will automatically search for new RDS stations. Up to 30 stations can be stored.
If you have already stored some stations in memory, the number of new stations you can store will be less.
1 Press TUNER on the remote control.
2 Press and hold down RDS ASPM on the remote control.
After "ASPM" has flashed for about 4 seconds, scanning will start (87.5 MHz to 108 MHz).
After scanning, the number of stations stored in memory will be displayed for 4 seconds, and then "END" will appear for 4 seconds.
To stop the ASPM operation before it is complete:
Press whilst it is scanning for stations. The stations which are already stored in memory will be kept there.

Note
- If the same station is broadcasting on different frequencies, the strongest frequency will be stored in memory.
- Any station which has the same frequency as the one stored in memory will not be stored.
- If 30 stations have already been stored in memory, the scan will be aborted. If you want to redo the ASPM operation, erase the preset memory.
- If no station have been stored in memory, "END" will appear for about 4 seconds.
- If the RDS signals are very weak, station names may not be stored in memory.
- The same station name can be stored in different channels.
- In a certain area or during certain time periods, the station names may temporarily be different.
Notes for RDS operation
If any of the following events occur, it does not mean that the unit is faulty:
- "PS", "NO PS" and a station name appear alternately, and properly.
- If a particular station is not broadcasting properly or a station is conducting tests, the RDS reception function may not work properly.
- When you receive an RDS station whose signal is too weak, information like the station name may not be displayed.
- "NO PS", "NO PTY" or "NO RT" will flash for about 5 seconds, and then the frequency will be displayed.
Notes for radio text:
- The first 16 characters of the radio text will appear and then they will scroll across the display.
- If you tune in to an RDS station which is not broadcasting any radio text, "NO RT" will be displayed when you switch to the radio text position.
- Whilst radio text data is received or when the text contents change, "RT" will be displayed.
Chapter 9:
Other connections

CAUTION
- Before making or changing the connections, switch off the power and disconnect the power cord from the AC outlet.
Connecting auxiliary components
Connect the front panel AUDIO IN mini-plug jack to your auxiliary playback component.
- This method can be used to play music on this unit from iPods/iPphones/iPads that do not support use of an iPod Dock and USB terminal.
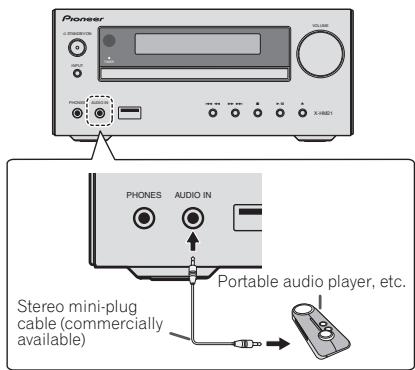
1 Press AUDIO IN as the input source.
When AUDIO IN is selected "AUDIO IN" will be displayed on the main display.

Note
- If the AUDIO IN miniplug jack is connected to auxiliary phones jack, the volume of the unit will be adjusted by the volume on the playback component. If the sound is distorted after you lower the volume of the unit, try lowering the volume on the auxiliary playback component.
Connect the rear panel LINE IN audio jacks to your auxiliary playback component.
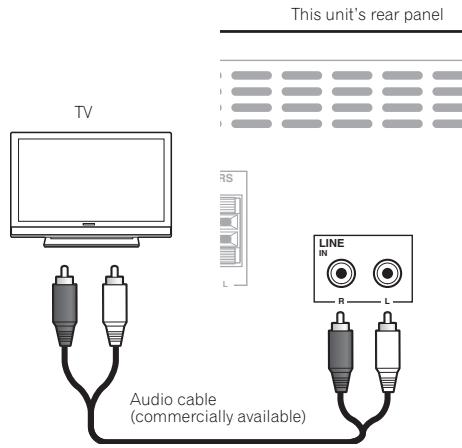
1 Press AUDIO IN twice as the input source.
When LINE is selected "LINE" will be displayed on the main display.
Chapter 10:
Additional information
Troubleshooting
Incorrect operations are often mistaken for trouble and malfunctions. If you think that there is something wrong with this component, check the points below. Sometimes the trouble may lie in another component. Investigate the other components and electrical appliances being used. If the trouble cannot be rectified even after exercising the checks listed below, ask your nearest Pioneer authorized service center or your dealer to carry out repair work.
- If the unit does not operate normally due to external effects such as static electricity disconnect the power plug from the outlet and insert again to return to normal operating conditions.
General problem
| Problem | Check | Remedy |
| Settings you have made have been cleared. | Was the power cord unplugged? | When power cord is unplugged, the settings you have made is cleared. Please set the clock again. If you do not want to clear the settings, do not unplug the power cord. |
| Difference in volume between CDs, MP3, WMA, iPod/iPhone/iPad, Tuner, AUDIO IN and LINE. | This is not a problem with this unit. | The volume may sound differently depending on the input source and recording format. |
| This unit cannot be operated with the remote control. | Are you operating from far away? | Operate within 7 m, 30° of the remote sensor on the front panel (page 5). |
| Is the remote control sensor exposed to direct sunlight or strong artificial light from a fluorescent bulb, etc.? | The remote control signals may not be received properly if the remote control sensor is exposed to direct sunlight or strong artificial light from a fluorescent bulb, etc. | |
| Are the batteries dead? | Replace the batteries (page 5). | |
| Disc cannot be played or disc is ejected automatically. | Is the disc scratched? | Scratched discs may not play. |
| Is the disc dirty? | Wipe the dirt off the disc (page 30). | |
| Is this unit placed in a humid location? | There could be condensation inside. Wait a while for the condensation to evaporate. Do not place this unit near an air-conditioner, etc. (page 30). | |
| Folder or file names are not recognized. (WMA, MP3). | Have you exceeded the maximum number of folder or file names this unit can recognize? | Up to 255 folders can be recognized on one disc. Up to 999 files can be recognized within one folder. Depending on the folder structure, however, this unit may not be able to recognize certain folders or files. |
| The unit turns off automatically. | If no play back and no operation has done for 30 minutes or more, the unit turns off automatically. |
When a USB storage device is connected
| Problem | Check | Remedy |
| USB storage device is not recognized. | Is the USB storage device properly connected? | Connect the device securely (all the way in). |
| Is the USB storage device connected via a USB hub? | This unit does not support USB hubs. Connect the USB storage device directly. | |
| Is the USB storage device supported by this unit? | This unit only supports USB mass storage class devices. | |
| This unit supports portable flash memory and digital audio playback devices. | ||
| Only the FAT16 and FAT32 file systems are supported. Other file systems (exFAT, NTFS, HFS etc.) are not supported. | ||
| USB flash drive that supports USB 2.0 can be used. | ||
| This device does not support the use of external hard disc drives. | ||
| This is not a problem with this unit. | Turn the power off then back on. | |
| Some USB storage devices may not be recognized properly. | ||
| File cannot be played. | Is the file copyright-protected (by DRM)? | Copyright-protected files cannot be played. |
| This is not a problem with this unit. | Files stored on a computer cannot be played. | |
| It may not be possible to play some files. | ||
| Folder or file names are not displayed or are not properly displayed. | Do the folder or file names contain more than 30 characters? | The maximum number of characters displayable for the folder and file names is 30. |
| Folder or file names are not displayed in alphabetical order. | This is not a problem with this unit. | The order in which the folder and file names are displayed depends on the order in which the folders or files were recorded on the USB storage device. |
| Much time is required to recognize the USB storage device. | What is the USB storage devices capacity? | Some time may be required to load the data when large capacity USB storage devices are connected (this could take several minutes). |
| Power is not supplied to the USB storage device. | Is AUTH ERROR displayed on the front panel display? No power is supplied if the power consumption is too high. | Turn the power off then back on. |
| Turn the power off, then disconnect and reconnect the USB storage device. | ||
| Press INPUT to switch to the other input, then switch again to the USB/iPod input. |
When an iPod/iPhone/iPad is connected
| Problem | Remedy |
| Can't operate the iPod/iPhone/iPad by the remote control. | Make sure the iPod/iPhone/iPad is connected correctly (refer to Connecting your iPod/iPhone/iPad on page 15). |
| Can't operate the iPod/iPhone/iPad. | Make sure the iPod/iPhone/iPad is connected correctly (refer to Connecting your iPod/iPhone/iPad on page 15).If the iPod/iPhone/iPad is experiencing a hangup, try resetting the iPod/iPhone/iPad, and reconnect it to the unit. |
Playable discs and formats
| Audio CD | • Commercially available audio CDs • CD-R/ -RW/ -ROM discs containing music recorded in the CD-DA format |
| WMA | WMA files recorded on CD-R/ -RW/ -ROM discs or USB storage devices |
| MP3 | MP3 files recorded on CD-R/ -RW/ -ROM discs or USB storage devices |
- Only the discs that have been finalized can be played.
- Disks recorded in packet write mode (UDF format) are not compatible with this unit.
Only discs recorded in ISO9660 Level 1, Level 2 and Joliet can be played. - Files protected by DRM (Digital Rights Management) cannot be played.
- Corporation and product names mentioned herein are trademarks or registered trademarks of the respective corporations.
Note
- This unit does not support multisession discs or multiborder recording.
- Multisession/multiborder recording is a method in which data is recorded on a single disc in two or more sessions/borders. A "session" or "border" is one recording unit, consisting of a complete set of data from lead-in to lead-out.
Regarding copy protected CDs
This unit is designed to conform to the specifications of the audio CD format. This unit does not support the playback or function of discs that do not conform to these specifications.
Supported audio file formats
- This unit does not support lossless encoding.
Cautions on use
When moving this unit
When moving this unit, be sure to first check that there is no disc loaded and disconnect the iPod/iPhone/iPad. Then press STANDBY/ON, wait for "STAND BY" disappears on main display to turn off, then unplug the power cord. Damage may occur if the unit is transported or moved with a disc inserted, or when another device is connected to the USB terminal or AUDIO IN mini Plug jack.
Place of installation
- Choose a stable place near the TV or stereo system being used with this unit.
- Do not place this unit on top of a TV or color monitor. Also install it away from cassette decks and other devices easily affected by magnetic forces.
Avoid the following locations:
- Places exposed to direct sunlight
- Humid or poorly ventilated places
- Extremely hot places
- Places exposed to vibrations
- Places in which there is much dust or cigarette smoke
- Places exposed to soot, steam or heat (kitchens, etc.)
Do not place objects on this unit
Do not place any objects on top of this unit.
Do not obstruct the ventilation holes.
Do not use this unit on shaggy rugs, beds, sofas, etc., or wrapped in cloth, etc. Doing so will prevent the heat from dispersing, leading to damage.
Do not expose to heat.
Do not place this unit on top of an amplifier or other component that generates heat. When rack mounting it, to avoid the heat given off by the amplifier or other audio component, place it on a shelf below the amplifier.
- Turn off the unit's power when not using it.
- Depending on signal conditions, striped patterns may appear on a TV screen and noise may enter the sound of radio broadcasts when the unit's power is on. If this happens, turn the unit's power off.
About condensation
If this unit is moved suddenly from a cold place into a warm room (in winter, for example) or if the temperature in the room in which this unit is installed rises suddenly due to heater operation, etc., water droplets (condensation) may form inside (on operating parts and the lens). When condensation is present, this unit will not operate properly and playback is not possible. Let this unit stand at room temperature for 1 or 2 hours with the power turned on (the time depends on the extent of condensation). The water droplets will dissipate and playback will become possible. Condensation can also occur in the summer if this unit is directly exposed to the air flow from an air-conditioner. If this happens, move this unit to a different place.
Cleaning the product
- Unplug the power cord from the power outlet when cleaning this unit.
- Clean this unit using a soft cloth. For tough dirt, apply some neutral detergent diluted in 5 to 6 parts water to a soft cloth, wring out thoroughly, wipe off the dirt, then wipe again with a soft, dry cloth.
- Alcohol, thinner, benzene, insecticides, etc., could cause the print or paint to peel off. Also, leaving rubber or vinyl products in contact with this unit for long periods of time could mar the cabinet.
- When using chemical-impregnated wipes, etc., read the cautions included with the wipes carefully.
Cleaning the lens
- This unit's lens should not become dirty in normal use, but if for some reason it should malfunction due to dust or dirt, consult your nearest Pioneer authorized service center. Although lens cleaners for players are commercially available, we advise against using them since some may damage the lens.
Handling discs
Storing
Always place discs in their cases and store them vertically, avoiding hot, humid places, places exposed to direct sunlight and extremely cold places.
- Be sure to read the cautions included with the disc.
Cleaning discs
- Discs may not play if there are fingerprints or dust on them. In this case, use a cleaning cloth, etc., to gently wipe the disc from the inside towards the outside. Do not use dirty cleaning cloths.
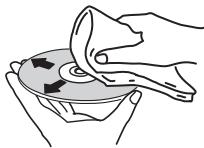
- Do not use benzene, thinner or other volatile chemicals. Also do not use record spray or antistatic agents.
- For tough dirt, apply some water to a soft cloth, wring out thoroughly, wipe off the dirt, then wipe off the moisture with a dry cloth.
- Do not use damaged (cracked or warped) discs.
- Do not let the signal surface of discs get scratched or dirty.
- Do not attach pieces of paper or stickers to discs. Doing so could warp discs, making it impossible to play them. Also note that rental discs often have labels attached to them, and the label's glue may have oozed out. Check that there is no glue around the edges of such labels before using rented discs.


About specially shaped discs
Specially shaped discs (heart-shaped, hexagonal, etc.) cannot be played on this unit. Do not attempt to play such discs, as they could damage this unit.

About iPod/iPhone/iPad
Made for

iPod

iPhone

iPad
"Made for iPod," "Made for iPhone," and "Made for iPad" mean that an electronic accessory has been designed to connect specifically to iPod, iPhone, or iPad, respectively, and has been certified by the developer to meet Apple performance standards. Apple is not responsible for the operation of this device or its compliance with safety and regulatory standards. Please note that the use of this accessory with iPod, iPhone, or iPad may affect wireless performance.
iPad, iPhone, iPod, iPod nano and iPod touch are trademarks of Apple Inc., registered in the U.S. and other countries.
Restoring all the settings to the defaults
Use the steps below to restore the all settings to their defaults.
1 Press STANDBY/ON to turn the power on.
2 Press CD on the remote control or INPUT on the main unit repeatedly to select CD input.
3 Press OPEN/CLOSE to open the disc tray.
4 Press STANDBY/ON while pressing.
Use the buttons on this unit's top panel. "DEFAULT" is displayed while the settings are being restored. Power is turned off.
Specifications
- Amplifier section
RMS Power Output: 15 W + 15 W (1 kHz, 10 %, T.H.D., 8 Ω)
Tuner section
Frequency Range (FM) 87.5 MHz to 108 MHz Antenna Input (FM). .75Ω unbalanced Frequency Range (AM) 522 kHz to 1620 kHz Antenna (AM) Loop antenna
Miscellaneous
USB terminal (X-HM21) 5 V, 2.1 A
USB terminal (X-HM11) 5 V, 500 mA
Power source. AC 220 V to 240 V, 50 Hz/60 Hz
Power consumption
Power on (X-HM21). 30 W
Power on (X-HM11). 21 W
Power stand-by. 0.5 W or less
Dimensions. 215 mm (W) x 95 mm (H) x 315 mm (D)
Weight (without package) 2.0 kg
Speaker (S-HM21)
Magnetically shieled speaker system
Type 2-way type speaker system 5 cm Tweeter 10 cm Woofer
Maximum input power. 15 W Impedance. 8 Dimensions. 130mm W × 211.5mm H × 240 mm D Weight 2.0 kg/each
Speaker (S-HM11)
Magnetically shieled speaker system
Type 2-way type speaker system Piezoelectric Tweeter 10 cm Woofer
Maximum input power. 15 W Impedance. .8Ω
Dimensions. 130mm W × 212 mm H × 228.5 mm (D) Weight 2.0 kg/each
- Accessories
Remote control 1 AAA batteries (R03) 2 AM antenna cable. 1 FM wire antenna. 1 Power cord iPad Stand (X-HM21 only) Warranty card Operating instructions (This document)

Note
- The specifications are applicable when the power supply is 230 V.
- Specifications and the design are subject to possible modifications without notice, due to improvements.
© 2012 PIONEER CORPORATION. All rights reserved.
ATTENTION
POUR EVITER TOUT RISQUE D' ELECTROCUTION, NE PAS ENLEVER LE COUVERCLE (NI LE PANNEAU ARRÈRE). AUCUNE PIECE REPARABLE PAR L'UTILISATEUR. NE TROUVE À L'INTERIEUR. CONFIER TOUT ENTRETIEN À UN PERSONNEL QUALIFIÉ UNIQUÉMENT.
D3-4-2-1-B1_Fr
AVERTISSEMENT
P.BASS:OFF
BASS/TREBLE: BASS = 0 TREBLE = 0
(30 stations FM / 15 stations AM)
Education - Education
Drama - Pièces
Uber iPod/iPhone/iPad 31
Uber iPod/iPhone/iPad
Made for

iPod

iPhone

iPad
ll playback di iPod/iPhone/iPad (solo X-HM21)
Education - Programmi
educativi
KLASSE 1 LASERPRODUCT
D58-5-2-2a A1_NI
WAARSCHUWING NETSNOER
P.BASS:OFF
BASS/TREBLE: BASS = 0 TREBLE = 0
(FM 30 stations/AM 15 stations)
Education - Educatief
Documentary Documents
© 2012 PIONEER CORPORATION.
Education - Material educatio
Drama - Radionovelas, etc.
Cultures-Cultura nacionalegional,teatro,etc.
Children's Progs -Programas infants
Social Affairs - Asuntos sociales
JI3EPHbI IPOOyKT KJIACC 1
D58-5-2-2a_A1_Ru
MEPbI IPEIOCTOPOXHOCTN IPIN OBPAUHIN C CETEBbIM UHYPOM
Держinte сeteвои shyp 3a вилky. He ByItacknBaIte BInKy, B38BUnCb 3a shHyp, И НКОду He KacaiTeCb ceteBOro shHpya, ecN BaWu pyKu BlnKxHbIe, tak KaK 3To MoKet npRBeCTN K KOPOTKOM 3aMbKaHINU INI nOpaXeHINO 3neKtpnueckm TOKOM. He CTabTe annapar,прдмTeI MeBENI nT.d. Na ceteBOw SHyP, He 3aKIMmaTe erO. He 3aB3bBAJBte y3IOB Ha shHype n He CB3bBAJBte erO c DpyrMnshHypam. CeteBbe I ShHybI dONKHBI leKaTb Ta, YTO6bI ha NHX HEnb3a 6blIO NaCTynTB. NOBpeJXDHeHb CeteBOi shHyp MoKet cStaTb prNCHNO BO3HNKHOBEHn NOkapa INI nnpa3ntB Bac 3eNKTPnueckm TOKOM. Bpem aT bPemEHn nPoBepraTe ceteBOw shHyp. B cnyuae O6hApYxeHn NOpeJXDHeHn O6paTIteCb 3a ZAMeHOn B 6blKnAunIopNuaMaJIbHbI cepBcNchI cyHTpФnMbPI PIONEER INI K BaWseMy dinepy.
S002*A1Ru
He yctahabnabaTpe rpoMkoROBOpTeHnHa ypOBHe BbIe TOnOblbHaNtONOk uHn HcSTehy.3aunTHaRe peWETka npoeKtnpyeTcBcEMHOu, COOTBeTCTBEHNO, OHa MOteYnaCTb N HAeCTNu Yuepe6 uN TpABMy np UyctAHOBKe HAD TOnOBO.
SGK004_A1_Ru
HOpMaunI nnb3oBateNe no c6opy uyttnnaumn 6bIBwero B 3Kcnnyataunn o6opydobAHn n OTPa6otabux 3JeMeHTOB NHTAHN
0603haeHne 1nnaopdyoBaHn

0603HaeyHnIa 3eHTOB nTaHnI

3THO603NaueHnHa IIPOyKuHN, ynaKOBKe, H/IIIN cOpBOJNTeJIbIbIX DOKyMeHTa O3NaHauOT, YTO bIBiBnA B KcIJIpyATAUHn 3JEKTPOTeXHHueCKn A 3JEKTPOHnA IPOdyKuHn H oTpaObaTahHbIe 3JIeMHeTbI pIHaTHn HE DIOJIHKHb BYbOpaCBaTBcBA MBeCTe C ObUYHbIM 6bTbOBm MycOpOM.
IITTO TIOO bIaHAA 6bIbIa B YnOtpe6JIeHH INpOlyKIIIN H OTePAoToAHBHe 3IeMeHTb IITAHANbI COOTBECTYIOUIM Obpa3OM Ope6AOTbIy, yTHIN3HPOBAHbI N IepePAoToAHbI, IOKaJIyCTa, IpeEJaIte Hx B COOTBECTYIOUIM IIyHKT C6Opa HcNOJIb3OBAHbIX 3JIeKTPOHbIX H3dJIIn B COOTBECTBHN C MeCTHbIM 3AKOHOATEJbCTOBM.
YTHIN3HpyaDHHbE yctpoBCTBa HJIeMeHTbIITaHIIHIIpaBnIbHO, BblIOmoraTe coxpanHTb IHeHbE pecSybcI h NpeIoTbparNTb BO3MOXbHE HeatnHBHe IOcJIeCTBnI 3IOpOBbI IOJIeI h OKpyKaIOJIeI cpeIbI, KOtOpBe MOrT bO3HNKHyTb B pe3yJIbTaTe HECOOBTCTBHyIOJero YdaJIeHI NOTXIOB.
IJIIOJIyEHnIOIOJIHHTeBHOH HOpMaIIHnO I PpaBHLbHbIX CIOco6ax C6opa n yTHJIN3aIIHNOTPAoTABIIEO6OpYIOBAHnN HcNOJIb3OBABAHBX 3JIeMEHTOB INITAHnH O6paIIaIITeCB COOTBeCTBYIOJIHE MeCTbIe OprAhnCaMOyIPaBLEHH, B IEHTpbl yTHJIN3aIIHNOTXIOB HII IO MeCTy IOKYIKN DAHHOFO H3JIeHN.
01 Pered nauanom pa6oTbI
KOMIIJEKTIOCTaBKN 5
YcTaHOBka 6aTaapeek B IyJIbT IINCTaHIOHHORO
yipabJIeHHN 5
HcIOJIb3OBaHHe IyIbTa HnCTaHnOHnHO ynpabJeHH ... 5
02 Ha3BaHnuaCTeN uФyHKcMn
IyIbT IY 6
Akyctnuecka cnTeMa 7
IpeHnHaPiHeJIb 8
ДиПЛeн 9
03 PoiKJIoueHnI
IIOKJIIOUeHHe IpOMKOROBOpHTeJIe 10
IoiKJIIOUeHHe aHTeHH 11
HcIOJIb3OBAHHe BHeIIHHx aHTeHH 11
IopKJIIOueHne 11
04 Hauano pa6oTbI
ДяВКЛIOHHeHЯПИТаHЯ 12
HacrpoKa yacob 12
O6iee yipapBJIeHne 12
yhkinha BBOJa 12
PeryJInpoBaHHe npKocTH HcIIe 12
ABTomathueckay yctaHOBka rpoMkoCTH 12
PeryJInpoBaHHe rPOMKocTH 12
IIprHJIyIeHHe 3Byka. 13
YIIpaBJIeHHe 3ByKOM 13
Kbaii3ep. 13
PeryIHHPOBaHHe Hn3KHX YAcTOr (peXHM P.BASS). 13
PerjHPOBkA TeM6pa Hn3KHX/BbICOKHX YAcTOr 13
HactpoiKa TaIMepa BkJIIOUeHnra 13
Bb3OB TaMepa BKIOueHn. 14
OTMeHa TaIMepa BKJIIOueHHra 14
HcnoJIb3OBaHHe TaIMepa BkJIIOueHHN 14
HcnoB3OBaHne TaMepa OTKJIOUeHHN 14
HcnoJIb3OBAHHe HayIIHHKOB 14
05 Bocnpoun3BedeHne iPod/iPhone/iPad (ToIbko X-HM21)
IIOITBvpeKJENHe IIOJIePckKN MOJIeNl iPD/iPhone/ iPad 15
IopKIOHueHne iPod/iPhone/iPad 15
Плдкгонецн iPod/Phone/iPadсиюльявен
прлараимо постбх. 15
Bocipon3BeJeHne iPod/iPhone/iPad 16
06 Bocnpon3BedeHne Dncka
Bocipon3BeJeHHe HJCKOB HJH qaiIOB 17
YcoBepHHeCTBOBaHHoe BOCnpoH3BeDeHne HnckOB CD Hn
MP3/WMA 18
IIpMaOH IIoHcIopOJKN 18
IIOBTOPHoe BOCIIPOH3BeJeHHe 18
BocpoH3BeHeHHe BcIyauHoiIOeIOBaTeJIbHOCTH... 18
3aiporpaMmPbAHHoe Bocpno3BedeHHe (CD HJMP3/ WMA). 19
O 3aŋpy3ke ΦaiJIOB MP3/WMA 19
O IopJke BocipnoH3BeJeHHaPiKN. 19
Bb6op IaIKN IJI BOCIIPOH3BeJeHH 20
IpekeJIIOueHHe coOpEKMOrO IHCIIIEe 20
07 Bocnpo3BeHeHne c USB
BocpoH3BeHeHHe 3aIOMHHaIOHX yCTPoICTB USB .21
IIOBTOPHoe BOCIIPOH3BeJeHHe 21
BocpoH3BeHeHHe BcIyauHHOIOeIOBaTeJIbHOCTH. 22
Bb6op IaIKN DJI BOCIIPOH3BeDeHH 22
IpekeJIIOueHHe coJepKHMOrO IHCIIIE 22
BocpoH3BeJeHHe BKeJaemOMIopJKe
(3aIIpOpaMMHPOBaHHoe BOCIIpOH3BeJeHHe) 22
08 NcnoJIb3ObaHne TIOhepa
IpocJyHbAHne paHIOpeJauch.23
Hactpoika 23
CoxpaHHe 3aIporpaMMHPOBAHHbIX paAnOCTaHn..23
IIIBbI3OBA 3aHeceHHoB IIaMaTb CTaHINH 24
IIaKHaHPOBaHHIpeYcTaHOBJeHHbIX cTahH.. 24
IIIIOIHORO cTHpAHNIIpeDyCTaHOBJIeHHOI IAMrTH .24
HcnoJIb3ObaHHe cnCTeMbI paJIOJaHHbIX (RDS) .24
3HaKOMCTBO C CHCTeMoR RDS 24
IIoHc IIpoIpaMM cHCTeMbI paIHOnaHaHbIX RDS. 24
HhopmaiHa, IpeIOCTabJIeMaI cHcTeMoR RDS. 25
NIOJIb3OBAHNE AHTMOCTHECKO HACTPOKN HA IpIeBAPHTEJHO 3A0MHeHHbIe noPpRAMMb
paHocTaHnH) (ASPM). 25
IIpHMeuHaHHI IOppeKHMyRDS 25
09Другne podknioyuHn
IoiocoeHHHeHne IIOJIHHTeJIbHbIX KOMIOHEHTOB 26
10 DononHntelbHaI INΦopMaun
YcTpaHHe HEnoJaIOK 27
BocipnoH3BOIDMbIe INCKH H fOpMaTbI 29
OTHOCHTEJIbHO KOMIIAKT-ДИСКOB C 3AIIITOI OT KOIIPOBAHIN 29
IopJepKHaembe opMaTb ayHnofoaIIOB 29
MepbI IpeIOCTOPOKHOCTH IIIN 3KcIIyataHH .29
IIpiIepeMeiueHHyctpoiCTBa. 29
MecTo yCTaHOBKn 29
He pa3meiTe IpeImetbHa ycTpoIcTbe. 29
O KOHJeHcauHH 30
UHCTKa H3JeJIHa 30
UHCTKaJIHH3bI 30
O6paIeHHe c IINCKaMn 30
XpaHeHne 30
UHCTKa IINCKOB. 30
O nckax cieuaJIbHOJ opMbI. 31
iPod/iPhone/iPad 31
C6poc Bcex Hactpoek Ha 3HaueHn IIO yMOJIuaHnIO .31
TexHHueckHe xapaKTepeHCTKN 32
Pazden 1:
HcnoJIb3yTeTcIaIbIb6opA HcToUHHKa BxOJa DaHHoro pecHBepa (ctp. 16, 17, 21, 23, 26).
3 KhoPkn ynpaBneHnpecnBepom CD CLOCK/TIMER
HcnoJIbIyETcR yIaYCTAHOBK YCaOH, aTAKeJIa YIaYCTAHOBK I npOBePKy TcAHOBOK TaiMePA (ctp. 12).
SLEEP
Cm. HcnoIb3o6aue maIepe omKIOUeHua hctp.14.
4 LInΦροBsIe KhoNkN (OTo 0do9)
HcnoJIb3yIte IJI BBOJa HOMepa (ctp. 18).
5 CLEAR
IcNoJIb3yIeIraOuOHCTKN 3aIPOrpAMnPBOAHHORO BocIpOnB3EdeHINr (ctp.19).
6 KhoIkn ynpaBneHnpecbbepom CD DISPLAY
HAnMHTeIJIpeKNEJIOUeHNHINCIIIEIPII HBOIPON3BcEHNHIN ECECN C CD IIN USB (CTP. 20).
FOLDER
HcnoIb3yIe IJIa BbOpa IIaIKN IIuCKa MP3/WMA IIIN 3aIOMHHaIOero yctpoIcTBA 6oJIbIOI eMKocTH USB (ctp.19).
MENU
HcIOJIb3yIte IJIg IOCTyIa K MeHIO.
MEMORY/PROGRAM
HcnoJIb3yIte ⅡIaIOMHHaHH HII INI pOgrpAMMnPOBaHH
INsKa MP3/WMA (ctp.19).
7 / / / (TUNE + / - ), ENTER
HcnoJIb3yIeI IaIb6Opa/NEpeKIOUeHNe HACTPOE KCHTEMbI KEPKMOB INI IOITBpeKJEnHeN DEiCTBN.
KHOIIKN TUNE +/- MOYT HcNOJIb3OBaTBcA DIII IOHcKa paIIOHocACTOT (ctp. 23).
8 PRESET + / -
IcnoJIb3yIeTJeIaBb6opa3aPOrpamMnPoBAHHxpaJHOCTAHII (ctp.24).
9 MUTE
OTKJIIOUeHHe/BKJIIOUeHHe 3ByKa (CTp.13).
10 Khonkn ynpablenbna Bocnpn3BeJeHneM
HcnoJIb3yIte IJIA yIpaBJIeHHa KaJdO hYHKIIeHIOce ee bIbOpa c HOMOIIbKO HONOK oYHKIIIN BxoJa (ctp. 17).
11 KhoIKN ynpaBneHn Tuner ST/MONO
HcnoJIb3yETcI,IIaIpeKIOUOHeHHpeKHMa 3BvUHnIMeKJy cTepeofoHNueCKHM mHOofoHNueCKHM peKHMamH (ctp.23).
RDS ASPM
HcnoJIb3yIte IJIA NOHCKA ATOBMATUHeckoi HA StcpoIKHa HnpEJaBPHTeJIbHO 3aONMHeHHBe IpOPIPMMb (paHIOCTaHH) IJIA cHcTeMBi RDS (ctp.24).
RDS PTY
HcnoIb3yETcTgIIIOHsKa TTHIOB IIPOrpaMM RDS (ctp. 24).
RDS DISPLAY
HaKMHTe DIIIpeKeIIOueHnI HcIIeR RDS dIy peKHMa HHΦopMaIHn (ctp. 24).
12 OPEN/CLOSE
HcnoJIb3yIte IJIg OTKpbITHa HJIH 3aKpbITHa JOTKa IJIg INCKOB (CTp.17).
13 KhoNkynpapBneHn 3Bykom
PeryinpyIOTKaueCTBO3Byka(cTp.13).
14 RANDOM
Bocipno3BeIeHHe IopOkeB cIyuaHoiIOscIeIOBaTeJIbHOCTn C CD, iPod HIN USB (ctp. 18).
15 REPEAT
Hajmte IJH3MeHeHHaCTpoIKNIOBTOPHOBOcIPOH3BeJeHHc CD, iPod HIN USB (ctp. 18).
16 Khonkn ynpabJeHnra Volume
HcnoJIb3yIteIpepyIINpOBKn yOpBnI rPOMKocTH npocIyIHHBaHHa (ctp.12).
17 DIMMER
PeyIINPOBKA JRPKCTN HcIIJIe. HeMeTcH YeTbIpe yPOBHa H3MeHeHHa JRPKCTH (ctp. 12).
Приимechаиме
KhoIIa BT AUDIO HeIOctYIIHa dIaHOrO aIIapata.
Akyctnuecka cnctema
1 BbICOKOaCToTHbI dHaMnK
2 Hn3KoOaCTOTHbI dHaMnK
3 Φa3oHHBepToPbHn npT

BAXHO
3aHTHpyeHTKgTPOKTOBOPRHeJHb3CHHMATb(X-HM13).
Ipn CHTNTHAaIHHTHnpeWTeKrPOMKOrOBOpHTeJIeYbEHNTEcB B OTCyTCTBHn KOHaTaKa Tc dHaappaMaMHrPOMKOrOBOpHTeJIeX (X-HM21).
PepednnaheB
1 Khonka STANDBY/ON
IcnoJIb3yETcI IaB BKJIOueHnpeCBnBepa HJI erO IpeKeJIIOueHnBpeKHM OKnJaHn (ctp.12).
2 DaTtHK DnCTaHcUHOHHoro ynpabHeHna
PnHHMaet cHHaJIbIOT NJIbTa YV.
3 HndkaTop TIMER
3aropaetcya, KOrla nHTaHHe yctpoiCTBa bKIOuHaeTcya, Ho aKTbHBpyeTcya YCTAHOBKA TaHMepa.
4 CnmboJbHbI dncJIpei
CM. Ducniew Ha ctp. 9.
5 PeryunpoBaHne rPOMKoCTn
HcnoJIb3yIte Iure peryJInpOBKn yOPOBBr rPOMKoCTn pOcIyIINBAHNI (ctp. 12).
6 KhoNka INPUT
HcnoIb3yetyraIbBb6opa HcToUHka BxoJa.
12 Khonka OTKpbITn/3aKpbITn JOTKa dIy DnCKOB
HcnoJIb3yIte IJIOtKpbITHn HIN 3aKpbITHn IOTKa IJIA INCKOB (ctp.17).
Ducnnei

1 ⑧
BbCBeuHBaetc npn pnpIyUHeHH 3Byka.
Приимechаиме
- 3NaOH II pHNH2IeHHe 3Byka 6yIeT OTo6paKaIbCkPacHbIM IIBETOM.
2
3aynck Bocnpoh3BedeHn.
3 II
Pay3a B BocipnoH3BeDeHHN.
4 ①
JaHeKHO BCTABTe KcJIeI rPOMKOTOBOPHTJIeB 3aKHMBI y6beITteC, TIO Ka6BeB He bIIaHaeI NT3aKHMa.
Приимецане
- MeKdY rPOMKOROBOpHTeJIaMn L H R HeT pa3HIIbI.
IopKJIIOUeHne aHTeHH
IIOKIOUHTe pamOCHyIO aHTENHy AM H IIOBPOLOUHY IO aHTENHy FM, KAK IIOKA3AO HNKe. JIa IyUyHIIeHN IIpHEMa H KaucECTBa 3bYka IOKIOUHTe BHeIIHNe aHTENHb (cm. pa3JIcI HcnoJb3o6aHue bneHHnX anmenn HnKe).
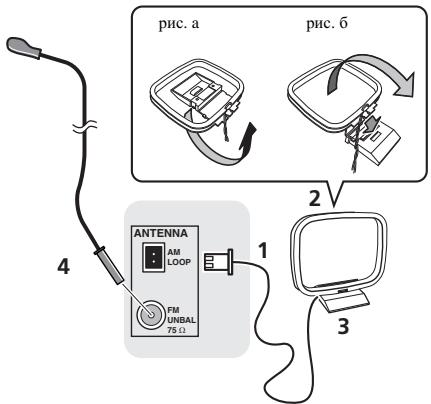
1 POncoeHnHTe npoBOa aHTehhbl AM.
PnIIOKJIIOUeHHN IepKHTecb 3a pa3bEmHyTO auctb Ka6eJIA.
2 PnKpeNtPe pAmOChyU aHTeHHy AM K cTeuaJIbHOI CTOnKe.
TuB6I pNkpeINHb aHTeHH K cTOniHK,OTOnHnTE cTOniKY B HnPaBJIeHH cTpeJHK (pHc. a), 3aTEM aKpeInHe pAmOuHyo aHTeHHa h CTOniE c NMOUHb 3aXmHa (pHc. 6).
3 YctaHOBnTe aHTeHHy AM Ha nlockyo NOBepxHocTb B HappaBneHn HauLyuWho npema.
4 PtoKIOHHTe npOBOnOHyo aHTEHy FM K pa3bemy aHTEHbI FM.
TuOblyuIyUHITbIpyHem,IOJIHOCTbIO BHTBNIte IPOBOLOUHyU anTHHnF FM II pKpEINTE ee K CTene HIN DBePBO pame. He OJONYCkAITE, TuObly aHTHeNA CBEIIHbAaLbA.HIN CIyTNbAiaLb.
IcnoJIb3OBAHHe BHeUHx aHTeHH
YnyuueHne kauecTba npnema FM
Длп IOДКЛЮЧЕНь ВЕПИЕМ FM-aHTeHнБИ HСПОЛБ3уг TE PALCOEDHHTEJB (ПринобетаETС OТДБЛБН).
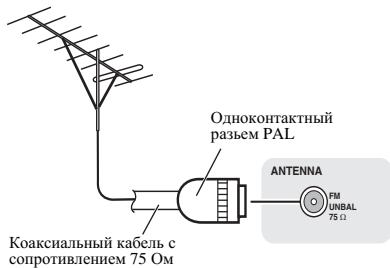
Поdkлочени
PNEyPExKDeHne
HcnoJIb3yIteToJIbKOKa6eJIbPiTHaIIIBBXOJaIIINB KOMIIIEKTIOCTABKNdAHHOrOyCTpoIcTBA.
HicnoIb3yInePiNlaAeMaJI Ka6EJI PtINAHnI ToJIbKO Iero pIpMOMY HAnaCHEnHIK,KAONIHCAHO INHe.
IpeE BbIIOJIeHHeM HJIH 3MMeHHeHm COeJIHHeH N BkJIIOUHTe IITAHNE H OTOeJIHHTe Ka6JIb IIITAHnO t cTeBO rpo3eTKH.
KoJla BbIIOJIeHHe BCEx CoOEJIHEnH 6yTeT 3aBepIeHo, BCTABtBE BIIky IITAHnHa YcToPiCTBa BpO3EtKY cETN IIpeEMEHOrO TOKA.

TnaBa 4:
Hauano pa6oTbI
ДяВКЮЧЕнЯ ПИТАнЯ
HaKMHTe KHOIIky 念 STANDBY/ONIJIBAKJIIOueHnIITaHnI.
Pocne nCnoJIb3OBAHnA:
HaKMHTe KHOIIky O STANDBY/ON, YTObI BOITN BpeKHM OKHJaHH.

Приимеанно
BpeKHMe OKHdHnA,ecHINIOJIKNIOUaTcE yCTPOICTBO iPod/iPhone/iPad, anHapat nepeKIIHOaTcB peKHM 3apJIKN.
Hacptponka yacob
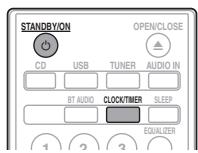
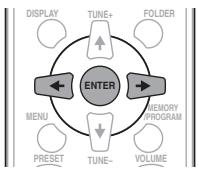
1 Haxmnte STANDBY/ON, yTo6bl BKIOUHTb NtAHne.
2 Haxmnte CLOCK/TIMER Ha nylte DnctaHcHOnHOro ynpabJeHHa.
HaTJIaBHomIINcIIIeOTo6paKaaTeCra CLOCK>
3 HaxmTe ENTER.
4 Haxmnte KhoNk ,yTo6bI yCTaHOBtB DeHb, 3aTeM haxmnte ENTER.
5 Haxmnte KhoNk ,yTo6bI yCTaHOBNTb acbI,3aTeM Haxmnte ENTER.
6 HaxMnte KhoNk ,YTObIyCTaHOBtB MHyTb,3aTeM HaxMnte ENTER nOdTBePxKDeHn.
7 Haxmnte ENTER.
PeryJInpOBka Tem6pa Hn3Knx/ BbICOKnx
yactOT
HaKMHTe BASS/TREBLE,3aTeM HaKMHTe / / ,TTO6bI oTepyIInpOBAt bH3KHe HINBbICOKHe qACTOTbI.
Приимechanicals
OIOHOBpeMeHHa pa6oTa EQUALIZER, P.BASS H BASS/TREBLLE HEBO3MOJHa. ByyT aKTHBbTo JToJIko Te yHKnHn, KOtOpIbe BV bB6pAln.
Ecnn Bbl BbIbnpaete Ondy n3 Tpex fynHKn,To o fynKnN, KOtOpBle He BblbpaHb, 6yDyT yctahOBJIeHb CJeDyOuM 06pa3OM.
1 EcIn Bbl N3MeHReTe HacTpoKn P.BASS (ON/OFF).
- EQUALIZER:FLAT
BASS/TREBLB: BASS = 0 TREBLE = 0
2 EcInn Bbl N3MeHReTe HAcTpoiKN EQUALIZER.
P.BASS:OFF
BASS/TREBLE: BASS=0, TREBLE=0
3 EcJIN Bbl N3MeHReTe HaCTpOuKn BASS/ TREBLE.
P.BASS:OFF
EQUALIZER:FLAT
HactpoKa TaMepa BkJIIOUeHnA
HcnoJIb3yETcraIIN H3MeHEnHRe TeKyuIeI yctaHOBKn Taimepa IIN IJIA yCTaHOBKN HOBOrTO taimepa.
1 Haxmnte STANDBY/ON, yTo6bl BkIIOHTb Ntahne.
2 HaxmTe u ydepXnBaIte KhoNky CLOCK/ TIMER.
3 Haxmnte KhoNk / ,YTO6bI Bb16paTb napamTp «ONCE» nnn «DALY》,3aTe m Haxmnte KhoNky ENTER.
ONCE -Cpa6aTbIbAeT TOJIbKO OINH pa3 B 3aDaHHoe BpeM. DAILY -Cpa6aTbIbAeT B 3aDaHHOE BpeM B 3aDaHHN duHb
4 Haxmnte KhoNk / ,yTo6bl Bbl6paTb napameTp «TIMER SET», 3aTe m Haxmnte ENTER.
5 Haxmnte KhoNk ,TO6bl Bbl6paTb NCTOCHNK BOCnpon3BeDeHnC TaMepom, 3aTeM Haxmnte ENTER.
B KauCTBE HCTOYHINCA BOIPOINBDEENHMOKHO BbI6pBATC,FD,AM,USB/iPod,USB,AUDIO IN H LINE
6 Haxmnte KhoNKn / ,yTo6bIyctaHOBnTb DeHb Ha TaMepe, 3aTeM Haxmnte ENTER.
7 Haxmnte KhoNk ,yTo6bI yCTaHOBNTb acbI, 3aTeM Haxmnte ENTER.
8 HaxMNTe KhoNKn / ,YTObIyCTaHOBnTb MNHyTb,3aTEM HaxMNTe ENTER.
- YCTAHOBHTE OKOHYATeJIbHO BpEMa, KAK OHnCaHO BIIarax 7 H 8 BIIHae.
9 OtperynnpyIte rpmKocTb HaxaTneM VOLUME + / - 3atem haxmTe ENTER.
10 Haxmte KhoNky STANDBY/ON, yTo6bI BOITN B peKIM OxndaHna.
3aropaetcHnHnKaTOp TIMER.
Bb3OB TaMepa BKJIIOueHnA
Tekyuio yctaHOky TaMepa MoKHO HcIOJIb3OBaTb MHOrOkaTHo.
1 BbInOpHnTe 7aun c 1 Do 3 B pa3dene «Setting the wake-up timer>.
2 HaxmTe / BBi6epnTe «TIMER ON» n HaxmTe ENTER.
OTmeHa TaMepa BkIIOUeHnA
BbKJIIOUeHHe TaIMepa.
1 BbINOJIHnTe 7aIc 1 Do 3 B pa3dene «Setting the wake-up timer>.
2 HaxmTe / = BBI6epnte «TIMER OFF» n HaxmTe ENTER.
NcNoIb3OBAHne TaIMepa BKJIUChENIA
1 Haxmnte STANDBY/ON, yTo6bl BbIKIOUHTb NITaHne.
2 Pn HactynIeHn BpeMeHn BKIOueHn DaHHoe yCTpoICTBO aBTOMaTNUeCKN BKIOUHTcN HaCHET BOCIpON3BeDeHne Ha BbIbpaHHo FyHKuIN BXOJa.

Приимеанne
Ecln BO Bpemr BKIOHcENH iPod/iPhone/iPad He NOKJIIOUeH KAnapATy, HIN HE CtBANHENCK, Anipat BKIOHTcR, HO He 6yET BCIOPNHOBDIHTD OPOOxKY.
HeKOTOpBleIINCKH HeMOrT BOCIIPOH3BOIDHTbCABTOMATNuecckn IIpH HAcTuJIeHHBpeMeHH BKIOUeHHe.
Ipny cystaHOBKe taHEpMa 3aBaBaHTe He MHeeO OJHOHNMHUYt MeKdy BpeMeHn HauJaA OKOHuaHH.
IcnojIb3OBAHne TaMepa
OTKJIIOUOHeHnA
TaiHempOTKIOHOENIOTIOAeYCTPOINCTBOYepe3 3aJAHnBII nepHOI BVPeMHN,IO3BOJIAN CIOKOIOHO 3aCINbATb,He6cIOKOBcO HEOxIOIOMOCTB BVIKIOHOEHVCTOBA.
1 Haxmnte SLEEP HeckoIbko pa3, YTo6bl BblpaTb BpeM OTKJIOUeHn.
Bb6epHTe MeKJy 3HueENHmB MmHytax 10 min, 20 min, 30 min, 60 min, 90 min, 120 min, 150 min, 180 min HIN OFF (BbIK). BBohBa 3aJaHHoe 3aHuEHe nOt6paXaetcB TceUHe 3 cekyHd, NocIe YTO BbIOJIHeHHe NaCTpOHKn 3AbePHeNo.

Приимеанne
TaimepOTKJIOCHENMOKOHTCYAHOBHTB HAKATHESEM SLEEP BO BPEMA OT60P6AKeHHO OCTABIIEOTC BPEMHEN.
IcnoJb3OBAHne HayuHNKOB
BctabBeIITeKepeHayIIHHKOBΓHe3IO.
\Pi\Pi\NII\KIOUeHHH NAYIHHNKOB 3bYk He 6y JET BOCIIPOH3B0DHTBCJYepe3 rPOMKOROBOPHTJIe.
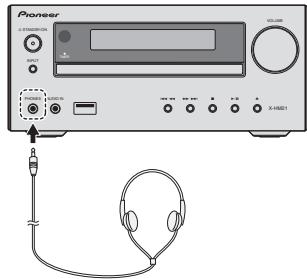
He BKJIOnaHaTepMOKocTb HaIOJIHyO MOIIHOCTb IIpH BKJIOneHH AnIiApata H cIyIaHTe My3IbKy IIpH cpeIHx yPoBHX TpOMKoCTn. H3bItoYHOc 3ByKOe DaJIeHNHe H3 HayIIHHKOB H IToJBOhBX TeIefoHOB MoKeT Bb3BaTb NtOeH O cIyxa.
IpeHIOJIKIOHEHEM HIN OTKIOHOEHN HAYIHHKOB YMeHIIHITRE TPOMKOCTb.
Y6eJITecb, YTO BAIIH HAYIHHKIN HMEIOIT TEIEKEP INAMETpOM 3,5 MM NHMIEAHCOT 16do 50 OM. PekomeHJUeMbIMNHEAHC COCTABJIET 32 OM.
3BykOT iPod/iPhone/iPad He cIbIeH epe3 HauHHKN, pIckIIOHueHNbE K aIIAPATy. Ecln Iprn BIVoBope yHKINi iPod/iPhone bblbIKIOUaete rPOMKOrOBOpHTeJH, oTO6pa3NTcR HINDKAuaN 《HP MUTE》.
TnaBa 5:
Воссанзveдени iPod/iPhone/iPad (Товко X-HM21)
Iprodctoe IIOcoeINHHe iPod/iPhone/iPad K daHHOMy yctroBCTYIOB3OJIeT IPOCJILMBATb BcOKOKaueCTBeHHbI 3ByK c iPod/iPhone/iPad. HactpoJIka BocIpOnH3BeDeHNMa3bIKn dIy iPod/iPhone iPad MoKeT bIIIOJIHTbc J daHHOrO aIInapata nnCaMOrO yctroBCTBa iPod/iPhone/iPad.
Ecln iPod/iPhone/iPad nIcknoaetcK, KOrJa dAnhbl anaparBkIoUenBocpon3BeJeHne iPod/iPhone/iPad he HauHETc.
2 Haxmnte USB dnn BbIbopa B KauecTBe BXoDHoro NCTOCHNka.
Ha oCHOBHOM INCIIIEIPOKA3bIBaETcN HINKAAIIH «USB/iPod»
EeHJN HOTMOKHOCTHnupaJIbIbIy IPod/IFhone/IPad,IpOBeIpe CcJeDHyIe PAnpAmETBy;
- IpaBnJIbHO JIN IOJKNIOUCh eH iPod/iPhone/iPad?
IpepeoIcOeIHHte iPod/iPhone/iPad k yctpoiCTBy. - He 3aBnC JI iPod/iPhone/iPad? PIIopno6yIte BbIIOJIHITb 6cbpoc nactpoek iPod/iPhone/iPad H nepeNoCoEOJIHNHTe iPod/iPhone/iPad K yctroiCTBy.
TnaBa6:
Bocnpon3VeJeHne Dncka
B3toi chTeMe MOrT BocipnoH3BOJHTbcSTaHdaptThbe Jnckn CD,CD-R/RWbΦopMaTe CD n CD-R/Rw cΦaiJAMn MP3 HnI WMA,Ho 3aIIncb Ha HxN HebO3MoKHa. HeKOTOpBe IINCHn ayINO CD-Rn CD-RW MOrT HE BocipnoH3BOJHTbcN3-3aCOtO8HH IINCKa HnI yCTPOJIcTBa,HCIOJIbYeMOrO,IJIa3INCh.
MP3:
MP3 JBIAEETcFOpMAtOM cKaTThN.3To a6bpeBnATpya, KOtOpar o603aHaayet MPEG Audio Layer 3. MP3 IpeCTABIeTTHn ayHIO KOdeKa,KOTOpByO pb6aTaBHaTeC co 3HaUHTeJIbHM cKaTHeM OT IepBOAHLBOY aUYHOHCTOUYHk PnP OueHb MaJbX IOTeRbX B KaueCTB 3BuYaHHN.
NoBToPHOe BocnpOn3BeDeHne
ПИ ВОТБОН BOCIPIN3BDEHIN MOKHO HENPEPBHBO BOCIPIN3BOINTO INJDOPOKKY, CBE DOPOKKH HIN DOPOKKH B 3ANIPORMAMPINOBAHN IONCJEIOBADATEBJHOCTN.
Дявocmpon3BedeHnBCExDopOExKВ cIyauHNoInocJeDoBaTeNbHOCTN:
HaKMHTE NOECIOK PO3 RANDOM. IOKA HE IOBHTTCA HINHDIKAHNI 'RANDON ON'. HaKMHTE ENTER.
ДягOTмениВOCПОНЗБЕDEньВСЛЧУЙНО NOcNeIOBATEJIbHOCTN:
HauKmHTE NcEkoB p3A RANDOM. NOKA He NoIaBHITcN HnIHuaKINe RANDOM OFF). HauKmHTE ENTER.
PpimMeaHne
Ecln KhoIIKa 1 HaxHMaertcB0 BpEm BocIpnO3BeJeHHN B CUYaJHIO HOJIeLOBaTEJIbHOCTN,MOKHO IpeHTN Ha cIeIyUoiYBObpaHHyIOpOKkYBpeKHe MOCIpON3BeEHN B CUYaJHIO HOJIeLOBaTeJIbHOCTN. B To JxBEpM,KHOIIKa! He IO3BOJAEITpeIeHTN Ha IIpebldyUIOpoKky. Byet OIIpeJIeHE MoCTo HauJIa BOCIpON3BOHMIOI DOpOKkN
-Пив ВОсIPINOB3BEDEHNN B CIVUayaHNoI NOcJIeOBAteJIbHOCTN yTOPICTBO 6yET BHyIOHPaT b I PNOHRpBaT b IOPOJKKY ABTOMATHeCckN.(HeJIb3A BHyIOHPaT IOcJIeOBATeJIbHOCTb IIOPOJKeK.)
- Bo vpeHMA BocPOnH3BeDHeN B ClyuHHOI NOEIOBATEJIbHOCTN NIOPTropHE BOCPOnH3BeDHe HEB03MOKHO.
3aInporpaMMPOBaHHoe BocIpOn3BeJeHne (CD nJn MP3/WMA)
MozhoKcIeJIbTbO32BbI6OBuI IIOBCIpOn3BeENHbI KjaEaMeON HocIEIOBaTeJIbHOCT.
1 B pexmme ocTaHOBKn HaxMnTe KhoNkY MEMORY/PROGRAM Ha nyIbTe Dy, YTo6bl BOITN B pexm coXpaHeHn npOrpamMbI.
2 HaxmTe KhONK I▶▶I nnuΦpObIe KhONK Ha nIbTe Dy IaBbIbopa Tpe6yeMbIX dopoKe.
3 Haxmnte ENTER yTo6bI coXpaHnITb Homep nankn iDopokk.
4 NOBTOPHe 3n2 n3 npynx nanok/ dopoKe. MoXHo 3anporpammnpoBaTb do 32 dopoKe.
EJCNBbXoTHTNEPOBPHTbIaONPAMMPOBAHJIHe JOpOJKKn, HAKMITEK KHNONk MEMORY/PROGRAM.
ПиошбokeMOKHOOTMEHHTBIOCEHNE 3aIporpaMMHPOBAHHbdoPOKKH,Hakab KHOIKY CLEAR.
5 HaxmTe KhoNky II nla Hauana Bocnpoun3BeDenia.
2 NOBTOPHO HAXMITE KONKY PRESET +/— npn 06hapuyxhen nn XeJaemc CTaHcnn.
IcnoJIb3OBAHnE CnCTeMbI paNoDaHHbIX (RDS)
3HaKOMCTBO C cHcTeMoR RDS
CnCTema paIIOHaIbHbIX (RDS) -3TO cHCTema, KOtOpa IcNIOJIb3yeTcE 6OJIbIIHHCTBOM paIIOCTaHIIN B IIaIaIa3OHe FM IJIpeIOCTaJIeHH CJIyIaTIeJIIM paI3JIIVHOH HfOpMaIHIN - HApIMeP, HA3BaIIHH paIIOCTaHIIN III IN TpaHCIIpyEmoi IIporpAMMbI.
OJHOH H3 yHKHHI cHCTeMbRDS YBJIeTc8 Bo3MOJXHOCTb IONKCA tCTAHINU, TpAChIYNUOIIe Tpe6yEMb TMN IporpAMMb. HanPmep, MOJHO OCUyIeCTBtBIOHKC tAHHINU, KOTOPAR TpAHNCIPYET IporpAMMb B JxHape JAZZ (Jka3).
Mozho BeCTH IOHCK IporpAMM CJIeIyIOHx TINIOB:
News - HOBOCTH
Current Affairs - Tekyüne co6btyh#
Information-InnΦopmaHsIaSport-cnpr
Education - o6p3a0BATEIbHAA HHOpMaUH
Drama -paHOCNEKTAJIH N.T.I.
Cultures - NaHIOHaJIbHaN MeCTHaK KyIbTpyHaJxH3b, TeATpH T.I.D.
Science-Hayka H TexHHKA
Varied Speech -IPOrpaMMbI, NocTPOEHNHe HA 6ececE HIN OHIIHHH, HAPHPMEBHKTOPHNH IIHN HHTPBcII.
Pop Music - MY-MY3BkBA Rock Music DOK-MY3BkBA
Easy Listening - Jęrka Му二字ka
Light Classics M-JeKAKJIKAChueKcKaMyBka
Serious Classics - cepb3HAA KJIACCSUeCKA My3Ha Ka
Other Music - MY3bIka, He COOTBETCTBYIOJIaII IpeuCIEJIHHM KATEOPHIM
Weather & Metr - CBOJKN INIPOGRHO3BIOFOJIO
Finance - 6HpKBeIbe CbOJIK, KOMMpeUccka, TOPoBraJ HnHfOpMaunu n T.I.
Children's Progs -Iporpammbia Juaeietei
Social Affairs - 0613eCTBENHAA JINHb
Religion - prpoqammbmo o peJIHHI
PhoneIn-ⅡpOgpaMMbI,
IpeIyCMAtpRbAoiUHHe
0cbcJxDHeNk KaKoJI-NbO TeMbI N
0b6IeHHe co cIyIaTcIaYMaII Mn
TeJIeOphO
Travel & Touring
IyTeIIeCTBnH NOTbIX
Leisure & Hobby - Cbo60dHoeB BPEM, HHTTEpeCbI Xo66H
National Music - nonyuaepnma Mybka He na anhuiqomKJbMa
Oldies Music - nonyIaRnA yMaIka 1950-x H 1960-x RoDoB
Folk Music - HapoDIIaM My3bKa Documentary
Iy6JIHnCTHueckHe IpoPpamMbI
Alarm Test - TpaHcIaIIa II pHi TecTnPoBaHHa ABapHOrO BeHaTeJIbHOrO O6OpyDoBaHHa HII INP PHeMHbIX YctPOCTb.
Alarm - TpeBora!
POnsck PnporpaMM cnCTembl paHnoDaHHbIX RDS
MoKHO oOcIeCTBHTb IOHCK TINOB IporpAMM, IpeEHCAJIeHHBX BvIIIE.
1 HaxmTe TUNER Ha nyIbTe DnCTaHcUHOHHoro ynpaBHeHra.
- ChTeMa RDS IOctTuHa ToJIbKO B DHaIa3OHe FM.
2 Haxmnte RDS PTY Ha npIbTe DnCTaHcUNHOHorO ynpabHeHna.
HnHKaIHa «SELECT» IIOBHTcI pHMePHO Ha 6 cKeYH.
3 HaxmTe / IyBb6opa TnnporpaMMbl, KOTOpYIOXoTNe npocnywaTb.
Пи Кадом Икайтей Коньн Будг.TИКОЗБВТСТI ПИрогамь.Есл.KHINΚИGAУДЕРКHABAETC,TIH.NIрогамьБудг.TI NOK3AIBBtE.HIJIPEPbBHO.
4 Bo Bpem OTo6paKeHnBbI6paHHoro TnnporpaMMbl (B TeueHne 6 cekyHd), NOBtOpHo haxMnte KhoNky RDS PTY.
IIOse 3aogopanHH B TeueHNe 2 cekyHn Bb6paHNO Tnna IporpamMbI, IOBHTC HNINKaIIH «SEARCH», N haunHertc OIepaHH NOnckA.
PpimMeaHne
Ecln HnHnKaaHna Ha nCnIepe InepcTaJa MHrTaB, 3aNcyTHe OneapAIOHO CHOBA c mra 2. Ecln AnIInapat haoJIn TKeJAEMb TNI pIPOpAMMb, To IIPMePno HA 8 cKyHd 3aOPIHTc COOTBETCTBYoUHIN Homep KAHaja, H 3aTeM OTo6pa3ITc HnBaHHe CTAnHH.
Ecln Heo6xoJHMO IpocLyIaHTb aHaJIOrHHyBTHI IIpOpaMbI dyFOyTcStAHN, HAKMITE KHOINky RDS PTY BO BPEM MHIraHHoHEMApeKahJaH NIK HABaHNr cTAHHN. YcTroHCTBO 6yET bblnoJIHTb IOHNc CJIeDyOHne CTAHN.
- Ecln He naiyeho HnaKaoCTaHINH, Na 4 cekyHbI IOBBNTcH NHHKAIAA «NOT FOUND’.
HnΦopMaun. npeIOCTaBIAeMa cnCTemO RDS
KaJbIpa3,KoTgHaNaHMaetcKaKHOIIaRDS DISPLAY,INcIIeIb6ydtpeKIOUpaTbcSJeTyUIMHM o6pa3OM:
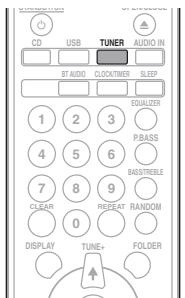
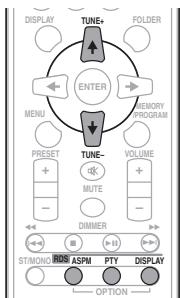

Ecln HeKOTOpbIe cTaHINH yJKe coXpaHEnb I pAmTt, YHcLIO HObIX CTaHII, KOTOpBIE MOJHO coXpaHHTb, 6yTeT MeHbIe.
1 HaxmTe TUNER Ha nyIbTe DnCTaHcNoHHoro ynpabJeHna.
2 HaxmTe n yepKuBaIe KhoNky RDS ASPHa npIbTe D.
IocJIe MngHnHn HnHnKaaHnN ASPM B TceHHe IpnHmepHo 4 cekyH,3aynCTTcKcAHHoBaanhe (87,5Mgdo108Mg). IocJIe cKaHHoBaanHnHa nHnCIIeB TceHne 4 cekyH6ydet OTObpaKaHTbcnHcO tcaHN, coxpaAHenHbX bHAMrH, n 3aTeM Ha 4 cekyHbIOBHTBCnHnHKaHnN END).
PpimeyaHn no pexmmy RDS
Ecnn nponcxoanT IIO6oe n3 cneyuouxu co6bItn, 3TO He O3NaHaet, YTO yCTpOcnCTBO HncnpaBHO:
IIOOhepeHIO IOBIIOTHOINI HUJIHAIJIINI 公 S X ^ N NO PS I HABAHBE TcAHIHN, IN Y BCTAHOBIEHNOHOPNJIDK.
EclnOpIeJIeHHeCTAHINHEBVAeAETJIOJIXHMbO6p3OM HnHa CTAnIHINPOBOJATcNbHbTARHH, yHkyKIIHIpHema RDS MoKet paoBtart HeHNpaBInbHO.
EclnPnHHMaTeCSTAHIIHRSDcCLIHKOMCJIabMnCHIaHOM,MOKet He OTo6paKaTbCe TAKA HNoFOpMaHIN,KAH3BaHHeCTaHINH.
HINDKAHHN<NOPS》,
PpimueaHn no paadnoTeKcTy:
IIOBARCTCIIePBbIe 16CHMBOJIOBpaIHOTeKCTaH3aTEMOH 6yUIT IPOKpyHBATbcIIO HcHcJIIEo.
- Пин Нстрике на CTаино RSA, котора не петдает раднотекг,обетотображатая сндкаша «NO RT» ппн петрлійчени на радноцу раднотекта.
EciHINHHMaOTcDAHIIbIe paHIOTeKCTa HINH3MeHReTcCoIEpKaHHe TKeCTa,HaNCHIIe 6yET OTO6paKaTbCnHINHkAni
Pa3d9:
Другne поКлоченья
PNEyPExEHE
IpeBbHIOJIHEHHEMHJIN3MHeHHEMcOeIIHHENBIKIOUHTE INTAHNHe NOTCOeIHINHTe Ka6eJIb IINTAHNOrOT cTeB0BPO3ETKN.
IOnCoeINHeHne DOnOJIHNTeJIbHbIX KOMNHOENTOB
Плклочп МHHH-pa3bem AUDIO IN ha IIpeJHeIи ПаHeII K BCINOMORATElbHOMY KOMIOHEHTY BOCIIPOH3BedeHn.
ДааньметOD можно HcIOJIb3OBaTь Дл рОнгьВАИЗ Музык ha 3OM anIIaparé c yctpoIcTBa iPod/iPhone/iPad, КOTOPOE He ПОДержИБаert HcIOJIb3OBaHHe DOK-cTaHIIN iPod n pa3bema USB.
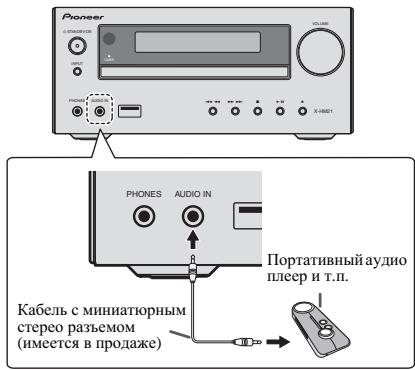
1 Haxmnte AUDIO IN nBbIbopa B KaueCTBe BXOdHOro NcToUHNka.
KorlaBbHpaetcAUDIO IN,HaOCHOBOMIHCIIeee OTObpaKaetc HNJHKaIIra «AUDIO IN»
Приимechаиме
EcnI rHe3IO IyMmHH-IIIeKepa AUDIO IN IOIOcoEHHHeO KTH3UY DIOJOLHHTeBbHX HAYUHHKOB, yPOBEHrPOMKCTN DAHHORoYcPOTbTB 6dEyETPERIPHOaRBA C COOTBETCTBBn CypOBHEr POMKCTN BOCpON3BOJaIeTO KCMIOHeHa. EIN 3yBk HApuyAeTc NocLe IOHNKeHrPOMKCTN yCtPOIcTBa,IOIIpOByTe CnH3Hb TpOMKcTb Ha BCINOMOrATEJIbHM KomOIOHeTE BOCpON3BeDEHeH.
Плклочтгнэдaylno LINE IN ha3aHneпанлк BCNOMORATElbHOMY KOMIOHeHTy BOCPON3BcEHeHH.
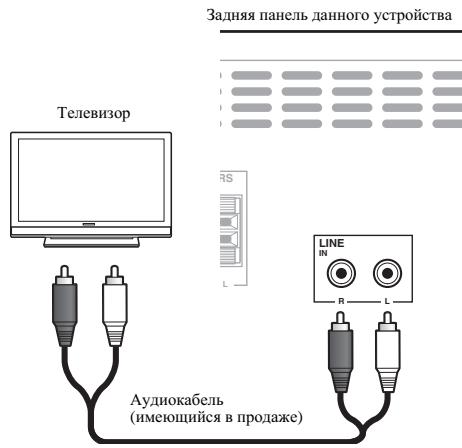
1 Haxmnte IBa pa3a AUDIO IN IJa BbIbopa Ba KaueCTBe BXoHOrO NcToUHnKa.
KorJa BbBnBaPaeTcL NEA, HA OCHOBHOM HcNJIeE OTObpaKaetcH INHINKAAH«LNE
Глaba 10:
Bocnpo3BoDnMbIe DnCKNΦOpMaTbI
C6poc Bcex HacTpoek Ha 3NaYeHnNo yMOnuHaHIO
Дя ВOCCTaHOBJIeHnB BCEx HAcTpoE Kу yMOJUHaHHIO BbIIOJIHHTe DeIeCTBnA, OIIHCaHHBe HNKe.
1 Haxmnte STANDBY/ON, yTo6bl BKJIouHtB nTuHne.
2 HaxmTe CD Ha nyIbTe Dn HeckoJbKo pa3 KhoNky INPUT Ha ochOBHm 6Noke, YTO6bl BbIbpaTb yHKuNIO CD.
3 HaxmTe OPEN/CLOSE, yTo6bI OTkpblb IOTOK dnnckOB.
4 HaxmTe STANDBY/ON, Haxmma npn 3TOM.
HcnoI3yIe KhoONKHa BexPHN HnAeHN yCTPOIcTBA. IIOKA nIeT
IpoIeCC BCocTHAOJIeHN HAcTOpeOK, OTObApKaetc
TexHnueckne xapaKTepeNCTNKn
- ycnjnteJb
BbIXOHaHpeIeNKeBAIpaTHueckaMoIIOHcTb: 15BT+15BT (1KtU,10%Ko3ΦΦHneHTrApoMHK,8OM)
- Cekzna Tiohepa
JACTOJIINHANAOH(FM).87.5MTIO108MTI BxOI ANTEHNJ (FM).75 OM HeC6aIAHNCPOBAAHH JACTOINHINHANAOH(AM) 522KTIIO1620KIT AHTENHA (AM). PAMOVAAANTENHA
OctaJIbHoe
Pazbem USB (X-HM21) .5V,2,1A
Pazbem USB (X-HM11) .5V,500mA
Hctouhik IIHTAHN
.OT 220Bdo 240B IpepeMeHHoro ToKa,50Tg/60Tg
Iotpe6JIeMaMA MoIHOCtB BkIOHeHE IIHTAHN (X-HM21) .30BT BkIOHeHE IIHTAHN (X-HM11) .21BT MoIHOCtB B peKHMe OJHADAHN .0,5BT HIN MeHIIIE
Pazmepb. 215 MM (III) X95 MM (B) x 315 MM (G)
Bec (63 yIaKOBKn) .2,0Kr
- FrpomkororobopnteB (S-HM21)
AkyCTHuecka CHCTema c MaTHHTbIM 3KpaHHPOBaHHem
THI ChTeMa rPOMKOrOBOpHTeJIe 2-IOIOCHOTO THII
BucKOcOHaCTOTnIHb IrPoMKOrOBOpHTeJIb 5 CM
HH3KoUAcTOTnIHb DnHaMnK 10 cm
MaCKmHaJIbH BxOJHAR MoIHocb 15 Bt
ConpoTHBJIeHne 8OM
Pa3Mebp. .130 MM (III) x 211,5 MM (B) x 240 MM (T)
Bec. 2,0 Kf/kakJd
- Frpomkorobopntb (S-HM11)
AkyctHuecka CnCTema c MaTHHTbIM 3KpaHnpoBaHHem
THI ChTema rPOMKOrOBOpHTeJIe 2-IOIoCHOTo THII
IIbe3OJIeKTPhueckN BbKOcOAcT0THb IINHaMHK
HN3KOAcTOTThb DInHaMHK 10cm
MaKcHMJIbHb BXOJHAR MOIOHcB .15Bt
ConpoTHBJIeHne .8OM
Pa3Mepb. .130 MM (III) x 212 MM (B) x 228,5 MM (F)
Bec. 2,0 Kf/kakJd
-Пинадлесхости
Пиьт дисанонногу упраьлени.. 1
Батарейки AAA (R03) . 2
Ka6eь aHTeHbI AM. 1
IproBoLOUChA anTeHnA FM. 1
Ka6eь ПИТANHnA
IoDcTBkДд iPad (ToJIbKO X-HM21)
TepaHTnHbI ceTpHnKAT
IhCtPyKIIIN IO KcIIJyAtaIIIN (dAnHHb IdoKymeHT)
Приимейанne
- TexHHueckHe xapaKtepeHCTKNyka3AHbI ynaHapRKeHHN 230 B.
B C83H C NOCTOHHM CopepeHCTBOHAHN M 13eJIIN TEXHHueCKeH XapeKtepHCTKN H KOHCTpyKJHMOI MOYT 6bTb HMEHEHb63 peBdAPHTeBJHOr yEboLMeJHn.
© PIONEER CORPORATION, 2012.
Bce npaba 3aunuiehbl.
10 (DonoJIHNTeJIbHaI INΦOpMaζη
http://www.pioneer.co.uk
http://www.pioneer.fr
http://www.pioneer.de
http://www.pioneer.it
http://www.pioneer.nl
http://www.pioneer.be
http://www.pioneer.es
http://www.pioneer-rus.ru
http://www.pioneer.eu
© 2012 PIONEER CORPORATION.
All rights reserved.
© 2012 PIONEER CORPORATION.
PIONEER ELECTRONICS (USA) INC.
P.O. BOX 1540, Long Beach, California 90801-1540, U.S.A. TEL: (800) 421-1404
PIONEER ELECTRONICS OF CANADA, INC.
340 Ferrier Street, Unit 2, Markham, Ontario L3R 2Z5, Canada TEL: 1-877-283-5901, 905-479-4411
PIONEER EUROPE NV
Haven 1087, Keetberglaan 1, B-9120 Melsele, Belgium TEL: 03/570.05.11
PIONEER ELECTRONICS ASIACENTRE PTE. LTD.
253 Alexandra Road, #04-01, Singapore 159936 TEL: 65-6472-7555
PIONEER ELECTRONICS AUSTRALIA PTY. LTD.
5 Arco Lane, Heatherton, Victoria, 3202, Australia, TEL: (03) 9586-6300
PIONEER ELECTRONICS DE MEXICO S.A. DE C.V.
Blvd.Manuel Avila Camacho 138 10 piso Col.Lomas de Chapultepec, Mexico, D.F. 11000 TEL: 55-9178-4270
K002_B4_Ru