Master Room - Steam cleaner FAKIR - Free user manual and instructions
Find the device manual for free Master Room FAKIR in PDF.

User questions about Master Room FAKIR
0 question about this device. Answer the ones you know or ask your own.
Ask a new question about this device
Download the instructions for your Steam cleaner in PDF format for free! Find your manual Master Room - FAKIR and take your electronic device back in hand. On this page are published all the documents necessary for the use of your device. Master Room by FAKIR.
USER MANUAL Master Room FAKIR
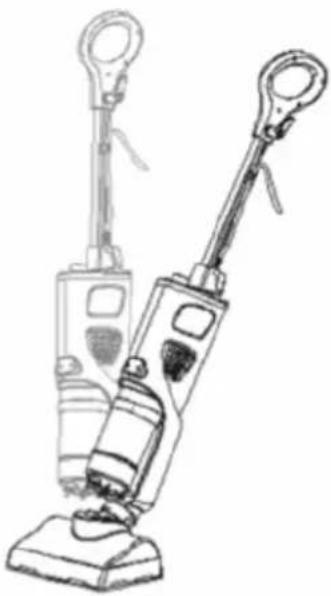
Vacuum Steam Cleaner
natural_image
White vacuum cleaner with attached black handle and brand logo, no visible text or symbols on device bodyGenel....3
natural_image
Simple line drawing of an open box with an upward arrow, no text or symbols present
UYARI!
text_image
Technical diagram of a vacuum cleaner with labeled parts including base, casing, and componentsnatural_image
3D rendered diagram of a mechanical component with no visible text or symbols
natural_image
Circular diagram with concentric rings and a curved arrow, no text or symbols present
ÖNEMLİ!
natural_image
Line drawing of a pair of electric toothbrushes (no text or symbols)text_image
Diagram showing five steps of a vacuum cleaner's internal components and their application, with numbered labels and a control panel inset.natural_image
Illustration of a vacuum cleaner with attached circuit board and base, showing internal components (no text or symbols)natural_image
Line drawing of a handheld vacuum cleaner with an inset close-up showing the component detail (no text or symbols)natural_image
Line drawing of a vacuum cleaner with handle and base (no text or symbols)text_image
Diagram illustrating three-step laboratory procedure for measuring a sample using a pressure gauge and pipette, with labeled steps 1, 2, and 3.Muhafaza
text_image
Diagram showing two steps of a cleaning or repair process: step 1 contains a tray with filter, switch, camera, and document icons, while step 2 depicts hand positioning and surface marking.MİKROFİBER TEMİZLİK BEZİNİ HERZAMAN YENİ GİBİ MUHAFAZA EDİNİZ.
Information about the operating instructions....16
Liability....16
Safety is important 16
Notices in the operating instructions....16
Important Safeguards....17
CE Declaration of Conformity....17
Usage Area....17
Unauthorized Use 17
Safety Instructions....17
Assembly....20
Unpacking and first use....20
Technical Specifications....20
Product Description....20
Usage....21
Vacuum mode....21
Steam mode 23
Cleaning and Maintenance ....24
Storage 25
Troubleshooting....26
Disposal....27
Dispatch....27
Thank you for purchasing Fakir Room Master Vacuum Steam Cleaner. It was developed and manufactured to work reliably for many years.
Information about the operating instructions
These operating instructions are intended to enable the safe and proper handling and operation of the appliance.
Read these operating instructions carefully before using the appliance for the first time.
Keep the operating instructions in a safe place. Include these operating instructions when passing the appliance on to another user.
Liability Fakir Elektrikli Ev Aletleri Dış Tic. A.Ş. will accept no
liability for damages resulting from failure to comply with the operating instructions and cannot assume any liability in case the appliance is used for other purposes than its intended use or handled, repaired or serviced improperly.
Safety is important For yours and others safety please read the instructions
before using the appliance. Please keep this instruction in a safe place for the further use. If you pass the appliance on, pass on the instructions too. Remove all packaging, but keep it until you are satisfied that the appliance is working.
Notices in the operating instructions

WARNING!
Indicates notices which, if ignored, can result in risk of in jury or death.

ATTENTION!
Indicates notices of risks that can result in damage to the appliance.

NOTICE!
Emphasizes tips and other useful information in the operating instructions.
CE Declaration of Conformity
This appliance fulfills the requirements of the Appliance and Product Safety Law (GPSG) and the EU Directives. 2004/108/EC "Electromagnetic Compatibility" and 2006/95/EC "Low-Voltage Directive". The appliance bears the CE mark on the rating plate.
Usage Area This product designed for just household use. It is not suitable for Business and industry type. Otherwise it will be accepted as “out of warranty conditions” by our Authorized Services.
Unauthorized Use The examples of unauthorized use listed here can result in malfunctions, damage to the appliance or personal injury: This appliance is not designed to be used by persons (including children) with limited physical, sensory or mental capacities or by persons lacking in experience and/or knowledge, unless they are supervised by someone who is responsible for their safety or have received instructions on how to use the appliance. Children should be supervised to ensure that they do not play with the appliance. Children should be supervised to ensure that they do not play with the appliance. Home appliances are not toys for children! Therefore, use and store the appliance away from the reach of children. Children do not recognize the danger involved with handling an appliance. Keep packaging films away from children - danger of suffocation!
Safety Instructions 1. Use the system only for its intended use.
- DO NOT use outdoors.
- DO NOT leave the appliance unattended when plugged in. Always unplug the power cord from the electrical outlet when not in use and before servicing.
- DO NOT allow the appliance to be used by children. Close attention is necessary when used by or near children, pets or plants.
- Use only as described in this manual.
-
Use only manufacturer's recommended accessories.
-
DO NOT operate the appliance with a damaged plug or cord, or if the unit has been dropped or damaged. To avoid the risk of electric shock, do not disassemble or attempt to repair the appliance on your own. Incorrect re-assembly or repair can cause a risk of electrical shock or injury to persons when the appliance is used.
- To protect against a risk of electric shock, DO NOT immerse the steam mop into water or any other liquids.
- DO NOT handle plug or steam mop with wet hands or operate appliance without shoes.
- DO NOT pull or carry by power cord, use power cord as handle, close a door on the power cord, or pull it around sharp edges or corners. Keep it away from heated surfaces.
- DO NOT unplug by pulling on power cord. To unplug, grasp the plug not the power cord. Do not use extension cords or outlets with inadequate current carrying capacity.
- DO NOT put any objects into openings. Do not use with any opening blocked.
- DO NOT put hands or feet under the steam mop. Unit gets very hot.
- DO NOT use on leather, wax polished furniture or floors, synthetic fabrics, velvet or other delicate, steam sensitive materials.
- DO NOT add cleaning solutions, scented perfumes, oils or any other chemicals to the water used in this appliance as this may damage the unit or make it unsafe for use. If you live in a hard water area, we recommend using distilled water in your steam mop.
- When in use, NEVER turn the appliance over or on its side.
- NEVER DIRECT STEAM TOWARDS PEOPLE, ANIMALS OR PLANTS.
- NEVER LEAVE THE STEAM MOP IN ONE SPOT ON ANY SURFACE FOR ANY PERIOD OF TIME WHEN MICRO-FIBER POCKET IS ATTACHED.
- Carefully remove the microfiber pocket immediately after you have unplugged and allowed the appliance to cool.
-
When cleaning the steam mop, unplug the power cord from the electrical outlet and clean with a dry or damp cloth. Do not pour water or use alcohol, benzene or paint thinner on the unit.
-
Extreme caution should be exercised when using this appliance to clean stairs. Never use steam mop without microfiber pocket attached.
- Store steam mop indoors in a cool, dry place.
- To avoid circuit overload, do not operate another appliance on the same socket (circuit) as the steam cleaner.
- If an extension cord is absolutely necessary, an extension cord rated a minimum of 2.5mm2 cord and 4m in length should be used. Cords rated for less amperage may overheat. Care should be taken to arrange cord so that it can not be pulled or tripped over.
- DO NOT leave the appliance unattended when the system is connected to a power supply/electrical outlet.
- DO NOT store unit with damp or wet microfiber cleaning pocket attached. Never leave the steam mop in one spot on any surface for any period of time with a damp or wet microfiber cleaning pocket attached as this will damage your floors.
- Always unplug and allow the appliance to cool before removing or changing mop heads.
28.Do not use the vacuum cleaner without dust cup and filter in place. - Do not vacuum up any liquids, it is dry vacuum cleaner.
- Do not pick up anything that is burning or smoking such as cigarettes, matches or pick up hard or sharp objects such as glass, screws.

WARNING:
Steam cleaner is designed to clean hard floor surfaces and to create a hygienic environment. It is not recommend to use it on wooden floors which are sensitive to water (passes water inside). Long term use on a fixed point of polished surfaces, may let the surface lose its brightness. It is always recommended to test an isolated area of the surface to be cleaned before proceeding. We also recommend that you check the use and care instructions from the floor manufacturer.
Unpacking and first use
Unpack the device and check the content of the packaging for completeness. Should you note any damage incurred during transit, please contact your dealer immediately.
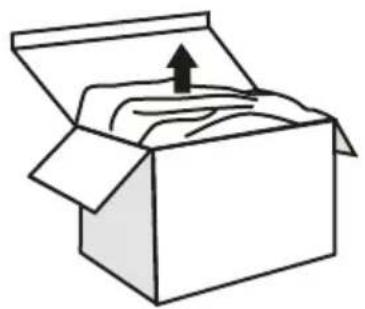
natural_image
Simple line drawing of an open box with an upward arrow inside, no text or symbols present.
WARNING!
Never use a defective appliance.

NOTICE!
Keep the packaging for storage and future transports (e.g. for moves, service).
Technical Specifications
Water tank capacity : 400 ml
Motor power : 400 Watt
Usage Life : 10 Years
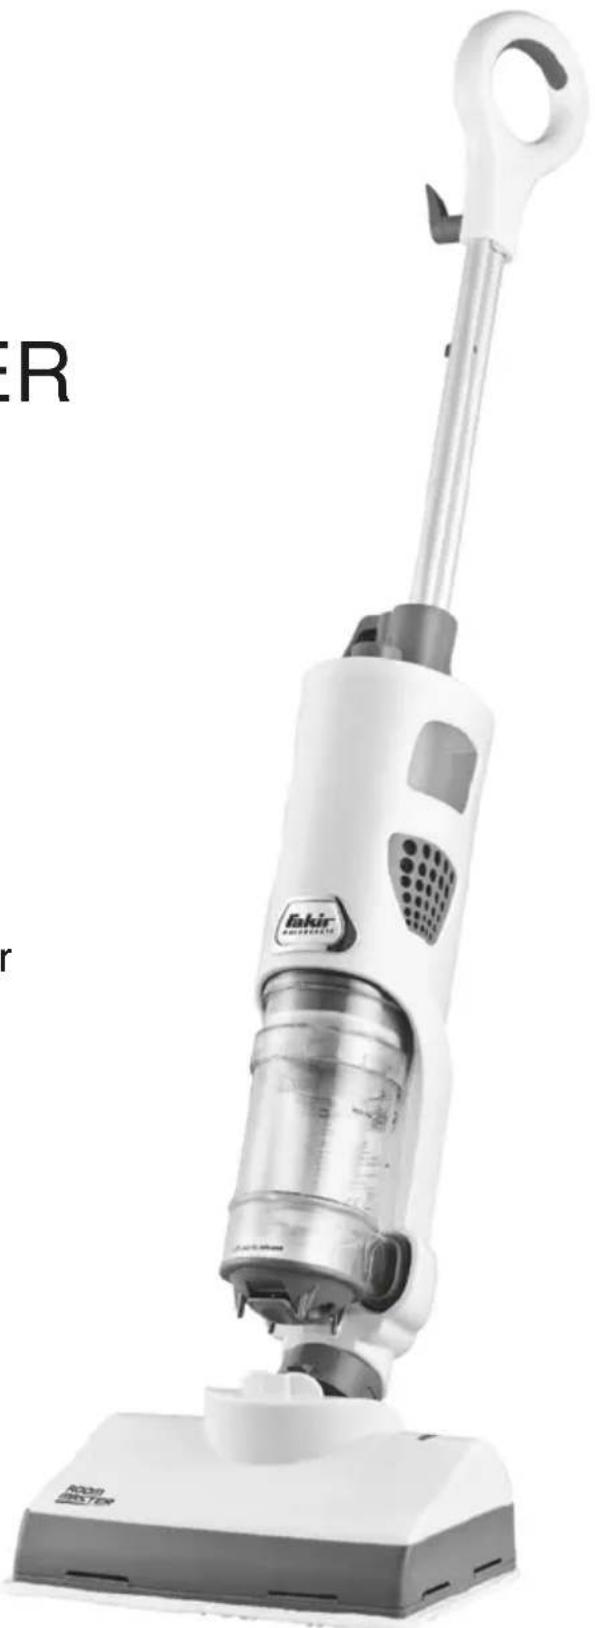
Product description
1-Handle
2- Quick release swivel cord wrap
3-Cord clip
4-Cleaning unit cord wrap
5-Vacuum and steam mode swith
6-Water tank
7-Cleaning unit filter
8-Dust cup assembly
9-2 pcs all-purpose cleaning pads
10-Steam frame
11- Filling flask
12-2 pcs dust cup filters

text_image
Technical diagram of a vacuum cleaner with numbered parts for identification
text_image
Labeled diagram of a vacuum cleaner with numbered parts including pump, container, and cloth coverWhen assembling your steam mop there may be a little water in or around the water tank. This is because we test all our steam mops 100% before you buy them, so you get a quality Fakir Room Master.

IMPORTANT:
Always make sure the mop is UNPLUGGED from the wall when not in use. Never fill the mop, attach the mop head, change or remove the cleaning pad when the mop is plugged into the wall. To prolong the life of your Room Master, we recommend using distilled water. Make sure you only add water to the tank. Chemicals or cleaning solution may damage the appliance and could be unsafe for you and your family.

NOTICE!
It is recommended to wash microfiber cleaning pads before first usage.
1-Slide the Mop handle into the cleaning unit and lock up the screw. Once in position, you never have to remove the handle.
2-Wrap cord around cord holders and secure plug to cord.
Usage Vacuum mode:
1- Remove steam pad and frame, if attached.
2- Plug in the unit.
3- Turn the switch to the steam position. The button panel will be illuminated blue when steam mode is activated.
natural_image
Technical illustration of a device casing with internal components and a circular component with directional arrows (no text or symbols)
WARNING:
You cannot use the vacuum function if the frame and pad are attached to the base.

WARNING:
Only vacuum hard floor surfaces and non-carpeted bare floor surfaces.
4- Place your foot lightly on the top of the cleaning unit base. Tilt the cleaning unit back, vacuum your floors.
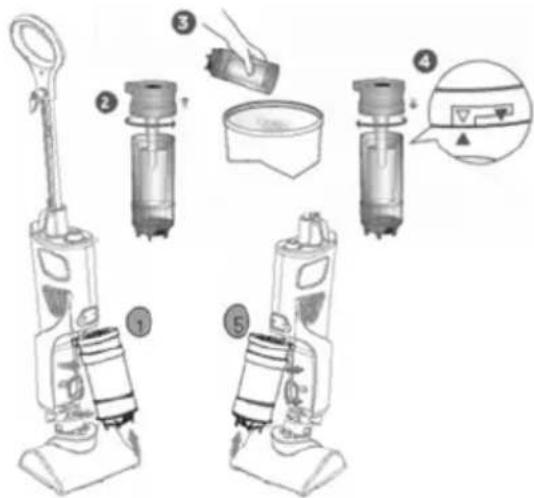
Emptying the dust cup:
text_image
Diagram showing five steps of a vacuum cleaner's internal components and a control panel with a dropdown menu.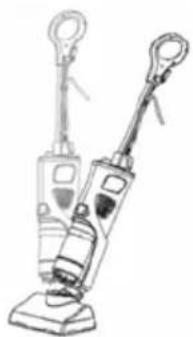
natural_image
Line drawing of a vacuum cleaner with two legs and a handle (no text or symbols)1- Press the dust cup latch at the bottom of the canister upward. Pull the dust cup assembly out and down.
2- Twist dust cup cover counter clockwise to open.
3- Tap canister gently over trash receptacle to empty.
4- To reattach the dust cup cover, align the indicators that are printed on the rear of the dust cup and cover. Turn the cover clockwise.
5- To replace the dust cup in to the unit. Gently push the dust cup assembly up and in. the dust cup will click into place.
Steam mode:
natural_image
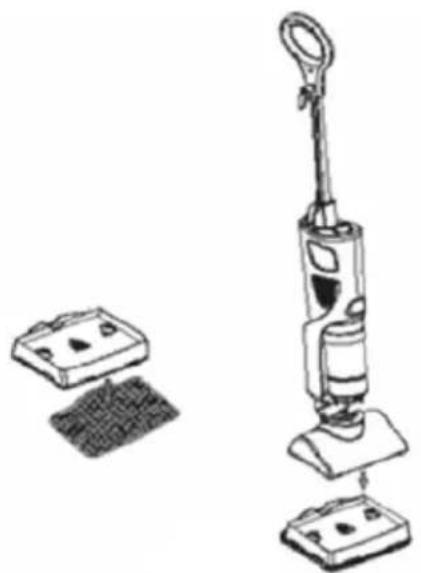
Line drawing of a vacuum cleaner with attached circuit board and battery (no text or symbols)1- Attach a steam pad onto the bottom of the steam frame.
2- Place the steam frame / pad assembly on the floor when the appliance is upright.
3- Filling the water tank: Keep the cleaning unit the upright position to add water. Turn the water tank cap counterclockwise and fill the water tank with the filling flask, closethe tap.

NOTICE!
Water can not be exceed maximum level.
natural_image
Line drawing of a handheld device with a magnified inset showing a close-up of its internal components (no text or symbols)4- Plug in the cleaning unit. Turn the switch to the steam position. The illuminated blue light indicates that the "boiler" is on.
natural_image
Line drawing of a vacuum cleaner with handle and base (no text or symbols)1- Place your foot lightly on the top of the base. Tilt handle back to activate steam pump.
2- Push handle upright to stop steam.

NOTICE:
Fill anytime throughout the cleaning process.

NOTICE:
Do not leave the appliance unattended when plugged in.

CAUTION:
Never leave the steam mop with a damp/wet micro-fiber pocket on any floor surface for any amount of time as this may damage the floor.
Cleaning and Maintenance
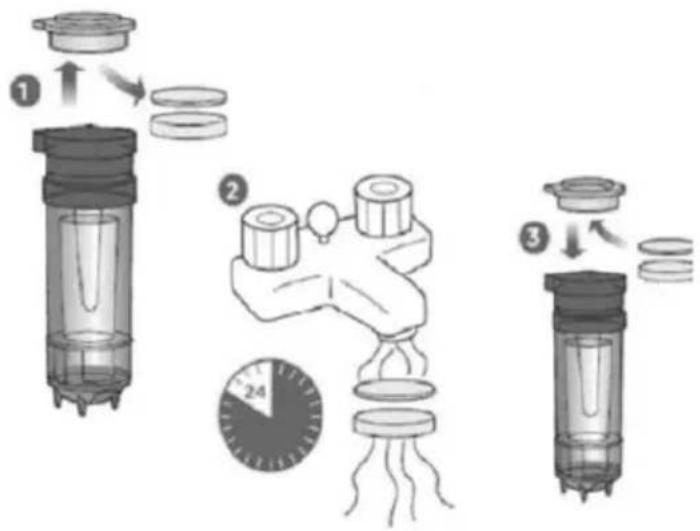
1- Unplug and turn off the vacuum. Pull out the dust cup. Lift the filter frame out from the top of the dust cup. Remove the two filter layers from the filter frame.
2- Thoroughly rinse the two filter in lukewarm water. Squeeze out any excess water. Air dry for 24 hours before using.
3- Insert a dry filter set into the filter frame.

NOTICE!
Make sure the thick filter is on the bottom and the thin filter is on top. Put the frame with the filter set back into the top of the dust cup.
Recommended average maintenance schedule:
1- Using only water thoroughly fines filters every 3 months.
2- Replace filter set in the appliance once a year.
text_image
Diagram illustrating three-step laboratory procedure for measuring a sample, with labeled steps and a stopwatch.Storage
1- Unplug and turn the unit off. Separate steam pad from steam frame.
2- Remove the water tank cap and empty water tank.
3- Wrap cord securely around cord management hooks.

CAUTION:
Use caution when handling the steam frame Because the frame retain heat wait 3-5 sec to cool down.
natural_image
Simple line drawing of a rectangular plate with four icons below (no text or symbols)
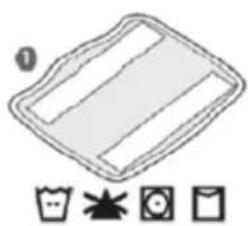
KEEPING YOUR MICROFIBER CLEANING POCKET AS GOOD AS NEW
-
We recommend washing your microfiber pads separately from other fabrics to avoid picking up lint. Only use liquid detergent. (no powder detergent) Don't use any fabric softeners or bleach.
-
If there are loose threads on the pocket carefully cut the thread with scissors. Don't pull on them or cut at the base.
Troubleshooting
| Problems | Reasons | Solutions |
| Room Master does not work | UnpluggedStatus of socketsDefective item | Verify the product is securely plugged into a 220V AC electrical outlet only.Verify if your in-house sockets, electrical fuse and leakage protection switch are in normal status.If the appliances still does not work, refer to authorized FAKIR Service. |
| Room Master does not steam | Nozzle is jamedNo water inside water tank | Verify if the steam nozzle is jamed.If no, please fill up with water.If there is no steam, refer to authorized FAKIR service. |
| Room Master more water left on floor after use | Cleaning cloth is too wetDirty microfiber cleaning clothLong usage at one point | Please replace with a dry cloth.Replace the cloth if it is too dirty.Verify if you use steam mop after it have produced hot steam since turned on for 30-second. Otherwise there will be much moisture because the steam temperature is low. |
| Room Master is hard to push | Assemblyed wronglyDirty microfiber cleaning cloth | Verify if the cleaning cloth is well attached in place on the mop head.Please replace with a new one. |
| Floors are cloudy, streaky or spotty after steaming | Damaged microfiber cleaning clothWrong appliance usage Hardness of water | If you washed the cloth with powder detergent, there may be residual detergent left on the cloth. Wash it again with liquid detergent.If you are going to clean kitchen area where there might be accumulative grease, Room Master may not be able to clean it up at a time. Please use degreasing agent to clean the floor first.Please use distilled water. |
Waste Disposal
If the service life of the device has ended, in particular if functional disturbances occur, make the worn-out device unusable by cutting through the power cable.
Dispose of the device according to the environmental regulations applicable in your country.

Electrical waste must not be disposed of together with household waste. Bring the worn-out device to a collection center. The packaging of the device consists of recycling-capable materials. Place these, sorted out according to material, in the collectors provided, so that recycling can be carried out on them. For advice on recycling, refer to your local authority or your dealer.
This appliance fulfills the requirements of the 2002/96/EC WEEE regulations.
Dispatch
Carry the appliance in the original package or a similar, well-padded package to prevent damage to the appliance.
This product is produced by Xiaotian (Zhongshan) Industrial CO., LTD Xiaolan Park, Xiaolan Town, Zhongshan City Guangdong, China Tel:+0086 852 2370 1068 on behalf of Fakir Elektrikli Ev Aletleri Dış Ticaret A.Ş.