
DDJ-T1 - DJ Controller PIONEER - Free user manual and instructions
Find the device manual for free DDJ-T1 PIONEER in PDF.
| Product Type | DJ Controller |
| Brand | Pioneer |
| Model | DDJ-T1 |
| Dimensions (W x H x D) | 680 mm x 95.2 mm x 317.7 mm |
| Weight | 4.9 kg |
| Power Supply | AC adapter 100-240 V, 50/60 Hz, output 5 V / 2 A; also USB bus power (5 V / 500 mA) |
| Power Consumption (adapter) | 700 mA |
| Power Consumption (USB bus) | 500 mA |
| Main Functions | 4-channel mixer, turntables with jog wheels, effects (6 types), browser, EQ controls, crossfader, channel faders, loop and cue functions, synchronization (beat sync), key lock, laptop dock |
| Audio Outputs | MASTER OUT 1 (6.3 mm TRS jack), MASTER OUT 2 (RCA), PHONES (6.3 mm stereo jack and 3.5 mm mini-jack) |
| Audio Inputs | AUX IN (RCA), MIC (6.3 mm jack) |
| Connectivity | USB Type B (USB cable included) |
| Compatible Software | TRAKTOR Pioneer DDJ-T1 EDITION (included), TRAKTOR PRO, TRAKTOR SCRATCH PRO |
| Nominal Output Level (MASTER OUT 1) | 4.2 Vrms |
| Signal-to-Noise Ratio (MASTER OUT 1) | 103 dB or more |
| Operating Temperature | +5°C to +35°C |
| Operating Humidity | 5% to 85% (without condensation) |
| Maintenance and Cleaning | Use a damp cloth; avoid liquid, aerosol, or alcohol-based products |
| Safety | Do not open the casing; disconnect before any connection changes; use only the supplied adapter |
| Box Contents | TRAKTOR software CD-ROM, AC adapter, power plug (×2), USB cable, warranty card, instruction manual |
| Environmental Instructions | Do not dispose of with household waste; follow recycling procedures for electronic equipment |
Frequently Asked Questions - DDJ-T1 PIONEER
User questions about DDJ-T1 PIONEER
0 question about this device. Answer the ones you know or ask your own.
Ask a new question about this device
Download the instructions for your DJ Controller in PDF format for free! Find your manual DDJ-T1 - PIONEER and take your electronic device back in hand. On this page are published all the documents necessary for the use of your device. DDJ-T1 by PIONEER.
USER MANUAL DDJ-T1 PIONEER
The Pioneer website shown above offers FAQs, information on software and various other types of information and services to allow you to use your product in greater comfort.
Operating Instructions
Mode d'emploi
Bedienungsanleitung
Thank you for buying this Pioneer product. Please read through these operating instructions so you will know how to operate your model properly. After you have finished reading the instructions, put them away in a safe place for future reference.
In some countries or regions, the shape of the power plug and power outlet may sometimes differ from that shown in the explanatory drawings.
However the method of connecting and operating the unit is the same.

If you want to dispose this product, do not mix it with general household waste. There is a separate collection system for used electronic products in accordance with legislation that requires proper treatment, recovery and recycling.
Private households in the member states of the EU, in Switzerland and Norway may return their used electronic products free of charge to designated collection facilities or to a retailer (if you purchase a similar new one).
For countries not mentioned above, please contact your local authorities for the correct method of disposal.
By doing so you will ensure that your disposed product undergoes the necessary treatment, recovery and recycling and thus prevent potential negative effects on the environment and human health.
K058b_A1_En
Before making or changing the connections, switch off the power and disconnect the AC adapter from the AC outlet.
For PLUGGABLE EQUIPMENT, the socket-outlet shall be installed near the equipment and shall be easily accessible.
D44-9-3_A1_En_PSV
Contents
How to read this manual
The names of displays, menus, and buttons in this manual are enclosed in brackets. (e.g. [MASTER] channel, [ON/OFF], [File] menu)
- The TRAKTOR manual and TRAKTOR GETTING STARTED can be viewed from the TRAKTOR help menu after TRAKTOR is installed.
01 Before start
Features 4
System setup example. 4
What's in the box. 4
About the AC adapter 5
Using the LAPTOP DOCK 6
Using with the feet removed 6
12 Before you start
About the TRAKTOR software. 7
Installing the TRAKTOR software 7
Launching TRAKTOR. 9
Performing product activation. 9
Updating the TRAKTOR software 10
About the driver software (Windows) 11
03 Connections
Names of terminals. 13
Connecting the input/output terminals 14
Part names and functions
Control panel. 15
1 Browser 16
2 Deck. 17
3 Mixer. 19
4 Effect. 20
05 Operations
Importing tracks to TRAKTOR 21
Loading tracks in decks. 21
Playback 21
Using the mixer functions 22
Using the effect function 22
Synchronizing the playing speed with other decks (beat sync) 22
Inputting the sound of a microphone or external device 23
06 Changing the TRAKTOR Preferences
List of TRAKTOR Pioneer DDJ-T1 EDITION setting items 24
Assigning the desired functions to the [NEEDLE SEARCH] pad.....24
07 Additional information
Troubleshooting 25
Using as a controller for other DJ software. 26
List of MIDI Messages 27
Disclaimer 30
Cautions on copyrights. 30
Specifications 30
Before start
Features
This product is an all-in-one DJ system for home DJ use, combining Pioneer DJ hardware - the world standard in club DJ equipment – with the "TRAKTOR Pioneer DDJ-T1 EDITION" DJ software by Native Instruments. You can enjoy full-fledged DJ play simply by connecting this product with a computer.
LAYOUT
The control panel in this unit's effect section is arranged with the same layout as the TRAKTOR control screen, so it can be operated without hesitation during performances. The player and mixer section operation panels use the layout of Pioneer DJ hardware, for intuitive and accurate operation.
4 DECK CONTROL
This unit is equipped with a 4-channel mixer with [LOAD], [MASTER] and [SYNC] buttons provided on each of the decks, so previously complicated DJ performances using all four channels can be achieved with greater ease.
TRAKTOR Pioneer DDJ-T1 EDITION
TRAKTOR Pioneer DDJ-T1 EDITION is a TRAKTOR software application designed exclusively for the DDJ-T1. All buttons and controls are preset so they are linked to the software, so DJ play is possible simply by connecting this unit to a computer (plug-and-play).
LAPTOP DOCK
The computer's keyboard section can be stowed under this unit. Docking the computer with this unit into a single unit allows you to create an efficient DJ system.
USB BUS POWER
This product supports USB bus power. It can be used simply by connecting it to a computer with a USB cable.
HIGH SOUND QUALITY
This product inherits the sound quality technology developed over the years for Pioneer DJ hardware to achieve the top level of sound quality in its class.
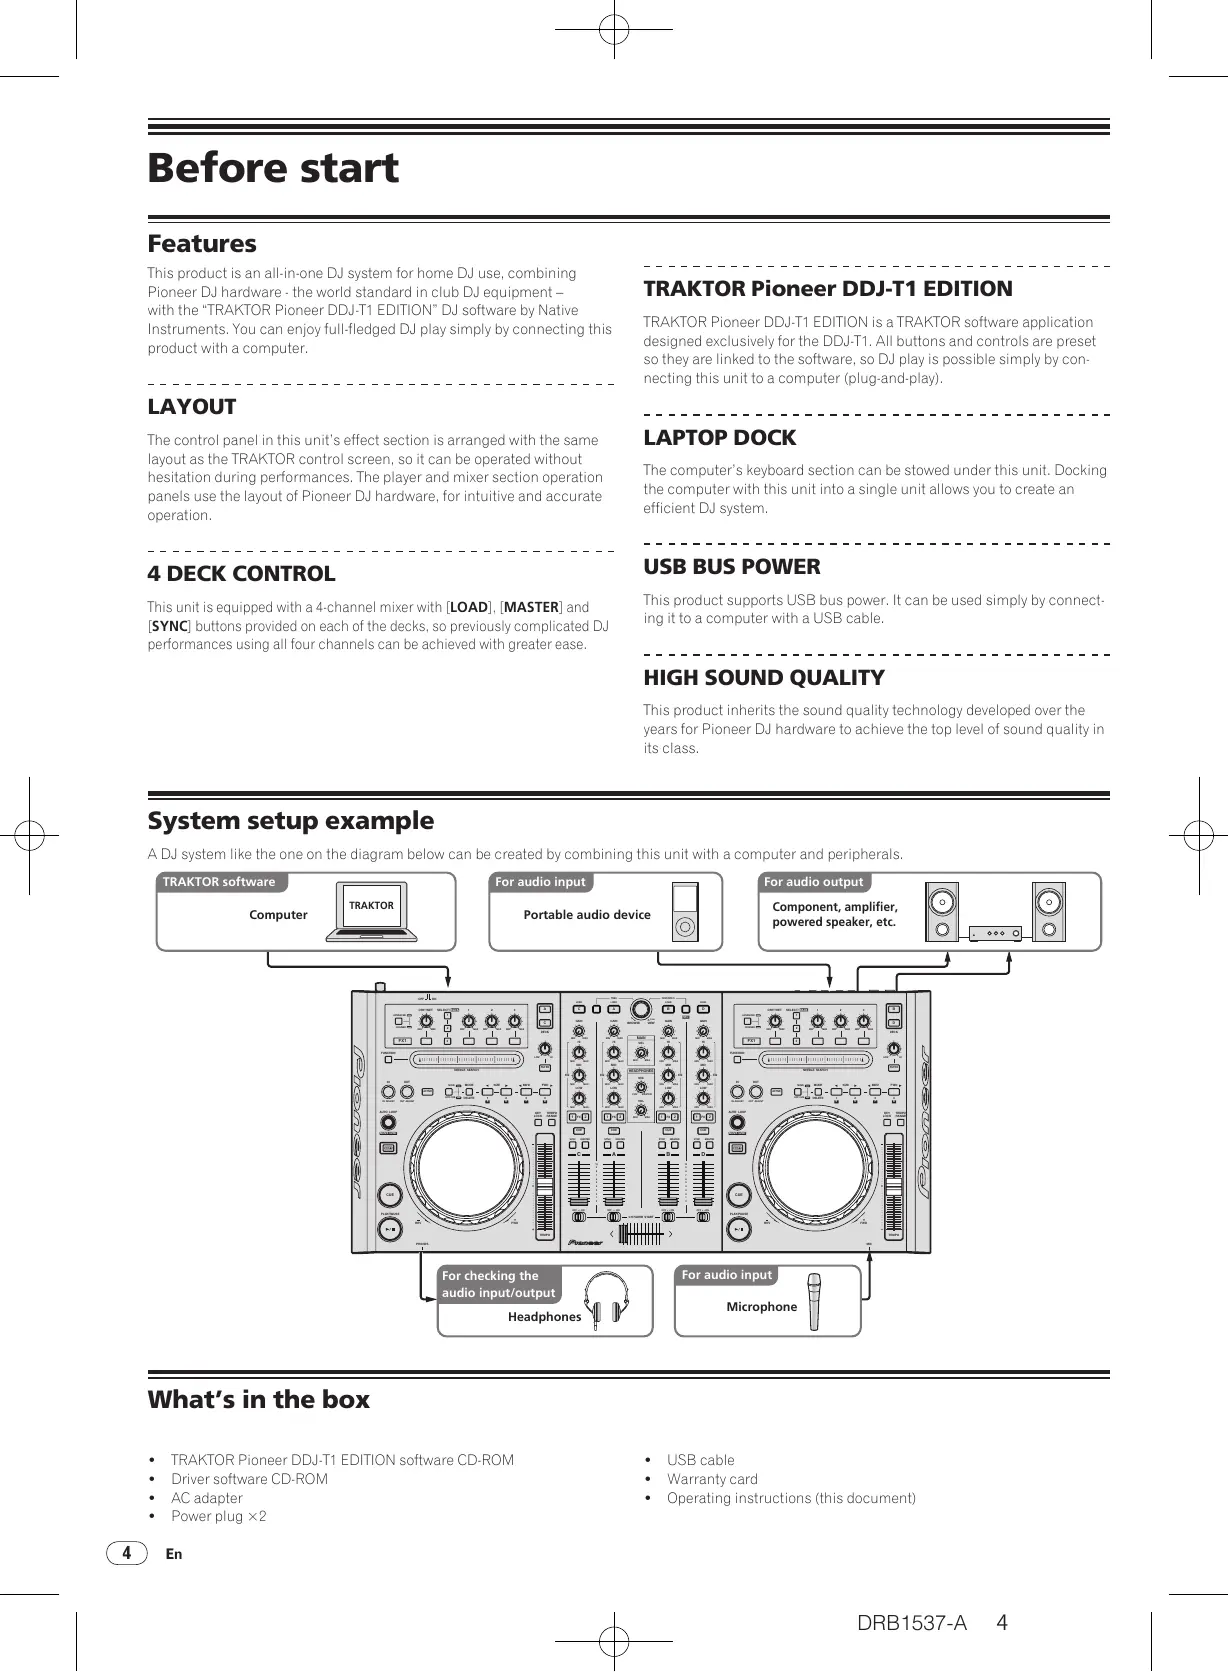
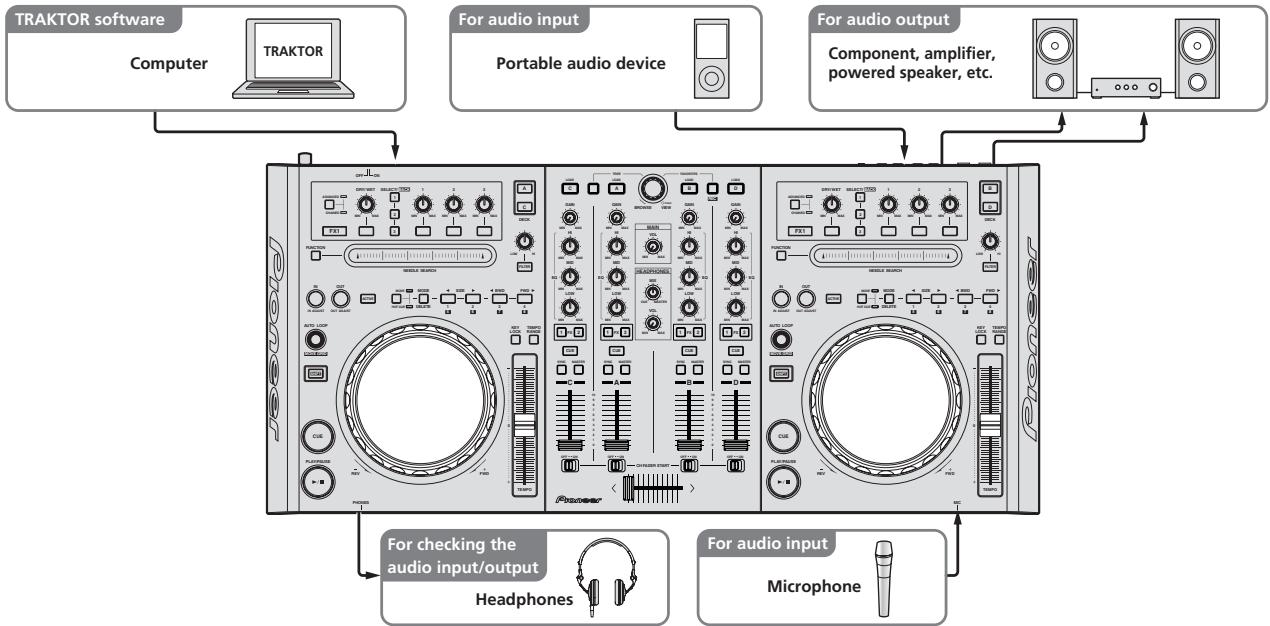
System setup example
A DJ system like the one on the diagram below can be created by combining this unit with a computer and peripherals.
What's in the box
- TRAKTOR Pioneer DDJ-T1 EDITION software CD-ROM
- Driver software CD-ROM
- AC adapter
Power plug × 2
USB cable
Warranty card
- Operating instructions (this document)
About the AC adapter
Safety instructions
To ensure your personal safety and to maximize the full operating potential of your unit, read and follow these safety instructions.
Read & Retain Instructions
Read all operating and user information provided with this product.
Cleaning
Use a damp cloth to clean the exterior housing. Avoid using any fluids including liquid, aerosol or alcoholbased cleaning products.
Water or Moisture
Avoid operating or locating this product near water or other sources of fluid.
Accessories
Do not place this product on an unstable cart, stand, or table. The product may fall and be seriously damaged.
Ventilation
Do not block or cover this product in use. This unit should not be placed in a built-in installation unless properly ventilated.
Environment
Avoid placing this product in a location with exposure to large quantities of dust, high temperatures, high humidity, or subject to excessive vibrations or shocks.
Power Sources
Operate this product only from the recommended power sources. If you are unsure of the power source, consult an authorized Pioneer representative.
Power-Cord Protection
When unplugging the unit, pull on the plug - not on the cord. Do not handle the cord or plug with wet hands; doing so could cause an electric short or shock. Do not allow anything to pinch or rest on the power cord and do not place in a walkway.
Power
Turn OFF the system before installing this or any other hardware device.
Overloading
Avoid connecting too many devices to a single wall socket or power source as this can cause fires or short circuits.
Object & Liquid Entry
Never push inappropriate objects in to the device. Avoid spilling any liquids in to or on the outside of the drive.
Servicing
Opening or removing the cover exposes you to possible electrical shock or other danger. Contact a Pioneer authorized service representative for repairing this product (refer to the enclosed Service & Support Card).
Damage Requiring Service
Unplug the unit and refer servicing to qualified service personnel in the following situations:
- When the power cord, plug, or chassis is damaged.
If liquid has been spilled, or objects have fallen into the product.
If the product has been exposed to rain or water. - If the product does not operate normally when the operating instructions are followed. Adjust only those controls that are covered by the operating instructions. Improper adjustment of other controls may result in damage and can require extensive work by a qualified technician to restore the unit to its normal operation.
- When the product exhibits a distinct change in performance – this indicates a need for service.
Check that there are no irregularities with the AC adapter or power plug, then insert the power plug into the specified position of the AC adapter
using the specified procedure until a click is heard. For details, see Mounting the power plug on page 5.
If there are irregularities with the AC adapter or power plug, ask your nearest Pioneer authorized service center or your dealer to carry out repair work.
- Do not use this unit with a coin, paper clip or other metal object stuck between the AC adapter and power plug. Doing so could cause a short circuit, leading to fire or electric shock.
- When mounting the AC adapter on a wall outlet, make sure there is no space between the AC adapter and the wall outlet. Faulty contact or a coin, paper clip or other metal object getting stuck in the space could cause a short circuit, leading to fire or electric shock.

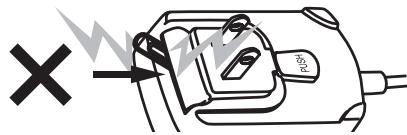
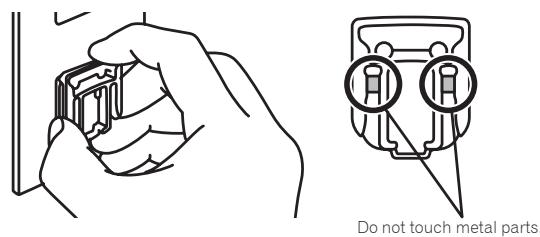
- The power plug could come detached from the AC adapter and remain in the power outlet if someone trips on the AC adapter's power cord or if something hits the AC adapter. If this happens, remove the power plug remaining in the outlet with dry hands, holding it as shown on the diagram below and without touching metal parts. Do not use any tools to remove it.
Mounting the power plug
Slide the power plug along the guide rails in the AC adapter unit as shown on the diagram below, then press in until a click is heard.
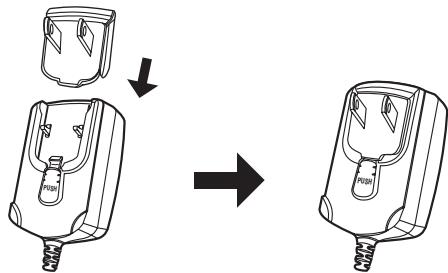
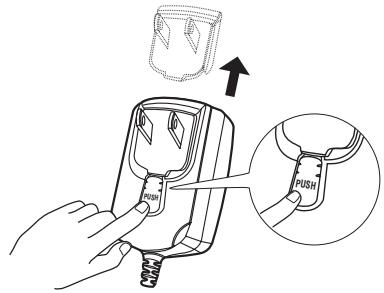
Removing the power plug
While pressing the [PUSH] button on the AC adapter unit, slide the power plug away from the adapter as shown on the diagram below to remove it.
Once the power plug is mounted, there is no need to remove it.
Power plug
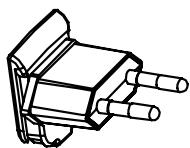
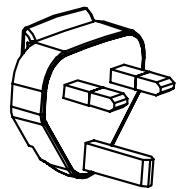
This product comes with the types of power plugs shown below. Use the appropriate power plug for the country or region you are in.
Type 1 (for Europe)
Type 2 (for the UK)
Using the LAPTOP DOCK
The computer's keyboard section can be stowed under this unit.

- Depending on the size of your (notebook) computer, the keyboard section may not fit in the LAPTOP DOCK.
Install in such a way that the computer unit does not touch this unit.
Install in such a way that the cables connected to the computer are not stuck under this unit.
Using with the feet removed
This unit's two feet can be removed.
Use a Phillips screwdriver to remove the screws from the left and right feet (2 screws each).
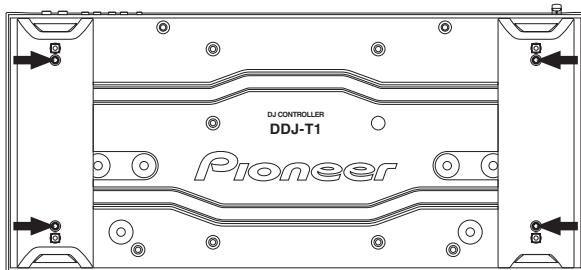
- The screws you have removed will be needed when mounting the feet. Be careful not to lose them. The feet cannot be properly mounted using other screws.
Before you start
About the TRAKTOR software
TRAKTOR Pioneer DDJ-T1 EDITION is a special version of TRAKTOR designed exclusively for the DDJ-T1. For a comparison of the functions between TRAKTOR Pioneer DDJ-T1 EDITION and other versions of TRAKTOR, see the website below. http://www.prodjnet.com/support/
- The DDJ-T1 supports TRAKTOR PRO and TRAKTOR SCRATCH PRO. If you own TRAKTOR PRO and TRAKTOR SCRATCH PRO, update to the latest version of the software before using it.
Cautions on installing the TRAKTOR software
Supported operating systems
| Mac OS X | 10.5 | ✓ |
| 10.6 | ✓ | |
| Windows® 7 Home Premium/Professional/Ultimate | 32-bit version | ✓ |
| 64-bit version | ✓ | |
| Windows Vista® Home Basic/Home Pre-mium/Business/Ultimate (SP1 or later) | 32-bit version | ✓ |
| 64-bit version | ✓ | |
| Windows® XP Home Edition/Profes-sional (SP3 or later) | 32-bit version | ✓ |
For the latest information on the operating environment and compatibility, and to acquire the latest operating system, please visit the following Native Instruments website: http://www.native-instruments.com/traktor
Minimum operating environment for TRAKTOR
| CPU | For Mac OS X | Macintosh computer equipped with an Intel® Core™ Duo processor of 1.66 GHz or greater |
| For Windows® 7, Windows Vista® and Windows® XP | PC/AT compatible computer equipped with a Pentium® 4 or AMD Athlon 1.4 GHz (SSE1) or greater processor PC/AT compatible computer equipped with a 2 GHz or greater Intel® Pentium® 4 (or compatible) processor | |
| Required memory | 1 GB or more of RAM | |
| Hard disc | Free space of 100 MB or greater | |
| CD drive | Optical disc drive on which the CD-ROM can be read | |
| Internet connection | An Internet connection environment is required for user registration with Native Instruments, to update the TRAKTOR software, etc.Use the most recent version of the web browser. | |
| USB port | A USB port is required to connect the computer with this unit. | |
Full functionality is not guaranteed on all computers, even those meeting the operating environment requirements described above.
- Even with the required memory indicated for the operating environment above, lack of memory due to resident programs, the number of services, etc., could prevent the software from offering optimal functionality and performance. In such cases, free up sufficient memory. We recommend installing additional memory for stable operation.
- Depending on the computer's power-saving settings, etc., the CPU and hard disk may not provide sufficient processing capabilities. For notebook computers in particular, make sure the computer is in the proper conditions to provide constant high performance (for example by keeping the AC power connected) when using TRAKTOR.
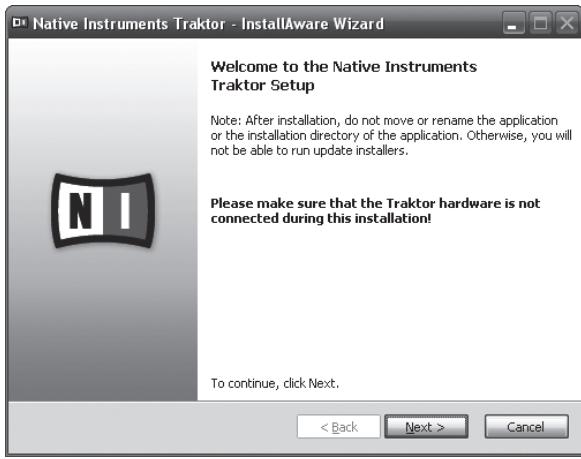
Installing the TRAKTOR software
About the installation procedure (Windows)
1 Insert the included TRAKTOR Pioneer DDJ-T1 EDITION software CD-ROM into the computer's CD drive.
2 From the Windows [Start] menu, double-click the [Computer (or My Computer)] > [Traktor] icon.
The contents of the CD-ROM are displayed.
3 Double-click [Traktor Setup PC.exe].
The TRAKTOR installer is launched.
4 Once the TRAKTOR installer is launched, click [Next].
To return to the previous screen: Click [Back].
- To cancel installation: Click [Cancel].
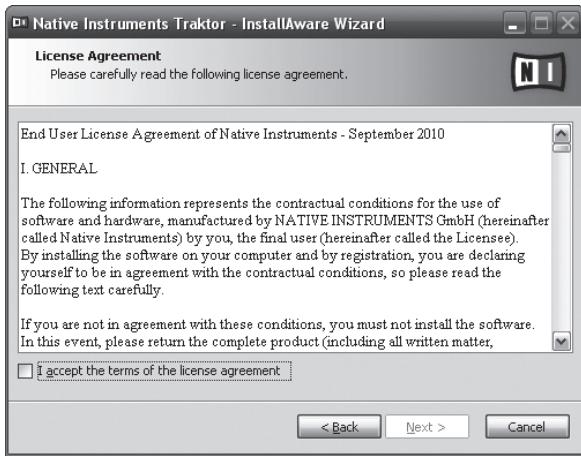
5 Read the contents of the [License Agreement] carefully, and if you agree, check [I accept the terms of the license agreement], then click [Next].
If you do not agree to the terms of the [License Agreement], click [Cancel] to cancel installation.
6 Choose the type of TRAKTOR installation, then click [Next].
Normally install all options, including [Controller Editor] and [Service Center].
7 Choose where to install TRAKTOR, then click [Next].
To choose the normal place of installation, simply click [Next]
To install in a different location, click [Change...], choose the place of installation, then click [Next].
8 Select the Native Instruments hardware driver, then click [Next].
Check the check box for your hardware.
9 To install the Traktor Kontrol X1 driver, check the check box, then click [Next].
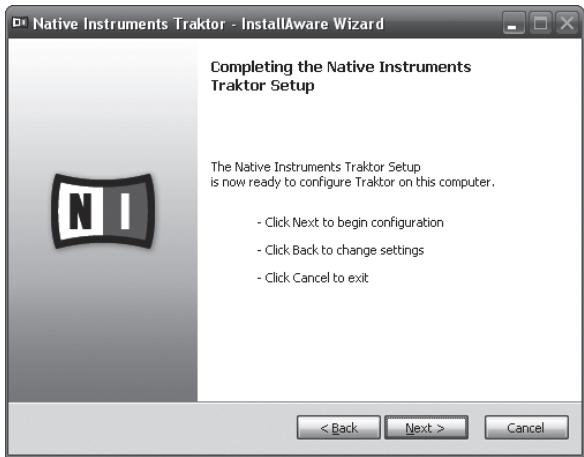
10 When the following screen appears, click [Next].
Installation begins.
The installation completed screen appears once installation is completed.
11 Click [Finish].
This completes the installation procedure.
About the installation procedure (Macintosh)
1 Insert the included TRAKTOR Pioneer DDJ-T1 EDITION software CD-ROM into the computer's CD drive.
The [Traktor] icon appears on the screen.
2 Double-click the [Traktor] icon.
The contents of the CD-ROM are displayed.
3 Double-click [Traktor Installer Mac.mpkg].
The TRAKTOR installer is launched.
4 Once the TRAKTOR installer is launched, click [Continue].
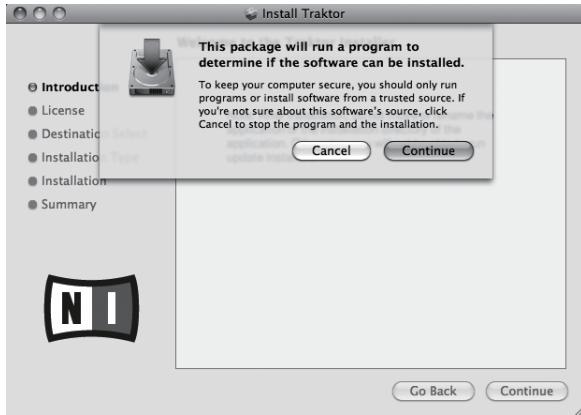
5 Read the contents of the license agreement carefully, then click [Continue].
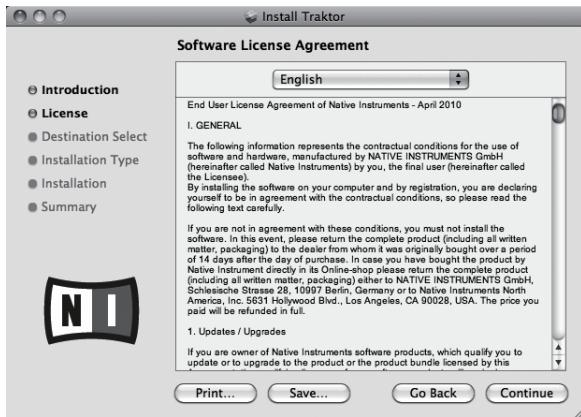
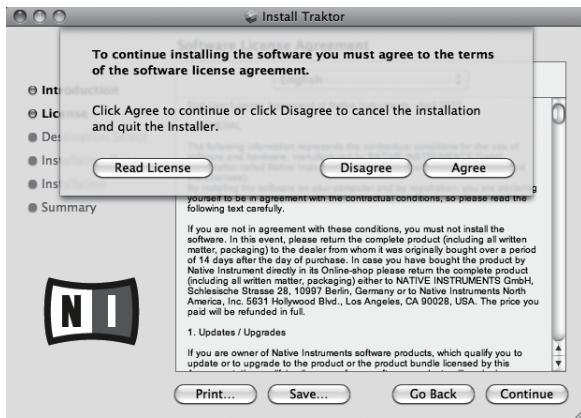
6 If you agree to the contents of the usage agreement, click [Agree].
If you do not agree to the contents of the usage agreement, click [Disagree] to cancel installation.
7 Select the Native Instruments hardware driver, then click [Continue].
Check the check box for your hardware.
8 Choose where to install TRAKTOR, then click [Install].
To choose the normal place of installation, simply click [Install]. To install in a different location, click [Change Install Location...], choose the place of installation, then click [Install].
Installation begins.
The installation completed screen appears once installation is completed.
Launching TRAKTOR
For Windows
From the Windows [Start] menu, open [All Programs] > [Native Instruments] > [Traktor], then click the [Traktor] icon.
For Mac OS X
In Finder, open the [Application] folder, next open [Native Instruments] > [Traktor], then double-click the [Traktor] icon.
Performing product activation
To use TRAKTOR Pioneer DDJ-T1 EDITION, first perform product activation (referred to simply as "activation" below) using Native Instruments SERVICE CENTER (referred to simply as "SERVICE CENTER" below).
Launching the SERVICE CENTER
There are three ways to do this:
- Launching from the dialog displayed when TRAKTOR is started up
- Launching from the TRAKTOR [Help] menu
- Launching SERVICE CENTER directly
To launch from the dialog displayed when TRAKTOR is started up
1 Launching TRAKTOR
The screen below appears.
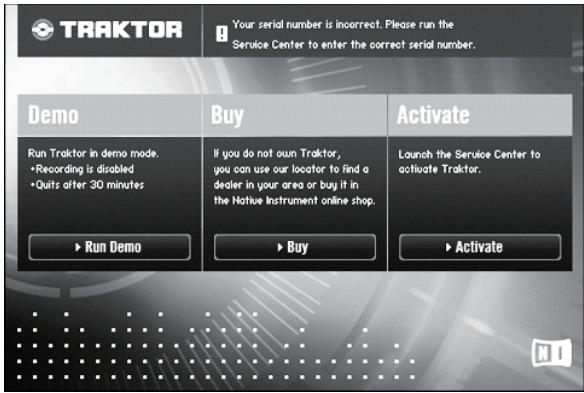
- This dialog is displayed each time TRAKTOR is launched until the license is acquired from Service Center.
2 Select the method for acquiring the license, then click.
- [Activate]: Acquire the license immediately from the SERVICE CENTER.
- [Buy]: Purchase TRAKTOR from the Native Instruments online shop.
- [Run Demo]: Launch TRAKTOR in the demo mode.
To launch from the TRAKTOR [Help] menu
From the TRAKTOR [Help] menu, click [Launch Service Center].
To launch the SERVICE CENTER directly
For Windows
From the Windows [Start] menu, click the [Native Instruments] > [Service Center] > [Service Center] icons.
For Mac OS X
In Finder, open the [Application] folder, then double-click the [Service Center] > [Service Center] icons.
Activation procedure
Online activation: When your computer is connected to the Internet
Offline activation: When your computer is not connected to the Internet
Online activation
1 Launch the SERVICE CENTER.
The log-in screen is displayed.
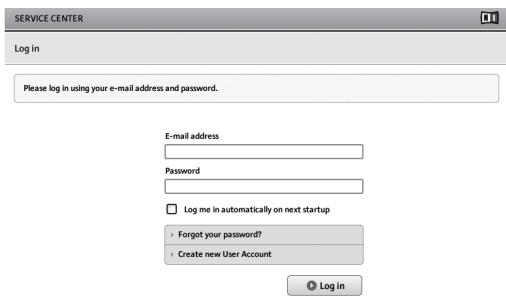
2 Input your e-mail address and password, then click [Log in].
- When logging in for the first time, you must create a new user account.
When [Create new User Account] is clicked, the new user account registration screen appears.
Input the required items (e-mail address, first and last names), select your country/region, then click [Next].
When the registration information confirmation screen appears, check the contents, then click [OK].
A password is sent to the e-mail address input on the form. Return to the log-in screen and log in.
- The personal information input when registering a new user account may be collected, processed and used based on the privacy policy on the Native Instruments website.
Pioneer Corporation does not collect, process or use this personal information.
3 Input the serial number indicated on the package of the TRAKTOR Pioneer DDJ-T1 EDITION software CD-ROM, then click [Activate].
![PIONEER DDJ-T1 - Input your e-mail address and password, then click [Log in]. - 1](/content/2024/12/118934/images/5e4263f45661607870fcc67de3900ebc2d9ed03e0439ad4908799727934b89ea.jpg)
4 Once the product license registration successful screen appears, click [Exit].
Offline activation
To activate TRAKTOR Pioneer DDJ-T1 EDITION installed on a computer that is not connected to the Internet, use SERVICE CENTER in the offline mode.
With this procedure, a second computer that can be connected to the Internet is required.
1 Launch the SERVICE CENTER on the computer on which TRAKTOR Pioneer DDJ-T1 EDITION is to be installed.
2 Click [Offline] at
[Continue without connecting to the internet].
3 Click [Create] at [Create Activation Request File].
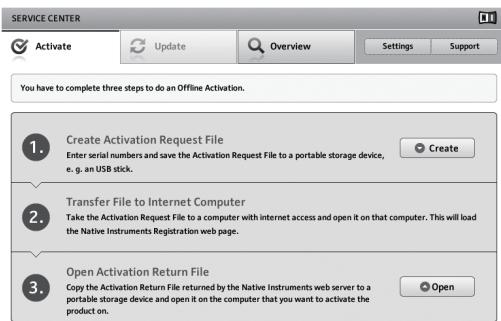
4 Input the serial number indicated on the package of the TRAKTOR Pioneer DDJ-T1 EDITION software CD-ROM, then click [Create].
A launch request file is created. Save this file on a USB device, etc.
5 Connect the USB device on which the launch request file is saved to the computer that can be connected to the Internet.
6 Double-click the launch request file on the computer that can be connected to the Internet.
The web browser is launched.
7 Once the product activation screen appears, click [Send].
8 Input your e-mail address and password, then click [SUBMIT].
- When logging in for the first time, you must create a new user account.
When [No - I do not have an NI account.] is checked and [SUBMIT] is clicked, the new user account registration screen appears.
Input the required items (e-mail address, first and last names, street address, city and postal code), select your country/region, then click [NEXT].
When a survey screen appears, select answers to the various questions, then click [SUBMIT].
A password is sent to the e-mail address input on the form. Return to the log-in screen and log in.
- The personal information input when registering a new user account may be collected, processed and used based on the privacy policy on the Native Instruments website.
Pioneer Corporation does not collect, process or use this personal information.
9 When the [Service Center Activation Page] appears, click [NEXT].
10 Check that [Product] is [TRAKTOR Pioneer DDJ-T1 EDITION] and [Status] is [OK], then click [NEXT].
A launch return file is created. Save this file on a USB device, etc.
11 Launch the SERVICE CENTER on the computer on which TRAKTOR Pioneer DDJ-T1 EDITION is to be installed.
12 Click [Offline] at
[Continue without connecting to the internet].
13 Click [Open] at [Open Activation Return File].
The launch return file is loaded.
14 Check in the SERVICE CENTER that product activation has completed.
Updating the TRAKTOR software
When the computer is connected to the Internet, TRAKTOR software can be updated by accessing the Native Instruments SERVICE CENTER (referred to simply as "SERVICE CENTER" below).
1 Launch the SERVICE CENTER and log in.
For instructions on launching the SERVICE CENTER and logging in, see Launching the SERVICE CENTER on page 9.
2 Click the [Update] tab.
Available updates are checked.
3 Check the check box.
Specify the update to be downloaded.
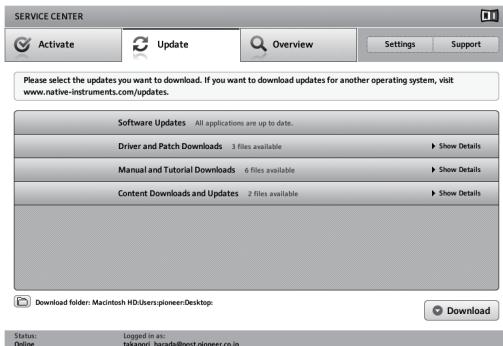
4 Click [Download].
Updating begins.
About the driver software (Windows)
This driver software is an exclusive ASIO driver for outputting audio signals from the computer. To use this unit connected to a computer on which Windows is installed, install the driver software on the computer beforehand.
There is no need to install the driver software when using Mac OS X.
Software end user license agreement
This Software End User License Agreement ("Agreement") is between you (both the individual installing the Program and any single legal entity for which the individual is acting) ("You" or "Your") and PIONEER CORPORATION ("Pioneer").
TAKING ANY STEP TO SET UP OR INSTALL THE PROGRAM MEANS THAT YOU ACCEPT ALL OF THE TERMS OF THIS LICENSE AGREEMENT. PERMISSION TO DOWNLOAD AND/OR USE THE PROGRAM IS EXPRESSLY CONDITIONED ON YOUR FOLLOWING THESE TERMS. WRITTEN OR ELECTRONIC APPROVAL IS NOT REQUIRED TO MAKE THIS AGREEMENT VALID AND ENFORCEABLE. IF YOU DO NOT AGREE TO ALL OF THE TERMS OF THIS AGREEMENT, YOU ARE NOT AUTHORIZED TO USE THE PROGRAM AND MUST STOP INSTALLING IT OR UNINSTALL IT, AS APPLICABLE.
1 Definitions
1 "Documentation" means written documentation, specifications and help content made generally available by Pioneer to aid in installing and using the Program.
2 "Program" means all or any part of Pioneer's software licensed to You by Pioneer under this Agreement.
2 Program license
1 Limited License. Subject to this Agreement's restrictions, Pioneer grants to You a limited, non-exclusive, nontransferable, license (without the right to sublicense):
a To install a single copy of the Program on the hard disk drive of Your computer, to use the Program only for Your personal purpose complying with this Agreement and the Documentation ("Authorized Use");
b To use the Documentation in support of Your Authorized Use; and
c To make one copy of the Program solely for backup purposes, provided that all titles and trademark, copyright and restricted rights notices are reproduced on the copy.
2 Restrictions. You will not copy or use the Program or Documentation except as expressly permitted by this Agreement. You will not transfer, sublicense, rent, lease or lend the Program, or use it for third-party training, commercial timesharing or service bureau use. You will not Yourself or through any third party modify, reverse engineer, disassemble or decompile the Program, except to the extent expressly permitted by applicable law, and then only after You have notified Pioneer in writing of Your intended activities. You will not use the Program on multiple processors without Pioneer's prior written consent.
3 Ownership. Pioneer or its licensor retains all right, title and interest in and to all patent, copyright, trademark, trade secret and other intellectual property rights in the Program and Documentation, and any derivative works thereof. You do not acquire any other rights, express or implied, beyond the limited license set forth in this Agreement.
4 No Support. Pioneer has no obligation to provide support, maintenance, upgrades, modifications or new releases for the Program or Documentation under this Agreement.
3 Warranty disclaimer
THE PROGRAM AND DOCUMENTATION ARE PROVIDED "AS IS" WITHOUT ANY REPRESENTATIONS OR WARRANTYES, AND YOU AGREE TO USE THEM AT YOUR SOLE RISK. TO THE FULLEST EXTENT PERMISSIBLE BY LAW, PIONEER EXPRESSLY DISCLAIMS ALL WARRANTYIES OF ANY KIND WITH RESPECT TO THE PROGRAM AND DOCUMENTATION, WHETHER EXPRESS, IMPLIED, STATUTORY, OR ARISING OUT OF COURSE OF PERFORMANCE, COURSE OF
DEALING OR USAGE OF TRADE, INCLUDING ANY WARRANTYES OF MERCHANTABILITY, FITNESS FOR A PARTICULAR PURPOSE, SATISFACTORY QUALITY, ACCURACY, TITLE OR NON-INFRINGEMENT.
4 Damages and remedies for breach
You agree that any breach of this Agreement's restrictions would cause Pioneer irreparable harm for which money damages alone would be inadequate. In addition to damages and any other remedies to which Pioneer may be entitled, You agree that Pioneer may seek injunctive relief to prevent the actual, threatened or continued breach of this Agreement.
5 Termination
Pioneer may terminate this Agreement at any time upon Your breach of any provision. If this Agreement is terminated, You will stop using the Program, permanently delete it from the computer where it resides, and destroy all copies of the Program and Documentation in Your possession, confirming to Pioneer in writing that You have done so. Sections 2.2, 2.3, 2.4, 3, 4, 5 and 6 will continue in effect after this Agreement's termination.
6 General terms
1 Limitation of Liability. In no event will Pioneer or its subsidiaries be liable in connection with this Agreement or its subject matter, under any theory of liability, for any indirect, incidental, special, consequential or punitive damages, or damages for lost profits, revenue, business, savings, data, use, or cost of substitute procurement, even if advised of the possibility of such damages or if such damages are foreseeable. In no event will Pioneer's liability for all damages exceed the amounts actually paid by You to Pioneer or its subsidiaries for the Program. The parties acknowledge that the liability limits and risk allocation in this Agreement are reflected in the Program price and are essential elements of the bargain between the parties, without which Pioneer would not have provided the Program or entered into this Agreement.
2 The limitations or exclusions of warranties and liability contained in this Agreement do not affect or prejudice Your statutory rights as consumer and shall apply to You only to the extent such limitations or exclusions are permitted under the laws of the jurisdiction where You are located.
3 Severability and Waiver. If any provision of this Agreement is held to be illegal, invalid or otherwise unenforceable, that provision will be enforced to the extent possible or, if incapable of enforcement, deemed to be severed and deleted from this Agreement, and the remainder will continue in full force and effect. The waiver by either party of any default or breach of this Agreement will not waive any other or subsequent default or breach.
4 No Assignment. You may not assign, sell, transfer, delegate or otherwise dispose of this Agreement or any rights or obligations under it, whether voluntarily or involuntarily, by operation of law or otherwise, without Pioneer's prior written consent. Any purported assignment, transfer or delegation by You will be null and void. Subject to the foregoing, this Agreement will be binding upon and will inure to the benefit of the parties and their respective successors and assigns.
5 Entire Agreement. This Agreement constitutes the entire agreement between the parties and supersedes all prior or contemporaneous agreements or representations, whether written or oral, concerning its subject matter. This Agreement may not be modified or amended without Pioneer's prior and express written consent, and no other act, document, usage or custom will be deemed to amend or modify this Agreement.
6 You agree that this Agreement shall be governed and construed by and under the laws of Japan.
Installing the driver software
Before installing the driver software
- Read Software end user license agreement carefully.
-
Turn off this unit's power switch, then disconnect the USB cable connecting this unit and the computer.
If any other programs are running on the computer, quit them. -
To install or uninstall the driver software, you need to be authorized by the administrator of your computer. Log on as the administrator of your computer before proceeding with the installation.
- If you connect this unit to your computer without installing the driver software first, an error may occur on your computer depending on the system environment.
- If installation of the driver software is interrupted after it has started, start the installation procedure over again from the beginning.
Supported operating systems
| Windows® 7 Home Premium/Professional/Ultimate | 32-bit version | ✓ |
| 64-bit version | ✓① | |
| Windows Vista® Home Basic/Home Premium/Business/Ultimate | 32-bit version | ✓ |
| 64-bit version | ✓① | |
| Windows® XP Home Edition/Professional (SP2 or later) | 32-bit version | ✓ |
When using a 64-bit version of Windows, the driver software can only be used for 32-bit applications.
1 Insert the included driver software CD-ROM into the computer's CD drive.
2 Once the CD-ROM's menu is displayed, double-click [Pioneer_DDJ_Driver_XXXXX.exe].
3 Proceed with installation according to the instructions on the screen.
If [Windows Security] appears on the screen while the installation is in progress, click [Install this driver software anyway] and continue with the installation.
- When installing on Windows XP
- If [Hardware Installation] appears on the screen while the installation is in progress, click [Continue Anyway] and continue with the installation.
- When the installation program is completed, a completion message appears.
Connecting this unit and computer
1 Connect this unit to your computer via a USB cable.
For details about connections, see Connections on page 13.
2 Slide the [ON/OFF] switch to the [ON] side.
Turn on the power of this unit.
- The message [Installing device driver software] may appear when this unit is first connected to the computer or when it is connected to a different USB port on the computer. Wait awhile until the message [Your devices are ready for use] appears.
Adjusting the buffer size
This unit functions as an audio device conforming to the ASIO standards.
- If an application using this unit as the default audio device (DJ software, etc.) is running, quit that application before adjusting the buffer size.
Click the Windows [Start] menu>[All Programs]>[Pioneer]>[DDJ]>[DDJ ASIO Settings Utility].
![PIONEER DDJ-T1 - Click the Windows [Start] menu>[All Programs]>[Pioneer]>[DDJ]>[DDJ ASIO Settings Utility]. - 1](/content/2024/12/118934/images/6bb73558e59ad980d09476440eb7c76c92f753b4b8beb4e6b18115c52dc5b6a2.jpg)
- If the buffer size is made large, drops in audio data (breaks in the sound) occur less easily, but the time lag due to the delay in the transfer of the audio data (latency) increases.
Checking the version of the driver software
Click the Windows [Start] menu> [All Programs]>[Pioneer] > [DDJ] > [DDJ Version Display Utility].
![PIONEER DDJ-T1 - Click the Windows [Start] menu> [All Programs]>[Pioneer] > [DDJ] > [DDJ Version Display Utility]. - 1](/content/2024/12/118934/images/3e04b56f0e1e20abfa77b1288d6392b759940c67164839783fccdbc2e8813f28.jpg)
- You can check the firmware version of this unit on the screen.
- The firmware version is not displayed when this unit is not connected to the computer or when this unit and computer are not properly communicating.
Checking the latest information on the driver software
For the latest information on the driver software for exclusive use with this unit, visit our website shown below. http://www.prodjnet.com/support/
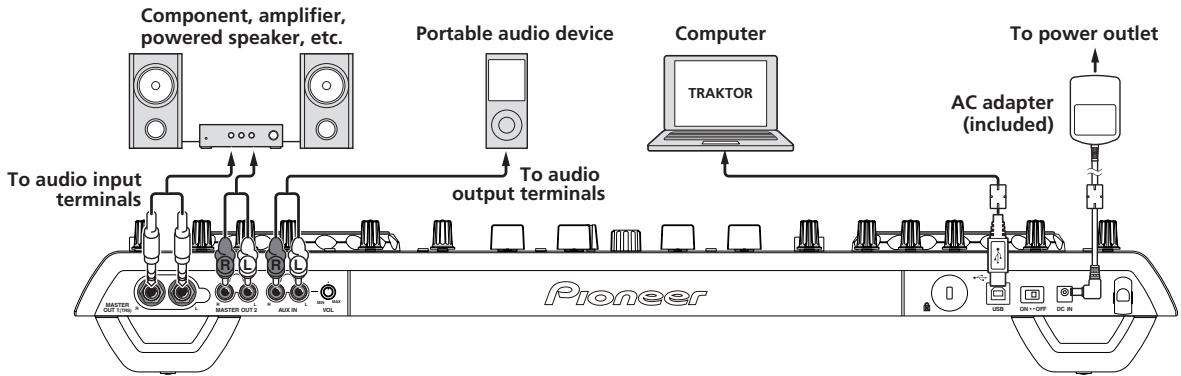
Connections
Be sure to turn off the power and unplug the AC adapter from the power outlet before making or changing connections between devices.
Wait until all connections between devices have been completed before connecting the AC adapter.
Only use the AC adapter included with this unit.
Refer to the operating instructions for the component to be connected.
Power to this unit is supplied by the AC adapter or by USB bus power.
This unit can be used by connecting it to a computer using a USB cable, even without connecting the AC adapter.
- Connect this unit and the computer directly using the included USB cable.
- A USB hub cannot be used.
- When using USB bus power, use the connected computer on an AC power supply.
-
In cases like the ones below, the power may be insufficient and this unit may not operate on USB bus power.
-
When the computer's USB power supply capacity is insufficient.
- When other USB devices are connected to the computer.
If this unit does not operate on USB bus power, connect the included AC adapter.
The following limitations apply when operating on USB bus power:
The jog dial indicator will not light.
The indicators (aside from the jog dial) will be dimmer.
The [AUX IN] and [MIC] terminals cannot be used.
The volume of the headphones will be lower.
To use the unit without these limitations, connect the included AC adapter.
Names of terminals
Rear panel

1 MASTER OUT 1 terminal
Connect powered speakers, etc., here.
This is a TRS phone jack, so both balanced and unbalanced outputs are supported.
- The sound will be distorted if the level is raised too high when using unbalanced outputs.
2 MASTER OUT 2 terminal
Connect to a power amplifier, etc.
3 AUX IN terminal
Connect to the output terminal of an external device (sampler, portable audio device, etc.)
- This cannot be used when operating on USB bus power.
4 VOL control
Adjusts the audio level input to the [AUX IN] terminals.
5 Kensington security slot
6 USB terminal
Connect to a computer.
- Connect this unit and the computer directly using the included USB cable.
- A USB hub cannot be used.
7 ON/OFF switch
Turns this unit's power on and off.
8 DC IN terminal
Connect to a power outlet using the included AC adapter (with the power plug mounted).
Wait until connection of all equipment is completed before connecting the AC adapter.
Only use the included AC adapter.
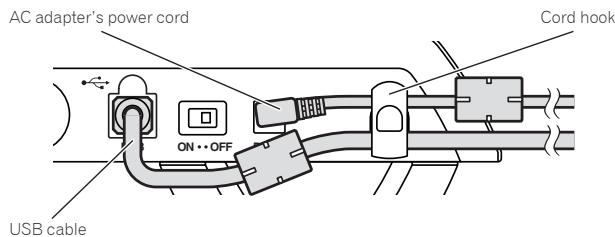
9 Cord hook
Catch the AC adapter's power cord and USB cable on this hook when using this unit. For details, see Cord hook on page 14.
- The sound will be interrupted if the AC adapter or USB cable is disconnected during playback.
Front panel

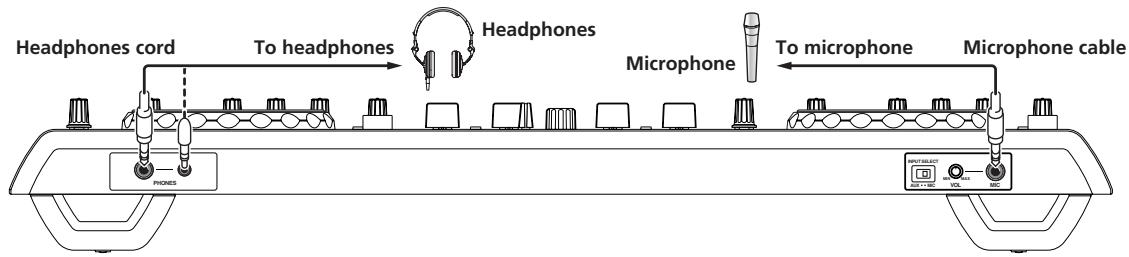
PHONES terminal
Connect headphones here.
Both stereo phone plugs (Ø 6.3 mm) and stereo mini phone plugs (Ø 3.5 mm) can be used.
- The volume decreases when headphones are connected simultaneously to both the stereo phone jack and the stereo mini phone jack.
2 AUX/MIC selector switch
Switches the audio input between the external device and the microphone.
- [AUX]: The external device connected to the [AUX] terminals is selected.
- [MIC]: The microphone connected to the [MIC] terminal is selected.
3 VOL control
Adjusts the audio level input to the [MIC] terminal.
4 MIC jack
Connect a microphone here.
- This cannot be used when operating on USB bus power.
Connecting the input/output terminals
Rear panel
Cord hook
Hook the AC adapter's power cord in the top of the cord hook, the USB cable in the bottom.
Fasten the AC adapter's power cord and USB cable in place by hooking them on the cord hook. This prevents the power cord and USB cable from being accidentally pulled and the plugs from being disconnected from the terminals.
- The sound will be interrupted if the AC adapter or USB cable is disconnected during playback.
Front panel
Part names and functions
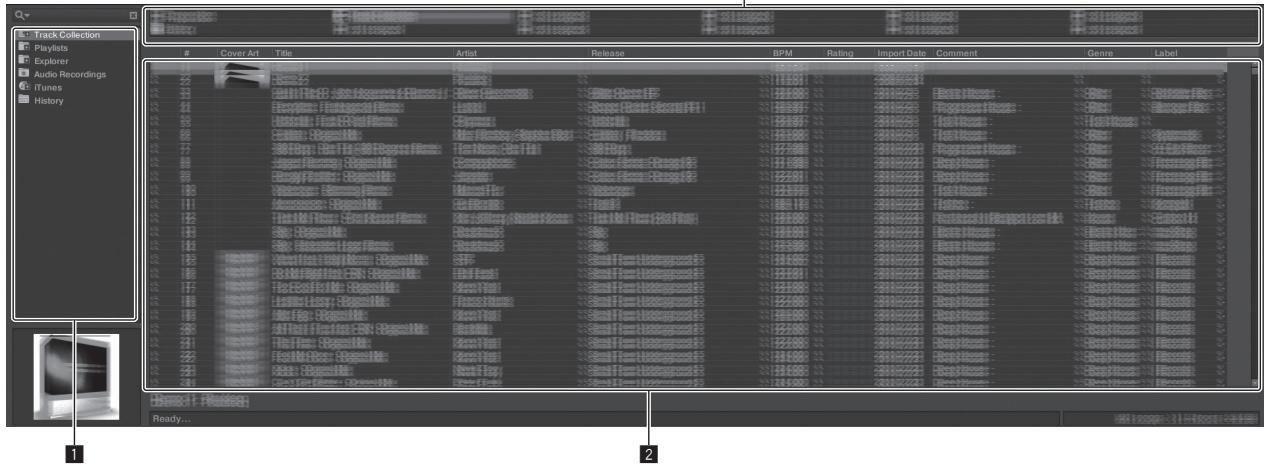
Control panel
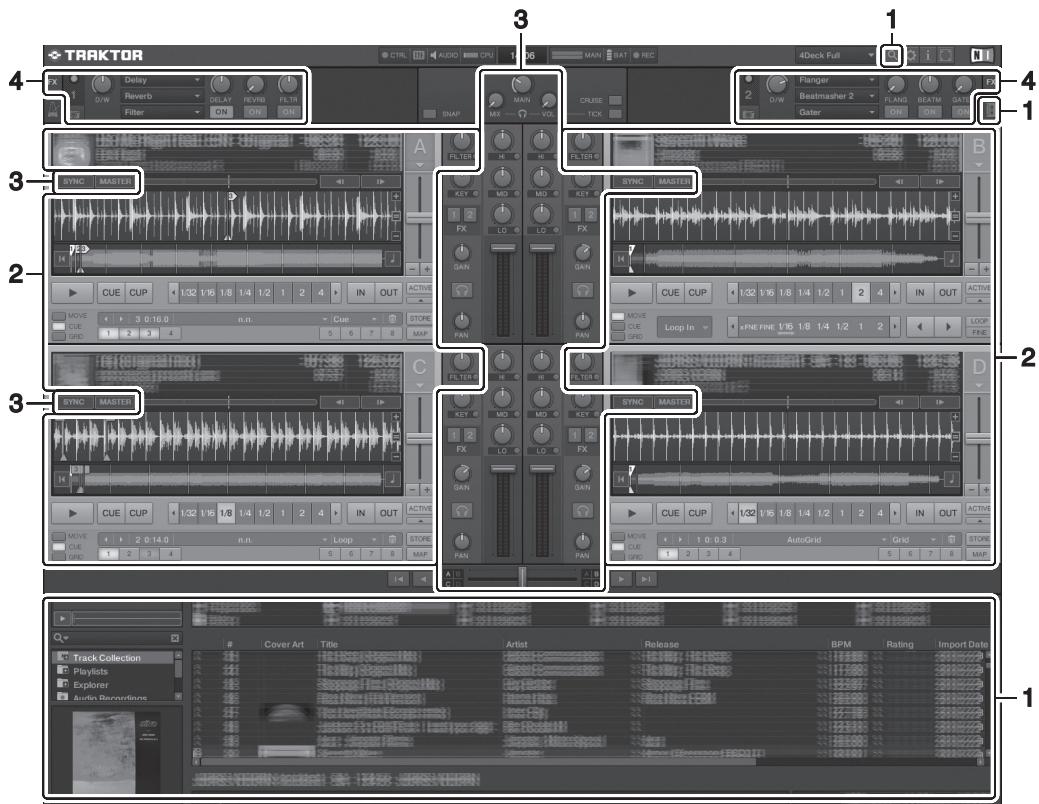
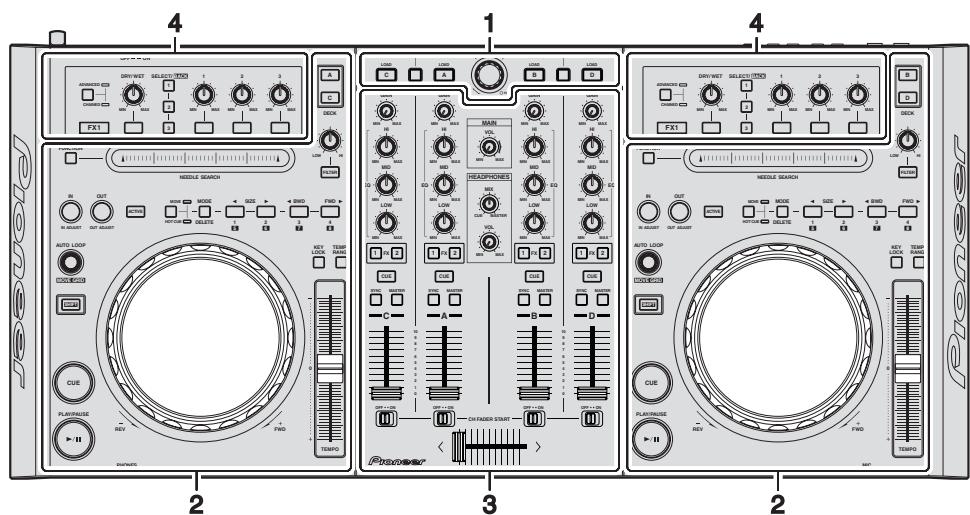
1 Browser (page 16)
3 Mixer (page 19)
2 Deck (page 17)
4 Effect (page 20)
The above screen shows just one example of the display.
The contents displayed differ according to the resolution of your computer's monitor.
The contents displayed on the screen can be changed using the procedure below.
- Click: Switches the full screen display on and off.
- Double-click the deck's track information display section (the part where the track name, BPM, etc., are displayed): Opens and closes the track information display section.
- Click [▲] under the [ACTIVE] button: Opens and closes the advanced panel.
1 Browser
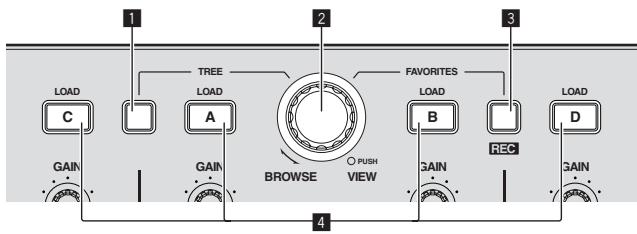
TREE button
- Turn the rotary selector while pressing the [TREE] button: Moves the cursor in the [TREE] area.
The section marked 1 on the above screen is called the [TREE] area. - Press the rotary selector while pressing the [TREE] button:
Opens/closes the folder.
2 Rotary selector
- Turn the rotary selector: Moves the cursor in the [TRACK] area.
The section marked 2 on the above screen is called the [TRACK] area. - Press the rotary selector: Turns the enlarged display of the [BROWSE] area on/off.
The [TREE] area, [TRACK] area and [FAVORITES] area are collectively called the [BROWSE] area.
Turn the rotary selector while pressing the [SHIFT] button: Moves the cursor in the [TRACK] area page by page.
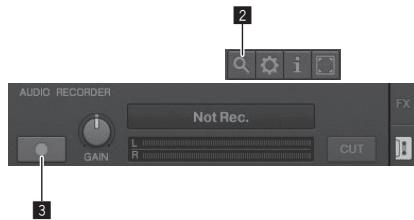
3 FAVORITES (REC) button
- Turn the rotary selector while pressing the [FAVORITES (REC)] button: Moves the cursor in the [FAVORITES] area.
The section marked 3 on the above screen is called the [FAVORITES] area.
- Press the [FAVORITES (REC)] button while pressing the [SHIFT] button: Starts/stops recording.
To display the [AUDIO REORDER] panel, click the icon in the upper right of the screen.
- Recording can be started/stopped even when the [AUDIO REORDER] panel is not displayed.
To play files you have recorded, select [Audio Recordings] in the [TREE] area.
The location where recorded files are stored can be checked and changed at [Recording] under [Preferences].
4 LOAD button
Loads the track selected with the cursor in each of the decks.
2 Deck
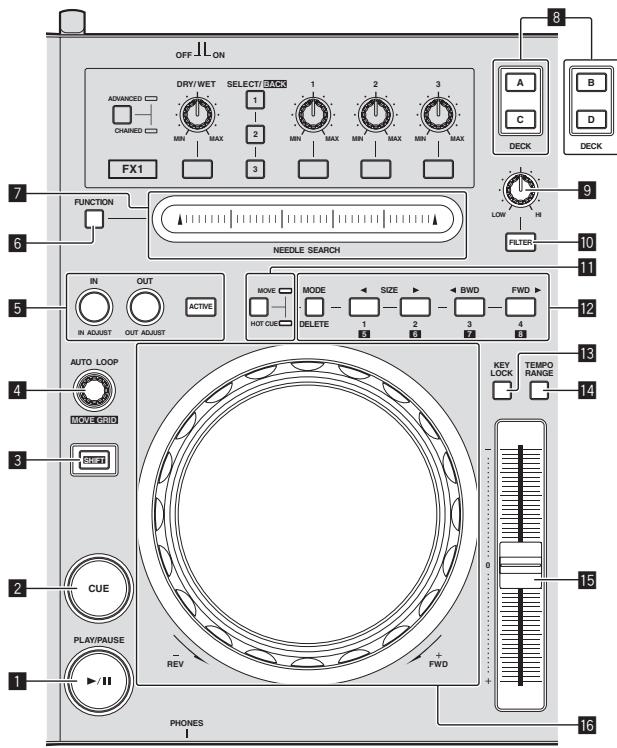
PLAY/PAUSE button
Use this to play/pause tracks.
2 CUE button
When the [CUE] button is pressed while pausing, the cue point is set at the position where playback is pausing.
- When TRAKTOR's [SNAP] function is on: The cue and loop points can be set at the desired position.
- When TRAKTOR's [SNAP] function is on: The cue and loop points are set to the nearest [Beat Grid].
When the [CUE] button is pressed during playback, playback returns to the set cue point, cues there, and the pause mode is set (back cue).
When you keep pressing the [CUE] button after returning to the cue point, playback continues as long as the button is pressed.
3 SHIFT button
When another button is pressed while pressing the [SHIFT] button, a different function is called out.
4 AUTO LOOP (MOVE GRID) control
- Turn the [AUTO LOOP (MOVE GRID)] control: Changes the loop size.
- Press the [AUTO LOOP (MOVE GRID)] control: Switches loop playback on/off.
-
Turn the [AUTO LOOP (MOVE GRID)] control while pressing the [SHIFT] button: The [Beat Grid] can be adjusted. This adjusts the difference with the results of analysis.
-
When adjusting the [Beat Grid], create at least one [BEAT MARKER].
- When creating [BEAT MARKER], set the hot cue [CUE TYPE] to [Grid].
- [CUE TYPE] (the type of hot cue) can be changed by clicking [▼] to the left of the icon.
5 IN (IN ADJUST) button, OUT (OUT ADJUST) button, ACTIVE button
IN (IN ADJUST) button
During playback, press the [IN (IN ADJUST)] button at the position at which you want to start loop playback (the loop in point) to set the loop in point.

The loop in point can be fine-adjusted by pressing the [IN (IN ADJUST)] button during loop playback then using the jog dial.
During fine-adjustment of the loop point, the [IN (IN ADJUST)] button flashes rapidly and the [OUT (OUT ADJUST)] button is off.
To return to normal loop playback, press the [IN (IN ADJUST)] button.
Real-time cue: When the [IN (IN ADJUST)] button is pressed during playback, the cue point is set at the position at which the button was pressed.
OUT (OUT ADJUST) button
Press the [OUT (OUT ADJUST)] button at the position at which you want to stop loop playback (the loop out point) to set the loop out point.
The loop out point is set, playback returns to the loop in point and loop playback starts.
The loop out point can be fine-adjusted by pressing the [OUT (OUT ADJUST)] button during loop playback then using the jog dial.
After switching [MOVE MODE] to [Loop Out], use the jog dial to fine-adjust the loop out point.
During fine-adjustment of the loop out point, the [OUT (OUT ADJUST)] button flashes rapidly and the [IN (IN ADJUST)] button is off.
To return to normal loop playback, press the [OUT (OUT ADJUST)] button.
ACTIVE button
Switches loop playback on/off.
6 FUNCTION button
Switches the [NEEDLE SEARCH] pad's function.
NEEDLE SEARCH pad
- When the [FUNCTION] button is off:
The [NEEDLE SEARCH] function can be used.
The sound at the position at which the [NEEDLE SEARCH] pad is touched can easily be played. - When the [FUNCTION] is on:
The desired function can be assigned.
Upon purchase, nothing is assigned.
For instructions on assigning functions, see Changing the TRAKTOR Preferences on page 24.
8 DECK button
Switches the deck to be operated.
Deck on left side of this unit: Deck [A] or [C]
Deck on right side of this unit: Deck [B] or [D]
9 Filter control
- Turn counterclockwise while filter function is on: Low pass filter.
- Turn clockwise while filter function is on: High pass filter.
10 FILTER button
Switches the filter function on/off.
11 MOVE/HOT CUE selector button
Switches [Move Panel] and [Cue Panel] in the advanced panel.
To open the advanced panel, click [▼] below [ACTIVE] in TRAKTOR.
12 MOVE PANEL/HOT CUE PANEL
- MOVE PANEL operation
[MOVE MODE] (the loop moving mode) switches each time the [MODE DELETE] button is pressed.
→[Beat Jump]→[Loop]→[Loop In]→[Loop Out]
- [Beat Jump]: The position of playback moves.
- [Loop]: The loop moves.
- [Loop In]: The loop in point moves.
- [Loop Out]: The loop out point moves.
Use the [SIZE ] buttons to set the amount of movement of the playback position or loop by fractions of the beat.
Use the [ BWD / FWD ] buttons to move the playback position or loop by the amount of movement set with the [SIZE ] buttons.
- HOT CUE PANEL operation
When a button at which nothing is set is pressed in the play or pause mode, a hot cue ([1] - [4]) is set at the position at which the button was pressed.
When a button at which a hot cue ([1] - [4]) is set is pressed in the play or pause mode, a hot cue ([1] - [4]) is called out.
To cancel a hot cue ([1] - [4]), press the corresponding button ([1] - [4]) while pressing the [DELETE] button.
Buttons [1] - [4] at which hot cues are set flash while the [DELETE] button is pressed.
To set or call out hot cues [5] to [8], press buttons [1] to [4] while pressing the [SHIFT] button.
To delete a hot cue from [5] to [8], press buttons [1] to [4] while pressing the [SHIFT] and [DELETE] buttons.
- [CUE TYPE] (the type of hot cue) can be changed by clicking [▼] to the left of the icon.
3 KEY LOCK button
Switches the key lock function on/off.
When the key lock function is on, the key does not change even when the playing speed is changed with the [TEMPO] slider.
14 TEMPO RANGE button
The [TEMPO] slider's range of variation switches each time this is pressed.
[±6] [±10] [±16] [±100]
TEMPO slider
- Move towards the + (front) side: The playing speed increases.
- Move towards the - (back) side: The playing speed decreases.
16 Jog dial
- Scratch
Spin the jog dial while pressing down on the top: The sound is played according to the direction and speed of rotation.
Pitch bend
During playback, spin the outer section of the jog dial.
Spin clockwise: The playing speed increases.
Spin counterclockwise: The playing speed decreases.
- Stop spinning: Playback at the normal speed resumes.
3 Mixer
MAIN VOL control
Adjusts the sound level output from the master.
Adjusts the monitor volume balance between the sound of the deck for which the [CUE] button is pressed and the sound of [MASTER OUT 1] and [MASTER OUT 2].
3 HEADPHONES VOL control
Adjusts the audio level output from the [PHONES] terminal.
4 GAIN control
Adjusts the sound level input to the various decks.
5 EQ (HI, MID, LOW) controls
These adjust the sound quality input to the various decks.
These adjust the [HI] (high range), [MID] (medium range) and [LOW] (low range), respectively.
6 Effect assign buttons
Press the [1] or [2] button to assign TRAKTOR effect unit [FX 1] or [FX 2] to the deck.
CUE button
The sound of decks for which the headphones [CUE] button is pressed can be monitored over headphones.
When multiple headphones [CUE] buttons are pressed, the sound of the decks for which the buttons are pressed is mixed and output from the headphones.
8 SYNC button
The track on the deck for which the [SYNC] button is pressed is synchronized to the [BPM] and [Beat Grid] of the deck for which the [MASTER] button is pressed or of the master clock.
9 MASTER button
Sets the tempo of the deck for which the [MASTER] button is pressed as the master for synchronizing with the beat sync function.
10 Channel fader
Adjusts the sound level output from the various decks.
11 CH FADER START switch
Switches the [CH FADER START] function on/off.
When the [CH FADER START] switch is set to [ON], the fader starts and back cue functions can be used according to the movement of the channel faders.
- Fader start: When the channel fader is moved from the front-most position towards the back while pausing at the cue point, playback starts immediately.
- Back cue: When the channel fader is returned from the back to the front-most position, playback returns to the set cue point, cues there, and the pause mode is set immediately.
12 Crossfader
Switches the sound of the decks assigned to the left and right sides of the crossfader for output.
The deck assignment can be changed with the [Deck Assign Button] at the sides of the TRAKTOR crossfader.
Do not pull on the channel fader and crossfader knobs with excessive force. The knobs are not designed to be removed. Pulling the knobs strongly may result in damaging the unit.
4 Effect
- The [Advanced] mode cannot be selected with TRAKTOR Pioneer DDJ-T1 EDITION.
The effect panel can be switched to the [Advanced] mode when you upgrade to TRAKTOR PRO or TRAKTOR SCRATCH PRO.
ADVANCED/CHAINED selector button
- [Chained] mode: Up to 3 effects can be selected on the effect panels and operated simultaneously.
- [Advanced] mode: The parameters of the one selected effect can be adjusted in detail.
2 Effect button
This button is exclusively for use in the [Advanced] mode.
3 DRY/WET control
Changes the balance between the effect sound and original sound.
4 SELECT/BACK button
The effect type switches each time the button is pressed. With TRAKTOR Pioneer DDJ-T1 EDITION, the 6 types of effects below can be used.
[ \rightarrow [noEffect] \rightarrow [Delay] \rightarrow [Reverb] \rightarrow [Flanger] \rightarrow [Beatmasher2] \rightarrow [Gater] ]
- When the [SELECT/BACK] button is pressed while pressing the [SHIFT] button, the direction in which the effect types switch is reversed.
- When in the [Advanced] mode, the effect type is switched by pressing the [1] button for [SELECT/BACK].
5 Effect control
Effect control dials
The linked functions differ depending on the TRAKTOR effect panel's mode.
- [Chained] mode: Adjusts the balance between the effect sound of the each effects and the original sound.
- [Advanced] mode: Adjusts the various parameters of the selected effect.
Effect control buttons
The linked functions differ depending on the TRAKTOR effect panel's mode.
- [Chained] mode: Switches the various effects on/off.
- [Advanced] mode: When the effect control [1] button is pressed, all the effect setting values return to the default setting values.
When effect control buttons [2] and [3] are pressed, the various parameters switch between on and off. The types of parameters differ according to the effect.
Operations
Importing tracks to TRAKTOR
This function is operated not on the DDJ-T1 but on the computer.
From Explorer or Finder, drag & drop music files or folders containing music files to [Track Collection] in TRAKTOR's [TREE] area.
- Right-click [Track Collection] (on Mac OS X, click [Track Collection] while pressing the [control] key), then select [Import Music Folders] from the menu. All the music files in your system's [My Music] or [Music] folder are imported.
Creating playlists
This function is operated not on the DDJ-T1 but on the computer.
1 Right-click [Playlists] in TRAKTOR's [TREE] area.
For Mac OS X, click it while pressing the [control] key.
2 From the menu, select [Create Playlist].
3 Input the playlist name, then click [OK].
The playlist you have created is displayed at [Playlists].
4 Drag & drop music files to the playlist you have created to add them.
Creating a FAVORITES
This function is operated not on the DDJ-T1 but on the computer.
Drag & drop the playlist folder to an open [FAVORITES] slot.
Loading tracks in decks
1 Turn the rotary selector while pressing the [TREE] button.
Select the playlist or folder.
- To select among [FAVORITES], turn the rotary selector while pressing the [FAVORITES] button.
- When the rotary selector is pressed at an item marked [+] while pressing the [TREE] button, the folder opens or closes.
2 Release the [TREE] or [FAVORITES] button and turn the rotary selector.
Select the track.
- When the rotary selector is turned while pressing the [SHIFT] button, the cursor jumps by pages.
3 Press the [LOAD] buttons for the decks into which you want to load the tracks.
The selected tracks are loaded into the respective decks.
Playing iTunes music files
If you are managing music files with iTunes, the iTunes library and playlists can be accessed directly with the TRAKTOR browser.
1 Turn the rotary selector while pressing the [TREE] button to select iTunes.
2 Browsing the library and playlists in the same way as with iTunes
- The iTunes library and playlists cannot be edited with the TRAKTOR browser.
- When played from the TRAKTOR browser, iTunes music files are automatically imported to the TRAKTOR [Track Collection] list.
Enlarging the browse display area
Press the rotary selector.
switches to and the browse display area is enlarged.
- To return to the normal display, press the rotary selector again.
Playback
Press the [PLAY/PAUSE /II] button.
Pausing
During playback, press the [PLAY/PAUSE II] button.
Adjusting the playing speed manually (Tempo Control)
Move the [TEMPO] slider forward or backward.
The playing speed increases when the slider is moved to the [+ side (towards you), decreases when the slider is moved to the [-] side (away from you).
The percentage by which the playing speed is changed is shown on the playing speed display.
Selecting the playing speed adjustment range
Press the [TEMPO RANGE] button.
The [TEMPO] slider's range of variation switches each time the button is pressed.
The range of variation setting is shown on the playing speed range of variation display.
- The playing speed can also be adjusted automatically (Synchronizing the playing speed with other decks (beat sync) on page 22).
Adjusting the playing speed without changing the pitch (Key Lock)
Press the [KEY LOCK] button.
The [KEY LOCK] indicator and light.
When in the key lock mode, the pitch does not change even when the playing speed is changed.
Set the cue
1 During playback, press the [PLAY/PAUSE /II] button.
Playback is paused.
2 Press the [CUE] button.
Cue point [] is set at the position at which playback was paused.
The [PLAY/PAUSE /II] indicator flashes and the [CUE] indicator lights.
No sound is output at this time.
- When a new Cue Point is set, the previously set Cue Point is deleted.
- For information about setting cue points, see MOVE PANEL/HOT CUE PANEL on page 18.
Adjusting the cue point position
1 Spin the jog dial while pressing down on the top.
The pause position is adjusted.
2 Press the [CUE] button.
Cue point [] is set to the [Beat Grid] nearest the position at which the button was pressed.
Returning to Cue Point (Back Cue)
During playback, press the [CUE] button.
The set immediately returns to the currently set cue point and pauses.
- When the [PLAY/PAUSE▶/II] button is pressed, playback starts from the cue point.
Checking Cue Point (Cue Point Sampler)
Keep pressing the [CUE] button after returning to the cue point.
Playback starts from the set cue point.
Playback continues as long as the [CUE] button is pressed.
Setting Cue Point during playback (Real Time Cue)
During playback, press the [IN (IN ADJUST)] button at the position at which you want to set the cue point.
Cue point [] is set to the [Beat Grid] nearest the position at which the button was pressed.
Using the mixer functions
Outputting sound
Set the volume of the power amplifiers connected to the [MASTER OUT
1, MASTER OUT 2] terminals to an appropriate level. Note that very loud sounds will be output if the volume is set too high.
1 Turn the [GAIN] control.
Adjusts the sound level input to the various decks.
2 Set the channel fader to the inner position.
Adjusts the sound level output from the various decks.
3 Set the crossfader.
Switch the deck whose sound is to be output from the speakers.
-
Left edge: Sound is output from deck [A] or [C].
Center: The sound of all the decks is mixed and output.
Right edge:Sound is output from deck [B] or [D]. -
The deck assignment can be changed with the [Deck Assign Button] at the sides of the TRAKTOR crossfader.
4 Turn the [MAIN VOL] control.
Audio signals are output from the [MASTER1] and [MASTER2] terminals.
Adjusting the sound quality
Turn the [EQ (HI, MID, LOW)] controls for the various decks.
Monitoring sound with headphones
1 Connect headphones to the [PHONES] jack.
2 Press the headphones [CUE] button for the deck you want to monitor.
3 Turn the [HEADPHONES MIX] control.
Turn counterclockwise: The sound of the deck for which the headphones [CUE] button is pressed becomes relatively louder.
Center position: The sound of the deck for which the headphones [CUE] button is pressed and the [MASTER OUT 1, MASTER2] sound have the same volume.
- When turned clockwise: The volume of the sound output from the [MASTER OUT 1, MASTER2] terminals becomes relatively louder.
4 Turn the [HEADPHONES VOL] control.
The sound of the deck for which the headphones [CUE] button is pressed is output from the headphones.
- When the headphones [CUE] button is pressed again, monitoring is canceled.
Using the effect function
TRAKTOR is equipped with two effect units, [FX 1] and [FX 2].
Each of the effect units can be assigned to one or more decks.
- TRAKTOR PRO and TRAKTOR SCRATCH PRO are equipped with four effect units.
Adding effects ([Chained] mode)
1 Press the effect assign button.
Press the [1] or [2] button to assign TRAKTOR effect unit [FX 1] or [FX 2] to the deck.
2 Turn the effect control dial.
Adjust the balance between the effect sound for the different effects and the original sound.
3 Press the effect control button.
Press the effect control button for the effect you want to apply.
- When the button is pressed again, the effect is turned off.
The effect unit's three effects can also be turned on simultaneously.
4 Turn the [DRY/WET] control.
Adjust the balance between the effect sound for all of the effects together and the original sound.
Synchronizing the playing speed with other decks (beat sync)
1 Press the [MASTER] button on the currently playing deck.
The deck whose [MASTER] button was pressed is set as the master for synchronization.
The [MASTER] indicator and [MASTER] in TRAKTOR light.
2 Press the [SYNC] button on a deck not set as the master for synchronization.
That deck is synchronized to the [BPM] and [Beat Grid] of the track on the deck set as the master for synchronization.
The [SYNC] indicator and [SYNC] in TRAKTOR light.
- For information about setting the master for synchronization, see Setting the master for synchronization on page 23.
-
In the cases below, the [SYNC] function may not operate properly.
-
When the loop length is under 1 beat
- When the [BPM] of the track on the deck for which the [MASTER] button is pressed exceeds the adjustable tempo range of the track on the deck for which the [SYNC] button is pressed
- When the track has not been analyzed.
Setting the master for synchronization
Click [A].
The master for synchronization can be selected and set from among the four types below.
Deck master (manual): The deck for which the [MASTER] button is pressed is set as the master.
Deck master (auto): Of the tracks being played, the deck with the track that has been playing longest is set as the master. It is also possible to set the deck for which the [MASTER] button is pressed as the master.
- Clock master (internal): The BPM value input by the user or the BPM value set by tapping is set as the master.
- Clock master (external): The MIDI clock of the external device is set as the master.
By default, the master for synchronization is set to deck master (auto).
When set to clock master (internal or external), the [MASTER] button is disabled.
Inputting the sound of a microphone or external device
The sound of an external device connected to the [AUX IN] or [MIC] terminals can be input to any of the decks and mixed.
By default on TRAKTOR Pioneer DDJ-T1 EDITION, the sound of external devices connected to the [AUX IN] and [MIC] terminals is input to deck [D]. To achieve a suitable volume, adjust the [VOL] control on this unit's rear panel according to the device connected to the [AUX IN] terminals.
Pioneer DJ player: Set near the center position.
- Portable audio player or other device with low volume: Set clockwise of the center position.
- When operating on USB bus power, the [AUX IN] and [MIC] terminals cannot be used.
Click [▼] on deck [D].
From the menu, select [Audio Through].
![PIONEER DDJ-T1 - Click [▼] on deck [D]. - 1](/content/2024/12/118934/images/62adf7161666d24e9c929d7504b58d4de90e17036b929b40eed4df87e8f48f9e.jpg)
- To set the deck to which the external device's audio signals are input to a different deck, change the setting at [Input Routing] in [Preferences].
- When the external device's audio input deck is set to one of decks [A] - [D], the effect functions, filter functions and EQ controls can be used.
To set the deck back as it was, click [▼] and select [Internal Playback].
Changing the TRAKTOR Preferences
Change TRAKTOR's environmental settings according to the usage conditions of your hardware.
For details on TRAKTOR's environmental settings, see the TRAKTOR manual.
If you wish to restore the changes to the environmental settings to their defaults, please check the following website. http://www.prodjnet.com/support/
1 Click the TRAKTOR [ (Preferences Button)] button.
Open the TRAKTOR settings menu.
2 Select the category and make the settings.
List of TRAKTOR Pioneer DDJ-T1 EDITION setting items
| Category | Descriptions |
| Audio Setup | Select the audio devices to be used for audio input/output. Set the sampling rate and latency. |
| Output Routing | [Internal]: Use TRAKTOR's internal mixer. To use only with this unit, select [Internal]. [External]: Use an external mixer. Set the master audio output and monitor audio output terminals. |
| Input Routing | Set the audio input from an external device (portable audio player, microphone, etc.) to a deck. |
| Loading | Set the conditions and functions for loading tracks to the decks. |
| Transport | Set the tempo and key lock functions. |
| Mixer | Set the auto gain, master limiter, etc. |
| Effects | Set the types of effects to be displayed when selecting effects. |
| Recording | Set whether to record the TRAKTOR master audio output or the external audio input. Set the location where recorded audio files are stored. |
| File Management | Make the settings for track importing, auto analysis, the analysis BPM range, etc. |
| Data Location | Set the path to the data (music files, iTunes library files, etc.). |
| Global View Options | Set the deck area display method, the font size to be used with the browser, etc. |
| Controller Manager | Assign TRAKTOR functions to the controller, keyboard, etc. |
| Traktor Kontrol X1 | Set this when using Native Instruments' Traktor Kontrol X1. |
Assigning the desired functions to the [NEEDLE SEARCH] pad
When assigning the desired functions to the [NEEDLE SEARCH] pad, first press the [FUNCTION] button to turn [FUNCTION] on.
- Functions can be assigned to up to 5 points on the [NEEDLE SEARCH] pad.
![PIONEER DDJ-T1 - Assigning the desired functions to the [NEEDLE SEARCH] pad - 1](/content/2024/12/118934/images/0f310445b5bded79e3c9cb4994f01a7b356ded9bc140cb9c55a23effcf0689a2.jpg)
1 Click the TRAKTOR [ (Preferences Button)] button.
Open the TRAKTOR settings menu.
2 Click [Controller Manager].
3 Click [Device] under [Device Setup].
From the pull-down menu, select [Pioneer. DDJ-T1].
4 Click [Add In...] under [Assignment Table].
From the pull-down menu, select the function to be assigned.
5 Click [Learn] under [Device Mapping].
Turn [Learn] on.
6 Touch the [NEEDLE SEARCH] pad.
Touch the point at which you want to assign the function.
The name of the point touched is displayed in the field to the right of [Learn] at [Device Mapping].
- The place at which the function is to be assigned can also be selected by clicking the field to the right of [Learn] at [Device Mapping].
7 Click [Learn] again.
Turn [Learn] off.
8 Click [Close] at the bottom right of the screen.
Close the TRAKTOR settings menu.
Setting the details of the functions assigned to the [NEEDLE SEARCH] pad
- [Modifier Conditions]: Sets the operating conditions for the function selected at [Add In...].
The operating conditions are switched with the [Value] setting. - [Type of Controller]: Selects [Button], [Fader/Knob], [Encoder], etc.
When assigned to [Function 1] - [Function 5], this is set to [Button]. - [Interaction Mode]: Sets the way in which the functions of TRAKTOR and the controller are associated.
- [Hold]: The function operates while the button is pressed.
- [Toggle]: The function's properties switch each time the button is pressed.
Setting the [Button Options]
Even more detailed settings can be made depending on the settings at [Type of Controller] and [Interaction Mode].
For example, when [Type of Controller] is set to [Button] and [Interaction Mode] is set to [Hold], the [Invert] setting can be made.
Additional information
Troubleshooting
Incorrect operation is often mistaken for trouble or malfunction. If you think that there is something wrong with this component, check the points below. Sometimes the trouble may lie in another component. Inspect the other components and electrical appliances being used. If the trouble cannot be rectified after checking the items below, ask your nearest Pioneer authorized service center or your dealer to carry out repair work.
This unit may not operate properly due to static electricity or other external influences. In this case, proper operation may be restored by turning the power off, waiting 1 minute, then turning the power back on.
| Problem | Check | Remedy |
| The power is not turned on. None of the indicators light. | Is the power [ON/OFF] switch set to [ON]? | Set the power [ON/OFF] switch to [ON]. |
| The jog dial indicator will not light. The indicators (aside from the jog dial) are dim. The [AUX IN] and [MIC] terminals cannot be used. The volume of the headphones is low. | Are you operating on USB bus power? | Connect the included AC adapter. (page 14) There are limitations when operating on USB bus power. To use the unit without these limitations, connect the included AC adapter. |
| This unit is not recognized. | Is the power [ON/OFF] switch set to [ON]? | Set the power [ON/OFF] switch to [ON]. |
| Is the included USB cable properly connected? | Connect the included USB cable properly. (page 14) | |
| Is [CTRL] lit in TRAKTOR? | Press any button on this unit and check that [CTRL] lights in TRAK-TOR. | |
| — | Check that [Pioneer. DDJ-T1] is selected at [Preferences] > [Controller Manager] > [Device Setup] > [Device]. (page 24) | |
| This unit operates on USB bus power even when the included AC adapter is used. | Is the included AC adapter properly connected? | Mount the power plug properly on the included AC adapter. (page 5) Connect the included AC adapter properly to the power outlet. (page 14) Connect the included AC adapter's DC plug properly to this unit. (page 14) |
| Power does not turn on when operating on USB bus power. | Is the included USB cable properly connected? | Connect the computer and this unit directly using the included USB cable. USB hubs cannot be used. (page 14) |
| The computer's USB power supply capacity may be insufficient. | Use the included AC adapter. | |
| Are you using a USB hub? | USB hubs cannot be used. Connect the computer and this unit directly using the included USB cable. (page 14) | |
| Are you using a commercially available USB cable? | Use the included USB cable. | |
| Positions of controls or sliders differ on this unit and in TRAKTOR. | — | When this unit's controls and sliders are moved, the TRAKTOR controls and sliders move in sync. |
| Music files cannot be played. | Are the music files damaged? | Play music files that are not damaged. |
| No tracks are displayed in the [TRACK] area. | Have the music files been properly imported? | Import the music files properly. (page 21) |
| Have you selected a [Playlists] or [FAVORITES] slot that does not contain any tracks? | Select a [Playlists] or [FAVORITES] slot that contains tracks. | |
| Music files cannot be found. | Have they been properly recorded? | Check the settings at [Preferences] > [Recording]. |
| Turn the rotary selector while pressing the [TREE] button and select [Audio Recordings]. (page 16) | ||
| Volume of device connected to [AUX IN] termi-nals is low. | Is the [AUX IN] terminals' [VOL] control set to the proper position? | Set the audio level to a suitable level for the connected device. (page 23) |
| Distorted sound. | Are the [MAIN VOL] and [GAIN] controls set to the proper position? | Adjust the [MAIN VOL] and [GAIN] controls while watching the [MAIN] level indicator in TRAKTOR. |
| Is the audio level being input to the [AUX IN] and [MIC] terminals set to a suitable level? | Set the audio level input to the terminals to a suitable level for the connected devices. | |
| Are the [MASTER OUT 1] terminals set to unbalanced output with a monaural cable? | With an unbalanced output, the sound will be distorted unless the output is set to a suitable level. Use the [MAIN VOL] control to set the output to a suitable level. | |
| Sound being played is interrupted. | Are the included AC adapter and included USB cable properly connected? | The sound will be interrupted if the included AC adapter's power cord or included USB cable is disconnected from this unit during playback. (page 14) Properly fasten the included AC adapter's power cord and the included USB cable to this unit's cord hook. (page 14) |
| Is the driver software's latency value suitable? | Set the driver software's latency to a suitable value. (page 12) | |
| Sound of an external device or microphone cannot be output. | Is [Audio Through] set? | Set [Audio Through] on decks whose sound you want to output. (page 23) |
| No sound is produced. | Are the connection cables properly connected? | Connect the connection cables properly. (page 14) |
| Is the included USB cable properly connected? | Connect the computer and this unit directly using the included USB cable. USB hubs cannot be used. (page 14) | |
| Are terminals or plugs dirty? | Wipe any dirt off terminals and plugs before connecting. | |
| Is the driver software properly set? | Set the driver software properly. (page 11) | |
| Are [Audio Setup], [Output Routing] and [Input Routing] in TRAKTOR properly set? | Check that [Preferences] is set as shown below. [Audio Setup] > [Audio Device] > [PIONEER DDJ-T1] (Mac OS X) or [Pioneer DDJ ASIO] (Windows) [Output Routing] > [Output Monitor] [L] > [3:DDJ-T1 PHONES L] and [R] > [4:DDJ-T1 PHONES R] [Output Routing] > [Output Master] [L] > [1:DDJ-T1 MASTER L] and [R] > [2:DDJ-T1 MASTER R] [Input Routing] > [Input Channel D] [L(Mono)] > [1:DDJ-T1 AUX/MIC L] and [R] > [2:DDJ-T1 AUX/MIC R] | |
| Set properly so that the sound of the external device is input. (page 23) | ||
| Are the connected components and amplifiers properly set? | Set the external input selection and volume on the components and amplifiers properly. | |
| BPM or overall waveform is not displayed. | Has the music file been analyzed? | Put a check at [Preferences] > [File Management] > [Analyze new tracks when loading into deck], then reload the track in the deck. |
| [SYNC] function does not work. | Have the music files been properly imported? | Reimport the music files and load them in the decks. (page 21) |
| Has the music file been analyzed? | If music files cannot be analyzed automatically, input the [Beat Grid] manually. | |
| [SYNC] function does not work even when files are analyzed. | Is [BEAT MARKER (Grid)] set for hot cue? | Set at least one [BEAT MARKER] to [Grid]. (page 17) |
| Put a check at [Preferences] > [File Management] > [Set Beat-Grid when detecting BPM], then reload the track in the deck. | ||
| Is the [BPM] of the track for the deck whose [MAS-TER] button is pressed too different from the [BPM] of the track for the deck whose [SYNC] button is pressed? | The [SYNC] function will not work properly if the [BPM] of the track for the deck whose [MASTER] button is pressed exceeds the adjustable tempo range of the track for the deck whose [SYNC] button is pressed. | |
| Are you scratching? | The [SYNC] function is disabled when scratching. | |
| Fader starting is not possible. | Is the [CH FADER START] switch set to [ON]? | Set the [CH FADER START] switch set to [ON]. |
| Are you in standby at the position at which the cue was set? | Either set the cue again or set the standby mode at the position at which the cue was set. (page 21) | |
| Deck area display is small. | — | Double-click the track information display section (the part where the track name, BPM, etc., are displayed) in the deck area. |
| [ADVANCED/CHAINED] selector button does not work. | — | The [Advanced] mode cannot be selected with TRAKTOR Pioneer DDJ-T1 EDITION. The effect panel can be switched to the [Advanced] mode when you upgrade to TRAKTOR PRO or TRAKTOR SCRATCH PRO. |
| Sound is interrupted when the ASIO driver is set. | Has the ASIO driver been set while TRAKTOR was running? | Set the ASIO driver before starting up TRAKTOR. (page 11) |
| Back cue function does not work. | Is a cue point set? | Set a cue point. (page 21) |
| Loop play function does not work. | Are loop points set? | Set loop points. (page 21) |
Using as a controller for other DJ software
The DDJ-T1 also outputs the operating data for the buttons and dials in MIDI format. If you connect a computer with a built-in MIDI-compatible DJ software via a USB cable, you can operate the DJ software on this unit. The sound of music files being played on the computer can also be output from the DDJ-T1.
To use as a controller for other DJ software, first make the DJ software's audio and MIDI related settings.
For details, see your DJ software's operating instructions.
List of MIDI Messages
On this unit, the browser, deck, mixer and effect sections are connected with the MIDI channels shown below.
Deck A MIDI channel 0
Deck B MIDI channel 1
Deck C MIDI channel 2
Deck D MIDI channel 3
Effect 1 MIDI channel 4
Effect 2 MIDI channel 5
Browser, mixer MIDI channel 6
1 Browser
| SW Name | MIDI message (this unit to computer) | Notes | ||
| TREE button | 96 | 66 | dd | OFF=0, ON=127 |
| Rotary selector (turn) | B6 | 64 | dd | Difference count value from when previously operated • Turn clockwise: 1 – (max) 30 • Turn counterclockwise: 127 – (min) 98 |
| Rotary selector (press) | 96 | 65 | dd | OFF=0, ON=127 |
| FAVORITES (REC) button | 96 | 67 | dd | OFF=0, ON=127 |
| LOAD A button | 96 | 70 | dd | OFF=0, ON=127 |
| LOAD B button | 96 | 71 | dd | OFF=0, ON=127 |
| LOAD C button | 96 | 72 | dd | OFF=0, ON=127 |
| LOAD D button | 96 | 73 | dd | OFF=0, ON=127 |
2 Deck
| SW Name | MIDI message (this unit to computer) | Notes | |||||
| When SHIFT button is off | When SHIFT button is on | ||||||
| PLAY/PAUSE▶/II button | 9n | 11 | dd | 9n | 71 | dd | OFF=0, ON=127 |
| CUE button | 9n | 12 | dd | 9n | 72 | dd | OFF=0, ON=127 |
| AUTO LOOP (MOVE GRID) control (turn) | Bn | 19 | dd | Bn | 79 | dd | Difference count value from when previously operated • Turn clockwise: 1 - (max) 30 • Turn counterclockwise: 127 - (min) 98 |
| AUTO LOOP (MOVE GRID) control (press) | 9n | 20 | dd | 9n | 80 | dd | OFF=0, ON=127 |
| IN (IN ADJUST) button | 9n | 16 | dd | 9n | 76 | dd | OFF=0, ON=127 |
| OUT (OUT ADJUST) button | 9n | 17 | dd | 9n | 77 | dd | OFF=0, ON=127 |
| ACTIVE button | 9n | 18 | dd | 9n | 78 | dd | OFF=0, ON=127 |
| FUNCTION button | 9n | 58 | dd | 9n | 107 | dd | OFF=0, ON=127 |
| NEEDLE SEARCH pad | Bn | 3 | dd | Bn | 8 | dd | OFF = 0, ON = 1-127 (position information) 1 at left edge, 27 at right edge |
| Filter control | Bn | 4 | dd | Bn | 9 | dd | 0-127 |
| FILTER button | 9n | 69 | dd | 9n | 116 | dd | OFF=0, ON=127 |
| MOVE/HOT CUE selector button | 9n | 42 | dd | 9n | 91 | dd | OFF=0, ON=127 |
| MODE DELETE button | 9n | 45 | dd | 9n | 94 | dd | OFF=0, ON=127 |
| SIZE ← button, 1 button, 5 button | 9n | 46 | dd | 9n | 95 | dd | OFF=0, ON=127 |
| SIZE ← button, 2 button, 6 button | 9n | 47 | dd | 9n | 96 | dd | OFF=0, ON=127 |
| ← BWD button, 3 button, 7 button | 9n | 48 | dd | 9n | 97 | dd | OFF=0, ON=127 |
| FWD ← button, 4 button, 8 button | 9n | 49 | dd | 9n | 98 | dd | OFF=0, ON=127 |
| KEY LOCK button | 9n | 26 | dd | 9n | 86 | dd | OFF=0, ON=127 |
| TEMPO RANGE button | 9n | 25 | dd | 9n | 85 | dd | OFF=0, ON=127 |
| TEMPO slider | Bn | 0 | MSB | Bn | 5 | MSB | 0-16383 |
| Bn | 32 | LSB | Bn | 37 | LSB | 0 at - side, 16383 at + side | |
| Jog dial (turn) | Bn | 1 | MSB | Bn | 6 | MSB | Difference count value from when previously operated • Turn clockwise: 1 • Turn counterclockwise: 16383 The cumulative difference count when the jog dial is turned 1 rotation is 2430. |
| Bn | 33 | LSB | Bn | 38 | LSB | ||
| Jog dial (press top) | 9n | 54 | dd | 9n | 103 | dd | OFF=0, ON=127 |
| Indicator name | MIDI message (computer to this unit) | Indicator color | Notes | |||||
| When SHIFT button is off | When SHIFT button is on | |||||||
| PLAY/PAUSE▶/II | 9n | 11 | dd | 9n | 71 | dd | Yellow-green | Off = 0, lit = 127 |
| CUE | 9n | 12 | dd | 9n | 72 | dd | Orange | Off = 0, lit = 127 |
| IN (IN ADJUST) | 9n | 16 | dd | 9n | 76 | dd | Orange | Off = 0, lit = 127 |
| OUT (OUT ADJUST) | 9n | 17 | dd | 9n | 77 | dd | Orange | Off = 0, lit = 127 |
| ACTIVE | 9n | 18 | dd | 9n | 78 | dd | Orange | Off = 0, lit = 127 |
| FUNCTION | 9n | 58 | dd | 9n | 107 | dd | Red | Off = 0, lit = 127 |
| FILTER | 9n | 69 | dd | 9n | 116 | dd | Orange | Off = 0, lit = 127 |
| MOVE | 9n | 43 | dd | 9n | 92 | dd | Orange | Off = 0, lit = 127 |
| HOT CUE | 9n | 44 | dd | 9n | 93 | dd | Orange | Off = 0, lit = 127 |
| MODE DELETE | 9n | 45 | dd | 9n | 94 | dd | Orange | Off = 0, lit = 127 |
| SIZE ⇌ 1.5 | 9n | 46 | dd | 9n | 95 | dd | Orange | Off = 0, lit = 127 |
| SIZE ⇌ 2.6 | 9n | 47 | dd | 9n | 96 | dd | Orange | Off = 0, lit = 127 |
| BWD, 3, 7 | 9n | 48 | dd | 9n | 97 | dd | Orange | Off = 0, lit = 127 |
| FWD ⇌ 4.8 | 9n | 49 | dd | 9n | 98 | dd | Orange | Off = 0, lit = 127 |
| KEY LOCK | 9n | 26 | dd | 9n | 86 | dd | Red | Off = 0, lit = 127 |
- n is the channel number.
Deck A is 0, Deck B is 1, Deck C is 2 and Deck D is 3. - When operated while pressing the [SHIFT] button, the code is the code for when the [SHIFT] button is on.
- MIDI messages cannot be assigned to the [DECK (A, B, C, D)] or [SHIFT] buttons.
3 Mixer
| SW Name | MIDI message (this unit to computer) | Notes | |||
| MAIN VOL control | B6 | 0 | dd | 0-127 | |
| HEADPHONES MIX control | B6 | 1 | dd | 0-127 | |
| HEADPHONES VOL control | B6 | 2 | dd | 0-127 | |
| GAIN control | Deck A | B6 | 3 | dd | 0-127 |
| Deck B | B6 | 4 | dd | 0-127 | |
| Deck C | B6 | 5 | dd | 0-127 | |
| Deck D | B6 | 6 | dd | 0-127 | |
| EQ [HI] control | Deck A | B6 | 7 | dd | 0-127 |
| Deck B | B6 | 8 | dd | 0-127 | |
| Deck C | B6 | 9 | dd | 0-127 | |
| Deck D | B6 | 10 | dd | 0-127 | |
| EQ [MID] control | Deck A | B6 | 11 | dd | 0-127 |
| Deck B | B6 | 12 | dd | 0-127 | |
| Deck C | B6 | 13 | dd | 0-127 | |
| Deck D | B6 | 14 | dd | 0-127 | |
| EQ [LOW] control | Deck A | B6 | 15 | dd | 0-127 |
| Deck B | B6 | 16 | dd | 0-127 | |
| Deck C | B6 | 17 | dd | 0-127 | |
| Deck D | B6 | 18 | dd | 0-127 | |
| SW Name | MIDI message (this unit to computer) | Notes | ||||
| Effect assign buttons | 1 button | Deck A | 96 | 76 | dd | OFF=0, ON=127 |
| Deck B | 96 | 77 | dd | OFF=0, ON=127 | ||
| Deck C | 96 | 78 | dd | OFF=0, ON=127 | ||
| Deck D | 96 | 79 | dd | OFF=0, ON=127 | ||
| 2 button | Deck A | 96 | 80 | dd | OFF=0, ON=127 | |
| Deck B | 96 | 81 | dd | OFF=0, ON=127 | ||
| Deck C | 96 | 82 | dd | OFF=0, ON=127 | ||
| Deck D | 96 | 83 | dd | OFF=0, ON=127 | ||
| Headphones CUE button | Deck A | 96 | 84 | dd | OFF=0, ON=127 | |
| Deck B | 96 | 85 | dd | OFF=0, ON=127 | ||
| Deck C | 96 | 86 | dd | OFF=0, ON=127 | ||
| Deck D | 96 | 87 | dd | OFF=0, ON=127 | ||
| SYNC button | Deck A | 96 | 88 | dd | OFF=0, ON=127 | |
| Deck B | 96 | 89 | dd | OFF=0, ON=127 | ||
| Deck C | 96 | 90 | dd | OFF=0, ON=127 | ||
| Deck D | 96 | 91 | dd | OFF=0, ON=127 | ||
| MASTER button | Deck A | 96 | 92 | dd | OFF=0, ON=127 | |
| Deck B | 96 | 93 | dd | OFF=0, ON=127 | ||
| Deck C | 96 | 94 | dd | OFF=0, ON=127 | ||
| Deck D | 96 | 95 | dd | OFF=0, ON=127 | ||
| Channel fader | Deck A | B6 | 19 | dd | 0-127 | |
| Deck B | B6 | 21 | dd | 0-127 | ||
| Deck C | B6 | 23 | dd | 0-127 | ||
| Deck D | B6 | 25 | dd | 0-127 | ||
| CH FADER START switch | Deck A | 96 | 96 | dd | OFF=0, ON=127 | |
| Deck B | 96 | 97 | dd | OFF=0, ON=127 | ||
| Deck C | 96 | 98 | dd | OFF=0, ON=127 | ||
| Deck D | 96 | 99 | dd | OFF=0, ON=127 | ||
| Crossfader | B6 | 31 | dd | 0-1270 at left side, 127 at right side | ||
| Indicator name | MIDI message (computer to this unit) | Indicator color | Notes | ||||
| Effect assign buttons | 1 | Deck A | 9n | 76 | dd | Orange | Off = 0, lit = 127 |
| Deck B | 9n | 77 | dd | Orange | Off = 0, lit = 127 | ||
| Deck C | 9n | 78 | dd | Orange | Off = 0, lit = 127 | ||
| Deck D | 9n | 79 | dd | Orange | Off = 0, lit = 127 | ||
| 2 | Deck A | 9n | 80 | dd | Orange | Off = 0, lit = 127 | |
| Deck B | 9n | 81 | dd | Orange | Off = 0, lit = 127 | ||
| Deck C | 9n | 82 | dd | Orange | Off = 0, lit = 127 | ||
| Deck D | 9n | 83 | dd | Orange | Off = 0, lit = 127 | ||
| Headphones CUE | Deck A | 9n | 84 | dd | Orange | Off = 0, lit = 127 | |
| Deck B | 9n | 85 | dd | Orange | Off = 0, lit = 127 | ||
| Deck C | 9n | 86 | dd | Orange | Off = 0, lit = 127 | ||
| Deck D | 9n | 87 | dd | Orange | Off = 0, lit = 127 | ||
| SYNC | Deck A | 9n | 88 | dd | Orange | Off = 0, lit = 127 | |
| Deck B | 9n | 89 | dd | Orange | Off = 0, lit = 127 | ||
| Deck C | 9n | 90 | dd | Orange | Off = 0, lit = 127 | ||
| Deck D | 9n | 91 | dd | Orange | Off = 0, lit = 127 | ||
| MASTER | Deck A | 9n | 92 | dd | Red | Off = 0, lit = 127 | |
| Deck B | 9n | 93 | dd | Red | Off = 0, lit = 127 | ||
| Deck C | 9n | 94 | dd | Red | Off = 0, lit = 127 | ||
| Deck D | 9n | 95 | dd | Red | Off = 0, lit = 127 | ||
4 Effect
| SW Name | MIDI message (this unit to computer) | Notes | |||||
| When SHIFT button is off | When SHIFT button is on | ||||||
| ADVANCED/CHAINED selector button | 9n | 64 | dd | 9n | 92 | dd | OFF=0, ON=127 |
| DRY/WET control | Bn | 0 | dd | Bn | 16 | dd | 0-127 |
| SELECT/BACK 1 button | 9n | 68 | dd | 9n | 96 | dd | OFF=0, ON=127 |
| SELECT/BACK 2 button | 9n | 69 | dd | 9n | 97 | dd | OFF=0, ON=127 |
| SELECT/BACK 3 button | 9n | 70 | dd | 9n | 98 | dd | OFF=0, ON=127 |
| Effect control 1 control | Bn | 2 | dd | Bn | 18 | dd | 0-127 |
| Effect control 2 control | Bn | 4 | dd | Bn | 20 | dd | 0-127 |
| Effect control 3 control | Bn | 6 | dd | Bn | 22 | dd | 0-127 |
| Effect control 1 button | 9n | 71 | dd | 9n | 99 | dd | OFF=0, ON=127 |
| Effect control 2 button | 9n | 72 | dd | 9n | 100 | dd | OFF=0, ON=127 |
| Effect control 3 button | 9n | 73 | dd | 9n | 101 | dd | OFF=0, ON=127 |
| Effect button | 9n | 67 | dd | 9n | 95 | dd | OFF=0, ON=127 |
| Indicator name | MIDI message (computer to this unit) | Indicator color | Notes | |||||
| When SHIFT button is off | When SHIFT button is on | |||||||
| ADVANCED | 9n | 65 | dd | 9n | 93 | dd | Orange | Off = 0, lit = 127 |
| CHAINED | 9n | 66 | dd | 9n | 94 | dd | Orange | Off = 0, lit = 127 |
| Effect control 1 button | 9n | 71 | dd | 9n | 99 | dd | Orange | Off = 0, lit = 127 |
| Effect control 2 button | 9n | 72 | dd | 9n | 100 | dd | Orange | Off = 0, lit = 127 |
| Effect control 3 button | 9n | 73 | dd | 9n | 101 | dd | Orange | Off = 0, lit = 127 |
| Effect | 9n | 67 | dd | 9n | 95 | dd | Orange | Off = 0, lit = 127 |
n is the channel number.
Effect assign button 1 is 4, effect assign button 2 is 5.
- When operated while pressing the [SHIFT] button, the code is the code for when the [SHIFT] button is on.
Disclaimer
- Pioneer is a registered trademark of Pioneer Corporation.
- Microsoft®, Windows Vista®, Windows® and Internet Explorer® are either registered trademarks or trademarks of Microsoft Corporation in the United States and/or other countries.
Apple, Macintosh, Mac OS, Safari, iTunes, and Finder are trademarks of Apple Inc., registered in the U.S. and other countries.
Intel and Pentium are trademarks of Intel Corporation in the U.S. and other countries.
ASIO is a trademark of Steinberg Media Technologies GmbH. - TRAKTOR is a registered trademark of Native Instruments.
AMD Athlon is a trademark of Advanced Micro Devices, Inc.
The names of companies and products mentioned herein are the trademarks of their respective owners.
This product has been licensed for nonprofit use. This product has not been licensed for commercial purposes (for profit-making use), such as broadcasting (terrestrial, satellite, cable or other types of broadcasting), streaming on the Internet, Intranet (a corporate network) or other types of networks or distributing of electronic information (online digital music distribution service). You need to acquire the corresponding licenses for such uses. For details, see http://www.mp3licensing.com.
Cautions on copyrights
Recordings you have made are for your personal enjoyment and according to copyright laws may not be used without the consent of the copyright holder.
- Music recorded from CDs, etc., is protected by the copyright laws of individual countries and by international treaties. It is the full responsibility of the person who has recorded the music to ensure that it is used legally.
- When handling music downloaded from the Internet, etc., it is the full responsibility of the person who has downloaded the music to ensure that it is used in accordance with the contract concluded with the download site.
Specifications
AC adapter
Power.. AC 100 V to 240 V, 50 Hz/60 Hz
Rated current 300 mA
Rated output. DC 5 V, 2 A
General - Main Unit
Power consumption (when using AC adapter) 700 mA
Power consumption (when using USB bus power) 500 mA
Main unit weight 4.9 kg
Max. external dimensions .680 mm (W) x 95.2 mm (H) x 317.7 mm (D)
Tolerable operating temperature +5^ to +35^
Tolerable operating humidity. 5 % to 85% (no condensation)
Audio Section
Rated output level
MASTER OUT 1 4.2 Vrms
MASTER OUT 2 .2.1 Vrms
Total harmonic distortion
MASTER OUT 1 .0.006%
MASTER OUT 2 .0.006%
Frequency characteristic
MASTER OUT 1 20 Hz to 20 kHz
MASTER OUT 2 20 Hz to 20 kHz
S/N ratio (when playing on computer)
MASTER OUT 1. 103 dB or greater (at rated output)
MASTER OUT 2 103 dB or greater (at rated output)
Input impedance
AUX 24 kΩ
MIC. 10 kΩ
Output impedance
MASTER OUT 1 1 kΩ or less
MASTER OUT 2 1 kΩ or less
PHONES 42Ω
Input/Output terminals
USB terminal B type .1 set
MASTER OUT 1 output terminal TRS phone jack (6.3 mm) .1 set
MASTER OUT 2 output terminal RCA pin jacks. 1 sets
PHONES output terminal
Stereo phone jack (6.3 mm) 1 set
Stereo mini phone jack (Ø 3.5 mm)............1 set
AUX input terminal
RCA pin jack .1 sets
MIC input terminal
Phone jack (6.3 mm) 1 set
For improvement purposes, specifications and design of this unit and the included software are subject to change without notice.
Published by Pioneer Corporation. Copyright © 2010 Pioneer Corporation. All rights reserved.
5 Touche IN (IN ADJUST), touche OUT (OUT ADJUST), touche ACTIVE
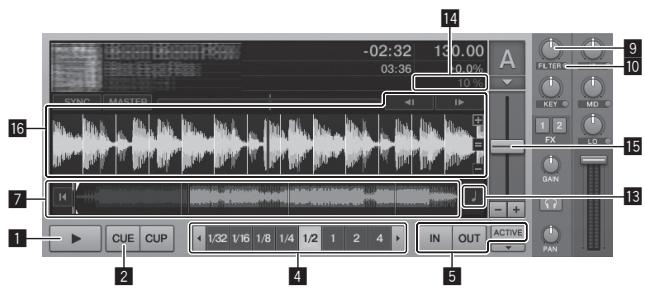

- Touche IN (IN ADJUST)
5 Commandes EQ (HI, MID, LOW)
Published by Pioneer Corporation.
Copyright © 2010 Pioneer Corporation.
All rights reserved.
Publication de Pioneer Corporation.
© 2010 Pioneer Corporation.