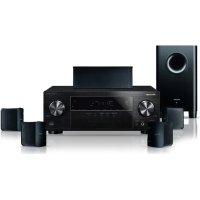
BCS-313 - Home theater audio system PIONEER - Free user manual and instructions
Find the device manual for free BCS-313 PIONEER in PDF.
| Product Type | Home Cinema Audio System |
| Brand | PIONEER |
| Model | BCS-313 |
| Power Supply | 230 V AC (or 120 V depending on region) |
| Disc Playback | Blu-ray, DVD, CD, BD-R/RE, DVD±R/RW, CD-R/RW |
| Video Formats | AVI, DIVX, MKV, MP4, WMV, MPEG, etc. |
| Audio Formats | MP3, WMA, AAC, Dolby Digital, DTS |
| Photo Formats | JPEG, PNG |
| Connectivity | HDMI (in/out), Component, Composite, Optical, AUX, LAN, Built-in Wi-Fi, USB, iPod |
| Radio | FM with RDS |
| Network Functions | DLNA, BD-Live, Online Services |
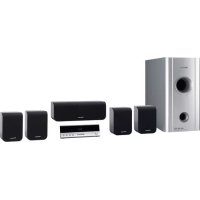
| Audio Output | 5.1 channels (front, center, surround speakers, subwoofer) |
| Sound Effects | PL II Film/Music, Clear Voice, Night, etc. |
| Blu-ray 3D | Playback of Blu-ray 3D discs |
| USB Playback | Playback of video, audio and photo files from USB flash drive/hard disk |
| CD Recording | Recording of audio CD onto USB flash drive |
| Ventilation | Free space of at least 10 cm around the unit |
| Ambient Temperature | +5 °C to +35 °C, humidity < 85% |
| Supplied Accessories | Remote control, batteries, video cable, FM antenna, speaker cables, bases, anti-slip pads |
| Maintenance | Clean with a soft, dry cloth. Do not use abrasive products. |
| Safety | Do not expose to water, do not block vents, unplug during prolonged non-use |
Frequently Asked Questions - BCS-313 PIONEER
User questions about BCS-313 PIONEER
0 question about this device. Answer the ones you know or ask your own.
Ask a new question about this device
Download the instructions for your Home theater audio system in PDF format for free! Find your manual BCS-313 - PIONEER and take your electronic device back in hand. On this page are published all the documents necessary for the use of your device. BCS-313 by PIONEER.
USER MANUAL BCS-313 PIONEER
Discover the benefits of registering your product online at http://www.pioneer.co.uk (or http://www.pioneer.eu).
Operating instructions
Mode d'emploi
Bedienungsanleitung
This lightning flash with arrowhead symbol within an equilateral triangle is intended to alert the user to the presence of uninsulated dangerous voltage within the product's
enclosure that may be of sufficient magnitude to constitute a risk of electric shock to persons.

The exclamation point within an equilateral triangle is intended to alert the user to the presence of important operating and maintenance (servicing)
instructions in the literature accompanying the product.
WARNING: TO PREVENT FIRE OR ELECTRIC SHOCK HAZARD, DO NOT EXPOSE THIS PRODUCT TO RAIN OR MOISTURE.
VENTILATION CAUTION: When installing this unit, make sure to leave space around the unit for ventilation to improve heat radiation (at least 10cm at top, 10cm at rear, and 10cm at each side).
WARNING: Slots and openings in the cabinet are provided for ventilation to ensure reliable operation of the product, and to protect it from overheating. To prevent fire hazard, the openings should never be blocked or covered with items (such as newspapers, table-cloths, curtains) or by operating the equipment on thick carpet or a bed.
Operating Environment: Operating environment temperature and humidity: +5^ to +35^ (+41^ to +95^) less than 85% RH (cooling vents not blocked)
Do not install this unit in a poorly ventilated area, or in locations exposed to high humidity or direct sunlight (or strong artificial light)
CLASS 1 LASER PRODUCT
APPAREL A LASER DE CLASSE
CAUTION: This product is a class 1 laser product classified under the Safety of laser products, IEC60825-1:2007.
To ensure proper use of this product, please read this owner's manual carefully and retain it for future reference. Shall the unit require maintenance, contact an authorized service center.
Use of controls, adjustments or the performance of procedures other than those specified herein may result in hazardous radiation exposure.
To prevent direct exposure to laser beam, do not try to open the enclosure. Visible laser radiation when open. DO NOT STARE INTO BEAM.
CAUTION concerning the Power Cord
Most appliances recommend they be placed upon a dedicated circuit;
That is, a single outlet circuit which powers only that appliance and has no additional outlets or branch circuits. Check the specification page of this owner's manual to be certain. Do not overload wall outlets. Overloaded wall outlets, loose or damaged wall outlets, extension cords, frayed power cords, or damaged or cracked wire insulation are dangerous. Any of these conditions could result in electric shock or fire. Periodically examine the cord of your appliance, and if its appearance indicates damage or deterioration, unplug it, discontinue use of the appliance, and have the cord replaced with an exact replacement part by an authorized service center. Protect the power cord from physical or mechanical abuse, such as being twisted, kinked, pinched, closed in a door, or walked upon. Pay particular attention to plugs, wall outlets, and the point where the cord exits the appliance. To disconnect power from the mains, pull out the mains cord plug. When installing the product, ensure that the plug is easily accessible.
This device is equipped with a portable battery or accumulator.
Safety way to remove the battery or the battery from the equipment: Remove the old battery or battery pack, follow the steps in reverse order than the assembly. To prevent contamination of the environment and bring on possible threat to human and animal health, the old battery or the battery put it in the appropriate container at designated collection points. Do not dispose of batteries or battery together with other waste. It is recommended that you use local, free reimbursement systems batteries and accumulators. The battery shall not be exposed to excessive heat such as sunshine, fire or the like.
CAUTION:
- Do not use or store batteries in direct sunlight or other excessively hot place, such as inside a car or near a heater. This can cause batteries to leak, overheat, explode or catch fire. It can also reduce the life or performance of batteries.
- When disposing of used batteries, please comply with governmental regulations or environmental public instruction's rules that apply in your country or area.
CAUTION: The apparatus shall not be exposed to water (dripping or splashing) and no objects filled with liquids, such as vases, shall be placed on the apparatus.
Information for users on collection and disposal of old equipment and used batteries


Symbol examples for batteries
These symbols on the products, packaging, and/or accompanying documents mean that used electrical and electronic products and batteries should not be mixed with general household waste.
For proper treatment, recovery and recycling of old products and used batteries, please take them to applicable collection points in accordance with your national legislation.
By disposing of these products and batteries correctly, you will help to save valuable resources and prevent any potential negative effects on human health and the environment which could otherwise arise from inappropriate waste handling.
For more information about collection and recycling of old products and batteries, please contact your local municipality, your waste disposal service or the point of sale where you purchased the items.
These symbols are only valid in the European Union.
For countries outside the European Union:
If you wish to discard these items, please contact your local authorities or dealer and ask for the correct method of disposal.
For Wireless product European Union Notice

PIONEER hereby declares that this/these product(s) is/are in compliance with the essential
requirements and other relevant provisions of Directive 1999/5/EC, 2004/108/EC, 2006/95/EC and 2009/125/EC.
Indoor Use Only
RF Radiation Exposure Statement
This equipment should be installed and operated with minimum distance 20cm between the radiator and your body.
WARNING: To prevent a fire hazard, do not place any naked flame sources (such as a lighted candle) on the equipment.
WARNING: Before plugging in for the first time, read the following section carefully.
The voltage of the available power supply differs according to country or region. Be sure that the power supply voltage of the area where this unit will be used meets the required voltage (e.g., 230V or 120V ) written on the rear panel.
CAUTION: The STANDBY/ON switch on this unit will not completely shut off all power from the AC outlet. Since the power cord serves as the main disconnect device for the unit, you will need to unplug it from the AC outlet to shut down all power. Therefore, make sure the unit has been installed so that the power cord can be easily unplugged from the AC outlet in case of an accident. To avoid fire hazard, the power cord should also be unplugged from the AC outlet when left unused for a long period of time (for example, when on vacation).
CAUTION: This product is for general household purposes. Any failure due to use for other than household purposes (such as long-term use for business purposes in a restaurant or use in a car or ship) and which requires repair will be charged for even during the warranty period.
Notes on Copyrights
- Because AACs (Advanced Access Content System) is approved as content protection system for Blu-ray Disc format, similar to use of CSS (Content Scramble System) for DVD format, certain restrictions are imposed on playback, analog signal output, etc., of AACs protected contents. The operation of this product and restrictions on this product may vary depending on your time of purchase as those restrictions may be adopted and/or changed by AACs after the production of this product.
- Furthermore, BD-ROM Mark and BD + are additionally used as content protection systems for Blu-ray Disc format, which imposes certain restrictions including playback restrictions for BD-ROM Mark and/or BD + protected contents. To obtain additional information on AACS, BD-ROM Mark, BD + , or this product, please contact an authorized Customer Service Center.
- Many BD-ROM/DVD discs are encoded with copy protection. Because of this, you should only connect your player directly to your TV, not to a VCR. Connecting to a VCR results in a distorted picture from copy-protected discs.
- This item incorporates copy protection technology that is protected by U.S. patents and other intellectual property rights of Rovi Corporation. Reverse engineering and disassembly are prohibited.
- Under the U.S. Copyright laws and Copyright laws of other countries, unauthorized recording, use, display, distribution, or revision of television programs, videotapes, BD-ROM discs, DVDs, CDs and other materials may subject you to civil and/or criminal liability.
Important Notice for TV colour system
The colour system of this player differs according to currently playing discs.
For example, when the player plays the disc recorded in the NTSC colour system, the image is output as an NTSC signal.
Only the multi system colour TV can receive all signals output from the player.
- If you have a PAL colour system TV, you will see just distorted images when using discs or video contents recorded in NTSC.
- The multi system colour TV changes the colour system automatically according to input signals. In case that the colour system is not changed automatically, turn it off and then on to see normal images on screen.
- Even if the disc recorded in NTSC colour system are well displayed on your TV, these may not be recorded correctly on your recorder.
Table of Contents
1 Getting Started
2 Safety Information
8 Introduction
8 - Playable Discs and symbols used in this manual
9 - About the "∅" Symbol Display
10 - Supplied Accessories
10 - Accessories of speaker box (S-BD707T)
10 - Accessories of speaker box (S-BD707SW)
10 - Accessories of speaker box (S-BD303)
11 - File compatibility
12 - AVCHD (Advanced Video Codec High Definition)
12 - About DLNA
13 -Certain System Requirements
13 - Regional Code
13 - Compatibility Notes
14 Remote control
15 Front panel
15 Rear panel
2 Connecting
16 Assemble the speakers
16 - Speaker Setup for BCS-717
18 - Speaker Setup for BCS-313
19 Wall mounting the center speaker
19 - Before mounting
19 Additional notes on speaker
20 Positioning the system
21 Connecting to Your TV
21 - HDMI Connection
22 - ARC (Audio Return Channel) function
23 - Component Video Connection
23 - Video Connection
24 - Resolution Setting
24 Antenna connection
25 Connections with external device
25 - AUX Connection
25 - PORTABLE IN connection
26 - OPTICAL IN connection
26 - HDMI IN 1/2 connection
27 Connecting to your Home Network
27 - Wired network connection
28 - Wired Network Setup
29 - Wireless Network Connection
29 - Wireless Network Setup
32 USB device connection
32 -Playback content in the USB device
3 System Setting
33 Settings
33 - Adjust the Setup Settings
33 - [DISPLAY] Menu
35 - [LANGUAGE] Menu
35 - [AUDIO] Menu
36 - [LOCK] Menu
37 - [NETWORK] Menu
38 - [OTHERS] Menu
39 Sound Effect
4 Operating
40 General Playback
40 - Using [HOME] menu
40 - Playing a Disc
40 - Playing a file on a disc/USB device
41 -PlayingBlu-ray3D disc
41 -Enjoying BD-LiveTM
42 - Playing a file on a network server
43 - Basic operations for video and audio content
43 - Basic operations for photo content
43 - Using the disc menu
44 -Resume playback
45 Advanced Playback
45 - Repeat Playback
45 - Repeating a specific portion
45 - Enlarge the playback image
46 - Marker Search
46 - Using the search menu
47 - Selecting a subtitle file
47 - Last Scene Memory
48 - Options while viewing a photo
48 - Listening to music while slide show
49 On-Screen display
49 - Displaying content information on-screen
50 - Playing from selected time
50 - Hearing a different audio
50 - Selecting a subtitle language
50 - Watching from a different angle
51 - Changing the TV Aspect Ratio
51 - Changing subtitle code page
51 - Changing the Picture Mode
52 Audio CD Recording
53 Playing the iPod
53 -Enjoying iPod on the screen
54 -Enjoying the iPod IN mode
55 Radio Operations
55 - Presetting the Radio Stations
55 - Deleting a saved station
55 - Deleting all the saved stations
55 - Improving poor FM reception
55 - See information about a radio station
56 Using the Online
70 Important Information Relating to Network Services
70 Software License Notice
5 Troubleshooting
57 Troubleshooting
57 - General
58 - Network
59 - Picture
59 -Sound
59 - Updates
6 Appendix
60 Controlling a TV with the Supplied Remote Control
60 - Setting up the remote to control your TV
61 Area Code List
62 Language code List
63 Trademarks and Licenses
65 Video Output Resolution
66 Specifications
69 Maintenance
69 - Handling the Unit
69 - Notes on Discs
Introduction
Playable Discs and symbols used in this manual
| Media/Term | Logo | Symbol | Description |
| Blu-ray | Blu-ray Disc | BD | ·Discs such as movies that can be purchased or rented. ·"Blu-ray 3D" discs ·BD-R/RE discs that are recorded in BDAV format. |
| MOVIE | ·BD-R/RE discs that contain Movie, Music or Photo files. ·ISO 9660+JOLIET, UDF and UDF Bridge format | ||
| MUSIC | |||
| PHOTO | |||
| DVD-ROM | DVD | DVD | ·Discs such as movies that can be purchased or rented. ·Video mode and finalized only ·Supports the dual layer disc also |
| DVD-R | VIDEO | ||
| DVD-RW | DVD | ||
| DVD+R | RW | ||
| DVD+RW | DVD+R | ||
| DVD+RW | DVD+RW | ||
| DVD+ReWritable | DVD+ReWritable | ||
| DVD-RW | DVD | VR mode and finalized only | |
| (VR) | DVD | ||
| (8 cm / 12 cm) | RW | ||
| Audio CD | COMPACT | Audio CD | |
| (8 cm / 12 cm) | DIGITAL AUDIO | ||
| CD-R/RW | COMPACT | ·CD-R/RW discs that contain Movie, Music or Photo files. ·ISO 9660+JOLIET, UDF and UDF Bridge format | |
| (8 cm / 12 cm) | DIGITAL AUDIO | ||
| Recordable | ReWritable | ||
| Note | - | ! | Indicates special notes and operating features. |
| Caution | - | ! | Indicates cautions for preventing possible damages from abuse. |
! Note
Depending on the conditions of the recording equipment or the CD-R/RW (or DVD±R/RW) disc itself, some CD-R/RW (or DVD±R/RW) discs cannot be played on the unit.
Depending on the recording software & the finalization, some recorded discs (CD-R/RW, DVD±R/RW, BD-R/RE) may not be playable.
BD-R/RE, DVD±R/RW and CD-R/RW discs recorded using a personal computer or a DVD or CD Recorder may not play if the disc is damaged or dirty, or if there is dirt or condensation on the player's lens.
- If you record a disc using a personal computer, even if it is recorded in a compatible format, there are cases in which it may not play because of the settings of the application software used to create the disc. (Check with the software publisher for more detailed information.)
- This player requires discs and recordings to meet certain technical standards in order to achieve optimal playback quality.
- Pre-recorded DVDs are automatically set to these standards. There are many different types of recordable disc formats (including CD-R containing MP3 or WMA files) and these require certain pre-existing conditions to ensure compatible playback.
- Customers should note that permission is required in order to download MP3 / WMA files and music from the Internet. Our company has no right to grant such permission. Permission should always be sought from the copyright owner.
- You have to set the disc format option to [Mastered] in order to make the discs compatible with the players when formatting rewritable discs. When setting the option to Live File System, you cannot use it on the player. (Mastered/Live File System : Disc format system for Windows Vista® and Windows 7®)
- BDXL cannot be supported.
About the "∅" Symbol Display
"O" may appear on your TV display during operation and indicates that the function explained in this owner's manual is not available on that specific media.
Supplied Accessories
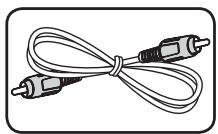
Video cable (1)
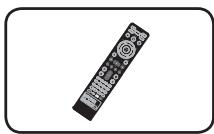
Remote control (1)

Battery (1)

FM antenna (1)
iPod cradle (1)
Accessories of speaker box (S-BD707T)

Colour-coded Speaker cables (5)

Screws (12)

Speaker stand bases (4)

Small non-skid pads (1)

Middle non-skid pads (1)
Accessories of speaker box (S-BD707SW)

Speaker cable (1)

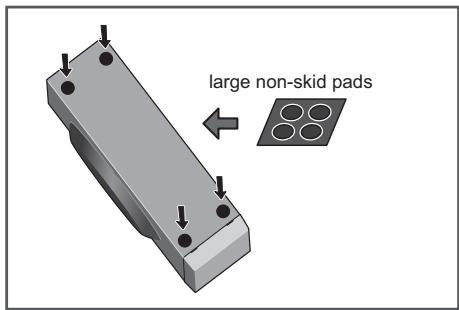
Large non-skid pads (1)
Accessories of speaker box (S-BD303)

Colour-coded Speaker cables (6)

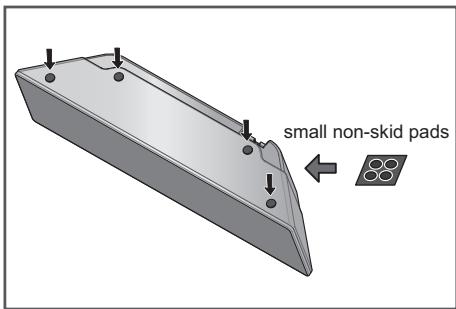
Small non-skid pads (1)

Large non-skid pads (1)
File compatibility
Movie files
| File Location | File Extension | Codec Format | Audio Format | Subtitle |
| Disc, USB | “.avi”,“divx”,“mpg”,“mpeg”,“mkv”,“mp4”,“asf”,“wmv”,“m4v”(DRM free) | DIVX3.xx, DIVX4.xx, DIVX5.xx, DIVX6.xx (Standard playback only), XVID, MPEG1 SS, H.264/MPEG-4 AVC, MPEG2 PS, MPEG2 TS, VC-1 SM (WMV3) | Dolby Digital, DTS, MP3, WMA, AAC, AC3 | SubRip (.srt / .txt), SAMI (.smi), SubStation Alpha (.ssa/.txt), MicroDVD (.sub/.txt), VobSub (.sub), SubViewer 1.0 (.sub), SubViewer 2.0 (.sub/.txt), TMPlayer (.txt), DVD Subtitle System (.txt) |
| DLNA, PC | “.avi”,“divx”,“mpg”,“mpeg”,“mkv”,“mp4”,“asf”,“wmv”(DRM free) | DIVX3.xx, DIVX4.xx, DIVX5.xx, DIVX6.xx, XVID, MPEG1 SS, H.264/MPEG-4 AVC, MPEG2 PS, MPEG2 TS, VC-1 SM (WMV3) | Dolby Digital, DTS, MP3, WMA, AAC, AC3 | SubRip (.srt / .txt), SAMI (.smi), SubStation Alpha (.ssa/.txt), MicroDVD (.sub/.txt), SubViewer 1.0 (.sub), SubViewer 2.0 (.sub/.txt), TMPlayer (.txt), DVD Subtitle System (.txt) |
Music files
| File Location | File Extension | Sampling Frequency | Bitrate | Note |
| Disc, USB, DLNA, PC | "mp3","wma", "wav", "m4a" (DRM free) | within 32 - 48 kHz (WMA), within 16 - 48 kHz (MP3) | within 20 - 320 kbps (WMA), within 32 - 320 kbps (MP3) | Some wav files are not supported on this player. |
Photo files
| File Location | File Extension | Recommended Size | Note |
| Disc, USB, DLNA, PC | “.jpg”,“.jpeg”,“.png” | Less than 4,000 x 3,000 x 24 bit/pixel Less than 3,000 x 3,000 x 32 bit/pixel | Progressive and lossless compression photo image files are not supported. |
! Note
The file name is limited to 180 characters.
Maximum files/folder: Less than 2000 (total number of files and folders)
Depending on the size and number of the files, it may take several minutes to read the contents on the media.
- File compatibility may differ depending on the server.
- The file requirements on page 11 are not always compatible. There may have some restrictions by file features and media server's ability.
- Playing a movie subtitle files are not supported on this player.
- The files from removable media such as USB drive, DVD-drive etc. on your media server may not be shared properly.
- This unit cannot support the ID3 Tag embedded MP3 file.
- The total playback time of audio file indicated on the screen may not correct for VBR files.
- HD movie files contained on the CD or USB 1.0/1.1 may not played properly. Blu-ray Disc, DVD or USB 2.0 are recommended to play back HD movie files.
- This player supports H.264/MPEG-4 AVC profile Main, High at Level 4.1. For a file with higher level, the warning message will appear on the screen.
- This player does not support files that are recorded with GMC ^1 or QpeI ^2 .
1 GMC - Global Motion Compensation
2 Qpel – Quarter pixel
AVCHD (Advanced Video Codec High Definition)
- This player can playback AVCHD format discs. These discs are normally recorded and used in camcorders.
- The AVCHD format is a high definition digital video camera format.
- The MPEG-4 AVC/H.264 format is capable of compressing images at higher efficiency than that of the conventional image compressing format.
- This player can playback AVCHD discs using "x.v.Color" format.
- Some AVCHD format discs may not play depending on the recording condition.
- AVCHD format discs need to be finalized.
- "x.v.Color" offers a wider colour range than normal DVD camcorder discs.
About DLNA
This Player is a DLNA Certified digital media player that can display and play movie, photo and music content from your DLNA-compatible digital media server (PC and Consumer Electronics).
The Digital Living Network Alliance (DLNA) is a cross-industry organization of consumer electronics, computing industry and mobile device companies. Digital Living provides consumers with easy sharing of digital media through your home network.
The DLNA certification logo makes it easy to find products that comply with the DLNA Interoperability Guidelines. This unit complies with DLNA Interoperability Guidelines v1.5.
When a PC running DLNA server software or other DLNA compatible device is connected to this player, some setting changes of software or other devices may be required. Please refer to the operating instructions for the software or device for more information.
Certain System Requirements
For high definition video playback:
- High definition display that has COMPONENT or HDMI input jacks.
- BD-ROM disc with high definition content.
- HDMI or HDCP capable DVI input on your display device is required for some content (as specified by disc authors).
For playing files on your PC's share folder via your home network, the PC requires below.
- Windows® XP (Service Pack 2 or higher), Windows Vista® (no Service Pack required), Windows 7^® (no Service Pack required)
1.2 GHz Intel Pentium III or AMD SempronTM 2200+ processors
Network environment: 100 Mb Ethernet, WLAN (IEEE 802.11a/b/g/n) - More than 1 folder on your PC has to be shared. Visit support link of your operating system for more information on file share settings.
Regional Code
This unit has a regional code printed on the rear of the unit. This unit can play only BD-ROM or DVD discs labeled same as the rear of the unit or "ALL".
Compatibility Notes
- Because BD-ROM is a new format, certain disc, digital connection and other compatibility issues are possible. If you experience compatibility problems, please contact an authorized Customer Service Center.
- This unit allows you to enjoy functions such as picture-in-picture, secondary audio and Virtual packages, etc., with BD-ROM supporting BONUSVIEW (BD-ROM version 2 Profile 1 version 1.1/ Final Standard Profile). Secondary video and audio can be played from a disc compatible with the picture-in-picture function. For the playback method, refer to the instructions in the disc.
Viewing high-definition content and up-converting standard DVD content may require a HDMI-capable input or HDCP-capable DVI input on your display device. - Some BD-ROM and DVD discs may restrict the use of some operation commands or features.
- Dolby TrueHD, Dolby Digital Plus and DTS-HD are supported with maximum 5.1 channels if you use HDMI connection for the audio output of the unit.
- You can use a USB device to store some disc related information, including downloaded online content. The disc you are using will control how long this information is retained.
Remote control
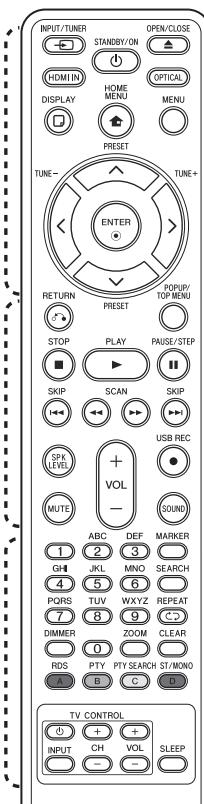
Battery Installation
Remove the battery cover on the rear of the Remote Control, and insert an R03 (size AAA) battery with and matched correctly.
1
INPUT/TUNER: Changes input mode.
(STANDBY/ON): Switches the player ON or OFF.
OPEN/CLOSE: Opens and closes the disc tray.
HDMI IN: Changes input mode to HDMI IN directly.
OPTICAL: Changes input mode to optical directly.
DISPLAY: Displays or exits On-Screen Display.
HOME MENU: Displays or exits the [Home Menu].
MENU:Accesses the menu on a disc.
Direction buttons: Selects an option in the menu.
ENTER: Acknowledges menu selection.
TUNE (+/-): Tunes in the desired radio station.
PRESET ( / V) : Selects programme of Radio.
2
RETURN: Exits the menu or resumes playback. The resume play function may not work depending on the BD-ROM disc.
POPUP/TOP MENU: Displays the DVD title menu or BD-ROM's pop-up menu, if available.
STOP: Stops playback.
PLAY:Starts playback.
II PAUSE/STEP: Pauses playback.
I / I SKIP: Goes to the next or previous chapter / track / file.
SCAN: Searches backward or forward.
SPK LEVEL: Sets the sound level of desired speaker.
- USB REC: Records an audio CD.
MUTE: Mute the unit.
SOUND: Selects a sound effect mode.
VOL + / - : Adjusts speaker volume.
3
0-9 numerical buttons: Selects numbered options in a menu or inputs letters in the keypad menu.
MARKER: Marks any point during playback.
SEARCH: Displays or exits the search menu.
REPEAT: Repeats a desired section or sequence.
DIMMER: Dims the light on the unit.
ZOOM: Accesses the zoom menu.
CLEAR: Removes a mark on the search menu or a number when setting the password.
Coloured (A, B, C, D) buttons: Use to navigate on menus.
-
A button (RDS): Radio Data System.
-
B button (PTY): Views the programme type of the RDS.
-
C button (PTY SEARCH): Searches programme type.
-
D button: Selects MONO or STEREO in FM mode.
TV Control Buttons: See page 60.
SLEEP: Sets a certain period of time after which the unit will switch to off.
Front panel
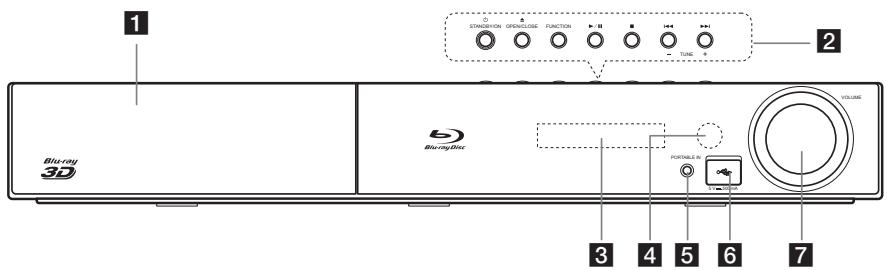
1 Disc Tray
2 Operation buttons
(STANDBY/ON) Button
Switches the player ON or OFF.
(OPEN/CLOSE)
FUNCTION
Changes the input source or function.
/II (PLAY/PAUSE)
STOP
144/141 (SKIP)
-TUNE ^+ (Radio tuning)
3 Display Window
4 Remote Sensor
5 PORTABLE IN
6 USB Port
7 Volume Control
Rear panel
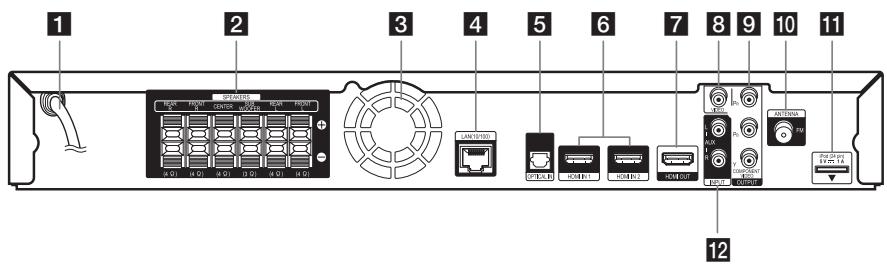
1 AC power cord
2 Speakers connectors
3 Cooling Fan
4 LAN port
5 OPTICAL IN
6 HDMI IN 1/2
7 HDMI OUT
VIDEO OUT
9 COMPONENTVIDEO (YPBPR) OUTPUT (PROGRESSIVE SCAN)
10 Antenna Connector
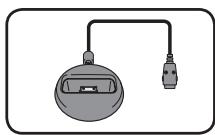
11 iPod (24 pin) Connect to the furnished iPod cradle.
12 AUX (L/R) INPUT
Assemble the speakers
Speaker Setup for BCS-717
Preparing the speakers
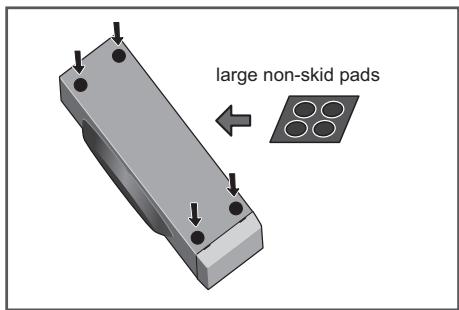
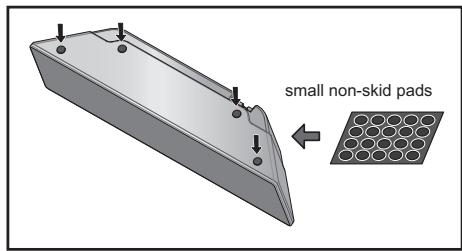
- Attach the non-skid pads to the base of each speaker stand bases, the subwoofer and the center speaker.
For speaker stand bases:
Use the supplied adhesive to attach four middle pads to the base (bottom) of each speaker stand base.

For subwoofer:
Use the supplied adhesive to attach four large pads to the base of subwoofer.
For center speaker:
Use the supplied adhesive to attach four small pads to the base of center speaker.
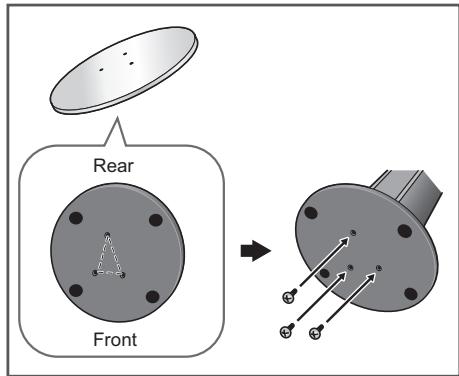
- Attach the speaker stand bases to the stems using the screws provided.
Once you have aligned the stem and base, secure with the small screws at the points shown below. Note that the speaker should face in the direction of the base of the isosceles triangle.
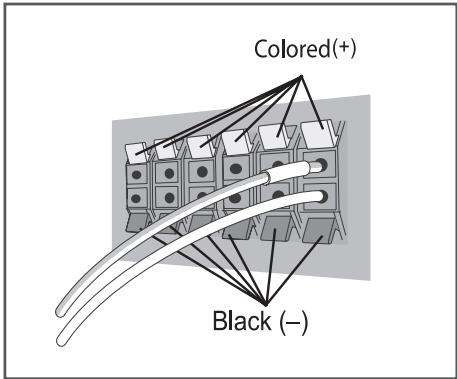
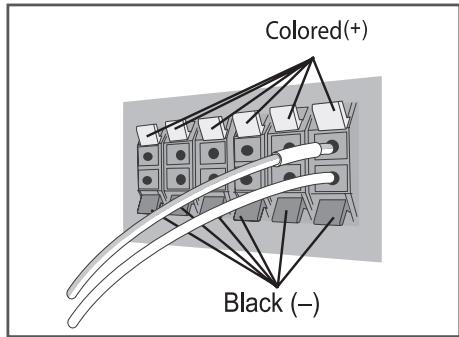
- Connect the wires to the player.
Connect the white wire with gray line into (+) side and the other wire into (-) side. To connect the cable to the player, press each plastic finger pad to open the connection terminal. Insert the wire and release the finger pad.

Caution
- Do not connect any speakers other than those supplied to this system.
- Do not connect the supplied speakers to any amplifier other than the one supplied with this system. Connection to any other amplifier may result in malfunction or fire.
- Please connect the speaker cable of subwoofer (purple) to orange of the player.
- These speaker terminals carry HAZARDOUS LIVE voltage. To prevent the risk of electric shock when connecting or disconnecting the speaker cables, disconnect the power cord before touching any uninsulated parts.
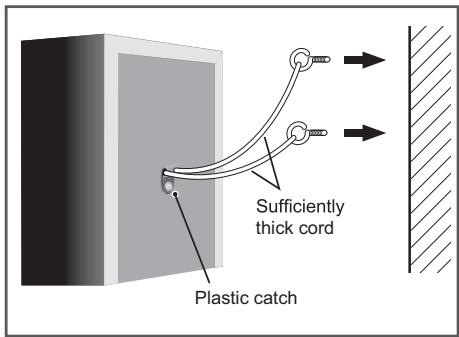
Securing your front and surround speakers
Secure each of the front and surround speakers using the plastic catch provided. Screw two supporting hooks into the wall behind the speaker. Pass a thick cord around the hooks and through the plastic catch so that the speaker is stabilized (make sure to test that it supports the weight of the speaker). After installing, make sure the speaker is securely fixed.

Caution
- The plastic catch is not a mounting fixture, and the speaker should not be hung directly from the wall using this catch. Always use a cord when stabilizing the speaker.
- Pioneer disclaims all responsibility for any losses or damage resulting from improper assembly, installation, insufficient strength of the installation materials, misuse, or natural disasters.
- When placing this unit, ensure that it is firmly secured and avoid areas where it may be likely to fall and cause injury in the event of a natural disaster (such as an earthquake).
- Do not stand on the speaker stand base of the tall speaker to push or swing the speaker. The speaker may fall and break, or someone may be injured. Pay special attention to children.
Speaker Setup for BCS-313
Preparing the speakers
- Attach the non-skid pads to the base of each speaker.
For speakers:
Use the supplied adhesive to attach four small pads to the base (bottom) of each speaker.

For subwoofer:
Use the supplied adhesive to attach four large pads to the base of subwoofer.
For center speaker:
Use the supplied adhesive to attach four small pads to the base of center speaker.
- Connect the wires to the player.
Connect the white wire with gray line into (+) side and the other wire into (-) side. To connect the cable to the player, press each plastic finger pad to open the connection terminal. Insert the wire and release the finger pad.

Caution
- Do not connect any speakers other than those supplied to this system.
- Do not connect the supplied speakers to any amplifier other than the one supplied with this system. Connection to any other amplifier may result in malfunction or fire.
- Please connect the speaker cable of subwoofer (purple) to orange of the player.
- These speaker terminals carry HAZARDOUS LIVE voltage. To prevent the risk of electric shock when connecting or disconnecting the speaker cables, disconnect the power cord before touching any uninsulated parts.
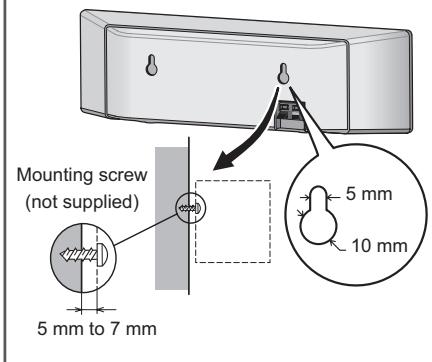
Wall mounting the center speaker
The center speaker have a mounting hole which can be used to mount the speaker on the wall.
Before mounting
Remember that the speaker system is heavy and that its weight could cause the screws to work loose, or the wall material to fail to support it, resulting in the speaker falling. Make sure that the wall you intend to mount the speakers on is strong enough to support them. Do not mount on plywood or soft surface walls.
Mounting screws are not supplied. Use screws suitable for the wall material and support the weight of the speaker.

Caution
If you are unsure of the qualities and strength of the wall, consult a professional for advice.
- Pioneer is not responsible for any accidents or damage that result from improper installation.
Additional notes on speaker
Install the main front left and right speakers at an equal distance from the TV.
Precautions:
Make sure that all the bare speaker wire is twisted together and inserted fully into the speaker terminal. If any of the bare speaker wire touches the back panel it may cause the power to cut off as a safety measure.
The front, center and surround speakers supplied with this system are magnetically shielded. However, depending on the installation location, colour distortion may occur if the speaker is installed extremely close to the screen of a television set. If this case happens, turn the power switch of the television set OFF, and turn it ON after 15 min. to 30 min. If the problem persists, place the speaker system away from the television set.
The subwoofer is not magnetically shielded and so should not be placed near a TV or monitor. Magnetic storage media (such as floppy discs and tape or video cassettes) should also not be kept close to the subwoofer.
Do not attach the front/surround speakers and subwoofer to a wall or ceiling. They may fall off and cause injury.
Positioning the system
The following illustration shows an example of positioning the system. Note that the illustrations in these instructions differ from the actual unit for explanation purposes.
For the best possible surround sound, all the speakers other than the subwoofer should be placed at the same distance from the listening position (A).
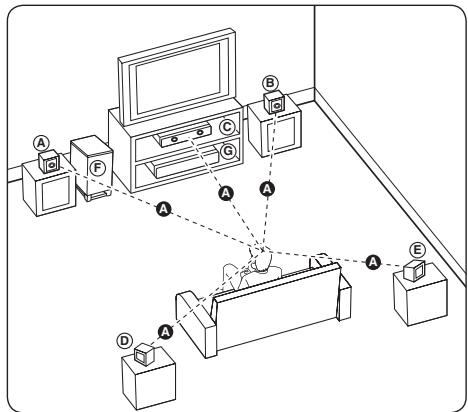
A Front left speaker (L)/
⑧ Front right speaker (R):
Place the front speakers to the sides of the monitor or screen and as flush with the screen surface as possible.
Center speaker:
Place the center speaker above or below the monitor or screen.
⑥ Surround left speaker (L)/
Surround right speaker (R):
Place these speakers behind your listening position, facing slightly inwards.
F Subwoofer:
The position of the subwoofer is not so critical, because low bass sounds are not highly directional. But it is better to place the subwoofer near the front speakers. Turn it slightly toward the center of the room to reduce the wall reflections.
Unit
Caution
- Be careful to make sure children do not put their hands or any objects into the subwoofer duct.
subwoofer duct: A hole for plentiful bass sound on subwoofer cabinet (enclosure). - Place the center speaker at a safe distance from the child's reach.
Otherwise it may result in the speaker falling down and causing personal injury and/or property damage.
- The speakers contain magnetic parts, so colour irregularity may occur on the TV screen or PC monitor screen. Please use the speakers away from the TV screen or PC monitor screen.
Connecting to Your TV
Make one of the following connections, depending on the capabilities of your existing equipment.
- HDMI connection (page 21)
- Component Video connection (page 23)
Video connection (page 23)
! Note
Depending on your TV and other equipment you wish to connect, there are various ways you could connect the player. Use only one of the connections described in this manual.
- Please refer to the manuals of your TV, stereo system or other devices as necessary to make the best connections.
- Make sure the player is connected directly to the TV. Tune the TV to the correct video input channel.
- Do not connect your player via your VCR. The image could be distorted by the copy protection system.
HDMI Connection
If you have a HDMI TV or monitor, you can connect it to this player using a HDMI cable (Type A, High Speed HDMI™ Cable with Ethernet). Connect the HDMI jack on the player to the HDMI jack on a HDMI compatible TV or monitor.
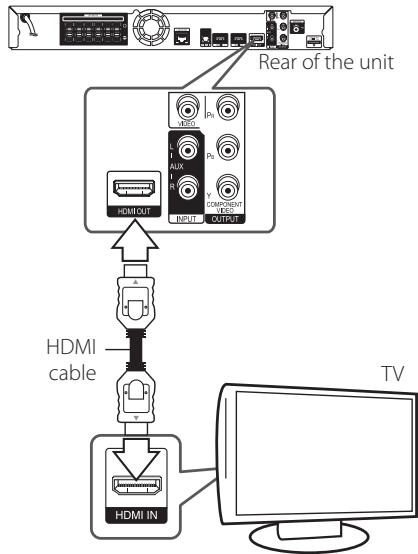
Set the TV's source to HDMI (refer to TV's Owner's manual).
Additional Information for HDMI
-
When you connect a HDMI or DVI compatible device make sure of the following:
-
Try switching off the HDMI/DVI device and this player. Next, switch on the HDMI/DVI device and leave it for around 30 seconds, then switch on this player.
- The connected device's video input is set correctly for this unit.
-
The connected device is compatible with 720x576p, 1280x720p, 1920x1080i or 1920x1080p video input.
-
Not all HDCP-compatible HDMI or DVI devices will work with this player.
-
The picture will not be displayed properly with non-HDCP device.
! Note
- If a connected HDMI device does not accept the audio output of the player, the HDMI device's audio sound may be distorted or may not output.
- When you use HDMI connection, you can change the resolution for the HDMI output. (Refer to "Resolution Setting" on page 24.)
- Select the type of video output from the HDMI OUT jack using [HDMI Color Setting] option on the [Setup] menu (see page 32).
- Changing the resolution when the connection has already been established may result in malfunctions. To solve the problem, turn off the player and then turn it on again.
- When the HDMI connection with HDCP is not verified, TV screen is changed to black screen. In this case, check the HDMI connection, or disconnect the HDMI cable.
- If there are noises or lines on the screen, please check the HDMI cable (length is generally limited to 4.5m(15ft) ).
ARC (Audio Return Channel) function
The ARC function enables an HDMI capable TV to send the audio stream to HDMI OUT of this player.
To use this function:
- Your TV must support the ARC function and the ARC of this player must be set to On (Initial setting is "Off").
- The setting method of ARC may differ depending on the TV. For details about ARC function, refer to your TV manual.
- You must use the HDMI cable (Type A, High Speed HDMI™ Cable with Ethernet).
- You must connect with the HDMI IN of TV that supports the ARC function using the HDMI OUT on this player.
- You can connect only one Home Theater to TV compatible with ARC.
- The ARC function does not warrant that the function works in all cases even if the above conditions are satisfied.
- When you use the ARC function, CEC (Consumer Electronics Control) may work. If you do not want to use CEC, you can stop it work by setting "ARC Off" on Home Menu. In this case, it is needed to connect TV and this player by an optical cable to send the audio stream to this player.
Component Video Connection
Connect the COMPONENTVIDEO OUT jacks on the player to the corresponding input jacks on the TV using component video cable. You can hear the sound the through the system's speaker.
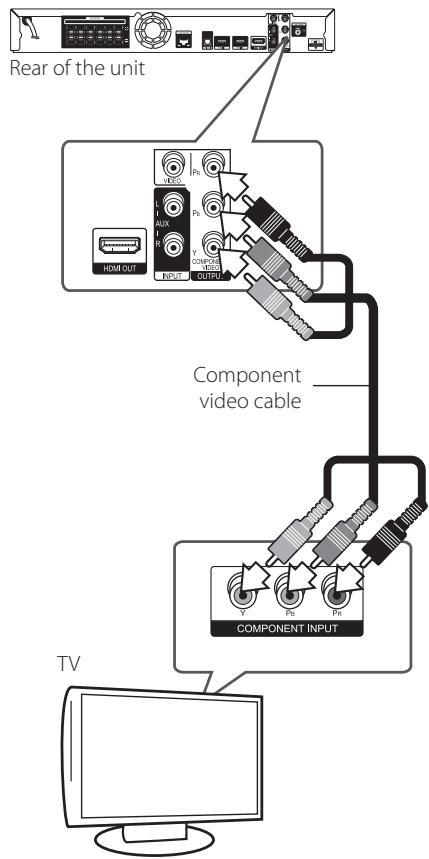

Note
When you use COMPONENT Video OUT connection, you can change the resolution for the output. (Refer to "Resolution setting" on page 24.)
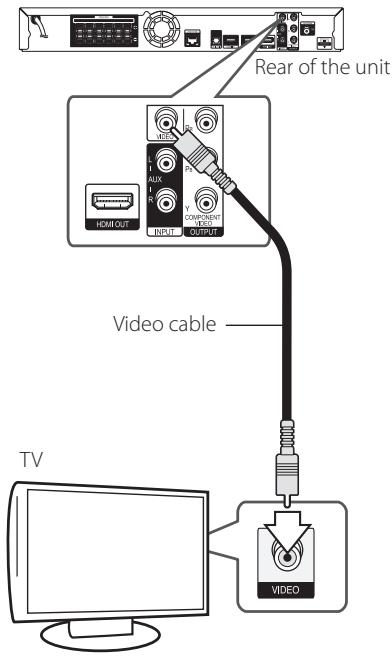
Video Connection
Connect the VIDEO OUT jack on the player to the video in jack on the TV using a video cable. You can hear the sound through the system's speakers.
Resolution Setting
The player provides several output resolutions for HDMI OUT and COMPONENT VIDEO OUTPUT jacks. You can change the resolution using [Setup] menu.
- Press HOME MENU (
- Use < / > to select the [Setup] and press ENTER (O). The [Setup] menu appears.
- Use / to select [DISPLAY] option then press to move to the second level.
- Use / V to select the [Resolution] option then press ENTER (⊙) to move to the third level.
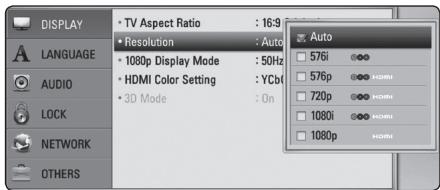
- Use / V to select the desired resolution then press ENTER (⊙) to confirm your selection.
! Note
-
If your TV does not accept the resolution you have set on the player, you can set resolution to 576p as follows:
-
Press to open the disc tray.
2 Press (STOP) for more than 5 seconds. - Since several factors affect the resolution of video output, see "Video Output Resolution" on page 65.
Antenna connection
Connect the supplied antenna for listening to the radio.

! Note
After connecting the FM wire antenna, keep it as horizontal as possible. Be sure to fully extend the FM wire antenna.
Connections with external device
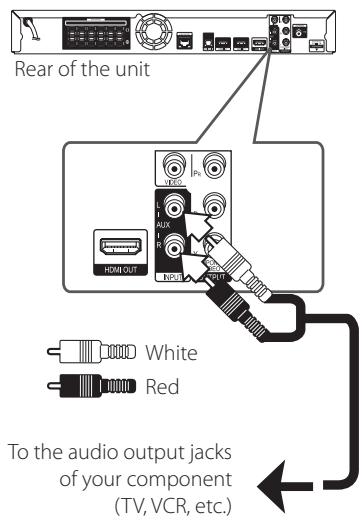
AUX Connection
You can enjoy the sound from an external component through the speakers of this system.
Connect the analog audio output jacks of your component into the AUX L/R (INPUT) on this unit. And then select the [AUX] option by pressing INPUT/TUNER and ENTER () .
You can also use the FUNCTION button on the front panel to select the input mode.
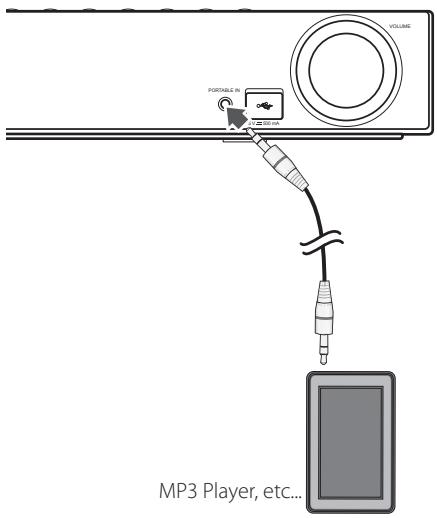
PORTABLE IN connection
You can enjoy the sound from your portable audio player through the speakers of this system.
Connect the headphones (or line out) jack of the portable audio player into the PORTABLE IN socket of this unit. And then select the [PORTABLE] option by pressing INPUT/TUNER and ENTER (⑨).
You can also use the FUNCTION button on the front panel to select the input mode.
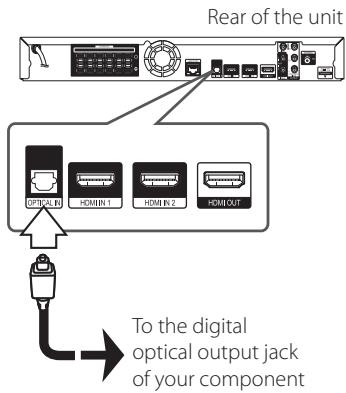
OPTICAL IN connection
You can enjoy the sound from your component with a digital optical connection through the speakers of this system.
Connect the optical output jack of your component into the OPTICAL IN jack on the unit. And then select the [OPTICAL] option by pressing INPUT/TUNER and ENTER (O). Or press OPTICAL to select directly.
You can also use the FUNCTION button on the front panel to select the input mode.
HDMI IN 1/2 connection
You can enjoy the pictures and sound from your component through this connection.
Connect the HDMI OUT jack of your component into the HDMI IN 1 or 2 jack on this unit. And then select the [HDMI IN 1/2] option by pressing INPUT/TUNER and ENTER (⑨).
You can also use the FUNCTION button on the front panel to select the input mode.
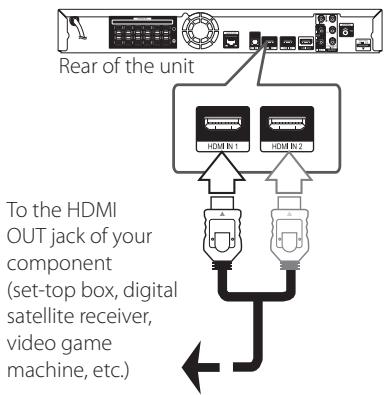
! Note
- You cannot change the video resolution in the HDMI IN 1/2 mode. Change the video resolution of the connected component.
- If the video output signal is abnormal when your personal computer is connected to HDMI IN 1/2 jack, change the resolution of your personal computer to 576p, 720p, 1080i or 1080p.
- The video signal from the HDMI input cannot be output from the component or composite video outputs.
- The player sends audio from the HDMI inputs to both the HDMI output and to the unit's speakers.
Connecting to your Home Network
This player can be connected to a local area network (LAN) via the LAN port on the rear panel or the internal wireless module.
By connecting the unit to a broadband home network, you have access to services such as BD-LIVE interactivity and Online content services.
Wired network connection
Using a wired network provides the best performance, because the attached devices connect directly to the network and are not subject to radio frequency interference.
Please refer to the documentation for your network device for further instructions.
Connect the player's LAN port to the corresponding port on your Modem or Router using a commercially available LAN or Ethernet cable.

Note
- When plugging or unplugging the LAN cable, hold the plug portion of the cable. When unplugging, do not pull on the LAN cable but unplug while pressing down on the lock.
- Do not connect a modular phone cable to the LAN port.
- Since there are various connection configurations, please follow the specifications of your telecommunication carrier or internet service provider.
- If you want to access content from PCs or DLNA servers, this player must be connected to the same local area network with them via a router.
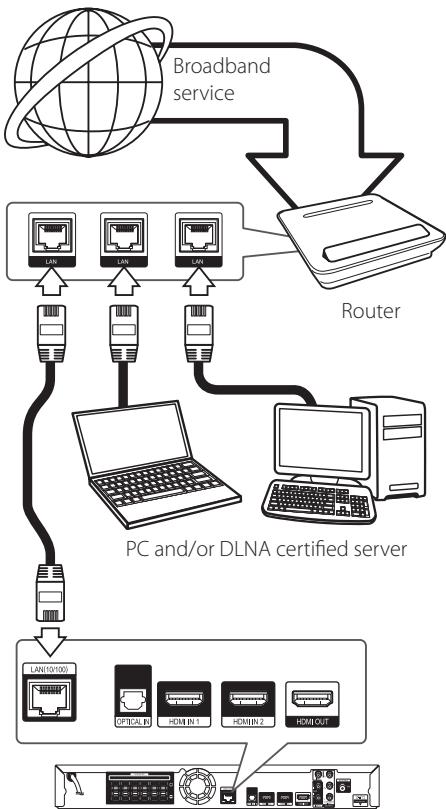
Rear of the unit
Wired Network Setup
If there is a DHCP server on the local area network (LAN) via wired connection, this player will automatically be allocated an IP address. After making the physical connection, a small number of home networks may require the player's network setting to be adjusted. Adjust the [NETWORK] setting as follow.
Preparation
Before setting the wired network, you need to connect the broadband internet to your home network.
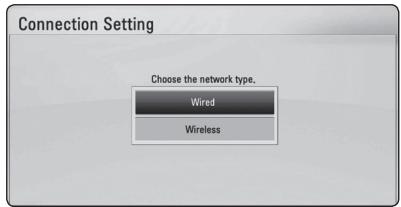
- Select [Connection Setting] option in the [Setup] menu then press ENTER (⊙).

- The [Connection Setting] menu appear on the screen. Use / V to select the [Wired] and press ENTER (⊙).
- Use / V / < / / > to select the IP mode between [Dynamic] and [Static].
Normally, select [Dynamic] to allocate an IP address automatically.
! Note
If there is no DHCP server on the network and you want to set the IP address manually, select [Static] then set [IP Address], [Subnet Mask], [Gateway] and [DNS Server] using / / < / > and numerical buttons. If you make a mistake while entering a number, press CLEAR to clear the highlighted part.
- Select [OK] and press ENTER (⊙) to apply network settings.
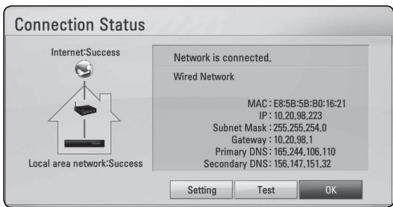
- The player will ask you to test the network connection. Select [OK] and press ENTER (O) to complete the network connection.
- If you select [Test] and press ENTER (O) at step 5 above, the network connection status is displayed on the screen.
You can also test it on the [Connection Status] in the [Setup] menu.
Wireless Network Connection
Another connection option is to use an Access Point or a wireless router. The network configuration and connection method may vary depending on the equipment in use and the network environment.
This player is equipped with an IEEE 802.11n (Dualband, 5 GHz and 2.4 GHz band) wireless module, which also supports the 802.11a/b/g standards. For the best wireless performance, we recommend using a IEEE 802.11n certified Wi-Fi network (access point or wireless router).
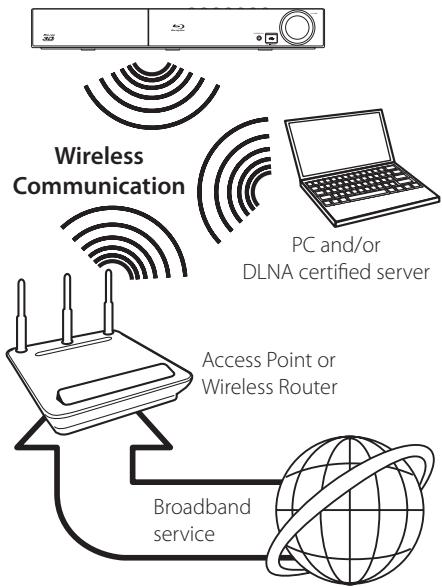
Refer to the setup instructions supplied with your access point or wireless router for detailed connection steps and network settings.
For best performance, a direct wired connection from this player to your home network's router or cable/DSL modem is always the best option. If you do chose to use the wireless option, note that performance can sometimes be affected by other electronic devices in the home.
! Note
Available frequency range and channels for 5 GHz band are listed as below. But, there may have the differences and restrictions depending on the country. Try setting your access point with other channel if you have difficulties in wireless network connection.
| Area | Frequency Range |
| North America | 5.15-5.25 GHz (ch. 36-48), 5.725-5.825 GHz (ch. 149-161), 5.825- 5.850 (ch.165) |
| Europe, UAE | 5.15-5.25 GHz (ch. 36-48) |
| Others | 5.15-5.25 GHz (ch. 36-48), 5.725-5.825 GHz (ch. 149-161), 5.825- 5.850 (ch.165) |
Wireless Network Setup
For the wireless network connection, the player needs to be set up for network communication. This adjustment can be done from the [Setup] menu. Adjust the [NETWORK] setting as follow. Setting up the access point or the wireless router is required before connecting the player to the network.
Preparation
Before setting the wireless network, you need to:
- connect the broadband internet to the wireless home network.
- set the access point or wireless router.
- note the SSID and security code of the network.
- Select [Connection Setting] option in the [Setup] menu then press ENTER (⊙).
- The [Connection Setting] menu appear on the screen. Use / V to select [Wireless] and press ENTER (⑨).
- Select [Yes] and press ENTER (O) to continue. The new connection settings reset the current network settings.
- The player scans the all available access points or wireless routers within range and display them as a list. Use / V to select an access point or wireless router on the list, and then press ENTER (⑨).
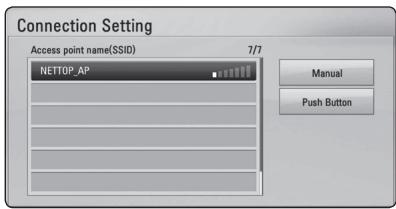
If you have security on your access point or wireless router, verify that the WEP or WPA key that was entered into the player matches the router's information exactly. You need to input the security code as necessary.

Note
- WEP security mode generally have 4 keys available on an access point or wireless router's setting. If your access point or wireless router use WEP security, enter the security code of the key "No.1" to connect on your home network.
- An Access Point is a device that allows you to connect to your home network wirelessly.
- If your access point or wireless router supports the PIN Code configuration method based on WPS(Wi-Fi Protected Setup), press yellow (C) coloured button and note the code number on the screen. And then, enter the PIN number on a setting menu of your access point or wireless router to connect. Refer to the documentation for your network device.
[Manual] - Your access point may not be broadcasting its access point name (SSID). Check your router settings through your computer and either set your router to broadcastSSID, or manually enter the access point name (SSID) in [Manual].
[Push Button] - If your access point or wireless router that supports the Push Button Configuration method, select this option and press the Push Button on your access point or wireless router within 120 counts. You do not need to know the access point name (SSID) and security code of your access point or wireless router.
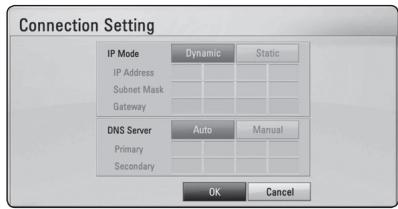
- Use / / < / > to select the IP mode between [Dynamic] and [Static]. Normally, select [Dynamic] to allocate an IP address automatically.

Note
If there is no DHCP server on the network and you want to set the IP address manually, select [Static] then set [IP Address], [Subnet Mask], [Gateway] and [DNS Server] using / / < / > and numerical buttons. If you make a mistake while entering a number, press CLEAR to clear the highlighted part.
- Select [OK] and press ENTER (O) to apply network settings.
- The player will ask you to test the network connection. Select [OK] and press ENTER (O) to complete the network connection.
- If you select [Test] and press ENTER (O) at step 7 above, the network connection status is displayed on the screen. You can also test it on the [Connection Status] in the [Setup] menu.
Notes on Network Connection:
- Many network connection problems during set up can often be fixed by re-setting the router or modem. After connecting the player to the home network, quickly power off and/or disconnect the power cable of the home network router or cable modem. Then power on and/or connect the power cable again.
- Depending on the internet service provider (ISP), the number of devices that can receive internet service may be limited by the applicable terms of service. For details, contact your ISP.
- Our company is not responsible for any malfunction of the player and/or the internet connection feature due to communication errors/malfunctions associated with your broadband internet connection, or other connected equipment.
- The features of BD-ROM discs made available through the Internet Connection feature are not created or provided by our company, and our company is not responsible for their functionality or continued availability. Some disc related material available by the Internet Connection may not be compatible with this player. If you have questions about such content, please contact the producer of the disc.
- Some internet contents may require a higher bandwidth connection.
- Even if the player is properly connected and configured, some internet contents may not operate properly because of internet congestion, the quality or bandwidth of your internet service, or problems at the provider of the content.
- Some internet connection operations may not be possible due to certain restrictions set by the Internet service provider (ISP) supplying your broadband Internet connection.
- Any fees charged by an ISP including, without limitation, connection charges are your responsibility.
- A 10 Base-T or 100 Base-TX LAN port is required for wired connection to this player. If your internet service does not allow for such a connection, you will not be able to connect the player.
-
You must use a Router to use xDSL service.
-
A DSL modem is required to use DSL service and a cable modem is required to use cable modem service. Depending on the access method of and subscriber agreement with your ISP, you may not be able to use the internet connection feature contained in this player or you may be limited to the number of devices you can connect at the same time. (If your ISP limits subscription to one device, this player may not be allowed to connect when a PC is already connected.)
- The use of a "Router" may not be allowed or its usage may be limited depending on the policies and restrictions of your ISP. For details, contact your ISP directly.
- The wireless network operates at 2.4 GHz radio frequencies that are also used by other household devices such as cordless telephone, Bluetooth® devices, microwave oven, and can be affected by interference from them.
- Turn off all unused network equipment in your local home network. Some devices may generate network traffic.
- For the purpose of the better transmission, placing the player from the access point as close as possible.
- In some instances, placing the access point or wireless router at least 0.45m (1.5 ft.) above the floor may improve the reception.
- Move closer to the access point if possible or reorient the player so there is nothing between it and the access point.
- The reception quality over wireless depends on many factors such as type of the access point, distance between the player and access point, and the location of the player.
- Set your access point or wireless router to Infrastructure mode. Ad-hoc mode is not supported.
USB device connection
This player can play movie, music and photo files contained in the USB device.
Playback content in the USB device
- Insert a USB device to the USB port until it fits into place.
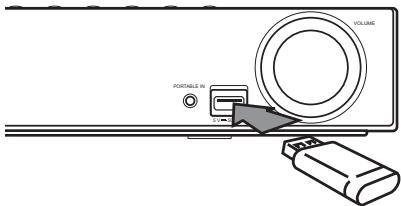
- Press HOME MENU (
- Select [Movie], [Photo] or [Music] using < / > and press ENTER (⑥).
- Select the [USB] option using / V , and press ENTER (⑨).
- Select a file using / / < / > , and press PLAY or ENTER (⊙) to play the file.
- Withdraw the USB device carefully.

Note
- This player supports USB flash drive/external HDD formatted in FAT16, FAT32 and NTFS when accessing files (music, photo, movie). However, for BD-LIVE and Audio CD recording, only FAT16 and FAT32 formats are supported. Use the USB flash drive/external HDD formatted in either FAT16 or FAT32 when using BD-LIVE and Audio CD recording.
- The USB device can be used for the local storage for enjoying BD-LIVE discs with Internet.
- This unit can support up to 8 partitions of the USB device.
- Do not extract the USB device during operation (play, etc.).
- A USB device which requires additional program installation when you have connected it to a computer, is not supported.
- USB device: USB device that supports USB1.1 and USB2.0.
- Movie, music and photo files can be played. For details of operations on each file, refer to relevant pages.
- Regular back up is recommended to prevent data loss.
- If you use a USB extension cable, USB HUB or USB Multi-reader, the USB device may not be recognized.
- Some USB device may not work with this unit.
- Digital camera and mobile phone are not supported.
- USB Port of the unit cannot be connected to PC. The unit cannot be used as a storage device.
Settings
Adjust the Setup Settings
You can change the settings of the player in the [Setup] menu.
- Press HOME MENU (↑).
- Use < / > to select the [Setup] and press ENTER (O). The [Setup] menu appears.
- Use / V to select the first setup option, and press to move to the second level.
- Use / V to select a second setup option, and press ENTER (⊙) to move to the third level.
- Use / V to select a desired setting, and press ENTER (O) to confirm your selection.
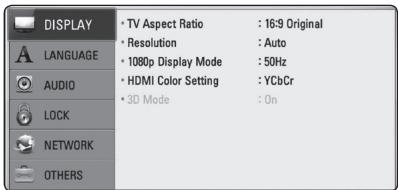
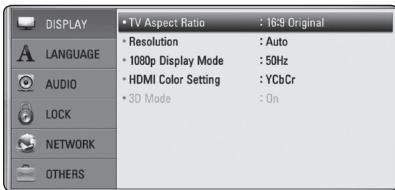
[DISPLAY] Menu
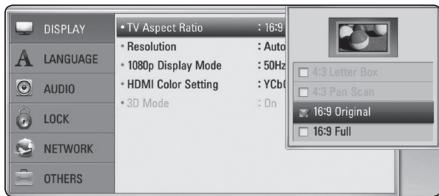
TV Aspect Ratio
Select a TV aspect ratio option according to your TV type.
[4:3 Letter Box]
Select when a standard 4:3 TV is connected. Displays theatrical images with masking bars above and below the picture.
[4:3 Pan Scan]
Select when a standard 4:3 TV is connected. Displays pictures cropped to fill your TV screen. Both sides of the picture are cut off.
[16:9 Original]
Select when a 16:9 wide TV is connected. The 4:3 picture is displayed with an original 4:3 aspect ratio, with black bars appearing at the left and right sides.
[16:9 Full]
Select when a 16:9 wide TV is connected. The 4:3 picture is adjusted horizontally (in a linear proportion) to fill the entire screen.
![PIONEER BCS-313 - [16:9 Full] - 1](/content/2019/11/118917/images/781b47b01199ce379efb6843271e5e68f6aa7e0509665dd429fbc3e62cdbafd4.jpg)
You cannot select [4:3 Letter Box] and [4:3 Pan Scan] option when the resolution is set to higher than 720p.
Resolution
Sets the output resolution of the Component and HDMI video signal. Refer to page 24 and 65 for details about the resolution setting.
[Auto]
If the HDMI OUT jack is connected to TVs providing display information (EDID), automatically selects the resolution best suited to the connected TV.
[1080p]
Outputs 1080 lines of progressive video.
[1080i]
Outputs 1080 lines of interlaced video.
[720p]
Outputs 720 lines of progressive video.
[576p]
Outputs 576 lines of progressive video.
[576i]
Outputs 576 lines of interlaced video.
108Op Display Mode
When the resolution is set to 1080p, select [24 Hz] for smooth presentation of film material (1080p/24 Hz) with a HDMI-equipped display compatible with 1080p/24 Hz input.

Note
- When you select [24 Hz], you may experience some picture disturbance when the video switches video and film material. In this case, select [50 Hz].
- Even when [1080p Display Mode] is set to [24 Hz], if your TV is not compatible with 1080p/24 Hz, the actual frame frequency of the video output will be 50 Hz to match the video source format.
- Since several factors affect the resolution of video output, see "Video Output Resolution" on page 65.
HDMI Color Setting
Select the type of output from the HDMI OUT jack. For this setting, please refer to the manuals of your display device.
[YCbCr]
Select when connecting to a HDMI display device.
[RGB]
Select when connecting to a DVI display device.
3D Mode
Select the type of output mode for Blu-ray 3D disc playback.
[Off]
Blu-ray 3D disc playback will output as 2D mode like a normal BD-ROM disc playback.
[On]
Blu-ray 3D disc playback will output as 3D mode.
[LANGUAGE] Menu
Display Menu
Select a language for the [Setup] menu and on-screen display.
Disc Menu/Disc Audio/ Disc Subtitle
Select the language you prefer for the audio track (disc audio), subtitles, and the disc menu.
[Original]
Refers to the original language in which the disc was recorded.
[Other]
Press ENTER (⊙) to select another language. Use number buttons then press ENTER (⊙) to enter the corresponding 4-digit number according to the language code list on page 62.
[Off] (Disc Subtitle only)
Turn off Subtitle.
![PIONEER BCS-313 - [Off] (Disc Subtitle only) - 1](/content/2019/11/118917/images/037ff75bc1c399bfc729a692215bcb4a2181569114fcfe7de857ec7f806f1732.jpg)
Note
Depending on the disc, your language setting may not work.
[AUDIO] Menu
Speaker Setup
To obtain the best possible sound, use the speaker setup display to specify the volume of the speakers you have connected and their distance from your listening position. Use the test to adjust the volume of the speakers to the same level.
[Speaker]
Select a speaker that you want to adjust.
[Volume]
Adjust the output level of each speaker.
[Distance]
Adjust the distance between each speaker and the listening position.
[Test/ Stop test tone]
The speakers will emit a test tone.
[OK]
Confirms the setting.
[Cancel]
Cancels the setting.
HD AV Sync
Sometimes Digital TV encounters a delay between picture and sound. If this happens you can compensate by setting a delay on the sound so that it effectively 'waits' for the picture to arrive: this is called HD AV Sync. Use / V to scroll up and down through the delay amount, which you can set at anything between 0 and 300 ms.
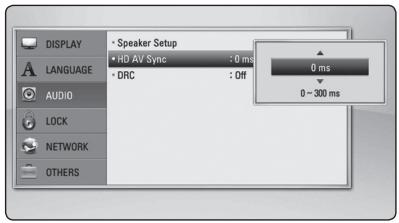
DRC (Dynamic Range Control)
This function allows you to listen to a movie at a lower volume without losing clarity of sound.
[Off]
Turns off this function.
[On]
Compress the dynamic range of the Dolby Digital, Dolby Digital Plus or Dolby TrueHD audio output.
[Auto]
The dynamic range of the Dolby TrueHD audio output is specified by itself.
And the dynamic range of the Dolby Digital and Dolby Digital Plus are operated as same as the [On] mode.
![PIONEER BCS-313 - [Auto] - 1](/content/2019/11/118917/images/8026e913a25ac3b7a7bf001127cffc1eac6bef713cc5f880c2cf41db600a3f78.jpg)
Note
The DRC setting can be changed only when a disc is not inserted or the unit is in complete stop mode.
[LOCK] Menu
The [LOCK] settings affect only Blu-ray Disc and DVD playback.
To access the any features in [LOCK] settings, you must enter the 4-digit security code you have created.
If you have not entered a password yet, you are prompted to do so. Enter a 4-digit password twice, and press ENTER (O) to create a new password.
Password
You can create or change the password.
[None]
Enter a 4-digit password twice, and press ENTER (O) to create a new password.
[Change]
Enter the current password and press ENTER (O). Enter a 4-digit password twice, and press ENTER (O) to create a new password.
If you forget your password
If you forget your password, you can clear it using the following steps:
- Remove any disc that might be in the player.
- Select [Password] option in the [Setup] menu.
- Use Number buttons to enter "210499". The password is cleared.

Note
If you make a mistake before pressing ENTER (⊙), press CLEAR. Then input the correct password.
DVD Rating
Blocks playback of rated DVD based on their content. (Not all discs are rated.)
[Rating 1-8]
Rating one (1) has the most restrictions and rating eight (8) is the least restrictive.
[Unlock]
If you select [Unlock], parental control is not active and the disc plays in full.
Blu-ray Disc Rating
Set an age limit of BD-ROM play. Use number buttons to input an age limit for BD-ROM viewing.
[255]
All BD-ROM can be played.
[0-254]
Prohibits play of BD-ROM with corresponding ratings recorded on them.
![PIONEER BCS-313 - [0-254] - 1](/content/2019/11/118917/images/d93640ada86f1bbb3d501ee5d5b55c46e052bb753e1ce0b403c3e1d00cd63810.jpg)
Note
The [Blu-ray Disc Rating] will be applied only for the Blu-ray disc that containing the Advanced Rating Control.
Area Code
Enter the code of the area whose standards were used to rate the DVD video disc, based on the list on page 61.
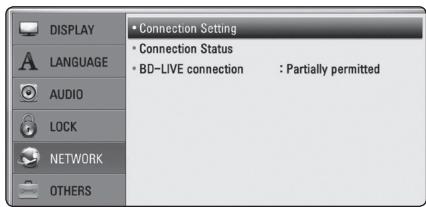
[NETWORK] Menu
The [NETWORK] settings are needed to use the BDLive and Online content services.
Connection Setting
If your home network environment is ready to connect the player, the player needs to be set the wired or wireless network connection for network communication. (See "Connecting to your Home Network" on pages 27-31.)
Connection Status
If you want to check the network status on this player, select the [Connection Status] options and press ENTER (⊙) to check whether a connection to the network and the internet have been established.
BD-LIVE connection
You can restrict Internet access when BD-LIVE functions are used.
[Permitted]
Internet access is permitted for all BD-LIVE contents.
[Partially permitted]
Internet access is permitted only for BD-LIVE contents which have content owner certificates. Internet access and AACS Online functions are prohibited for all BD-LIVE contents without a certificate.
[Prohibited]
Internet access is prohibited for all BD-LIVE contents.
[OTHERS] Menu
ARC (Audio Return Channel)
You can set ARC (Audio Return Channel) function [On] or [Off]. The ARC function enables an HDMI capable TV to send the audio stream to HDMI OUT of this player. Refer to page 22 for details about this function.
DivX VOD
ABOUT DIVXVIDEO:DivX®is a digital video format created by DivX, Inc. This is an official DivX Certified device that plays DivX video. Visit divx.com for more information and software tools to convert your files into DivX video.
ABOUT DIVXVIDEO-ON-DEMAND: This DivX Certified® device must be registered in order to play purchased DivX Video-on-Demand (VOD) movies. To obtain your registration code, locate the DivX VOD section in your device setup menu. Go to vod. divx.com for more information on how to complete your registration.
[Register]
Displays the registration code of your player.
[Deregister]
Deactivate your player and display the deactivation code.
![PIONEER BCS-313 - [Deregister] - 1](/content/2019/11/118917/images/4ac404955b74e684f36e12045316f04d730b929f433c79108a7e04339da8d8cb.jpg)
Note
All the downloaded videos from DivX VOD with this player's registration code can only be played back on this unit.
Auto Power Off
The screen saver appears when you leave the player in Stop mode for about five minutes. If you set this option to [On], the unit automatically turns off within 25 minutes since the Screen Saver is displayed. Set this option to [Off] to leave the screen saver until the unit is operated by the user.
Initialize
[Factory Set]
You can reset the player to its original factory settings.
[BD-LIVE Storage Clear]
Initializes the BD-LIVE contents from the connected USB storage.
![PIONEER BCS-313 - [BD-LIVE Storage Clear] - 1](/content/2019/11/118917/images/a827cecac3607ed6674b723ac71549074dff4e37bdb5fb02e1db41ee495292de.jpg)
Note
If you reset the player to its original factory settings using [Factory Set] option, you have to set all the activation for the Online services and network settings again.
Software Information
Displays the current software version.
Disclaimer Notice
Press ENTER (⊙) to view the notice of Network Service Disclaimer.
Sound Effect
You can select a suitable sound mode. Press SOUND repeatedly until the desired mode appears on the front panel display or the TV screen. The displayed items for the equalizer maybe different depending on sound sources and effects.
[Mode 1]: Gives you suitable sound setting with connecting small type of speakers (S-BD303).
[Mode 2]: Gives you suitable sound setting with connecting tall type of speakers (S-BD707T).
[Bypass]: Software with multichannel surround audio signals is played according to the way it was recorded.
[Bass Blast]: Reinforce the bass sound effect from front left and right speaker and subwoofer.
[PL II Movie]: Performs Pro Logic II movie mode decoding to the input signal and produces five full-bandwidth output channels from 2 channel sources. This setting is ideal for watching videos of overdubbed or old movies. This mode is available only to 2 channel sources.
[PL II Music]: Performs Pro Logic II music mode decoding to the input signal and produces five full-bandwidth output channels from 2 channel sources. This setting is ideal for normal stereo sources such as CD. This mode is available only to 2 channel sources.
[Clear Voice]: This mode makes voice sound clear, improving the quality of voice sound.
[Game]: You can enjoy more virtual sound while playing video games.
[Night]: This may be useful when you want to watch movies at low volumes late at night.
[Mus. ReTouch]: When listening to MP3 files or other compressed music, you can enhance the sound. This mode is available only to 2 channel sources.
[Loudness]: Improves bass and treble sound.
GeneralPlayback
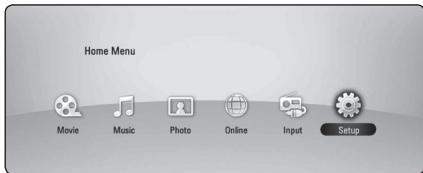
Using [HOME] menu
The home menu appears when you press HOME MENU ()。Use /V / < / > to select a category and press ENTER (O).
![PIONEER BCS-313 - Using [HOME] menu - 1](/content/2019/11/118917/images/f085b4fcb4fa5634026a559918f0baa4c6e0b8395475a66f07981b6641f89764.jpg)
1 [Movie] - Plays video contents.
2 [Music] - Plays audio contents.
[Photo] - Plays photo contents.
4 [Online] - Displays the Online Home screen.
[Input] - Changes input mode.
[Setup] - Adjusts the system settings.
Playing a Disc
BD DVD ACD
- Press (OPEN/CLOSE), and place a disc on the disc tray.
-
Press (OPEN/CLOSE) to close the disc tray. For the most Audio CD, BD-ROM and DVD-ROM discs, playback starts automatically.
-
Press HOME MENU (↑).
- Select [Movie] or [Music] using < / > , and press ENTER (O).
- Select [Blu-ray Disc], [DVD], [VR] or [Audio] option using / , and press ENTER (⑨).
! Note
- Playback functions described in this manual are not always available in every files and media. Some functions can be restricted depending on many factors.
Depending on the BD-ROM titles, a USB device connection may be needed for the proper playback. - Unfinalized DVD VR format discs may not be played in this player.
- Some DVD-VR discs are made with CPRM data by DVD REORDER. This unit cannot support these kinds of discs.
Playing a file on a disc/USB device
MOVIE MUSIC PHOTO
This player can play movie, music and photo files contained in the disc or USB device.
- Insert a data disc on the tray or connect a USB device.
- Press HOME MENU (↑).
- Select [Movie], [Photo] or [Music] using < / > and press ENTER (②).
- Select [Data] or [USB] option using / V , and press ENTER (⑨).
- Select a file using / / < / > , and press (PLAY) or ENTER (⊙) to play the file.
Playing Blu-ray 3D disc
BD
This player can play the Blu-ray 3D discs which contains separate views for the left and right eyes.
Preparation
In order to playback Blu-ray 3D title in stereoscopic 3D mode, you need to:
- Check your TV is 3D capable and has HDMI (3D) input(s).
- Wear 3D glasses to enjoy the 3D experience if it is necessary.
- Check whether the BD-ROM title is the Blur ray 3D disc or not.
-
Connect an HDMI cable (High Speed HDMI™ Cable with Ethernet) between the player's HDMI output and TV's HDMI input.
-
Press HOME MENU (↑), and set the [3D Mode] option on the [Setup] menu to [On] (page 34).
- Press (OPEN/CLOSE), and place a disc on the disc tray.
- Press (OPEN/CLOSE) to close the disc tray. The playback starts automatically.
- Refer to the owner's manual of your 3D-ready TV for the further instruction.
You may need to adjust the display settings and focus on your TV's setting for the improved 3D effect.

Caution
- Watching a 3D content for a long period time may cause dizziness or tiredness.
- It is not recommended to watch a movie in 3D mode for infirm, child (particularly under 6) and pregnant woman.
- If you are experiencing headache, tiredness or dizziness while viewing contents in 3D, it is strongly recommended to stop the playback and rest until you feel normal.
Enjoying BD-Live™
BD
BD-ROM supporting BD-Live (BD-ROM version 2 Profile 2) that has a network extension function allows you to enjoy more functions such as downloading new movie trailers by connecting this unit to the internet.
- Check the network connection and settings (pages 27-31).
- Insert a USB storage device to the USB port on the front panel.
A USB storage device is needed to download bonus content.
- Press HOME MENU (1), and set the [BD-LIVE connection] option on the [Setup] menu (page 37).
Depending on a disc, the BD-Live function may not be operated if [BD-LIVE connection] option is set to [Partially Permitted].
- Insert a BD-ROM with BD-Live.
The operations are differ depending on the disc. Refer to the manual supplied with the disc.

Caution
Do not extract the connected USB device while content is being downloaded or a Blur ray disc is still in the disc tray. Doing so may damage the connected USB device and BDLive features may not operate properly with the damaged USB device anymore. If the connected USB device seems damaged from such an action, you can format the connected USB device from the PC and reuse it with this player.

Note
- Some BD-Live contents may be restrictively accessed in some territories by contents provider's own decision.
- It may take up to several minutes to load and start enjoying BD-Live contents.
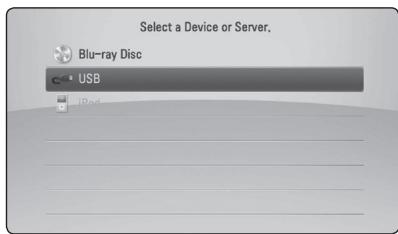
Playing a file on a network server
MOVIE MUSIC PHOTO
This player can play movie, music and photo files located in a PC or a DLNA server through your home network.
- Check the network connection and settings (pages 27-31).
- Press HOME MENU (
- Select [Movie], [Photo] or [Music] using < / > and press ENTER (⑥).
- Select a DLNA media server or a share folder on your PC on the list using / V , and press ENTER (⊙).
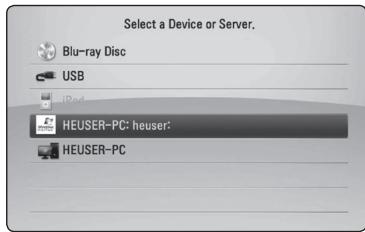
If you want to rescan available media server, press the green (B) coloured button.
- Select a file using / / < / > , and press ENTER (O) to play the file.
! Note
- The file requirements are described on page 11.
- The thumbnail of the unplayable files can be displayed, but those cannot be played on this player.
- The subtitle file name and movie file name have to be the same and located at the same folder.
- The playback and operating quality may be affected by your home network condition.
- You may experience connection problems depending on your server's environment.
- DTCP-IP cannot be supported.
Entering a network user ID and the password
Depending on your PC's environment, you may need to enter a network user ID and the password for accessing a shared folder.
- The keyboard menu appears automatically if the network user ID and the password are required.
- Use / V / < / > to select a character then press ENTER (O) to confirm your selection on the virtual keyboard.
To enter a letter with an accent mark, press DISPLAY (□) to display the extended character set.
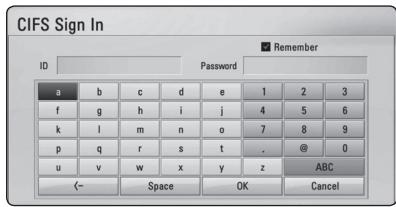
[Cancel] - Returns to the previous screen.
[Space] - Inserts a space at the cursor position.
[- - ] - deletes the previous character at the cursor position.
[ABC / abc / #+-=&] - Change the keyboard menu settings to capital letters, small letters or symbols.
- When you finish entering the network user ID and password, select [OK] using / / < / > and press ENTER (O) to access the folder.
The network user ID and password will be remembered after accessing the folder for your convenience. If you do not want the network user ID and password to be remembered, press red (A) coloured button to un-tick the [Remember] check box before accessing the folder.
Basic operations for video and audio content
To stop playback
Press (STOP) while playback.
To pause playback
Press II (PAUSE/STEP) while playback. Press (PLAY) to resume playback.
To play frame-by-frame (Video)
Press III (PAUSE/STEP) while movie playback.
Press II (PAUSE/STEP) repeatedly to play Frame-by-Frame playback.
To scan forward or backward
Press or to play fast forward or fast reverse during playback.
You can change the various playback speeds by pressing or repeatedly.
To slow down the playing speed
While the playback is paused, press repeatedly to play various speeds of slow motion.
To skip to the next/previous chapter/track/file
During playback, press or to go to the next chapter/track/file or to return to the beginning of the current chapter/track/file.
Press twice briefly to step back to the previous chapter/track/file.
In the file list menu of a server, there may have many types of contents in a folder together. In this case, press 1 or 2 to go to the previous or next content with same type.
Basic operations for photo content
To play a slide show
Press▶(PLAY) to start slide show.
To stop a slide show
Press (STOP) while slide show.
To pause a slide show
Press (PAUSE/STEP) while slide show. Press (PLAY) to re-start the slide show.
To skip to the next/previous photo
While viewing a photo in full screen, press < or > to go to the previous or next photo.
Using the disc menu
BD DVD AVCHD
To display the disc menu
The menu screen may be displayed first after loading a disc which contains a menu. If you want to display the disc menu while playback, press MENU.
Use / V / < / > buttons to navigate through menu items.
To display the Pop-up menu
Some BD-ROM discs contain Pop-up menu that appears while playback.
Press POPUP/TOP MENU while playback, and use / V / < / > buttons to navigate through menu items.
Resume playback
BD DVD AVCHD MOVIE ACD MUSIC
The unit records the point where you pressed the
( STOP) depending on the disc.
If"Resume Stop")appears on the screen briefly, press (PLAY) to resume playback (from the scene point).
If you press (STOP) twice or unload the disc,
"Complete Stop") appears on the screen. The unit will clear the stopped point.
! Note
- The resume point may be cleared when a button is pressed (for example; (STANDBY/ON), (OPEN/CLOSE), etc).
- On BD-ROM discs with BD-J, the resume playback function does not work.
- If you press (STOP) once during BD-ROM interactive title playback, the unit will be in Complete Stop mode.
Advanced Playback
Repeat Playback
BD DVD AVCHD ACD MUSIC
During playback, press REPEAT (C) repeatedly to select a desired repeat mode.
Blu-ray Disc/DVDs
A- Selected portion will be repeated continually.
Chapter - The current chapter will be played back repeatedly.
Title - The current title will be played back repeatedly.
To return to normal playback, press REPEAT (C) repeatedly to select [Off].
Audio CDs/Music files
Track- The current track or file will be played back repeatedly.
All - All the tracks or files will be played back repeatedly.
- The tracks or files will be played back in random order.
All - All the tracks or files will be played back repeatedly in random order.
A-B - Selected portion will be repeated continually. (Audio CD only)
To return to normal playback, press CLEAR.
! Note
- If you press once during Repeat Chapter/Track playback, the repeat playback cancels.
This function may not work on some disc or title.
Repeating a specific portion
BD DVD AVCHD ACD
This player can repeat a portion you have selected.
- While playback, press REPEAT (C) to select [A-] at the beginning of the portion you wish to repeat.
- Press ENTER (O) at the end of the portion. Your selected portion will be repeated continually.
- To return to normal playback, press REPEAT (口) repeatedly to select [Off].
! Note
- You cannot select a portion less than 3 seconds.
This function may not work on some disc or title.
Enlarge the playback image
BD DVD AVCHD MOVIE PHOTO
- During playback or pause mode, press ZOOM to display the [Zoom] menu.
- Use red (A) or green (B) coloured button to zoom out or in the picture. You can move through the zoomed picture using / V / < /> buttons.
- To return to the normal picture size, press yellow (C) coloured button.
- Press RETURN (o) to exit the [Zoom] menu.
Marker Search
BD DVD AVCHD MOVIE
You can start playback from up to nine memorized points.
To enter a marker
- While playback, press MARKER at the desired point. The Marker icon appears on the TV screen briefly.
- Repeat step 1 to add up to nine markers.
To recall a marked scene
- Press SEARCH and the search menu appears on the screen.
- Press a number button to select a marker number that you want to recall. Playback starts from the marked scene.
To delete a Marker
- Press SEARCH and the search menu appears on the screen.

- Press V to highlight a marker number. Use < / > to select a marked scene that you want to delete.
- Press CLEAR and the marked scene is erased from the search menu.

Note
- This function may not work depending on discs, titles, server ability.
- All marked points are cleared if the title is in complete stop (■) mode, the title is changed or if you unload the disc.
- If the total length of the title is less than 10 seconds, this function is not available.
Using the search menu
BD DVD AVCHD MOVIE
Using search menu, you can easily to find the point where you want to start playback.
To search a point
- During playback, press SEARCH to display the search menu.

- Press < / > to skip the playback 15 seconds forward or backward. You can select a point that you want to skip by pressing and holding < / > button.
To start playback from a marked scene
- Press SEARCH and the search menu appears on the screen.
- Press V to highlight a marker number. Use < / > to select a marked scene that you want to start playback.
- Press ENTER (O) to start playback from the marked scene.

Note
- This function may not work depending on discs, titles, server ability.
- This function may not work depending on the file type and ability of the media server.
Selecting a subtitle file
MOVIE
If the subtitle file name is different from the movie file name, you need to select the subtitle file on the [Movie] menu before playing the movie.
- Use / / < / > to select the subtitle file you wish to play in the [Movie] menu.
- Press ENTER (O).
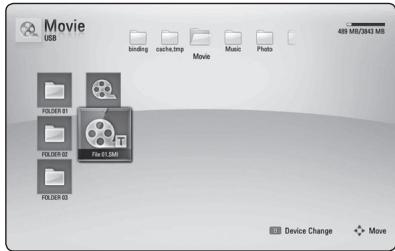
Press ENTER (O) again to deselect the subtitle file. Selected subtitle file will be displayed when you play the movie file.
! Note
- If you press (STOP) while playback, the subtitle selection is cancelled.
- This function is not available for playing file on a server via home network.
Last Scene Memory
BD DVD
This unit memorizes the last scene from the last disc that is viewed. The last scene remains in memory even if you remove the disc from the unit or switch off the unit. If you load a disc that has the scene memorized, the scene is automatically recalled.
! Note
- Last Scene Memory function for a previous disc is erased once a different disc is played.
- This function may not work depending on the disc.
- On BD-ROM discs with BD-J, the last scene memory function does not work.
- This unit does not memorize settings of a disc if you switch off the unit before commencing to play it.
Options while viewing a photo
PHOTO
You can use various options during viewing a photo in full screen.
- While viewing a photo in full screen, press DISPLAY (□) to display the option menu.
- Select an option using / .
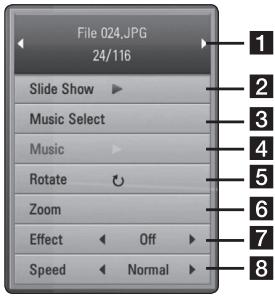
1 Current photo/Total number of photos - Use < / > to view previous/next photo.
2 Slide Show - Press ENTER (O) to start or pause slide show.
3 Music Select - Select the background music for the slide show (page 48).
4 Music -Press ENTER (⊙) to start or pause background music.
5 Rotate - Press ENTER (O) to rotate the photo clockwise.
6 Zoom - Press ENTER (⊙) to display the [Zoom] menu.
7 Effect - Use < / > to select a transition effect between photos in a slide show.
Speed - Use < / > to select a delaying speed between photos in a slide show.
- Press RETURN (o) to exit the option menu.
Listening to music while slide show
PHOTO
You can display photo files while listening to music files.
- While viewing a photo in full screen, press DISPLAY (□) to display the option menu.
- Use / V to select [Music Select] option, and press ENTER (O) to display the [Music Select] menu.
- Use / to select a device, and press ENTER (⊙).
Device that you can select are differ depending on the location of the photo file you are displaying in full screen.
| Photo location | Available Device |
| Disc, USB | Disc, USB |
| Share Folder (PC) | Share Folder (PC) |
| DLNA server | DLNA server |
- Use / V to select a file or a folder you wish to play.
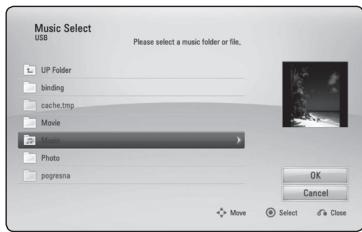
Select and press ENTER (O) to display the upper directory.
! Note
When selecting music file from a server, folder selection is not available. Only file selection is available.
- Use > to select [OK], and press ENTER (⊙) to complete music selection.
On-Screen display
You can display and adjust various information and settings about the content.
Displaying content information on-screen
BD DVD AVCHD MOVIE
- While playback, press DISPLAY (□) to show various playback information.
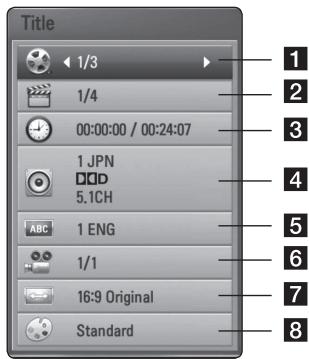
1 Title - current title number/total number of titles
2 Chapter - current chapter number/total number of chapters
Time - elapsed playing time/total playback time
4 Audio - selected audio language or channel
5 Subtitle - selected subtitle.
Angle - selected angle/total number of angles
7 TV Aspect Ratio - selected TV aspect Ratio
Picture Mode - selected picture mode
- Select an option using / .
- Use < / > to adjust the selected option value.
- Press RETURN (o) to exit the On-Screen display.
! Note
- If no button is pressed for a few seconds, the on-screen display disappears.
- A title number cannot be selected on some discs.
- Available items may differ depending on discs or titles.
- If an interactive Blu-ray Disc is playing back, some setting information is displayed on the screen but prohibited to be changed.
Playing from selected time
BD DVD AVCHD MOVIE
- Press DISPLAY (□) during playback. The time search box shows the elapsed playing time.
- Select the [Time] option and then input the required start time in hours, minutes, and seconds from left to right.
For example, to find a scene at 2 hours, 10 minutes, and 20 seconds, enter "21020".
Press < / > to skip the playback 60 seconds forward or backward.
- Press ENTER (⊙) to start playback from selected time.
! Note
- This function may not work on some disc or titles.
- This function may not work depending on the file type and ability of the DLNA server.
Hearing a different audio
BD DVD AVCHD MOVIE
- During playback, press DISPLAY (□) to display the On-Screen display.
- Use / V to select the [Audio] option.
- Use < / > to select desired audio language, audio track or audio channel.
! Note
- Some discs allow you to change audio selections only via the disc menu. In this case, press POPUP/TOP MENU or MENU button and choose the appropriate audio from the selections on the disc menu.
- Immediately after you have switched sound, there may be a temporary discrepancy between the display and actual sound.
- On BD-ROM disc, the multi audio format (5.1CH or 7.1CH) is displayed with [MultiCH] in the on-screen display.
Selecting a subtitle language
BD DVD AVCHD MOVIE
- During playback, press DISPLAY (□) to display the On-Screen display.
- Use / to select the [Subtitle] option.
- Use < / > to select desired subtitle language.
- Press RETURN (o) to exit the On-Screen display.
! Note
Some discs allow you to change subtitle selections only via the disc menu. If this is the case, press POPUP/TOP MENU or MENU button and choose the appropriate subtitle from the selections on the disc menu.
Watching from a different angle
BD DVD
If the disc contains scenes recorded at different camera angles, you can change to a different camera angle during playback.
- During playback, press DISPLAY (□) to display the On-Screen display.
- Use / to select the [Angle] option.
- Use < / > to select desired angle.
- Press RETURN (o) to exit the On-Screen display.
Changing the TV Aspect Ratio
BD DVD AVCHD MOVIE
You can change the TV aspect ratio setting while playback.
- During playback, press DISPLAY (□) to display the On-Screen display.
- Use / V to select the [TV Aspect Ratio] option.
- Use < / > to select desired option.
- Press RETURN (o) to exit the On-Screen display.
! Note
Even if you change the value of the [TV Aspect Ratio] option in On-Screen display, the [TV Aspect Ratio] option in the [Setup] menu is not changed.
Changing subtitle code page
MOVIE
If the subtitle is displayed in broken letter, you can change the subtitle code page to view the subtitle file properly.
- During playback, press DISPLAY (□) to display the playback menu.
- Use / V to select the [Code Page] option.
- Use < / > to select desired code option.
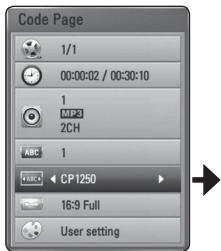
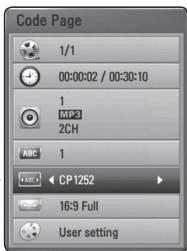
- Press RETURN (o) to exit the On-Screen display.
Changing the Picture Mode
BD DVD AVCHD MOVIE
You can change the [Picture mode] option while playback.
- During playback, press DISPLAY (□) to display the On-Screen display.
- Use / V to select the [Picture Mode] option.
- Use < / > to select desired option.
- Press RETURN (o) to exit the On-Screen display.
Setting the [User] option
- During playback, press DISPLAY (□) to display the On-Screen display.
- Use / V to select the [Picture Mode] option.
- Use < / > to select the [User setting] option, and press ENTER (O).
![PIONEER BCS-313 - Setting the [User] option - 1](/content/2019/11/118917/images/77d02db87dc3b68c142874732a41f913e79790ed94d4d4ae4d5ce01ec9dd4565.jpg)
- Use / V / < / > to adjust the [Picture Mode] options.
Select [Default] option then press ENTER (O) to reset the all video adjustments.
- Use / / < / > to select the [Close] option, and press ENTER (⊙) to finish setting.
Audio CD Recording
You can record one desired track or all of the tracks in Audio CD to a USB storage device.
- Insert a USB storage device to the USB port on the front panel.
- Press (OPEN/CLOSE), and place an Audio CD on the disc tray.
Press (OPEN/CLOSE) to close the disc tray. The playback starts automatically.
- Press DISPLAY (□) to display the option menu.
Or
Press USB REC button on the remote control. You can record all musics in the audio CD.
- Use / V to select [CD Recording] option, and press ENTER (⑨).
- Use / V to select a track you wish to copy on the menu, and press ENTER (C).
Repeat this step to select tracks as many as you can.
| Select All | Selects all the tracks on an Audio CD. |
| Option | Selects an encoding option from the pop-up menu (128 kbps, 192 kbps, 320 kbps or Lossless). |
| Close | Cancels the recording and returns to the previous screen. |
- Use / V / < / > to select [Start], and press ENTER (⑨).
- Use / / < / > to select a destination folder to be copied.
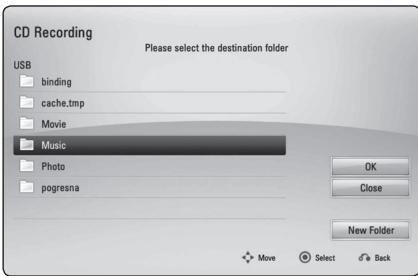
If you want to create a new folder, use
/ / < / > to select [New Folder] and press ENTER (O).
Enter a folder name using virtual keyboard, and
press ENTER (O) while [OK] is selected.
- Use / / < / > to select [OK], and press ENTER (O) to start Audio CD recording.
If you want to stop in progressing Audio CD recording, press ENTER (O) while [Cancel] is highlighted. - A message appears when Audio CD recording is completed. Press ENTER (O) to check the audio file created in the destination folder.

Note
- The table below shows the average recording time from an music track with 4 minutes of playback time to a audio file with 192 kbps as an example.
| stop mode | while playback |
| 1.4 min. | 2 min. |
- Recording times in the table above are approximate.
- Actual recording time for USB storage device varies depending on the USB storage device's ability.
- Make sure that there is minimum of 50 MB free space is needed when recording into the USB storage device.
- The length of the audio should be longer than 20 seconds for the proper recording.
- Do not turn off this player or extract the connected USB storage device during Audio CD recording.

Caution
The making of unauthorized copies of copy-protected material, including computer programmes, files, broadcasts and sound recordings, may be an infringement of copyrights and constitute a criminal offense. This equipment should not be used for such purposes.
Be responsible
Respect copyrights
Playing the iPod
You can enjoy the sound with your iPod. For details about iPod, refer to the iPod's User Guide.
Preparation
-
To view iPod's Videos and Photos on the TV screen.
-
Be sure to use the video connection through the VIDEO OUT jack on the rear panel of this unit. Select the appropriate video input mode on the TV.
Depending on the iPod, make sure that select Videos > Video settings, and then set TV Out to Ask or On from your iPod. For details about Video Settings, refer to the iPod User Guide. -
The viewing photos is available only if this unit is in iPod IN mode and you can view photos only as a slide show. You have to start a slide show on your iPod to view a photo on a TV. For details about a slide show, refer to the iPod User Guide.
-
Before connecting the iPod, turn this unit off and reduce the volume of this unit to its minimum.
- Connect the cradle so that the mark is downwards. Put your iPod on it. Connect the iPod firmly. If you turn this unit on, your iPod is automatically turned on and recharging starts.
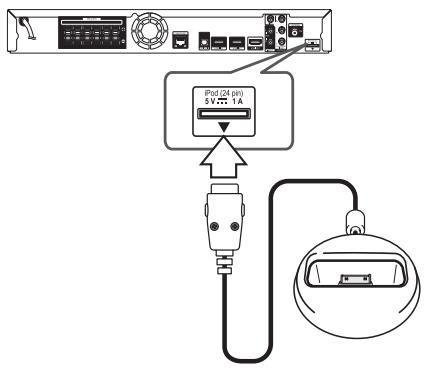
- Select a file using / / < / > , and press ENTER (O) to play the file.
Enjoying iPod on the screen
- Connect the iPod firmly.
- Press HOME MENU (↑).
- Select [Music] or [Movie] using < / > , and press ENTER (O). If you connected the other device CD or USB), select the iPod on the menu.
- Select a content using / V / < /> , and press ENTER (⊙) to play.
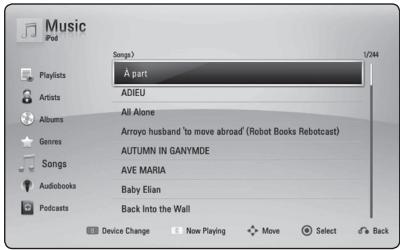
Enjoying the iPod IN mode
You can operate your iPod by using the supplied remote control and controls on your iPod.
- Connect the cradle so that the mark is downwards. Put your iPod on it. Connect the iPod firmly. If you turn this unit on, your iPod is automatically turned on and recharging starts.
- Press INPUT/TUNER to select [iPod in] mode.
| ∧/∨/</> | Selects an option in the menu. |
| ►/ENTER | Starts playback the music or video. |
| ∥ | To pause while it is playing. To resume playing, press►(PLAY) again. |
| ↔/► | Fast-forward or rewind a song or video |
| ↔/► | Skip the playback forward or backward. |
| REPEAT | To select a desired repeat mode: Track (▷), All (▷), Off (No display). |

Note
This system is compatible with the audio and video of the iPod (4th generation), iPod nano, iPod classic, iPod mini, iPod touch and iPhone (iPod shuffle is not supported.).

Note
- An error message "CHECK IPOD" or "Connected iPod model is not supported." appears when:
- your iPod is not available for the function to be operated.
- If this unit displays an error message, follow the message. An error message "CHECK IPOD" or "Please check your iPod" appears when:
- the communication between this unit and your iPod is failed.
Undock & re-dock your iPod in this unit. - your iPod is not connected firmly.
- this unit recognises your iPod as unknown device.
-
your iPod is exceptionally low on power.
The battery needs to be charged.
If you charge the battery while iPod is extremely low in power, it may take longer to charge. -
Compatibility with your iPod may vary depending on the type of your iPod.
- iPod touch and iPhone have any difference in operation other than iPod. You may need any additional control to use them with this unit. (e.g. "slide to unlock")
- If you use an application, make a call, or send and receive SMS text message, etc. on iPod touch or iPhone, disconnect it from iPod dock of this unit and then use it.
- This unit has been developed and tested for the software version of iPod/Phone indicated on the website of Pioneer.
- Installing software versions other than indicated on the website of Pioneer to your iPod/iPhone may result in incompatibility with this unit.
- The video quality depends on the video sources on your iPod.
- If you have a problem with your iPod, please visit www.apple.com/support/iPod.
Radio Operations
Be sure that the antennas are connected.
(Refer to the page 24)
Listening to the radio
- Press INPUT/TUNER until TUNER (FM) appears in the display window. The last received station is tuned in.
- Press and hold TUNE (- / +) for about two seconds until the frequency indication starts to change. Scanning stops when the unit tunes in a station. Or Press TUNE (- / +) repeatedly.
- Adjust the volume by rotating VOLUME on the front panel or by pressing VOL (+/-) on the remote control.
Presetting the Radio Stations
You can preset 50 stations for FM.
Before tuning, make sure that you have turned down the volume.
- Press INPUT/TUNER until the TUNER (FM) appears in the display window.
- Select the desired frequency by using TUNE (-+)
- Press ENTER (O) a preset number will flash in the display window.
- Press PRESET (A/V) to select the preset number you want.
- Press ENTER (O). The station is stored.
- Repeat the steps 2 to 5 to store other stations.
Deleting a saved station
- Press PRESET ( / V) to select a preset number you want to delete.
- Press CLEAR, the preset number will blink in the display window.
- Press CLEAR again, to delete the selected preset number.
Deleting all the saved stations
Press and hold CLEAR for two seconds.
"ERASE ALL" will flash up. Press CLEAR again. Then all the saved stations are deleted.
Improving poor FM reception
Press blue (D) (ST/MONO) coloured button on the remote control. This will change the tuner from stereo to mono and usually improve the reception.
See information about a radio station
The FM tuner is supplied with the RDS (Radio Data System) facility. This shows information about the radio station being listened to. Press RDS repeatedly to cycle through the various data types:
| PS | (Programme Service Name) The name of the channel will appear in the display |
| PTY | (Programme Type Recognition) The programme type (e.g. Jazz or News) will appear in the display. |
| RT | (Radio Text) A text message contains special information from the broadcast station. This text may scroll across the display. |
| CT | (Time controlled by the channel) This shows the time and date as broadcast by the station. |
Using the Online
You can use various content services via Internet with the Online feature.
- Check the network connection and settings (pages 27-31).
- Press HOME MENU (↑).
- Select the [Online] using < / > , and press ENTER (⊙).
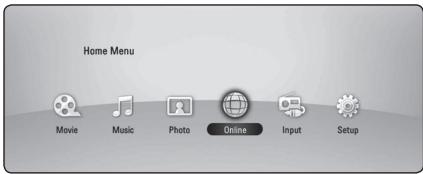
- Select an Online service using < / > , and press ENTER (O).

Note
- Detailed information of each service, contact to the content provider or visit support link of the service.
- The content of Online services and service related information, including user interface, is subject to changes. Please refer to the web site of each service for most up-to-date information.
- Using Online features with wireless network connection may result in improper streaming speed by interference from household devices that are using radio frequencies.
- Please note that the related privacy policy will be applied to your privacy and legal rights of you when you provide the online services with user names, passwords, or other login information or personal information and when Pioneer stores them. Please refer to Pioneer Privacy Policy on the WEB site.
Troubleshooting
General
| Symptom | Cause & Solution |
| The Power does not turned on. | Plug the power cord into the wall outlet securely. |
| The unit does not start playback. | Insert a playable disc.(Check the disc type, colour system, and regional code) Place the disc with the playback side down. Place the disc on the disc tray correctly inside the guide. Clean the disc. Cancel the Rating function or change the rating level. |
| The angle cannot be changed. | Multi-angles are not recorded on the DVD Video being played. |
| Cannot play movie, photo or music files. | The files are not recorded in a format that the unit can play. The unit does not support the codec of the movie file. |
| The remote control does not work properly. | The remote control is not pointed at the remote sensor of the unit. The remote control is too far from the unit. There is an obstacle in the path of the remote control and the unit. The batteries in the remote control are exhausted. |
| The unit is plugged in, but the power will not turn on or off. | You can reset the unit as follows. 1. Press and hold the STANDBY/ON button for at least five seconds. This will force the unit to power off then turn the unit back on. 2. Unplug the power cord, wait at least five seconds, and then plug it in again. |
| The unit is not operating normally. |
Network
| Symptom | Cause & Solution |
| BD-LIVE feature does not work. | ·The connected USB storage may not have enough space. Connect the USB storage with at least 1GB free space. ·Ensure that the unit is correctly connected to the local area network and can access the internet (see page 27-31). ·Your broadband speed may not fast enough to use the BD-LIVE features. Contact your Internet Service Provider (ISP) and increase the broadband speed is recommended. ·The [BD-LIVE connection] option in the [Setup] menu is set to [Prohibited]. Set the option to [Permitted]. |
| Streaming video services (such as YouTube™, etc.) are often stopped or "buffer" during playback. | ·Your broadband service speed may not be fast enough to stream video services. Contact your Internet Service Provider (ISP) and increase the broadband speed is recommended. |
| Shared folder or files from your PC or a media server are not displayed on the device list. | ·The firewall or anti-virus software on your media server is running. Turn off the firewall or anti-virus software running on your PC or media server. ·The player is not connected to the local area network that your PC or the media server are connected. |
| Cannot connect the player to the access point or wireless LAN router. | ·The wireless communication may be interrupted from household devices that are using radio frequencies. Move the player away from them. |
| Access point is not displayed on the "Access point name" list. | ·The access point or wireless LAN router may not broadcast its SSID. Set your access point to broadcast its SSID through your computer. ·Your network device such as access point may not set with available frequency range and channel that this player can support. Try setting the frequency range and channel on the network device setting. |
Picture
| Symptom | Cause & Solution |
| There is no picture. | • Select the appropriate video input mode on the TV so the picture from the unit appears on the TV screen. • Connect the video connection securely. • Check the [HDMI Color Setting] in the [Setup] menu is set to the appropriate item that conforms to your video connection. • Your TV may not support the resolution you have set on the player. Change the resolution that your TV accepts. • The player's HDMI OUT jack is connected to a DVI device that does not support copyright protection. |
| Picture noise appears | • You are playing a disc recorded in a colour system that is different from your TV. • Set the resolution which your TV accepts. |
| Blu-ray 3D disc playback does not output 3D views. | • Connect the player to your TV with HDMI cable (Type A, High Speed HDMI™ Cable with Ethernet). • Your TV may not support "HDMI 3D mandatory format". • The [3D Mode] option in the [Setup] menu is set to [Off]. Set the option to [On]. |
Sound
| Symptom | Cause & Solution |
| There is no sound or the sound is distorted. | • The unit is in scan, slow motion, or pause mode. • The sound volume is low. • Check the speaker cable connection. (page 16) |
Updates
Note that information on this product is available on the Pioneer website. Please check the website for information on updating or servicing this player.
Controlling a TV with the Supplied Remote Control
You can control your TV using the buttons below.
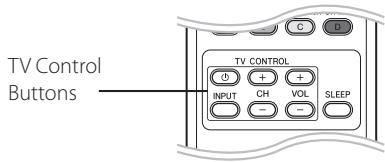
| By pressing | You can |
| (TV POWER) | Turn the TV on or off. |
| INPUT | Switch the TV's input source between the TV and other input sources. |
| CH +/- | Scan up or down through memorized channels. |
| VOL +/- | Adjust the volume of the TV. |

Note
Depending on the unit being connected, you may not be able to control your TV using some of the buttons.
Setting up the remote to control your TV
You can operate your TV with the supplied remote control.
If your TV is listed in the table below, set the appropriate manufacturer code.
- While holding down (TV POWER) button, and press the manufacturer code for your TV with the numerical buttons (see the table below).
| Manufacturer | Code Number |
| Pioneer | 1 (Default) |
| Sony | 2, 3 |
| Panasonic | 4, 5 |
| Samsung | 6, 7 |
| LG | 8, 9 |
- Release the (TV POWER) button to complete setting.
Depending on your TV, some or all buttons may not function on the TV, even after entering the correct manufacturer code. When you replace the batteries of the remote, the code number yo have set may be reset to the default setting. Set the appropriate code number again.
Area Code List
Choose an area code from this list.
| Area | Code | Area | Code | Area | Code | Area | Code |
| Afghanistan | AF | Fiji | FJ | Monaco | MC | Singapore | SG |
| Argentina | AR | Finland | FI | Mongolia | MN | Slovak Republic | SK |
| Australia | AU | France | FR | Morocco | MA | Slovenia | SI |
| Austria | AT | Germany | DE | Nepal | NP | South Africa | ZA |
| Belgium | BE | Great Britain | GB | Netherlands | NL | South Korea | KR |
| Bhutan | BT | Greece | GR | Antilles | AN | Spain | ES |
| Bolivia | BO | Greenland | GL | New Zealand | NZ | Sri Lanka | LK |
| Brazil | BR | Hong Kong | HK | Nigeria | NG | Sweden | SE |
| Cambodia | KH | Hungary | HU | Norway | NO | Switzerland | CH |
| Canada | CA | India | IN | Oman | OM | Taiwan | TW |
| Chile | CL | Indonesia | ID | Pakistan | PK | Thailand | TH |
| China | CN | Israel | IL | Panama | PA | Turkey | TR |
| Colombia | CO | Italy | IT | Paraguay | PY | Uganda | UG |
| Congo | CG | Jamaica | JM | Philippines | PH | Ukraine | UA |
| Costa Rica | CR | Japan | JP | Poland | PL | United States | US |
| Croatia | HR | Kenya | KE | Portugal | PT | Uruguay | UY |
| Czech Republic | CZ | Kuwait | KW | Romania | RO | Uzbekistan | UZ |
| Denmark | DK | Libya | LY | Russian Federation | RU | Vietnam | VN |
| Ecuador | EC | Luxembourg | LU | Saudi Arabia | SA | Zimbabwe | ZW |
| Egypt | EG | Malaysia | MY | Senegal | SN | ||
| El Salvador | SV | Maldives | MV | ||||
| Ethiopia | ET | Mexico | MX |
Language code List
Use this list to input your desired language for the following initial settings: [Disc Audio], [Disc Subtitle] and [Disc Menu].
| Language | Code | Language | Code | Language | Code | Language | Code |
| Afar | 6565 | French | 7082 | Lithuanian | 7684 | Sindhi | 8368 |
| Afrikaans | 6570 | Frisian | 7089 | Macedonian | 7775 | Singhalese | 8373 |
| Albanian | 8381 | Galician | 7176 | Malagasy | 7771 | Slovak | 8375 |
| Ameharic | 6577 | Georgian | 7565 | Malay | 7783 | Slovenian | 8376 |
| Arabic | 6582 | German | 6869 | Malayalam | 7776 | Spanish | 6983 |
| Armenian | 7289 | Greek | 6976 | Maori | 7773 | Sudanese | 8385 |
| Assamese | 6583 | Greenlandic | 7576 | Marathi | 7782 | Swahili | 8387 |
| Aymara | 6588 | Guarani | 7178 | Moldavian | 7779 | Swedish | 8386 |
| Azerbaijani | 6590 | Gujarati | 7185 | Mongolian | 7778 | Tagalog | 8476 |
| Bashkir | 6665 | Hausa | 7265 | Nauru | 7865 | Tajik | 8471 |
| Basque | 6985 | Hebrew | 7387 | Nepali | 7869 | Tamil | 8465 |
| Bengali; Bangla | 6678 | Hindi | 7273 | Norwegian | 7879 | Telugu | 8469 |
| Bhutani | 6890 | Hungarian | 7285 | Oriya | 7982 | Thai | 8472 |
| Bihari | 6672 | Icelandic | 7383 | Panjabi | 8065 | Tonga | 8479 |
| Breton | 6682 | Indonesian | 7378 | Pashto, Pushto | 8083 | Turkish | 8482 |
| Bulgarian | 6671 | Interlingua | 7365 | Persian | 7065 | Turkmen | 8475 |
| Burmese | 7789 | Irish | 7165 | Polish | 8076 | Twi | 8487 |
| Byelorussian | 6669 | Italian | 7384 | Portuguese | 8084 | Ukrainian | 8575 |
| Chinese | 9072 | Japanese | 7465 | Quechua | 8185 | Urdu | 8582 |
| Croatian | 7282 | Kannada | 7578 | Rhaeto-Romance | 8277 | Uzbek | 8590 |
| Czech | 6783 | Kashmiri | 7583 | Rumanian | 8279 | Vietnamese | 8673 |
| Danish | 6865 | Kazakh | 7575 | Russian | 8285 | Volapük | 8679 |
| Dutch | 7876 | Kirghiz | 7589 | Samoan | 8377 | Welsh | 6789 |
| English | 6978 | Korean | 7579 | Sanskrit | 8365 | Wolof | 8779 |
| Esperanto | 6979 | Kurdish | 7585 | Scotts Gaelic | 7168 | Xhosa | 8872 |
| Estonian | 6984 | Laothian | 7679 | Serbian | 8382 | Yiddish | 7473 |
| Faroese | 7079 | Latin | 7665 | Serbo-Croatian | 8372 | Yoruba | 8979 |
| Fiji | 7074 | Latvian, Lettish | 7686 | Shona | 8378 | Zulu | 9085 |
| Finnish | 7073 | Lingala | 7678 |
Trademarks and Licenses


Blu-ray Disc™, Blu-ray™, Blu-ray 3D™, BD-Live™, BONUSVIEW™ and the logos are trademarks of the Blu-ray Disc Association.

DVD is a trademark of DVD Format/Logo Licensing Corporation.

Oracle and Java are registered trademarks of Oracle and/or its affiliates. Other names may be trademarks of their respective owners.

HDMI, the HDMI logo, and High-Definition Multimedia Interface are trademarks or registered trademarks of HDMI Licensing LLC in the United States and other countries.

Manufactured under license from Dolby Laboratories. Dolby and the double-D symbol are trademarks of Dolby Laboratories.

DivX, DivX Certified and associated logos are trademark of DivX, Inc., and are used under license.

dhts-hD Master Audio | Essential
Manufactured under license under U.S. Patent #s: 5,451,942; 5,956,674; 5,974,380; 5,978,762; 6,226,616; 6,487,535; 7,392,195; 7,272,567; 7,333,929; 7,212,872 & other U.S. and worldwide patents issued & pending. DTS and the Symbol are registered trademarks, & DTS-HD, DTS-HD Master Audio | Essential and the DTS logos are trademarks of DTS, Inc. Product includes software. © DTS, Inc. All Rights Reserved.


DLNA™, the DLNA Logo and DLNA CERTIFIED™ are trademarks, service marks, or certification marks of the Digital Living Network Alliance.

The Wi-Fi CERTIFIED Logo is a certification mark of the Wi-Fi Alliance.

The Wi-Fi Protected Setup Mark is a trademark of the Wi-Fi Alliance.
x.v.Color x.v.Color
"x.v.Color", x.v.Color and x.v.Color are trademarks of Sony Corporation.

"AVCHD" and the "AVCHD" logo are trademarks of Panasonic Corporation and Sony Corporation.
Made for

iPod

iPhone
"Made for iPod" and "Made for iPhone" mean that an electronic accessory has been designed to connect specifically to iPod, or iPhone, respectively, and has been certified by the developer to meet Apple performance standards. Apple is not responsible for the operation of this device or its compliance with safety and regulatory standards. Please note that the use of this accessory with iPod or iPhone may affect wireless performance.
iPhone, iPod, iPod classic, iPod nano, and iPod touch are trademarks of Apple Inc., registered in the U.S. and other countries.

YouTube™ is a trademark of Google Inc.

Picasa™
Web Albums
Picasa™ Web Albums is a trademark of Google Inc.
This product includes technology owned by Microsoft Corporation and cannot be used or distributed without a license from Microsoft Licensing, Inc.
Video Output Resolution
When the non-copy protected media is playing back
When the copy protected media is playing back
| Video Out Resolution | HDMI OUT | COMPONENT VIDEO OUT | |
| HDMI connected | HDMI disconnected | ||
| 576i | 576p | 576i | |
| 576p | 576p | 576p | |
| 720p | 720p | 720p | |
| 1080i | 1080i | 1080i | |
| 1080p/24 Hz | 1080p / 24 Hz | 576i | 1080i |
| 1080p / 50 Hz | 1080p / 50 Hz | 576i | 1080i |
| Video Out Resolution | HDMI OUT | COMPONENT VIDEO OUT |
| 576i | 576p | 576i |
| 576p | 576p | 576i or 576p |
| 720p | 720p | 576i or 576p |
| 1080i | 1080i | 576i or 576p |
| 1080p/24 Hz | 1080p / 24 Hz | 576i or 576p |
| 1080p / 50 Hz | 1080p / 50 Hz | 576i or 576p |
HDMI OUT connection
- If you select a resolution manually and then connect the HDMI jack to TV and your TV does not accept it, the resolution setting is set to [Auto].
- If you select a resolution that your TV does not accept, the warning message will appear. After resolution change, if you cannot see the screen, please wait 20 seconds and the resolution will automatically revert back to the previous resolution.
- The 1080p video output frame rate may be automatically set to either 24Hz or 50 Hz depending both on the capability and preference of the connected TV and based on the native video frame rate of the content on the BD-ROM disc.
COMPONENTVIDEO OUT Connection
Blu-ray Disc, DVD video stream could prevent upscaling on analog output.
VIDEO OUT connection
The resolution of theVIDEO OUT jack is always outputted at 576i resolution.
Specifications
| General | |
| Power requirements | AC 220-240 V, 50/60 Hz |
| Power consumption | 150 W (In Standby mode: Less than 0.3 W) |
| Dimensions (W x H x D) | Approx. 430 x 64 x 304 mm |
| Net Weight (Approx.) | 3.4 kg |
| Operating temperature | 5 °C to 35 °C |
| Operating humidity | 5 % to 85 % |
| Inputs/Outputs | |
| VIDEO OUT | 1.0 V (p-p), 75 Ω, sync negative, RCA jack x 1 |
| COMPONENTVIDEO OUT | (Y) 1.0 V (p-p), 75 Ω, sync negative, RCA jack x 1 (Pb)/(Pr) 0.7 V (p-p), 75 Ω, RCA jack x 2 |
| HDMI IN/OUT (video.audio) | 19 pin (Type A, HDMI™ Connector) |
| ANALOG AUDIO IN | 2.0 Vrms (1 kHz, 0 dB), 600 Ω, RCA jack (L, R) x 1 |
| DIGITAL IN (OPTICAL) | 3 V (p-p), Optical jack x 1 |
| PORTABLE IN | 0.5 Vrms (3.5 mm stereo jack) |
| Tuner | |
| FM Tuning Range | 87.5 to 108.0 MHz |
| Amplifier | |
| Power output (RMS) | |
| Total | 1100 W |
| Front | 180 W × 2 (1 kHz, 4 Ω, THD 10 %) |
| Center | 180 W (1 kHz, 4 Ω, THD 10%) |
| Rear | 180 W × 2 (1 kHz, 4 Ω, THD 10 %) |
| Sub-Woofer | 200 W (100 Hz, 3 Ω, THD 10 %) |
| System | |
| Laser | Semiconductor laser |
| Wavelength | 405 nm / 650 nm |
| Signal system | Standard PAL/NTSC colour TV system |
| Frequency response | 20 Hz to 18 kHz (48 kHz, 96 kHz, 192 kHz sampling) |
| Harmonic distortion | Less than 0.05 % |
| Dynamic range | More than 80 dB |
| LAN port | Ethernet jack x 1, 10BASE-T / 100BASE-TX |
| Wireless LAN (internal antenna) | Integrated IEEE 802.11n (5 GHz and 2.4 GHz bands) wireless networking access, compatible with 802.11a/b/g Wi-Fi networks. |
| Bus Power Supply (USB) | DC 5 V = 500 mA |
| Speakers for BCS-717 | |||
| S-BD707T | |||
| • Front/Surround speaker (Left/Right) | |||
| Type | 2 Way | Net Dimensions (W x H x D) | 260 x 1097 x 260 mm |
| Impedance Rated | 4 Ω | Net Weight | 3.8 kg |
| • Center speaker | |||
| Type | 1 Way | Net Dimensions (W x H x D) | 300 x 87 x 65 mm |
| Impedance Rated | 4 Ω | Net Weight | 0.6 kg |
| S-BD707SW | |||
| • Subwoofer | |||
| Type | 1 Way | Net Dimensions (W x H x D) | 130.5 x 420 x 375 mm |
| Impedance Rated | 3 Ω | Net Weight | 4.4 kg |
| Speakers for BCS-313 | |||
| S-BD303 | |||
| • Front/Surround speaker (Left/Right) | |||
| Type | 1 Way | Net Dimensions (W x H x D) | 96 x 96 x 85 mm |
| Impedance Rated | 4 Ω | Net Weight | 0.4 kg |
| • Center speaker | |||
| Type | 1 Way | Net Dimensions (W x H x D) | 300 x 87 x 65 mm |
| Impedance Rated | 4 Ω | Net Weight | 0.6 kg |
| • Subwoofer | |||
| Type | 1 Way | Net Dimensions (W x H x D) | 130.5 x 420 x 375 mm |
| Impedance Rated | 3 Ω | Net Weight | 4.4 kg |
- Design and specifications are subject to change without notice.
Maintenance
Handling the Unit
When shipping the unit
Please save the original shipping carton and packing materials. If you need to ship the unit, for maximum protection, re-pack the unit as it was originally packed at the factory.
Keeping the exterior surfaces clean
- Do not use volatile liquids such as insecticide spray near the unit.
- Wiping with strong pressure may damage the surface.
- Do not leave rubber or plastic products in contact with the unit for a long period of time.
Cleaning the unit
To clean the player, use a soft, dry cloth. If the surfaces are extremely dirty, use a soft cloth lightly moistened with a mild detergent solution. Do not use strong solvents such as alcohol, benzine, or thinner, as these might damage the surface of the unit.
Maintaining the Unit
The unit is a high-tech, precision device. If the optical pick-up lens and disc drive parts are dirty or worn, the picture quality could be diminished. For details, please contact your nearest authorized service center.
Notes on Discs
Handling Discs
Do not touch the playback side of the disc. Hold the disc by the edges so that fingerprints do not get on the surface. Never stick paper or tape on the disc.
Storing Discs
After playing, store the disc in its case. Do not expose the disc to direct sunlight or sources of heat and never leave it in a parked car exposed to direct sunlight.
Cleaning Discs
Fingerprints and dust on the disc can cause poor picture quality and sound distortion. Before playing, clean the disc with a clean cloth. Wipe the disc from the center to out.
Do not use strong solvents such as alcohol, benzine, thinner, commercially available cleaners, or anti-static spray intended for older vinyl records.
Important Information Relating to Network Services
All information, data, documents, communications, downloads, files, text, images, photographs, graphics, videos, webcasts, publications, tools, resources, software, code, programs, applets, widgets, applications, products and other content ("Content") and all services and offerings ("Services") provided or made available by or through any third party (each a "Service Provider") is the sole responsibility of the Service Provider from whom it originated.
The availability of and access to Content and Services furnished by the Service Provider through the PIONEER Device are subject to change at any time, without prior notice, including, but not limited to the suspension, removal or cessation of all or any part of the Content or Services.
Should you have any inquiry or problem related to the Content or Services, you may refer to the Service Provider's website for the most up-to-date information. PIONEER is neither responsible nor liable for customer service related to the Content and Services. Any question or request for service relating to the Content or Services should be made directly to the respective Content and Service Providers.
Please note that PIONEER is not responsible for any Content or Services provided by the Service Provider or any changes to, removal of, or cessation of such Content or Services and does not warrant or guaranty the availability of or access to such Content or Services.
Software License Notice
The licenses for the open source software used on this player can be found at the end of this document.
RISQUE D'ÉLECTROCUTION. NE PAS OUVRIR.

ATTENTION:POUR EVITER UN RISQUE DE CHOC ELECTRIQUE,NE PAS RETIRER LE CACHE (NI L'ARRIÈRE).AUCUNE PIECE DE CET APPAREIL N'EST SUSCEPTIBLE D'ETRE REPAREE PAR L'UTILISATEUR. CONFIEZ L'ENTRETIEN DE L'APPAREIL A DES PERSONNES QUALIFIÉES.

CLASS 1 LASER PRODUCT
APPAREL A LASER DE CLASSE

m = 311 ;


dhts-hD Master Audio | Essential
http://www.oss-pioneer.com/homeav/hts/
Copyright © 2000 Keith Packard
Copyright © 2005 Keith Packard
- freetype: Copyright © 2003 The FreeType Project (www.freetype.org).
International Components pour Unicode: copyright © 1995-2010 International Business Machines Corporation et autres
-JPEG:ce logiciel est base en partie sur le travail du groupe Independant JPEG Group Copyright © 1991-1998, Thomas G. Lane. - JSON: Copyright © 2005 JSON.org
- lighttpd: Copyright © 2004, Jan Kneschke, incrementation
- mgn: Copyright © 2000-2007 Gerard Juyn, Glenn Randers-Pehrson
ntp: Copyright © David L. Mills 1992-2006 - OpenSSL:
pcre: Copyright © 1997-2010 University of Cambridge
PHP: Copyright © 1999 - 2010 PHP Group
- pixman:
Copyright 1987, 1988, 1989, 1998
Groupe Open source
Copyright 1987, 1988, 1989 Digital Equipment Corporation
Copyright 1999,2004,2008 Keith Packard
Copyright 2000 SuSE, Inc.
Copyright 2000 Keith Packard, membrde de XFree86 Projectt, Inc.
Copyright 2004, 2005, 2007, 2008 Red Hat, Inc.
Copyright 2004 Nicholas Miell
Copyright 2005 Lars Knoll & Zack Rusin, Troltech
Copyright 2005 Trolltech AS
Copyright 2007 Luca Barbato
Copyright 2008 Aaron Plattner, NVIDIA Corporation
Copyright 2008 Rodrigo Kumpera
Copyright 2008 Andre Tupinamba
Copyright 2008 Mozilla Corporation
Copyright 2008 Frederic Plourde
Copyright 2009 Sun Microsystems, Inc.
- copyright © 2004 Glenn Randers-Pehrson.
- portmap: Copyright © 1990 The Regents of the University of California.
Tampon de protocole: Copyright 2008, Google Inc. - tiff:
Copyright © 1988-1997 Sam Leffler
Copyright © 1991-1997 Silicon Graphics, Inc.
tinyxml: Fichier d'origine de Yves Berquin.
UnitTest++: Copyright © 2006 Noel Llopis et Charles Nicholson
- UpnP SDK: copyright © 2000-2003 Intel Corporation
xml2: Copyright © 1998-2003 Daniel Veillard.
- xslt:
Copyright © 2001-2002 Daniel Veillard.
Copyright © 2001-2002 Thomas Broyer, Charlie Bozeman et Daniel Veillard.
Copyright © 1989, 1991 Free Software Foundation, Inc., 51 Franklin Street, Fifth Floor, Boston, MA 02110-1301, USA.
Copyright © 1991, 1999 Free Software Foundation, Inc.
51 Franklin Street, Fifth Floor, Boston, MA 02110-1301 USA
| Datei-Speicherort | Datei-erweiterung | Codec-Format | Audioformat | Untertitel |
| Disc,USB | "avi","divx","mpg","mpeg","mkv","mp4","ast","wmv","m4v"(ohneDRM) | DIVX3.xx, DIVX4.xx,DIVX5.xx, DIVX6.xx(nur normaleWiedergabe), XVID,MPEG1 SS, H.264/MPEG-4 AVC, MPEG2PS, MPEG2 TS, VC-1SM (WMV3) | Dolby Digital, DTS, MP3,WMA, AAC, AC3 | SubRip (.srt/.txt), SAMI (.smi), SubStation Alpha (.ssa/.txt), MicroDVD (.sub/.txt), VobSub (.sub), SubViewer 1.0 (.sub), SubViewer 2.0 (.sub/.txt), TMPlayer (.txt), DVD Subtitle System (.txt) |
| DLNA,PC | "avi","divx","mpg","mpeg","mkv","mp4","ast","wmv"(ohneDRM) | DIVX3.xx, DIVX4.xx,DIVX5.xx, DIVX6.xx(nur normaleWiedergabe), XVID,MPEG1 SS, H.264/MPEG-4 AVC, MPEG2PS, MPEG2 TS, VC-1SM (WMV3) | Dolby Digital, DTS, MP3,WMA, AAC, AC3 | SubRip (.srt/.txt),SAMI (.smi), SubStation Alpha (.ssa/.txt), MicroDVD (.sub/.txt), SubViewer 1.0 (.sub), SubViewer 2.0 (.sub/.txt), TMPlayer (.txt), DVD Subtitle System (.txt) |
Musikdateien
AVCHD (Advanced Video Codec High Definition)
[Test/Testton beenden]
ARC (Audio Return Channel)
Master Audio | Essential
CLASS 1 LASER PRODUCT
APPAREL A LASER DE CLASSE 1
AVCHD (Advanced Video Codec High Definition)
dhts-hD Master Audio | Essential
CLASS 1 LASER PRODUCT
APPAREIL A LASER DE CLASSE 1
Alternatively, you can use the botón FUNCTION to select the panel frontals for selection and enter a code.
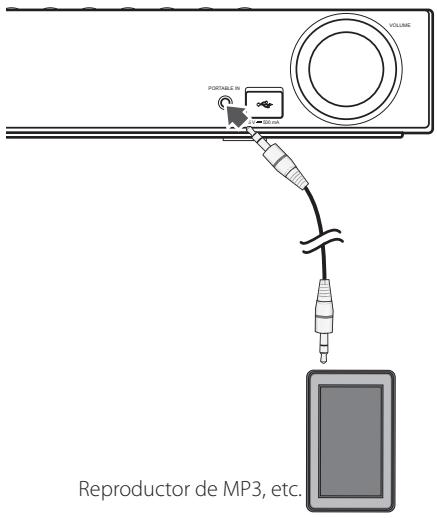
Conexión OPTICAL IN
Alternatively, you can use the bot function of panel frontal to select an entry.
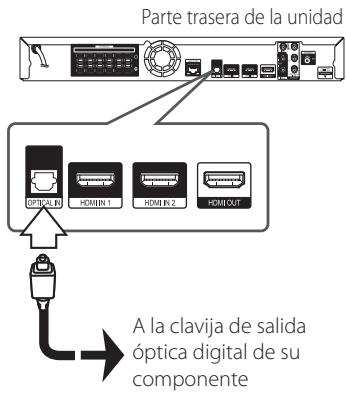
Conexión HDMI IN 1/2
[Form. panorém. 4:3]
Para reinstatement of a videotape (video)
dhts-hD Master Audio | Essential
AVCHD (Advanced Video Codec High Definition)
[Test/Stop testtoon]
Vooruit of awhileit scanners
dhts-hD Master Audio | Essential
The following GPL executables and LGPL libraries used in this product are subject to the GPL2.0/LGPL2.1 License Agreements:
GPL EXECUTABLES: Linux kernel, bash, busybox, dhcpcd, e2fprog, fdisk, msd-1.1, mtd-utils, net-tools, procps, psmisc, samba3.0.25b, sysutils, tftpd, tinylogin, unzip, utleted
LGPL LIBRARIES: avahi, ATK, uClibc, DirectFB, cairo, fmmpeg, gail, glib, gnuTLS, GK + ,iconv, libcrypt, libdaemon, libgperror, libsocl, libintl, mpg123, pango, PyEnchant, webkit
gSOAP Public License 1.3 LIBRARY:
gsoap
You can get corresponding open source code from the following URL.
http://www.oss-pioneer.com/homeav/hts/
We are unable to answer any question about the source code for the open source software.
This product includes
- Crypt Data Packaging: Copyright © Trantor Standard Systems Inc., 2001
- curl: copyright © 1996 - 2008, Daniel Stenberg
- expat: copyright © 2006 expat maintainers
fontconfig: - Copyright © 2000 Keith Packard
- Copyright © 2005 Patrick Lam
- freetype: copyright © 2003 The FreeType Project (www.freetype.org).
International Components for Unicode: copyright © 1995-2010 International Business Machines Corporation and others
-JPEG: This software is based in part on the work of the Independent JPEG Group copyright © 1991 - 1998, Thomas G. Lane. - JSON: Copyright © 2005 JSON.org
- lighttpd: Copyright © 2004, Jan Kneschke, incremental
- mg: copyright © 2000-2007 Gerard Juyn, Glenn Randers-Pehrson
ntp:copyright©DavidL.Mills1992- 2006 - OpensSLS: cryptographic software written by Eric Young (eay@cryptsoft.com).
software written by Tim Hudson
(tjh@cryptsoft.com).
- software developed by the OpenSSL Project for use in the OpenSSL Toolkit. (http://www.openss.org)
- pcre: Copyright © 1997-2010 University of Cambridge
PHP : Copyright © 1999 - 2010 The PHP Group -
pixman :
Copyright 1987, 1988, 1989, 1998 The Open Group
Copyright 1987, 1988, 1989 Digital Equipment Corporation
Copyright 1999,2004,2008 Keith Packard
Copyright 2000 SuSE, Inc.
Copyright 2000 Keith Packard, member of The XFree86 Project, Inc.
Copyright 2004, 2005, 2007, 2008 Red Hat, Inc.
Copyright 2004 Nicholas Miell
Copyright 2005 Lars Knoll & Zack Rusin, Trolitech
Copyright 2005 Troltech AS Copyright 2007 Luca Barbat
Copyright 2008 Aaron Plattner, NVIDIA Corporation
Copyright 2008 Rodrigo Kumpera
Copyright 2008 Andre Tupinambá
Copyright 2008 Mozilla Corporation
Copyright 2008 Frederic Plourde
Copyright 2009 Sun Microsystems, Inc. -
png: copyright © 2004 Glenn Randers-Pehrson
portmap:copyright©1990The Regents of the University of California
Protocol Buffer: Copyright 2008, Google Inc. - tiff:
Copyright © 1988-1997 Sam Leffler
Copyright © 1991-1997 Silicon Graphics, Inc.
tinyxml: Original file by Yves Berquin.
UnitTest++:copyright © 2006 Noel Llopis and Charles Nicholson
- UnpS SDK: copyright © 2000-2003 Intel Corporation
- xml2: copyright © 1998-2003 Daniel Veillard
- xslt:
Copyright © 2001-2002 Daniel Veillard.
Copyright © 2001-2002 Thomas Broyer, Charlie Bozeman and Daniel
Veillard.
- WPA Suppliant: Copyright © 2003-2007, Jouni Malinen j@w1.fi and contributors
- zlib: copyright © 1995-2002 Jean-loup Gailly and Mark Adler.
All rights reserved.
Permission is hereby granted, free of charge, to any person obtaining a copy of this software and associated documentation files (the "Software"), to deal in the Software without restriction, including without limitation the rights to use, copy, modify, merge, publish, distribute, sublicense, and/or sell copies of the Software, and to permit persons to whom the Software is furnished to do so, subject to the following conditions:
THE SOFTWARE IS PROVIDED "AS IS", WITHOUT WARRANTY OF ANY KIND, EXPRESS OR IMPLIED, INCLUDING BUT NOT LIMITED TO THE WARRANTYES OF MERCHANTABILITY, FITNESS FOR A PARTICULAR PURPOSE AND NONINFRINGEMENT. IN NO EVENT SHALL THE AUTHORS OR COPYRIGHT HOLDERS BE LIABLE FOR ANY CLAIM, DAMAGES OR OTHER LIABILITY, WHETHER IN AN ACTION OF CONTRACT, TORT OR OTHERWISE, ARISING FROM, OUT OF OR IN CONNECTION WITH THE SOFTWARE OR THE USE OR OTHER DEALINGS IN THE SOFTWARE.
GNU GENERAL PUBLIC LICENSE
Version 2, June 1991
Copyright © 1989, 1991 Free Software Foundation, Inc.
51 Franklin Street, Fifth Floor, Boston, MA 02110-1301, USA
Everyone is permitted to copy and distribute verbatim copies of this license document, but changing it is not allowed.
Preamble
The licenses for most software are designed to take away your freedom to share and change it. By contrast, the GNU General Public License is intended to guarantee
your freedom to share and change free software--to make sure the software is free for all its users. This General Public License applies to most of the Free Software Foundation's software and to any other program whose authors commit to using it. (Some other Free Software Foundation software is covered by the GNU Lesser General Public License instead.) You can apply it to your programs, too.
When we speak of free software, we are referring to freedom, not price. Our General Public Licenses are designed to make sure that you have the freedom to distribute copies of free software (and charge for this service if you wish), that you receive source code or can get it if you want it, that you can change the software or use pieces of it in new free programs; and that you know you can do these things.
To protect your rights, we need to make restrictions that forbid anyone to deny you these rights or to ask you to surrender the rights. These restrictions translate to certain responsibilities for you if you distribute copies of the software, or if you modify it. For example, if you distribute copies of such a program, whether gratis or for a fee, you must give the recipients all the rights that you have. You must make sure that they, too, receive or can get the source code. And you must show them these terms so they know their rights.
We protect your rights with two steps: (1) copyright the software, and (2) offer you this license which gives you legal permission to copy, distribute and/or modify the software.
Also, for each author's protection and ours, we want to make certain that everyone understands that there is no warranty for this free software. If the software is modified by someone else and passed on, we want its recipients to know that what they have is not the original, so that any problems introduced by others will not reflect on the original authors' reputations. Finally, any free program is threatened constantly by software patents. We wish to avoid the danger that redistributors of a free program will individually obtain patent licenses, in effect making the program proprietary. To prevent this, we have made it clear that any patent must be licensed for everyone's free use or not licensed at all.
The precise terms and conditions for copying, distribution and modification follow.
TERMS AND CONDITIONS FOR COPYING, DISTRIBUTION AND MODIFICATION
- This License applies to any program or other work which contains a notice placed by the copyright holder saying it may be distributed under the terms of this General Public License. The "Program", below, refers to any such program or work, and a "work based on the Program" means either
the Program or any derivative work under copyright law: that is to say, a work containing the Program or a portion of it, either verbatim or with modifications and/or translated into another language. (Hereinafter, translation is included without limitation in the term "modification.") Each licensee is addressed as "you". Activities other than copying, distribution and modification are not covered by this License; they are outside its scope. The act of running the Program is not restricted, and the output from the Program is covered only if its contents constitute a work based on the Program (independent of having been made by running the Program). Whether that is true depends on what the Program does.
- You may copy and distribute verbatim copies of the Program's source code as you receive it, in any medium, provided that you conspicuously and appropriately publish on each copy an appropriate copyright notice and disclaimer of warranty; keep intact all the notices that refer to this License and to the absence of any warranty; and give any other recipients of the Program a copy of this License along with the Program.
You may charge a fee for the physical act of transferring a copy, and you may at your option offer warranty protection in exchange for a fee.
- You may modify your copy or copies of the Program or any portion of it, thus forming a work based on the Program, and copy and distribute such modifications or work under the terms of Section 1 above, provided that you also meet all of these conditions:
a) You must cause the modified files to carry prominent notices stating that you changed the files and the date of any change.
b) You must cause any work that you distribute or publish, that in whole or in part contains or is derived from the Program or any part thereof, to be licensed as a whole at no charge to all third parties under the terms of this License.
c) If the modified program normally reads commands interactively when run, you must cause it, when started running for such interactive use in the most ordinary way, to print or display an announcement including an appropriate copyright notice and a notice that there is no warranty (or else, saying that you provide a warranty) and that users may redistribute the program under these conditions, and telling the user how to view a copy of this License. (Exception: if the Program itself is interactive but
does not normally print such an announcement, your work based on the Program is not required to print an announcement.)
These requirements apply to the modified work as a whole. If identifiable sections of that work are not derived from the Program, and can be reasonably considered independent and separate works in themselves, then this License, and its terms, do not apply to those sections when you distribute them as separate works. But when you distribute the same sections as part of a whole which is a work based on the Program, the distribution of the whole must be on the terms of this License, whose permissions for other licensees extend to the entire whole, and thus to each and every part regardless of who wrote it.
Thus, it is not the intent of this section to claim rights or contest your rights to work written entirely by you; rather, the intent is to exercise the right to control the distribution of derivative or collective works based on the Program.
In addition, mere aggregation of another work not based on the Program with the Program (or with a work based on the Program) on a volume of a storage or distribution medium does not bring the other work under the scope of this License.
- You may copy and distribute the Program (or a work based on it, under Section 2) in object code or executable form under the terms of Sections 1 and 2 above provided that you also do one of the following:
a) Accompany it with the complete corresponding machine-readable source code, which must be distributed under the terms of Sections 1 and 2 above on a medium customarily used for software interchange; or,
b) Accompany it with a written offer, valid for at least three years, to give any third party, for a charge no more than your cost of physically performing source distribution, a complete machine-readable copy of the corresponding source code, to be distributed under the terms of Sections 1 and 2 above on a medium customarily used for software interchange; or,
c) Accompany it with the information you received as to the offer to distribute corresponding source code. (This alternative is allowed only for noncommercial distribution and only if you received the program in object code or executable form with such an offer, in accord with Subsection b above.)
The source code for a work means the preferred form of the work for making modifications to it. For an executable work, complete source code means all the source code for all modules it contains, plus any associated interface definition files, plus the scripts used to control compilation and installation of the executable. However, as a special exception, the source code distributed need not include anything that is normally distributed (in either source or binary form) with the major components (compiler, kernel, and so on) of the operating system on which the executable runs, unless that component itself accompanies the executable. If distribution of executable or object code is made by offering access to copy from a designated place, then offering equivalent access to copy the source code from the same place counts as distribution of the source code, even though third parties are not compelled to copy the source along with the object code.
- You may not copy, modify, sublicense, or distribute the Program except as expressly provided under this License. Any attempt otherwise to copy, modify, sublicense or distribute the Program is void, and will automatically terminate your rights under this License. However, parties who have received copies, or rights, from you under this License will not have their licenses terminated so long as such parties remain in full compliance.
- You are not required to accept this License, since you have not signed it. However, nothing else grants you permission to modify or distribute the Program or its derivative works. These actions are prohibited by law if you do not accept this License. Therefore, by modifying or distributing the Program (or any work based on the Program), you indicate your acceptance of this License to do so, and all its terms and conditions for copying, distributing or modifying the Program or works based on it.
- Each time you redistribute the Program (or any work based on the Program), the recipient automatically receives a license from the original licensor to copy, distribute or modify the Program subject to these terms and conditions. You may not impose any further restrictions on the recipients' exercise of the rights granted herein. You are not responsible for enforcing compliance by third parties to this License.
- If, as a consequence of a court judgment or allegation of patent infringement or for any other reason (not limited to patent issues), conditions are imposed on you
(whether by court order, agreement or otherwise) that contradict the conditions of this License, they do not excuse you from the conditions of this License. If you cannot distribute so as to satisfy simultaneously your obligations under this License and any other pertinent obligations, then as a consequence you may not distribute the Program at all. For example, if a patent license would not permit royalty-free redistribution of the Program by all those who receive copies directly or indirectly through you, then the only way you could satisfy both it and this License would be to refrain entirely from distribution of the Program. If any portion of this section is held invalid or unenforceable under any particular circumstance, the balance of the section is intended to apply and the section as a whole is intended to apply in other circumstances. It is not the purpose of this section to induce you to infringe any patents or other property right claims or to contest validity of any such claims; this section has the sole purpose of protecting the integrity of the free software distribution system, which is implemented by public license practices. Many people have made generous contributions to the wide range of software distributed through that system in reliance on consistent application of that system; it is up to the author/donor to decide if he or she is willing to distribute software through any other system and a licensee cannot impose that choice. This section is intended to make thoroughly clear what is believed to be a consequence of the rest of this License.
- If the distribution and/or use of the Program is restricted in certain countries either by patents or by copyrighted interfaces, the original copyright holder who places the Program under this License may add an explicit geographical distribution limitation excluding those countries, so that distribution is permitted only in or among countries not thus excluded. In such case, this License incorporates the limitation as if written in the body of this License.
- The Free Software Foundation may publish revised and/or new versions of the General Public License from time to time. Such new versions will be similar in spirit to the present version, but may differ in detail to address new problems or concerns. Each version is given a distinguishing version number. If the Program specifies a version number of this License which applies to it and "any later version", you have the option of following the terms and conditions
either of that version or of any later version published by the Free Software Foundation. If the Program does not specify a version number of this License, you may choose any version ever published by the Free Software Foundation.
10. If you wish to incorporate parts of the Program into other free programs whose distribution conditions are different, write to the author to ask for permission. For software which is copyrighted by the Free Software Foundation, write to the Free Software Foundation; we sometimes make exceptions for this. Our decision will be guided by the two goals of preserving the free status of all derivatives of our free software and of promoting the sharing and reuse of software generally.
NO WARRANTY
- BECAUSE THE PROGRAM IS LICENSED FREE OF CHARGE, THERE IS NO WARRANTY FOR THE PROGRAM, TO THE EXTENT PERMITTED BY APPLICABLE LAW. EXCEPT WHEN OTHERWISE STATED IN WRITING THE Copyright Holders AND/OR OTHER PARTIES PROVIDE THE PROGRAM "AS IS" WITHOUT WARRANTY OF ANY KIND, Either EXPRESSED OR IMPLIED, INCLUDING, BUT NOT LIMITED TO, THE IMPLIED WARRANTYES OF MERCHANTABILITY AND FITNESS FOR A PARTICULAR PURPOSE. THE ENTIRE RISK AS TO THE QUALITY AND PERFORMANCE OF THE PROGRAM IS WITH YOU. SHOULD THE PROGRAM PROVE DEFECTIVE, YOU ASSUME THE COST OF ALL NECESSARY SERVICING, REPAIR OR CORRECTION.
- IN NO EVENT UNLESS REQUIRED BY APPLICABLE LAW OR AGREED TO IN WRITING WILL ANY Copyright HOLDER, OR ANY OTHER PARTY WHO MAY MODIFY AND/OR REDISTRIBUTE THE PROGRAM AS PERMITTED ABOVE, BE LIABLE TO YOU FOR DAMAGES, INCLUDING ANY GENERAL, SPECIAL, INCIDENTAL OR CONSEQUENTIAL DAMAGES ARISING OUT OF THE USE OR INABILITY TO USE THE PROGRAM (INCLUDING BUT NOT LIMITED TO LOSS OF DATA OR DATA BEING RENDERED INACCURATE OR LOSSES SUSTAINED BY YOU OR THIRD PARTIES OR A FAILURE OF THE PROGRAM TO OPERATE WITH ANY OTHER PROGRAMS), EVEN IF SUCH HOLDER OR OTHER PARTY HAS BEEN ADVISED OF THE POSSIBILITY OF SUCH DAMAGES.
END OF TERMS AND
CONDITIONS
How to Apply These Terms to Your New Programs
If you develop a new program, and you want it to be of the greatest possible use to
the public, the best way to achieve this is to make it free software which everyone can redistribute and change under these terms. To do so, attach the following notices to the program. It is safest to attach them to the start of each source file to most effectively convey the exclusion of warranty; and each file should have at least the "copyright" line and a pointer to where the full notice is found.
Copyright ©
This program is free software; you can redistribute it and/or modify it under the terms of the GNU General Public License as published by the Free Software Foundation; either version 2 of the License, or (at your option) any later version.
This program is distributed in the hope that it will be useful, but WITHOUT ANY WARRANTY; without even the implied warranty of MERCHANTABILITY or FITNESS FOR A PARTICULAR PURPOSE. See the GNU General Public License for more details.
You should have received a copy of the GNU General Public License along with this program; if not, write to the Free Software Foundation, Inc., 51 Franklin Street, Fifth Floor, Boston, MA 02110-1301, USA.
Also add information on how to contact you by electronic and paper mail.
If the program is interactive, make it output a short notice like this when it starts in an interactive mode:
Gnomovision version 69, Copyright © year name of author
Gnomovision comes with ABSOLUTELY NO WARRANTY; for details type 'show w'. This is free software, and you are welcome to redistribute it under certain conditions; type 'show c' for details.
The hypothetical commands 'show w' and 'show c' should show the appropriate parts of the General Public License. Of course, the commands you use may be called something other than 'show w' and 'show c'; they could even be mouse-clicks or menu items—whatever suits your program. You should also get your employer (if you work as a programmer) or your school, if any, to sign a "copyright disclaimer" for the program, if necessary. Here is a sample; alter the names:
Yoyodyne, Inc., hereby disclaims all copyright interest in the program 'Gnomovision' (which makes passes at compilers) written by James Hacker.
This General Public License does not permit incorporating your program into proprietary programs. If your program is
a subroutine library, you may consider it more useful to permit linking proprietary applications with the library. If this is what you want to do, use the GNU Lesser General Public License instead of this License.
GNU LESSER GENERAL PUBLIC LICENSE
Version 2.1, February 1999
Copyright © 1991, 1999 Free Software Foundation, Inc.
51 Franklin Street, Fifth Floor, Boston, MA 02110-1301 USA
Everyone is permitted to copy and distribute verbatim copies of this license document, but changing it is not allowed. [This is the first released version of the Lesser GPL. It also counts as the successor of the GNU Library Public License, version 2, hence the version number 2.1.]
Preamble
The licenses for most software are designed to take away your freedom to share and change it. By contrast, the GNU General Public Licenses are intended to guarantee your freedom to share and change free software—to make sure the software is free for all its users.
This license, the Lesser General Public License, applies to some specially designated software packages—typically libraries—of the Free Software Foundation and other authors who decide to use it. You can use it too, but we suggest you first think carefully about whether this license or the ordinary General Public License is the better strategy to use in any particular case, based on the explanations below.
When we speak of free software, we are referring to freedom of use, not price. Our General Public Licenses are designed to make sure that you have the freedom to distribute copies of free software (and charge for this service if you wish); that you receive source code or can get it if you want it; that you can change the software and use pieces of it in new free programs; and that you are informed that you can do these things.
To protect your rights, we need to make restrictions that forbid distributors to deny you these rights or to ask you to surrender these rights. These restrictions translate to certain responsibilities for you if you distribute copies of the library or if you modify it.
For example, if you distribute copies of the library, whether gratis or for a fee, you must give the recipients all the rights that we gave you. You must make sure that they, too, receive or can get the source code. If you link other code with the library, you must provide complete object files to the recipients, so that they can relink them with the library after making changes to the library and recomilling it. And you must
show them these terms so they know their rights.
We protect your rights with a two-step method: (1) we copyright the library, and (2) we offer you this license, which gives you legal permission to copy, distribute and/or modify the library.
To protect each distributor, we want to make it very clear that there is no warranty for the free library. Also, if the library is modified by someone else and passed on, the recipients should know that what they have is not the original version, so that the original author's reputation will not be affected by problems that might be introduced by others.
Finally, software patents pose a constant threat to the existence of any free program. We wish to make sure that a company cannot effectively restrict the users of a free program by obtaining a restrictive license from a patent holder. Therefore, we insist that any patent license obtained for a version of the library must be consistent with the full freedom of use specified in this license.
Most GNU software, including some libraries, is covered by the ordinary GNU General Public License. This license, the GNU Lesser General Public License, applies to certain designated libraries, and is quite different from the ordinary General Public License. We use this license for certain libraries in order to permit linking those libraries into non-free programs.
When a program is linked with a library, whether statically or using a shared library, the combination of the two is legally speaking a combined work, a derivative of the original library. The ordinary General Public License therefore permits such linking only if the entire combination fits its criteria of freedom. The Lesser General Public License permits more lax criteria for linking other code with the library. We call this license the "Lesser" General Public License because it does Less to protect the user's freedom than the ordinary General Public License. It also provides other free software developers Less of an advantage over competing non-free programs. These disadvantages are the reason we use the ordinary General Public License for many libraries. However, the Lesser license provides advantages in certain special circumstances.
For example, on rare occasions, there may be a special need to encourage the widest possible use of a certain library, so that it becomes a de-facto standard. To achieve this, non-free programs must be allowed to use the library. A more frequent case is that a free library does the same job as widely used non-free libraries. In this case, there is little to gain by limiting the free library to free software only, so we use the Lesser General Public License.
In other cases, permission to use a particular library in non-free programs enables a greater number of people to use a large body of free software. For example,
permission to use the GNU C Library in non-free programs enables many more people to use the whole GNU operating system, as well as its variant, the GNU/Linux operating system.
Although the Lesser General Public License is Less protective of the users' freedom, it does ensure that the user of a program that is linked with the Library has the freedom and the wherewithal to run that program using a modified version of the Library.
The precise terms and conditions for copying, distribution and modification follow. Pay close attention to the difference between a "work based on the library" and a "work that uses the library". The former contains code derived from the library, whereas the latter must be combined with the library in order to run.
TERMS AND CONDITIONS FOR COPYING, DISTRIBUTION AND MODIFICATION
- This License Agreement applies to any software library or other program which contains a notice placed by the copyright holder or other authorized party saying it may be distributed under the terms of this Lesser General Public License (also called "this License"). Each licensee is addressed as "you".
A "library" means a collection of software functions and/or data prepared so as to be conveniently linked with application programs (which use some of those functions and data) to form executables. The "Library", below, refers to any such software library or work which has been distributed under these terms. A "work based on the Library" means either the Library or any derivative work under copyright law: that is to say, a work containing the Library or a portion of it, either verbatim or with modifications and/or translated straightforwardly into another language. (Hereinafter, translation is included without limitation in the term "modification")
"Source code" for a work means the preferred form of the work for making modifications to it. For a library, complete source code means all the source code for all modules it contains, plus any associated interface definition files, plus the scripts used to control compilation and installation of the library.
Activities other than copying, distribution and modification are not covered by this License; they are outside its scope. The act of running a program using the Library is not restricted, and output from such a program is covered only if its contents constitute a work based on the Library (independent of the use of the Library in a tool for writing it). Whether that
is true depends on what the Library does and what the program that uses the Library does.
- You may copy and distribute verbatim copies of the Library's complete source code as you receive it, in any medium, provided that you conspicuously and appropriately publish on each copy an appropriate copyright notice and disclaimer of warranty; keep intact all the notices that refer to this License and to the absence of any warranty; and distribute a copy of this License along with the Library.
You may charge a fee for the physical act of transferring a copy, and you may at your option offer warranty protection in exchange for a fee.
- You may modify your copy or copies of the Library or any portion of it, thus forming a work based on the Library, and copy and distribute such modifications or work under the terms of Section 1 above, provided that you also meet all of these conditions:
a) The modified work must itself be a software library.
b) You must cause the files modified to carry prominent notices stating that you changed the files and the date of any change.
c) You must cause the whole of the work to be licensed at no charge to all third parties under the terms of this License.
d) If a facility in the modified Library refers to a function or a table of data to be supplied by an application program that uses the facility, other than as an argument passed when the facility is invoked, then you must make a good faith effort to ensure that, in the event an application does not supply such function or table, the facility still operates, and performs whatever part of its purpose remains meaningful.
(For example, a function in a library to compute square roots has a purpose that is entirely well-defined independent of the application. Therefore, Subsection 2d requires that any application-supplied function or table used by this function must be optional: if the application does not supply it, the square root function must still compute square roots.)
These requirements apply to the modified work as a whole. If identifiable sections of that work are not derived from the Library, and can be reasonably considered independent and separate works in themselves, then this License, and its terms, do not apply to those sections when you distribute them as separate works. But when you distribute the same sections as part of a whole which is a work based on the Library,
the distribution of the whole must be on the terms of this License, whose permissions for other licensees extend to the entire whole, and thus to each and every part regardless of who wrote it.
Thus, it is not the intent of this section to claim rights or contest your rights to work written entirely by you; rather, the intent is to exercise the right to control the distribution of derivative or collective works based on the Library. In addition, mere aggregation of another work not based on the Library with the Library (or with a work based on the Library) on a volume of a storage or distribution medium does not bring the other work under the scope of this License.
- You may opt to apply the terms of the ordinary GNU General Public License instead of this License to a given copy of the Library. To do this, you must alter all the notices that refer to this License, so that they refer to the ordinary GNU General Public License, version 2, instead of to this License. (If a newer version than version 2 of the ordinary GNU General Public License has appeared, then you can specify that version instead if you wish.) Do not make any other change in these notices.
Once this change is made in a given copy, it is irreversible for that copy, so the ordinary GNU General Public License applies to all subsequent copies and derivative works made from that copy.
This option is useful when you wish to copy part of the code of the Library into a program that is not a library.
- You may copy and distribute the Library (or a portion or derivative of it, under Section 2) in object code or executable form under the terms of Sections 1 and 2 above provided that you accompany it with the complete corresponding machine-readable source code, which must be distributed under the terms of Sections 1 and 2 above on a medium customarily used for software interchange.
If distribution of object code is made by offering access to copy from a designated place, then offering equivalent access to copy the source code from the same place satisfies the requirement to distribute the source code, even though third parties are not compelled to copy the source along with the object code.
- A program that contains no derivative of any portion of the Library, but is designed to work with the Library by being compiled or linked with it, is called a "work that uses the Library". Such a work, in isolation, is not a
derivative work of the Library, and therefore falls outside the scope of this License.
However, linking a "work that uses the Library" with the Library creates an executable that is a derivative of the Library (because it contains portions of the Library), rather than a "work that uses the library". The executable is therefore covered by this License. Section 6 states terms for distribution of such executables.
When a "work that uses the Library" uses material from a header file that is part of the Library, the object code for the work may be a derivative work of the Library even though the source code is not. Whether this is true is especially significant if the work can be linked without the Library, or if the work is itself a library. The threshold for this to be true is not precisely defined by law.
If such an object file uses only numerical parameters, data structure layouts and accessors, and small macros and small inline functions (ten lines or less in length), then the use of the object file is unrestricted, regardless of whether it is legally a derivative work. (Executables containing this object code plus portions of the Library will still fall under Section 6.)
Otherwise, if the work is a derivative of the Library, you may distribute the object code for the work under the terms of Section 6. Any executables containing that work also fall under Section 6, whether or not they are linked directly with the Library itself.
- As an exception to the Sections above, you may also combine or link a "work that uses the Library" with the Library to produce a work containing portions of the Library, and distribute that work under terms of your choice, provided that the terms permit modification of the work for the customer's own use and reverse engineering for debugging such modifications.
You must give prominent notice with each copy of the work that the Library is used in it and that the Library and its use are covered by this License. You must supply a copy of this License. If the work during execution displays copyright notices, you must include the copyright notice for the Library among them, as well as a reference directing the user to the copy of this License. Also, you must do one of these things:
a) Accompany the work with the complete corresponding machine-readable source code for the Library including whatever changes were used in the work (which must be distributed under Sections 1 and 2 above); and, if the work is an executable
linked with the Library, with the complete machine-readable "work that uses the Library", as object code and/or source code, so that the user can modify the Library and then relink to produce a modified executable containing the modified Library. (It is understood that the user who changes the contents of definitions files in the Library will not necessarily be able to recompile the application to use the modified definitions.)
b) Use a suitable shared library mechanism for linking with the Library. A suitable mechanism is one that (1) uses at run time a copy of the library already present on the user's computer system, rather than copying library functions into the executable, and (2) will operate properly with a modified version of the library, if the user installs one, as long as the modified version is interface-compatible with the version that the work was made with.
c) Accompany the work with a written offer, valid for at least three years, to give the same user the materials specified in Subsection 6a, above, for a charge no more than the cost of performing this distribution.
d) If distribution of the work is made by offering access to copy from a designated place, offer equivalent access to copy the above specified materials from the same place.
e) Verify that the user has already received a copy of these materials or that you have already sent this user a copy.
For an executable, the required form of the "work that uses the Library" must include any data and utility programs needed for reproducing the executable from it. However, as a special exception, the materials to be distributed need not include anything that is normally distributed (in either source or binary form) with the major components (compiler, kernel, and so on) of the operating system on which the executable runs, unless that component itself accompanies the executable.
It may happen that this requirement contradicts the license restrictions of other proprietary libraries that do not normally accompany the operating system. Such a contradiction means you cannot use both them and the Library together in an executable that you distribute.
- You may place library facilities that are a work based on the Library side-by-side in a single library together with other library facilities not covered
by this License, and distribute such a combined library, provided that the separate distribution of the work based on the Library and of the other library facilities is otherwise permitted, and provided that you do these two things:
a) Accompany the combined library with a copy of the same work based on the Library, uncombined with any other library facilities. This must be distributed under the terms of the Sections above.
b) Give prominent notice with the combined library of the fact that part of it is a work based on the Library, and explaining where to find the accompanying uncombined form of the same work.
- You may not copy, modify, sub license, link with, or distribute the Library except as expressly provided under this License. Any attempt otherwise to copy, modify, sub license, link with, or distribute the Library is void, and will automatically terminate your rights under this License. However, parties who have received copies, or rights, from you under this License will not have their licenses terminated so long as such parties remain in full compliance.
- You are not required to accept this License, since you have not signed it. However, nothing else grants you permission to modify or distribute the Library or its derivative works. These actions are prohibited by law if you do not accept this License. Therefore, by modifying or distributing the Library (or any work based on the Library), you indicate your acceptance of this License to do so, and all its terms and conditions for copying, distributing or modifying the Library or works based on it.
- Each time you redistribute the Library (or any work based on the Library), the recipient automatically receives a license from the original licensor to copy, distribute, link with or modify the Library subject to these terms and conditions. You may not impose any further restrictions on the recipients' exercise of the rights granted herein. You are not responsible for enforcing compliance by third parties with this License.
- If, as a consequence of a court judgment or allegation of patent infringement or for any other reason (not limited to patent issues), conditions are imposed on you (whether by court order, agreement or otherwise) that contradict the conditions of this License, they do not excuse you from the conditions of this License. If you cannot distribute so as to satisfy simultaneously your
obligations under this License and any other pertinent obligations, then as a consequence you may not distribute the Library at all. For example, if a patent license would not permit royalty-free redistribution of the Library by all those who receive copies directly or indirectly through you, then the only way you could satisfy both it and this License would be to refrain entirely from distribution of the Library.
If any portion of this section is held invalid or unenforceable under any particular circumstance, the balance of the section is intended to apply, and the section as a whole is intended to apply in other circumstances. It is not the purpose of this section to induce you to infringe any patents or other property right claims or to contest validity of any such claims; this section has the sole purpose of protecting the integrity of the free software distribution system which is implemented by public license practices. Many people have made generous contributions to the wide range of software distributed through that system in reliance on consistent application of that system; it is up to the author/donor to decide if he or she is willing to distribute software through any other system and a licensee cannot impose that choice. This section is intended to make thoroughly clear what is believed to be a consequence of the rest of this License.
- If the distribution and/or use of the Library is restricted in certain countries either by patents or by copyrighted interfaces, the original copyright holder who places the Library under this License may add an explicit geographical distribution limitation excluding those countries, so that distribution is permitted only in or among countries not thus excluded. In such case, this License incorporates the limitation as if written in the body of this License.
-
The Free Software Foundation may publish revised and/or new versions of the Lesser General Public License from time to time. Such new versions will be similar in spirit to the present version, but may differ in detail to address new problems or concerns. Each version is given a distinguishing version number. If the Library specifies a version number of this License which applies to it and "any later version", you have the option of following the terms and conditions either of that version or of any later version published by the Free Software Foundation. If the Library does not specify a license version number, you may choose any version ever published by the Free Software Foundation.
-
If you wish to incorporate parts of the Library into other free programs whose distribution conditions are incompatible with these, write to the author to ask for permission. For software which is copyrighted by the Free Software Foundation, write to the Free Software Foundation; we sometimes make exceptions for this. Our decision will be guided by the two goals of preserving the free status of all derivatives of our free software and of promoting the sharing and reuse of software generally.
NO WARRANTY
- BECAUSE THE LIBRARY IS LICENSED FREE OF CHARGE, THERE IS NO WARRANTY FOR THE LIBRARY, TO THE EXTENT PERMITTED BY APPLICABLE LAW. EXCEPT WHEN OTHERWISE STATED IN WRITING THE COPYRIGHT HOLDERS AND/OR OTHER PARTIES PROVIDE THE LIBRARY "AS IS" WITHOUT WARRANTY OF ANY KIND, Either EXPRESSED OR IMPLIED, INCLUDING, BUT NOT LIMITED TO, THE IMPLIED WARRANTY OF MERCHANTABILITY AND FITNESS FOR A PARTICULAR PURPOSE. THE ENTIRE RISK AS TO THE QUALITY AND PERFORMANCE OF THE LIBRARY IS WITH YOU. SHOULD THE LIBRARY PROVE DEFECTIVE, YOU ASSUME THE COST OF ALL NECESSARY SERVICING, REPAIR OR CORRECTION.
- IN NO EVENT UNLESS REQUIRED BY APPLICABLE LAW OR AGREED TO IN WRITING WILL ANY Copyright HOLDER, OR ANY OTHER PARTY WHO MAY MODIFY AND/OR REDISTRIBUTE THE LIBRARY AS PERMITTED ABOVE, BE LIABLE TO YOU FOR DAMAGES, INCLUDING ANY GENERAL, SPECIAL, INCIDENTAL OR CONSEQUENTIAL DAMAGES ARISING OUT OF THE USE OR INABILITY TO USE THE LIBRARY (INCLUDING BUT NOT LIMITED TO LOSS OF DATA OR DATA BEING RENDERED INACCURATE OR LOSSES SUSTAINED BY YOU OR THIRD PARTIES OR A FAILURE OF THE LIBRARY TO OPERATE WITH ANY OTHER SOFTWARE), EVEN IF SUCH HOLDER OR OTHER PARTY HAS BEEN ADVISED OF THE POSSIBILITY OF SUCH DAMAGES.
END OF TERMS AND CONDITIONS
How to Apply These Terms to Your New Libraries
If you develop a new library, and you want it to be of the greatest possible use to the public, we recommend making it free software that everyone can redistribute and change. You can do so by permitting redistribution under these terms (or, alternatively, under the terms of the ordinary General Public License). To apply these terms, attach the following notices to the library. It is safest to attach
them to the start of each source file to most effectively convey the exclusion of warranty; and each file should have at least the "copyright" line and a pointer to where the full notice is found.
Copyright ©
This library is free software; you can redistribute it and/or modify it under the terms of the GNU Lesser General Public License as published by the Free Software Foundation; either version 2.1 of the License, or (at your option) any later version.
This library is distributed in the hope that it will be useful, but WITHOUT ANY WARRANTY; without even the implied warranty of MERCHANTABILITY or FITNESS FOR A PARTICULAR PURPOSE. See the GNU Lesser General Public License for more details.
You should have received a copy of the GNU Lesser General Public License along with this library; if not, write to the Free Software Foundation, Inc., 51 Franklin Street, Fifth Floor, Boston, MA 02110-1301 USA
Also add information on how to contact you by electronic and paper mail. You should also get your employer (if you work as a programmer) or your school, if any, to sign a "copyright disclaimer" for the library, if necessary. Here is a sample; alter the names:
Yoyodyne, Inc., hereby disclaims all copyright interest in the library 'Frob' (a library for tweaking knobs) written by James Random Hacker.
signature of Ty Coon, 1 April 1990 Ty Coon, President of Vice
That's all there is to it!
Declaration of Conformity with regard to the R&TTE Directive 1999/5/EC
Manufacturer:
Pioneer Corporation
1-1, SHIN-OGURA, SAIWAI-KU, KAWASAKI-SHI, KANAGAWA-KEN 212-0031, JAPAN
EU Representative's:
Pioneer Europe NV
Haven 1087, Keetberglaan 1, 9120 Melsele, Belgium
http://www.pioneer.eu

English:
Hereby, Pioneer, declares that this BCS-717 (BCS-313) is in compliance with the essential requirements and other relevant provisions of Directive 1999/5/EC.
Suomi:
http://www.pioneer.co.uk
http://www.pioneer.fr
http://www.pioneer.de
http://www.pioneer.it
http://www.pioneer.nl-http://www.pioneer.be
http://www.pioneer.es
http://www.pioneer.eu
Published by Pioneer Corporation. Copyright © 2011 Pioneer Corporation. All rights reserved.
Publication de Pioneer Corporation.
PIONEER ELECTRONICS (USA) INC.
P.O. BOX 1540, Long Beach, California 90801-1540, U.S.A. TEL: (800) 421-1404
PIONEER ELECTRONICS OF CANADA, INC.
340 Ferrier Street, Unit 2, Markham, Ontario L3R 2Z5, Canada TEL: 1-877-283-5901, 905-479-4411
PIONEER EUROPE NV
Haven 1087, Keetberglaan 1, B-9120 Melsele, Belgium TEL: 03/570.05.11
PIONEER ELECTRONICS ASIACENTRE PTE. LTD.
253 Alexandra Road, #04-01, Singapore 159936 TEL: 65-6472-7555
PIONEER ELECTRONICS AUSTRALIA PTY. LTD.
5 Arco Lane, Heatherton, Victoria, 3202, Australia, TEL: (03) 9586-6300
PIONEER ELECTRONICS DE MEXICO S.A. DE C.V.
Blvd.Manuel Avila Camacho 138 10 piso Col.Lomas de Chapultepec, Mexico, D.F. 11000 TEL: 55-9178-4270