
CDJ-2000 - DJ CD player PIONEER - Free user manual and instructions
Find the device manual for free CDJ-2000 PIONEER in PDF.

User questions about CDJ-2000 PIONEER
0 question about this device. Answer the ones you know or ask your own.
Ask a new question about this device
Download the instructions for your DJ CD player in PDF format for free! Find your manual CDJ-2000 - PIONEER and take your electronic device back in hand. On this page are published all the documents necessary for the use of your device. CDJ-2000 by PIONEER.
USER MANUAL CDJ-2000 PIONEER
The Pioneer website listed above provides answers to frequently asked questions, information about software, and other up-to-date data of assistance to our customers.
For inquiries on rekordbox, please see the support site indicated above.
Operating Instructions
Mode d'emploi
Bedienungsanleitung
Thank you for buying this Pioneer product.
Please read through these operating instructions so you will know how to operate your model properly. After you have finished reading the instructions, put them away in a safe place for future reference.
In some countries or regions, the shape of the power plug and power outlet may sometimes differ from that shown in the explanatory drawings.
However the method of connecting and operating the unit is the same.
K015 En
IMPORTANT

The lightning flash with arrowhead symbol, within an equilateral triangle, is intended to alert the user to the presence of uninsulated "dangerous voltage" within the product's enclosure that may be of sufficient magnitude to constitute a risk of electric shock to persons.
CAUTION
RISK OF ELECTRIC SHOCK
DO NOT OPEN
CAUTION: TO PREVENT THE RISK OF ELECTRIC SHOCK,DO NOT REMOVE COVER (OR BACK).NO USER-SERVICEABLE PARTS INSIDE.REFER SERVICING TO QUALIFIED SERVICE PERSONNEL.

The exclamation point within an equilateral triangle is intended to alert the user to the presence of important operating and maintenance (servicing) instructions in the literature accompanying the appliance.
D3-4-2-1-1_A1_En
Replacement and mounting of an AC plug on the power supply cord of this unit should be performed only by qualified service personnel.
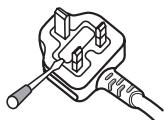
IMPORTANT: THE MOULDED PLUG
This appliance is supplied with a moulded three pin mains plug for your safety and convenience. A 5 amp fuse is fitted in this plug. Should the fuse need to be replaced, please ensure that the replacement fuse has a rating of 5 amps and that it is approved by ASTA or BSI to BS1362.
Check for the ASTA mark or the BSI mark on the body of the fuse.
If the plug contains a removable fuse cover, you must ensure that it is refitted when the fuse is replaced. If you lose the fuse cover the plug must not be used until a replacement cover is obtained. A replacement fuse cover can be obtained from your local dealer.
If the fitted moulded plug is unsuitable for your socket outlet, then the fuse shall be removed and the plug cut off and disposed of safely. There is a danger of severe electrical shock if the cut off plug is inserted into any 13 amp socket.
If a new plug is to be fitted, please observe the wiring code as shown below. If in any doubt, please consult a qualified electrician.
IMPORTANT: The wires in this mains lead are coloured in accordance with the following code:
Blue: Neutral, Brown: Live
As the colours of the wires in the mains lead of this appliance may not correspond with the coloured markings identifying the terminals in your plug, proceed as follows;
The wire which is coloured BLUE must be connected to the terminal which is marked with the
Letter N or coloured BLACK.
The wire which is coloured BROWN must be connected to the terminal which is marked with the
letter L or coloured RED.
How to replace the fuse: Open the fuse compartment with a screwdriver and replace the fuse.
D3-4-2-1-2-B_EN
CAUTION
This product is a class 1 laser product classified under the Safety of laser products, IEC 60825-1:2007.

D58-5-2-a_A1_En
When using this product, confirm the safety information shown on the bottom of the unit.

If you want to dispose this product, do not mix it with general household waste. There is a separate collection system for used electronic products in accordance with legislation that requires proper treatment, recovery and recycling.
Private households in the member states of the EU, in Switzerland and Norway may return their used electronic products free of charge to designated collection facilities or to a retailer (if you purchase a similar new one).
For countries not mentioned above, please contact your local authorities for the correct method of disposal.
By doing so you will ensure that your disposed product undergoes the necessary treatment, recovery and recycling and thus prevent potential negative effects on the environment and human health.
K058b_A1_En
Operating Environment
Operating environment temperature and humidity:
+5°C to +35°C (+41°F to +95°F); less than 85%RH
(cooling vents not blocked)
Do not install this unit in a poorly ventilated area, or in
locations exposed to high humidity or direct sunlight (or
strong artificial light)
D3-4-2-1-7c*A1_EN
WARNING
This equipment is not waterproof. To prevent a fire or shock hazard, do not place any container filled with liquid near this equipment (such as a vase or flower pot) or expose it to dripping, splashing, rain or moisture. D3-4-2-1-3_B_En
WARNING
Before plugging in for the first time, read the following section carefully.
The voltage of the available power supply differs according to country or region. Be sure that the power supply voltage of the area where this unit will be used meets the required voltage (e.g., 230V or 120V) written on the rear panel. D3-4-2-1-4_A_En
WARNING
To prevent a fire hazard, do not place any naked flame sources (such as a lighted candle) on the equipment. D3-4-2-1-7a_A_En
VENTILATION CAUTION
When installing this unit, make sure to leave space around the unit for ventilation to improve heat radiation (at least 5cm at rear, and 5cm at each side).
WARNING
Slots and openings in the cabinet are provided for ventilation to ensure reliable operation of the product, and to protect it from overheating. To prevent fire hazard, the openings should never be blocked or covered with items (such as newspapers, table-cloths, curtains) or by operating the equipment on thick carpet or a bed. D3-4-2-1-7b_A_En
CAUTION
The POWER switch on this unit will not completely shut off all power from the AC outlet. Since the power cord serves as the main disconnect device for the unit, you will need to unplug it from the AC outlet to shut down all power. Therefore, make sure the unit has been installed so that the power cord can be easily unplugged from the AC outlet in case of an accident. To avoid fire hazard, the power cord should also be unplugged from the AC outlet when left unused for a long period of time (for example, when on vacation). D3-4-2-2-2a_A_En
POWER-CORD CAUTION
Handle the power cord by the plug. Do not pull out the plug by tugging the cord and never touch the power cord when your hands are wet as this could cause a short circuit or electric shock. Do not place the unit, a piece of furniture, etc., on the power cord, or pinch the cord. Never make a knot in the cord or tie it with other cords. The power cords should be routed such that they are not likely to be stepped on. A damaged power cord can cause a fire or give you an electrical shock. Check the power cord once in a while. When you find it damaged, ask your nearest PIONEER authorized service center or your dealer for a replacement. 5002*En
If the AC plug of this unit does not match the AC outlet you want to use, the plug must be removed and appropriate one fitted, Replacement and mounting of an AC plug on the power supply cord of this unit should be performed only by qualified service personnel. If connected to an AC outlet, the cut-off plug can cause severe electrical shock. Make sure it is properly disposed of after removal. The equipment should be disconnected by removing the mains plug from the wall socket when left unused for a long period of time (for example, when on vacation).
D3-4-2-2-1a_A1_En
Contents
How to read this manual
The names of displays, menus, and buttons in this manual are enclosed in brackets. (e.g. [MASTER] channel, [ON/OFF], [File] menu)
01 Before start
Features 4
12 Before you start
What's in the box. 6
Discs/files playable on the CDJ-2000 6
03 Part Names and Functions
Control Panel. 8
Rear Panel 9
Front Panel. 9
Main unit display. 10
Jog dial display section. 10
04 Connections
Basic style. 11
Using in combination withrekordbox. 11
Using other brands of DJ software. 12
Connections for relay play 12
05Playback
Loading discs. 13
Loading SD memory cards. 13
Loading USB devices. 13
Using the PRO DJ LINK function 13
Playback. 14
Setting Cue. 15
Setting Loop. 15
Setting Hot Cue. 16
Storing cue and loop points 16
Operating the jog dial 17
Operating the [NEEDLE SEARCH] pad. 17
Operating the CDJ-2000 in combination with other devices 18
Using the [BROWSE] button 18
Using the [TAG LIST] button. 19
Using the [INFO] button 20
06 Changing the settings
Using the [MENU/UTILITY] button. 21
About the rekordbox software 22
About the driver software 24
Using other brands of DJ software 25
07 Additional information
Troubleshooting 26
About the liquid crystal display. 27
Error messages 27
List of icons displayed on the main unit display section. 27
Cautions on use 28
Handling discs 28
Disclaimer. 29
Specifications 29
Before start
Features
The CDJ-2000 is a multi player for professional DJs, offering the variety of functions, durability and operability required for working in discos and nightclubs.
MULTI MEDIA, MULTI FORMAT
The CDJ-2000 can play not only discs (CDs and DVDs), but also music files recorded on SD memory cards and USB devices (flash memory drives and hard disks). Supported music file formats include not only music CD (CD-DA) and MP3 but also AAC, WAV and AIFF.
rekordboxTM
The included rekordbox music management software can be used to prepare playlists, cues, loops, hot cues and other data required for DJ play unhurriedly at home ahead of time. This allows you to devote all your attention to DJ play at the disco/nightclub, with total assurance. From acquiring music files to DJ play, all steps in the cycle of the DJ's work can be accomplished smoothly.
rekordbox is an application for managing music files which are used for DJ play with a Pioneer DJ Player (i.e. CDJ-2000, CDJ-900).
Data that has been detected and measured, as well as any points which have been set and stored using rekordbox, can be used in combination with a Pioneer DJ Player (i.e. CDJ-2000, CDJ-900) to achieve outstanding DJ performance.
PRO DJ LINK
Functions include "SD & USB Export" using SD memory cards and USB devices (flash memory drives and hard discs) and "rekordbox LINK Export" using the computer on whichrekordbox is installed.
SD & USB Export
This function can be used to transfer rekordbox music files and management data using SD memory cards/USB devices. This eliminates the need to take your computer to the disco or club.
rekordboxLINKExport
When the CDJ-2000 and computer are connected by LAN cable, the rekordbox music files and management data can be transferred directly between them. This eliminates the need to export data to SD memory cards/USB devices.
SOUND CARD
The CDJ-2000 is equipped with exclusive interface and MIDI interface for controlling the DJ software of other brands. There is also a built-in sound card, so other equipment can be connected easily.
DISPLAY
A large 6.1-inch color LCD is used to display not only text data but also jacket photos. The combination of a GUI displaying music file information in easily understandable fashion and a rotary selector with easy operation lets you select tracks with no stress.
WAVE DISPLAY
WAVE displays indicate the data with a higher resolution than previous Pioneer products.
NEEDLE SEARCH
When the NEEDLE SEARCH pad is touched with a finger, the sound near the position at which the pad is touched is played instantaneously. This makes for faster point searching than ever before.
TAG LIST
In addition to playlists prepared using rekordbox, tracks to be played next can be temporarily collected inside the CDJ-2000. The music files added to the tag list can be displayed as a list. This function is extremely convenient for selecting tracks during live performances.
KEYWORD SEARCH
Keyword searching, letter jumping and other functions let you quickly and precisely search for the desired music file.
HISTORY MEMORY
The CDJ-2000 is equipped with a history function storing the playing history of music files. Playlists can be created from this playing history using rekordbox.
0.5 FRAME STEP
The minimum frame has evolved from 1 (1/75 seconds) to 0.5 frames. This makes it possible to set the cue and loop points with greater precision to achieve accurate, advanced DJ play.
ADVANCED JOG DIAL
The jog ring illumination lights in four places, so the top and side edges of the jog dial are clearly visible, even in dark DJ booths. This can also be used to impress the audience.
QUANTIZE
The CDJ-2000 is equipped with a quantize function for putting a track on beat even when the button is pressed roughly, as long as the track has been analyzed withrekordbox. When setting real time cues and hot cues, the beat is automatically set to the beat closest to the position at which the button was pressed.
HIGH SOUND QUALITY
The CDJ-2000 is designed for thorough improvement of the sound quality, for both the digital and analog outputs.
For the digital circuitry, a high performance Wolfson D/A converter is used to faithfully reproduce even the most delicate sounds, achieving clear, high quality sound with a rich sense of mass and acoustic field.
For the analog circuitry, a hybrid OP amplifier is used to reduce to the utmost limits that inaudible noise of 20kHz and higher that can blur the original sound. Unwanted digital noise is shut out to achieve clear, highly transparent sound faithful to the original.
Before you start
What's in the box
Audio cable
Power cable
Control cord
LAN cable
Disc force eject pin
- CD-ROM (rekordbox)
Warranty card
- Operating instructions (this document)
Discs/files playable on the CDJ-2000
Playable discs
Discs including the following marks on the disc label, package or jacket can be played.
Types of discs that can be played and marks
| COMPACT DIGITAL AUDIO | COMPACT DIGITAL AUDIO | COMPACT DIGITAL AUDIO |
| CD | CD-TEXT | CD-R |
| COMPACT DIGITAL AUDIO (ReWritable) | DVD | DVD |
| R | RW | |
| DVD-R | DVD-RW | |
| CD-RW |
DVD is a trademark of DVD Format/Logo Licensing Corporation. Discs playable on this player are as shown below.
- CD-R/-RW discs recorded in music CD (CD-DA) format
- CD-R/-RW, DVD-R/-RW, DVD+R/+RW, DVD-R DL (dual layer) and DVD+R DL (dual layer) discs on which music files (MP3/AAC/WAV/AIFF) are recorded
Discs that cannot be played
DTS-CD
Photo CDs
Video CDs
CD Graphics (CD-G) discs
- Unfinalized CDs
DVD-Video discs
DVD-Audio discs
DVD-RAM discs
- Unfinalized DVDs
Playback of discs created on a computer or DVD recorder
Depending on the application's settings and the computer's environment settings, it may not be possible to play discs created on a computer. Record discs in a format playable on the CDJ-2000. For details, contact your application's selling agent.
It may not be possible to play discs created on a computer or DVD recorder due to the disc's properties, scratches or dirt, or poor recording quality (dirt on the recording lens, etc.).
See Handling discs on page 28 for instructions on handling discs.
Creating backup discs
When CD-R/-RW, DVD-R/-RW, DVD+R/+RW, DVD-R DL (dual layer) and DVD+R DL (dual layer) discs are paused or left in the pause mode at cue points for long periods of time, it may become difficult to play the disc that point, due to the properties of the disc. When a specific point is looped repeatedly an extremely large number of times, it may become difficult to play that point.
When playing valuable discs, we recommend making backup discs.
Regarding copy protected CDs
This player is designed to conform to the specifications of the audio CD format. This player does not support the playback or function of discs that do not conform to these specifications.
About DualDisc
This player is designed to conform to the specifications of the audio CD format. This player does not support the playback or function of discs that do not conform to these specifications.
About 8 cm single CDs
8 cm single CDs cannot be played on the CDJ-2000. Do not mount 8 cm adapters on CDs and play them on the CDJ-2000. The adapter could fall off as the disc spins, damaging the disc or the player.
About CD-Text
The CDJ-2000 supports CD-Text. Titles, album names and artist names recorded in CD-Text are displayed. When multiple text data is recorded, the first text data is displayed. The supported character codes are shown below.
ASCII
ISO-8859
MS-JIS
- Mandarin Chinese character code
About CD playback
Music files (MP3/AAC/WAV/AIFF) recorded on CD-R/-RW, DVD-R/-RW, DVD+R/+RW, DVD-R DL (dual layer) and DVD+R DL (dual layer) discs can be played.
| Folder layers | Max. 8 levels (files in folders beyond the 8th level cannot be played) |
| Max. number of folders | 2000 folders per disc (Folders beyond the 2000th folder cannot be displayed) |
| Max. number of files | 999 files for each file format3000 files per disc (files beyond the 3000th folder cannot be displayed) |
When there are many folders or files, some time may be required for loading.
About SD memory cards
Music files (MP3/AAC/WAV/AIFF) recorded on SD and SDHC memory cards conforming to SD standards can be played.
Such data as disc identification information, cue points, loop points and hot cues can be recorded on SD memory cards.
| Folder layers | Max. 8 levels (files in folders beyond the 8th level cannot be played) |
| Max. number of folders | Unlimited (Folders beyond the 10 000th folder within a single folder cannot be displayed) |
| Max. number of files | Unlimited ( files beyond the 10 000th file within a single folder cannot be displayed) |
| Supported cards[1] | SD memory cards: 8 MB – 2 GB SDHC memory cards: 4 GB – 32 GB |
| Compatible formatals | SD memory cards: FAT12 and FAT16 (conforming to SD standards) SDHC memory cards: FAT32 (conforming to SD standards) |
CPRM is not supported.
- SDHC memory cards can be used with devices supporting SDHC memory cards. They cannot be used with devices that only support SD memory cards.
- When using SD memory cards with a capacity of 4 GB or greater, use SD memory cards on which the SDHC logo is indicated.
- SD memory cards are shipped from the manufacturer in the standard format indicated above. If a non-formatted SD memory card is loaded, [FORMAT SD] is displayed and the card cannot be used.
- It may not be possible to used card formatted on a computer, digital camera, etc.
- Pioneer does not guarantee that all SD memory cards will operate on the CDJ-2000.
Cautions on using SD memory cards
- SD memory cards are precision electronic devices. Handle them with care. Bending, dropping or subjecting SD memory cards to strong forces or shocks could break them. Also, do not use or store SD memory cards in environments where static electricity or electric noise tends to be produced. We recommend periodically making copies of valuable data.
- Please note that Pioneer will accept no responsibility whatsoever for loss of data recorded by the customer on SD memory cards or other direct or indirect problems resulting from connection to the CDJ-2000.
After ejecting SD memory cards, store them in their dedicated case, etc. - Depending on the SD memory card you are using, the desired performance may not be achieved.
About USB devices
Music files (MP3/AAC/WAV/AIFF) recorded on USB devices can be played. Such data as disc identification information, cue points, loop points and hot cues can be recorded on USB devices.
| Folder layers | Max. 8 levels (files in folders beyond the 8th level cannot be played) |
| Max. number of folders | Unlimited (Folders beyond the 10 000th folder within a single folder cannot be displayed) |
| Max. number of files | Unlimited ( files beyond the 10 000th file within a single folder cannot be displayed) |
| Supported file systems | FAT, FAT32 and HFS+ |
- The CDJ-2000 supports such USB mass storage class USB devices as external hard discs, portable flash memory drives and digital audio players. External DVD/CD drives and other optical disc devices cannot be used.
- When there are many folders or files, some time may be required for loading.
If multiple partitions are set for the USB device, the device may not be recognized.
Cautions on using USB devices
- Some USB devices may not operate properly. Please note that Pioneer will accept no responsibility whatsoever for loss of data recorded on USB devices.
- USB hubs cannot be used.
- USB devices equipped with flash card readers may not operate.
- If a current above the allowable level is detected in the CDJ-2000's USB port, it could happen that a warning message is displayed, the power to the USB device is cut off and signal transfer is stopped. To restore normal operation, remove USB devices connected to the player, then press USB STOP. Avoid reusing the USB device for which the excess current was detected. If normal operation is not restored after performing the above operation (if signals are not transferred), try turning off the player's power then turning it back on.
- Depending on the USB device you are using, the desired performance may not be achieved.
About MP3 files
MP3 files can have a constant bit rate (CBR) or a variable bit rate (VBR). Both types of files can be played on the CDJ-2000, but the search and super fast search functions are slower with VBR files. If your priority is operability, we recommend recording MP3 files in CBR.
The CDJ-2000 supports MP3 files in the formats shown below.
| Compatible formats | MPEG-1 | Audio Layer-3 sampling frequencies of 32 kHz, 44.1 kHz and 48 kHz, and bit rates of 32 kbps – 320 kbps are supported. |
| MPEG-2 | Audio Layer-3 sampling frequencies of 16 kHz, 22.05 kHz and 24 kHz, and bit rates of 16 kbps – 160 kbps are supported. | |
| Track information | ID3 tag versions 1.0, 1.1, 2.2, 2.3 and 2.4 are supported. Titles, album names, artist names, etc., are displayed here.1JPEG images embedded in ID3 tags are displayed as the jacket photo.2 | |
| File extension | .mp3 |
To display characters written in a local code other than Unicode, change the [LANGUAGE] setting at [UTILITY] (page 21).
2 Files larger than 800× 800 dots cannot be displayed.
About AAC files
- AAC is the abbreviation of "Advanced Audio Coding", a basic format of audio compression technology used for MPEG-2 and MPEG-4.
- The file format and extension of AAC data depends on the application used to create the data.
-
In addition to AAC files encoded with iTunes® and with the extension ".m4a", files with the extensions ".aac" and ".mp4" can also be played on the CDJ2000. However, copyright protected AAC files purchased for example at the iTunes Music Store cannot be played. Also, some files may not be playable, depending on the iTunes version used to encode them.
-
The CDJ-2000 supports AAC files in the formats shown below.
| Compatible formats | MPEG-4 AAC LC | Sampling frequencies of 16 kHz, 22.05 kHz, 24 kHz, 32 kHz, 44.1 kHz and 48 kHz, and bit rates of 16 kpbs – 320 kbps are supported. |
| Track information | aac | ID3 tag versions 1.0, 1.1, 2.2, 2.3 and 2.4 are supported. Titles, album names, artist names, etc., are displayed here.1JPEG images embedded in ID3 tags are displayed as the jacket photo.2 |
| Extensions other than aac | Meta tags (embedded tags) are supported. Titles, album names, artist names, etc., are displayed here.1JPEG images embedded in tags are displayed as the jacket photo.2 |
File extension .m4a, .aac and .mp4
To display characters written in a local code other than Unicode, change the [LANGUAGE] setting at [UTILITY] (page 21).
2 Files larger than 800× 800 dots cannot be displayed.
About WAV files
The CDJ-2000 supports WAV files in the formats shown below.
| Compatible formats | The 16-/24-bit non-compressed PCM format and sampling frequencies of 44.1 kHz and 48 kHz are supported. |
| Track information | LST chunk Titles, album names, artist names, etc., are displayed here.1 |
| File extension | .wav |
To display characters written in a local code other than Unicode, change the [LANGUAGE] setting at [UTILITY] (page 21).
About AIFF files
The CDJ-2000 supports AIFF files in the formats shown below.
| Compatible formats | The 16-/24-bit non-compressed PCM format and sampling frequencies of 44.1 kHz and 48 kHz are supported. Titles, album names, artist names, etc., are displayed here.1 |
| File extension | .aif, .aiff |
To display characters written in a local code other than Unicode, change the [LANGUAGE] setting at [UTILITY] (page 21).
Aboutrekordbox
- rekindbox is an application for managing music files which are used for DJ play with a Pioneer DJ Player (i.e. CDJ-2000, CDJ-900). Data that has been detected and measured, as well as any points which have been set and stored using rekindbox, can be used in combination with a Pioneer DJ Player (i.e. CDJ-2000, CDJ-900) to achieve outstanding DJ performance.
- Install rekordbox from the included CD-ROM onto a computer. For instructions on using rekordbox, see Using in combination with rekordbox on page 11 and About the rekordbox software on page 22.
Part Names and Functions
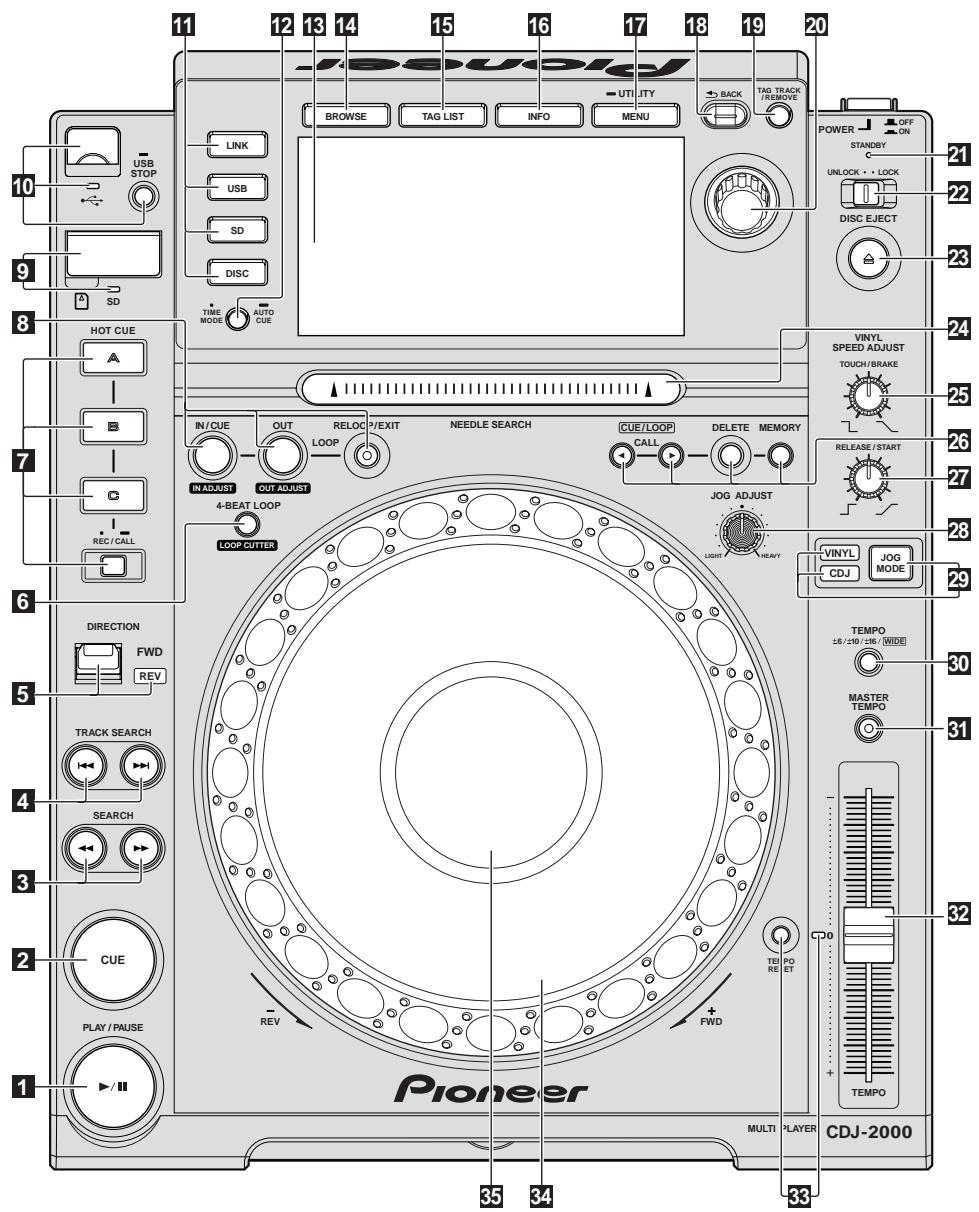
Control Panel
Rear Panel
Front Panel
Control Panel
1 PLAY/PAUSE /II and PLAY/PAUSE /II indicator (page 14)
This lights when playing tracks and flashes when in the pause mode.
2 CUE and CUE indicator (page 15)
This lights when a cue point is set (except during track searching), and flashes when a new cue point can be set in the pause mode.
3 SEARCH
4 TRACK SEARCHI<page 14)
5 DIRECTION FWD REV and REV indicator (page 14)
6 4-BEAT LOOP/LOOP CUTTER (page 16)
7 HOT CUE (A, B, C, REC/CALL) (page 16)
8 LOOP IN/CUE (IN ADJUST) (page 15), LOOP OUT (OUT ADJUST) (page 15), RELOOP/EXIT (page 15)
9 SD memory card door, insertion slot and SD memory card indicator (page 13)
10 USB device insertion slot, USB indicator and USB STOP (page 13)
11 LINK, USB, SD, DISC (page 14)
12 TIME MODE/AUTO CUE (page 15)
13 Main unit display (page 10)
14 BROWSE (page 18)
15 TAG LIST (page 19)
16 INFO (page 20)
17 MENU/UTILITY (page 21)
18 BACK (page 18)
19 TAG TRACK/REMOVE (page 19)
20 Rotary selector and indicator
When selecting tracks or setting items, the cursor moves when the rotary selector is turned. Press the rotary selector to enter.
21 STANDBY indicator (page 21)
This lights when in the standby mode.
22 UNLOCK, LOCK (page 13)
23 DISC EJECT and DISC EJECT indicator (page 13)
24 NEEDLE SEARCH pad (page 17)
25 VINYL SPEED ADJUST TOUCH/BRAKE (page 17)
CUE/LOOP CALL (page 16), DELETE (page 16), MEMORY (page 16)
27 VINYL SPEED ADJUST RELEASE/START (page 17)
28 JOG ADJUST (page 17)
29 JOG MODE, VINYL mode indicator and CDJ mode indicator (page 17)
The mode switches between VINYL and CDJ each time this is pressed. The indicator for the selected mode lights.
30 TEMPO ± 6 / ± 10 / ± 16 WIDE (page 14)
31 MASTER TEMPO (page 14)
32 TEMPO (page 14)
33 TEMPO RESET and TEMPO RESET indicator
Regardless of the position of the TEMPO dial, tracks are played at the original playing speed recorded on the disc, etc. The indicator lights when TEMPO RESET is turned on.
34 Jog dial (-REV / + FWD) and JOG RING ILLUMINATION (page 17)
55 Jog dial display section (page 10)
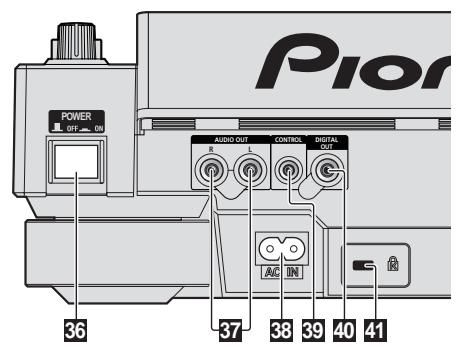
Rear Panel
36 POWER ON OFF
Press to turn the power on and off.
37 AUDIO OUT L/R (page 11)
38 ACIN (page 11)
99 CONTROL (page 18)
40 DIGITAL OUT
Kensington security slot
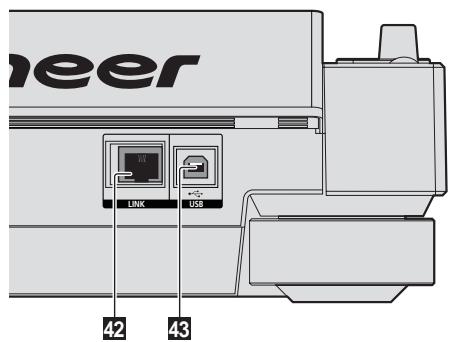
LINK (page 11)
43 USB (page 11)
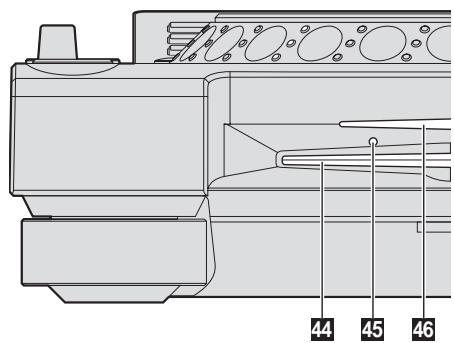
Front Panel
44 Disc insertion slot
45 Disc force eject pin insertion hole
46 Disc insertion slot indicator
About ejecting discs by force
- If the disc cannot be ejected by pressing [DISC EJECT], the disc can be ejected forcibly by inserting the disc force eject pin all the way into the disc force eject pin insertion hole on the main unit's front panel.
- When forcibly ejecting a disc, be sure to do so following the procedure below.
1 Press [POWER] and wait at least 1 minute after the set's power has turned off.
Never forcibly eject a disc directly after turning off the set's power. Doing so is dangerous for the reasons described below.
The disc will still be spinning when ejected and could hit your fingers, etc., causing injury.
Also, the disc clamp will rotate in an unstable way, and the disc could get scratched.
2 Use the included disc force eject pin. (Do not use anything else.)
The included disc force eject pin is mounted on the CDJ-2000's bottom panel. When the pin is inserted all the way into the insertion hole, the disc is ejected 5mm to 10mm out of the disc insertion slot. Grasp the disc with your fingers and pull it out.
Main unit display
1 Information display section
2 REMAIN
This lights when the time display is set to the remaining time.
3 TRACK
This indicates the track number (01 - 99).
4 PLAYER
This indicates the player number (1 - 4) assigned to this CDJ-2000.
5 A. CUE (page 15)
This lights when auto cue is set.
6 MEMORY
Cue points, loop points and hot cues recorded on SD memory cards and USB devices are displayed as marks.
7 CUE
The positions of cue points, loop points and hot cues are displayed as marks.
8 Playing address display
The track is displayed as a bar graph. The current playback position is displayed as a white vertical line. When the elapsed time is displayed, the left edge of the graph lights. When the remaining time is displayed, the display turns off from the left side. The entire graph flashes slowly when there are less than 30 seconds remaining in the track, then begins flashing rapidly when less than 15 seconds remain.
9 WAVE display
This displays the WAVE display, guidance, etc.
Jog dial display section

10 NEEDLE
This lights when needle searching is possible.
11 Time display (minutes, seconds and frames)
There are 75 frames to a second.
QUANTIZE
This lights red when [QUANTIZE] is turned on.
When [QUANTIZE] is turned on, the loop points and hot cue are automatically set to the beat nearest the position at which [LOOP IN/CUE (IN ADJUST)],
[LOOP OUT (OUT ADJUST)], [4-BEAT LOOP] or [HOT CUE] (A, B or C) was pressed.
The quantize function does not work in the following situations ([QUANTIZE] is displayed in gray):
- When playing tracks recorded on discs
- When playing music files that have not been analyzed with rekordbox
In the pause mode
MT
This lights when the master tempo is set (page 14).
14 BPM
Displays BPM (Beats Per Minute) of the track currently being played.
15 Playing speed display
The number changes according to the position of [TEMPO].
16 Playing speed adjustment range display
This indicates the range in which the playing speed can be adjusted with respect to the original playing speed recorded on the medium.
1 Operation display
This indicates the playing position, with one revolution equal to 135 frames. It turns during playback and stops in the pause mode.
2 Cue point display
3 Audio memory status display
This flashes when the audio memory is being written. It stops flashing, remaining lit, when writing is completed.
The operations below may not be possible while the audio memory is being written.
-
Setting Cue Point during playback (Real Time Cue)
-
Setting Hot Cue
The display also flashes when there is not enough memory due to scratch play.
4 Jog touch detection display
When the jog mode is set to VINYL, the top of the jog dial lights when pressed.
5 VINYL
This lights when the jog mode is set to VINYL (page 17).
Connections
Be sure to turn off the power and unplug the power cord from the power outlet whenever making or changing connections.
Refer to the operating instructions for the component to be connected.
Connect the power cord after all the connections between devices have been completed.
Do not disconnect the LAN cable when music files and/or information are being shared using PRO DJ LINK.
Basic style
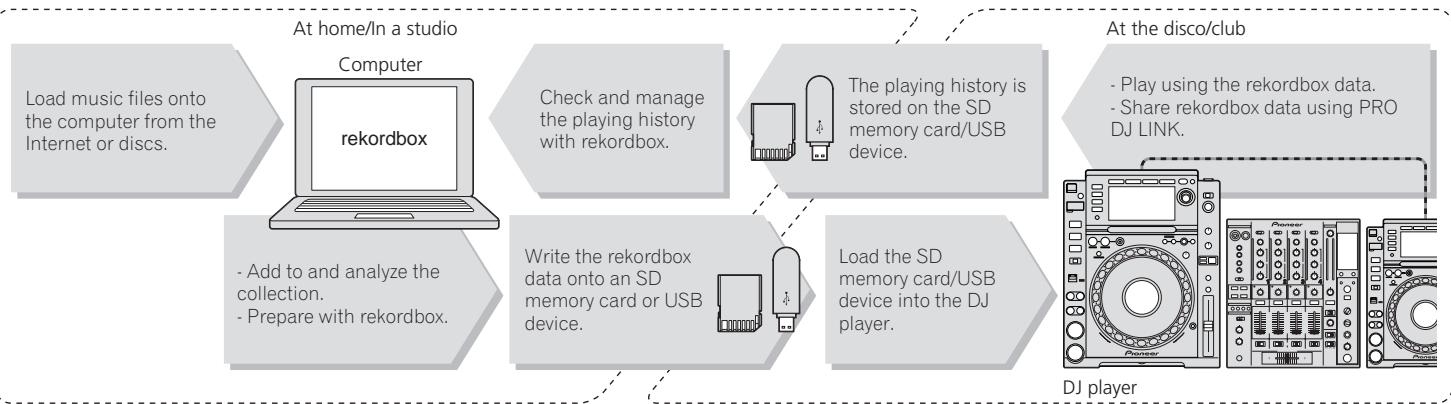
- rekordbox music files and data can be transferred to the CDJ-2000 using USB devices (flash memory drives, hard discs, etc.), eliminating the need to bring a computer into the DJ booth. Playlist, cue, loop and hot cue information set with rekordbox in advanced can be used for DJ play.
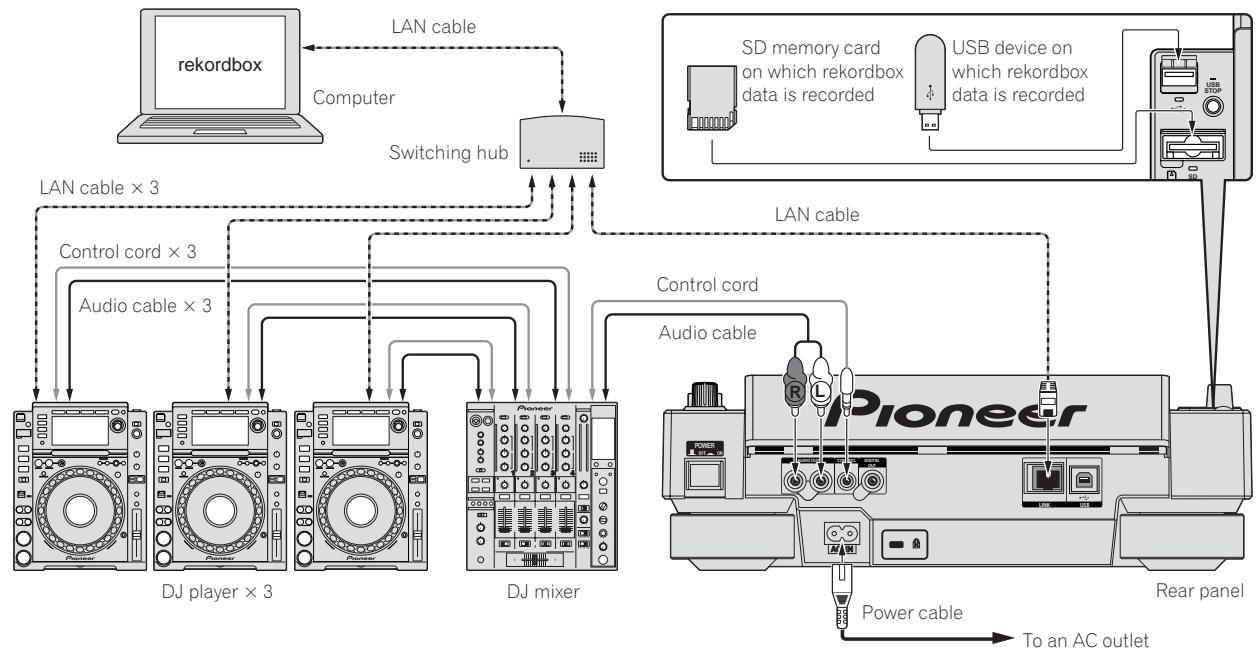
The contents of media loaded in DJ players (tracks, cue point memories, WAVE information, etc.) can be shared. For details, see Using the PRO DJ LINK function on page 13. - Up to four units can be connected. A switching hub (commercially available) is required to connect three or more units. Use a switching hub of 100 Mbps or greater. Note that some switching hubs may not operate normally.
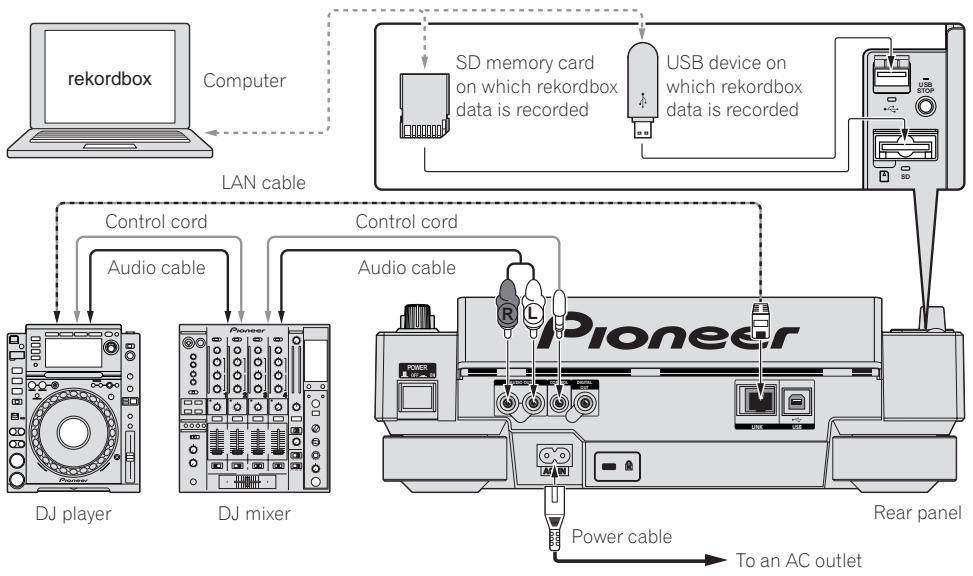
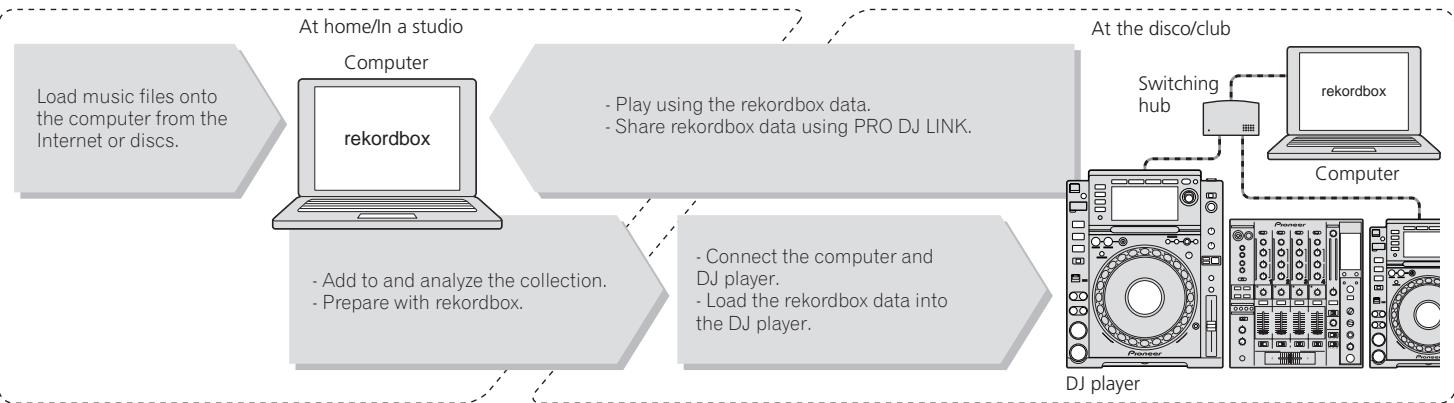
Using in combination withrekordbox
- When connected by LAN cable to a computer on which rekordbox is installed, tracks in rekordbox can be selected and played. For instructions on operating rekordbox on the computer, see the rekordbox manual. Instructions on operating rekordbox can be found in the rekordbox [Help] menu.
- Up to two computers can be connected.
The contents of media loaded in the different DJ players (tracks, cue point memories, WAVE information, etc.) can be displayed (page 14). - Up to four units can be connected. A switching hub (commercially available) is required to connect three or more units. Use a switching hub of 100 Mbps or greater. Note that some switching hubs may not operate normally.
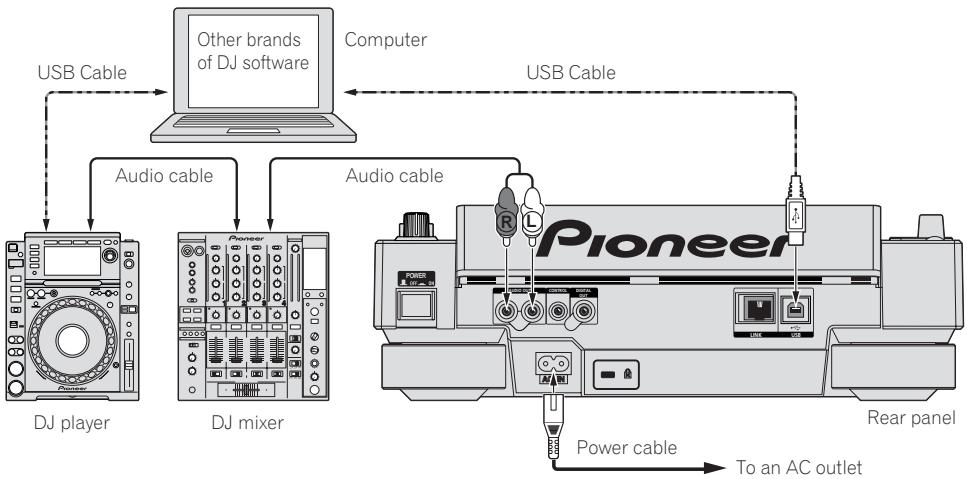
Using other brands of DJ software
With the CDJ-2000, the operating information of the buttons, tempo adjustment dial, etc., can also be output in universal MIDI format. When connected by USB cable to a computer on which MIDI-compatible DJ software is installed, the DJ software can be operated from the CDJ-2000. The sound of music files being played on the computer can also be output from the CDJ-2000. For details, see About the driver software on page 24 and Using other brands of DJ software on page 25.
- Connect a computer on which Mac OS X (10.4.6 or later), Windows Vista® or Windows XP is installed.
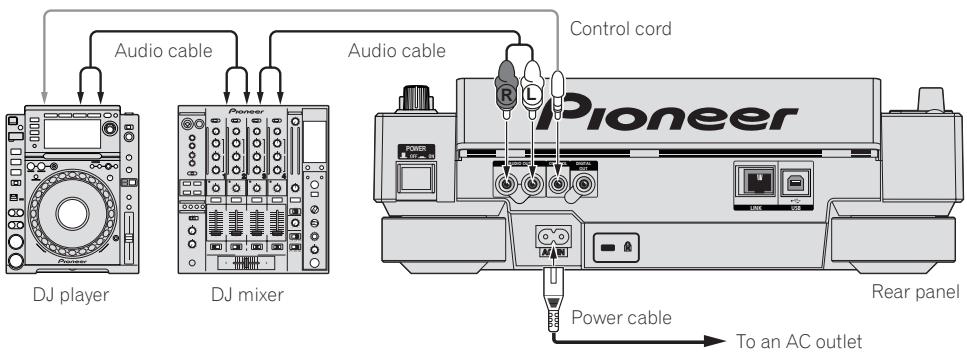
Connections for relay play
Relay play between two DJ players is possible by interconnecting the CDJ-2000 and a Pioneer DJ player using the CONTROL jacks (page 18).
Playback
Loading discs
- Set the disc with the printed side facing up.
- Insert the disc into the disc insertion slot on the set's front panel.
- Do not insert two or more discs at once.
- Do not force discs into the set's disc insertion slot when the set's power is off. Doing so could damage the disc or the set.
- When the disc is being drawn in or ejected, do not apply any force to the disc in the direction opposite its movement. Doing so could damage the disc or the set.
1 Press [POWER].
Turn on the power of this unit.
2 Insert the disc into the disc insertion slot.
Playback starts.
- When auto cue is turned on, playback starts when [PLAY/PAUSE▶II] is pressed. For details on the auto cue function, see Setting auto cue on page 15.
Ejecting discs
Press [DISC EJECT].
The disc is ejected from the disc insertion slot.
- If [DISC EJECT ] is pressed by mistake, press [PLAY/PAUSE▶/II] immediately. The set is restored to the status it was in just before [DISC EJECT ] was pressed. (No sound is output during this time.)
- When [UNLOCK/LOCK] is set to [LOCK], press [PLAY/PAUSE▶/II] to set the pause mode, then press [DISC EJECT].
Loading SD memory cards
1 Open the SD memory card door.
2 Insert the SD memory card.
Insert the SD memory card vertically, with the back side facing forward and the notch facing down. Push the card in slowly until it stops.
3 Close the SD memory card door.
The SD memory card indicator lights.
- When an SD memory card that has previously been loaded in the CDJ-2000 or a Pioneer DJ player is loaded, the number of discs for which WAVE information, etc., is recorded is displayed on the main unit display.
Ejecting SD memory cards from the set
Do not eject SD memory cards or turn off the CDJ-2000's power while the SD memory card indicator is flashing. Doing so could damage the data recorded on the card.
1 Open the SD memory card door.
The SD memory card indicator turns off.
2 Press the SD memory card in. When it pops back up, pull it out vertically.
- Do not forcibly insert or remove SD memory cards. Doing so could damage the SD memory card or the set.
- Do not insert any objects other than SD memory cards into the SD memory card insertion slot. Inserting coins or other metal objects could damage the internal circuitry, resulting in malfunction.
Loading USB devices
Insert the USB device into the USB port.
The USB indicator lights.
- When a USB device that has previously been loaded in the CDJ-2000 or a Pioneer DJ player is loaded, the number of discs for which WAVE information, etc., is recorded is displayed on the main unit display.
Removing USB devices from the set
- Be sure to follow the procedure below when removing USB devices from the set. Removing a USB device without following this procedure could erase the set's management data and make it impossible to read the USB device.
- When turning the set's power off, be sure to remove the USB device first.
1 Press [USB STOP] for over 2 second.
The USB indicator turns off.
2 Disconnect the USB device.
Using the PRO DJ LINK function
When two or more CDJ-2000s are connected by LAN cable, tracks recorded on SD memory cards or USB devices connected to other players can be loaded onto this unit.
1 Connect this unit and other DJ players using LAN cables.
2 Press [LINK].
Media loaded in another DJ player is displayed on this unit's display.
3 Select the medium and enter.
The medium's contents are displayed.
4 Select the track and enter.
The track is loaded into this unit.
- The information below can be shared among DJ players connected by PRO DJ LINK.
Tracks (music files)
TAG LIST (page 19)
INFO (page 20)
Disc cue points
Disc WAVE displays
Sharing disc information
1 Load an SD memory card or USB device into the DJ player connected by PRO DJ LINK.
2 Load a disc in the CDJ-2000.
When no SD memory card or USB device is loaded in this unit, the player number and check screen for DJ players in which SD memory cards or USB devices are loaded are displayed on this unit's display.
3 Press [MEMORY] on this unit.
The disc information set for this unit is registered on the SD memory card/USB device of the DJ player connected by PRO DJ LINK.
- When multiple DJ players are connected by PRO DJ LINK and SD memory cards/USB devices are loaded in two or more DJ players, discs are not registered in DJ players other than this one.
- If [DELETE] is pressed in step 3, the disc information is not registered on any DJ player. No disc information is registered on any DJ player until the SD memory card/USB device is loaded on the CDJ-2000. To register the disc information, press [DISC], then press [MENU/UTILITY] and select the player in which the information is to be registered.
Browsing libraries and folders
The browsing display differs depending on whether or not library information is recorded on the SD memory card/USB device.
- With library information Library browsing: The music files are displayed by the categories set in rekordbox (album, artist, etc.).
- Without library information Folder browsing: The folders/tracks on the medium are displayed with a tree structure.
The types of items on the category menu can be changed in rekordbox's preferences (environmental settings).
1 List of contents The contents of the selected medium are displayed.
Uppermost level Displays the name of the upper folder or media of the displayed item.
Cursor Turn the rotary selector to move the cursor up and down.
1 Contents of The contents of the line selected with the cursor are displayed.
When artwork is registered in rekordbox or when the ID3 tag contains a JPEG image, the image for the track selected with the cursor is displayed.
Playback
1 Load the medium in this unit.
2 Press [DISC], [SD], [USB] or [LINK].
The contents of the selected medium are displayed.
3 Turn the rotary selector.
Select the track. The category/folder/track information is displayed.
- Once the lowermost level in the folder is reached, press the rotary selector. Press [BACK] to return to the uppermost level.
- Press [BACK] for over 1 second or press the media button of the medium you are browsing to return to the uppermost level.
4 Press the rotary selector.
The track is loaded and playback begins. is displayed to the left of the currently playing track.
- [TRACK SEARCHI< / ] can be used to select tracks within the currently playing track's category/folder.
- When a disc containing music files recorded with a hierarchical structure is loaded, playback starts from the tracks in the uppermost level.
- When [UNLOCK/LOCK] is set to [LOCK], press [PLAY/PAUSE▶/II] to set the pause mode, then press the rotary selector.
Pausing
During playback, press [PLAY/PAUSE▶/II].
The PLAY/PAUSE▶II and CUE indicators flash. Press [PLAY/PAUSE▶II] again to resume playback.
- If no operation is performed for 100 minutes while in the pause mode, the disc automatically stops spinning. When [PLAY/PAUSE▶II] is pressed at this time, playback resumes from the first track. When auto cue is turned on, the set cues to the first track and pauses there.
Resuming playback from the position playing just before the disc was ejected (Resume)
- After a disc is ejected, if that same disc is immediately reloaded in the CDJ2000, playback resumes from the position playing just before the disc was ejected.
- The resume function only works when the same disc is ejected then reloaded before loading another disc.
- When [TRACK SEARCHI< / ] is pressed before starting playback, the set searches for the beginning of the track and playback starts.
- The resume function does not work for SD memory cards or USB devices.
Forward and reverse scanning
Press [SEARCH<▶].
When [SEARCH←/▶] pressed and held in, the track is fast-forwardsed or fast-reversed.
- When the music files are recorded in a folder structure, only tracks within the same category/folder are fast-forwarded/fast-reversed.
Finding the beginnings of tracks (Track Search)
Press [TRACK SEARCHI<1/>]
Press the [> ] to move to the beginning of the next track.
When [1≤slant 1] is pressed, the beginning of the currently playing track is searched. When pressed twice consecutively, the set returns to the beginning of the previous track.
- When the music files are recorded in a folder structure, only tracks within the same category/folder are searched.
- When auto cue is turned on, the set searches for the beginning of the track and pauses there (page 15).
Adjusting the playing speed (Tempo control)
Move [TEMPO] up or down.
The tempo increases when moved to the [+] side (down), decreases when moved to the [-] side (up). The rate at which the playing speed is changed is indicated on the playing speed display.
Selecting the range for adjusting the playing speed
Press [TEMPO ± 6 / ± 10 / ± 16 WIDE].
The range of adjustment of the [TEMPO] control switches each time the button is pressed. The adjustment range setting is indicated on the playing speed adjustment range display.
- The tempo can be adjusted in units of 0.02% when set to ± 6% , in steps of 0.05% when set to ± 10% , in steps of 0.05% when set to ± 16% , and in steps of 0.5% when set to WIDE.
- The adjustment range is ± 100% when set to WIDE. When set to -100% , playback stops.
The adjustment range is set to ± 10% when the power is turned on.
Adjusting the playing speed without changing the pitch (Master Tempo)
Press [MASTER TEMPO].
The MASTER TEMPO indicator and [MT] on the main unit display light. The pitch does not change even when the playing speed is changed with the [TEMPO] control.
- The sound is digitally processed, so the sound quality decreases.
Playing in reverse
Set [DIRECTION FWD/REV] to [REV].
The REV indicator lights and the track plays in the reverse direction.
- When the music files are recorded in a folder structure, only tracks within the same category/folder can be played in reverse. Also note that reverse playback may not start immediately.
- The direction in which the playing speed is increased or decreased according to the direction in which the jog dial is turned is reversed.
- When such operations as track searching and loop playback are performed during reverse playback, the audio memory status display on the jog dial display section flashes and scratch play may not be possible.
Setting Cue
1 During playback, press [PLAY/PAUSE▶/II].
Playback is paused.
2 Press [CUE].
The point at which the track is paused is set as the cue point. The CUE indicator lights and the PLAY/PAUSE▶/II indicators flashes. No sound is output at this time.
- When a new cue point is set, the previously set cue point is canceled.
- For instructions on saving cue points, see Storing cue and loop points on page 16.
Adjusting the cue point position
1 Press [SEARCH<▲/▶] while pausing at the cue point.
The CUE and PLAY/PAUSE>II indicators flash.
2 Press [SEARCH<▶].
The cue point can be fine-adjusted in steps of 0.5 frames.
- The same operation is possible using the jog dial.
3 Press [CUE].
The point at which the button was pressed is set as the cue point.
- When a new cue point is set, the previously set cue point is canceled.
- When the medium containing the track is removed, the cue point is canceled. For instructions on saving cue points, see Storing cue and loop points on page 16.
Returning to Cue Point (Back Cue)
During playback, press [CUE].
The set immediately returns to the currently set cue point and pauses.
- When [PLAY/PAUSE>II] is pressed, playback starts from the cue point.
Checking Cue Point (Cue Point Sampler)
Press and hold [CUE] after returning to the cue point.
Playback starts from the currently set cue point. Playback continues while [CUE] is pressed in.
- When the music files are recorded in a folder structure, the cue point can only be checked for tracks within the same category/folder.
Setting Cue Point during playback (Real Time Cue)
During playback, press [LOOP IN/CUE (IN ADJUST)] at the position at which you want to set the cue point.
The point at which the button was pressed is set as the cue point.
Setting auto cue
When a track is loaded or the track search operation is performed, the silent section at the beginning of the track is skipped and the cue point is automatically set at the point immediately before the sound starts.
Press [TIME MODE/AUTO CUE] for over 1 second.
Auto cue is turned on. [A. CUE] lights on the main unit display.
- The auto cue level setting remains in the memory, even when the power is turned off.
Changing the auto cue level
The sound pressure level for identifying a section as silent can be selected from among the following eight steps:
-36 dB, -42 dB, -48 dB, -54 dB, -60 dB, -66 dB, -72 dB and -78 dB
- The auto cue level setting remains in the memory, even when the power is turned off.
- There are two ways to change the auto cue level, as shown below.
Changing procedure - [MENU/UTILITY]
1 Press [MENU/UTILITY] for over 1 second.
The [UTILITY] screen is displayed.
2 Select [AUTO CUE LEVEL] and enter.
3 Turn the rotary selector.
The auto cue level setting changes.
Changing procedure - [TIME MODE/AUTO CUE]
1 Press [TIME MODE/AUTO CUE] for at least 5 seconds.
The auto cue level setting changing mode is set.
2 Press [CUE/LOOP CALL<▶].
The auto cue level setting changes.
- To cancel the changing mode, press [TIME MODE/AUTO CUE] again.
Setting Loop
1 During playback, press [LOOP IN/CUE (IN ADJUST)] at the position at which you want to start looping (the loop in point).
2 Press [LOOP OUT (OUT ADJUST)] at the position at which you want to stop looping (the loop out point).
Loop In Point is set.
- This operation is not necessary if you have already set a Cue Point as a Loop In Point.
The Loop Out Point is set, and Loop playback starts from the Loop In Point.
- When playing music files, looping can only be set within the same track.
Fine-adjusting the loop in point (loop in adjust)
1 During loop playback, press [LOOP IN/CUE (IN ADJUST)].
[LOOP IN/CUE (IN ADJUST)] switches to a fast flashing and [LOOP OUT (OUT ADJUST)] turns off.
The loop in point's time is displayed on the main unit display.
2 Press [SEARCH<▶].
The loop in point can be adjusted in units of 0.5 frames.
- The same operation is possible using the jog dial.
- The loop in point can be adjusted by ± 30 frames and must be in front of the loop out point.
3 Press [LOOP IN/CUE (IN ADJUST)].
- Normal loop playback resumes.
- Normal loop playback also resumes if no operation is performed for over 10 seconds.
- When playing music files, the loop in point can only be adjusted within the same track.
Fine-adjusting the loop out point (loop out adjust)
1 During loop playback, press [LOOP OUT (OUT ADJUST)]. [LOOP OUT (OUT ADJUST)] switches to a fast flashing and [LOOP IN/CUE (IN ADJUST)] turns off.
The loop out point's time is displayed on the main unit display.
2 Press [SEARCH<▶].
The loop out point can be adjusted in units of 0.5 frames.
- The same operation is possible using the jog dial.
- The loop out point adjustment range is anywhere after the loop in point.
3 Press [LOOP OUT (OUT ADJUST)].
Normal loop playback resumes.
- Normal loop playback also resumes if no operation is performed for over 10 seconds.
- When playing music files, the loop out point can only be adjusted within the same track.
Canceling Loop playback (Loop Exit)
During loop playback, press [RELOOP/EXIT].
Playback continues after the Loop Out Point without returning to the Loop In Point.
Returning to Loop playback (Reloop)
After canceling loop playback, press [RELOOP/EXIT] during playback.
Playback returns to the previously set Loop In Point, and Loop playback resumes.
Setting loops automatically (4-beat Loop)
During playback, press [4-BEAT LOOP/LOOP CUTTER].
A loop of 4 beats starting from the point at which the button was pressed is set automatically according to the BPM of the currently playing track, and loop playback starts.
- If the track's BPM cannot be detected, the BPM is set to 130.
Cutting loops (Loop Cut)
During loop playback, press [4-BEAT LOOP/LOOP CUTTER].
The loop playing time is cut in half each time the button is pressed.
Extending loops
During loop playback, press [4-BEAT LOOP/LOOP CUTTER] while pressing in [LOOP OUT (OUT ADJUST)].
The loop playing time is doubled each time the button is pressed.
The same operation can be performed as described below
Press [SEARCH<▶/▶] while pressing [LOOP OUT (OUT ADJUST)].
Turn the jog dial while pressing [LOOP OUT (OUT ADJUST)].
Setting Hot Cue
1 Press [HOT CUE REC/CALL].
The set switches to the hot cue recording mode. The HOT CUE indicator (A, B, C) light red.
2 During playback or in the pause mode, press [HOT CUE] (A, B or C) at the point at which you want to set the hot cue.
The position at which the button was pressed or the currently playing loop is set at the [HOT CUE] button (note that the direction of playback is not recorded). The button's indicator flashes.
- While the hot cue is being recorded, it is not possible to record other [HOT CUE] buttons, set cue points, fast-forward/fast-reverse or scratch
- When an SD memory card or USB device is loaded in the player, the point information is recorded automatically.
- When a hot cue is set during scratch play, playback may stop temporarily.
Playing hot cues
1 Press [HOT CUE REC/CALL].
The hot cue playing mode is set.
- The indicators of buttons at which cue points are recorded light green.
- The indicators of buttons at which loop playback is recorded light orange.
The indicators of the buttons at which nothing is recorded do not light.
2 During playback or in the pause mode, press [HOT CUE] (A, B or C).
Playback starts instantaneously from the point recorded at that button.
- For loop playback recorded at the [HOT CUE] buttons, the information differs from loop playback set using the [LOOP IN/CUE (IN ADJUST)] and [LOOP OUT (OUT ADJUST)] buttons. Loop playback can be canceled using the [RELOOP/EXIT] button and the loop out point can be fine-adjusted using the [LOOP OUT (OUT ADJUST)] button. Adjusting this directly changes the information recorded at the [HOT CUE] buttons (A, B and C).
Calling out Hot Cue
Procedure for calling out hot cues (for discs)
1 Load an SD memory card/USB device in the CDJ-2000.
2 Load a disc in the CDJ-2000.
When the disc's hot cues are recorded on the SD memory card/USB device, the HOT CUE indicator (A, B or C) flashes.
3 Press the [HOT CUE] button (A, B or C) whose hot cue you want to call out.
The hot cue is called out. The HOT CUE (A, B, C) indicator lights.
-
If you do not want to call out a hot cue, press [HOT CUE REC/CALL] without pressing [HOT CUE] (A, B or C). Buttons for which no hot cue was not called out turn off.
-
When playing tracks recorded on media other than discs, hot cues cannot be called out even when a disc for which hot cues are recorded is loaded in the CDJ-2000.
- If you accidentally cancel the hot cue call out mode, eject the SD memory card/USB device, then reload it.
Procedure for calling out hot cues (for SD memory cards/USB devices)
1 Load an SD memory card/USB device in the CDJ-2000.
2 Load the track whose hot cue you want to call out.
3 Press [HOT CUE REC/CALL] for over 1 second.
The set switches to the hot cue call out mode, and the HOT CUE indicators (A, B or C) at which hot cues are recorded flash.
4 Press the [HOT CUE] button (A, B or C) whose hot cue you want to call out.
The hot cue is called out. The HOT CUE (A, B, C) indicator lights.
- If you do not want to call out a hot cue, press [HOT CUE REC/CALL] without pressing [HOT CUE] (A, B or C). Buttons for which no hot cue was not called out turn off.
- If you accidentally cancel the hot cue call out mode, press [HOT CUE REC/CALL] again.
Canceling the hot cue call out mode
Perform one of the operations below to cancel the hot cue call out mode. The hot cue call out mode is not canceled when a different track is played.
1 Calling out hot cues A, B and C.
2 Press [HOT CUE REC/CALL].
Storing cue and loop points
1 Load an SD memory card/USB device in the CDJ-2000.
2 Set Cue Point or Loop Point.
3 Press [MEMORY].
![PIONEER CDJ-2000 - Press [MEMORY]. - 1](/content/2019/11/118731/images/909c9bf01682fde5d8fe7f0602ce8e9653cba36a49677b416e37f934abbd94c1.jpg)
stored cue point appears on the playing address display. The point information is registered on the SD memory card/USB device.
- When both an SD memory card and USB device are loaded on the CDJ-2000, the SD memory card has priority.
- To store loop points, press [MEMORY] during loop playback. The stored loop points appear on the playing address display.
![PIONEER CDJ-2000 - Press [MEMORY]. - 2](/content/2019/11/118731/images/7fb584982a6141b90b71b9080dfa7e8fac2aa3a0b2fd113523dfeaef6e631833.jpg)
- The icon is displayed to the left of tracks for which cue or loop points are saved.
- The information is automatically recorded on the SD memory card/USB device.
Cue point or loop playback information set at [HOT CUE] (A, B and C)
Track's WAVE display information
Calling out saved cue or loop points
1 Load an SD memory card/USB device in the CDJ-2000.
2 Load the track whose cue or loop points you want to call out.
Cue and loop points are displayed as marks on the playing address display.
3 Press [CUE/LOOP CALL<▶].
Playback is moved to the selected point and paused.
- When multiple points are recorded, the point moves each time the button is pressed.
4 Press [PLAY/PAUSE>II].
Playback starts from the Cue or Loop point.
Deleting cue or loop points individually
1 Load an SD memory card/USB device in the CDJ-2000.
2 Load the track containing the cue point or loop points you want to delete.
Cue and loop points are displayed as marks on the main unit display's playing address display.
3 Press [CUE/LOOP CALL<▶].
Playback is moved to the selected point and paused.
- When multiple points are recorded, the point moves each time the button is pressed.
4 Press [DELETE].
![PIONEER CDJ-2000 - Press [DELETE]. - 1](/content/2019/11/118731/images/fd5b2b1ab74e242e2f286c0586c336a44200273bdb595b7997cf4c1569fd4dbf.jpg)
DELETE] is displayed on the main unit display and the selected point
information is deleted.
Deleting all cue and loop points for a disc
1 Load an SD memory card/USB device in the CDJ-2000.
Cue and loop points are displayed as marks on the main unit display's playing address display.
2 Press [DELETE] for at least 5 seconds.
[DISC CUE/LOOP DATA-DELETE? PUSH MEMORY] appears on the main unit display.
3 Press [MEMORY].
All cue and loop points for the disc currently loaded in the CDJ-2000 are deleted.
- The deletion mode is canceled when any button other than [MEMORY] is pressed.
Deleting all disc information recorded on the SD memory card/USB device
1 With no disc loaded in the CDJ-2000, press [DELETE] for at least 5 seconds.
[DISC CUE/LOOP DATA-DELETE ALL? PUSH MEMORY] appears on the main unit display.
2 Press [MEMORY].
All the disc information recorded on the SD memory card/USB device is deleted.
- The deletion mode is canceled when any button other than [MEMORY] is pressed.
Operating the jog dial
The top of the jog dial has an embedded switch. Do not place objects on the jog dial or subject it to strong forces. Also note that water or other liquids getting into the set will lead to malfunction.
The jog dial has two modes.
- VINYL mode: When the top of the jog dial is pressed during playback, playback stops, and when the jog dial is spun at this time sound is produced according to the direction in which the jog dial is spun.
- CDJ mode: When the top of the jog dial is pressed, playback stops, and such operations as scratch play are not possible.
Frame search [VINYL-CDJ]
In the pause mode, spin the jog dial.
The position at which the track is pausing can be moved in units of 0.5 frames.
- The position is moved in the direction of playback when the jog dial is spun clockwise, in the reverse direction when it is spun counterclockwise. The position moves 135 for one revolution of the jog dial.
Super fast search [VINYL·CDJ]
Spin the jog dial while pressing in [SEARCH<▶].
The track is fast-forwarded/fast-reversed in the direction in which the jog dial is spun.
- When the [SEARCH<▲/▶] button is released, this function is canceled.
- When you stop the jog dial from spinning, normal playback resumes.
- The fast-forward/fast-reverse speed can be adjusted according to the speed at which the jog dial is spun.
Super fast track search
When the jog dial is spun while pressing in [TRACK SEARCHI< / ], the track advances at high speed in the direction in which the jog dial is spun.
Pitch bend [VINYL·CDJ]
During playback, spin the outer section of the jog dial.
The playing speed increases when spun clockwise, decreases when spun counterclockwise. When spinning is stopped, playback returns to the normal speed.
- When the jog mode is set to the CDJ mode, the same operation can be performed by spinning the top of the jog dial.
Scratch play [VINYL]
When the jog mode is set to the VINYL mode, tracks can be played according to the direction and speed at which the jog dial is spun by spinning the top of the jog dial while pressing it.
1 Press [JOG MODE].
Set the jog mode to VINYL.
2 During playback, press the top of the jog dial.
Playback slows then stops.
3 Spin the jog dial in the desired direction and at the desired speed.
The sound is played according to the direction and speed at which the jog dial is spun by spinning the top of the jog dial while pressing it.
4 Release your hand from the top of the jog dial.
Normal playback resumes.
Adjusting the load when the jog dial is spun
Turn [JOG ADJUST].
The load gets heavier when turned clockwise, lighter when turned counterclockwise.
Adjusting the time until which playback stops when the top of the jog dial is pressed
Turn [VINYL SPEED ADJUST TOUCH/BRAKE].
The speed increases when turned clockwise, decreases when turned counterclockwise.
- When the jog mode is set to VINYL, the speed at which playback stops when [PLAY/PAUSE▶/II] is pressed changes simultaneously.
Adjusting the speed until which normal playback resumes when the top of the jog dial is released
Turn [VINYL SPEED ADJUST RELEASE/START].
The speed increases when turned clockwise, decreases when turned counterclockwise.
- When the jog mode is set to VINYL, the speed at which playback starts when [PLAY/PAUSE>II] is pressed changes simultaneously.
Operating the [NEEDLE SEARCH] pad
- The [NEEDLE SEARCH] pad can only be operated in the following cases: - In the pause mode
While the jog dial is being pressed with the jog mode set to VINYL - Touch the [NEEDLE SEARCH] pad with a finger to easily play the sound at the position at which the pad is touched. Move your finger while touching the pad to quickly move to the desired position.
- For several of the CDJ-2000's functions, this pad is used to input characters.
Playing from the position at which the pad was touched
Touch the [NEEDLE SEARCH] pad.
![PIONEER CDJ-2000 - Touch the [NEEDLE SEARCH] pad. - 1](/content/2019/11/118731/images/4f6a4bd4d5061188a859af81d07b0497de02d8987cceec3927037b68b3f6836a.jpg)
![PIONEER CDJ-2000 - Touch the [NEEDLE SEARCH] pad. - 2](/content/2019/11/118731/images/e2e25985402e5638b14e81f816aeec524bf4d18016f7d533e1fc154dd121d485.jpg)
The track is played from the position at which the pad was released. The current playing position on the playing address display moves to directly over the position at which the pad was touched.
- The position of playback can be moved by moving your finger over the pad while touching it. Note that when this is done, the position on the playing address display may not be displayed properly and the sound may not be played properly.
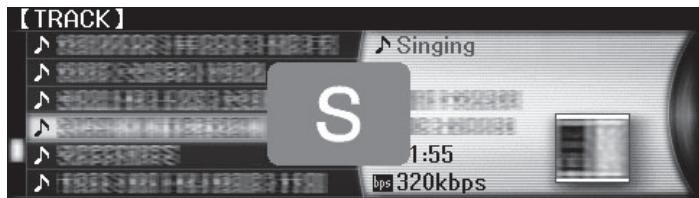
Inputting characters
Inputting search characters using the [SEARCH] buttons
1 Touch the [NEEDLE SEARCH] pad.
![PIONEER CDJ-2000 - Touch the [NEEDLE SEARCH] pad. - 1](/content/2019/11/118731/images/8cb8b26e6d8344bb809f5d59f678c360c21e1a7fca4b58c1b057eb367304a1eb.jpg)
![PIONEER CDJ-2000 - Touch the [NEEDLE SEARCH] pad. - 2](/content/2019/11/118731/images/7599bfd8b2663f419324bcc165905c3e66c6d31a5fe34f3066e62625018aaa01.jpg)
The character directly above the position touched is enlarged.
2 Release your finger from the [NEEDLE SEARCH] pad.
The enlarged character is input.
- To input more characters at this point, repeat the above procedure.
-
The characters that can be input are letters A-Z, numbers 0–9 and symbols. The characters that can be input switch when the position just below [ABC] or [123] is pressed.
-
When C is input, a single character is deleted. If input again, characters are deleted consecutively.
Operating the CDJ-2000 in combination with other devices
Starting playback using a DJ mixer's fader (Fader Start)
1 Connect the CDJ-2000 with a Pioneer DJ mixer using the included control cord.
For instructions on connecting, see Basic style on page 11.
2 Move the DJ mixer's channel fader or cross fader.
The DJ player's pause mode is canceled and the track is played instantaneously. Also refer to the operating instructions of the connected DJ mixer.
- When the channel fader or cross fader is set back to its original position, playback cues back to the set cue point and the pause mode is set (Back Cue).
Relay play on two DJ players
1 Connect the CDJ-2000 and a DJ mixer.
For instructions on connecting, see Connections for relay play on page 12.
2 Set the DJ mixer's cross fader to the center position.
3 Turn auto cue on for both DJ players.
The DJ players' auto cue indicators light.
4 Start playback on this unit.
The first track on this unit is played, and once it finished playback begins automatically on the other DJ player. This unit cues to the beginning of the next track and pauses. This operation is repeated for relay play between the two DJ players.
- The medium can be changed and the cue point set on the DJ player that is in standby.
- If the power of one DJ player is turned off during playback, playback may start on the other DJ player.
- The fader start function does not work during relay play.
Relay play may not be possible if the two DJ players are not connected to the same DJ mixer.
Using the [BROWSE] button
Rearranging tracks (Sort menu)
When in the library browse mode, the tracks can be rearranged using the Sort menu. (The Sort menu is not displayed when in the folder browse mode.)
1 Press [MENU/UTILITY] while the tracks are displayed.
The Sort menu is displayed to the right of the information display screen.
![PIONEER CDJ-2000 - Press [MENU/UTILITY] while the tracks are displayed. - 1](/content/2019/11/118731/images/5a05c135637811b13f5e711581660571cfad9ac42fae31d47b1fe6a72aa4f8bb.jpg)
2 Select and enter the setting item.
The tracks are sorted according to the selected item. The track information is displayed.
- Sorting is canceled when [BACK] is pressed to return to the uppermost level.
- The types of sorting items on the Sort menu can be changed in the rekordbox preferences (environmental settings).
Searching for tracks (SEARCH)
- The search function can be used to search for tracks recorded on the media loaded in the set with [SEARCH].
Tracks recorded on discs cannot be searched. - Tracks recorded on media for which library browsing is not possible cannot be searched.
1 Select [SEARCH] and enter the setting item.
A character appears at the bottom of the main unit display.
2 Use the [NEEDLE SEARCH] pad to input a character.
Tracks including the character you have input are displayed.
- When more characters are input at this point, tracks starting with the character string you have input are displayed.
- When [BACK] is pressed, the category screen reappears.
Using the jump function
The jump function can be used to instantaneously move to the track, category or folder you want to play.
The jump function includes the two modes below.
- Letter jumping: Use this when the tracks are arranged or sorted in alphabetical order.
- Page jumping: Use this when the tracks are not arranged or sorted in alphabetical order. Turn the rotary selector to jump by page.
In the letter jump mode
1 Press the rotary selector for at least 1 second.
The mode switches to the letter jump mode. The first letter of the selected track is enlarged.
2 Select the character or symbol to which you want to jump and enter.
The display moves to the category starting with the selected character or symbol.
- The characters that can be displayed are letters A-Z, numbers 0-9 and symbols.
1 Press the rotary selector for at least 1 second.
The mode switches to the page jump mode.
2 Select the page to which you want to jump and enter.
The display moves to the selected page.
Using hot cue banks
Hot cue banks set ahead of time in rekordbox can be registered at the CDJ-2000's [HOT CUE] buttons (A, B and C).
1 Load the medium on which the hot cue bank is registered in the CDJ-2000.
[Hot Cue BANK] appears in the category items.
2 Select [HOT CUE BANK] and enter the setting item.
The hot cue bank is displayed. The cursor is fixed to hot cue bank A. It cannot be moved using the rotary selector or other buttons.
3 Select the hot cue bank you want to call out and enter.
The hot cues registered in the hot cue bank are registered at the CDJ-2000's [HOT CUE] buttons (A, B or C). The indicators (A, B or C) light.
- When a new hot cue is registered at the CDJ-2000's [HOT CUE] buttons (A, B or C), all of the hot cue bank's point information is deleted.
- Hot cue banks cannot be deleted on the CDJ-2000.
Checking the playing history (HISTORY)
- The track playing history is recorded and displayed at [HISTORY].
- Playlists can be created based on the playing history at [HISTORY] using rekordbox. For details, see rekordbox's operating instructions.
1 Load an SD memory card/USB device in the CDJ-2000.
2 Playing tracks.
The currently playing track is recorded and displayed at [HISTORY].
- When a USB device, etc., is connected to the CDJ-2000 for the first time or reconnected, the new [HISTORY] is automatically created on the USB device.
- A warning message is displayed if there is not enough free space on the USB device, etc., or if the device is write-protected.
- The name of [HISTORY] can be preset at [UTILITY] (page 21).
- If a track already recorded in [HISTORY] is played again after playing a different track, it is newly recorded in [HISTORY]. However, tracks played using the [HOT CUE] buttons (A, B and C) are not recorded in the history (they are recorded when the hot cue is called out).
- The maximum number of tracks that can be recorded in [HISTORY] is 999. When a 1000th track is recorded, the oldest item in the history is deleted.
Deleting [HISTORY]
1 While [HISTORY] is selected, press [MENU/UTILITY].
The delete menu is displayed.
2 Select the range to be deleted and enter.
- [DELETE]: The [HISTORY] item selected with the cursor is deleted.
-
[ALL DELETE]: The entire [HISTORY] is deleted.
-
The [HISTORY] is deleted when [HISTORY] is converted into a playlist usingrekordbox.
Using the [TAG LIST] button
Up to 60 tracks to be played next or tracks selected for specific DJ scenes can be preset in the tag list.
![PIONEER CDJ-2000 - Using the [TAG LIST] button - 1](/content/2019/11/118731/images/328c140f9d4ec2c3ac86ba7c74d6f24e91bec001345aa8dca9726b511b35765f.jpg)
1List of contents
The contents of the tag list are displayed here.
2Medium name
The name of the medium on which the track is recorded is displayed here.
| Cursor | Turn the rotary selector to move the cursor up and down. |
| Jacket photo | When artwork is registered in rekordbox or when the ID3 tag contains a JPEG image, the image for the track selected with the cursor is displayed. |
Adding tracks to the tag list
Select the track, then press [TAG TRACK/REMOVE].
![PIONEER CDJ-2000 - Select the track, then press [TAG TRACK/REMOVE]. - 1](/content/2019/11/118731/images/beee9260fbc6ef9199c43bccbcd64229d2f0b838ab340cd027dcaede1455cb12.jpg)
is displayed to the left of the track.
- The number of tracks that can be added to the tag list is 60 tracks per medium. If you attempt to add a 61st track, a warning message is displayed and the track cannot be added. (There is no limit to the number of tracks when a computer on which rekordbox is installed is connected.)
Tracks can be recorded in the tag list ahead of time usingrekordbox. - When multiple DJ players are connected by PRO DJ LINK, the same tag list contents are displayed on all DJ players.
- When [TAG TRACK/REMOVE] is pressed while the information is displayed after pressing [INFO], the tracks loaded in this unit are added to the tag list.
Adding categories or folders to the tag list
With the list of the tracks displayed on the right side of the information display screen, press [TAG TRACK/REMOVE].
The category name/folder name flashes, and the tracks in that category/folder are added to the tag list.
- When a category/folder including tracks already added to the tag list is selected and [TAG TRACK/REMOVE] is pressed, only the tracks not already on the tag list are added.
- When a folder is added while in the folder browse mode, the track names are registered as file names. The artist names are not registered.
Adding playlists to the tag list
With the list of the tracks displayed on the right side of the information display screen, press [TAG TRACK/REMOVE].
The playlist name flashes, and the tracks in that playlist are added to the tag list.
- When a playlist including tracks that have already been added to the tag list is selected and [TAG TRACK/REMOVE] is pressed, only the tracks that were not previously added to the tag list are added.
- Playlists can also be added by pressing [TAG TRACK/REMOVE] while artwork is displayed on the information display screen.
Loading tracks from the tag list
1 Press [TAG LIST].
The tag list is displayed.
2 Select the track to be loaded and enter.
The track is loaded and playback starts.
Removing tracks from the tag list
1 Press [TAG LIST].
The tag list is displayed.
2 Select the track to be removed from the tag list, then press [TAG TRACK/REMOVE] for at least 1 second.
The track is removed from the tag list.
- If a track that has been added to the tag list is removed from the tag list while it is playing, the track is played to the end, then the stop mode is set. The next track is not played.
- When a medium is removed from the CDJ-2000, all the tracks recorded on that medium are removed from the tag list.
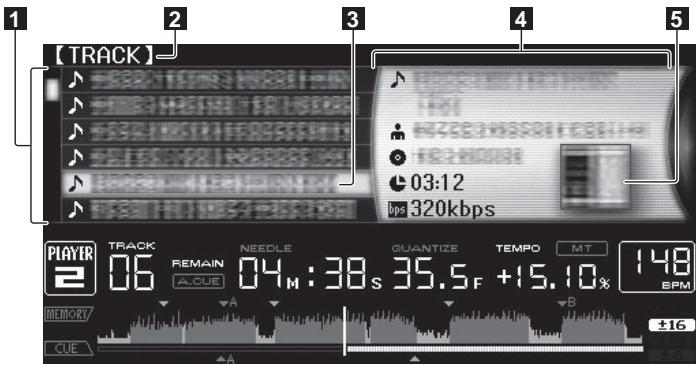
Using the [INFO] button
The details of the tracks loaded in the CDJ-2000 can be checked by pressing [INFO]. When DJ players are connected by PRO DJ LINK, the details of the tracks loaded in the other DJ players can also be checked.
![PIONEER CDJ-2000 - Using the [INFO] button - 1](/content/2019/11/118731/images/7df9a637461ca80fdef62ec55fc2360263cd32b4df6590fcc2498e50f7a253d6.jpg)
| 1Track details | The details of the tracks loaded in the DJ player are displayed here. |
| 2Medium/player number | The place where the track information is stored is displayed here. |
| 3Jacket photo and comment | The jacket photo and comment about the track loaded in the DJ player are displayed here. |
Checking the details of loaded tracks
While the track is playing, press [INFO].
The track's details are displayed.
Displaying details of tracks loaded in other DJ players
1 Connect this unit and the other DJ players by PRO DJ LINK.
2 Press [INFO], then press [MENU/UTILITY].
The [Link Info] screen appears.
3 Select the DJ player and enter.
The details of the tracks loaded in the selected DJ player are displayed.
- If no tracks are loaded in the selected DJ player, no details are displayed.
Using the information jump function
This function can be used to select items displayed in the details and move them to the category, etc., in which a track is included.
1 Display the track details.
2 Select and enter the setting item.
The library browse mode for the selected item is set.
It may not be possible to select some items.
- When a track is selected, it is moved to the category in which the track was loaded.
- It is not possible to move items from the disc's details to tracks loaded in a DJ player connected by PRO DJ LINK.
- When an item for which only an icon is displayed is selected, that icon is moved to the corresponding category.
Changing the settings
Using the [MENU/UTILITY] button
Various settings on the CDJ-2000 can be changed by pressing [MENU/UTILITY].
![PIONEER CDJ-2000 - Using the [MENU/UTILITY] button - 1](/content/2019/11/118731/images/5561b7564bee0705ba9bbfad21c99158f88516cf34dc78377a505d5879c8f2d5.jpg)
1
2
Setting item
The CDJ-2000's settings items are displayed here.
2 Setting
The settings for the various items are displayed here.
Changing the settings
1 Press [MENU/UTILITY] for over 1 second.
The [UTILITY] screen is displayed.
2 Select and enter the setting item.
The cursor moves to the setting.
3 Change the setting and enter.
The cursor returns to the setting.
- Press [BACK] before changing the setting to return to step 2.
4 Press [MENU/UTILITY].
Press [MENU/UTILITY] to return to the menu screen.
List of settings
The factory default settings are indicated in bold.
| Options settings | Setting ranges | Descriptions |
| QUANTIZE | ON/OFF | For details, see QUANTIZE on page 10. |
| AUTO CUE LEVEL | -36dB/-42dB/-48dB/-54dB/-60dB/-66dB/-72dB/-78dB | For details, see Changing the auto cue level on page 15. |
| MIDI CHANNEL | 1 - 16 | — |
| LANGUAGE | — | The language used for the CDJ-2000's display can be selected here. |
| ART WORK | ON/OFF | When set to [ON], jacket photos are displayed on the tag list. When set to [OFF], jacket photos are not displayed. |
| LIBRARY CREATOR | LIBRARY/FOLDER | This can only be selected when a medium on which a Pioneer MEP-7000 library is recorded is loaded. |
| HISTORY NAME | — | For details, refer to Setting [HISTORY NAME] on the right. |
| DIGITAL OUT | 16 bit/24 bit | This switches the number of bits of the audio signals output from the [DIGITAL OUT] terminal. |
| PLAYER No. | AUTO, 1 - 4 | Sets this unit's player number. The player number cannot be changed when a medium is loaded in this unit. |
| LINK STATUS | — | When PRO DJ LINK connections are made, the connection status is displayed here. |
| AUTO STANDBY | ON/OFF | For details, refer to Setting the auto standby mode on the right. |
| LCD BRIGHTNESS | 1 - 3 - 5 | Sets the main unit display's brightness. |
| Options settings | Setting ranges | Descriptions |
| SCREEN Saver | ON/OFF | When set to [ON], the screenshot starts up in the following cases: • When no track is loaded in the CDJ-2000 for over 5 minutes • When no operation is performed for over 100 minutes while in the pause or cue standby mode or when [END] is displayed on the main unit display. |
| VERSION No. | — | Displays the CDJ-2000's software version. |
Setting the auto standby mode
1 Select [AUTO STANDBY] and enter the setting item.
2 Select [ON] or [OFF] and enter.
When [AUTO STANDBY] is set to [ON], the power management function is activated in the following cases and the standby mode is set.
- When no operation at all is performed for over 4 hours with no disc, SD memory card or USB device loaded, no PRO DJ LINK connection and no computer connected to the USB port (on the main unit's rear panel).
- When the CDJ-2000 is operated, the standby mode is canceled.
- The CDJ-2000 is shipped with the power management function turned on. If you do not want to use the power management function, set [AUTO STANDBY] to [OFF].
Setting [HISTORY NAME]
The name of the [HISTORY] recorded on the SD memory card/USB device can be preset.
1 Select [HISTORY NAME] and enter the setting item.
2 Use the [NEEDLE SEARCH] pad to input a character.
3 Press the rotary selector to enter.
The [HISTORY NAME] setting is changed.
- If [HISTORY NAME] is not set, numbers are added sequentially after [HISTORY].
- The maximum number of characters that can be set for the [HISTORY] name is 32, including both letters, numbers and symbols.
Changing the language
1 Select [LANGUAGE] and enter the setting item.
2 Select the language and enter.
The language of the on-screen display is changed.
- To display characters written in a local code other than Unicode, change the [LANGUAGE] setting.
About the rekordbox software
rekordbbox is an application for managing music files which are used for DJ play with a Pioneer DJ Player (i.e. CDJ-2000, CDJ-900).
-rekordbox can be used to classify and search for music files stored on your computer and create playlists used for DJ performance.
—rekordbox allows you to detect, measure and adjust the beats, tempos (BPM) and other elements of your music files prior to performance.
-rekordbox can be used to set and store point information (for Cue, Loop, Hot Cue, etc.) prior to performance.
Data that has been detected and measured, as well as any points which have been set and stored using rekordbox, can be used in combination with a Pioneer DJ Player (i.e. CDJ-2000, CDJ-900) to achieve outstanding DJ performance.
Software end user license agreement
This Software End User License Agreement ("Agreement") is between you (both the individual installing the Program and any single legal entity for which the individual is acting) ("You" or "Your") and PIONEER CORPORATION ("Pioneer"). TAKING ANY STEP TO SET UP OR INSTALL THE PROGRAM MEANS THAT YOU ACCEPT ALL OF THE TERMS OF THIS LICENSE AGREEMENT. PERMISSION TO DOWNLOAD AND/ OR USE THE PROGRAM IS EXPRESSLY CONDITIONED ON YOUR FOLLOWING THESE TERMS. WRITTEN OR ELECTRONIC APPROVAL IS NOT REQUIRED TO MAKE THIS AGREEMENT VALID AND ENFORCEABLE. IF YOU DO NOT AGREE TO ALL OF THE TERMS OF THIS AGREEMENT, YOU ARE NOT AUTHORIZED TO USE THE PROGRAM AND MUST STOP INSTALLING IT OR UNINSTALL IT, AS APPLICABLE.
1 Definitions
1 "Documentation" means written documentation, specifications and help content made generally available by Pioneer to aid in installing and using the Program.
"Program" means all or any part of Pioneer's software licensed to You by Pioneer under this Agreement.
2 Program license
1 Limited License. Subject to this Agreement's restrictions, Pioneer grants to You a limited, non-exclusive, nontransferable, license (without the right to sublicense):
a. To install a single copy of the Program on the hard disk drive of Your computer, to use the Program only for Your personal purpose complying with this Agreement and the Documentation ("Authorized Use");
b. To use the Documentation in support of Your Authorized Use; and
c. To make one copy of the Program solely for backup purposes, provided that all titles and trademark, copyright and restricted rights notices are reproduced on the copy.
2 Restrictions. You will not copy or use the Program or Documentation except as expressly permitted by this Agreement. You will not transfer, sublicense, rent, lease or lend the Program, or use it for third-party training, commercial time-sharing or service bureau use. You will not Yourself or through any third party modify, reverse engineer, disassemble or decompile the Program, except to the extent expressly permitted by applicable law, and then only after You have notified Pioneer in writing of Your intended activities. You will not use the Program on multiple processors without Pioneer's prior written consent.
Ownership. Pioneer or its licensor retains all right, title and interest in and to all patent, copyright, trademark, trade secret and other intellectual property rights in the Program and Documentation, and any derivative works thereof. You do not acquire any other rights, express or implied, beyond the limited license set forth in this Agreement.
4 No Support. Pioneer has no obligation to provide support, maintenance, upgrades, modifications or new releases for the Program or Documentation under this Agreement.
3 Warranty disclaimer
THE PROGRAM AND DOCUMENTATION ARE PROVIDED "AS IS" WITHOUT ANY REPRESENTATIONS OR WARRANTYES, AND YOU AGREE TO USE THEM AT YOUR SOLE RISK. TO THE FULLEST EXTENT PERMISSIBLE BY LAW, PIONEER EXPRESSLY DISCLAIMS ALL WARRANTYES OF ANY KIND WITH RESPECT TO THE PROGRAM AND DOCUMENTATION, WHETHER EXPRESS, IMPLIED, STATUTORY, OR ARISING OUT OF COURSE OF PERFORMANCE, COURSE OF DEALING OR USAGE OF TRADE, INCLUDING ANY WARRANTYES OF MERCHANTABILITY, FITNESS FOR A PARTICULAR PURPOSE, SATISFACTORY QUALITY, ACCURACY, TITLE OR NON-INFRINGEMENT.
4 Damages and remedies for breach
You agree that any breach of this Agreement's restrictions would cause Pioneer irreparable harm for which money damages alone would be inadequate. In addition to damages and any other remedies to which Pioneer may be entitled, You agree that Pioneer may seek injunctive relief to prevent the actual, threatened or continued breach of this Agreement.
5 Termination
Pioneer may terminate this Agreement at any time upon Your breach of any provision. If this Agreement is terminated, You will stop using the Program, permanently delete it from the computer where it resides, and destroy all copies of the Program and Documentation in Your possession, confirming to Pioneer in writing that You have done so. Sections 2.2, 2.3, 2.4, 3, 4, 5 and 6 will continue in effect after this Agreement's termination.
6 General terms
1 Limitation of Liability. In no event will Pioneer or its subsidiaries be liable in connection with this Agreement or its subject matter, under any theory of liability, for any indirect, incidental, special, consequential or punitive damages, or damages for lost profits, revenue, business, savings, data, use, or cost of substitute procurement, even if advised of the possibility of such damages or if such damages are foreseeable. In no event will Pioneer's liability for all damages exceed the amounts actually paid by You to Pioneer or its subsidiaries for the Program. The parties acknowledge that the liability limits and risk allocation in this Agreement are reflected in the Program price and are essential elements of the bargain between the parties, without which Pioneer would not have provided the Program or entered into this Agreement.
2 The limitations or exclusions of warranties and liability contained in this Agreement do not affect or prejudice Your statutory rights as consumer and shall apply to You only to the extent such limitations or exclusions are permitted under the laws of the jurisdiction where You are located.
3 Severability and Waiver. If any provision of this Agreement is held to be illegal, invalid or otherwise unenforceable, that provision will be enforced to the extent possible or, if incapable of enforcement, deemed to be severed and deleted from this Agreement, and the remainder will continue in full force and effect. The waiver by either party of any default or breach of this Agreement will not waive any other or subsequent default or breach.
4 No Assignment. You may not assign, sell, transfer, delegate or otherwise dispose of this Agreement or any rights or obligations under it, whether voluntarily or involuntarily, by operation of law or otherwise, without Pioneer's prior written consent. Any purported assignment, transfer or delegation by You will be null and void. Subject to the foregoing, this Agreement will be binding upon and will inure to the benefit of the parties and their respective successors and assigns.
5 Entire Agreement. This Agreement constitutes the entire agreement between the parties and supersedes all prior or contemporaneous agreements or representations, whether written or oral, concerning its subject matter. This Agreement may not be modified or amended without Pioneer's prior and express written consent, and no other act, document, usage or custom will be deemed to amend or modify this Agreement.
6 You agree that this Agreement shall be governed and construed by and under the laws of Japan.
Cautions on copyrights
rekorrdbox restricts playback and duplication of copyright-protected music contents.
- When coded data, etc., for protecting the copyright is embedded in the music contents, it may not be possible to operate the program normally.
- When rekordbox detects that coded data, etc., for protecting the copyright is embedded in the music contents, processing (playback, reading, etc.) may stop.
Recordings you have made are for your personal enjoyment and according to copyright laws may not be used without the consent of the copyright holder.
- Music recorded from CDs, etc., is protected by the copyright laws of individual countries and by international treaties. It is the full responsibility of the person who has recorded the music to ensure that it is used legally.
- When handling music downloaded from the Internet, etc., it is the full responsibility of the person who has downloaded the music to ensure that it is used in accordance with the contract concluded with the download site.
Cautions on Installation
Read the "Software end user license agreement" carefully before installing rekordbox.
rekordbox is compatible with the operating systems shown below.
Mac OS X (10.4.6 or later)
Windows Vista® Home Basic/Home Premium/Ultimate/Business
- Windows® XP Home Edition/Professional (SP2 or later)
-rekordbox is not compatible with 64-bit editions of operating systems (Windows XP Professional x64 edition or 64-bit editions of Windows Vista®).
The included CD-ROM contains installation programs and operating instructions in the following 12 languages:
- English, French, German, Italian, Dutch, Spanish, Portuguese, Russian, Chinese (simplified characters), Chinese (traditional characters), Korean, Japanese.
- When using rekordbox with an operating system in a different language, follow the instructions on the screen to select [English].
Check that the computer provides the operating environment described below before starting installation.
CPU:
For Mac OS X, Macintosh computer equipped with a 1.83 GHz or greater Intel® Core™ Duo (or compatible) processor
For Windows Vista® or Windows XP, PC/AT compatible computer equipped with a 2 GHz or greater Intel Pentium® 4 (or compatible) processor
- Required memory: 512 MB or more of RAM
- Hard disc: 250 MB or more of free space (not including space for storing music files, etc.)
- CD drive: Optical disc drive on which the CD-ROM can be read
Sound: Audio output to speakers, headphones, etc. (internal or external audio device) - Internet connection: For user registration and inquiries, use a web browser supporting 128-bit SSL (Safari 2.0 or later or Internet Explorer® 6.0 or later).
- USB port: A USB port for connection of a USB device (flash memory, hard disc, etc.) is required to transfer music files to the USB device.
- LAN port: An Ethernet LAN adapter (RJ45 port) for communicating with the DJ player is required to transfer music files to a Pioneer DJ player (i.e. CDJ-2000, CDJ-900).
Operation is not guaranteed on all computers, even those with the operating environment described above.
- Even with the required memory capacity indicated for the operating environment above, depending on the number of resident programs and services, the software may not provide full functionality and performance due to lack of memory. In this case, stop some resident programs and services in order increase the amount of free memory. We recommend adding extra memory in order to achieve stable performance.
Depending on the computer's power settings, etc., the CPU and hard disc processing capacity may be insufficient. When using laptop computers in particular, always keep the AC power connected and set the computer to maximum performance conditions when using rekordbox.
Note that problems may arise in the operation of rekordbox due to other software being used together with it.
Installingrekordbox
Installation Procedure (Macintosh)
- Read the "Cautions on installation" carefully before installing rekordbox.
- Authorization of the computer's administrator is required to install and uninstall rekordbox. Have the name and password of the computer's administrator ready.
1 When the included CD-ROM is inserted into the computer's CD drive, the CD drive opens on the screen. Double-click the [CD_menu.app] icon.
- If the CD drive does not open on the screen when the CD-ROM is inserted, use Finder to open the CD drive, then double-click the [CD_menu.app] icon.
![PIONEER CDJ-2000 - When the included CD-ROM is inserted into the computer's CD drive, the CD drive opens on the screen. Double-click the [CD_menu.app] icon. - 1](/content/2019/11/118731/images/509d8b45025ad02386b3f3839eb44aa2a99f59c88e58c65ae292de202f39ea7c.jpg)
2 When the CD-ROM's menu is displayed, select [rekordbox: Install Music Management Software], then click [Start].
![PIONEER CDJ-2000 - When the CD-ROM's menu is displayed, select [rekordbox: Install Music Management Software], then click [Start]. - 1](/content/2019/11/118731/images/90108d31f134bee35864fdbe1e0944527bdea074107258e085d400015889ead9.jpg)
To close the CD-ROM menu, click [Exit].
3 Installrekordbox following the instructions on the screen.
Once installation of rekordbox is completed, the operating instructions can be opened from rekordbox's [Help] menu.
Installation Procedure (Windows)
- Read the "Cautions on installation" carefully before installing rekordbox.
- Authorization of the computer's administrator is required to install and uninstall rekordbox. Log on as the user registered as the computer's administrator before installing rekordbox.
1 Insert the included CD-ROM into the computer's CD drive.
The CD-ROM menu is displayed.
- If the CD-ROM menu does not appear when the CD-ROM is inserted, open the CD drive from [Computer (or My Computer)] in the [Start] menu, then double-click the [CD_menu.exe] icon.
2 When the CD-ROM's menu is displayed, select [rekordbox: Install Music Management Software], then click [Start].
![PIONEER CDJ-2000 - When the CD-ROM's menu is displayed, select [rekordbox: Install Music Management Software], then click [Start]. - 1](/content/2019/11/118731/images/b4da4303d9024f1e7467ada2507950dc72816f37ecba079fd40852b8b4ca17ac.jpg)
To close the CD-ROM menu, click [Exit].
3 Installrekordbox following the instructions on the screen.
Once installation of rekordbox is completed, the operating instructions can be opened from rekordbox's [Help] menu.
- To stop installation in progress, click [Cancel].
Using the support site
Before making an inquiry about rekordbox operations and technical support, refer to the operating instructions for rekordbox and check the FAQs published on the support site for rekordbox.
http://www.prodjnet.com/rekordbox/support/
- To make an inquiry about rekordbox, you need to register as a user in advance on the support site for rekordbox.
- You need to enter the license key for your user registration. Have the license key ready. Also, be sure not to forget the login name (your e-mail address) and the password specified for your user registration, as well as the license key.
- Pioneer Corporation collects your personal information for the following purposes:
1 To provide customer support for your purchased product
2 To inform you of product or event information by e-mail
3 To reflect your opinions collected by survey on product planning
- Your personal information is kept confidential corresponding to the privacy policy set forth by our company.
- You can check our privacy policy on the support site for rekordbox.
- When you make an inquiry about rekordbox, be sure to provide us the information on the model name, specifications (CPU and memory capacity and peripheral devices connected), and operating system version of your computer, as well as specific descriptions of system malfunction.
- For an inquiry about configuring your computer with peripheral devices other than our products and the corresponding technical support, contact each manufacturer or retailer.
-rekordbox is subject to upgrade for enhanced function and performance. The upgrade program can be downloaded on the support site. We strongly recommend you upgrade your software on a regular basis to keep the latest updates on your system.
About the driver software
This driver software is an exclusive ASIO driver for outputting audio signals from the computer. To use the CDJ-2000 connected to a computer on which Windows is installed, install the driver software on the computer beforehand. When using a computer on which a MAC operating system is installed, use the operating system's standard driver software.
Software end user license agreement
Carefully read the provisions of the Software end user license agreement (page 22) before installing or using the driver software. Using the driver software implies that you have consented to the Software end user license agreement.
Cautions on Installation
- Before installing the driver software, be sure to turn off the power of this unit and disconnect the USB cable from both this unit and your computer.
- If you connect this unit to your computer without installing the driver software first, an error may occur on your computer depending on the system environment.
- If you have discontinued the installation process in progress, step through the installation process again from the beginning according to the following procedure.
- Carefully read the provisions of the Software end user license agreement before installing the driver software for exclusive use with this unit.
- Before installing the driver software, terminate all other programs running on your computer.
- The driver software is compatible with the following OSs.
- Windows Vista® Home Basic/Home Premium/Ultimate/Business
- Windows XP Home Edition/Professional (SP2 or later)
The driver software is not compatible with 64-bit OS (Windows XP Professional x64 edition and Windows Vista® 64-bit). - The included CD-ROM contains installation programs in the following 12 languages: English, French, German, Italian, Dutch, Spanish, Portuguese, Russian, Simplified Chinese, Traditional Chinese, Korean, and Japanese If the language of your OS is one other than the ones listed above, select [English] following the instructions on the screen.
Installing the driver software
- Carefully read "Cautions on Installation" before installing the driver software.
- To install or uninstall the driver software, you need to be authorized by the administrator of your computer. Log on as the administrator of your computer before proceeding with the installation.
1 Insert the included CD-ROM into the computer's CD drive. The CD-ROM menu is displayed.
- If the CD-ROM menu does not appear when the CD-ROM is inserted, open the CD drive from [Computer (or My Computer)] in the [Start] menu, then double-click the [CD_menu.exe] icon.
2 When the CD-ROM's menu is displayed, select [CDJ-2000/CDJ900: Install Driver Software], then click [Start].
![PIONEER CDJ-2000 - When the CD-ROM's menu is displayed, select [CDJ-2000/CDJ900: Install Driver Software], then click [Start]. - 1](/content/2019/11/118731/images/e061f1b6293bed9980b4b01e93829b89048a5ce11c4439fd633ea8f3da8fab9a.jpg)
To close the CD-ROM menu, click [Exit].
3 Proceed with installation according to the instructions on the screen.
If [Windows Security] appears on the screen while the installation is in progress, click [Install this driver software anyway] and continue with the installation.
- When installing on Windows XP
If [Hardware Installation] appears on the screen while the installation is in progress, click [Continue Anyway] and continue with the installation. - When the installation program is completed, a completion message appears.
Connecting the CDJ-2000 and computer
1 Connect this unit to your computer via a USB cable.
2 Press [POWER].
Turn on the power of this unit.
- The message [Installing device driver software] may appear when the CDJ2000 is connected to the computer for the first time or when it is reconnected to the computer's USB port. Wait until the [Your devices are ready for use] message appears.
-
When installing on Windows XP
-
[Can Windows connect to Windows Update to search for software?] may appear while the installation is in progress. Select [No, not this time] and click [Next] to continue with the installation.
- [What do you want the wizard to do?] may appear while the installation is in progress. Select [Install the software automatically (Recommended)] and click [Next] to continue with the installation.
- If [Hardware Installation] appears on the screen while the installation is in progress, click [Continue Anyway] and continue with the installation.
Adjusting the buffer size (Windows)
This unit functions as an audio device conforming to the ASIO standards.
Click Windows [Start] menu > [All Programs] > [Pioneer] > [Pioneer CDJ] > [Pioneer CDJ ASIO Settings Utility].
![PIONEER CDJ-2000 - Click Windows [Start] menu > [All Programs] > [Pioneer] > [Pioneer CDJ] > [Pioneer CDJ ASIO Settings Utility]. - 1](/content/2019/11/118731/images/43fbb27a238d2c758f331bf378b0892d1a223774fd451c01176004061503544f.jpg)
A sufficiently large buffer size decreases the chance of sound dropout (sound interruption) but increases audio signal transmission delay (latency).
- When an application program (DJ software, etc.) with this unit set as a fixed device is running, terminate the program before adjusting the buffer size.
Checking the version of the driver software
Click Windows [Start] menu > [All Programs] > [Pioneer] > [Pioneer CDJ] > [ Pioneer CDJ Version Display Utility].
- You can check the firmware version of this unit on the screen.
- The firmware version is not displayed when the CDJ-2000 is not connected to the computer or when the CDJ-2000 and computer are not properly communicating.
Checking the latest information on the driver software
For the latest information on the driver software for exclusive use with this unit, visit our website shown below.
http://www.prodjnet.com/support/
Using other brands of DJ software
Operating DJ software by MIDI interface
The CDJ-2000 also outputs the operating data for the buttons and dials in MIDI format. If you connect a computer with a built-in MIDI-compatible DJ software via a USB cable, you can operate the DJ software on this unit. The sound of music files being played on the computer can also be output from the CDJ-2000. Before using the CDJ-2000 as an audio device, install the driver software on the computer (page 24). Also, the CDJ-2000 must be selected in the DJ software's settings. For details, see your DJ software's operating instructions.
1 Connect the USB port on this unit to your computer.
For instructions on connecting, see Using other brands of DJ software on page 12.
2 Press [BROWSE], then press [LINK].
[Control Mode] and [USB-MIDI] appear on the menu screen.
3 Select [Control Mode] and enter.
The connecting screen is displayed.
4 Select [USB-MIDI] and enter.
The CDJ-2000 switches to the control mode.
5 Start the DJ software.
Communication with the DJ software starts.
- The DJ software on the computer can be operated using the buttons and rotary selector on the CDJ-2000.
It may not be possible to use some buttons to operate the DJ software. - The control mode is canceled when a track is loaded in the CDJ-2000.
- For messages output by the CDJ-2000, see List of MIDI Messages.
Changing the MIDI channel setting
1 Press [MENU/UTILITY] for over 1 second.
The utility screen appears.
2 Select [MIDI CHANNEL] and enter.
3 Turn the rotary selector.
Select the MIDI channel and change the setting. A setting from 1 - 16 can be selected.
4 Press the rotary selector to enter.
5 Press [MENU/UTILITY].
The previous screen reappears.
List of MIDI Messages
| SW Name | SW Type | MIDI Messages | Notes | ||
| MSB | |||||
| JOG (TOUCH) | - | Bn | 10 | dd | A linear value corresponding to the speed, from stop to 4X: 64 for stop, 65 (0.06X) - 127 (4X) in the forward direction, 63 (0.06X) - 0 (4X) in the reverse direction. |
| TEMPO SLIDER | VR | Bn | 1D | dd | 0 - 127, 0 on the - side, 127 on the + side |
| TOUCH/BRAKE | VR | Bn | 1E | dd | 0 - 127, 0 (min.) on the left side, 127 (max.) on the right side |
| RELEASE/START | VR | Bn | 1F | dd | 0 - 127, 0 (min.) on the left side, 127 (max.) on the right side |
| JOG RING | - | Bn | 30 | dd | A linear value corresponding to the speed from 0.5X to 4X: 64 when stopped (under 0.49X), 65 (0.5X) to 127 (4X) in the forward direction, 63 (0.5X) to 0 (4X) in the reverse direction. |
| ENCODER | General Purpose Controller | Bn | 4F | dd | 98 - 127, 1 - 30 Difference of count from previous time is sent (±1 - ±30) When over ±30, set at ±30 |
| PLAY/PAUSE | SW | 9n | 00 | dd | OFF=0, ON=127 |
| CUE | SW | 9n | 01 | dd | OFF=0, ON=127 |
| SEARCH FWD | SW | 9n | 02 | dd | OFF=0, ON=127 |
| SEARCH REV | SW | 9n | 03 | dd | OFF=0, ON=127 |
| TRACK SEARCH NEXT | SW | 9n | 04 | dd | OFF=0, ON=127 |
| TRACK SEARCH REV | SW | 9n | 05 | dd | OFF=0, ON=127 |
| LOOP IN | SW | 9n | 06 | dd | OFF=0, ON=127 |
| LOOP OUT | SW | 9n | 07 | dd | OFF=0, ON=127 |
| RELOOP | SW | 9n | 08 | dd | OFF=0, ON=127 |
| MEMORY | SW | 9n | 0A | dd | OFF=0, ON=127 |
| CALL NEXT | SW | 9n | 0B | dd | OFF=0, ON=127 |
| CALL PREV | SW | 9n | 0C | dd | OFF=0, ON=127 |
| DELETE | SW | 9n | 0D | dd | OFF=0, ON=127 |
| TIME/A.CUE | SW | 9n | 0E | dd | OFF=0, ON=127 |
| TEMPO RANGE | SW | 9n | 10 | dd | OFF=0, ON=127 |
| MASTER TEMPO | SW | 9n | 11 | dd | OFF=0, ON=127 |
| JOG MODE | SW | 9n | 12 | dd | OFF=0, ON=127 |
| HOT CUE A | SW | 9n | 18 | dd | OFF=0, ON=127 |
| HOT CUE B | SW | 9n | 19 | dd | OFF=0, ON=127 |
| HOT CUE C | SW | 9n | 1A | dd | OFF=0, ON=127 |
| HOT CUE REC/CALL | SW | 9n | 1C | dd | OFF=0, ON=127 |
| TEMPO RESET | SW | 9n | 1D | dd | OFF=0, ON=127 |
| JOG TOUCH | SW | 9n | 20 | dd | OFF=0, ON=127 |
| REVERSE | SW | 9n | 21 | dd | OFF=0, ON=127 |
| 4 BEAT LOOP | - | 9n | 2A | dd | OFF=0, ON=127 |
| EJECT | SW | 9n | 2F | dd | OFF=0, ON=127 |
| TAG TRACK | SW | 9n | 30 | dd | OFF=0, ON=127 |
| BACK | SW | 9n | 32 | dd | OFF=0, ON=127 |
| ENCODER PUSH | SW | 9n | 33 | dd | OFF=0, ON=127 |
| NEEDLE | Touch Sensor | Bn | 1C | dd | OFF = 0 1 to 127 position data from left to right side |
n is the channel number.
Additional information
Troubleshooting
Incorrect operation is often mistaken for trouble or malfunction. If you think that there is something wrong with this component, check the points below. Sometimes the trouble may lie in another component. Inspect the other components and electrical appliances being used. If the trouble cannot be rectified after checking the items below, ask your nearest Pioneer authorized service center or your dealer to carry out repair work.
- The CDJ-2000 may not operate properly due to such external causes as static electricity. If this happens, normal operation can sometimes be restored by turning the power off, waiting for the disc to stop completely, then turning the power back on.
Non-finalized (partial discs) CD-R/-RW, DVD-R/-RW, DVD+R/+RW and DVD±R dual layer discs cannot be played on the CDJ-2000.
- Irregularly shaped discs other than standard 12 cm discs cannot be played on the CDJ-2000 (doing so will lead to damage or accidents).
- The BPM measured by the CDJ-2000 may differ from the BPM indicated on the disc or that of a Pioneer DJ mixer, etc. This is due to the different methods used for measuring the BPM, and is not a malfunction.
| Problem | Check | Remedy |
| Disc cannot be ejected. | Is [UNLOCK/LOCK] set to [LOCK]? | Press [PLAY/PAUSE▶/II] to set the pause mode, then press [DISC EJECT▲]. |
| Set [UNLOCK/LOCK] to [UNLOCK], then press [DISC EJECT▲]. | ||
| - | If the [DISC EJECT▲] button does not work, insert the pin in the disc force eject pin insertion hole to eject the disc. | |
| Playback does not start when disc is loaded. | Is the disc or file playable? | See Discs/files playable on the CDJ-2000 on page 6. |
| Is the auto cue function activated? | Press [AUTO CUE] for at least 1 second to turn cancel the auto cue function. | |
| File cannot be played. | Is the file copyright-protected (by DRM)? | Copyright-protected files cannot be played. |
| No sound is produced, or sound is distorted or noisy. | Are you operating the connected DJ mixer properly? | Check the operation of the DJ mixer. |
| Is the CDJ-2000 placed near a TV? | Turn the TV's power off, or install the CDJ-2000 and TV away from one another. | |
| Loud noise is produced or playback stops when a certain disc is played. | Is the disc scratched? | Scratched discs may not play. |
| Is the disc dirty? | Wipe the dirt off the disc (page 28). | |
| File information is not properly displayed. | Is [LANGUAGE] properly set? | Set [LANGUAGE] to the proper language. |
| Is the information recorded in a language not supported by the CDJ-2000? | When creating files using DJ software, etc., record the information in a language supported by the CDJ-2000. | |
| Track search operation takes too long. | Is the auto cue function activated? | Track searching may take some time when there are long silent sections between tracks. |
| - | If track searching is not possible within 10 seconds, a cue point is set at the beginning of the track. | |
| Back cue function does not work. | Is a cue point set? | Set the cue point (page 15). |
| Loop play function does not work. | Is a cue point set? | Set the cue point (page 15). |
| Settings are not stored in the memory. | Has the power been turned off directly after changing the setting? | After changing settings, wait at least 10 seconds before turning the power off. |
| USB device is not recognized. | Is the USB device properly connected? | Connect the device securely (all the way in). |
| Is the USB device connected via a USB hub? | USB hubs cannot be used. | |
| Is the USB device supported by the CDJ-2000? | This player only supports USB mass storage class devices. | |
| This player supports portable flash memory and digital audio playback devices. | ||
| Is the file format supported by the CDJ-2000? | Check the file format of the connected USB device. For the file formats supported by the CDJ-2000, see About USB devices on page 7. | |
| - | Turn the power off then back on. | |
| Cue points or loops of tracks recorded on SD memory cards/USB devices are not stored in the memory. | Is there sufficient free space on the SD memory card/USB device? | A maximum of 100 cue and loop points per disc can be recorded on SD memory cards/USB devices (10 per track for media other than discs). If you attempt to record more points than the limit, [POINT FULL] is displayed and the points cannot be recorded. |
| If the SD memory card is write-protected, [CARD PROTECTED] is displayed and the points cannot be recorded. | ||
| If there is not enough free space on the USB device or if the device is write-protected, [USB FULL] is displayed and the points cannot be recorded. | ||
| Cue points or loops of tracks recorded on SD memory cards/USB devices are not displayed. | Has the SD memory card/USB device been properly removed? | Points may not be displayed if the SD memory card/USB device is removed without performing the proper stopping procedure or if the CDJ-2000's power is turned off. |
| The playing address display is not displayed in the remaining time mode. | - | When playing files recorded in VBR, it may happen that the set cannot detect the length of the track immediately and that some time is required for the playing address display to appear. |
| Time is required to read SD memory cards/USB devices (flash memory drives and hard discs). | Is there a large number of folders or files recorded on the SD memory card/USB device? | When there are many folders or files, some time may be required for loading. |
| Are files other than music files stored on the SD memory card/USB device? | When files other than music files are stored in folders, time is required to read them as well. Do not store files or folders other than music files on the USB device. | |
| Library browsing is not possible. | Is a medium on which library information is recorded loaded? | The library browse mode is only set when media on which library information is recorded are loaded. When a medium on which no library information is recorded is loaded, the folder browse mode is set. |
| [HISTORY] is not displayed. | Is an SD memory card/USB device loaded? | The [HISTORY] function can only be used for DJ players on which an SD memory card/USB device is loaded. |
| Nothing is displayed. | Is the power management function activated? | The CDJ-2000 is shipped with the power management function turned on. If you do not want to use the power management function, set [AUTO STANDBY] to [OFF]. (page 21) |
| PRO DJ LINK does not work well. | Are the player numbers properly set? | Set [PLAYER No.] to [AUTO] or to a number different from the number currently set. (page 21) |
| Is the LAN cable properly connected? | Connect the LAN cable properly to the [LINK] terminal. | |
| Is the switching hub's power turned on? | Turn the switching hub's power on. | |
| Is an unnecessary device connected to the switching hub? | Disconnect the unnecessary device from the switching hub. |
About the liquid crystal display
- Small black or shining points may appear on the liquid crystal display. This is a phenomenon inherent to liquid crystal displays; this is not a malfunction.
- When using in cold places, the liquid crystal display may be dark for a while after the CDJ-2000's power is turned on. It will reach the normal brightness after a while.
- When the liquid crystal display is exposed to direct sunlight, the light will reflect off it, making it difficult to see. Block the direct sunlight.
Error messages
When the CDJ-2000 cannot operate normally, an error code appears on the display. Take the necessary measures, referring to the table below. If an error code not indicated on the table below is displayed or if the same error code appears after the indicated action has been taken, contact your store of purchase or nearby Pioneer service station.
| Error code | Error type | Description of error | Cause and action |
| E-7201 | TOC READ ERROR | TOC data cannot be read. | Disc is cracked.→Replace the disc. |
| E-8301 | Disc is dirty.→Clean the disc. | ||
| E-8302 | PLAYER ERROR | Disc that cannot be played normally is loaded. | If operation is normal with other discs, the problem is with that disc. |
| E-8303 | |||
| E-8304 | DECODE ERROR | Music files that cannot be played normally are loaded. | Format is wrong.→Replace with music files in the proper format. |
| E-8305 | DATA FORMAT ERROR | ||
| E-8306 | NO FILE | Track recorded in the library, playlist, etc., has been deleted from the SD memory card/USB device and cannot be played. | Do not delete that track from the SD memory card/USB device. |
| E-9101 | MECHANICAL TIME OUT | Mechanical error (time out) during loading or ejecting of disc. | Displayed when mechanism operation is not completed within the specified time. |
List of icons displayed on the main unit display section
| Genre | Player number (1-4) | Computer | Close folder | Date library added |
| Artist | Cue point set in memory | Disc | File type | Sampling rate |
| Album | Registered in tag list | Label | Year | Comment |
| Track/file name | Tempo (BPM) | Key | Remixer name | WAIT |
| Playlist HISTORY Hot Cue Bank List | Color | Bit rate | Original artist | rekordbox |
| Rating | USB | Playing | Search | |
| Time | SD | Open folder | DJ play count |
Cautions on use
About condensation
Water droplets (condensation) may form inside the unit (on operating parts and lenses) in the winter, for example, if the unit is moved from a cold place into a warm room or if the temperature in the room in which the unit is installed rises suddenly (through heating, etc.). The unit will not operate properly and will not be playable with condensation inside. Let the unit stand for 1 to 2 hours at room temperature (though this time depends on the conditions of the condensation) without turning on the power. The water droplets will evaporate and the unit will become playable. Condensation can occur in the summer as well if the unit is exposed to the direct wind from an air-conditioner, etc. If this happens, move the unit to a different location.
Cleaning the lens
The player's lens should not become dirty in normal use, but if for some reason it should malfunction due to dust or dirt, consult your nearest Pioneer authorized service center. Although lens cleaners for players are commercially available, we advise against using them since some may damage the lens.
Handling discs
Storing
- Always place discs in their cases and store them vertically, avoiding hot, humid places, places exposed to direct sunlight and extremely cold places.
- Be sure to read the cautions included with the disc.
Cleaning discs
- Discs may not play if there are fingerprints or dust on them. In this case, use a cleaning cloth, etc., to gently wipe the disc from the inside towards the outside. Do not use dirty cleaning cloths.
- Do not use benzene, thinner or other volatile chemicals. Also do not use record spray or antistatic agents.
- For tough dirt, apply some water to a soft cloth, wring out thoroughly, wipe off the dirt, then wipe off the moisture with a dry cloth.
- Do not use damaged (cracked or warped) discs.
- Do not let the signal surface of discs get scratched or dirty.
- Do not place two discs in the disc tray, one on top of the other.
- Do not attach pieces of paper or stickers to discs. Doing so could warp discs, making it impossible to play them. Also note that rental discs often have labels attached to them, and the label's glue may have oozed out. Check that there is no glue around the edges of such labels before using rented discs.


About specially shaped discs
Specially shaped discs (heart-shaped, hexagonal, etc.) cannot be played on this player. Do not attempt to play such discs, as they could damage the player.

About condensation on discs
Water droplets (condensation) may form on the surface of discs if they are moved from a cold place (particularly in winter) into a warm room. Discs may not play normally if there is condensation on them. Carefully wipe the water droplets off the surface of the disc before loading it.
Disclaimer
- Pioneer and rekordbox are trademarks or registered trademarks of the Pioneer Corporation.
- Microsoft®, Windows Vista®, Windows® and Internet Explorer® are registered trademarks or trademarks in the United States and other countries of the Microsoft Corporation of the United States.
- Apple, Macintosh, Mac OS, Safari, iTunes and Finder are registered trademarks of Apple Inc. in the United States and other countries.
- Pentium is a registered trademark of Intel Corporation.
- Adobe and Reader are either registered trademarks or trademarks of Adobe Systems Incorporated in the United States and/or other countries.
- ASIO is a trademark of Steinberg Media Technologies GmbH.
- The SD logo is a trademark.

The SDHC logo is a trademark.

The names of companies and products mentioned herein are the trademarks of their respective owners.
This product has been licensed for nonprofit use. This product has not been licensed for commercial purposes (for profit-making use), such as broadcasting (terrestrial, satellite, cable or other types of broadcasting), streaming on the Internet, Intranet (a corporate network) or other types of networks or distributing of electronic information (online digital music distribution service). You need to acquire the corresponding licenses for such uses. For details, visit http://www.mp3licensing.com.

Fraunhofer
Institut
The audio compression technology for MP3 is offered under the license of Fraunhofer IIS and Thomson Multimedia.
Specifications
Power requirements.. AC 220 V to 240 V, 50 Hz/60 Hz
Power consumption 28 W
Power consumption (standby) 0.4 W
Main unit weight 4.6 kg
External dimensions. 320 mm (W) x 106.4 mm (H) x 405.7 mm (D)
Tolerable operating temperature. +5^ to +35^
Tolerable operating humidity. 5% to 85% (no condensation)
Analog audio output (AUDIO OUT L/R)
Output terminal.RCA terminal
Output Level 2.0 Vrms (1 kHz)
Frequency response 4 Hz to 20 kHz
S/N ratio. 115 dB
Total harmonic distortion 0.0018%
Digital audio output (DIGITAL OUT)
Output terminal.RCA terminal
Output type. Coaxial digital (S/PDIF)
Output level .0.5 Vp-p (75 Ω)
Output format. 44.1 kHz, 24 bit/16 bit
USB downstream section (USB)
Port ......... Type A
Power supply. 5 V/500 mA or less
USB upstream section (USB)
Port ......... Type B
LAN (PRO DJ LINK)
Rating. 100Base-TX
Control output (CONTROL)
Port............ Mini-jack
SD memory card section
File system............ Conforming to "SD Specifications Part 2 File System Specification
Version 2.00"
Max. memory capacity 32 GB
Main display
Display type........Active matrix TFT liquid crystal display (LCD)
Screen size. 6.1-inch, wide
Supported languages. 18 languages
- The articles concerning free repairs, etc., indicated on the warranty do not apply to the rekordbox music management software. Before installing or using rekordbox, carefully read the articles in Software end user license agreement on page 22.
- The specifications and design of this product are subject to change without notice.
- Published by Pioneer Corporation. Copyright © 2009 Pioneer Corporation. All rights reserved.
Exportation SD & USB
La lecture commence.
Pitch-Bend [VINYL·CDJ]
Programme]>[Pioneer]>[Pioneer CDJ]>[Pioneer CDJ ASIO
ll softwarerekordbox. 23
Estensioned file .wav
22 UNLOCK, LOCK (a vagina 14)
Indicatore DISC EJECT e DISC EJECT (a pagina 14)
24 Comando NEEDLE SEARCH (a pagina 19)
25 VINYL SPEED ADJUST TOUCH/BRAKE (a vagina 19)
26 CUE/LOOP CALL / (a pagina 18), DELETE (a pagina 18), MEMORY (a pagina 17)
27 VINYL SPEED ADJUST RELEASE/START (a pagina 19)
28 JOG ADJUST (a pagina 18)
29 Indicatore modo JOG MODE, VINYL e indicatoro modo CDJ (a pagina 18)
3 Premere [LOOP/CUE (IN ADJUST)].
3 Premere [LOOP OUT (OUT ADJUST)].
1 Premere [HOT CUE REC/CALL].
1 Premere [HOT CUE REC/CALL].
KLASSE 1 LASERPRODUCT
D58-5-2-2a_A1_NI
WAARSCHUWING NETSNOER
2 Druk op [DISC], [SD], [USB] of [LINK].
De inhoud van het gekozen medium worden到场。
En algunos paíSES o regiones, la forma de la clavija de alimentación y del enchufe de corrienteSEOSEOSEOSEOSEOSEOSEOSEOSEOSEOSEOSEOSEOSEOSEOSEOSEOSEOSEOSEOSEOSEOSEOSEOSEOSEOSEOSEOSEOSEOSEOSEOSEOSEOSEOSEOSEOSEOSEOSEOSEOSEOSEOSEOSEOSEOSEOSEOSEOSEOSEOSEOSEOSEOSEOSEOSEOSEOSEOSEOSEOSEOSEOSEOSEOSEOSEOSEOSEOSEOSEOSEOSEOSEOSEOSEOSEOSEOSEOSEOSEOSEOSEOSEOSEOSEOSEOSEOSEOSEOSEOSEOSEOSEOSEOSEOSEOSEOSEOSEO SEOEO SEOEO SEOEO SEOEO SEOEO SEOEO SEOEO SEOEO SEOEO SEOEO SEOEO SEOEO SEOEO SEOEO SEOEO SEOEO SEOEO SEOEO SEOEO SEOEO SEOEO SEOEO SEOEO SEOEO SEOEO SEOEO SEOEO SEOEO SEOEO SEOEO SEOEO SEOEO SEOEO SEOEO SEOEO SEOEO SEOEO SEOEO SEOEO SEOEO SEOEO SEOEO SEOEO SEOEO SEOEO SEOEO SEOEO SEOEO SEOEO SEOEO SEOEQ
K015 Sp
IMPORTANT

3 Pulse [LOOP IN/CUE (IN ADJUST)].
3 Pulse [LOOP OUT (OUT ADJUST)].
Pulse [SEARCH<▶▶])mñtras pulsa [LOOP OUT (OUT ADJUST)].
Gire el dial jog cuando pulsa [LOOP OUT (OUT ADJUST)].
1 Pulse [HOT CUE REC/CALL].
1 Pulse [HOT CUE REC/CALL].
Usted accepts that each of the four countries has a present contract to acquire and maintain the rights and assets of the U.S. in the form of a purchase agreement.
- This unit is a program that uses the same basic functions as the one used in the previous section.
- Each unit has a function name and a description of the function.
- Each unit has a function name and a description of the function.
- Each unit has a function name and a description of the function.
- Each unit has a function name and a description of the function.
- Each unit has a function name and a description of the function.
- Each unit has a function name and a description of the function.
- Each unit has a function name and a description of the function.
- Each unit has a function name, a description of the function, and a description of the function.
- Each unit has a function name, a description of the function, and a description of the function.
- Each unit has a function name, a description of the function, and a description of the function.
- Each unit has a function name, a description of the function, and a description of the function.
- Each unit has a function name, a description of the function, and a description of the function.
- Each unit have a function name, a description of the function, and a description of the function.
- Each unit have a function name, a description of the function, and a description of the function.
- Each unit have a function name, a description of the function, and a description of the function.
- Each unit have a function name, a description of the function, and a description of the function.
- Each unit have a function name, a description of the function, and
![PIONEER CDJ-2000 - Pulse [LOOP OUT (OUT ADJUST)]. - 1](/content/2019/11/118731/images/4917fb558b091b8f40565a94d3ab837236ffde0a0754752ce0c14914610e6aec.jpg)
IcNoB3yETCdIpyDyPpeKdHn
nOb3oBaTeIa 06 «OnaChOM HaprJKeHIn»
BHTyR KOpNcya N3dEmn, KOTOpoe
OBTBIOCTaTOHO BvICOKM IN
TIPINPHIPOPAKENIAIIOJEN 3NKTQPUNHECKIM TOKOM.
CAUTION
RISK OF ELECTRIC SHOCK
DO NOT OPEN
BHUMAHNE:
BO N3BEXAHNE IOPAXEHNIA
3JIeKTPuECKnM TOKOM HE
CHIMAIITE KPBILKU (NIN 3ADHIO
CTEHKU).BHYTPN HE COIDEPJKATC
DEATNI, INPEDAHA3HAUEHHBIE DNIA
PEMOHTA NIOB3OBATEJEM.JIY 057
OBCTIYXBAHMAOBPATIECBK KBAIHAUMPOBAHOMO
COTYDNHKMCEPBCHOH CNYKSH

BocKnIuaTeIbHbI 3HaK, 3aKnIOeHbI B
paBHOCTOPOHHN TpeyroJbHNK,
mCNoIb3yETcDЯ npeDynpexKdEHHa
NONb3OBAteTlO HAIChN BJIHTepaType,
NOCTABNREMBOKOMNIKECTCUNDEINEM,
Baxhixyuk3a3HnPi Pa 06CnVXBAHmO
D3-4-2-1-1_A1_Ru
BHIMAHNE
JaHHoe n3dJIeЯBJIeTcJIa3epHbIM n3dJIeMeKnacca 1 corlacho KnaCCNΦnKaunn no
БezonaCHOCTnIa3epbIXn3deJI,IEC
60825-1:2007.
D58-5-2-2a_A1_Ru
JIa3EPHbI INPOdYKT KJACC 1
PnI nCNoJIb3OBAHnI DaHHoro I3dJIyra, npOuTnte IHOpMaunIO mepam
6e3oNaCHOCTHa HnKHe CToPoHe annapata.

EcnBbXeJnAeTe yTINNINIOPOBaT daHnHOe IaIeJIe, He BbIbpaCBAIte ERO BMcTe C oBbIbMbIM MycOpOM. CyueCTByET OtIDbHbN CNTMeTA CbOpaC HIObnLbAOHNbHX 3NkETPOHbIX INdEIN B COOTBCTBN C 3AKHOHOATEbTBOM, KOtopa NpeDIOHaET COOTBCTBIOUe 6ObaHEnDE, BO3PAT NpepeB6OtK.
AChthyIeNtHbI-Y cTbpAHx-YNueHEXCA, B WbEJIaHIN I HOpBERMOTGcEBnIaTHO BO3BpaaATb I NcONPb3OBaHIIbe 3eKETPOHHBe I EADENJY COBTOBCTYBOUOE YNtKbIc6ObaI INI dNIEpny (pnj NKoynfC xOHOHO HOBOr I EADENJI).
BCTPAAH,HepeHnCNEHbIbXbIe,IIaIPOUChnIHΦOpMaIOn O pABINbHbX CNOCoBX aYTHN3auO bOuAaiTeB CootBTcTByIOUme yueKdEHN.
IocTyna TaKIM 6pa3OM, Bbl MoKeTe 6bItb YbepeHb T ToM, yToYtNn3npyEmbl npOdyKT 6ydt COOTBETCTByIOUm 6pa3OM o6pa60TaH,
peepan B COOTBETCTBTOHKT INepepaToh 6e3 Bo3MOxHbIX HeraTnBbX IOcNEdTBm Ipn OkpykaOSeI Cpebln 3doPobBraIOdei.
K058b_A1_Ru
EcnnBnIka shHypa nItaHn i3dJIy He
COOTBETCTBYET IMEHOUeC3NeKtropo3eTKe, BNIky CNEdyET 3aMEHnB Ha NIOxOJyUy K PO3eTKe.
3aMeHa n yCTaHOBKa BnIKn DOJNkHbI npOIm3BODntbC8 ToJIbKO KBaINΦmUPOBaHHbIM TEXHkOM.
OTcoeDInHeHHaONT Ka6eNn BnIka, NoKJIIOUeHHaNKpO3eTK,MOKETBb3BaT TBJKeJeNo NopaxKeHne3NeKTpuueckm TOKom. NocLe ydaJIeHHaBnIKyTNIN3uPyITee eoFnxHbIM o6pa30m.
O6opydoBaHne cneDyet OTKJIOUaTb OT aNEKtPoCeTn, H3BLeKAB YNkY Ka6EJI NITaHnI N3 POEtKN, eCNI OHO He yDeT IcNoJIb3oBaTbC B TeChHe NDoToro BBeMeHN (HaNPIMeP, eCNI BBy 8eZKaete B ToOTNyck).
D3-4-2-2-1a_A1_Ru
BHIMAHNE
BbiklouateIb POWER
DAHNOYUcTbHe NOINHOCTbO OTKIIOaET erO 0aJNEKTOcTeN. YTO6bI NOINHOCTbO OTKIIOuHTb NITAHNVE yCTOpCTBa, BbITaUNITEB BYIKy Ka6eJIa NITAHNIA H3 aNekTropo3ETKn. PO3OTMOny UcTPOCTBO CnDEyET cYTAHANIBaTb TAK, YTO6bI NIKIky Ka6eJIa NITAHNIA MOKHO bBJIO JERKO BbITaUNITEB IN3 pO3ETKN B Vpe3BbUaHbIX o6CTOReNTbXb. Bo n36eKaHInE NoOKapa CnDEyET n3BLeKATb BYIKy Ka6eJIa NITAHNIA IN3 pO3ETKN, ECNI yCTOpCTBO He 6yIDet NCN0NJ3OBaTBcB Ta TEueHE mDOIRO TBeMeHH (HAnPrIMep,ecNI BBye3XaKeT E O'TNYCK).
D3-4-2-2-2a_A_Ru
PPEyPPEKDEHNE
DaHHoe oobopyoBaHne He ABnEeTc
BDOHEnpOnHuaembIM.Bo n36eXaHne noXapa nn
NopaxeHn3JneKtpnueckm TOKom He NomeaTe
PraOM C obopyoBaHHem EMKoCTn C KINKOCTaM
(Hanpimep, Ba3bl, ZBeTochHbIe rOpshKn) N He
donyckaIte nonaHaHa Ha Hero Kaenb,6pbI3r,
doxnBna.
D3-4-2-1-3_A_Ru
PNEyPPEKDEHNE
Ipepe npebim eKnioyeHuemobopydoaHua
EHumamenbNo npoumume cneyouu pa3den.
HAnpJxHeHn B3JIeKTPocEt MoXeT 6bITb pa3HbIM
Bpa3nHbIX cTpaHax nperoHax. Y6eIntecb, yTO
ceTeBoe HaprrxHne B MeCTHOCTn, rde 6ydet
NcNoB3OBaTbC DaHHoe ycTpoIcTBO,
COOTBeTCTBye Tpe6yEMomy HnpanxkeHnIO
(hanpimep, 230 B nnn 120 B), yka3aHHomy Ha
3aDHe nHaHEn.
D3-4-2-1-4_A_Ru
PNEyPEXKDEHNE
Bo n36ekahne noxapa He np6jnxkaTe K
obopyoBAHIO nCTOuHNK OTKpbItoro ORHa
(HanpImep,3axKeHHbIe CBeuN).
D3-4-2-1-7a_A_Ru
OB3ATEJIbHAR BEHTNIJIAIIN
Pn yctaHOBKe yctpoNCTBa o6ecneYbTe
DocTaOuHoe npoctpaHCTBO DnBBeHTnIaun BO
n36exaHne NOBbIeHnTeMnepaTypbI BHyTpN
Hn B KOem Cnyae He cneyet 3aKpbBaTb Hnn
3acNoHЯТbpyrIMn ppeMTeAMn (ra3eTaMn,
CKaTePTrMn uTOpamN) nIyUcTaHaBnBaTb
O6OpydoBaHne Ha ToJCTOM KOBpe NnN NoCTeJI.
D3-4-2-1-7b_A_Ru
YcnoBna 3KcnJyaTaun
I3dennne 3Kcnnyatnpyetc npn cneyuounx
TEMNEpaTpe IN BIAJXHOCTN:
+5℃do +35℃;BnaxxHocTb MeHee 85% (He
3acNoHnTe OXlaJaIOUne BeHTnJIrTOpbI)
He yctanabnbaIte n3dene B pnoxo
IPOBETPnBaEMOM IOMeHmN INB MecTe C BbICOKO
BJIAXHOCTbIO,OTKpbITOMДЯПРМOROCONHEHORO
CBeta (NIM CNINbHORO NCKYCCTBEHHORO CBeta).
D3-4-2-1-7c*A1Ru
MEPbI IPEIOCTOPOXHOCTN IPI
OBPAUHEHNC CETEBbIM UHHYPOM
Дерхи te ceTeBOI shHyp 3a BnIky. He
BbITACKnBaIe BNlky, B3aBwncb 3a WHyp, n
HnKoTda He KacaTeCb CeTeBOrO UHypa,ecnn
Baun pykn BnaXhbie, TAK kak 3TO MoKet
PnBecTN K KOPOTKOMY 3aMbIkaHHO NII
nopaxeHHIO 3JIeKTPnueckm TOKOM.He CTaBbTe
annapaT, npedMeTbI MeBEnn T.D. Ha cTeBOH
UHyp, He 3axmamteero. He 3aBraBaIe y3IOB
HaUHype HHe CBA3bIaTe erO cDpyrMM
UHypam. CteBbIe UHpybl OJNOHbJI JHexaTb TaK, YTOb6a H NIX HeJb34 BbJNo HACTYNTb.
(Hanpimep, kanaI [MASTER], [ON/OFF], MeHIO [File])
01 Do hauana
CboiCTBa 4
IcnoJIb3ObaHne KhoIKN [BROWSE] 20
IcnoJIb3OBAHne KhoNKn [TAG LIST] 20
IcnoJIb3ObaHne KhoIKN [INFO] 21
06 3meHeHne Hactpoek
IcnoJIb3ObaHne KhoIKN [MENU/UTILITY] 22
O nporpammmom obecneuenrrekordbox 23
O nporpammmHOM dpaBbepe 25
IcnoIb3ObaHne nporpaMMHoro obecneueHryDJdpynxmapok. 26
07 DononHnTeJIbHaI INHΦopMaun
Bo3MOxHbIe HeINcPpABHOCTn i CnOcObI IN yCtpaHeHHa 27
O xuokopctaJInuueckom ducnnee 28
CoobeneNo6 ounkbax 28
CnncokIKoHOK,OTOBpaXaEMbIXBa pa3JeIe nCpneOCHOBHO6noka. 28
IpeodocTepeKeHnno nCNoB3OBAHnIO 29
OboaueHne c dNCKamn 29
OrpaHnueHne OTBeTCTBHeHOctn 30
Texnueckx xapaKtepcntkN 30
CBOICTBa
CDJ-2000 yBnIeTcM HOrOfoyHkuHOHaJIbHbIM npOnrPbIbATEIeM dIy npOceccnoHaJIbHbIX DJ c MHOxEcTBOM fYHKU, hAedKHOCTbIO pa6oTOcNOco6HOCTbIO dIy IcNoJIb3OBAHnB D nDCKOTekAn HocHbIX Kny6ax.
MULTI MEDIA, MULTI FORMAT
CDJ-2000 MOKET BOCPON3BODNTB He TOIbKO DnCKN (CD n DVD), HO TaKKe My3bKaJIbHbIe paIbI, 3aIcAHHbIe Ha KapTax NaMHTu SD n yCTpoICTBa Ph3u-Namrtn u JeCTKne dncKn). POnDiepXnBaemIe fOpMaTbI My3bKaJIbHbIX paIIOB BKIOUaHOT He ToIbKO My3bKaJIbHbIe CD (CD-DA) n MP3, Ho TaKKe AAC, WAV n AIFF.
rekordboxTM
IocTbJIeMoe npOrpAMMHoe oecneueHn Iy npabHeHn My3bIKo reKordbox Moxet nCIOJIb3OBAtbcI py IOrTOBKn CInCKOB BOCPOn3BeHn, MeTO, pTeN, MetOK 6bICTporo doctyna u dpyuNX daHHbIX,Tre6byUxncxra Iy BOCPOn3BeHn DJ 3a6IarOBpeMeHNO 6e3 cneXn domA.3To PO3BOJrE T cIOJIHO yBepenHOCTbIO 3aoCTpNTb BCE BHIMAHHe Ha BOCPOn3BeHn DJ Ha ndckoteke/HouHOM kny6e. Bce 7aarrn B znkLe paobToBJ DJ moryr npoteKaT b IpaIKO, hauHnaor OT c60pa My3bIKaJIbHbIX faJIOB DnBocPOn3BeHn DJ.
rekordboxявяпгспprinpoхенemдя уравленьma3bikalhblmФaДamn,Испь3уевIMи Дя ВocрпоиЗveDEDня DJ ha DJ npoirpbivatele Pioneer (t.e. CDJ2000, CDJ-900).
ObnapyKeHHbe nI3MepeHHBe daHHBe, a TaKke yctaHOBJIeHHBe i coXpaHeHHbC nOMoU bRekordbox Tockn MoryT nCnoJIb3ObaTbcra B KOM6Haun C DJ npOnrpBbATEJem Pioneer (t.e. CDJ-2000, CDJ-900) dJa doCTnxKeHHaHnyuShero nCnoHNHeHHaDJ.
PRO DJ LINK
Bocnp0n3B0dMbIe DnCKN
Moxho BOCPON3BOIDnTb DnCKN CO CNeDyUOUMN Oo3HaueHnRAHn Ha 3TNKeTke, ynakOBKe nIi FyTnpe DnCKa.
Tnbl BOCPON3BODIMbIX DACKOB N 6o3HaueHna
| COMPACT DISC DIGITAL AUDIO | COMPACT DISC DIGITAL AUDIO | COMPACT DISC DIGITAL AUDIO |
| CD | CD-TEXT | CD-R |
| COMPACT DISC DIGITAL AUDIO ReWritable | DVD | DVD |
| R | RW | |
| CD-RW | DVD-R | DVD-RW |
DVDЯльета TopROB Марков Формanta DVD/Logo Licensing Corporation. Bocnpo3BODIMbte Ha danHOM npOINrpBbATEne DnCKn OTO6paxeHb HnKe.
HeBocpOn3BODIMbIe DNCKN
- DTS-CD
ΦOTOCINCKN
Video CD nckn
CD Graphics (CD-G) dinckn - He3akpbItbIe IJIa 3aIncs CD dIckn
DVD-VideoДиасn
DVD-Audio ducckn
DVD-RAMДиackn - He3akpbItbIe dIaIncu DVD IuCKn
Bocnpon3BepeHne nCKOB, co3daHHbIX Ha KOMnbIToTepe nn DVD pekopdepe
B 3aBcIMoCTn OT hAcTpoE npInIOJeHn HAcTpoE cpebl KOMNbIeTa, co3-DAHHbIe Ha KOMMbIePe IINCKN MOrT He BOCpON3BOIDITbcr. 3aINCbIbAte DnCKN BΦopMaTe, BOCpON3BOIDmOM Ha CDJ-2000. IOpO6Hee, CBxNtEcB C ToproBbIM aREhTOM npInIOJeHn.
Co3aHbIe Ha KOMNbHOtepe IINi DVD peKOpDEpe DnCKN MOrYT He BOCpON3BO-DITcBn 3-3a XapaKTepNC TnCKA, ZapapanIH INI rP3N, INI pNOxOro KaYeCTBa 3aNcN (rpo3b Ha 3aNcMbIAoUoe IINH3e, dp.).
OTHOCHTeBnIO INCTpyKcIINo ObpaueHIO C DnCKaMn CmOTpnte ObpaueHne c DnCKaMn Ha cTp. 29.
C03dahnepe3epBhbIXNCKOB
Korda CD-R/-RW, DVD-R/-RW, DVD+R/+RW, DVD-R DL (Двсюнь) n DVD+RL (Двсюнь) дисустановны на паузу плпocь.Tб lemго мayы в ToCkax MeTkn npdoJOLXnTeJIbHOe Bpemr, 3TO MOKET Co3aTb TpydHOCtN pnp BoCNPon3BedeHN takToTockn DiuNk uN3-3a XapakTeprucNTK dNcKa. Korda onpeleHnA ToKc NaOBTopHO deNaet neTko npdeJIbHO 6OJIbIoo KOnIueCTBO pa3, tTO MOKet Co3aTb TpydHOCtN prnp BoCNPon3BedeHN takToKcN.
При Воспpon3бевени цньх дисов pekomehуетс создаразь pe3epbble duCKN.
OTHOCHTeBHO CD DnCKOB C 3aunTOI OT KONHPoBaHHA
CPRM He noDaepeKnaeTcA.
- Kap'tbI namrtn SDHC moryt nCnoJb3ObaTbcS C yctpoNCTbAMn, noDepxKbNAIO- uIMn Kap'tbI namrtn SDHC. OHI He moryt nCnoJb3ObaTbcS C yctpoNCTbAMn, KOtopbI noDdpeKJBNAOT TOnbKO kapt'tbI namrtn SD.
- Пи Исплььзовани Карт памгт SD Вмостимocью 4 Г Или SF
- ИсплььзуITE Картл памгт SD сnorotinom SDHC.
- KapтыnamатSDOTpykaTcnpoIN3bOInTeIeM BCTaHapTHomФopMaTe, yka3aHHOM bIIe.ПиЗЗгуЗКе HeOTФopMaTIpOBaHNoH KApTыnamatSD 6yET OTobpaKataBcR [FORMAT SD]И KapTa He MoKet IcNtOb3ObaTbcS.
- OToFopMaTnOpOBaHbIe Ha KOMMbIoTepe, UΦPpOBOM pOToaannapate, dp. KapTbI MOrTy 6bItb HeNoCTyINbIMn DЯ NcNoJIb3OBAHnI.
Pioneer He rapaHTnpyET, yTo BCE kapTbI namrTn SD 6ydyT cpa6aTbIBaTb Ha CDJ-2000.
MepbI npedoctopoxKHOCTn nncnoB3OBaHIO KapT naMaTn SD
KaptIi namrTSD ABnHOTcT oTHbIMn 3NeKTPOHHbIMn yCTpoIcBAMn. BybTe BnHmATEbHbI npn o6paueHm n HmN. KaptIi namrTSD moryr cnomatbc npn iNriBaHm, naDEHm INI NOB BnHNHeM cINbHbX Harpy3OK INI COTpceHn. TaKKe, He IcNOB3yte INI XPAHNTe KaptIi namrTSD b CpeaX, rda MoKET co3DaBAtcBcT cTAuYeCKOE 3NeKTPrueCTBO INI CTaTMueckn Shym. PekomeHnyETc nepINOaNcckn BblONNHByk ONNNeEHbIX daHHbIX.
- Пожауньста, поннite, чу Pioneer He BydET Hectn HnkaKoI OTBETCTBeHnOCTn 3a Лобую Notepho DaHHbIX, ЗanicaHbIX NOlb3OBaTeMeHa KaptaxnamrTSDИПЛIOБьпnpobNeMbI,празmo ИП KOCBEHNo CBraAHbIe C nOdKnHouChenm K CDJ-2000.
- После ИЗВЕЧЕНИКAPТ памгт SD xpaHNTe IXB COOTBETCTBHyOJIeM ФуTЯр,др.
B 3aBnCIMoCTn OT nCnOlb3yEmoK KapTbI nAmrtn SD npOn3BODnteHNoctb MOKeT 6bITb xUke.
06 yctpojCTbax USB
Moxho Bocnpo3B0Dntb My3bikalbHbe paaibl (MP3/AAC/WAV/AIFF), 3auncaHbIe Ha yctpoiCTbax USB.
Ha yctpoiCTbax USB moKHO 3aIncbIbTaB TaKne daHbIe KaK uHΦopMaunu ndentnФнkaunm dNcKa, TOnKu MeTKn, ToKu NeTJIn mMeTk6bICTpOro DoCTyna.
Bhe 3aBnCIMOCTn OT nIOJoxeHn pyuKn TEMPO, DOpOxKn BocnpOn3BOJaTcna HxCXoHn CKOpOCTn BOCpOn3BeDeHn, 3aIncaHNo Ha DaNcKe, dp. Ppn BKJIouHeHn TEMPO RESET BbICBeuNbAeTcN INDInKaTOP.
34Поворотьи поеклочаел (-REV/+ FWD)и JOG RING ILLUMINATION (ctp.18)
55 Pa3dien ducnneier noBopOTHoro nepeKnUoyatela (ctp. 11)
3aDnnaHeIb
36 POWER ON OFF
HaxmteIgBkLIOeHnNOTKIOeHnNITaHn.
37 AUDIO OUT L/R (ctp. 12)
38 AC IN (ctp. 12)
39 CONTROL (cTp. 19)
40 DIGITAL OUT
41 CJOT 3amka KeHcHrToHa
LINK (ctp. 12)
USB (cTp. 12)
ΦpoHTaJIbHa nAHeJIb
43arpy3oHbI cnot ncka
45 OTBepCTne IJI JIINJIbKn IpnHydnteJIbHOrO n3BJIeueHnI DaCKa
46 INdkaTop 3aRpy3Kn Cnota DaNcKa
BbCBeuBaETc npy uCTaHOBKe OCHOBHOro TEMna (CTp. 15).
14 BPM
OTo6paKaet BPM (yIaBbMmHyTu) TeKyuEe BocPon3BOJaueCnDopokkN.
15 DucnJeIckOpocTn BOCpon3BeDeHnA
KoIuYeCTBO pa3JInuaetcB 3aBcIMocTn OT IIOJoxeHn [TEMPO].
16Дисплей Диana3OHa peryJinpoBkn ckopocTn BOCPON3BeDeHn
O6o3Haayet dnaaataOH, B npeJenax KOTOPOR MOxHO OTperynipobaTb ckOpocTb BOCPON3BeDEHnB OTHoSeHn INCXoHOn CKOpOCTN BOCPON3BeDEHnHa HocITene.
Pa3dien DnCnIe naBOpoTHoro nepeKliouaTeJIa

1 DnCJIeIynpaBJIeHna
O6o3Naayet MeTo BO CnpOn3BedeHnry, OJHO nOJIHoe BpaueHne paBHO 135 KaIpAM. IIObOpaunBaeTcBO BpeMBo CnpOn3BedeHnry n OCTaHaBnBaETcBApeXmme np3bl.
2 DucnJIeT OTuKm MEtKu
3 DicnJIeI COCTOHNy ayDIOJAMrTn
Miraet Bo Bpem 3aPiu cy aynOpamTn. IIO 3aBepenHna 3aInc npectaet MiraTb N OCTaETcB bICBeueHHbIM.
Bo Bpem 3aHnC aaynOanamTn onepaun HnKe MOrTy 6bItb HeIOCTynHbI.
- HactpoKa ToUKN MeTkn BO BpeMg BocnpOn3BeJeHnA (YcTaHOBka MeTkn B peKIme peaIbHOrO BpeMeHN)
HactpoKa MeKn 6bictporo doctyna
Ecn HeIOCTaTOUHO NaMAYI N3-3a BOCnpoN3BeDEHnA CO CkP3TcHm, TaKKe MInrae TINCNJIeN.
4 DucnJeI onpeJeHnKacAHnIOBOpTOHorO
nepekJIIOUyATEJIA
Korda pexim nobopoTHoro nepekIIOUaTeJI yctAHOBHeH ha VINYL, npn HaxaTm NbCBeuBaTcBepxHra Yactb nobopoTHoro nepekIIOUaTeJI.
5 VINYL
BbCBeuBaETc npu yctaHOBKe peKIMa NOBOpOTHoro nepeKIOUaTeJIHa VINYL (ctp. 18).
Подкlioочners
PnBbIIOHENHINNIM3MeHEnHIN NOKIOUeHIn,OBa3ateJbHOOTKIOUHTe NITaHHeNOTCOeHNHTe CINNOBOKABeNbOTpO3eTKN. CMOTnTe INCTpyuKnnIO NKcPiYatauCn K NOKIOUHOMOMIOHENTy. Tcne 3abeRseHNE BCEX NOKIOUeHn Mekdy UCTPOIECTBAMN NOKIOUHTe CINNOBO Ka6enb.
He oToeDnHnTe LAN kaBeb, ecn M3bikabHbIe faai bIu nnHfOpmaIg IcNoJIb3yETcO BMeCTHO Hepe3 PRO DJ LINK.
OCHOBHON CTNJIb
rekordbox my3bkaIbHbIe paIbI y daHbIe MOrT nepeDaBaTcRa h CDJ-2000 c nOmoIy uCtpoiCTB USB (ycToPcTBa pI3w-namrIn, JcEcknE dNcKn, dp.), m36abIy oT Heo6xOdMocTn nepeHOCA KOMIbIOTepa B KaIbIKy DJ. Iy BOCpOn3BeDeHn DJ MoKET nCpONb3OBaTcRn HΦOpMaun CnNcKa BOCpOn3BeHn, MeTK, netIN m METkn 6blctporo doctyna, npedBaupTeIbHO yctAHOBJIeHHa c nOmoIbUre rekordbox.
Mozho coBmctHO nCnoIb3ObaT MeiHa MaTePnAn, 3arpyKeHHb Ha DJ npOnIrpbIbATEJx (DopoxKn, NaMaTb ToKm MetKn, HΦOpMauH WAVE, dp.). POpbo6Hee, cmotpnte IcNoIb3ObaHne yHKunn PRO DJ LINK Ha cTp. 14.
Mozho nooknouh do yebipex annapatob. Iy nooknyehn trpex nlin 60nee yctpoCTB tpebyetc KOHcHTpaTOp-KOMMyTaTOp (npdaetc OTeJIbHO). Ncno3yte KOHcHTpaTOp-KOMMyTaTOp Ha 100 Mnt/C nnn 60jhe. POMHnte, YTO HeKoTOpble KOHcHTpaTOpbl-KOMMyTaTOpbl MOYt He cpaabibatb COOTBeTcByOzumm o6pa3om.
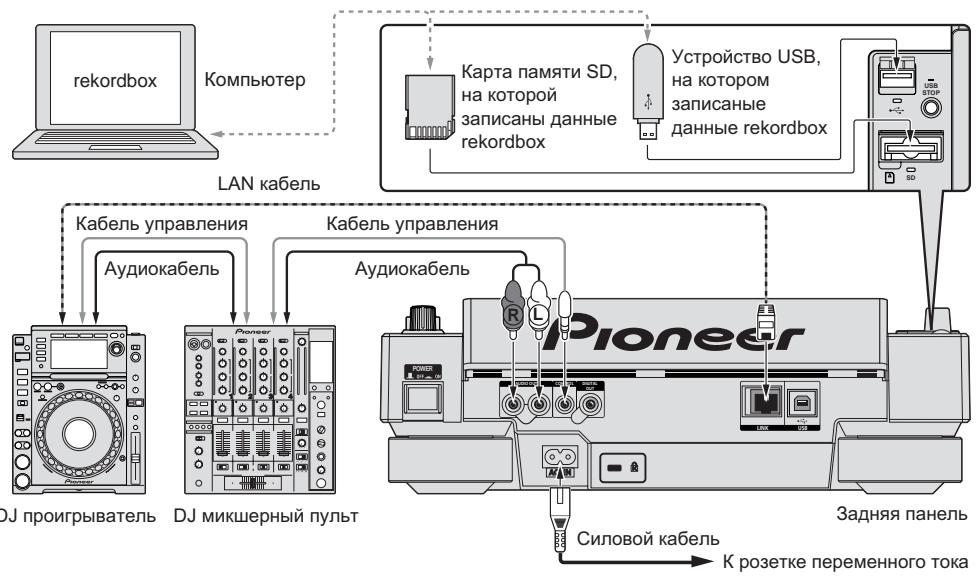
3 3akpoTe DBepu KaTbI NaMaTn SD.
BbCBeuBaETcH INDkaTOp KApTbI nAmrTn SD.
1 OtkoPte DBepy KApTbI nAmrTH Sd.
HДиKaTOp KapTbI nAmrTi SD OTKJIOuHaETc.
2 Haxmnte Kapty namrtn SD BHytpb. Korda OHa BbickaKnBaet Ha3aT, NotraHnte ee BEPTKajlbHO.
BbCBeuBaetcHnDnKaTOp USB.
2 HaxmTe [DISC], [SD], [USB] nIIn [LINK].
OTo6paKaTaCra CoepKaHHe BbI6paHHOro HocHTeJIa.
3 NObepHnTe NOBOPoTHbI CeJIeKTOp.
Bb6epntoDopokky. OTo6paKaTcra HOpmaZna KaTeOpnn/panKn/Dopokkn.
- KaK ToIbKO DoCTNHyT HAnHn3Shm yPoBeHb B nAnKe, HaxMnTe NOBOpOTbH cnEkeTOp. HaxMnTe [BACK]ДЯВОЗВраТК HAnHBicUeMy yPoBHIO.
- HaximaiTe [BACK] 6oJIe 1 cekyHdbI IINn HaxmTe MeHaN aKHOpy npocMaTpNBaemOrO HocITeIЯ Bo3BpaTa Ha HAnBbICuI yPoBeHb.
4 HaxMMTe NOBOPoTHbI CeJIeKTOp.
3arpykaetcdoopkka n 3anyckaetc Bocpon3bdeHne. Cleba ot tekyueBoc

npOn3B0DJaIeIcI DOpOxKIOTo6paKaaeTcI
- [TRACK SEARCHI←/→] MOKET INCINb3OBAbTcBd I Na BbIbopa DOpoxek BHyTpN Kateropnn/nanKn Tekyuue BocnpnO3BDoJaSce DOpoxkn.
-Пизагузke ДИСКАС мУЗькалнБIMN ФаДамМ,З苹SCаннБIMN Вперархи-уесков STРУКТYPE,ВОСПОН3BEDEENHE 3ANYCKAETCЯ ДорожЕКВ HANBICSWEM ypoBHe. - Korga [UNLOCK/LOCK] yctaHOBnEn Ha [LOCK], haxMnte [PLAY/PAUSE>II] Дя установки ржима пay3bl, 3aTeM haxMnte NOBOPOT-NbI сеNTop.
Pay3a
Bo Bpem BoCnpon3BedeHn, Haxmnte [PLAY/PAUSE>II].
MngaIOTnHnDnKaTOpblPLAY/PAUSE>IINCUE.HaXmTe[PLAY/PAUSE>II] eue pa3dIy BO3O6HOBnEHNBOcPOn3BeDeHn.
- Ecnn B Teuehen 100 MmHyT He BbInoJIHnaIacb HnKakaa OpeaIaB PexIme nay3bl, DnCK AToMATuWeckn NepeCTaET BpaauTbCra. Pnp Haxkatnn [PLAY/PAUSE>II] B daHHbM MOMENT, BOcPOn3BeDeHne Bo3O6HOBnIeTC n nepBoiDopoxkN. Pnp BKNUeHenn AToMATuWeckn MetKtn, Annapat nepExo-dnt Ha nepByIO dopoxky u yctaHaBnIbAeTC TaM Ha nay3y.
Bo306HOBJIeHne BOCpOu3BeJeHnC MeCTa BOCpOu3BeJeHn, rIe 6bl n3BLeueH dNcK (Bo306HOBJeHne)
- Послій ИЗБл uehenя ДИСК, ecnіТОТ-жЕ ДИСК cpa3y-жЕ obpaTHO 3aRpyKEN B CDJ-2000, BOCpOnu3BveHne BO3O6HOBnIeTcRc MecTa, KOTOpoe BOCpOnu3BO-DInIOcBdo I3BLeuehenia DlSCa.
-ФункияВОЗБНовлиясрабаыBaeТToьКоKOrДаОДИнДИСКБИЛИЗВLE-уениЗатемобразноЗагружениdoЗагруздpryloroДИСК.
Korda [TRACK SEARCHI</>I] hajata nepei 3anyckom Bocnpoun3BedeHnra, annapat niet hauano dopokkni 3anyckaetcra Bocnpoun3BedeHne.
- Φυнкця ВОЗбовлени He cpa6aTbIbaet ДЯ Kapт пamгТ SД устpoCTВ USB.
PeylnpOBka ckopocTH BOCnpon3BedeHna 6e3 n3MeHeHn BbICOTbl (OCHOBHO TeMn)
Haxmnte [MASTER TEMPO].
BbICBeuHbAHTcR INDnKAtOp MASTERTEMPOI [MT]Ha DCnCInee OCHOBHO 6Ioka.BbICota He n3MeHReTc DaXe npi n3MeHeHn CkOpcTn BocPOn3BeDeHn c NOMOuBIOpeRyUnpOBKn [TEMPO].
3ByuHHe 6pa6aTbIbaeTcra cHpOBoC XeMo, YTO pINBOuNT K CnHexHIO KaueCTBa 3ByuHaHry.
Pebepchoe Bocpon3BedeHne
YctaHObnte [DIRECTION FWD/REV] Ha [REV].
BbCBeuBaetcN HnDnKaTOp REV n DopoXka BocnpOn3BOoNTcB O6paTHOM HanpabJIeHIN.
Korda My3bkaIbHbIe faaIbI 3aIINcAHI B CtpyKType nank, MoKHO BOCPON3-BOITb BOpaTHOM HapabJIeHN TOJIbKO DOpOJKN BHYTpN OINHAKOBI KATEropn/npKn. TaKe NOMHInTe, YTO peBepCHoe BOCPON3BeDeHne He 6yDet 3anyckatbcr He3ameDInTebHO.
- HanpaBHeHne, B KOTOpOM CKOpOCTb BOCIpOn3BeHEnnIOBbIaEcTcNIN NOHmKaEtCBA COoTBcTcBm C HApBaJIeHEm BpaUeHnIO NobopoTHOrO nepeKlHOaTeNa nepeBopaUHbAeTCB aOBpaTHyIO CTOpOHy.
-Пи Выллгнелп.TaknxОпациКak ПONСДорожкИВOCрpon3BedeHne neTIN BO BpeMЯ peBepCHOrO BOCppon3BedeHnI, MIRaetДИСРЛe COCTOHAyDINONAMrN B pa3dene DmCIIe NOBOPOTHorO pepeKlIOuAteJI N BOCpOn3-BedeHne CO Ckp3TuHem MoKeT 6bITb HeNoCTynHO.
Hactpoika Metkn
1 Bo BpemBocnpo3BeDhen, haxmnte [PLAY/PAUSE>II].
Bocnpoun3BeDHeHne yctanabnBaetcnaay3y.
2 Haxmnte [CUE].
Toya yCTaHOBKn nay3bl DOpOxKn YCTaHaBnBaETcKa KAc ToKa MeTkn. BbCBeuNaBcTcN HdNkATop CUE mMraHT NdNkATOpbl PLAY/PAUSE>II.B DaHHb MOMENT 3ByaHHe He bYbOJNTcR.
- Пиустановке HOBOI TOUKN MeTKN, paHee yCTaHOBNeHHaЯ TOUka MeTKN OTMeHЯETcR.
Пи Инструкцяам O coхраени Точек метки CMOTРITE Coхраене MeTKI TOteKпeTTNHa CTp.17.
Perylnpobka Mecta Toukn Metkn
1 HaxmTe [SEARCH</>>] npn nay3e Ha TOyKe MeTkn.
MiraHT INHdkaTopbI CUE n PLAY/PAUSE>II.
2 Haxmnte [SEARCH<▶].
ToUKa MeTKn MoKet peryIInpoBaTbC a TcUHOCTbU B Waarax No 0,5 KaIpOB.
Ta-ke OepaunBaO3MOxHa C NOMOuBIO NOBOPoTHOrO nepeKluOaTeIa.
3 Haxmnte [CUE].
Touka, rde bBJna hajata KhoNka, yCTaHabnBaETcKa KaTOKa MeTKM.
- Пиу установке HOBOI TOUKN MEtKN, paHee yCTaHOBJIeHHa TOTka MeTkn OTMeHЯrTeC.
- Пи ИЗБЕЧЕНИ NOCHTEЯ, гige 3дпсанда Дорожka, точka MEтк OТмEHETС.
ПИ ИСТРУКИМ O COXPAЕНИ NTOYEK MEТКI CMOTPUTE COXPAЕНИ MEТКI IN TOUK E N TIN N HA CTp. 17.
Bo3bpaT Ha ToUky MeTkn (Bo3bpaT K MeTke)
Bo BpemBocnpOn3BeDeHnHaXmTe [CUE].
Annapat HezamdeInteIbHO Bo3BpaIaIeTcB T EKyu yCTaHOBJIeHHyTOUky METKN U YCTaHABJIINBaETc H Naay3y.
- Пин нажати [PLAY/PAUSE>II], Воспponзбение заускаeted с точкIMETКИ.
ПоберkaТочknMeTKN(CэмпелрТочknMeTKN)
Haxmte n ydepkmbaite [CUE] nocne BO3Bpata Ha Toky METKN.
Bocnpon3BeHeHne 3aynckaeTcra TekyeeyctahOBnHHO TOKN MeTKN. Bocnpon3BeHeHne npOdoJIxaeTcra, noka Haxata [CUE].
Korda my3bikalbHbe paJIbI 3aIncahbl B CTpykType naKN, TOka MeTkn MoKet npocMaTpNBaTbCra ToIbKO IyIdoPoxKe BHyTpN OINHaKOB KoTEROpn/naKn.
HactpoJa Ka TouKn MeTkn BO BpeMn BocnpOn3BedeHn (YcTaHObKa MeTkn B peXmpeaJIbHOrO BpeMeHn)
Bo BpemBocnpOn3BeDeHnHaXmnte [LOOP IN/CUE (IN ADJUST)] Ha MecTe, rIe 6bIJa yCTaHOBJNeHa ToyKa MeTKn.
Touka, rnde 6bila haxata KHONka, yCTaHaBJINaBaetcKa KAc ToUka MetKn.
Hactpoika aBTOMaTHueCKoM MeTKn
Пи рзагузke дорожки пь вылелени onepaци посякдорожк,бe33ычнь pa3дeн в hashane dopожкпрponусаetс,И точka метки abTomatuecekn ycta-hablnbaetc cpa3у пered toukoi,OTkyda habnhaetc 3byaHne.
HaxmMaTe [TIME MODE/AUTO CUE] 6oJee 1 cekyHdbI.
BkIIOUaETcA bOTOMaTNUeCKa MEtKa. [A.CUE] BbICBeHbAEtCra Ha DnCINee OCHOBHOrO 6Joka.
- HactpoJa ypoBHa aBTOMaTHueCKoM eTKu COxpaHReTcB namrTa, daKe KOrDa nITaHHe OTKluOHe.
IpekeJIIOUeHne ypOBnA bTOMaTHueCKoM MetKn
YpOBeHb 3ByKOBOrO DaBLeHnI dIe ONpeJeHnI 6e33ByHoro pa3dena MoKeT BbIbpaTbc rpei cneDyUoXN BocbMn WaRb:
-36 έБ, -42 έБ, -48 έБ, -54 έБ, -60 έБ, -66 έБ, -72 έБ u -78 έБ
-
HactpoJa ypoBHa aBtOMaTnuecko MeKu CoXpaHReTc B nAmrTu, daKe KOrDa nITaHHe OTKHNoHeO.
CzyuceTByeT Dba MeToa NepeKNoChEny UpOBHn ABTomaTneCKo MeTKn KaN nOKa3aHO HnKe. -
Пюцетура поеклочець - [MENU/UTILITY]
1 HaximmaTe [MENU/UTILITY] 6oJee 1 cekyHd.
OTo6paXaetaK3KpAn [UTILITY].
2 BbIbepnTe [AUTO CUE LEVEL] n Haxmnte BBOJ.
3 Nobephnte NOBOPOTbIcEneKTop.
HactpoIka ypOBnA bTOMaTHueCKoM MeTKn NepeKJIuOyaeTc.
Пюцениа поцения - [TIME MODE/AUTO CUE]
1 HaximmaTe [TIME MODE/AUTO CUE] 6oJIee 5 cekyHd.
YctaHaBnBaETcpeKIM npeKJIooHEny ypoBn aBTOMaTnueckOeMTeKn.
2 HaxmTe [CUE/LOOP CALL<].
Hactpoika ypOBHЯ abTOMaTHUeCKO MeTKn nepeKInHouaETc.
- Д�� OTмны рекима пеклоченя, сюва нахмite [TIME MODE/ AUTO CUE].
HactpoKa PntIe
1 Bo Время BOCPON3BeDEHЯнЖМTe [LOOP IN/CUE(IN ADJUST)]Ha MeCTe, Гд НуЖно 3aNYcTnTb NeTЛNo (ToUka BXOdaВпeТЛЮ).
YctaHabnBaetcTouka BXoJa B neTJIIO.
B daHno onepaunn HET Heo6xOIMOCn,ecn ToKametkn yke 6bIJa ycta-HOBNeHa B kaueCTBe ToKu BXOa B neTNI.
2 HaxmTe [LOOP OUT (OUT ADJUST)] Ha MeCTe, rIe HuxHo octaHOBnTb NtJIO (TOUka BbIXOda N3 NtJN).
UctahabnBaetcT Ouyka BbIXoJa n3 neTn, n BocnpOn3BeDeHne PTeN 3aynCka- etcT OToKu BxOJa B netnIO.
- PnP BOCPON3BedeHm My3bIaJIbHbIX ΦaJIIOB PeTJIa MOKeT yCTaHaBnBaTbcr TOnbKO BHYTPN ONDHO DOPOJKN.
Tochnay perylnipopbka Tockn BxOda B neTIO (peylnipopbka BXOda B neTIO)
1 Bo BpemBocPon3BeDeHnIeTnHaXmTe [LOOP IN/CUE (IN ADJUST)].
[LOOP IN/CUE (IN ADJUST)] haunhaet 6bictpo mraTb n [LOOP OUT (OUT ADJUST)] OTKNIouaetc.
BpemrToKBNxoJaBnTIIPOToBpaKaaeTcHnDinPiieOCHOBHOro6Ioka.
2 Haxmnte [SEARCH<▶].
Tocka BxoDaB nTeTIO MOKeT perynipoBaTcB EeINHuaX no 0,5 kaDpoB.
Ta-ze onepaunra BO3MOxHa c nOmoosbIO NOBOPOTHO nepeKIOUaTeJI.
Tocka Bxoda B neTIO MOKET peyIINPOBaTbCRA Ha ± 30 kaIPOB N DOJIKHa 6blTb neped ToCKOB bIXOda n3 neTJIN.
3 Haxmte [LOOP/CUE (IN ADJUST)].
B036HOBJAETCBOCPON3BeJeHHe ObIyHOIeTIN.
Bocnpo3BeHneOblyHn neTnTakKe BO3OBHOBJIaTeC,ecnB TeueHne 60nee10ceynHne npOn3BODnIacb HnKaKaJ Opeaun.
- PnB OBCPON3BeDeHm My3bIaJIbHbIX φaIIOB TOKc BxOJa B NtJIIO MOKET perynipOBaTcTOJbKO BHTpN OHOH DOpOJKN.
Tochna pergunpoBka ToCKN BbIXOda n3 neTln (pergunpoBka BbIXOda n3 neTln)
1 Bo BpemBocnpOn3BeDeHnIeTnn HaxMnte [LOOP OUT (OUT ADJUST)].
[LOOP OUT (OUT ADJUST)] HauchHaet 6bictpo MmraTb N [LOOP IN/CUE (IN ADJUST)] OTKJIUyaeTc.
Bpemr TouKn BixOa n3 neTn OTo6paKaetcHa dncnnee OCHOBHO 6Ioka.
2 Haxmnte [SEARCH<▶].
Tocka BbIXoJa n3 neTnMoKTe peryNipOBaTcB eEINHuaX no 0,5 kaDPOB.
Ta-ke onepaunra BO3MOXHa C nOmozbu NOBOPOTHOpeKJIuOaTeJ.
-Диапаэон PerуллорвКи TOUKN BbIXOda ИЗ.netПи HaxODITcR Be3de NOCJI ToKn BXOda B netIIO.
3 HaxmTe [LOOP OUT (OUT ADJUST)].
Bo3o6HOBJareTcBOCpon3BeJeHneOblyHOn neTJn.
Bocnpo3BeHneO6bHuOH neTnTakKHe BO3OBHOBJAreTcA,ecnB TeueHne 60one 10 cekyHNe H npOn3BOmIaIcb HnKaKaJ OepaZna.
- Pπn BOCPON3BedeHm MY3bIkaJIbHbIX ΦaIIOB TOcKa BbIXOa I3 NeTπM OMeTpeγιNPOBaTbCRA TOJIbKO BHYTpri ONDHO DOPOXKIN.
OTMeHa BocnpOn3BedeHnI PeTIn (BbIXoI n3 peTIn)
Bo Bpem BoCnpoN3BeDHeNn peTnHn HaxMnte [RELOOP/EXIT].
Bocnpou3BeDeHne npoDJIkaeTcna oCnE ToUKn BbIXOa n3 neTIn 6e3 Bo3BpaTa Na ToUky BxOda B neTIO.
1 Haxmte [HOT CUE REC/CALL].
Annapat nepekIIOUaETcB pexKIM 3aInc MeTKI bICTPOIoCTyna. INdkaTOp HOT CUE (A, B, C) BbICBeuHbAEcTc KpachbIM.
2 Bo BpemB OBCnpn3BeDeHnI NII BpeKmE np3bl HaKMITE [HOT CUE] (A, B nIIN C) B TOUKe, rIe HxKHO yCTaHOBTb MeTKy 6bICTporo DoCTyna.
Mecto, rda 6bIJa haxkata KhoNka mII INI TeKUaJ BOCpnON3BOJaUaCra NtTna YCTaHabINBaETc dIy KhoNkn [HOT CUE] (nOMHnte, yTO HAnpAbJeHne BOCpnON3Be-DeHnHa He 3aNcBIAeTc). Miraet nHdNKaTOP KhoNkn.
- Ioka 3aIncbIbaeTcra MeTKa 6bIcTporo DocTyna, HeBO3MOxHO 3aIncBaT dpYrIne KhoIKN [HOT CUE], yCTaHaBJIbIbTaB ToCkN MeTKn, pOnI3BOJntb 6bIcTpyU npOkpTyKu Bnepd/6bIcTpyU npOKpyTKu Ha3aI nIIIN BOCpON3BOJntb CO CKP3TuEM.
- Ppi 3aqrpy3ke kaptbI naMHTn SD nIyycTpoiCTBa USB B npoirpbIbaTeNb, INHcOpMaunrTOckN 3aIINCbIbAeTcABTOMaTHueCKN.
Korda metka bictrho doctyna yctahOBJIeHa BO BpemBocPOn3BeHnra CCKp3TuHm, BOCPOn3BeHnne MOKeT BpeMeHHO IpepbIbTaC.
Bocnpon3BeHne MeTOK 6bICTpOro Doctyna
1 Haxmnte [HOT CUE REC/CALL].
YctaHabnBaetcpejkmBocnpoun3BeJeHnMeTkn6bictporo doctyna.
- INHДИКaTOPbI KHOПОK, ДЯ KOTOpbIX 3aПИСаНы TOUKN MEТКи BbICBEчВaIOTc 3eJIeHbIM.
- INHДИКАТОРы KHOПОК, ДЛЯ KOTOPыX 3aПИСаНо BOCПОЗБЕДЕНИп.TЛIN ВьСБЕчИВАЮТСОЧАнЖЕБМ.
- INДиKaTOpbI KHOHOK,ДЯ KOTOpbIX He 3a\PuCaH O HUeRo He BbICBeuBaHOTcA.
2 Bo BpemB OBCPOn3BeDeHnA NJIu BpeKIme nay3bI HaxMnte [HOT CUE] (A, B nnn C).
HemeiHeNo 3aynckaeTcBocnpn3BeHne OToKn, 3aIncanHOJ DnA COOT-BetCTByUoSe KhoNk.
Для ВOCрпои3БeDEньпгл,ЗлсаСнHоДдгКНОК[HOT CUE],Инфорmaць разлчaETСТ OВСрпои3БeDEньпгл,уctановпнOHс nOMO-ькнОК[LOOP IN/CUE (IN ADJUST)]n[LOOP OUT (OUT ADJUST)].ВOCрпои3БeDEньпгл мokжETбыT OTмЕнEOс nOMоьь кONKNI[RELOOP/EXIT]nTOчka BblxOdaи Nтгл mOKж TOчNOperylnpoBaTbCn NOMOьь KONKNI[LOOP OUT (OUT ADJUST)].ПЯмая PerулmpOBKa n3MeHЯет Инфорmaць,ЗлсаСнHуДдгКНОКHOT CUE.
BbI3OB MeTka 6bIcTporo Doctyna
3 Haxmte KhoNky [HOT CUE] (A, B nIi C), ybIO MeKy 6bICTporo DOcTyNa HxKHO BbI3BaTb.
BbI3BaetcMeTka 6bIcTporo Doctyna. BbICBeuHbAeTcN HINIKaTOp HOT CUE (A, B, C).
- EcHn HET HeoXOaMIOCTn B BbI3OBe MeTkn 6bICTPOrO DoCTyna, HaxMMTe [HOT CUE REC/CALL] 6e3 haxKaTnA [HOT CUE] (A, B nIIN C). KHOJKN, MetKa 6bICTPOrO DoCTyna He 6blna Bbl3BaHa OTKJIQUaOHTCs.
- Пи Воспponьдени Дорожек, 3апсаньх Ha Нocтеляx, КрмЕ ДИСКOB, меткь бICTPORо дoctуна He могут БызыВатсая дaxe пи ри загузke ДИСКАВ CDJ-2000, Дя КOTOPORO запсань меткь sbICTPORо дoctуна.
- Ecni pekim Bbl0Ba MeKn 6bIcTpoRo DocTyna 6bl cnCyauH OToMeHEn, n3BNeKeTe KapTu namrTu SD/ycTpoJcTBO USB, 3aTeM 3aHOBo BCTabBe erO.
Пюцени Клг Вьзова MeTOK 6bIcTpOro DoCTyna (Дд Карт пamЯTN SD/yctpoiCTB USB)
1 3arpy3nTe KapTu pAmrTn SD/ycTroPoIcTBo USB B CDJ-2000.
2 3arpy3nTe Dopoxky, MeTKy 6bICTporo DocTyna KOtOpoi HxKHO Bbl3BaTb.
3 HaxmMaTe [HOT CUE/REC/CALL] 6oJee 1 cekyHdbI.
Annapat nepeknnoaetcB pexnmbb30ba MeKb6ictporo Doctyna, mMraIOT nHdkaTOpbl HOT CUE (A,B nnC), dJa KOTopbix 3aNCAhbl MeKb 6bICTporo DoCTyna.
4 HaxmTe KhoNky [HOT CUE] (A, B nIn C), YbHO MeKy 6bICTporo Doctyna HyxHo BbI3BaTb.
Bb3BaetcMeKa 6bIcTporo Doctyna. BbICBeuHbAeTcN HnDnKAtOp HOT CUE (A, B, C).
- EcHn HET HeoXOaIMOCtN B BbI3OBe MeTkn 6bICTPOrO DoCTyna, HauKMITE [HOT CUE REC/CALL] 6e3 haxaTnA [HOT CUE] (A, B nJIn C). KhoNKn, MetKa 6bICTPOrO DoCTyna He 6blna BbI3BaHa OTKJIOnuAHOtCn.
- Ecni peXIM BblOBA MeTkn 6bIcTporo DoCTyna 6bln CnyaHNO OTMeHeH, CHOBA naKMITE [HOT CUE REC/CALL].
OTmeHa peXIMa BbI3OBA MeTkn 6bICTpOro doCTyna
1 BbI3OB MeTOK 6bICTporo Doctyna A, B u C.
2 Haxmnte [HOT CUE REC/CALL].
CoxpaHeHne MeTkn I Toyek neTlin
1 3arpy3nTe KapTy namTn SD/yctpOcTBo USB B CDJ-2000.
2 YctaHOBIne ToKy MeTKn NIn ToKy MeTKn.
3 HaxmTe [MEMORY].

MEMORY] mnn

MEMORY] OTo6paXaetcHa DnCnIee OChOBHOro 6NoKa.
CoxpaenHHa TOnKa MeTKn OTobpaXaAETc Ha NcPnEe aDpeCa BocpOun3BeDeHn.
InHΦopMaZuN ToKn pernctpnpyETc Ha KapTy namrTn SD/yctpoIcTBo USB.
Korda kaPta namrTn SD u yctPoIcTBO USB oNHOpeMeHNO 3aRpyKeHb B CDJ2000, npnoPiTe TOTdAeTcRa KapTe namrTn SD.
- Дя coхаени точк netи нахмite [MEMORY] BO Врем BOCPON3BedeHnЯ netи. Coхаени точк netи OTobpaЖаOTсЯ диспjee adpeca BOCPON3BedeHnY.

- IKoHka OTo6paKaaETcCneBa OTdoPoxKe,ДЯ KOTOpbIX COxpaHeHbI METKA INI TOUKN NTeJI.
- Информаця обтоматчески заимсь茧ется на карту памгтSD/усточю USB.
HΦopmaTOnKmMeTknnnBocpon3BeDeHnneTnnycTaHaBnBa-etCn [HOT CUE] (A,B n C)
Bb3OB COxpaHeHHo MEtKn NIn ToeK NeTJIn
1 3arpy3nte KapTu namrTn SD/yctpOietBO USB B CDJ-2000.
2 3arpy3nte dopokky, MeTKy HJIN TOUKN PeTNI KOTOPOH HyXHO Bbl3BaTb.
MeTka n ToUkN nTeTn OTo6paXaHOTcB B VIne OTMeTOK Ha dncnnee aDpeca BOCpOn3BeDeHn.
3 HaXMMTe [CUE/LOOP CALL<▶].
Bocnpoun3BeDeHne nepemeaetcHa BblbpaHHyU ToKu N yctaHabnBaetcHa nay3y.
Korda zanicaho HeckoIbKO ToeK,ToUka nepemeaetc npn KaJdom HajataKN KHOKN.
4 Haxmnte [PLAY/PAUSE>II].
Bocnpoun3BeDeHne 3anyckaetcO TouKm MeTkn nn PTeTn.
INHnBnDyaJIbHOe ydaJIeHne MetKn nIe ToeK neTNI
1 3arpy3nte KapTu pAmrTn SD/ycTroPcTBo USB B CDJ-2000.
2 3arpy3nte doPOkky CToyKOmMeKn nIIN Toykamn neTJN, KOtOpbIE HxHNo ydaJIHTb.
MeTka N ToUKN NeTNI OTOBpaKaIOTcB BVNe OE TmEToK Ha DnCnJIe e aDpeCa BOCnpoN3BeDeHnHa DnCnJIee OCHOBHOrO 6Joka.
3 HaXMMTe [CUE/LOOP CALL<▶].
Bocnpoun3BeDeHne nepemeaetcHa Bbl6paHHyU TOky N yctaHabnBaETcHa nay3y.
Korda zanicaHO HeckoIbKO ToeK,ToUka nepemeaetc npu KaJdOM HaxaTNI KHONKI.
4 Haxmnte [DELETE].

DELETE] oTo6paKaaeTcra Ha nDCnPee OCHOBHOro 6Joka HnHΦopMa-
YBaBpaHNoTouKn ydaIaIeTcA.
YdaJIeHHe BCEM ToEeK NToTnI DnNCKa
1 3arpy3nte KapTu namrTn SD/yctpOietBO USB B CDJ-2000.
MeTka N ToUKN NToTNI OTO6paKaJIoTcB BVNe OTeMTOK Ha DInCnJIee aDpeCa BocnpoN3BeDeHnHa DInCnJIee OCHOBHOrO 6Ioka.
2 HaximaiTe [DELETE] 6oJee 5 cekyHd.
[DISC CUE/LOOP DATA-DELETE? PUSH MEMORY] onobpaKaetcHa nucnne OCHOBHOro 6Ioka.
3 HaxmTe [MEMORY].
Bce MeTkn I TOckn PTeTJIN dIy TeKyuIeO 3aRpyKeHHOro B CDJ-2000 nnckaydaJIaIOTcI.
- Pexim ydaJIeHn OTMHeTcra npu haxaTIN JIO60 KHOJKN, KpOME [MEMORY].
YdaJIeHHe BcE INHΦOpMauIIN DnCKa, 3aIncAHHoHa KapTe NaMAtN SD/yCTpoiCTBe USB
1 Korda B CDJ-2000 oTcYtCTByeT dNcK, HaxmMaTe [DELETE] 6oJIee 5 cekyHd.
[DISC CUE/LOOP DATA-DELETE ALL? PUSH MEMORY] oTo6paKaetcHa Dnucnlee ochOBHOrO 6noka.
2 HaxmTe [MEMORY].
BcI INΦopmaZnIcKa, 3aIncHna Ha KapTe namrTn SD/yctpoiCTBe USB ydaIaeTc.
- Pexim ydaJIeHn OTMHeTcra npu haxaTIN JIO60 KHOJKN, KpOME [MEMORY].
YnpaBJIeHne NOBOpOTbIM nepeKJIIOUaTeJEM
В верхию чаь nobороноpeкнюателвстpoeh pekeknioateNB. He pacnojarai Te npedmetbHa noBOPOTHom pekeknioateNe INI NOBepraTe erO BO3deiCTBnAM Cnbl. TaKke NOMHITE, YTO nonaDaHne BODI INpyrnx JxndkocteB annapat npinBeDET K NOJOMKe.
IobopoTHbI nepeKJIouaTeNb IMeET dBa peXIma.
- Pexim VINYL:При Нжати Ворхней ча_ST NOBOPOTHORO nepeKJIQUaTeTЯ BO BPEM YBCPOn3BEdENHry, BOCPOn3BEdENHe NpOCTaHABINBaEeTCY, IN pRn pOKpyuHaBnH NOBOPOTHORO nepeKJIQUaTeTЯ B DaHbI MOpEt 3ByaHne BVBoDNTcB C COBTBeTCTBm C HAnpaBNeHem BpaSeHnI NOBOPOTHO nepeKJIQUaTeTЯ.
- Pexim CDJ: Ппн Нахати Ворхней часп NOBOPOTHORO pepeknIOUATEJIЯ, BOCPON3BedeHne пnoCTaHaBJIbAeTcR, И takne OpeaUN KAK BOCPON3BedeHne CO Ckp3TuHem CTaHOBJrCHe HeNoCTyNHbIMN.
Cbepx6bictpbI nonck [VINYL-CDJ]
KpyTnte NOBOPOTHbIe nepeKlnOuTaTeIb, ydepxnBaJ HaxaToI [SEARCH<4/>>].
Iopokka 6bictpo npokpyuHaetcBnpeD/6bictpo npokpyuHaetc Ha3aD Hnapableni BpauneHn NOBOPoTHOro NepeKluateJI.
- Пио OTnyckанн Кноки [SEARCH<4/>>]дана Функю OTmeняETс.
- Pπo octaHOBKe BpaUeHnIOBOpOTHOIpeKJIouYateJIa BO3O6HOBJIeTcA O6bIHyoe BOCpON3BeDeHne.
- CkopoocTb 6blcTpo npokpyTKn Bnpea/6blcTpo npokpyTKn Ha3ad MOKet perylnipobatbcra B COOTBETCTBm CO CkopoocTbIO BpaueHn NOBOPOTHO nepeKJIHouaTeIa.
Cbepx6bICTpbI NOHCKdoPOKKN
PnBpaueHnn nobopoTHoro nepeKNIuOaTeJIa, ydexpNbAra haxaToI
[TRACK SEARCHI</>I],DopoKka yckopraTcC nOBbIeHHoN cKOpocTbO B HaprabHeHn BpaSeHnY nobOpOTHO nepeKJIOuateJIa.
N3MeHeHne BbICOTbl TOHa [VINYL-CDJ]
Bo Bpem BoCnpoN3BedeHn BpaaTe BHeuHIO uactb nobopoTHoro nepeKluOaTeJIa.
Ckopocb BOCPON3BedeHnIONBbIaewcTpN BpaueHnNo YacBOO CTpeJIke, yEmbIaewcTpN BpaueHn IpOTNb YACOBOW CTpeJIKN. PpN OCTaHOBKe BpaueHn BO306HOBJIeTcB OBCPON3BedeHne Ha ObUYHOJ CKOPoCTn.
Korda pexim noBopOTHO nopeKnOHTeY yCTaHOBnEHa peXIM CDJ, Ta-Ke onepaun MOKeT BbINOpHrTbcry PyTeM BpaSeHn BepXHeu cactn noBopOTHO nepeKnOHTeJI.
BocnpOn3BeDHeNe co cKpəTcHem [VINYL]
Korda pexim noBopOTHORo nepeKIOUATEJIy yCTaHOEN Ha peXIM VINYL, DOROJKM MOrYT BOCIPNO3BOIDTCBc B COOTBETCTBN C HAnpaBNeHEm N CKOPoCTbHO BpaSeHn NOBOPOTHORo nepeKIOUATEJI npn BpaSeHm BepXHe qACTN NOBOPOTHORo nepeKIOUATEJI C ONDOBpEmHHbIM ERO HAXaTHeM.
1 Haxmte [JOG MODE].
YctaHOBInTe pexm noBopOTHO nepeKJIouateJHa VINYL
2 Bo BpemB OBCnpOn3BeDeHnHaXmTe BepXHIOU YaCTb NOBOPoTHoro nepeKnIOuTeJIa.
Bocnpoun3BeDene 3aemdIeTcN 3aTeM npnoctaHaBnBaetc.
3 BpaaTe NOBOpOTbI nepeKIOUaTeIb B HxHOM HanpaBJeHHN N C HxHON CKOpocTbI.
3ByaHHe BOCpON3BODITCR B COOTBeTCTBN C HAnpaBNeHnEM N CKOpOCTbIO Bpa- 1IeHINIO NOBOPOTHOIpeKJIouateJIpyTeM BpaIeHnIO NobOPOTHOIpeKJIouaTeJI C OJHOBPeMeHHbIM ERO HAKaTIeM.
4 Y6epnte pyky CBepxneyactn noBopothoro nepekIIOuataTeJ.
Bo3o6HOBnIeTcObIuHoeBocnpOn3BeJeHne.
Perylnpobka Harpz3kn npn BpaueHnn nobopoTHoro nepeKluoyateTna
BpaaaiTe [JOG ADJUST].
Harpy3kn cTahOBnTcB 60JIbSe npn BpaUeHN nO yacOBoN cTpeJIke, MehSe npn BpaUeHN npOTnB YacOBoN cTpeJIkn.
Perynnpovka BpemeH,do KOtOporo npnoctaHaBnBaetc BocnpoN3BeDeHne npn Haxatm BepxHeJ qactn nobopoTHoro nepeKluOyateTl
BpaaaiTe [VINYL SPEED ADJUST TOUCH/BRAKE].
CkopoocbI nobblsaeTc npBpaueHnNo yacobOy cTpeJIke,ymeHblaeTc npBpaueHn npOTNB yacobOy cTpeJIkn.
- Korda peşim noBOPoTHOro nepeKJIOnuTeIaYcTaHOBnEn Ha VINYL, odHO-BpemeHHO n3MeHNeTcR cKOpocTb ocTaHOBKn BOCnpoN3BeDeHnЯ npi hXaTmN [PLAY/PAUSE>II].
Perynnpovka ckopoctn,do KOTopoB BO306HOBJIaTeC 0blyHoe BOCpOu3BedeHne npn OTnycKaHm BepxHei qactn nobopoTHoro nepeKluoyatela
BpaaaiTe [VINYL SPEED ADJUST RELEASE/START].
Ckopoctb nobbIaAeTc npn BpaueHn no YacobO CTpeJIke, yMehbIaETc npn BpaueHn npOTNB YacobO CTpeJIkn.
Korda pexim nobopoTHoro nepeknHouateYcTahOBnHeHa VINYL, OndoBpeMeHHO n3MeHReTcckOpocTb 3aNycca BocnpOn3BeDeHn npn HaxaTN [PLAY/PAUSE>II].
YnpaBleHne KOHTaKTHoN PloUaDKoN [NEEDLE SEARCH]
- KOHTAKHoi pIIOUaJKOI [NEEDLE SEARCH] MOxHo yIpaBJIaTb TOnbKO B CNe-DyHOuNX cIyuaX:
BpeKIme naay3bl
Ioka noBopOtHbI nepeKIOUOATEJIy UdEpxNBAeTcHnKaTbIM, KOrdapeXIM NOBOPOTHO nepeKIOUOATEJIY UCTaHOBNeH HA VINYL
KacaiTeCb KOHTaKTHoN pIooJaKn [NEEDLE SEARCH] naIbIeM dIy oIbner-ueHn BOCnpOn3BeDeHn 3BvUaHn Ha MeCTe npIKoCHOBHeHn KOHTaKTHoN pIo-uaKn. IpeEdbiragTte naneu, KacaBc KOHTaKTHoN pIooJaKn, dIy bIcTporo nepemeeHn Ha hyxHOe MeCTO.
-ДянecковихфункшCDJ-2000 daHHaЯ кOTAKTHaЯ поцадka Испь-3yETcЯ дЯ BBOda 3нakOB.
Bocnpon3BeDeHne c MeCTa npNKoCHOBeHnKaHTaKTHoI pIoUaAdK
PnPKoCHNTecb K KOHTaKTHOI nloaJaKe [NEEDLE SEARCH].
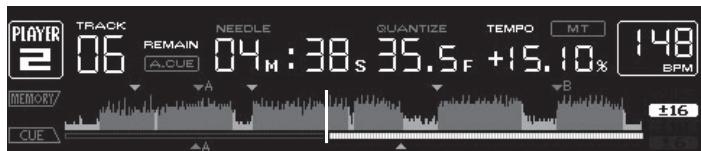
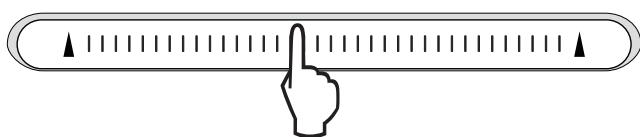
Iopokka BOCPON3BOOHTCn C MeCTa, rHe 6bJNa OTnyuSha KOHTAKTHa nnOuaJa. Tekyuee MeCTo BOCPON3BeDeHnHa DnCnnee aDpeCa BOCPON3BeHnnepeMeUaETc nIpyMO Ha MecTo pNkOCHOBeHn K KOHTAKTHo nnOuaJaKe.
- MecTo BOCpOn3BedeHnMoXHo NepemEeMaTb nyTem npeMeSeHn naIbua
- NOKTAKTHoN PIOUaDke, OndOBpeMeHNo pNkAcAraCb K Hei. POMHnTe, YTO
- KOrJa 3TO BvIOnJHReTcA, MecTo Ha IucPiee aDpeCa BOCpOn3BedeHn MOKeT
- HE OTObpaKaTaCB CoOTBETCTByUOuM o6pa3Om m 3ByuHaHe MOKeT HE BOCpOn
- N3BOIDtCB CaOOTBETCTByUOuM o6pa3Om.
BBOD CMMBOJIOB
BBoD 3HaKOB NONCKC NOMOsbIO KHOHOK [SEARCH]
1 PrnkocnTeScb K KOHTaKTHoI NIOsaJaKe [NEEDLE SEARCH].
![PIONEER CDJ-2000 - BBoD 3HaKOB NONCKC NOMOsbIO KHOHOK [SEARCH] - 1](/content/2019/11/118731/images/9f3654b42df1cbd5ce19fa35cc9acf811d1e4fb4ea985af72097ed4f0652e6fc.jpg)
![PIONEER CDJ-2000 - BBoD 3HaKOB NONCKC NOMOsbIO KHOHOK [SEARCH] - 2](/content/2019/11/118731/images/1652d888ee83b7a9cf5de879df614356e5811461f5698b3a70d1157bdba0cde4.jpg)
YBeINuHbAeTc 3HaK HEnOcpeDCTBeHHo HaD MeCTOM npIKOCHOBeHnIa.
2 Y6epeTne paneC kOHTaKTHoN pIooaAdKn [NEEDLE SEARCH]. BvoHITcR yBelenueHHb 3HaK.
-Дя Ввда дугх 3навов в даньй мочent поворп te npоцу bbyiue.
- MoxHNO BBOIDnTB 6yKBbl A-Z, lIqΦpbl 0-9 nCMMBOJIb. BBOIMbIe 3HaKIn nepeKIIHOuAIOCTc npH naKaTmN MeCTa HneocpeDCTBeHHo NOD [ABC] ININ [123].
![PIONEER CDJ-2000 - Y6epeTne paneC kOHTaKTHoN pIooaAdKn [NEEDLE SEARCH]. BvoHITcR yBelenueHHb 3HaK. - 1](/content/2019/11/118731/images/9aaf9e35ba59ab2259e57d6a130ec130c506d31b5c3e29d6b438b2bbfee08f14.jpg)
- NctopnB OBCPpOu3BeDHeHn DopoJKeK 3aIINcBbAeTcN OTO6paXaEtC B [HISTORY].
C nomoubIIO nCTOpIN BOCnpoIN3BedeHnB [HISTORY], nCnoJIb3y reKordbox, MOxHO co3aTb CnCKn BOCnpOIN3BedeHn. Iopro6Hee, CMOTpIte INcHTpyKuIN no 3KcNpIyatauIN K reKordbox.
1 3aŋpy3nte KapTu namTn SD/yctpOoiCTBO USB B CDJ-2000.
2 Bocnpoun3BeJeHne DopOxKe.
Tekyaanza Bocnpo13BodjaaCra DopoJka 3anncbIbaetcra n OTo6paKaaETcBA [HISTORY].
- Пи подключени устpoиства USB, др., к CDJ-2000 в перbvь раз ипи по повтором подключени, на устpoиства USB abTomatчески соэдагсу Новая [HISTORY].
- EcIn Ha yctpoiCTBe USB, dp., HeIOcTaTOUHO CBO6oDnHO npocTpaHCTBa INe ecIn yctpoiCTBO 3aunuEHO OT 3aINcN, OTobpaxaeTc npedynpeXdaIouee coo6uEHe.
- IMRA [HISTORY] MÖXHO πρεγύταHOBιT B [UTILITY] (CTp. 22).
- Пи поТор"HOM BOCPOn3BEdENHДОPOXKN,уKE 3aПИСанHоВ [HISTORY],посné BOCPOn3BEdENHДуTORДОPOXKN,ОА 3aHOBO 3aПИСьBAeTcВ [HISTORY].ОДнAKO,ДОPOXKN,BOCPOn3BODIMbIe C NOMOПьIO KHOПOK [HOT CUE] (A,B,I C), He 3aПИСьBAiOTcR b ICTOPIN (OHI 3aПИСьBAiOTcR BO BpEma BblOba MeKn 6blCTporo DoCTyna).
B [HISTORY] moKHO 3aIncaTb MaKcMym 999 dopoJek. PpI 3aIncn 1000- n dopoJkn, HauCTapeiun npaMeTp B IVCTOpN yUdJIaIeTcJ.
UdaneHne [HISTORY]
1 Ioka BbIbpaHa [HISTORY], haxmnte [MENU/UTILITY].
OTo6paXaetcMeHIOydaIeHnI.
2 BbI6epnte dnaana3OH ydaJIeHn n HaxMNTe BBOd.
- [DELETE]: Bыденинный kypocopom napametp [HISTORY] удаяетс.
- [ALL DELETE]: [HISTORY] ydaJIaTeTcI NOJIHOCTbIO.
[ HISTORY] ydaIaIeTc npn pneOba3ObaHInn [HISTORY] B cIncOK BocnpOn3-BeDeHnC nOMoUbOrekordbox.
Испльбоване Конки [TAG LIST]
B cIncke T3ROB moKHO npedyctaHOBnTb do 60doPooKek, KOtOpblc 6yDyT Bocnpo n3BOIDnTBcB CpeDyoUu pa3, ININ doPooKek, BbIbpaHHbx dIpy onpepeeneHHbx cueh DJ.
![PIONEER CDJ-2000 - Испльбоване Конки [TAG LIST] - 1](/content/2019/11/118731/images/8d4ab2c2d1f78d52c97f7a393ebfda7de1053e3cd7afc6c45e5947520a453fd7.jpg)
| 1Cniscok copej- Жаня | 3Decb oToobpaJxæTcR coopejxahne BvIbpaHnOro cniscKa TərOv. |
| 2IMЯ hocitelЯ | 3Decb oToobpaJxæTcR IMЯ hocitelЯ, Na KOTOPOM 3aɪnciHa dopoJɔkka. |
| 3Kypcop | Поворачибайе поворотний сelenктор дэлпэршени Курсopa Вверх ил bHni3. |
| 4Фotorpaфия обложки | При ретистрацио оpopмлени в rekordbox ил когда в тэг ID3 copejxitcR pисунok JPEG, oToobpaJxæTcR pисунok дэл dopoJɔkki, BvIbpaHnOс помоцью Курсopa. |
Mnraet NMRcNcKa BOCpON3BeDEHn, INoDPOXKa B TaKOM CnICKe BOCpON3Be-DeHn Do6aBnEeTcB CNICOK T9ROB.
- Пи Вьборе спнда Сворондени, сореджшero дорожки, уж doобавлени B cncok T3roB, И нахати [TAG TRACK/REMOVE], doabawiptc TOnbKO Te dopojkki, KOTopbie pahee He doabawnincb B cncok T3roB.
Cnicku Bocnpoun3beDHeN TaKke MoXHO DoabNTb, HaxAB [TAG TRACK/REMOVE], noka OTo6paXaETcR oΦopMlEHe Ha 3KpaHe INHΦopMaunOHoro Dncnpe.
3aarpy3ka DopoXke n3 cncsKa T3ROB
1 HaxmTe [TAG LIST].
OTo6paKaaETc CNsOK T3rOB.
2 BbIbepnTe 3arpykaemyo Iopokky n Haxmnte BBOd.
Iopoxka 3a pykaetc n 3anyckaetc Bocnpon3BedeHne.
YdaJIeHne IopOJKeK n3 cIeCKa T3rOB
1 HaxmTe [TAG LIST].
OTo6paKaAetc CnncOK TəROB.
2 BbI6epHte ydaJIeMyIO dopOxKy u3 cINsKa T3ROB, 3aTeM haxnMaIte [TAG TRACK/REMOVE] 6oJee 1 ceKynDbI.
Дорожka ydaJIЯTeTc n3 cnIscA T3rOB.
- Ecnn doopokka,doabablenha B cnncOK T3ROB,6blya ydaeneHa n3 cnncKa T3ROB BO Bpem BoCnpOn3BeDeHnra Tako DOpokkn, doopokka BocnpOn3BODNTcra DO
KOHua, 3aTeM yCTaHaBnBaETCp eXIM OCTaHOBKn. CneIyUoJiaDopOxKa He BOCIpOn3BOODITcR.
- Пии n3BneeyHnHnocTeTЯ n3 CDJ-2000, BCE doPoJxKn, 3aIncAHNbIe Ha TOM HocITeIe, ydaJIyIOrTa n3 cNtCKa TərOB.
Испобзованке Конки [INFO]
Плорбуни Информачи O дорожкх, загуженив CDJ-2000, мохно рочсмOTрь, нажав [INFO]. KOrда DJ поогрыВаTeЛ noДКЛючЕны черз PRO DJ LINK, takke можно порсмOTрь NOдОБуни Информачи O дорожкх, загуженив DB JпогрыВаTeЯX.
![PIONEER CDJ-2000 - Испобзованке Конки [INFO] - 1](/content/2019/11/118731/images/fc2da529c79fe5dcc19e28d7ce1a8e0f2bcd515656b472420049bfa52e6f143d.jpg)
rekordbox OrpAHnUHaBt BOCPOn3BedeHne I KOnIPOBaHne My3bIkaJIbHOrO MaTePnAna, 3aunuHHO TO KOnIPOBaHn.
- EcnB My3bIaJIbHOM MaTePnaIe CoDEpXaTcra 3aKoInpOBaHHbIe DaHHbIe,Др..ДЯЗaIHTbI ABTOpCKIN npab,MOKeT 6bITb HeBO3MOxHO ynpabnTb nporpaM-MOJ KAK ObIuHo.
Kordarekordboxo6hapuyknaBaetakne3aokDnpoBaHHbEByM3bKaJIbHOM MaTePnaJe DaHHbIe,dp..JINr3aunTbIaBTOpCKNx npab,OBpaOToKa (BOcnpOn3- BeHeHne,HTehne,dp.)MOKeT pPiocTaHOBnTbcra.
BbIOnIOHeHHbIe BAMM 3aIcN IpeDaHa3NaUeHbI DnA BAJIero IINHOrO YDOBOJIbCTBNI N O 3aKOHAm O 3aunITE ABTOPCKNX npab He MOrY IcNIOJb3OBaTbc S63 corgnacn BlaadenbLa ABTOPCKNX npab.
My3bka, 3aIcAHHa Ha CD dnckax, dp., 3aIuIaetcra 3aKoHAmO 3aIuIte abTOPCKHX npabax OTdJIbHbIX cTpaH n MEXJyHapOdbIMn COrrlaeHnMn. OTrbETBeHHocTh 3a IerIbHoe INCIOJIb3OBaHHe 3aIcAHHo My3bIKI PONHOCTbIO JekIT Ha YelOBeKe, BblONHNBWeM 3aINCb.
- PnO6paueHmC My3bIKo, 3aRpyKeHHo C INItepeHa, dp., 3aRpy3NBuMMy3bIKy CEIOBek Hecet IONHyO OTBeTCTBEHNHOCTb 3a NcIONb3OBaHHe MY3bIKN B COOTBetCTBm C KOHTpAKTom, 3aKIIHOeHHbIM C caITOM 3aRpy3KN.
MepbippeoctopoxkHOCTn no yctahOBke
BnMaTeIbNo npOHTnTE "IinueH3nOHHe CoIaSeHne c KOHeuHbIM nonb3oBaTeJeM" nepeD yctahOBkoRekordbox.
rekordbox COBmCTIM C NOKa3aHHbIMN HIXe ONEpaCNoHHbIMN CNCTeMaMn.
Mac OS X (10.4.6 nnn no3xe)
Windows Vista® Home Basic/Home Premium/Ultimate/Business
- Windows® XP Home Edition/Professional (SP2 und no3xe)
—rekordboxHECOBMECTUMC64-6HTOBbIMMBEPCnA MNI ONEPAUONHbIXCNCTEM 64-6HTOBaB BepcN (BepcNWindowsXPProfessionalx64uIN64-6HTOBaB BepcN Windows Vista).
IocTabJIaembI CD-ROM copejxIT npOrpaMMbl yCTaHOBKn I HnCTpyKcunn no 3KcPJIyatauun Ha cJeDyUOux 12 r3bikax:
AHRnIckM,PhaHcy3ckN,HemeckN,ItalbaryckN,TolnaHdcNk, NcpanhckN, IopTyraIbckN, PyccKNItaickN (ynpooehhbe 3hak), KtatackN (tpaduioHHbe 3hak), KopeickN, JnoHckN.
- PnI nCnoJIb3OBAHm reKordbox c OpeaIOHOH CNTeMoH Na dpyrom Ra3biKe, cIeDyI INCTpyKmH Ha 3kpaH, BblEepTe [English (Ahrnnickn)].
Ipeed Haayanom yctaHOBKn y6eInTeCb, YTO KOMNbHOTep 6bnaaet OINcaHHo HnKe ONEpaunHOH CpeDo.
L:
- Ecni MeHIO CD-ROM He oTo6paKaaeTc npi 3aRpy3ke CD-ROM, otKpoIte CD DnCKOBOD n3 [KomNbOTeP (nJIn MoN KoMnBTope)] B MeHIO [PiYck], 3aTeM DBaJdbI uenKHNte no NkOHKe [CD_menu.exe].
2 Пи отобрахен MeHIO CD-ROM bI6epHTe [rekordbox: UctaHOBtB ПограмMHoe obecneueHne Дя упавлени My3bIKoJ], 3aTeM ueKNHTe [3anyCTnTb].
![PIONEER CDJ-2000 - Пи отобрахен MeHIO CD-ROM bI6epHTe [rekordbox: UctaHOBtB ПограмMHoe obecneueHne Дя упавлени My3bIKoJ], 3aTeM ueKNHTe [3anyCTnTb]. - 1](/content/2019/11/118731/images/0168fd34e9595839be81808d81dbb00b128e6562b176b7e5017321e99721c673.jpg)
ДязakрытmaMeHIO CD-ROM ZeJIKHInTe [BbIXOД].
3 CJIeDy INHCTpyKzmaH Ma 3KpaHe yctaHObnte rekordbox.
MepbI npeOCTOpOxHocTH no yCTaHOBKe
-Перед установский поportаммого драиьера оtmлочиные данноапапа с отосенинге USK可靠ь оданноа папа с компьотepa.
Подкюнец дан Horо оannapata K komlbOTepу 6e npedBapntelho yctaHOBKN nporpamMHoro dpaHbepa moKet npnbecTu K c6oMa Ha kombHTepe B 3aBnCmOCTu OT CNTeMHOcpebl.
- Ecni yctahOBka 6bIina npepBaHn BO Bpemy yctaHBOKn, 3aHOBO npoIN3BeDInTe npocecc yctaHOBKn c camoro hauana, cneyu cneyuOuEe npoueDype.
- Pered yctahOBKO nporpammHO drpaBepa DnI NCKIOUHTeHBO HcONb3OBAHN Ha daHOM apnapate, BHIMTeHbNO npOTNe NOJOKENHaJIueHIOHHOe CornauHene C KOHeYbHM IOnb3OBATeNem.
- Пера установский поргамmarо драьера седует порваь вce другп.
3anyuchны поргамьи на komпьоте.
- PpOprpAMMHbI dpaHBeP COBMeCTIM CO CJIeDyUoZIMM ONepaUHOHHbIMN CNTTEMAMN.
Windows Vista® Home Basic/Home Premium/Ultimate/Business
WindowsXP Home Edition/Professional (SP2 nIi no3ke)
Пограмньдраивересовмс 64-6ИТовIMОпацоньIMССТем amn (Windows XP Professional x64 edition Windows Vista 64-bit).
UuΦpOBoA yAnOBbIXoD (DIGITAL OUT)
BbIXoHNoTepMnHaJI TepMnHaJ RCA
Tin BixoJa KoakcnabHbI uDpOBoi (S/PDIF)
BbIXoHNoYpOBeHb 0,5Vp-p(75Ω)
BbIXoHNoΦopMaT 44,1KΓu,246nT/166nT
Pa3dJI HnCxOJaIero noToKa USB (USB)
TnA
3JIeKtpoNTaHHe 5B/500MAIIMMeHbSe
Pa3dien Bocxoadjoero noToKa USB (USB)
TunB
LAN (PRO DJ LINK)
Published by Pioneer Corporation.
Copyright © 2009 Pioneer Corporation.
All rights reserved.
Publication de Pioneer Corporation.
© 2009 Pioneer Corporation.