
IDK-01 - Audio Dock PIONEER - Free user manual and instructions
Find the device manual for free IDK-01 PIONEER in PDF.

| Product Type | Audio Dock for iPod |
| Brand | PIONEER |
| Model | IDK-01 |
| Power Supply | DC 12 V via supplied AC adapter |
| iPod Compatibility | iPod, iPod mini, iPod photo (3rd generation and later) |
| Playback Functions | Play, pause, forward/back, shuffle, repeat, playlist navigation |
| Display | On-Screen Display (OSD) via video output |
| Remote Control | Infrared remote control with CR2025 lithium battery (included) |
| Remote Control Range | Approximately 7 meters |
| Output Connectors | Stereo RCA audio, Composite video (yellow), S-Video, CONTROL IN port (SR) |
| Input Connector | iPod connector port with interchangeable type adapters |
| Included iPod Adapters | 6 adapters for different iPod models (20GB, 40GB, mini, nano, etc.) |
| Included Cables | Audio cable (2m), video cable (2m), SR cable (2m) |
| AC Adapter | Yes, with plug adapters (x2) |
| Remote Control Battery | Lithium CR2025 (included) |
| Cleaning | Soft dry cloth, or water and mild detergent solution |
| Safety | Do not expose to water, do not open, refer servicing to qualified personnel |
| Warranty | Warranty card included |
| Repairability | No user-serviceable parts |
Frequently Asked Questions - IDK-01 PIONEER
User questions about IDK-01 PIONEER
0 question about this device. Answer the ones you know or ask your own.
Ask a new question about this device
Download the instructions for your Audio Dock in PDF format for free! Find your manual IDK-01 - PIONEER and take your electronic device back in hand. On this page are published all the documents necessary for the use of your device. IDK-01 by PIONEER.
USER MANUAL IDK-01 PIONEER
Control Dock for iPod
iPod is a trademark of Apple Computer, Inc., registered in the U.S. and other countries.
The lightning flash with arrowhead symbol, within an equilateral triangle, is intended to alert the user to the presence of uninsulated "dangerous voltage" within the product's enclosure that may be of sufficient magnitude to constitute a risk of electric shock to persons.
CAUTION
RISK OF ELECTRIC SHOCK DO NOT OPEN
CAUTION:
TO PREVENT THE RISK OF ELECTRIC SHOCK. DO NOT REMOVE COVER (OR BACK). NO USER SERVICEABLE PARTS INSIDE. REFER SERVICING TO QUALIFIED SERVICE PERSONNEL.

The exclamation point within an equilateral triangle is intended to alert the user to the presence of important operating and maintenance (servicing) instructions in the literature accompanying the appliance.
D3-4-2-1_En-A
WARNING
This equipment is not waterproof. To prevent a fire or shock hazard, do not place any container filed with liquid near this equipment (such as a vase or flower pot) or expose it to dripping, splashing, rain or moisture. D3-4-2-1-3_A.En
D3-4-2-1-3_A_En
WARNING
To prevent a fire hazard, do not place any naked flame sources (such as a lighted candle) on the equipment. D3-4-2-1-7a
D3-4-2-1-7a_A_En
This product complies with the EMC Directives (89/336/EEC, amended by 92/31/EEC and 93/68/EEC). D3-4-2

If you want to dispose this product, do not mix it with general household waste. There is a separate collection system for used electronic products in accordance with legislation that requires proper treatment, recovery and recycling.
Private households in the 25 member states of the EU, in Switzerland and Norway may return their used electronic products free of charge to designated collection facilities or to a retailer (if you purchase a similar new one).
For countries not mentioned above, please contact your local authorities for the correct method of disposal.
By doing so you will ensure that your disposed product undergoes the necessary treatment, recovery and recycling and thus prevent potential negative effects on the environment and human health.
K058_En
AC adapter caution
- Make sure to grasp the body of the AC adapter when removing it from the power outlet. If you pull the power cord, it may become damaged which could lead to fire and/or electrocution.
- Do not attempt to plug in or remove the AC adapter with wet hands. This may result in electrocution.
- Insert the prongs of the AC adapter all the way into the power outlet. If the connection is incomplete, heat may be generated which could lead to fire. Furthermore, contact with the connected prongs of the adapter may result in electrocution.
- Do not insert the AC adapter into a power outlet where the connection remains loose despite inserting the prongs all the way into the outlet. Heat may be generated which could lead to fire. Consult with the retailer or an electrician regarding replacement of the power outlet.
Thank you for buying this Pioneer product.
Please read through these operating instructions so that you will know how to operate your model properly. After you have finished reading the instructions, put them in a safe place for future reference.
Contents
01 Before you start
Checking what's in the box 4
Inserting the battery 4
Range of the remote control unit. 5
Regarding interference with this unit 5
Attaching the iPod type adapter 6
Fitting the AC adapter plug 6
02 Controls and displays
Top and front panel 7
Rear panel. 7
03 Connecting up
Connecting the system to your AV receiver or TV. 8
04 Getting started
iPod playback features. 9
Using the on-screen display. 10
05 Additional information
Troubleshooting 11
Specifications 11
Cleaning the unit 11
Discover the benefits of registering your product online at www.pioneer.co.uk (www.pioneer-eur.com)
Chapter 1
Before you start
Checking what's in the box
Please check that you've received the following supplied accessories:
Remote control
Lithium battery (CR2025)
- iPod type adapter x6
- AC adapter
- Plug adapters (for AC adapter) x2
Audio cable (2 m) red/white
Video cable (2 m) yellow
- SR cable (2 m)
These operating instructions
Warranty card
Inserting the battery
Reseat the lithium battery (CR2025) in the remote control as shown right. When you notice a decrease in the operating range, replace the battery in the same manner.
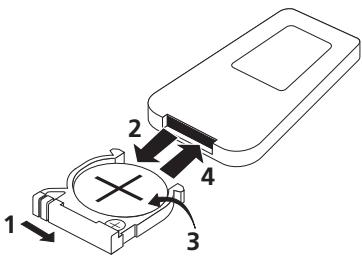
1 Push the release tab to the right to open the battery casing.
2 Pull out the battery casing.
3 Remove the battery from the casing.
If you're doing this for the first time, remove the protective seal from the battery supplied with the system before re-inserting it.
4 Place a new battery in the casing.
Make sure the ① side of the battery is facing up when you place it in the space provided.

Caution
When using lithium batteries, please observe the following:
- Dispose of used battery cells immediately after replacement. Keep away from children.
-
If swallowed, please contact a doctor immediately.
-
Lithium batteries may present a fire or chemical burn hazard if misused. Do not disassemble, heat above 100^ or incinerate.
- Remove the battery if the unit isn't going to be used for a month or more.
- When disposing of used batteries, please comply with governmental regulations or environmental public instruction's rules that apply in your country/area.
- There is danger of explosion if the battery is incorrectly replaced. Make sure to replace only with the same type recommended by the manufacturer.
- Do not use or store batteries in direct sunlight or other excessively hot place, such as inside a car or near a heater. This can cause batteries to leak, overheat, explode or catch fire. It can also reduce the life or performance of batteries.
Range of the remote control unit
The remote control has a range of about 7 meters. It may not work properly if:
- There are obstacles between the remote control and this unit's remote sensor.
- Direct sunlight or fluorescent light is shining onto the remote sensor.
- This system is located near a device that is emitting infrared rays.
- This unit is operated simultaneously with another infrared remote control unit.

Regarding interference with this unit
There may be cases where using a cellular phone near this unit will result in noise or interference. If you experience this problem, distance your cellular phone and this unit.
Attaching the iPod type adapter
For your iPod to sit properly in the dock connector port, you will have to match the iPod type adapter with your model of iPod. Each iPod type adapter has a model marking as shown below.
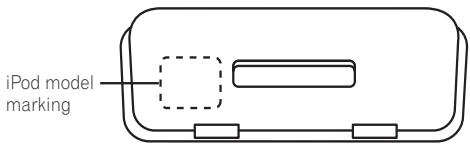
Model mark Corresponding iPod type
| iPod 20GB | Fourth generation 20 GB iPod |
| iPod 40GB | Fourth generation 40 GB iPod |
| mini | iPod mini |
| Color 20GB | 20 GB / 30 GB iPod <color display> |
| 30GB | |
| Color 40GB | 40 GB / 60 GB iPod <color display> |
| 60GB | |
| nano | iPod nano |
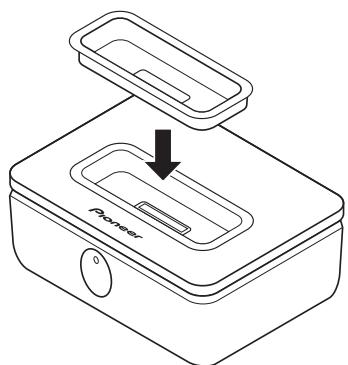
After selecting the iPod type adapter that corresponds with your iPod unit, insert it into the iPod type adapter pocket as shown.
-
It is also possible to connect an iPod type adapter from an original iPod dock.
-
When using fifth generation iPod models with this system, please use the iPod type adapter supplied with your iPod unit.
- When using a third generation iPod model with this system, please use an 'Apple iPod Universal Dock adapter 3-pack for iPod with Dock Connector' available for purchase from Apple Computer Inc.
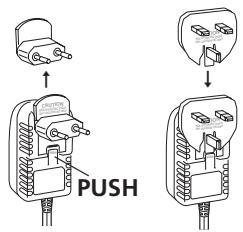
Fitting the AC adapter plug
U.K. model only
Make sure the AC adapter is fitted with the appropriate plug for your region. Switch the removable AC adapter plug as shown below.
Chapter 2
Controls and displays
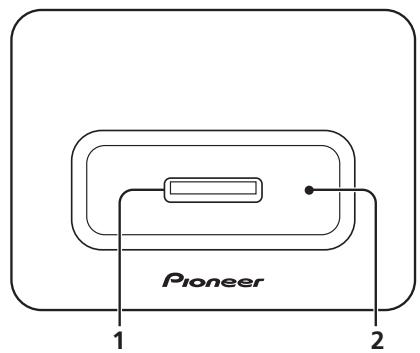
Top and front panel

1 iPod connector port
Insert your iPod dock connector port to connect and recharge your iPod unit.
2 iPod type adapter pocket
Holds the iPod type adapter that matches your iPod unit.
3 Power indicator
Lights when your iPod is connected to the dock connector port.
4 Remote sensor
See Range of the remote control unit on page 5 for more on this.
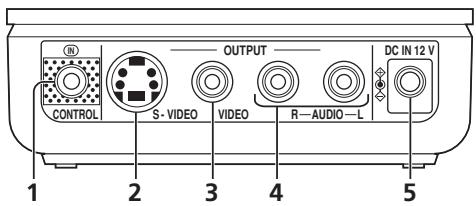
Rear panel
1 CONTROL IN terminal
Connect this to a Pioneer AV receiver (or similar component) CONTROL OUT terminal using the supplied SR cable. This allows you to use the receiver's remote to control this unit. Check your Pioneer receiver's operating instructions for more on this.
2 S-VIDEO output terminal
Use to connect an S-video cable to your TV/AV receiver to view the on-screen display or for higher quality iPod video playback (no video is output to the VIDEO terminal if you make this connection).
3VIDEO output terminal
Connect a standard (composite) video cable to your TV/AV receiver to view the on-screen display or for iPod video playback.
4 AUDIO output terminal
Use to connect a stereo RCA/phono terminal cable to your AV receiver /power amplifier for two-channel audio.
5 AC adapter DC IN 12 V terminal
Use to connect the AC adapter to an AC power outlet.
Note
Chapter 3
Connecting up
Connecting the system to your AV receiver or TV
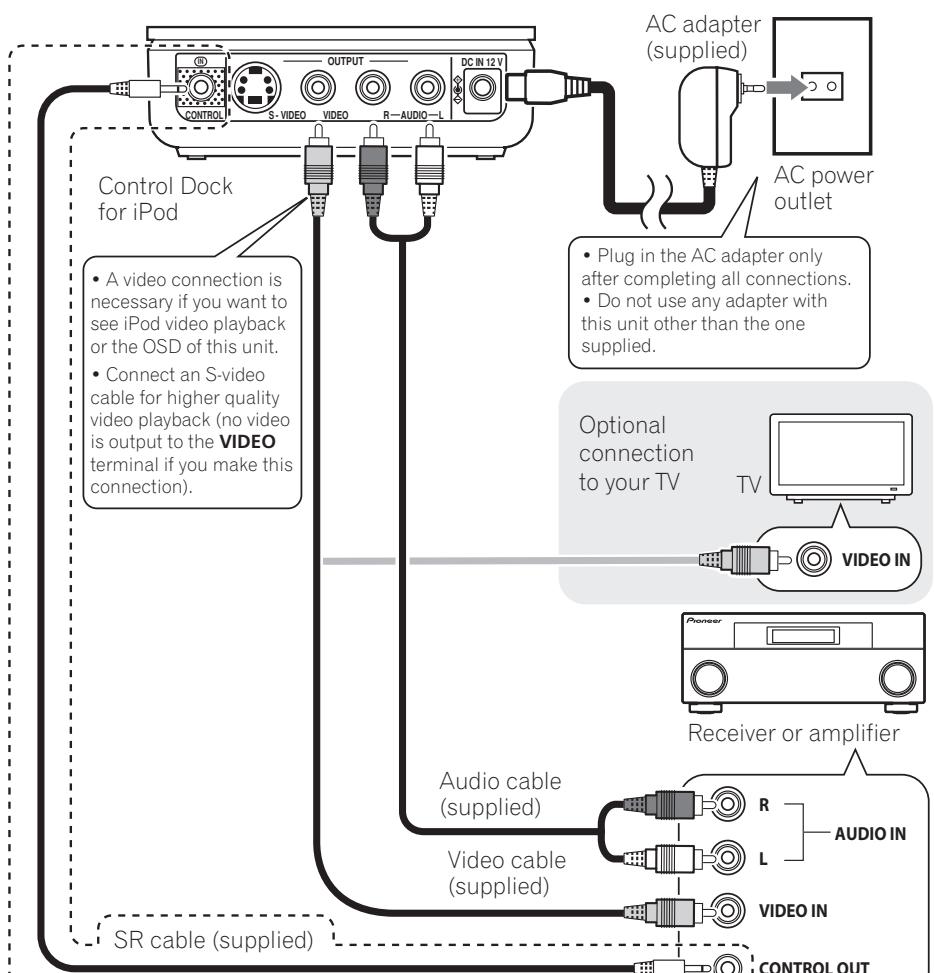
Most Pioneer receivers have a CONTROL OUT terminal which can be used to link this component, allowing you to use the receiver's remote to control this unit. Check your Pioneer receiver's operating instructions for more on this. (If you have connected an SR cable to this terminal, you must point the remote control supplied with this unit at the remote sensor of the connected receiver or amplifier.)
Chapter 4
Getting started
iPod playback features
Once you have connected everything, you're ready to starting watching videos and listening to music. Follow the steps below for an introduction to your iPod dock.
1 Place your iPod into the dock connector port.
Make sure you have fitted the connector port with the iPod type connector that matches your iPod model (see Attaching the iPod type adapter on page 6 to do this).
2 Select the proper input on your AV receiver (or power amplifier).
To use the on-screen display or to watch video, you must also switch on your TV or monitor.
3 Start playback.
Check the table in Basic remote controls below for an explanation of the playback features available with this system.
- Since the volume of the iPod cannot be controlled using this unit, please adjust the volume using the AV receiver or power amplifier to which you have connected.
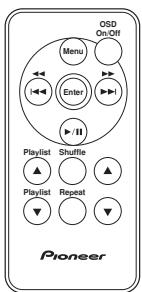
Basic remote controls
The following table shows the basic playback controls for your iPod:
| Button | What it does |
| OSD On/Off | Switches on/off this unit's on-screen display (this appears on the video component to which you're connected). |
| Menu | Returns to the previous menu. |
| Enter | Selects menu items/levels. |
| II | Starts/pauses playback. |
| Press and hold during playback to start scanning. | Press and hold during playback to start scanning. |
| Press to skip to the previous/next song. | Press to skip to the previous/next song. |
| Playback Playlist | Starts playback of the previous/next playlist. |
| Shuffle | Press repeatedly to switch between shuffle play options. |
| Repeat | Press repeatedly to switch between repeat play options. |
| ▲▼ | Use these buttons to move the cursor (on-screen). |

Important
- This system is compatible with an iPod mini, iPod Photo, iPod nano and iPod Video portable device (third generation and above), however, compatibility may vary depending on the software version of your iPod. The following software versions have been tested:
| Model | Software version |
| iPod Video | 1.0 or higher |
| iPod nano | 1.0 or higher |
| iPod Photo | 1.2 or higher |
| iPod mini | 1.4 or higher |
| Fourth Generation iPod | 3.02 or higher |
| Third Generation iPod | 2.3 or higher |
Depending on your model of iPod, some features may not be available.
Video output with this system is compatible with the PAL TV format.
- Pioneer is not responsible for any data loss occurring when using your iPod together with this unit.
Using the on-screen display
For ease of use, this system makes use of a graphical on-screen display (OSD).
All the screens are navigated in basically the same way, using the cursor buttons ( ,) to change the highlighted item and pressing ENTER to select it. See Basic remote controls above for the other controls available.
- Make sure the iPod dock is connected to a video component, then press 'OSD On/Off'.
The OSD will appear on screen. If you want to play video content from your iPod, or use any of the iPod main unit playback controls, you must press OSD On/Off again to switch the OSD off before using your iPod.
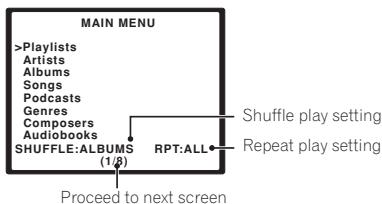
Main menu screen

[ \text{ Playlist } ]
Playback screen
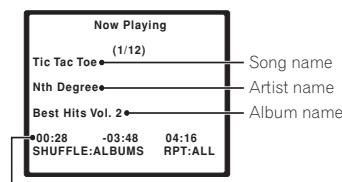
Elapsed playback time / remaining playback time / total time

Note
1 A screen saver appears after 3 minutes of inactivity. Press any button to return to the OSD menu.
- Playback stops when OSD On/Off is pressed.
2 Note that non-roman characters in playlists will be displayed as
Chapter 5
Additional information
Troubleshooting
Incorrect operations are often mistaken for trouble and malfunctions. If you think that there is something wrong with this component, check the points below. Sometimes the trouble may lie in another component. Investigate the other components and electrical appliances being used. If the trouble cannot be rectified even after exercising the checks listed below, ask your nearest Pioneer authorized service center or your dealer to carry out repair work.
| Problem | Remedy |
| No sound/no picture. | ·Make sure your iPod is working properly. ·Make sure the iPod is seated correctly in the iPod connector dock. ·Make sure you have properly connected the AV outputs from the dock to your external components. Also check that the correct input is selected on your receiver and/or monitor. ·If you have connected the S-video output, nothing is output from the standard (composite) video output. |
| Operation doesn't seem possible after connecting the SR cable from this unit to an external component. | ·For operation, you must point the remote control supplied with this unit at the remote sensor of the connected receiver or amplifier. ·Make sure you are using the SR cable supplied with this system. |
Specifications
Power section and miscellaneous
Power requirements (using the supplied adapter) DC12V
Dimensions . . . 99 mm (W) x 33 mm (H) x 74 mm (D)
Weight 200g
- Accessories
Remote control 1
Lithium battery (CR2025) 1
iPod type adapter. 6
ACadapter 1
Plug adapters (for AC adapter) 2
Audio cable (2 m) red/white 1
Video cable (2 m) yellow 1
SR cable (2 m). 1
These operating instructions. 1
Warranty card. 1

Note
- Specifications and design subject to possible modification without notice, due to improvements.
Cleaning the unit
- Use a polishing cloth or dry cloth to wipe off dust and dirt.
- When the surface is dirty, wipe with a soft cloth dipped in some neutral cleanser diluted five or six times with water, and wrung out well, and then wipe again with a dry cloth. Do not use furniture wax or cleansers.
- Never use thinners, benzine, insecticide sprays or other chemicals on or near this unit, since these will corrode the surface.
Published by Pioneer Corporation
Copyright ©2006 Pioneer Corporation
All rights reserved
IMPORTANT

Dimensions .99 mm (L) x 33 mm (H) x 74 mm (P)
Poids. xxxg
- Accessoires
Télécommande 1
Publication de Pioneer Corporation.
© 2006 Pioneer Corporation.
Pioneer Corporation.
2 iPod type-adapter opening
[ \text{Playlistmenu}^2 ]
![PIONEER IDK-01 - [ \text{Playlistmenu}^2 ] - 1](/content/2025/01/118608/images/ad37b9607ed8bd4d380dbb61abbd41a7371227f5e1f2421385b7e7f5cb245def.jpg)
Weergaveschemr
Copyright © 2006 Pioneer Corporation.
PIONEER ELECTRONICS (USA) INC.
P.O. BOX 1540, Long Beach, California 90810-1540, U.S.A. TEL: (800) 421-1404
PIONEER ELECTRONICS OF CANADA, INC.
300 Allstate Parkway, Markham, Ontario L3R OP2, Canada TEL: 1-877-283-5901
PIONEER EUROPE NV
Haven 1087, Keetberglaan 1, B-9120 Melsele, Belgium TEL: 03/570.05.11
PIONEER ELECTRONICS ASIACENTRE PTE. LTD.
253 Alexandra Road, #04-01, Singapore 159936 TEL: 65-6472-7555
PIONEER ELECTRONICS AUSTRALIA PTY. LTD.
178-184 Boundary Road, Braeside, Victoria 3195, Australia, TEL: (03) 9586-6300
PIONEER ELECTRONICS DE MEXICO S.A. DE C.V.
Blvd.Manuel Avila Camacho 138 10 piso Col.Lomas de Chapultepec, Mexico,D.F. 11000 TEL: 55-9178-4270
K002_A_En