EXPRESSION PHOTO XP-750 - Photo printer EPSON - Free user manual and instructions
Find the device manual for free EXPRESSION PHOTO XP-750 EPSON in PDF.
User questions about EXPRESSION PHOTO XP-750 EPSON
0 question about this device. Answer the ones you know or ask your own.
Ask a new question about this device
Download the instructions for your Photo printer in PDF format for free! Find your manual EXPRESSION PHOTO XP-750 - EPSON and take your electronic device back in hand. On this page are published all the documents necessary for the use of your device. EXPRESSION PHOTO XP-750 by EPSON.
USER MANUAL EXPRESSION PHOTO XP-750 EPSON
For information on Epson's ink cartridge yields, please visit the website above.
Where to Find Information. 2
Caution, Important and Note. 2
Using Epson Connect Service. 2
Safety Instructions. 2
Control Panel Overview. 3
Button and LCD. 4
Lights. 4
Paper and Media Handling. 5
Selecting Paper. 5
Loading Paper. 5
Into the paper cassette. 5
Into the rear paper feed slot. 6
Loading a CD/DVD. 7
Removing a CD/DVD. 8
Inserting a Memory Card. 8
Placing Originals. 9
Automatic Document Feeder (ADF). 9
Scanner glass. 11
Copying. 11
Printing Photos. 12
From a Memory Card. 12
From a Digital Camera. 12
Scanning. 13
Faxing. 13
Introducing FAX Utility. 13
Connecting to a Phone Line. 14
About a phone cable. 14
Using the phone line for fax only. 14
Sharing line with phone device. 14
Checking the fax connection. 14
Setting Up Fax Features. 15
Setting up speed dial entries. 15
Setting up group dial entries. 15
Sending Faxes. 15
Receiving Faxes. 16
Printing Reports. 16
More Functions. 17
Replacing Ink Cartridges. 18
Safety instructions. 18
Precautions. 18
Replacing an ink cartridge. 19
Basic Troubleshooting. 21
Error Messages. 21
Paper Jams. 22
Removing jammed paper from the rear cover 22
Removing jammed paper from inside the product. 22
Removing jammed paper from the paper cassette. 23
Removing jammed paper from the Automatic Document Feeder (ADF). 23
Print Quality Help. 24
Faxing Help. 25
Where To Get Help. 25
Technical Support Web Site. 25
Introduction
Where to Find Information
The latest version of the following manuals are available on the Epson support website. http://www.epson.eu/Support (Europe) http://support.epson.net/ (outside Europe)
Start Here (paper):
Provides you with information on setting up the product and installing the software.
Basic Guide (paper):
Provides you with basic information when you are using the product without a computer.
User's Guide (PDF):
Provides you with detailed operating, safety, and troubleshooting instructions. See this guide when using this product with a computer, or when using advanced features such as 2 sided copying. To view the PDF manual, you need Adobe Acrobat Reader 5.0 or later, or Adobe Reader.
Network Guide (HTML):
Provides network administrators with information on both the printer driver and network settings.
Help (on the product display):
Provides basic operating and troubleshooting instructions on the product's LCD screen. Select the Help menu on the control panel.
Caution, Important and Note
Caution, Important and Note in this manual are indicated as below and have the following meaning.
Caution
must be followed carefully to avoid bodily injury.
Important
must be observed to avoid damage to your equipment.
Note
contain useful tips and restrictions on product operation.
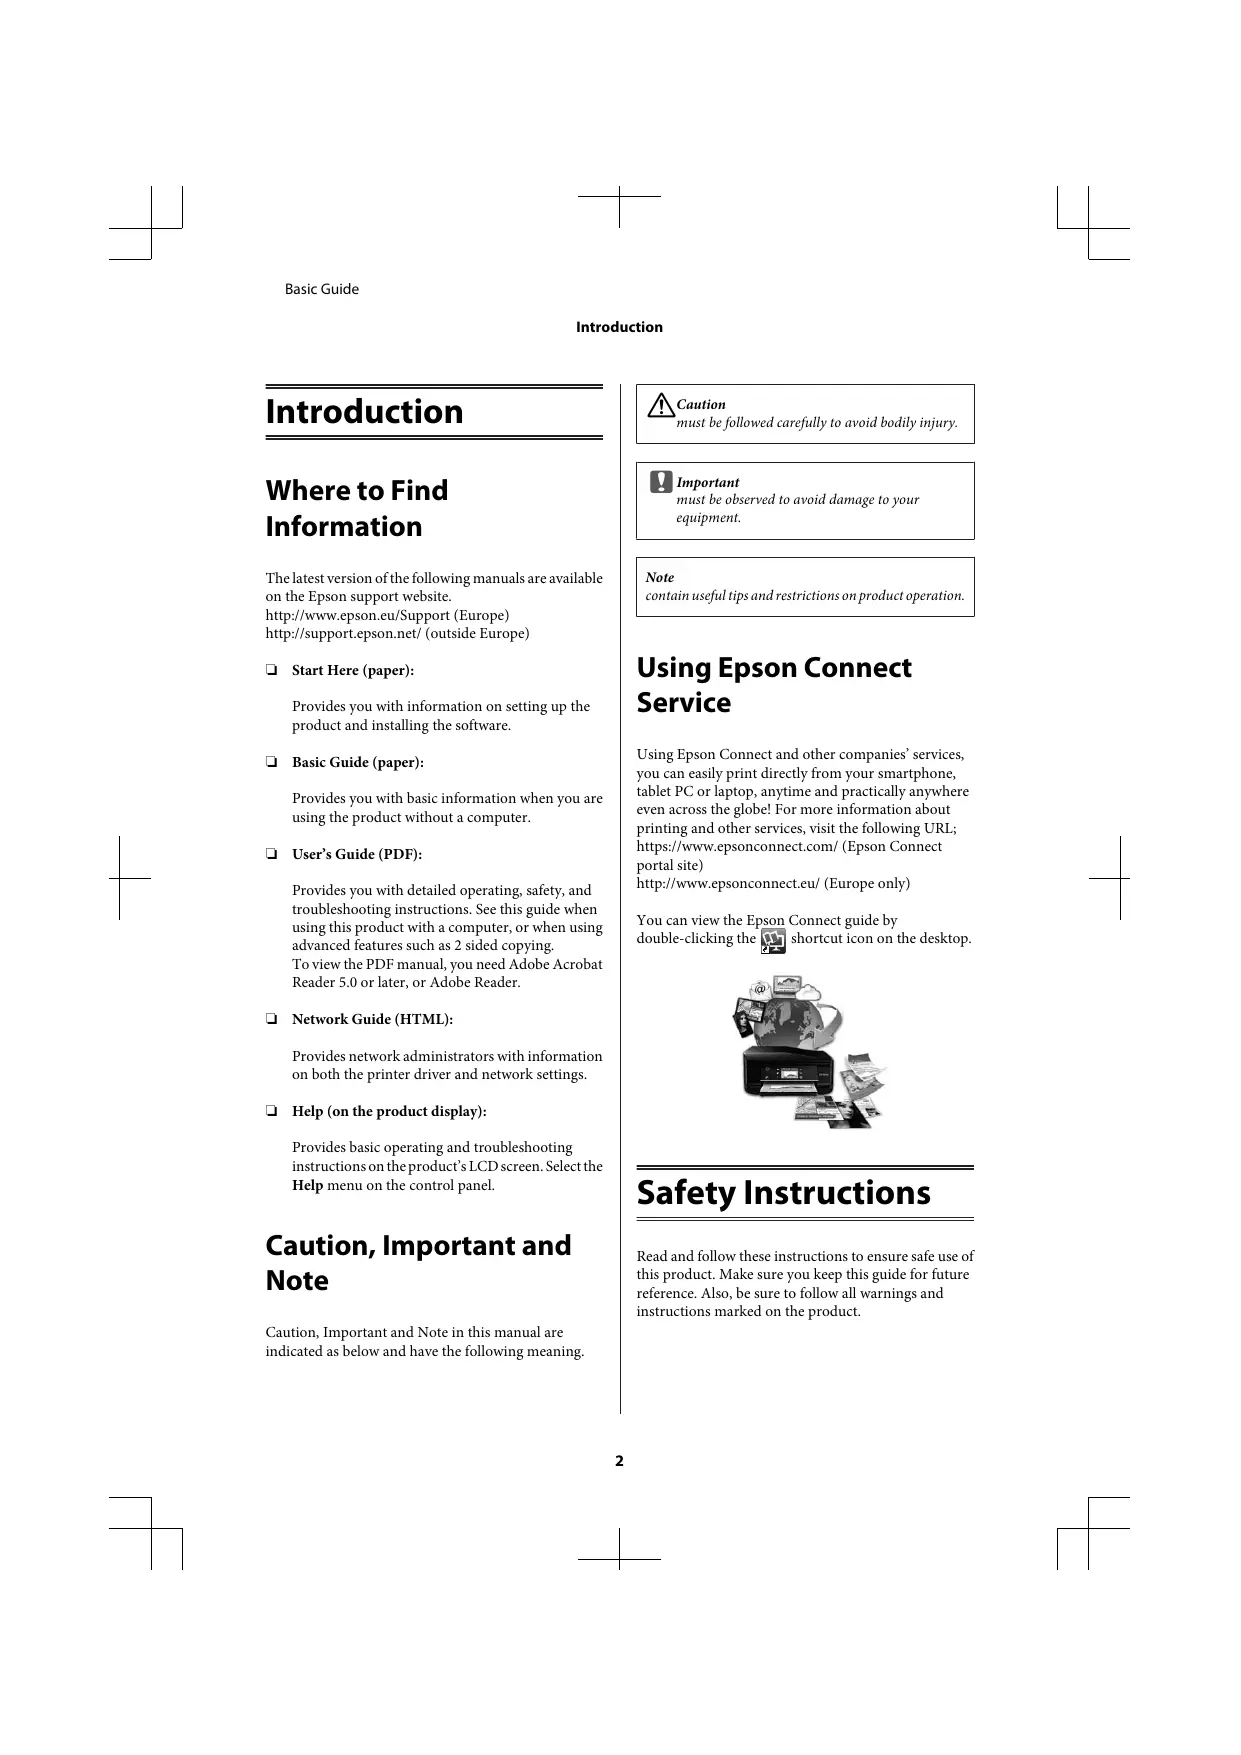
Using Epson Connect Service
Using Epson Connect and other companies' services, you can easily print directly from your smartphone, tablet PC or laptop, anytime and practically anywhere even across the globe! For more information about printing and other services, visit the following URL; https://www.epsonconnect.com/ (Epson Connect portal site) http://www.epsonconnect.eu/ (Europe only)
You can view the Epson Connect guide by double-clicking the shortcut icon on the desktop.
Safety Instructions
Read and follow these instructions to ensure safe use of this product. Make sure you keep this guide for future reference. Also, be sure to follow all warnings and instructions marked on the product.
Control Panel Overview
Use only the power cord supplied with the product and do not use the cord with any other equipment. Use of other cords with this product or the use of the supplied power cord with other equipment may result in fire or electric shock.
- Be sure your AC power cord meets the relevant local safety standard.
- Never disassemble, modify, or attempt to repair the power cord, plug, printer unit, scanner unit, or options by yourself, except as specifically explained in the product's guides.
Unplug the product and refer servicing to qualified service personnel under the following conditions: The power cord or plug is damaged; liquid has entered the product; the product has been dropped or the casing damaged; the product does not operate normally or exhibits a distinct change in performance. Do not adjust controls that are not covered by the operating instructions.
Place the product near a wall outlet where the plug can be easily unplugged.
- Do not place or store the product outdoors, near excessive dirt or dust, water, heat sources, or in locations subject to shocks, vibrations, high temperature or humidity.
Take care not to spill liquid on the product and not to handle the product with wet hands.
- Keep this product at least 22cm away from cardiac pacemakers. Radio waves from this product may adversely affect the operation of cardiac pacemakers.
If the LCD screen is damaged, contact your dealer. If the liquid crystal solution gets on your hands, wash them thoroughly with soap and water. If the liquid crystal solution gets into your eyes, flush them immediately with water. If discomfort or vision problems remain after a thorough flushing, see a doctor immediately.
- Avoid using a telephone during an electrical storm. There may be a remote risk of electric shock from lightning (for fax capable models).
Do not use a telephone to report a gas leak in the vicinity of the leak (for fax capable models).
Note:
The following provides safety instructions for ink cartridges.
"Replacing Ink Cartridges" on page 18
Control Panel Overview
Note:
Control panel design varies depending on location.
Although the control panel design and what displayed on the LCD screen such as menu names and option names may differ from your actual product, the method of operation is the same.
Control Panel Overview
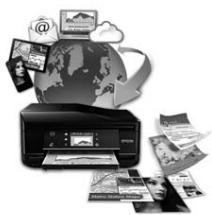
Button and LCD
| Buttons | Function | |
| a | Turns the product on or off. | |
| b | Displays the Home menu. | |
| c | LCD screen displays menus. If your product has a touch panel, you can scroll the screen by swiping the LCD screen. Swipe the center of LCD screen quickly. Try swiping a bit harder if the touch panel is slow to respond. Menu are displayed depending on the action you perform, such as inserting a memory card. If the menu you want is not displayed, press ↑. To disable automatic menu selection, turn off each item in the Auto Selection Mode menu. Setup > Guide Functions > Auto Selection Mode | |
| d | ▲,▼ | Scrolls the screen. |
| e | Press to display the CD/DVD label menu. The product prepares CD/DVD label printing. | |
| f | Cancel/s RETURNS to the previous menu. | |
| g | Starts copying/printing/scanning/faxing. |
Lights
| Lights | Function |
| ● | On when the product is on. Flashes when the product is receiving data, printing/copying/scanning/faxing, replacing an ink cartridge, charging ink, or cleaning the print head. Flashes slowly when the product is in sleep mode. |
| —Wi-Fi | Stays on while the printer is connected to a network. Flashes while network settings are being adjusted (green: Wi-Fi/orange: Ethernet). |
| Note: See the Help on the control panel for more information on the icons displayed on the LCD screen. |
Paper and Media Handling
Selecting Paper
The product automatically adjusts itself for the type of paper you select in your print settings. That is why the paper type setting is so important. It tells your product what kind of paper you are using and adjusts the ink coverage accordingly. The table below lists the settings you should choose for your paper.
| For this paper | LCD paper type |
| Plain paper* | Plain Paper |
| Epson Bright White Ink Jet Paper* | Plain Paper |
| Epson Ultra Glossy Photo Paper | Ultra Glossy |
| Epson Premium Glossy Photo Paper | Prem. Glossy |
| Epson Premium Semigloss Photo Paper | Prem. Glossy |
| Epson Glossy Photo Paper | Glossy |
| Epson Photo Paper | Photo Paper |
| Epson Photo Quality Ink Jet Paper | Matte |
| Epson Matte Paper-Heavyweight | Matte |
| Epson Double-Sided Matte Paper | Matte |
| Epson Photo Stickers | Photo Sticker |
- You can perform 2-sided printing with this paper.
Loading Paper
Into the paper cassette
Note:
Although the instructions in this section are based on cassette 2, the method of operation is the same for cassette 1.
The available paper type, size and loading capacity differs between cassette 1 and 2. See the PDF User's Guide for more information.
For instructions on loading envelopes or a Photo Stickers sheet, see the User's Guide PDF.
1 Open the front cover.
Note:
If the output tray has been ejected, close it before pulling out the paper cassette.
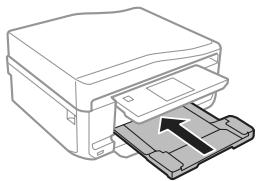
Pull out the paper cassette.
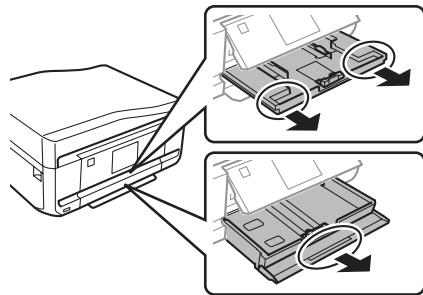

Slide the edge guides to the sides of the paper cassette.
Note:
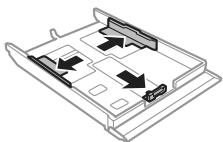
When using Legal-size paper, remove the CD/DVD tray, and then extend cassette 2 as shown in the illustration.

Slide the edge guide to adjust to the paper size you will use.
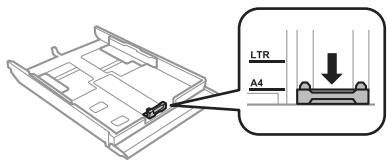

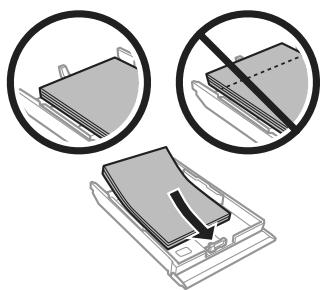
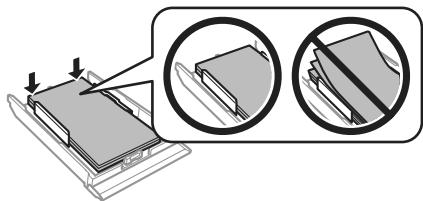
Load paper toward the edge guide with printable side face-down, and check that the paper is not sticking out from the end of the cassette.
Note:
Fan and align the edges of the paper before loading.
For plain paper, do not load paper above the line just under the arrow mark inside the edge guide. For Epson special media, make sure the number of sheets is less than the limit specified for the media.
- When you select Cassette 1 > Cassette 2 as the Paper Source, load the same size and type of paper in both cassettes.

Slide the edge guides to the edges of the paper.
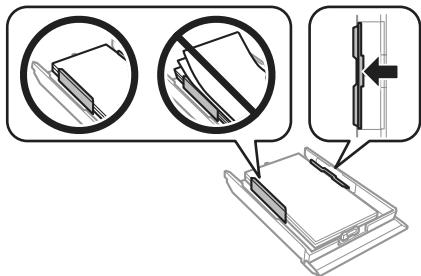

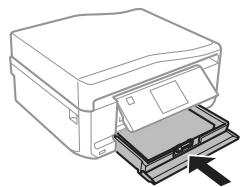
Keep the cassette flat and insert it back into the product carefully and slowly.
Note:
Leave enough space in front of the product for the paper to be fully ejected.
Do not remove or insert the paper cassette while the product is operating.
Into the rear paper feed slot
Note:
Even though you can print on paper with a thickness of 0.05 to 0.6mm , some hard paper may not be fed correctly even if the thickness is within this range.
1 Send your print job to the product (from your computer, or by using the control panel).
Note:
Before sending your print job, you cannot load paper into the rear paper feed slot.
2 Open the rear paper feed slot cover and then pull out the paper support.
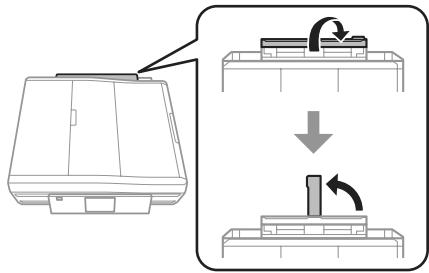
3 Slide the edge guide.
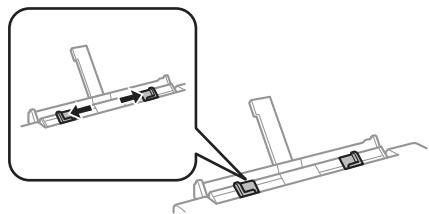
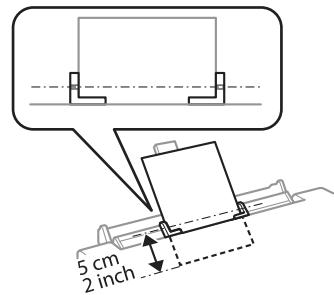
4 Load a single sheet of paper with the printable side face-up at the center of the rear paper feed slot, and then set the edge guide. The printable side is often whiter or brighter than the other side.
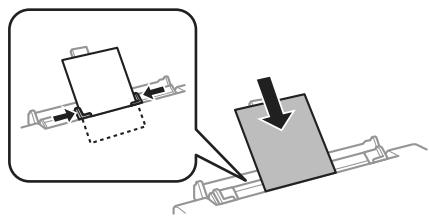
Note:
Insert the paper so that the leading edge is approximately 5cm from the groove in the edge guides.
Press
Note:
The paper ejects automatically after a certain period of time.
Loading a CD/DVD
Important:
Do not insert the CD/DVD tray while the product is operating. Otherwise, your product may be damaged or the surface of the CD/DVD may become dirty or scratched.
- When ejecting/inserting the CD/DVD tray, make sure nothing is placed on the output tray.
Note:
You can also print on a Blu-ray Disc ^TM
1 Press on the control panel, and then select Load CD/DVD.
2 Raise the panel as far as it will go.
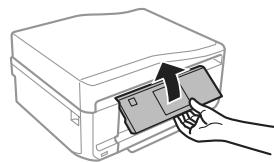
Note:
If the output tray has been ejected, close the tray and the front cover.

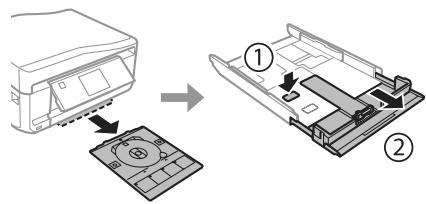
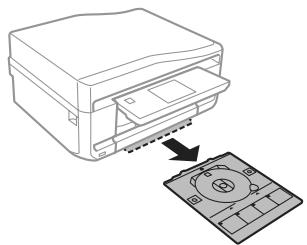
3
Remove the CD/DVD tray from the product.
4
Place a CD/DVD on the CD/DVD tray with the printable side face-up, and then insert the tray into the product. Make sure that the marks on the tray and the marks on the product match, so that the line on the tray aligns with the product.
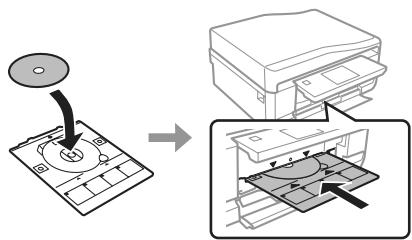
5
Press Done on the LCD screen.
Note:
The CD/DVD tray ejects automatically after a certain period of time.
Removing a CD/DVD

Remove the CD/DVD tray from the product, and then remove your CD/DVD from the tray.
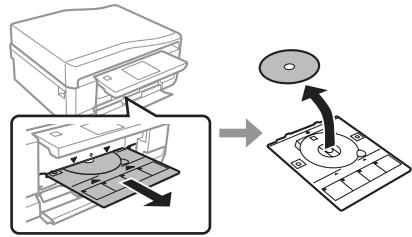

Caution:
Be careful not to scratch the surface of the CD/DVD when removing it.
2
Lower the control panel.
3
Insert the CD/DVD tray back into the slot on the bottom of the product.
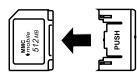
Inserting a Memory Card
You can print photos in a memory card or save a scanned data in a memory card. The following memory cards are supported.
SD, miniSD, microSD, SDHC, miniSDHC, microSDHC, SDXC, microSDXC, MultiMediaCard, MMCplus, MMCmobile, MMCmicro, Memory Stick Duo, Memory Stick PRO Duo, Memory Stick PRO-HG Duo, Memory Stick Micro, MagicGate Memory Stick Duo, CompactFlash, Microdrive

Important
The following memory cards require an adapter. Attach it before inserting the card into the slot, otherwise the card may get stuck.
miniSD, microSD, miniSDHC, microSDHC, microSDXC, MMCmicro
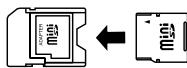
MMCmobile
Memory Stick Micro
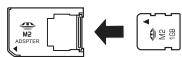
1 Open the cover, and insert one card at a time.
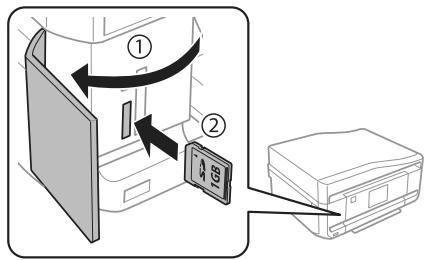
Check the light stays on.
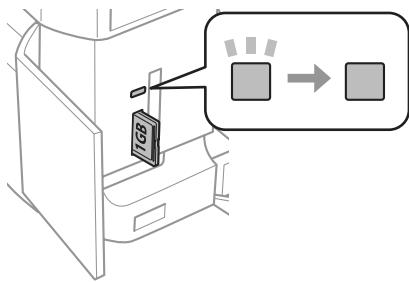
=on, = flashing

Important
Do not try to force the card all the way into the slot. It should not be fully inserted.
Do not remove the memory card while the light is flashing. The data in the memory card may be lost.
Note:
If you have more than 999 images on your memory card, images are automatically divided into groups and the group selection screen is displayed. Select the group that contains the image you want to print. Images are sorted by the date they were taken.
To select another group, select Print Photos on the Home menu. Next, select Options, Select Location, and then Select Folder or Select Group.
Placing Originals
Automatic Document Feeder (ADF)
Note:
The Automatic Document Feeder is only available for XP-850.
You can load your original documents in the Automatic Document Feeder (ADF) to copy, scan, or fax multiple pages quickly. The ADF can scan both sides of your documents. To do so, select the option in the copy setting menu.
You can use the following originals in the ADF.
| Size | A4/Letter/Legal |
| Type | Plain paper |
| Weight | 64 g/m2to 95 g/m2 |
| Capacity | 30 sheets or 3 mm or less (A4, Letter)/10 sheets (Legal) |
When you scan a 2-sided document using the ADF, legal size paper is not available.
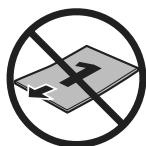
Important:
To prevent paper jams, avoid the following documents. For these types, use the scanner glass.
Documents held together with paper clips, staples, etc.
Documents that have tape or paper stuck to them.
Photos, OHPs, or thermal transfer paper.
Paper that is torn, wrinkled, or has holes.
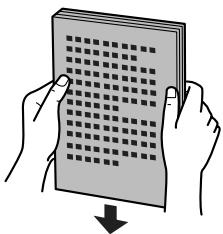
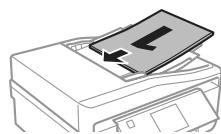
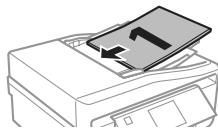
1 Tap the originals on a flat surface to even the edges.
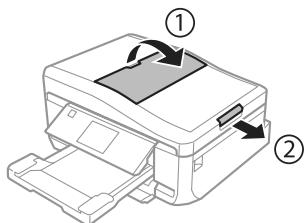
2 Open the ADF input tray, and then slide out the output tray extension.
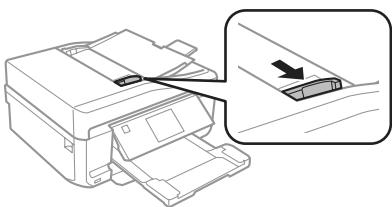
3 Slide the edge guide on the Automatic Document Feeder.
4
Insert the originals face-up and short edge first into the Automatic Document Feeder, and then slide the edge guide until it is flush with the originals.
Note:
The ADF icon is displayed when originals are placed in the automatic document feeder.
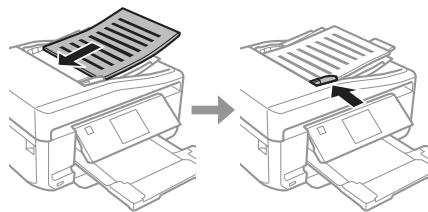
Note:
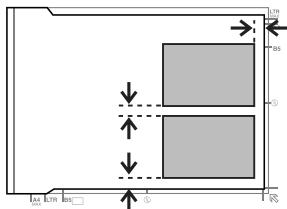
For A4, 2-up Copy layout, place the original as shown. Make sure the orientation of the original matches the Document Orientation settings.

- When you use the copy function with the Automatic Document Feeder (ADF), the print settings are fixed at Reduce/Enlarge - Actual Size, Paper Type - Plain Paper, and Paper Size - A4. The print is cropped if you copy an original larger than A4.
Scanner glass
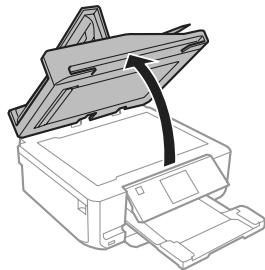
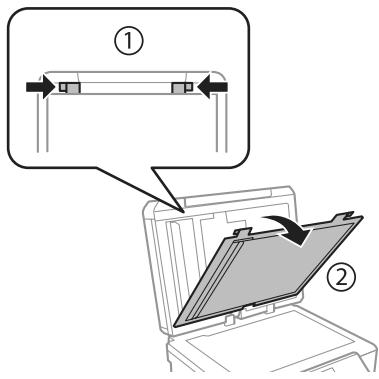
1 Open the document cover.
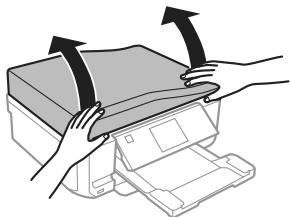
2 Place your original face-down on the scanner glass, and slide it to the front-right corner.
3 Close the cover gently.
Note:
When there is a document in the Automatic Document Feeder (ADF) and on the scanner glass, priority is given to the document in the Automatic Document Feeder (ADF).
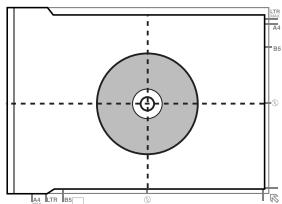
Placing a CD
Place the CD face-down in the center.
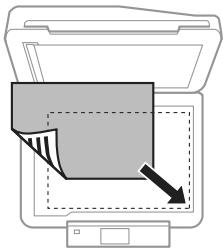
Placing photos
Place photos 5mm apart.
Note:
You can copy one photo or multiple photos of different sizes at the same time, as long as they are larger than 30x 40mm
Copying
Follow the steps below to copy documents.
1 Load paper in the cassette 2.
"Into the paper cassette" on page 5
2 Place original.
"Placing Originals" on page 9
3 Enter Copy mode from the Home menu.
4 Press + or - to set the number of copies.
5 Set the color.
6 Press to make the copy settings.
Printing Photos
7 Select the appropriate copy settings such as paper size, paper type, and paper quality.
Note:
You can preview the copy results before you start copying.
- You can make various layout copies such as 2-sided copy, 2-up copy, and so on. Change the 2-sided or layout settings as necessary.
8
Press to start copying.
Note:
Refer to the PDF User's Guide for other copying functions and the Copy mode menu list.
Printing Photos
From a Memory Card
1 Load photo paper in the paper cassette.
→“Into the paper cassette” on page 5
2 Insert a memory card. "Inserting a Memory Card" on page 8
Note:
You can also print photos from an external USB device.
3 Enter Print Photos mode from the Home menu.
4 Select a photo and press ^+ or - to set the number of copies.
Note:
- You can crop and enlarge your photo. Press Edit and Crop/Zoom, and then make the settings.
To select more photos, press 5 and repeat step 4.
If you want to correct your images, press Edit and Photo Adjustments, and then make the settings. Scroll down if necessary.
If the screen display (for example, " - ", " + ", or menus) disappears, touch the LCD screen.
Press Settings, and then make the print settings. Scroll down if necessary.
6 Press to start printing.
Note
Refer to the PDF User's Guide for other printing functions and the Print Photos mode menu list.
From a Digital Camera
1 Load photo paper in the paper cassette. "Into the paper cassette" on page 5
2 Remove a memory card.
3 Enter Setup mode from the Home menu.
4 Enter External Device Setup. Scroll down if necessary.
5 Select Print Settings.
Make the appropriate print settings. Scroll down if necessary.
Scanning
7 Connect the camera to the product with a USB cable, and then turn on the camera.
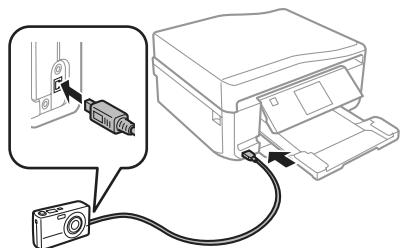
8 See your camera's guide to print.
| Compatibility | PictBridge |
| File Format | JPEG |
| Image Size | 80 × 80 pixels to 9200 × 9200 pixels |
Note:
Depending on the settings on this printer and the digital camera, some combinations of paper type, size, and layout may not be supported.
Some of the settings on your digital camera may not be reflected in the output.
Scanning
You can scan documents and send the scanned image from the product to a memory card or a connected computer.
Note:
If you want to scan your data to a memory card, insert a memory card first.
"Inserting a Memory Card" on page 8
If you want to use the Scan to Cloud service, double-click the shortcut icon on your desktop and check the Epson Connect guide.
1 Place your original(s).
"Placing Originals" on page 9
2 Enter Scan mode from the Home menu.
3 Select a scan menu item.
4 If you select Scan to Memory Card, you can make scanning settings. If you select Scan to PC, select your computer.
Press to start scanning.
Note: See the PDF User's Guide for other scanning functions and the Scan mode menu list.
Your scanned image is saved.
Faxing
Note:
Refer to the PDF User's Guide for other faxing functions and the Fax mode menu list.
The Fax function is only available for XP-850.
Introducing FAX Utility
FAX Utility is a software capable of transmitting data such as documents, drawings, and tables created using a word processing or spreadsheet application directly by fax, without printing. Use the following procedure to run the utility.
Windows
Click the start button (Windows 7 and Vista) or click Start (Windows XP), point to All Programs, select Epson Software, and then click FAX Utility.
Mac OS X
Click System Preference, click Print & Fax or Print & Scan, and then select FAX (your product) from Printer. Then click as follows;
Mac OS X 10.6.x, 10.7.x: Option & Supplies - Utility - Open Printer Utility
Mac OS X 10.5.x: Open Print Queue - Utility
Note: For more details, see the online help for FAX Utility.
Connecting to a Phone Line
About a phone cable
Use a phone cable with the following interface specification.
RJ-11 Phone Line
RJ-11 Telephone set connection
Depending on the area, a phone cable may be included with the product. If so, use that cable.
Using the phone line for fax only
1 Connect a phone cable leading from a telephone wall jack to the LINE port.
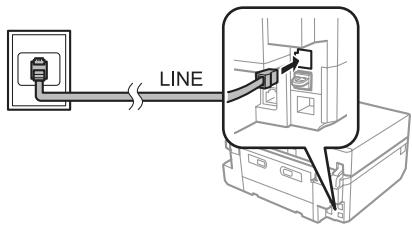
2 Make sure Auto Answer is set to On.
"Sending Faxes" on page 15
Important:
If you do not connect an external telephone to the product, make sure you turn on auto answer.
Otherwise, you cannot receive faxes.
Sharing line with phone device
1 Connect a phone cable leading from a telephone wall jack to the LINE port.
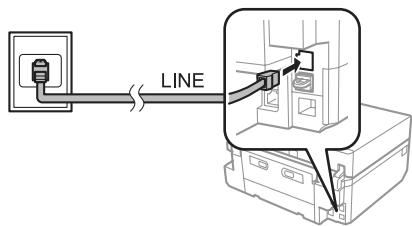
2 Remove the cap.
3 Connect a phone or answering machine to the EXT. port.
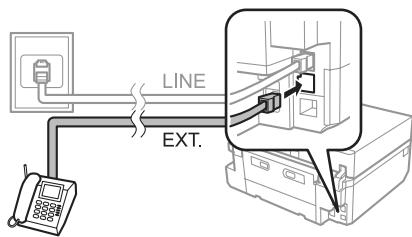
Note: See the PDF User's Guide for other connection methods.
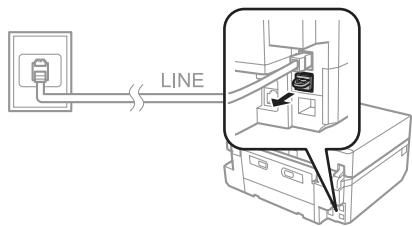
Checking the fax connection
You can check whether the product is ready to send or receive taxes.
1 Load A4-size plain paper in the cassette. "Loading Paper" on page 5
2 Enter Setup mode from the Home menu.
3 Select Fax Settings.
4 Select Check Fax Connection.
Press to print the report.
Note: If an errors are reported, try the solutions in the report.
Setting Up Fax Features
Setting up speed dial entries
You can create a speed dial list allowing you to select fax recipient numbers quickly when faxing. Up to 60 combined speed dial and group dial entries can be registered.
1 Enter Fax mode from the Home menu.
Press Contacts.
3 Select Add/Edit Contacts.
4 Select Speed Dial Setup. You see the available speed dial entry numbers.
5 Select the speed dial entry number that you want to register. You can register up to 60 entries.
6 Enter a phone number. You can enter up to 64 digits.
Note: A hyphen ("-") causes a slight pause when dialing. Only include it in phone numbers when a pause is necessary. Spaces entered between numbers are ignored when dialing.
7 Select Done.
8 Enter a name to identify the speed dial entry. You can enter up to 30 characters.
9 Select Done to register the name.
Setting up group dial entries
You can add speed dial entries to a group, allowing you to send a fax to multiple recipients at the same time. Up to 60 combined speed dial and group dial entries can be entered.
1 Enter Fax mode from the Home menu.
2 Select Contacts.
3 Select Edit Contacts.
4 Select Group Dial Setup. You see the available group dial entry numbers.
5 Select the group dial entry number that you want to register.
6 Enter a name to identify the group dial entry. You can enter up to 30 characters.
7 Select Done to register the name.
8 Select the speed dial entry number that you want to register in the group dial list.
9 Repeat step 8 to add other speed dial entries to the group dial list. You can register up to 30 speed dial entries in a group dial.
10 Select Done to finish creating a group dial list.
Sending Faxes
1 Place your original in the Automatic Document Feeder or on the scanner glass.
"Placing Originals" on page 9
2 Enter Fax mode from the Home menu.
Faxing
3 Touch the Enter Fax Number area on the LCD screen.
4 Enter the fax number, and then select Done. You can enter up to 64 digits.
Note:
To display the last fax number you used, press Redial.
Make sure you have entered the header information. Some fax machines automatically reject incoming faxes that do not include header information.
Press▼, select Color or B&W, and then change the other settings if necessary.
6 Press to start sending.
Note:
If the fax number is busy or there is some problem, this product redials after one minute. Press Redial to radial immediately.
Receiving Faxes
Follow the steps below to make settings to receive taxes automatically. For instructions on receiving taxes manually, see the PDF User's Guide.
1 Load A4-size plain paper in the cassette.
"Loading Paper" on page 5
2 Make sure Auto Answer is set to On. Setup Fax Settings Receive Settings Auto
Answer > On
Note:
- When an answering machine is connected directly to this product, make sure you set Rings to Answer correctly using the following procedure.
Depending on the region, Rings to Answer may be unavailable.
3 Enter Setup mode from the Home menu.
4 Select Fax Settings.
5 Select Communication.
6 Select Rings to Answer.
Press ^+ or - to select the number of rings, and then select Done.
Important:
Select more rings than needed for the answering machine to pick up. If it is set to pickup on the fourth ring, set the product to pick up on the fifth ring or later. Otherwise the answering machine cannot receive voice calls.
Note:
When you receive a call and the other party is a fax, the product receives the fax automatically even if the answering machine picks up the call. If you pick up the phone, wait until the LCD screen displays a message saying that a connection has been made before you hang up. If the other party is a caller, the phone can be used as normal or a message can be left on the answering machine.
Printing Reports
Follow the instructions below to print a fax report.
1 Load A4-size plain paper in the cassette.
"Loading Paper" on page 5
2 Enter Fax mode from the Home menu.
3 Select Advanced Options.
4 Select Fax Report.
5 Select the item you want to print.
Note:
Only Fax Log can be viewed on the screen.
6
Press to print the report you selected.
More Functions
More Functions provides you with many special menus that make printing easy and fun! For more details, select More Functions, select each menu, and then follow the instructions on the LCD screen.
| Menu | Functions | |
| Copy/Restore Photos | → | You can make faithful copies of your originals. If your original photo is faded, you can restore color to bring it back to life. |
| Photo Layout Sheet | → | You can print your photos on a memory card in various layouts. |
| Greeting Card | → | You can create custom cards with handwritten messages by using an A4 template. First print a template, write your message, and then scan the template to print your cards. |
| Copy to CD/DVD | → | You can copy your photo or CD/DVD label onto a CD/DVD label. The image is automatically cropped and resized to fit the CD/DVD label. |
| Print on CD/DVD | → | You can create CD/DVD labels from photos on a memory card without using a computer. |
Replacing Ink Cartridges
| Menu | Functions | |
| Print Ruled Papers | You can print ruled paper or graph paper with or without a photo set as the background. | |
| Coloring Book* | You can create a coloring sheet from your photos or line drawings. | |
- Only use the Coloring Book function for drawings and pictures that you created yourself. When using copyrighted materials, make sure you stay within the range of laws governing printing for personal use.
Replacing Ink Cartridges
Safety instructions
- Keep ink cartridges out of the reach of children.
- Be careful when you handle used ink cartridges, as there may be some ink around the ink supply port. If ink gets on your skin, wash the area thoroughly with soap and water.
If ink gets into your eyes, flush them immediately with water. If discomfort or vision problems continue after a thorough flushing, see a doctor immediately.
If ink gets into your mouth, spit it out immediately and see a doctor right away.
If you remove the cartridge from the product for later use or to dispose of it, make sure you put the cap back on the cartridge's ink supply port to prevent ink from drying out or to prevent surrounding areas from getting smeared by ink.
Precautions
- Do not push hard or squeeze the ink cartridges, or be careful not to drop them. Doing so may cause ink leakage.
Epson recommends the use of genuine Epson ink cartridges. Epson cannot guarantee the quality or reliability of non-genuine ink. The use of non-genuine ink may cause damage that is not covered by Epson's warranties, and under certain circumstances, may cause erratic product behavior. Information about non-genuine ink levels may not be displayed.
To maintain optimum print head performance, some ink is consumed from all cartridges not only during printing but also during maintenance operations such as ink cartridge replacement and print head cleaning. - Be careful not to let dust or any objects get inside the ink cartridge holder. Anything inside the holder may adversely affect the printing results or result in an inability to print.
For maximum ink efficiency, only remove an ink cartridge when you are ready to replace it. Ink cartridges with low ink status may not be used when reinserted.
- Do not open the ink cartridge package until you are ready to install it in the product. The cartridge is vacuum packed to maintain its reliability. If you leave a cartridge unpacked for a long time before using it, normal printing may not be possible.
Install all ink cartridges; otherwise, you cannot print.
Replacing an ink cartridge
Note:
Make sure that the CD/DVD tray is not inserted in the product and that the light is on, but not flashing.
Do not shake cartridges after opening the package, as they may leak.
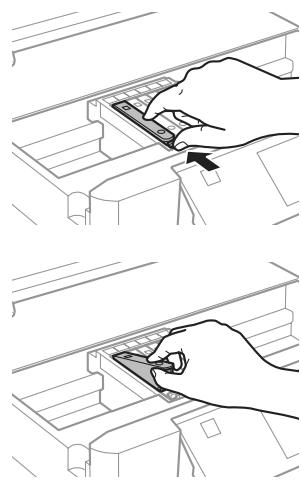
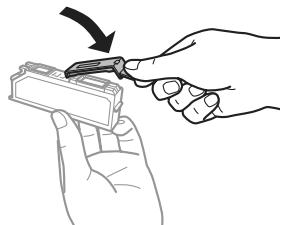
1 Remove the ink cartridge from its package and then remove the cap from the bottom of the cartridge.
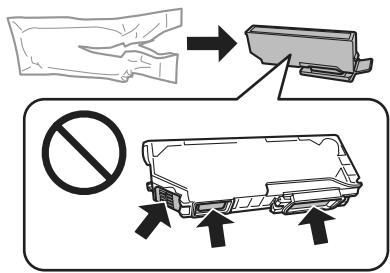
Note:
Do not touch the sections shown in the illustration. Doing so may prevent normal operation and printing.
2 Open the scanner unit. The ink cartridge holder moves to the ink cartridge replacement position.
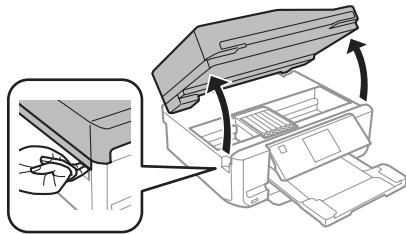

Important:
Do not touch the flat white cable connected to the ink cartridge holder.
Note:
If the ink cartridge holder does not move to the ink cartridge replacement position, follow the instruction below.
Home > Setup > Maintenance > Ink Cartridge Replacement
Do not move the ink cartridge holder by hand; otherwise, you may damage the product.
Replacing Ink Cartridges
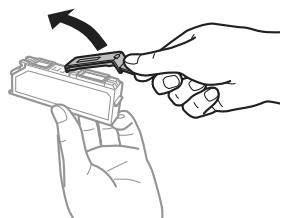
Push the tab to unlock the ink cartridge holder and then remove the cartridge diagonally.
Note:
The illustration shows replacement of the cartridge on the far left. Replace the cartridge appropriate to your situation.
Put the ink cartridge head first into the ink cartridge holder. Then push the bottom of the cartridge down until it clicks into place.
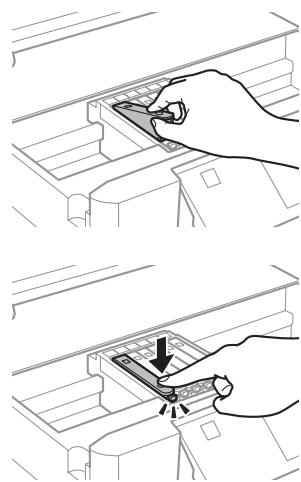
Put the cap back on to the removed cartridge's ink supply port. Dispose of the used cartridge properly.
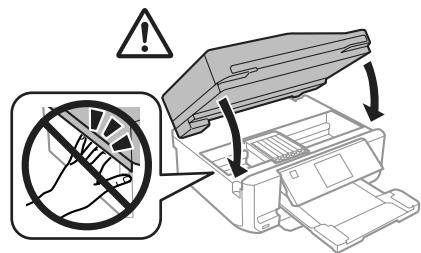
6 Close the scanner unit. The ink cartridge holder returns to its home position.
7 Follow the on-screen instruction.
Note:
The light continues to flash while the product is charging ink. Do not turn off the product during ink charging. If the ink charging is incomplete, you may not be able to print.
Do not insert CD/DVD tray until ink charging complete.
Basic Troubleshooting
Error Messages
This section describes the meaning of messages displayed on the LCD screen.
| Error Messages | Solutions |
| Paper jam | → See "Paper Jams" on page 22 |
| Paper out | → See "Loading Paper" on page 5 |
| Photos not recognized. Place the photos correctly on the scanner glass. | → See "Scanner glass" on page 11 |
| Printer error. Turn the power off and on again. For details, see your documentation. | Turn the product off and then back on. Make sure that no paper is still in the product. If the error message still appears, contact Epson support. |
| Communication error. Check if a computer is connected. | Make sure the computer is connected correctly. If the error messages still appear, make sure that scanning software is installed on your computer and that the software settings are correct. |
| A printer's ink pad is nearing the end of its service life. Please contact Epson Support. | Press ♂ to resume printing. The message will be displayed until the ink pad is replaced. Contact Epson support to replace ink pads before the end of their service life. When the ink pads are saturated, the printer stops and Epson support is required to continue printing. |
| A printer's ink pad is at the end of its service life. Please contact Epson Support. | Contact Epson support to replace ink pads. |
| Memory card or external device not recognized. | Make sure memory card or external device has been inserted correctly. |
| No dial tone detected. Run Check Fax Connection under Fax Settings in Setup menu. | Make sure the phone cable is connected correctly and the phone line works. → See "Connecting to a Phone Line" on page 14 If you connected the product to a PBX (Private Branch Exchange) phone line or Terminal Adapter, turn off the Dial Tone Detection. Select Fax Settings > Communication > Dial Tone Detection > Off. |
| Combination of IP address and subnet mask is invalid. See your documentation. | Refer the online Network Guide. |
| Recovery Mode | The firmware update has failed. You will need to re-attempt the firmware update. Ready a USB cable and visit your local Epson website for further instructions. |
Basic Troubleshooting
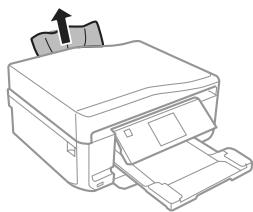
Paper Jams
Caution:
Never touch the buttons on the control panel while your hand is inside the product.
Note:
- Cancel the print job if prompted by a message from the LCD screen or the printer driver.
After you have removed the jammed paper, press the button indicated in the LCD screen.
Removing jammed paper from the rear cover
Pull out the rear cover and carefully remove the jammed paper.
2 Carefully remove the jammed paper.
3 Open the rear cover and carefully remove the jammed paper.
4 Reattach the rear cover.
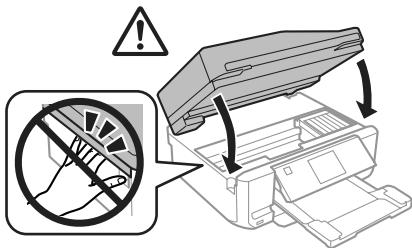
Removing jammed paper from inside the product
1 Carefully remove the jammed paper.
2 Open the scanner unit. Then remove all of the paper inside, including any torn pieces.
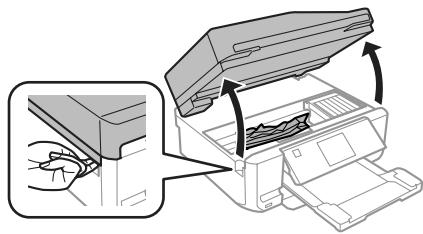
Basic Troubleshooting

Important:
Do not touch the flat white cable connected to the ink cartridge holder.
3
Close the scanner unit slowly.
Removing jammed paper from the paper cassette
1
Pull out the paper cassette. Then carefully remove the jammed paper.
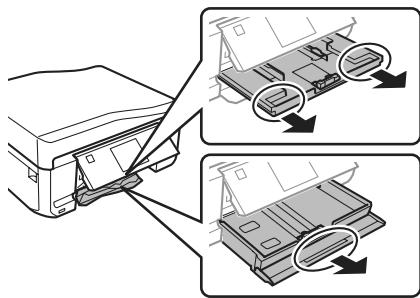
2
Remove the jammed paper from the cassette.
3
Align the edges of the paper.
4
Keep the cassette flat and slowly and carefully reinsert it all the way into the product.
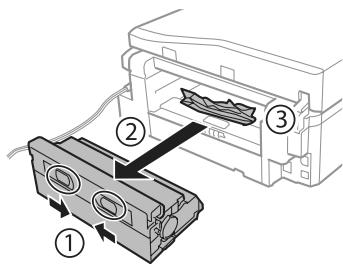
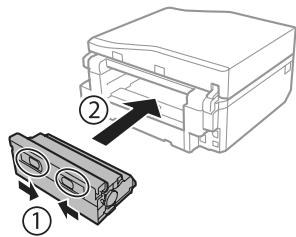
Removing jammed paper from the Automatic Document Feeder (ADF)
The availability of this feature varies by product.

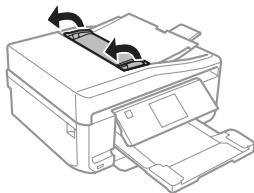
Remove the stack of paper from the ADF input tray.

Open the ADF cover. Then carefully remove the jammed paper.
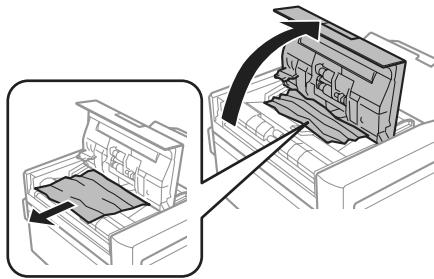

Important:
Make sure you open the ADF cover before removing jammed paper. If you do not open the cover, the product may be damaged.
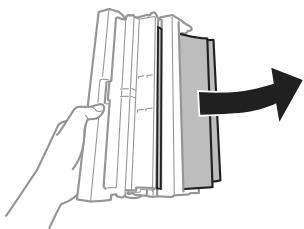
3
Open the document cover.
Basic Troubleshooting
4 Remove the document mat.
5 Carefully remove the jammed paper.
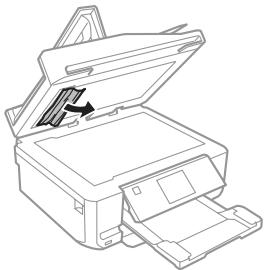
6 Reattach the document mat and close the document cover.
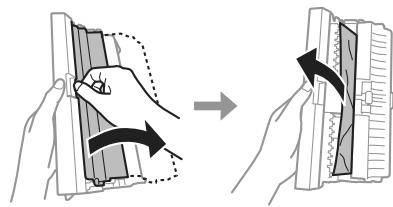
7 Open the Automatic Document Feeder (ADF).
8 Carefully remove the jammed paper.
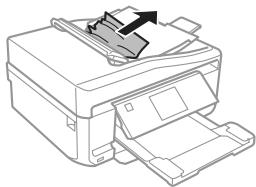
9 Close the Automatic Document Feeder (ADF).
Print Quality Help
If you see banding (light lines), missing colors, or any other quality problems in your printouts, try the following solutions.
Make sure you have loaded the paper and place your original correctly.
"Loading Paper" on page 5
"Placing Originals" on page 9
Check the paper size settings and the paper type settings.
"Selecting Paper" on page 5
The print head may be clogged. Perform a nozzle check first and then clean the print head. Setup > Maintenance > Nozzle Check
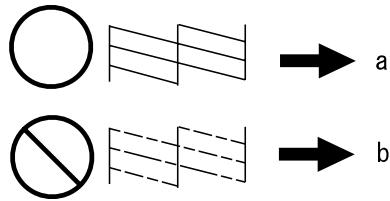
(a) OK
(b) Needs a head cleaning
Faxing Help
Make sure the phone cable is connected correctly and check that the phone line works. You can check the line status by using the Check Fax Connection function.
"Connecting to a Phone Line" on page 14
If the fax could not be sent, make sure that the recipient's fax machine is turned on and working.
If this product is not connected to a phone and you want to receive faxes automatically, make sure you turn on auto answer.
"Receiving Faxes" on page 16
Note: For more solutions to faxing problems, see the PDF User's Guide.
Where To Get Help
Technical Support Web Site
Epson's Technical Support Web Site provides help with problems that cannot be solved using the troubleshooting information in your product documentation. If you have a Web browser and can connect to the Internet, access the site at:
http://support.epson.net/ http://www.epson.eu/Support (Europe)
If you need the latest drivers, FAQs, manuals, or other downloadables, access the site at:
http://www.epson.com
http://www.epson.eu/Support (Europe)
Then, select the support section of your local Epson Web site.
Note: If your Epson product is not operating properly and you cannot solve the problem using the troubleshooting information in your product's documentation, contact Epson support services for assistance. See the User's Guide for Epson support information.
Table des matieres
Table des matieres
Introduction. 2
| Epson Premium Glossy Photo Paper (Papier photo glacé Premium) | Glacé Prem. |
| Epson Premium Semigloss Photo Paper (Papier photo se-mi-glacé Premium) | Glacé Prem. |
| Epson Glossy Photo Paper (Pa-pier photo glacé) | Glacé |
| Epson Photo Paper (Papier photo) | Pap photo |
| Epson Photo Quality Ink Jet Pa-per (Papier couché qualité photo) | Mat |
| Epson Matte Paper–Heavy-weight (Papier mat épais) | Mat |
| Epson Double-Sided Matte Pa-per (Papier mat recto verso) | Mat |
| Epson Photo Stickers (Autocol-lants photo) | Autocoll. photo |
Mac OS X 10.6.x, 10.7.x: Option & Supplies (Opzioni e forniture) - Utility - Open Printer Utility (Apri utility stampante)
Mac OS X 10.5.x: Open Print Queue (Apricoda di stampa) - Utility
Nota:
Uso del service Epson Connect. 2
https://www.epsonconnect.com/ (portal de Epson Connect)
http://www.epsonconnect.eu/ (solo para Europa)
Utilizar o Servico Epson Connect. 2
Verificar aligaçao do fax. 15
Configurar as Funcionalias do Fax. 16
No part of this publication may be reproduced, stored in a retrieval system, or transmitted in any form or by any means, electronic, mechanical, photocopying, recording, or otherwise, without the prior written permission of Seiko Epson Corporation. The information contained herein is designed only for use with this product. Epson is not responsible for any use of this information as applied to other printers.
Neither Seiko Epson Corporation nor its affiliates shall be liable to the purchaser of this product or third parties for damages, losses, costs, or expenses incurred by the purchaser or third parties as a result of accident, misuse, or abuse of this product or unauthorized modifications, repairs, or alterations to this product, or (excluding the U.S.) failure to strictly comply with Seiko Epson Corporation's operating and maintenance instructions.
Seiko Epson Corporation shall not be liable for any damages or problems arising from the use of any options or any consumable products other than those designated as Original Epson Products or Epson Approved Products by Seiko Epson Corporation.
Seiko Epson Corporation shall not be held liable for any damage resulting from electromagnetic interference that occurs from the use of any interface cables other than those designated as Epson Approved Products by Seiko Epson Corporation.
EPSON® is a registered trademark, and EPSON EXCEED YOUR VISION or EXCEED YOUR VISION is a trademark of Seiko Epson Corporation.
SDXC Logo is a trademark of SD-3C, LLC.
Memory Stick Duo, Memory Stick PRO Duo, Memory Stick PRO-HG Duo, Memory Stick Micro, and MagicGate Memory Stick Duo are trademarks of Sony Corporation.
General Notice: Other product names used herein are for identification purposes only and may be trademarks of their respective owners. Epson disclaims any and all rights in those marks.