
EMS21400W - Microwave AEG-ELECTROLUX - Free user manual and instructions
Find the device manual for free EMS21400W AEG-ELECTROLUX in PDF.
| Product type | Microwave |
| Brand | AEG-ELECTROLUX |
| Model | EMS21400W |
| Dimensions (H x W x D) | 287 mm x 485 mm x 422 mm |
| Net weight | 13.46 kg |
| Capacity | 21 liters |
| Supply voltage | 230 V ~ 50 Hz |
| Power consumption | 1250 W |
| Microwave power | 800 W |
| Grill power (quartz) | 1000 W |
| Microwave frequency | 2450 MHz |
| Main functions | Microwave, Grill, Combination microwave+grill, Automatic and manual defrost, Timer |
| Display | Digital (LED) |
| Control type | Rotary and push buttons |
| Child safety lock | Yes |
| Economode function (energy saving) | Yes |
| Automatic turntable return | Yes |
| Included accessories | Glass turntable, turntable support, cooking rack |
| Care and cleaning | Clean with a mild detergent and a damp cloth; do not use abrasive products |
| Installation class | Class B (domestic use) |
| Warranty | European (according to country of residence) |
Frequently Asked Questions - EMS21400W AEG-ELECTROLUX
User questions about EMS21400W AEG-ELECTROLUX
0 question about this device. Answer the ones you know or ask your own.
Ask a new question about this device
Download the instructions for your Microwave in PDF format for free! Find your manual EMS21400W - AEG-ELECTROLUX and take your electronic device back in hand. On this page are published all the documents necessary for the use of your device. EMS21400W by AEG-ELECTROLUX.
USER MANUAL EMS21400W AEG-ELECTROLUX
Care and cleaning 16
Technical data 17
Installation 17
Environmental information 19
European guarantee 20

Safety information
The built-in safety interlock switches prevent the microwave oven from operating when the door is open.
Do not tamper with them, or attempt to operate the oven with the door open as open door operation can result in exposure to microwave energy.
Do not allow food spills or cleaner residue to accumulate on door sealing surfaces. See the Cleaning and Care section for cleaning instructions.
It is particularly important that the oven door closes properly and that there is no damage to the: (1) door (warped), (2) hinges and latches (broken or insecure), (3) door seals and sealing surface.

Warning: If the door, hinges/latches or door seals are damaged, the microwave must not be operated until it has been repaired by an authorized service person.

Warning: It is hazardous for anyone except factory trained service personnel to service or make adjustments to this oven. Contact your
nearest authorised service agent if service should be required.
Do not remove the outer case, door or control panel at any time. Doing so may cause exposure to extremely high voltage.
Install or locate this oven only in accordance with 'installation instructions' found in this manual.
Use the appliance for its intended use as described in this manual. Do not use corrosive chemicals in this appliance. This type of oven is specifically designed to heat, cook, or defrost food. It is not designed for industrial or laboratory use neither for commercial use as this will invalidate the guarantee.
Do not operate the oven empty. If food or water is not present to absorb the microwave energy, the magnetron tube can be damaged.
Do not store this appliance outdoors. Do not use this product near water.
Do not attempt to dry clothing or newspapers in the microwave oven. These items can ignite.
Do not use the cavity for storage purposes. Do not leave paper products, cooking utensils, or food in the cavity when not in use.
Microwave oven is a Group 2 ISM equipment in which radio frequency
energy is intentionally generated and used in the form of electromagnetic radiation for the treatment of material.
This oven is a Class B equipment suitable for use in domestic establishments and in establishments directly connected to a low voltage power supply network which supplies buildings used for domestic purposes.
The microwave oven shall not be placed in a cabinet unless it has been tested in a cabinet.

Warning: If smoke is observed, switch off or unplug the appliance and keep the door closed in order to stifle any flames. Never use water.

Warning: Only allow children or infirm persons to use the microwave, without supervision, when adequate instructions have been given so that the child or infirm person is able to use the microwave in a safe way and understand the hazards of improper use.

It is quite normal for steam to be emitted around the door, or for misting to occur on the door, or even for water droplets to appear below the door during the cooking cycle. This is merely condensation from the heat of the food and does not affect the safety of your oven. The door is not intended to seal the oven cavity completely.
Do not force the turntable to rotate by hand. This may cause malfunctioning.
Arcing in the oven during microwave operation usually occurs from use of metallic utensils. Continuous arcing, however, can damage the unit. Stop the programme and check the utensil.
Care should be taken not to obstruct any air vents located on the top, rear, side and bottom of the oven.

Warning: Do not use this oven for commercial purposes. This oven is made for domestic use only.
Unpacking

When you unpack the oven, check that the product is free from damage. Damage or any missing parts must be reported immediately to the retailer.
The oven, parts of the oven or the accessories may be wrapped by a protection foil. If so, you must remove this foil before using the oven. Do not leave packing material so that small children can play with it. This can be hazardous.
Utensil safety
Most glass, glass ceramic and heat-resistant glassware utensils are excellent for use in the microwave oven. Although microwave energy will not heat most glass and ceramic items, these utensils
can become hot as heat transfers from the food to the container. The use of oven gloves to remove dishes is recommended.
Oven utensils and accessories guide
A variety of Utensils and Materials may be used for cooking in your microwave oven. For your safety and to prevent damaging utensils and your oven choose appropriate utensils and materials for each cooking method. The list below is a general guide.
| Material | Utensils | Mode of operation | |
| Microwave | Grill | ||
| Ceramic & Glass | Corning ware | YES | YES |
| Heat resistant glass ware | YES*1 | YES | |
| Glass ware with metal decoration | NO | NO | |
| Lead crystal glass | NO | NO | |
| China | Without metal decoration | YES | YES |
| Pottery*2 | YES | YES | |
| Plastic | Microwave oven heat-proof wear | YES | NO |
| Plastic wrap | YES | ||
| Metal | Baking pan | NO | YES |
| Aluminium foil*3 | YES | YES | |
| Paper | Cups, plates, towels | YES | NO |
| Waxed paper | YES | NO | |
| Wood | NO | NO | |
| Accessories | Grill rack | NO | YES |
| Turntable | YES | YES | |
YES: Utensils and accessories to use
NO: Utensils and accessories to avoid
1 Only if there is no metal trim.
2 Only if it does not have a glaze containing metal.
*3 Use aluminium foil only for shielding purposes, over use may cause arcing.
Testing suitability of cookware
Utensils should be checked to ensure they are suitable for use in Microwave Ovens.
Place the cookware in the microwave along with a glass half full of water. Heat on full power for one minute. If the cookware feels hot, you should not use it. If it is just slightly warm, you can use it for reheating but not for cooking. If the dish is room temperature, it is suitable for microwave cooking.
Paper napkins, wax paper, paper towels, plates, cups, cartons, freezer wrap and cardboard are great convenience utensils. Always be sure containers are filled with food to absorb energy and thus avoid the possibility of overheating or ignition.
Many plastic dishes, cups, freezer containers and plastic wraps may be used in the microwave oven. Follow manufacturer's instructions when using plastics in the oven. Avoid using plastic utensils with foods that have high fat or sugar content since these foods reach high temperatures and could melt some plastics.
Do not leave oven unattended, and look at it from time to time when heating or cooking food in plastic, paper or other combustible containers.
Metal utensils and utensils with metallic trim should not be used in the microwave oven, unless specifically recommended for microwave use.
Containers with restricted openings, such as bottles, should not be used for microwave cooking.
Use caution when removing a lid or cover from a dish to avoid steam burns.
Foil containers
Shallow foil containers may safely be used to reheat foods in your microwave
oven providing the following rules are observed:
-
Foil containers should not be more than 3 cms (1 1/4") deep.
-
Foil lids must not be used.
-
The foil containers must be at least two-thirds full of food. Empty containers must never be used.
-
Foil containers should be used singly in the microwave oven and should not be allowed to touch the sides. If your oven has a metal turntable or cooking rack, the foil container should be placed on an upturned ovenproof plate.
-
Foil containers should never be reused in the microwave oven.
If the microwave oven has been in use for 15 minutes or more, allow it to cool before using it again.
The container and turntable may become hot during use; take great care when removing either from the oven. It is advisable to use an oven cloth or glove when doing so.
Remember when using an aluminium foil container that the reheating or cooking times may be longer than you are used to, always ensure that the food is piping hot before serving.
Food safety
Do not heat food in a can in the microwave oven. Always remove the food to a suitable container.
Deep fat frying should not be done in the microwave oven, because the fat temperature cannot be controlled, hazardous situations can result.
Popcorn may be prepared in the microwave oven, but only in special packages or utensils designed specifically for this purpose. This cooking operation should never be unattended.
Pierce foods with non-porous skins or membranes to prevent steam build-up and bursting. Apples, potatoes, chicken livers, and egg yolks are examples of items that should be pierced.
The contents of feeding bottles and baby food jars are to be stirred or shaken and the temperature is to be checked before consumption, in order to avoid burns.

Warning: Liquids or other foods must not be heated in sealed containers since they are liable to explode.

Warning: Microwave heating of beverages can result in delayed eruptive boiling; therefore care must be taken when handling the container.

Warning: When heating liquids, e.g. soups, sauces and beverages in your microwave oven, overheating the liquid beyond boiling point can occur without evidence of bubbling. This could result in a sudden boil over of the hot liquid. To prevent this possibility the following steps should be taken:
Avoid using straight-sided containers with narrow necks.
Do not overheat.
Stir the liquid before placing the container in the oven and again halfway through the heating time.
After heating, allow standing in the oven for a short time, stirring again before carefully removing the container.

Warning: Some products such as whole eggs and sealed containers – for example, closed glass jars – may explode and should not be heated in this oven.
Occasionally, poached eggs may explode during cooking. Always pierce the yolk, then cover and allow the standing time of one minute before removing cover.
Product description
How to operate your microwave oven

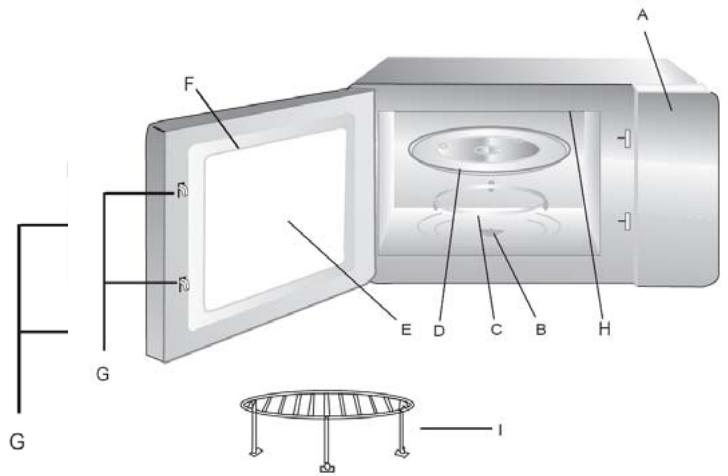
Name and Function of Parts
A. Control panel
B. Turntable drive shaft
C. Turntable support and roller assembly. Place on the floor of the oven to support the turntable
D. Glass turntable. Food in suitable container is placed on this tray for cooking. Do not use the oven without the turntable
E. Viewing window. Food can be seen through this window while cooking
F. Oven door and seal. Oven door must always be closed during cooking and the faces free from dirt and build up of food
G. Latch hook
H. Grill
I. Rack
Turntable Installation
- Ensure that the turntable drive shaft is located into the hole in the oven floor and engaged with the 'D' shaft of the drive motor
- Place the turntable support and roller assembly so that it sits concentric with the drive shaft
- Place the glass turntable onto the turntable support and roller assembly and rotate gently until it locates into the drive shaft
N.B.
- Never place the turntable upside down.
- Turntable, support and drive shaft must be used during cooking.
- Food and food containers must always be placed on the turntable
- The turntable can rotate clockwise or anticlockwise. This is normal.
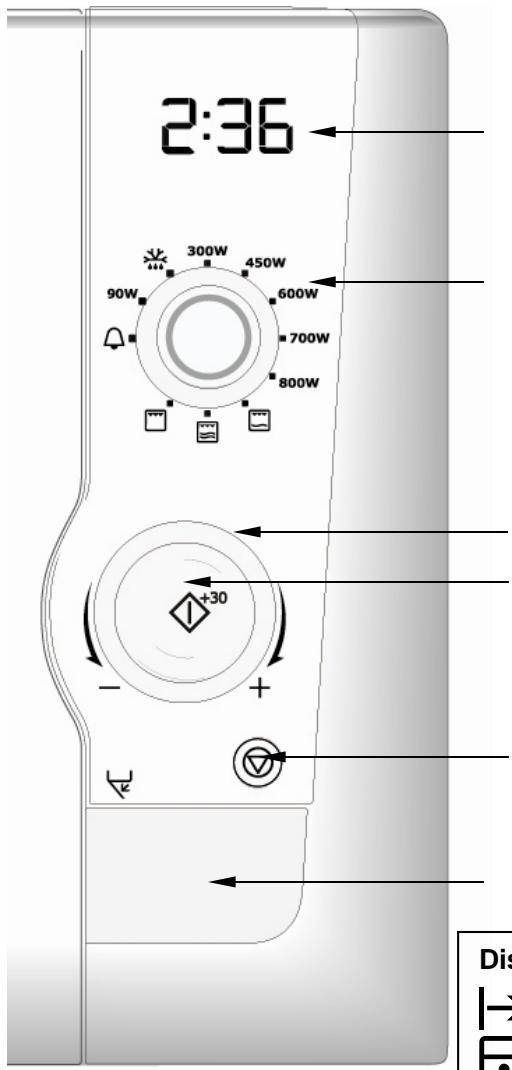
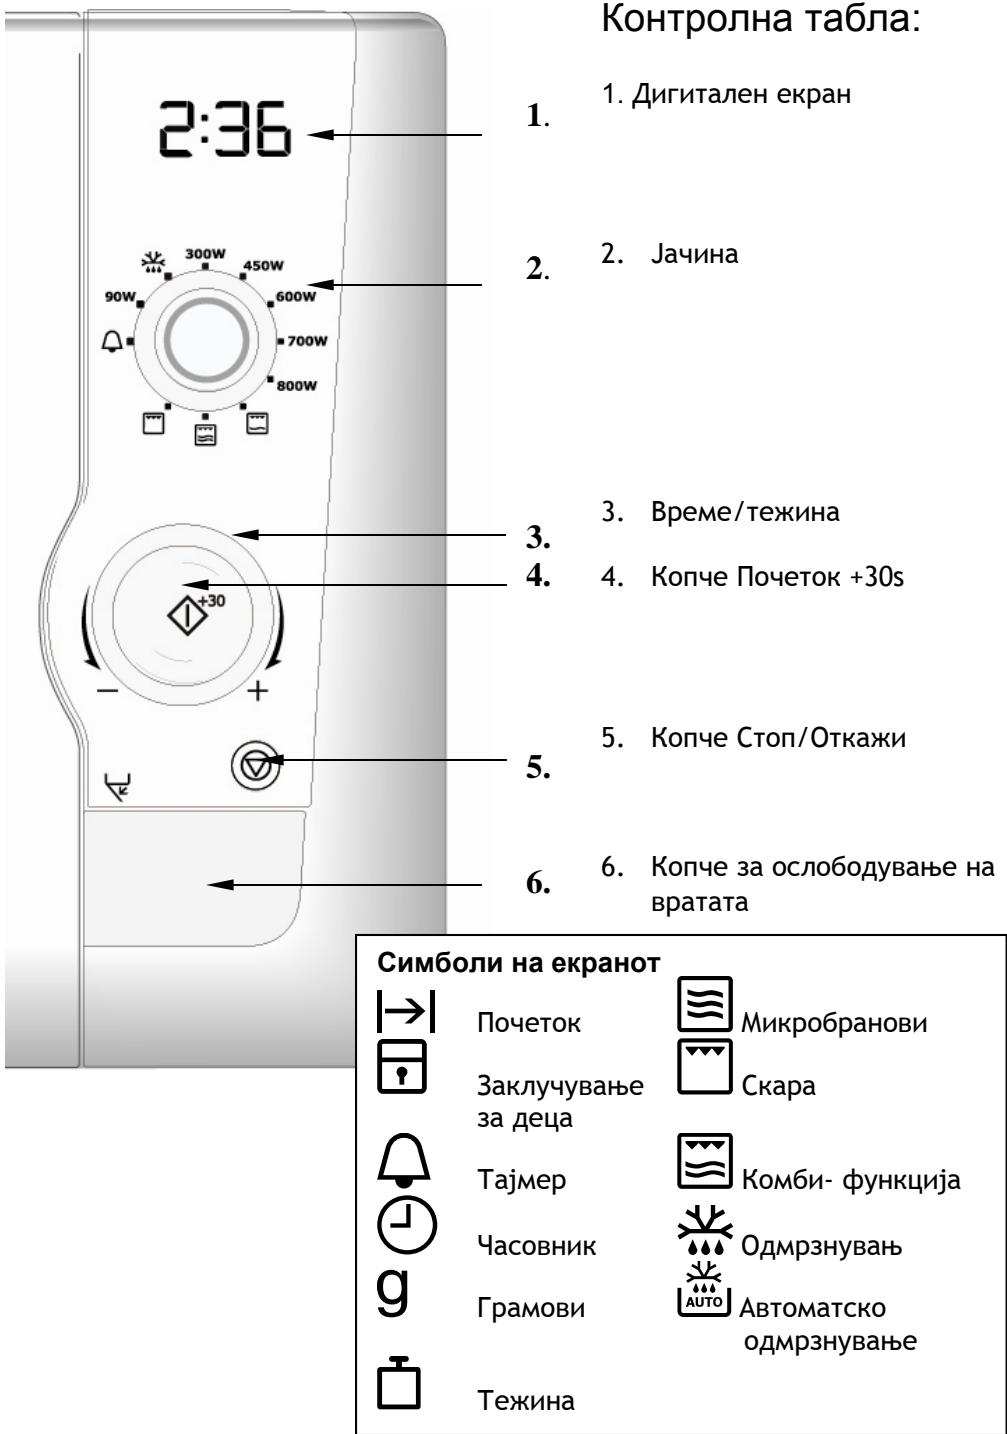
Control Panel
1.
- Digital Display
2.
- Power Selector
3.
- Time/weight selector
4.
- Start +30s push button
5.
- Stop / Cancel push button
6.
- Door Release push button
Display Symbols

Start

Child Lock

Minute
Timer

Time of Day

Grammes
Weight

Microwave
Grill
Combi

Defrost
Auto Defrost
Before first use
IMPORTANT
This oven has an energy saving feature called 'Economode'.
Note 1 When the oven is first connected to the electrical power supply, the default setting is 'Economode'.
Note 2. This 'Economode function' switches off the product 3 minutes after the end of any cooking cycle, i.e. there is no digital display visible. This is designed to reduce the power absorbed by the appliance to zero when not in use.
Note 3: You have the option to select and switch on the time of day in the display window. When 'time of day' clock is selected the 'Economode' setting is switched off.
IMPORTANT
You can choose to select
1.the 'time of day' clock. OR
2. the 'Economode' energy saving feature
It is NOT possible to select 'Economode' and the 'time of day clock'.
- To set the 'time of day' clock:
-
Open the door and keep it open.
-
Press and hold the 'start +30s' push button for 5 seconds.
-
The oven will 'beep' to advise that it has entered 'time of day' setting mode and 12h will flash together with the clock symbol in the digital display.
4a. To set 'Time of Day' in 12 hour mode: -
rotate the time/weight control knob to set the hour.
- press the ‘start +30s’ push button’. The selected ‘hour’ is confirmed and stops flashing, and the minute digits will start to flash
- rotate the time/weight control knob to set the minutes.
- press the 'start +30s' push button'. The selected 'minutes' is confirmed and stops flashing. The display shows the time of day and the colon between the hours and minutes flashes and the clock symbol remains on.
4b. To set 'Time of Day' in 24 hour mode: - press 'start +30s' push button once more. 24h will show flash in the display.
- rotate the time/weight control knob to set the hour.
- press the ‘start +30s’ push button’. The selected ‘hour’ is confirmed and stops flashing, and the minute digits will start to flash
- rotate the time/weight control knob to set the minutes.
- press the 'start +30s' push button'. The selected 'minutes' is confirmed and stops flashing. The display shows the time of day and
the colon between the hours and minutes flashes.
Note 1: If the food is removed from the cavity, on closing the door, the display shows the time of day.
Note 2: If the Stop/Cancel push button is pressed 3 times during a cook cycle, the display shows the time of day.
To restore the 'Economode' function once the time of day has been set:
- Open the door and press the start +30S button for 5 seconds. 12H will flash in the display.
- Press start + 30S once more.
24H will flash in the display. - Press start + 30S once more. Econ will flash in the display.
- Close the door. The oven will now enter 'Economode' and the 3 minute countdown will begin.
Note : If the Stop/Cancel push button is pressed once after the 'Economode' countdown has begun the display will clear immediately.
- 'Economode'
IMPORTANT
The energy saving feature below is only available when 'Economode' is selected. This feature is NOT available if the 'time of day' clock is selected.
-
When the oven is in Economode and has completed the selected cook cycle, the oven turns off.
-
The display shows the selected power level from the previous cook cycle.
- After 3 minutes have elapsed the oven will now enter 'Economode', a further 3 minute countdown will begin.
- The display shows 'Econ' followed by, 2.57, 2.56, 2.55 and then 'Econ' followed by 2.51, 2.50, 2.49 until 3 minutes has elapsed.
- After the 'Economode' 3 minute countdown is complete there will be no visible digital display
Note 1: If the food is removed from the cavity, on closing the door, the display shows 'Econ' and the 3 minute countdown will begin.
Note 2: If the Stop/Cancel push button is pressed 3 times during a cook cycle, the display shows 'Econ' and the 3 minute countdown will begin.
Note 3: It is possible to interrupt the 'Economode' countdown by:
- Opening the door, or
- Turning the power selector, or
- Turning the time weight selector, or
- Pushing the Stop/Cancel push button, or
- Pushing the Start +30s push button
Note 4: If the Stop/Cancel push button is pressed once after the 'Economode' countdown has begun the display will clear immediately.
Operation
IMPORTANT
Pressing the Stop/Cancel push button will end the selected cooking cycle.
3. Cooking with Microwave.
The upper power selector control knob is used to select microwave power level and the lower Time/weight selector is used to set the desired cooking time up to 90 minutes.
Turn the Time/ weight selector to select the cook time and note the increments as shown in the following table:
Select the power level using the power selector.
Press start+30s push button.
Note : the power level and /or cook time can be changed at any time during the cooking process by altering the time or power setting.
Note: During cooking if defrost power level is selected 180 will appear in the display (this is the defrost power level). If the
minute timer position is selected 0.00 will appear in the display.
e.g. To cook for 5 minutes at 700 watt power:
- Select 700 w power level using the power selector
- Turn the Time/ weight selector clockwise until 5:00 is shown in the display
-
Press 'start + 30S' push button
-
Cooking with grill.
The upper power selector control knob is used to select the grill function and the lower Time/weight selector is used to set the desired cooking time up to 90 minutes.
Use the grill rack which sits on the turntable to raise the position of the food in the cavity
Turn the Time/ weight selector to select the cook time and note the increments as shown in the following table:
Press start+30s push button.
Note : the grill selector and /or cook time can be changed at any time during the cooking process by altering the time or function setting.
Note: During cooking if defrost power level is selected 180 will appear in the display (this is the defrost power level). If the minute timer position is selected 0.00 will appear in the display.
e.g. To grill food for 12 minutes:
- Select the grill position using the power selector
- Turn the Time/ weight selector clockwise until 12:00 is shown in the display
- Press 'start + 30S' push button
- Cooking with grill and microwave in combination.
The upper power selector control knob is used to select the grill and microwave combi function and the lower Time/ weight selector is used to set the desired cooking time up to 90 minutes. There are two grill and microwave combi positions: one with 240 watt of microwave power and the second with 450 watts of microwave power.
Use the grill rack which sits on the turntable to raise the position of the food in the cavity
Turn the Time/ weight selector to select the cook time and note the
increments as shown in the following table:
Select the power microwave/grill combi function using the power selector. You can select grill with 240 watts of microwave or grill and 450 watts of microwave.
Press start+30s push button.
Note : the microwave/grill combi selector and /or cook time can be changed at any time during the cooking process by altering the time or function setting.
Note: During cooking if defrost power level is selected 180 will appear in the display (this is the defrost power level). If the minute timer position is selected 0.00 will appear in the display.
e.g. To grill and microwave (240W) food for 12 minutes:
- Select grill and 240 W microwave combi using the power selector
- Turn the Time/ weight selector clockwise until 12:00 is shown in the display
- Press 'start + 30S' push button
NB. Food will cook more quickly using the combi mode. Adjust cooking times accordingly
To cook using the grill and 450W microwave follow the same procedure after selecting this alternative combi cooking mode using the power selector.
6. The 'plus 30 seconds' function
1. Pressing 'start +30s' push button when the oven is in 'stand by' mode i.e. when not in use and 'time of day' is displayed, will automatically start microwave cooking at the power selected for 30 seconds. The appropriate symbol will switch on in the display.
Any additional operation of this push button will add '30 seconds' to the existing cook time. The maximum cook time which can be entered is 90 minutes.
2. During microwave cooking or 'defrosting by time' pressing the start button at any time will increase the cook / defrost time by 30 seconds. Note: this function is not available when using the oven in automatic mode i.e. 'auto defrost by weight'.
7. Auto defrosting by weight
1. Set defrost power level using the power selector. The defrost,
weight and ‘g’ symbols will flash in the display
2. Rotate the Time/ weight selector anticlockwise to select the frozen weight in grams of the food you are defrosting. (between 2000g and 100g). The manual defrost symbol will switch off and the auto defrost symbol and 'g' will continue to flash.
3. Press 'start +30s' push button to begin the automatic defrosting function. The oven will calculate the defrosting time and power level required to defrost the food perfectly. The defrosting time left will be shown in the display and the auto defrost symbol will switch on.
Note 1: The oven will pause midway through the defrostingprogramme to allow you to turn /stir the food to aid even defrosting
Note 2: Power level or defrosting time cannot be changed during automatic defrosting
8. Defrosting by time.
1 Set defrost power level using the power selector. The defrost symbols and 'g' will flash in the display
2. Rotate the Time/ weight selector clockwise to select the defrost time required. The manual defrost symbol will continue to
flash and the auto defrost and 'g' symbols will switch off
- Press 'start +30s' push button to begin the manual defrosting function. The defrosting time left will be shown in the display and the manual defrost symbol will switch on.
Note 1: The oven will pause midway through the defrostingprogramme to allow you to turn /stir the food to aid even defrosting
Note2: The power level and defrost time can be changed during the defrost programme, but any change in power level may not provide acceptable defrosting results.
9. Kitchen Timer
Your oven has a useful kitchentimer function to help time thoseother activities in the kitchen
- Set to kitchen timer (zero microwave power) using the power selector. The bell symbol will flash in the display.
- Rotate the Time/ weight selector clockwise to select the time required.
- Press 'start +30s' push button. The bell symbol will switch on
- The timer will start to countdown.
- The oven will 'beep' three times when the time has elapsed.
Note1: There is no microwave energy generated using this function and the oven lamp and cooling fan do not operate
De-selection of the minute timer function will cancel the current timer operation.
10. Child Lock.
The oven can be rendered inoperable should you wish to prevent unauthorised use i.e. excluding children from using the appliance
In the 'stand by' mode, press and hold the cancel button for 5 seconds. You will hear a long 'beep' which denotes that the child lock has been engaged and the child lock symbol will illuminate in the display.
The oven cannot now be used unless the child lock function is removed:
To exit the 'child lock' mode, press and hold the cancel button for 5 seconds. You will hear a long 'beep' which denotes that the child lock has been dis-engaged and the child lock symbol will switch off in the display.
- Re-Turntable function. Your oven has a helpful returntable feature. The turntable always stops in the position at which it started at the beginning of the cook cycle. This allows the orientation of cooking utensils to remain in the correct position for removal from the oven cavity after cooking.
Note : at the end of the cook cycle, the oven will not switch off until the turntable has returned to its original position.
-
General information and user guidelines.
-
Each time a push button is pressed a 'beep' will sound to confirm this action.
-
The initial rotation of the control knob will be accompanied by a 'beep'.
- After any cooking programme has been set, failure to initiate cooking by pressing start button within 3 minutes will result in cancellation, and the 'time of day' will be displayed or the oven will enter 'Economode'.
- At the end of every cooking cycle, the oven will 'beep' three times.
- Opening the door during the cooking cycle will stop the oven operation. The start button must be pressed to resume cooking
Care and cleaning
The oven must always be clean. Residue of food from spillovers or spatters will attract microwave energy causing it to burn on. This could reduce the efficiency of the oven and may cause bad odours.
Do not attempt to tamper with or make any adjustments or repairs to any part of the oven.
Repairs should only be done by a qualified service technician.
Be sure the oven is off or the unit is unplugged before cleaning.
Cleaning the accessories (turntable, support and Grill rack)
Clean them with mild detergent after removing them for the cavity. Turntable support should be carefully handled.
The inside of the oven and turntable get very hot; so do not touch them immediately after use.
Cleaning the interior
Always keep the inside of the oven clean. Wipe up spillovers and food spatters immediately. Deposits that are allowed to remain on the oven walls, door seal and door surface will absorb microwave energy, reduce the efficiency of the oven, and possibly damage the oven interior. Use mild, liquid detergent, warm water and a soft, clean cloth to remove deposits from the base of the oven. For the side of the oven use a soft damp cloth only, no liquids should be used near the venting holes.

Never use abrasive cleaners, commercial oven cleaners or steel wool pads on any part of the microwave oven.
To loosen difficult deposits, boil a cup of water in the microwave oven for 2 or 3 minutes.

Never use a knife or any utensil to remove deposits from the oven surfaces.
To remove odours from the oven interior, boil a cup of water plus 2 tablespoons of lemon juice for 5 minutes.
Cleaning the door seals
Wipe up spillovers and food spatters immediately. Deposits that are allowed to remain on the door seals will absorb microwave energy, reduce the efficiency of the oven, and possibly damage the oven interior. You can only use mild, liquid detergent, warm water and a soft, clean cloth to remove deposits from the door seals.
Cleaning the exterior
Open the oven door when cleaning the control panel. This will prevent the oven from being turned on accidentally. You should clean outside surfaces of the oven with mild liquid detergent and water followed by a wiping with clear water to remove any excess detergent. Dry with a soft cloth.
Spray-on window cleaners or all-purpose spray-on kitchen cleaners can also be used. Never use abrasive cleaners, scouring pads or harsh chemicals on outside surfaces of your oven. To prevent damage to the working parts, do not allow water to seep into ventilation openings.
Technical data
| AC Voltage | 230V / 50 Hz |
| Absorbed Power | 1250W |
| Microwave Output Power | 800W |
| Grill Power (quartz) | 1000W |
| Microwave Frequency | 2450 MHz |
| Product Dimensions (h x w x d) | 287mm x 485mm x 422mm |
| Oven Capacity | 21 litre |
| Weight | 13.46 Kg |

Installation
- Remove any promotion label from the door.
- The oven should be installed on a flat, level surface. The surface must be strong enough to safely bear the weight (13.5 kg) of the oven, and the contents. To avoid the possibility of causing vibration
or noise the oven must be in a stable position.
-
Keep the oven away from heat and water. Exposure to heat and water can lower oven efficiency and lead to malfunctioning, so be sure to install the oven away from heat and water sources.
-
Do not block air vents on the top and the sides of the cabinet and also do not place any articles on the top of the oven. If air vents are blocked during operation, the oven may overheat, and this may lead to malfunctioning. Hot air escapes from the vents so be sure not to obstruct it or let curtains come between the oven and the rear wall.
- Place the oven as far away from radios and TV's as possible. This oven does conform to EEC requirements of radio interference suppression, but some interference may occur if it is placed too close to a radio or TV, so keep them as far apart as possible.
IMPORTANT!
The rear panel may become hot. Ensure that the microwave is placed close to the wall to prevent contact during use.

The oven can be placed almost anywhere in the kitchen. Make sure the oven is placed on a flat, level surface and that vents as well as the surface underneath the oven are not blocked (for sufficient ventilation).
Connecting to the mains
The oven is delivered with the power cord and a plug for 230V, 50Hz, earthed socket outlet.
Earth protection minimises the risks should a short circuit occur. Check to ensure the voltage of the oven matches the supply.

If the oven is connected to the socket via an extension cord, make sure the cord is earthed.

This appliance must not be used on a non-earth protected power supply.
Contact an electrician if you are uncertain regarding electrical connection of the oven or provision of earth protection of the supply.

This appliance must be earthed. If this appliance is fitted with a non-rewireable plug for which your socket is unsuitable, the plug should be cut off and the appropriate plug fitted. If it is necessary to change the fuse in a non-rewireable plug, the fuse cover must be refitted. If the fuse cover is lost or damaged, the
plug must not be used until a replacement is obtained.
Electrical connections
WARNING! THIS APPLIANCE
MUST BE EARTHED.
The manufacturer declines any liability should this safety measure not be observed.
If the plug that is fitted to your appliance is not suitable for your socket outlet, please contact service force.
Environmental information

The symbol on the product or on its packaging indicates that this product may not be treated as household waste. Instead it shall be handed over to the applicable collection point for the recycling of electrical and electronic equipment. By ensuring this product is disposed of correctly, you will help prevent potential negative consequences for the environment and human health, which could otherwise be caused by inappropriate waste handling of this product. For more detailed information about recycling of this product, please contact your local city office, your household waste disposal service or the shop where you purchased the product
European guarantee
This appliance is guaranteed by Electrolux in each of the countries listed below for the period specified in the appliance guarantee or otherwise by law. If you move from one of these countries to another of the countries listed below the appliance guarantee will move with you subject to the following qualifications: -
The appliance guarantee starts from the date you first purchased the appliance which will be evidenced by production of a valid purchase document issued by the seller of the appliance.
The appliance guarantee is for the same period and to the same extent for labour and parts as exists in your new country of residence for this
particular model or range of appliances.
The appliance guarantee is personal to the original purchaser of the appliance and cannot be transferred to another user.
The appliance is installed and used in accordance with instructions issued by Electrolux and is only used within the home, i.e. is not used for commercial purposes.
The appliance is installed in accordance with all relevant regulations in force within your new country of residence.
The provisions of this European Guarantee do not affect any of the rights granted to you by law.
Inneháll
Sakerhetsinformation 2
Tillbehör 4
Tryck start+30s knappen.
Tryck start+30s knappen.
Tryck start+30s knappen.
- Upptining after tid.
Sikkerhet for matvarer
Ilke varm opp mat i kanne i mikrobolgeovnen. Ha alltid maten i en egnet beholder.
ADVARSEL! DETTE APPARATET SKAL JORDES.
Montering at drejetallerken
Be36eHnOCT Ha xpaHaTa
He 3arpebajTe xpaHa BO KOH3epBn BO MmKpO6paHOBaTa neUka. Cekorau m3BaJeTe ja xpaHaTa n CTaBeTe ja Bo nOroDen caI.
Bo Minkpo6paHOBaTa neUka He Tpe6a Da ce npKu BO MACOTnBnDejKn TEMpePaTypaTa Ha MACOTnTe He MOKe Da ce KOHTpOInpa N MOKe Da DoJde Do ONaCHn CNTyaCm.
Bo Minkpo6paHOBaTa neUka MoKe da ce npabaT NyKaHKn, HO cAmo BO CneuJaHa aMbaJaxa NIn BO caObN KOHCTpyuPAHn Noce6Ho 3a Taa HameHa. PpaBeHbEtO nyKaHKn HIKORAHe Cmee Da 6nDe 6e3 HaD3Op.
Ipo6oJe ta xpaHata co HnnpOnycnI LyuIIN IIN ONHN 3a da cnpeYInTe Hac6bupaHe napea n npckAbe. Ja6oJIkata, KOMnprte, NIIeUknOT uIrep IxOJUKNTE oJajca ce npimep 3a xpaHa WTo Tpe6a da ce np6oBe.
CodpknHata Ha uuunbata 3a 6eunha n Terlnte co 6e6eukka xpaHa Tpeba da ce npomeaaat nn npoTpecaT, a nped xpanHeTo Tpeba da ce npOBepn TemnpaTypata 3a da ce n36erhat n3ropeHHU.

IpeynpeyBaHe: TeuHocn n npyra xpaHa He CMeaT da ce 3arpeBaat Bo xepMeTuKn 3aTBoPeHn caObN 6ndejkn MoKe da ekCnloDnpaat.

IpeynpeyBaHe: Mnkpo6paHOBOTo 3aRpeBaHe njaau MoKe da npEn3BnKa OndoXeHo epyNTuBHO 3OBpNBaHe; 3aToa Mopa Da ce BHIMaBA np paKyBaHeTO CO caIoT.

Ipeynpeybahe:Kora BO MmKpObpaHOBaTa neUka ce 3arpeBaat TeuHOCTn,Ha np. cyu, cocobu n NiJaNauM OMe Ja DoJde Do IperpeBaHe Ha TeuHOCTa HAD ToUkata Ha BpneHe 6e3 BUnBn MeypunHa.Toa MoKe da DOBeDe DO HeHaJejHo IpeBpuBaHe Ha BpeJaTa TeuHOcT.3a Da ce cnpeu TAKBO HeuTO, TpeBa Da ce noctanyBa Ha CJIeHNOB NaHH:
I36erHyBaJTe KOpncTeHe caoBn Co npaBn SuOBoN TeCHn rPna.
He npesarpebajre.
PpomeaJte ja TeuHocTa nped da ro CTaBnTe caIOT BO neyKaTa n NOBTOPOKOly NIOOBHa BpeMe 3a 3arpeBaHe.
IIO 3aRpeBaHbEtO, OCTaBeTe ja da cTOn BO NeUkaTa KycO Bpeme, IpOMEuYBaJkn ja IOBTOPNO IpeD Da rO n3BaAnTe caDoT BHIMATEJIHO.

Ipeynpeybahe: Hekon npo3BODn, kao zeJIJajua n xepMeTnUKN 3aTBOpeHcAIOBN-Ha np. 3aTBOpeHcCTaKJIeHN TeJI-N-MOKe Da ekCnloDnPaAT N He CMeat da ce 3arpeBaat BO Obaa Neka. IOBpemeHo MOKe da ce cnuyn jajiua To
ce Bapat 6e3 lywna da ekcnjIoNpaaT BO TEkOT Ha roTBeHbTeO. CekoraI npobodeJe ja konlkaTa,notoanokpnjTe n OCTaBete eHa MNHyTa nped da ro TprHHe TKAnakOT.
Опис на пронзвовот
PaKyBaHbe co MmKpO6paHObAta neUka
Ime nФункида Na DeJIobnTe
A. KoHTpoHa Ta6la
B. リロонcka ocka Ha nloyata
C. Komniet dpkau n Tpkao Ha npoata. Ctabete ro Ha dnoto Ha neykata 3a da ja dpkni npoata
D. CtaKJIeHa nIIOUa. Ha OBaa nOJIoRa ce cTaBa xpaHa 3a rotBeHbe BO cooDBeTeH caI. He KopnCTeTe ja neuKaTa 6e3 nIOUata
E. PpO3OpEu. XpaHaTa MoKe Da ce BnDn Hn3 npO3OpEoT DoeKa Ce roTbN
F. BpataHa neykaTa n 3aNTNBka. BpaataHa neykaTa Mopa cekoraW da 6nIe 3aTBopeHa BO TEKOT Ha rOTBeHbeto I da 6nIe 6e3 HeuNCTOTnN IN OCTaTOU OxpaHa
G. Kykn Ha pe3nHaTa n 6e36eHocen CNTem 3a 3aKJyBaHe
H. Ckapa
I. NpOmTeHyBaU 3a cKaPa
MecTeHe Ha nIIOyata
- BHIMabajte noroHCKata ocka Ha nIooata Da 6nDE Bo dynkata Ha nOoT Ha neukata H 3aIabeHa BO ockata ,D" Ha nOrOHCKNOT MOTOP
- Ctabete ro KOMnIeTOT dPkau N TpkaNo Ha IIIOUaTa KOHcHTpNHO Ha NOrOHCKaTa Ocka
- Ctabete ja ctaKleHaTa nloya Ha KOMnIeTOT dPkau N TPKaIHO Hnloyata N CBPTeTe ja HeXHo DoKeKa He ce BkIoN BO NOrOHCKaTa Ocka
HanomeHa
Hikoraw He ctabajte ja nloyata Haonaky.
Плоча,TджачOTиnorOHckata Ocka Mopa Да ce KOpHCTaT 3a BpeMe Ha rotBeHeTo."
XpaHata n caObIte co xpaHa ceKoraw Mopa da ce cTaBaat Ha IIIOUaTa.
ПлочаТа ceВrtиВ Лево ИлиВ ДесHo.Toa e HopMaHNo.
PpeD npBaTa ynoTppe6a
BAXHO
Obaa peuka imaФункиJA 3a 3auyByBaHbe eHeprJia HapeyeHa 'Economode'.
Белewska 1 Kora 3a npВ naT peukkata e BknyeHa BO cTpyja, cTaHdapdHOTo NocTaByBaHBe e 'Economode'.
Beneuka 2.Функциjuana
'Economode function' ro ncknyuba npo3BOOT NO 3 MInHyTN NO 3aBpUyBaBeTo Ha KOJ 6uNo npouec Ha rotBeHbe, T.e. HeMa BnIINBO DnITaIIHO pNkKaXyBaHbe. Oba e HnPaBeHo 3a da ja HamaJIeHeprJaTa DO Hyla wTO anapaTOT ja anCopbnpa Kora He e BO ynoTpe6a.
Белewska 3: Имате onцида ro изберети в КлунITE Времeto od Денот BO позорецт за празожьва bene. Kora уасовникot e избран, постува hteto 'Economode' e在其случно.
BAXHO
Moxkete da n3bepete nomery
- YacOBHnKOT NJIIN
2.Функида 'Economode'3a 3aуВа№ ha eheprnja
HE e MoXHo nCTOBpeMeHo da rH n36epTe 'Economode' u yaCoBHNKOT.
1. MecTeHbe Ha yAcOBHNKOT:
- OToBopeTe ja BpaTata n npKeTe ja oToBopeHa.
2.Држete ro npHTnCHaTO KOnyTeO „NoyetOK +30s" 5 cekyni. - Пechа та ке 'свирп' 3aда ИЗВЕСТУDEКA E BHECEH ржIMOT НА NOCTАВУBAнБе YACOBИКОТ И ЕКРАНТ 3a пИКЖУBAнБе К СВЕТHE 12h 3aEDHо CO CImбОЛТ 3a YACOBИК.
4a.3a da oDpeiTe YacOBHnKOT da 6nide BO peXIM 3a 12 yaca:
- BpTeTe FO KOnUeTo 3aВpeMe/TeKInHa 3aДa FOHameCTIte YacOT.
- npHTNCHeTe ro KOnyTeO
"PoYeToK +30s". N36paHnOT vac e
NOTBpDeH n PpeTaHyBa Da
TpEeKa, a 6pojKeTte 3a MInHyTn
NoUHyBaat Da TpeNkaat
-BPTeTe ro KOnyTeTo 3a
BpeMe/TexHa 3a Da rN
HaMeCTnTe MInHyTnTe. - npHTnCHTe ro KOnyTeo „Noctok +30s". N36paHnte MNHyTn Ce nOTBpDeHn InpctaHyBaat Da TpeNkaat. Ha ekpaHOT Ce npKakJyBa ToHOT BpeMe, DBeTe TOUKN MeIy YacOT MInHyTnTe TpeNkaat N Cm6OJot 3a YacOBHnK CBtN.
- 3a Да одреничасовникотда бидево ржим за 24 уда:
-ywTe eHaaw npHTNCHeTo KOnueTo 'NoeToK+30s'.Bo ekpaHOT Ke CBETHe 24h. -
BpTeTe ro KonUeTo 3aВpeMe/TeXnHa 3a Da roHameCTHe YacOT.
-
npHTnCHeTe ro KOnyTeO "NoyeToK +30s .H36paHnot Yac e NOTBpDeH nIpeCTaHyBa Da TpeNka, a 6pojKInTe 3a MNHyTN NoHyBaAT Da TpeNkaat - BPTeTe ro KOnyTeO 3a BPeMe/TeXnHa 3a Da rH HaMeCTnTe MNHyTnTe.
- npHTNCHeTe ro KOnUeTo "NoyeToK +30s". N36paHnTe MmHyTn Ce nOTBpDeHn I npecTaHyBaat Da TpenKaat. Ha ekpaHot Ce npKaJyBa ToHOTo BpeMe, DBeTe TOckMeyaCOT mHyTnTe TpenKaat.
Белewska 1: ДOKOLKY xpaHaTa e OTCTpaHeTa OД NeukKaTa, РИЗАТВОРа№ He Na BpATA Na EKpaHOT ce NOKAJYBa BpeMeTo OД DeHOT.Белewska 2:ДOKOLKY KONHTO 3a npITnCKa№Ce CToN/OTkAnu' e npITnCHaTO 3 NaTH 3a BpeMe Ha npOuecOT Na rOTBeHBe, ekpaHOT rO NOKaJyBa BpeMeTo OД DeHOT.
3a BpakaHe Ha cyHKnjaTa 'Economode' wTOM BpeMeTo oD DeHOT e NOCTaBeHo:
- OTbopete ja BpaTata n 3a 5 ceKyHdN dpxKeTe ro npHTncHaTO konyeTo 'NoeToK+30s'. 12H ke CBeTHaT ha ekpaHot.
2.УштешеншпншеТ 'ПочетOK+30s'.24H Ke CBetHaT Ha ekpaHOT.
3.УшTe eДнаш npHTnCHeTe 'ПочETOK+30s'.Econ Ke CBetHe Ha ekpaHOT. - 3aTbOpete ja BpaTata. Cera neukata Ke BJe3e Bo 'Economode'
I Ke 3aOpHe Od6pojyBaHbETo oD 3 MInHyTn.
Белшka:ДOKOLKY KONQUE3a npHTNcKaHBe 'CToI/OTkAHH' e npHTNCHaTO BeHaH No 3aNoUHyBaHbETo Ha Od6pojyBaHbETo, ekpaHOT Ke ce HcHnCTn BeHaH.
- „Economode"
BAKHO
Функида за зауввае eнергиJA npetctabeha поюу e Доctанha само кORA e ИЗбрано 'Economode'. Obaa ФункиJA HE e Доctанha дOKOLky e ИЗбраз ЧаСOBИКOT.
Kora nekaTa e Bo Economode n Iro mAm 3aBpuHcN36paHnOT IpOuec Ha roTBeHe, neKaTa ce NCKJyBa.
EkpaHOT ro nokayya n36paHOT HnBO Ha eHeprJia oI npetXoDnOt npoec Ha rotBeHe.
- OKaKO Ke NOMHaT 3 MInHyTN neKaTa Ke BJe3e BO 'Economode',Ke 3aNoUHe HOBo o6pojBaHbe Ha 3 MNHyTN.
EkpaHOT nokkBya Econ' cIeJeHO oJ 2.57, 2.56, 2.55 n noToa Econ' cIeJeHO oJ 2.51, 2.50, 2.49 ce doKeHa He n3MnHaT 3 MInHyTuN.
- OТkaKO Ke 3aBpshn
OДбpojyBaHbeTo OД 3 МИнТи 3a
'Economode', Нма за Има
ВИДЛВ ДИГТалЕнЕкpaH.
Белewska 1: ДOKOLky xpaHaTa e OTCTpaHeta oД neukata,При 3aTBopa№ He Na BpaTata Ha ekpaHot ce nokaxyBa 'Econ'и Od6pojyBa№To od 3 MInHyTu 3anOuHyBa.
Белшka 2: ДOKOLKY KONЧЕТа\ пгИСКаHe 'СтО/N' e\ пгИСнСHATO 3 пати 3a Врeme Ha\ пpoцecOT ha rotbeHbe, ekpaHot\ ПOKЖУВА 'Econ' И оДбpoJOуВаBJeTO\ OD 3 MInHyTи 3anOчHyВa.
Белешка 3: Можно有很大 попекинейе одбpoюваьeto на 'Economode' co:
- OTBopaHe Ha BpaTaTa HJIH
BPTeHe Ha n36paQOT 3a eHeprJia nn
BpTeHe Ha n36npaQoT 3a BpeMe nn
-припсканые на konчeto 'Стон/Откожи' Иллргпсканые на konчeto 'Почetok+30s'
Белшka 4: ДOKOLу кочeto 3a npNTSCaHe 'СтО/OTkaЖи' e npNTsCHaTO BeДhaI NO 3aNoTHyBaHbETo Ha o6poJyBaHbETo, ekpaHOT Ke ce ИСчИСТи BeДhaI.
PaKyBaHbe
BAXHO
Co npitnckahe Ha konyeTo 'CTon/OTkaxn', n36paHnot pOucec Ha rotBeHe Ke 6nnde ppeKHaT.
3. TOrTBeHb e co MHKpo6paHOBn.
TogHOTOKoNc3a jaUHa ce KOpHCTn 3a O6bpaHe Ha jaUHaTaHa MInKpO6paHOBHTe, a DoJIHOTOKoNc3a BpeMe/TeXHa Ce KOpHCTn 3a OdpeDyBaHe Ha cakaHOTo BpeMe 3a rotBeHe Do 90 MNHyTN.
BpTeTo ro konuTeTo 3a
BpeMe/TeXnHa 3a da ro n36epTe
BpeMeTo 3a rotBeHe N majTe rN
npeDbNd 3roJeMyBaHaTa
PpNKaHaN BO CLeDHaB Ta6eJa:
| Mery | ЗгoleмУвараза ce |
| 0 ceK. ~ 5 мHH. | 15 ceK. |
| 5 мHH. ~ 10 мHH. | 30 ceK. |
| 10 мHH. ~ 30 мHH. | 1 мHH. |
| 30 мHH. ~ 90 мHH. | 5 мHH. |
I36epete ro HnBOTO ha eHepnja kOpncTejKn ro I36npaoyT 3a eHepnja.
PnTnCHeTe ro KOnHeTo 'PoYeToK+30s'.
Белеша : НИВОТо Ha eHeprNiJa И/NИN BpeMeTo Ha rOTBeHe може Да ce CmEHaT Bo KoE 6nIo BpeMe BO TEKOT Ha rOTBeHbTeO Co МeHyBa№Ha nOCTaByBaHbTa 3a ВpeMe ИИN eHeprNiJa.
Белшka : 3a Врeme Ha rotBeHe ako e n36paHO HnBOTO Ha eHeprJna 3a 3aToPnyBaHbe, Ha ekpaHOT Ke ce nojabn 180 (Oba e HNBOTo Ha eHeprJa 3a 3aToPnyBaHbe). Ako e n36paHO Od6pojYBaHbeto Ha
MnHyTN,HaekpaHOTKe ce nojabN 0.00.
Ha np. 3a da roTbIte 5 MInHyTu Ha jaUnHa oD 700 BaTH:
1.N36epete jaunha od 700 batn co konyeTo 3a jaunHa
2.BpTeTe ro konUteTo 3a 6npaHBe BpeMe/TeXnHa B DeCHO DoEka Ha ekpaHot He ce nojabn 5:00
3.Пи捜нше Го кончето „Почetok +30s"
4. TOrBeHbe co ckapa.
TogHOTOKoNc3a jaunHa ce
KOpNCTn 3a O6npaBe Ha
ФyHKuJata 3a cKaPa, a DOJIHOTO
KoNc3a BpeMe/TeJnHa ce
KOpNCTn 3a OdpeDyBaHe Ha
CaKaHOTo BpeMe 3a roTBeHe Do 90
MNHyTN.
KopncTeTe ro NpMeTHyBaOT 3a ckapa To ce CTaBA Ha NIOUaTa 3a da ja NpHHeTe XpaHaTb BO BHaTpeuHOCTa
BpTeTo ro konUeTo 3a
BpeMe/TeKInHa 3a da ro n36epeTe
BpeMeTo 3a rotBeHe u majTe r npEdbNd 3roJeMyBaHbTa
PnPKaKaHN BO CJIeDHaBa Ta6ena:
- Safety information
- nearest authorised service agent if service should be required.
- Unpacking
- Utensil safety
- Oven utensils and accessories guide
- Product description
- Name and Function of Parts
- Turntable Installation
- N.B.
- Control Panel
- Display Symbols
- Before first use
- IMPORTANT
- Operation
- Cooking with Microwave.
- Kitchen Timer
- Child Lock.
- Care and cleaning
- Cleaning the interior
- Cleaning the exterior
- Technical data
- Installation
- IMPORTANT!
- Connecting to the mains
- plug must not be used until a replacement is obtained.
- Electrical connections
- Environmental information
- European guarantee
- Inneháll
- Montering at drejetallerken
- Опис на пронзвовот
- Ime nФункида Na DeJIobnTe
- MecTeHe Ha nIIOyata
- HanomeHa
- PpeD npBaTa ynoTppe6a
- BAXHO
- Beneuka 2.Функциjuana
- MecTeHbe Ha yAcOBHNKOT:
- BAKHO
- PaKyBaHbe
- TOrTBeHb e co MHKpo6paHOBn.
- TOrBeHbe co ckapa.
Brand : AEG-ELECTROLUX
Model : EMS21400W
Category : Microwave