
AI-S AF DC-NIKKOR 135MM F/2 - Camera lens NIKON - Free user manual and instructions
Find the device manual for free AI-S AF DC-NIKKOR 135MM F/2 NIKON in PDF.
Download the instructions for your Camera lens in PDF format for free! Find your manual AI-S AF DC-NIKKOR 135MM F/2 - NIKON and take your electronic device back in hand. On this page are published all the documents necessary for the use of your device. AI-S AF DC-NIKKOR 135MM F/2 by NIKON.
USER MANUAL AI-S AF DC-NIKKOR 135MM F/2 NIKON
H3 H4 J K/P M_ R T " U "
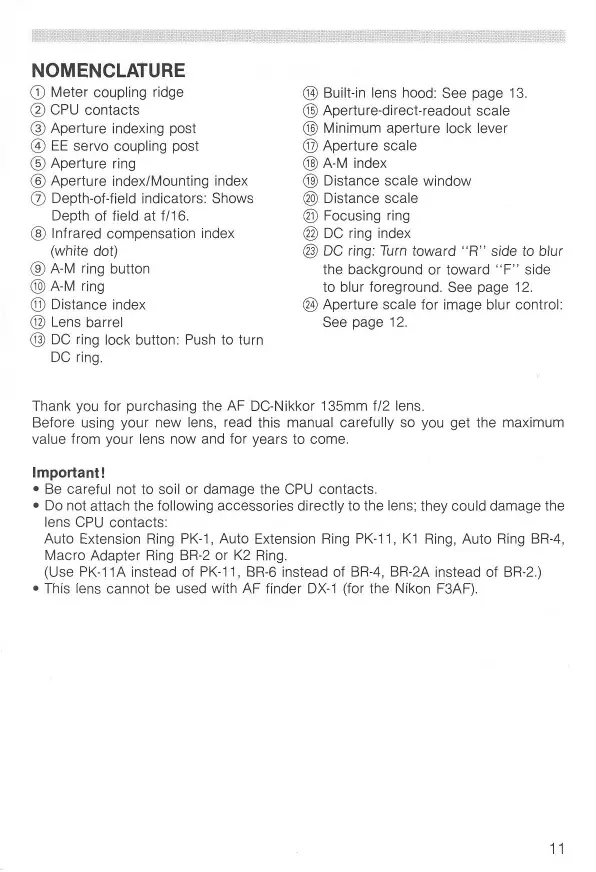
Meter coupling ridge CPU contacts Aperture indexing post EE servo coupling post Aperture ring Aperture index/Mounting index Depth-of-fieid indicators: Shows Depth of field at f/16. Infrared compensation index (white dot) A-M ring button A-M ring Distance index Lens barrel DC ring lock button: Push to turn DC ring.
Built-in lens hood: See page 13. Aperture-direct-readout scale Minimum aperture lock lever Aperture scale A-M index Distance scale window Distance scale Focusing ring DC ring index DC ring: Turn toward "R" side to blur the background or toward " F " side to blur foreground. See page 12. ® Aperture scale for image blur control: See page 12. Thank you for purchasing the AF DC-Nikkor 135mm f/2 lens. Before using your new lens, read this manual carefully so you get the maximum value from your lens now and for years to come. Important!
- Be careful not to soil or damage the CPU contacts.
- Do not attach the following accessories directly to the lens; they could damage the lens CPU contacts: Auto Extension Ring PK-1, Auto Extension Ring PK-11, K1 Ring, Auto Ring BR-4, Macro Adapter Ring BR-2 or K2 Ring. (Use PK-11 A instead of PK-11, BR-6 instead of BR-4, BR-2A instead of BR-2.)
- This lens cannot be used with AF finder DX-1 (for the Nikon F3AF).
CONTROLLING DEFOCUS IMAGE—MAKING IMAGE BLUR
AF DC (Defocus image Control)-Nikkor 135mm f/2 enables you to defocus the background or foreground. The lens' rounded diaphragm opening makes out-offocus elements appear as circular high-lights on your pictures. While pushing the DC ring lock button, rotate the DC ring toward the R (rear) side to blur the background, or toward the F (front) side to blur the foreground. (See lllust. A). To effectively blur background or foreground images, turn the DC ring so the f-number on the ring that corresponds to aperture in use aligns with the index on the DC ring. Turning the ring beyond the aperture in use lets you create a soft-focus effect. See photos on page 4. Photo 1: No image blur Photo 2: Background images are blurred Photo 3: Foreground images are blurred
- With the DC ring at either the F or R side, the focusing ring may not show the correct distance.
- Defocus control should always be performed before focusing. If you rotate the DC ring after focusing, or during focus lock in autofocus photography, your subject will be out of focus.
- The effect of defocus image control depends on subject conditions such as subject-to-background distance, subject-to-foreground distance, etc. As you cannot verify the results through the viewfinder, perform bracketing with the DC ring at various settings to obtain the desired effect. FOCUSING This lens can be used for both autofocus and manual focus. To select autofocus, while pressing the A-M ring lock button, turn the A-M ring so that "A" aligns with the A-M index. Also, set the camera's focus mode selector to autofocus position. To select manual, turn the A-M ring so " M " aligns with the A-M index. Also, set the camera's focus mode selector for manual focus.
- With a Nikon autofocus camera, improperly setting the camera's focus mode selector and lens' A-M ring may damage the camera body.
- With the DC ring set at either the F or R side, the focusing ring will shift slightly from its original position. Nikon Rear Focusing (RF) System A system in which the rear lens elements move inside the lens, there is absolutely no increase in the overall length of the lens barrel as the lens is focused closer.
Various interchangeable focusing screens are available for Nikon cameras to suit any type of lens or picture-taking situation. Those which are recommended for use with your lens are listed.
Screen A/L Camera F4 with DP-20
H3 H4 J K/P M A T" U"
© = Excellent focusing O = Acceptable focusing Slight vignetting or moire phenomenon affects screen image, but film image shows no traces of this. A = Acceptable focusing
- The in-focus image in the central circular area may prove to be slightly out of focus on the film. Focus on the surrounding matte area. ( ) = Indicates degree of exposure compensation needed for F4- and F2-series cameras. For F4-series cameras, compensate using the Exposure Compensation Dial for the focusing screens. (See the F4/F4s instruction manual, page 78). Blank box means not applicable. Since type M screen can be used for both macrophotography at a 1:1 magnification ratio and for photomicrography, it has different applications than other screens.
- For F3-series cameras, exposure compensation is not necessary. ** Screens T and U are not available for use with F2-series cameras. For the K2, B2 and E2 focusing screens, refer to the columns on the K, B and E screens, respectively. For details, also refer to the specific camera's instruction manual.
MINIMUM APERTURE LOCK
For progammed auto or shutter-priority auto exposure shooting, use the minimum aperture lock lever to lock the lens aperture at if/16.
1. Set the lens to its minimum aperture (f/16).
2. Slide the lock lever in the direction of the aperture ring so the white dot on the
lever aligns with the orange dot. (Illust. B) To release the lock, slide the lever in reverse direction.
USING BUILT-IN LENS HOOD
Pull out the hood and turn it counterclockwise for two rotations. (See Illust. C). To store, turn the hood clockwise and push back.
- Although you should always keep lens surfaces clean, rough cleaning must be avoided. To remove grease or fingerprints from the lens surfaces, wipe with a soft, clean cotton cloth moistened with alcohol.
- Never use thinner or benzine to clean the lens.
- To protect the lens surface from dirt or damage, use of an L37C filter is recommended at all times. The lens hood also helps protect the lens.
- Cover lens with lens cap when lens is not in use.
- Attach both front and rear caps when the lens is stored separately.
- If you will not use the lens for a long time, store it in a cool, dry place away from direct sunlight.
- Reinforced plastic is used for some parts in the lens unit; to avoid damage, take extra care to never leave the lens in an excessively hot place. SPECIFICATIONS Focal length: Maximum aperture: Lens construction: Picture angle: Distance scale: Aperture scale: Minimum aperture: Diaphragm: Focusing: Exposure measurement: Mount: Attachment size: Dimensions: Weight: 135mm f/2 7 elements in 6 groups (plus built-in dustproof glass front plate) 18° Graduated in meters and feet from 1.1m (4 feet) to infinity (oo) f/2 to f/16 on both standard and aperture-directreadout scales Provided Fully automatic Nikon Rear Focusing (RF) system Via full-aperture method for Al cameras or cameras with CPU interface system; via stop-down method for other cameras Nikon bayonet mount 72mm (P = 0.75mm) Approx. 79mm dia. x 120mm extension from the camera's lens mounting flange; overall length is approx. 128mm Approx. 870g OPTIONAL ACCESSORIES 72mm screw-in filters Hard lens case CL-38 Flexible lens pouch No. 63 Teleconverter TC-14B
H3 H4 J K/P M R T" U"
H3 H4 J K/P M R T" U"
H3 H4 J K/P M P, T " U "
H3 H4 J K/P M Ft T " U "
USO DEL PARALUCE INCORPORATO
(ft) Depth of field Focused distance f/2 f/4
Photographic Range with Close-up Attachment (in) Lens in normal position Close-up Attachment Reproduction ratio Subject field Focused distance 97.5— 23.4—
- The first values are for the PK-11A ring used alone and the other ones for the PK-11A—PK-13, PK-11—PK-13, or PK-1—PK-3 rings used together. The PK-11 and PK-1 rings cannot be attached directly to the lens.
- Lens cannot be attached in reverse position.
No reproduction in any form of this manual, in whole or in part (except for brief quotation in critical articles or reviews), may be made without written authorization *rom NIKON CORPORATION. Nikon NIKON CORPORATION FUJI BLDG., 2-3, MARUNOUCHI 3-CHOME, CHIYODA-KU, TOKYO 100, JAPAN PHONE: 81-3-3214-5311 TELEX: J22601 (NIKON) FAX: 81-3-3201-5856 Printed in Japan 9&021-B01 (K133)