
REFLEX - NIKKOR 500MM F/8 - Camera lens NIKON - Free user manual and instructions
Find the device manual for free REFLEX - NIKKOR 500MM F/8 NIKON in PDF.
Download the instructions for your Camera lens in PDF format for free! Find your manual REFLEX - NIKKOR 500MM F/8 - NIKON and take your electronic device back in hand. On this page are published all the documents necessary for the use of your device. REFLEX - NIKKOR 500MM F/8 by NIKON.
USER MANUAL REFLEX - NIKKOR 500MM F/8 NIKON
crc t #OTiffMS¥t* i/2.5fST-f„ S "bC, CC7)U>X'(I(S, 3 J f f i 7 - K H N - 2 7 * # * L T U J^„ ff**S«0ifi7tOT(iA\S'B##(t/r
- S x 1^=1 >"<-:?-TC-200, 201S, 14*, HAS, I4BS**«ffl t fc#* A/L B C D E Gl G2 G3 G4 HI H2 H3 H4 J K/P M
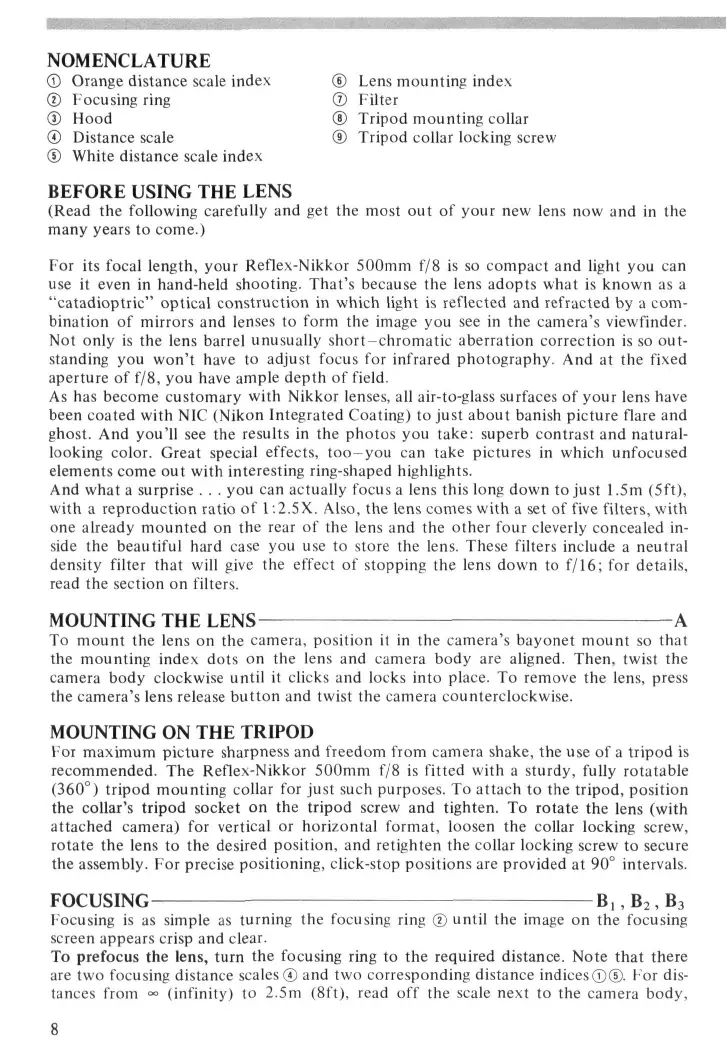
TC-l4BS«ffl<7)£ £ (17-r .IU?-£SI'J ( i f LT < ti$\.\ ©EP : B 1 T T . SEP : X 7 " ' J 7 K v - f 7 P 7 ' i J X A T i i t " > h-&h-t+(iT-# $-£*., OEP :ffll?<7>—as*<#-4>jic< < 4''J I T 4 ! t ' > t-^-hitHTf £«1: i f „ ftsraax-t, NOMENCLATURE © Orange distance scale index © Focusing ring © Hood © Distance scale © White distance scale index
Lens mounting index Filter Tripod mounting collar Tripod collar locking screw
BEFORE USING THE LENS
(Read the following carefully and get the most out of your new lens now and in the many years to come.) For its focal length, your Reflex-Nikkor 500mm f/8 is so compact and light you can use it even in hand-held shooting. That's because the lens adopts what is known as a "catadioptric" optical construction in which light is reflected and refracted by a combination of mirrors and lenses to form the image you see in the camera's viewfinder. Not only is the lens barrel unusually short-chromatic aberration correction is so outstanding you won't have to adjust focus for infrared photography. And at the fixed aperture of f/8, you have ample depth of field. As has become customary with Nikkor lenses, all air-to-glass surfaces of your lens have been coated with NIC (Nikon Integrated Coating) to just about banish picture flare and ghost. And you'll see the results in the photos you take: superb contrast and naturallooking color. Great special effects, too-you can take pictures in which unfocused elements come out with interesting ring-shaped highlights. And what a surprise . . . you can actually focus a lens this long down to just 1.5m (5ft), with a reproduction ratio of 1:2.5X. Also, the lens comes with a set of five filters, with one already mounted on the rear of the lens and the other four cleverly concealed inside the beautiful hard case you use to store the lens. These filters include a neutral density filter that will give the effect of stopping the lens down to f/16; for details, read the section on filters.
MOUNTING THE LENS
To mount the lens on the camera, position it in the camera's bayonet mount so that the mounting index dots on the lens and camera body are aligned. Then, twist the camera body clockwise until it clicks and locks into place. To remove the lens, press the camera's lens release button and twist the camera counterclockwise.
MOUNTING ON THE TRIPOD
For maximum picture sharpness and freedom from camera shake, the use of a tripod is recommended. The Reflex-Nikkor 500mm f/8 is fitted with a sturdy, fully rotatable (360°) tripod mounting collar for just such purposes. To attach to the tripod, position the collar's tripod socket on the tripod screw and tighten. To rotate the lens (with attached camera) for vertical or horizontal format, loosen the collar locking screw, rotate the lens to the desired position, and retighten the collar locking screw to secure the assembly. For precise positioning, click-stop positions are provided at 90° intervals. FOCUSING B ! , B 2 , B3 Focusing is as simple as turning the focusing ring © until the image on the focusing screen appears crisp and clear. To prefocus the lens, turn the focusing ring to the required distance. Note that there are two focusing distance scales © and two corresponding distance indices©©. For distances from - (infinity) to 2.5m (8ft), read off the scale next to the camera body, using the white distance scale index©. For closer distances down to 1.5m (5ft), read off the scale next to the orange band on the lens barrel, using the orange distance scale index © that appears above the white distance scale index. The Reflex-Nikkor 500mm f/8 can focus from <*> (infinity) down to as close as 1.5m (5 ft), and offers a reproduction ratio of approximately 1:2.5X. When it is extremely hot or cold, the effective focal length of the lens may differ from what it is in regular temperatures. To compensate for this, focus with the lens beyond the <» (infinity) focus position. Because it's a high-powered supertelephoto, your lens magnifies even the most minute focusing error and blur, so careful focusing and solid support are absolutely essential. Thus, although hand-held shooting is possible with this lens, results are usually better when a tripod is used. Note that the tripod socket of the lens is designed for correct balance with the lens mounted on a camera body. Also, the lens comes with an exclusive lens hood © , the HN-27, to prevent stray light from entering the lens and causing ghost and flare in your pictures, as well as to protect the delicate surface of the lens.
RECOMMENDED FOCUSING SCREENS
Various interchangeable focusing screens are available for F3- and F2-series cameras to suit any type of lens or picture-taking situation. Those which are recommended for use with your lens are listed below. For screens used with Nikon cameras other than F3and F2-series cameras, refer to the column for F3-series cameras. For the K2, B2 and E2 focusing screens, refer to the columns on the K, B and E screens, respectively. For details, also refer to the specific focusing screen's instruction sheet. Camera Screen
E Gl G2 G3 G4 HI H2 H3 H4 J K/P
- When the Teleconverter TC-201, TC-200, TC-14A, TC-14B* or TC-14* is attached to this lens, use the following table: ~~~~~~~~~~^^^ Screen B C D E Gl G2 G3 G4 HI H2 H3 H4 J K/P M R T U Camera —-—__ A/L
- To attach the TC-14B or TC-14 to this lens, filter should first be detached. ©= Excellent focusing ®= Acceptable focusing The split-image rangefinder, microprism or crosshair area is dim. Focus on the surrounding matte area. 0 = Acceptable focusing Slight vignetting or moire phenomenon affects the screen image. But the image on film shows no trace of this. Blank means not usable.
Your lens comes with a set of five 39mm-diameter Nikon filters: Ultraviolet (L37C), Orange (056), Amber (A2), Blue (B2) and Neutral Density (ND4). The ultraviolet filter is factory-installed into the rear lens mount; the four other filters are stored in the CA-2 filter case inside the lens case. Make sure a filter is screwed onto the rear lens mount at all times. You normally leave the ultraviolet filter on when you wish no particular change in contrast or f/number. To change filters, simply unscrew and remove the one on the lens and replace it with one of the four other filters. Orange Filter 0 5 6 : Used exclusively for black-and-white photography to increase contrast. Don't use this filter with color film unless you're striving for special effects. Amber Filter A2 and Blue Filter B2: Both are used exclusively for color photography. A2 corrects the bluish coloration that sometimes affects daylight film; B2 removes the reddish tinge from sunrise or sunset shots. Ultraviolet Filter L37C and Neutral Density Filter ND4: Both can be used for either black-and-white or color photography. The ND4 filter gives the effect of stopping the lens down by two stops. Caution: The thickness of the glass used in the Nikon filters usable with your lens is carefully matched to the optical properties of the lens. So, do not use 39mm-diameter filters of any other make but Nikon. Otherwise, focus cannot be accurate at all. Type of filter Filter factor Color and shade Designation Daylight Tungsten light
L37C Orange 3.5X(1 5/6) 2X(1) Amber 1.2XU/3) Blue 1.2X(l/3) ND4 4X(2) 4X(2) Note: Number enclosed in parentheses indicates f/stop to be compensated in each combination.
OBTAINING CORRECT EXPOSURE
Your lens is the fixed-aperture type and will not couple with the TTL exposure metering system that may be built into some camera bodies. To get the correct exposure, please refer to the stopped-down exposure measurement section in the camera's instruction manual. Remember that even if you set the camera to its top shutter speed, you won't be able to obtain correct exposure. A rule of thumb is to use either the supplied neutral density filter ND4 or optional ND8 or ND2 singly or together; use slower film in extremely bright situations and faster film in low light. Note: When the lens is used with the Nikon F-401/N4004*, the camera meter coupling function does not operate and the exposure indicator LEDs do not appear. *The Nikon N4004 is sold exclusively in the U.S.A.
CONTROLLING THE APERTURE
To obtain a smaller aperture for the fixed-aperture Reflex-Nikkor 500mm f/8, use a neutral density (ND) filter. If you use the ND filter with an exposure value of 4X that comes with your lens, you can achieve the effect of stopping the lens down to f/16. However, since the ND filter does not actually stop down the lens but only decreases the amount of light striking the film, depth of field will remain unaffected.
SPECIFICATIONS Focal length: 500mm Maximum aperture: f/8 Lens construction: 6 elements in 6 groups Picture angle: 5° Diaphragm: Fixed Meter coupling shoe: Not provided Focusing range: Infinity (°°) to 1.5m (5ft) Distance scale: Graduated in both meters and feet Filter: 39mm diameter screw in; L37C, 056, A2, B2 and ND4 provided Mount: Nikon bayonet mount Attachment size: 82mm (P=0.75mm) Dimensions: Approx. 89mm dia. x 109mm extension from flange; 116mm long (overall) Weight: Approx. 840g ACCESSORIES Supplied Slip-on plastic front lens cap Rear lens cap LF-1 Screw-in lens hood HN-27 39mm screw-in filters (L37C, 056, A2, B2, ND4) Filter case CA-2 Hard lens case CL-39 Optional Other 39mm screw-in filters Teleconverter TC-14A* Teleconverter TC-14B Teleconverter TC-201 *
- Usable, but vignetting or other performance deterioration may be noticeable in the image recorded on the film. LENS CARE
- Although you should always keep the lens surfaces clean, rough cleaning must be avoided. Wipe with a soft, clean cotton cloth moistened with alcohol to remove grease or fingerprints from the lens surfaces. If you use ether in cleaning the lens, a smudge sometimes appears on the surface of a multi-coated lens. If this happens, wipe it again with a cotton cloth moistened with alcohol.
- Keep the lens cap in place whenever the lens is not in use.
- Attach both the front and rear caps when the lens is stored separately.
- To ensure proper fit of the lens when stored in the leather lens case, set the lens' focusing ring to the infinity (°°) setting.
E Gl G2 G3 G4 HI H2 H3 H4 J A/L Kamera K/P
E Gl G2 G3 G4 HI H2 H3 H4 J A/L
- — - ^ ^ ^ Verre Boitier
E Gl G2 G3 G4 HI H2 H3 H4 J K/P
E Gl G2 G3 G4 HI H2 H3 H4 J K/P
E Gt G2 G3 G4 HI H2 H3 H4 J K/P
USO'DE LOS FILTROS
Cj, C2 DEPTH-OF-FIELD TABLE (ft) Focused Distance
No reproduction in any form of this manual, in whole or in part (except for brief quotation in critical articles or reviews), may be made without written authorization from NIKON CORPORATION. Nikon NIKON CORPORATION FUJI BLDG., 2-3, MARUNOUCHI 3-CHOME, CHIYODA-KU, TOKYO 100, JAPAN PHONE: 81-3-3214-5311 TELEX: NIKON J22601 FAX: 81-3-3201-5856 Printed in Japan 9&184-e02 (K044)