
TELECOMMANDE FILAIRE MC-36 - Remote control NIKON - Free user manual and instructions
Find the device manual for free TELECOMMANDE FILAIRE MC-36 NIKON in PDF.

| Product type | Wired remote control for Nikon cameras |
| Brand | Nikon |
| Model | MC-36 |
| Power supply | 2 AAA 1.5V LR03 alkaline batteries |
| Dimensions (excluding protruding parts) | Approx. 155 × 40 × 18 mm |
| Weight (magnetic core not included) | Approx. 105 g |
| Cable length | Approx. 850 mm |
| Operating temperature | -20 °C to +50 °C |
| Main features | Programmable timer (delay, exposure time, interval, number of shots), manual release, backlight, control lock |
| Compatibility | Nikon cameras with 10-pin remote terminal (D2, D1, D200, D100 with grip, F6, F5, F100, F90X, F90, etc.) |
| Compatible accessories (optional) | MC-21 extension cable, MC-35 GPS adapter, MC-26 cable |
| Maintenance | Avoid shocks, humidity, sudden temperature changes, and strong magnetic fields |
| Safety | Do not disassemble, avoid moisture, handle batteries with care |
| Spare parts and repairability | AAA batteries (not included); separate accessories; repair by Nikon authorized service center |
| General information | FCC Class B compliant; meets Canadian interference-causing equipment requirements |
Frequently Asked Questions - TELECOMMANDE FILAIRE MC-36 NIKON
User questions about TELECOMMANDE FILAIRE MC-36 NIKON
0 question about this device. Answer the ones you know or ask your own.
Ask a new question about this device
Download the instructions for your Remote control in PDF format for free! Find your manual TELECOMMANDE FILAIRE MC-36 - NIKON and take your electronic device back in hand. On this page are published all the documents necessary for the use of your device. TELECOMMANDE FILAIRE MC-36 by NIKON.
USER MANUAL TELECOMMANDE FILAIRE MC-36 NIKON
The Illuminator/Lock Button 7
Connecting the MC-36 7
Using the MC-36 8
Timed Photography 8
Manual Release 15
Precautions for Use 16
Caring for the MC-36 16
Specifications. 17
En
For Your Safety (1/2)
To prevent damage to your Nikon product or injury to yourself or to others, read the following safety precautions in their entirety before using this equipment. Keep these safety instructions where all those who use this equipment will read them.
The consequences that could result from failure to observe the precautions listed in this section are indicated by the following symbol:
This icon marks warnings, information that should be read before using this Nikon product to prevent possible injury.
Do not disassemble or modify
Failure to observe this precaution could result in electric shock or product malfunction. Should the product break open as the result of a fall or other accident, remove the batteries and take the
product to a Nikon-authorized service representative for inspection.
Keep dry
Do not handle with wet hands or immerse in or expose to water or rain. Failure to observe this precaution could result in fire or electric shock.
Do not use in the presence of flammable gas
Failure to observe this precaution could result in explosion or fire.
Keep out of reach of children
This device contains small parts which may pose a choking hazard. Consult a physician immediately if a child swallows any part of this device.
Turn off immediately in the event of malfunction
Should you notice smoke or an unusual smell coming from this device, remove the battery im
mediately and take the device to a Nikon-authorized service representative for inspection, taking care to avoid burns. Continued operation could result in injury.
Do not expose to high temperatures
Do not leave the device in a closed vehicle under the sun or in other areas subject to extremely high temperatures. Failure to observe this precaution could result in fire or in damage to the casing or internal parts.
Observe precaution when handling batteries
Batteries may leak or explode if improperly handled. Observe the following precautions when handling batteries for use in this device:
- Use only batteries listed in this manual. Do not mix old and new batteries or batteries of different types.
For Your Safety (2/2)
En
- Read and follow all warnings and instructions provided by the manufacturer.
- Do not short or disassemble.
- Do not expose to flame or excessive heat.
- Do not attempt to insert batteries upside down or backwards.
- Batteries are prone to leakage when fully discharged. To avoid damage to the product, be sure to remove the batteries when leaving the product unattended for prolonged periods or when no charge remains.
- Should liquid from the batteries come into contact with skin or clothing, rinse immediately with fresh water.
Notices (1/2)
Notice for Customers in the U.S.A.: Federal Communications Commission (FCC) Radio Frequency Interference Statement
This equipment has been tested and found to comply with the limits for a Class B digital device, pursuant to Part 15 of the FCC rules. These limits are designed to provide reasonable protection against harmful interference in a residential installation. This equipment generates, uses, and can radiate radio frequency energy and, if not installed and used in accordance with the instructions, may cause harmful interference to radio communications. However, there is no guarantee that interference will not occur in a particular installation. If this equipment does cause harmful interference to radio or television reception, which can be determined by turning the equipment off and on, the user is encouraged to try to correct the interference by one or more of the following measures:
-
Reorient or relocate the receiving antenna.
-
Increase the separation between the equipment and receiver.
- Connect the equipment into an outlet on a circuit different from that to which the receiver is connected.
- Consult the dealer or an experienced radio/television technician for help.
CAUTIONS
Modifications: The FCC requires the user to be notified that any changes or modifications made to this device that are not expressly approved by Nikon Corporation may void the user's authority to operate the equipment.
Interface Cables: Use the interface cables sold or provided by Nikon for your equipment. Using other interface cables may exceed the limits of Class B Part 15 of the FCC rules.
Notices (2/2)
Notice for Customers in the State of California
WARNING: Handling the cord on this product will expose you to lead, a chemical known to the State of California to cause birth defects or other reproductive harm. Wash hands after handling.
Nikon Inc.,
1300 Walt Whitman Road, Melville, New York
11747-3064,U.S.A. Tel.: 631-547-4200
Notice for Customers in Canada
CAUTION: This class B digital apparatus meets all requirements of the Canadian Interference Causing Equipment Regulations.
Thank you for your purchase of an MC-36 remote cord. The MC-36 is equipped with an interval timer suited to a wide variety of tasks, including astronomical photography. See page 17 for a list of compatible cameras.
Parts of the MC-36 (1/3)
Refer to the illustrations inside the front cover.
Body
① 10-pin connector.
② Cord
③ Release lamp. 12-13
④ Control panel. 6,7,8-13,15
⑤ TIMER START/STOP button 12-13
⑥ SET button 8,10,12
⑦ Illuminator/lock button
⑧ Arrow button. 10-11
⑨Shutter-release button. 15
10 Battery-chamber cover. 6
Eyelet for strap (available separately; use cell phone or other similar strap)
Parts of the MC-36 (2/3)
En
Control Panel
Selection cursor. 10-11
2 Timer display 10-13, 15
3 Lock indicator. 7
4 Low battery indicator. 6
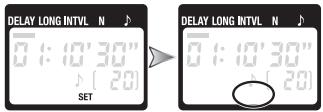
5 "TIMER ACTIVE"indicator. 12-13
6 Speaker on/off indicator. 9, 11
7 "SET"indicator. 8,10-12
3 "RELEASE"indicator. 12-13,15
Number of shots 9-13
- The illustration inside the front cover shows the control panel with all elements lit. In the other illustrations throughout this manual, elements relevant to the explanation in the accompanying text are shown in black. Indicators not mentioned in the text are shown in gray.
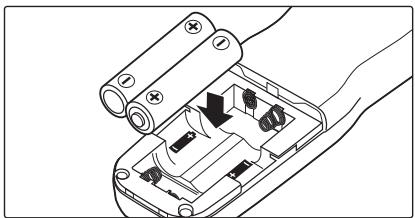
Inserting Batteries
Slide the battery-chamber cover (10) from the back of the MC-36 and insert two AAA 1.5V LR03 alkaline batteries (available separately) as shown.
The Low Battery Indicator (c)
The low battery indicator (4) will blink when the batteries are low. Ready spare batteries.
Replacing Batteries
When replacing batteries:
1 Check that the "TIMER ACTIVE" (5) and "RELEASE" (8) indicators are not displayed (see right).
2 Turn the camera off and disconnect the MC-36.
3 Remove the batteries.
4 Wait until the control panel has gone out and insert new batteries.
When the MC-36 Is Not in Use
The MC-36 is not equipped with an off switch. To reduce the drain on the batteries when the MC-36 is not in use, end shooting and check that the "TIMER ACTIVE" (5), "SET" (7), and "RELEASE" (8) indicators are not displayed (see right). The drain on the batteries increases when these indicators are flashing.
Parts of the MC-36 (3/3)
The "TIMER ACTIVE," "SET," and "RELEASE" Indicators
If this flashes It means this; do this to turn it off
| TIMER ACTIVE | Timer active (page 13); press TIM-ER START/STOP button (⑤). |
| SET | Settings can be modified (page 8); press SET button (⑥). |
| RELEASE(TIMERACTIVE not flashing) | Manual release active (page 15); release shutter-release button (⑨; if button is in HOLD position, release shutter-release lock). |
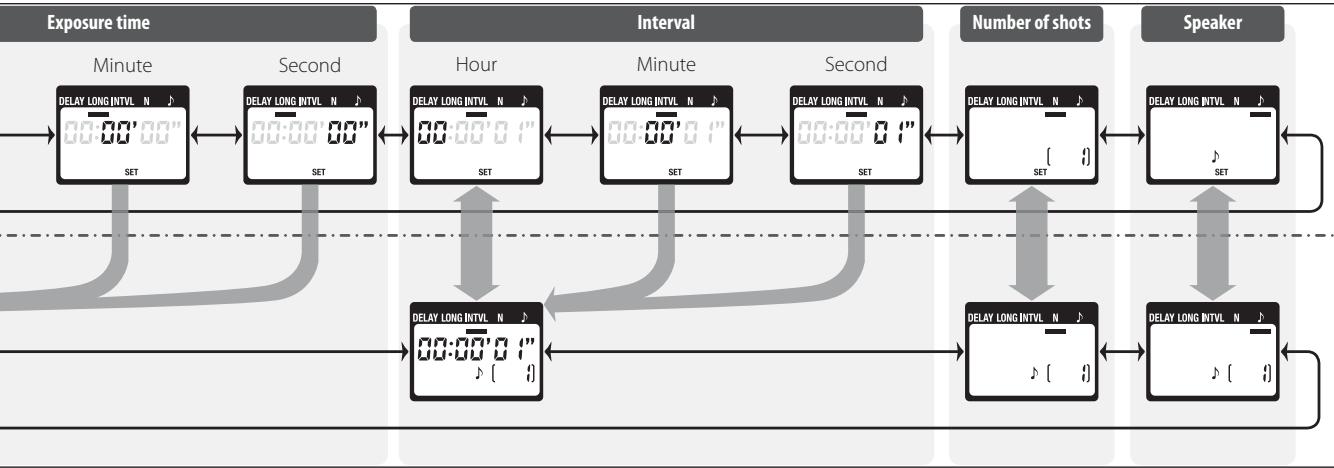
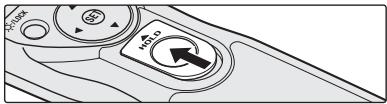
The Illuminator/Lock Button
Press the illuminator/lock button (7) briefly to activate the control panel backlight. The backlight will remain lit for about six seconds; pressing the arrow button (8) while the backlight is on extends the timer for another six seconds.
To lock all controls except the shutter-release (9) and illuminator/lock buttons, press the illuminator lock button until the lock icon is displayed in the control panel. To release the lock, press the illuminator/lock button until the lock icon is no longer displayed.

Connecting the MC-36
1 Turn the camera off.
2 Check that the "TIMER ACTIVE" (5) and "RELEASE" (8) indicators are not displayed.
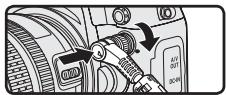
3 Remove the 10-pin terminal cover from the camera. Keeping the mark on the 10-pin connector (①) aligned with the mark on the camera body, insert the connector as shown and then tighten the locking nut.
Disconnecting the MC-36
After checking that the "TIMER ACTIVE" (5) and "RE-LEASE" (8) indicators are not displayed, turn the camera off and disconnect the MC-36. Replace the 10-pin terminal cover.
Using the MC-36
En
The MC-36 functions as:
An automatic timer (pp. 8-14). Choose the delay (time before shooting starts), exposure time, interval, and number of shots for timed interval photography. Shutter speed can be selected with the camera if desired (pg. 14).
- A manual release (pg. 15). Take photographs manually using the shutter-release button on the MC-36. Photographs can be taken manually even when the timer is running.
Timed Photography (1/7)
- Adjust Camera Settings
1.1 Connect the MC-36 (pg. 7) and turn the camera on.
1.2 Adjust camera settings as follows (see the camera manual for details):
| Exposure mode | M (manual) |
| Shutter speed | Bulb |
| Interval timer | Off |
| Focus mode | AF-C (continuous-servo autofo-cus)* or M (manual) |
| Continuous | S (single frame) |
-
Select "release priority" if available.
-
Set the Timer
2.1 Press the SET button (⑥). "SET" will flash in the control panel.

The MC-36 can be connected to the camera after the timer has been set.
Timed Photography (2/7)
2.2 Adjust the following settings:
| Option | Description | Supported settings |
| DELAY | Delay before shutter is released | 0s to 99 hrs 59 min 59s (in one-second increments) |
| LONG | Exposure time | |
| INTVL | Interval | 1s to 99 hrs 59 min 59s (in one-second increments) |
| N | Number of shots | 1 to 399, - (unlimited) |
| J | Speaker on/off | J(on), Joff) |
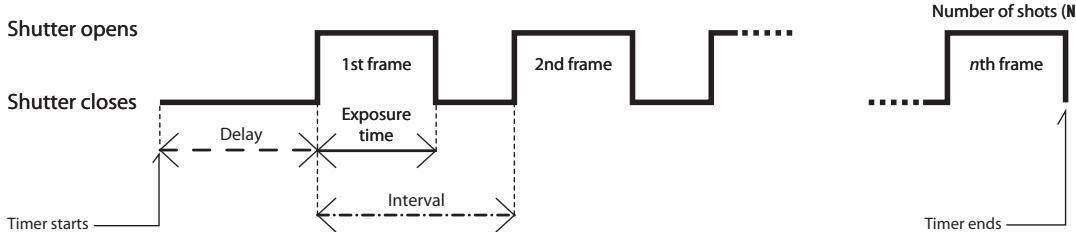
Delay, Exposure, and Interval Settings
Timed Photography (3/7)
En
Setting the Timer
Use the arrow button to set the timer. Press left or right to select, up or down to change. The current selection is indicated by the selection cursor (1).

Adjust settings
Press SET (6) at any time to complete the operation and display the new settings for the selected item. To view other settings, press the arrow button left or right. The current selection is indicated by the selection cursor (1). Press the SET button to edit the current setting as described above.
Setting complete
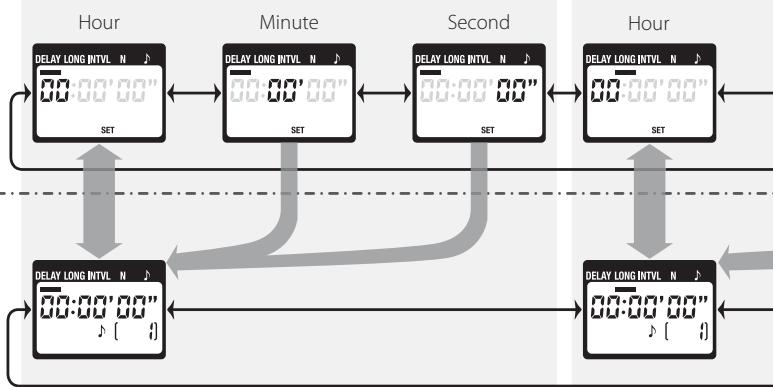
Delay (time until shooting starts)
Timed Photography (4/7)
En
Timed Photography (5/7)

Setting the Timer
To ensure correct operation, choose an interval at least one second longer than the exposure time. When using autofocus, set the delay to two seconds or more and choose an interval at least two seconds longer than the exposure time to ensure that the camera has time to focus. When using long exposure noise reduction (available with some digital cameras), the interval should be at least twice the exposure time.
Intervals of 00:00:00 will automatically be reset to 00:00:01 when the SET button (6) is pressed to put settings into effect.
To set the number of shots to -- (unlimited), select 1 and press the arrow button (8) down or select 399 and press the arrow button up.
2.3 After adjusting all settings as desired, press the SET button (6) to put the new settings into effect. A beep will sound (if the speaker is on) and the "SET" indicator will go out.
The new settings will remain in effect until changed or until the batteries are removed or exhausted.
3. Start the Timer
Press the TIMER START/STOP button (5). The timer will start and "TIMER ACTIVE" (6) will flash in the control panel. Between shots, the control panel will show the time remaining until the next photograph is taken. If the speaker is on, a beep will sound three times at one-second intervals before the shutter opens.
While the shutter is open, the control panel will show the time remaining until the shutter closes, and the release lamp and "RE-LEASE" indicator (3) will flash at one-second intervals. The number of shots remaining will be updated each time a photograph is taken.
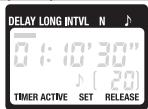
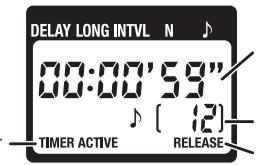
Control Panel Display (Timer Active)
Flashes while timer is active
Between shots: Time remaining until next shot
While shutter is open: Time remaining until shutter closes
Number of shots remaining
Flashes while shutter is open
The Speaker and Release Lamp
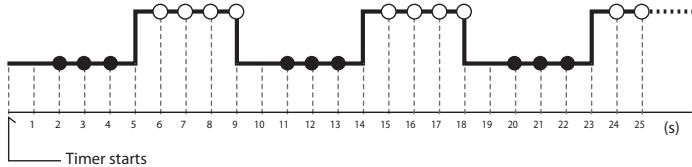
The following illustration shows when a beep will sound (●) and the release lamp flash (○) with a delay of 5 s, an exposure time of 4 s, and an interval of 9 s.
Shutter open
Shutter closed
- End Shooting
Shooting will end automatically when the selected number of shots has been taken. To end shooting before all photographs have been taken, press the TIMER START/STOP button (5).
Timed Photography (7/7)
| Using the Camera to Select Shutter Speed To take photographs at the shutter speed selected with the camera, adjust settings as follows: | ||
| Camera | Exposure mode | M (manual) or S (shutter-priority auto) |
| Shutter speed | Any | |
| Interval timer | Off | |
| Focus mode | AF-C (continuous-servo autofocus)* or M (manual) | |
| Shooting mode | S (single frame) | |
| MC-36 | Exposure time | 0s |
| Interval | Longer than camera shutter speed† | |
| * Select "release priority" if available. +When using autofocus, choose an interval at least two seconds longer than the camera shutter speed to allow the camera time to focus. When using long exposure noise reduction (available with some digital cameras), choose an interval at least double the camera shutter speed. | ||
Using the Timer
Before using the timer for extended periods, check that the batteries have enough charge. Replace the batteries when the low battery indicator (1) flashes in the control panel (4).
Manual Release
The MC-36 shutter-release button (9) functions in much the same way as the camera shutter-release button.
1. Adjust Camera Settings
Connect the MC-36 (pg. 7) and turn the camera on. Choose exposure mode, shutter speed, focus mode, and shooting mode as desired.
2. Take Pictures
2.1 Press the MC-36 shutter-release button (9) halfway and check focus and exposure, then press it the rest of the way down to take a picture. While the shutter is open, a beep will sound at one-second intervals, the "RELEASE" indicator (8) will flash, and
the control panel will show the time remaining until the shutter closes.
To keep the shutter-release button fully pressed for bulb photography, slide the button to the HOLD position. Slide it in the opposite direction to release the lock.
2.2 Release the button to end shooting.
The MC-36 shutter-release button can be used when no batteries are inserted. The control panel will remain off and no beep will sound.
The shutter-release button can be used to release the shutter manually while the timer is active. Timer count-down (including the control panel display, release lamp, and beep) continues during manual release. If a manual release overlaps with an automatic release, the shutter will remain open until both exposure times have expired.
Precautions for Use
En
Check the camera battery level and number of exposures remaining before using the MC-36 (see the camera manual for details). The timer will continue to operate even when no pictures can be recorded due to low battery, lack or film or memory, or lack of space in the memory buffer (digital cameras only). An AC adapter (available separately) is recommended for longer sessions.
Some cameras have an AF activation option that determines whether the camera will focus when the shutter-release button is pressed halfway (see the camera manual for details). Enable shutter-release button AF-activation when using the MC-36.
Please note that the timer is less accurate than most watches or household clocks.
Caring for the MC-36
Do not drop: The product may malfunction if subjected to strong shocks or vibration.
Keep dry: This product is not waterproof and may malfunction if immersed in water or exposed to high levels of humidity. Rusting of the internal mechanism can cause irreparable damage.
Avoid sudden changes in temperature: Sudden changes in temperature, such as occur when entering or leaving a heated building on a cold day, can cause condensation inside the device. To prevent condensation, place the device in a carrying case or a plastic bag before exposing it to sudden changes in temperature.
Keep away from strong magnetic fields: Strong static charges or the electromagnetic fields produced by equipment such as radio transmitters could interfere with the device.
A note on electronically-controlled devices: In extremely rare instances, unusual characters may appear in the control panel and the device may stop functioning. In most cases, this phenomenon is caused by a strong external static charge. Turn the camera off, disconnect the MC-36, remove the batteries, and then replace them once the control panel has turned off. Caution is required when handling the batteries, which may be hot from use. In the event of continued malfunction, contact your retailer or Nikon representative.
The control panel: LCD displays tend to darken at high temperatures and exhibit slower response times at low temperatures. This does not indicate a malfunction.
Specifications
| Supported cameras* | Nikon D2-series, D1-series, D200, and D100 (requires MB-D100 battery pack) digital cameras; Nikon F6, F5, F100, F90X, F90 |
| Timer delay | 0s to 99 hrs 59 min 59 s in one-second increments |
| Exposure time | 0s to 99 hrs 59 min 59 s in one-second increments |
| Interval | 1 s to 99 hrs 59 min 59 s in one-second increments |
| Number of shots | 1 to 399, - (unlimited) |
| Power source | Two AAA 1.5V LR03 alkaline batteries |
| Battery life | Approximately two months of continuous shooting with a delay of 5 min, an exposure time of 4 min 56 s, and an interval of 5 min. Use of the illuminator will reduce battery life. |
| Operating temperature | -20-+50°C (-4-+122°F) |
| Dimensions | Approximately 155×40×18 mm (6.1×1.6×0.7 in.), excluding projections |
| Weight | Approximately 105 g (3.7 oz), excluding ferrite core |
| Length of cord | Approximately 850 mm (33.5 in.) |
| Compatible remote terminal accessories (available separately) | MC-21 extension cord (operation is not guaranteed if two or more MC-21 extension cords are used), MC-35 GPS adapter cord (connects to 10-pin terminal on MC-35) |
- An MC-26 adapter cord can be used to connect the MC-36 to any camera or accessory with a remote terminal, including motor drives (MD-12 motor drive excluded).
1300 Walt Whitman Road, Melville, New York
11747-3064,U.S.A. Tel.: 631-547-4200
CAUTION: This class B digital apparatus meets all requirements of the Canadian Interference Causing Equipment Regulations.
Presentsation
1300 Walt Whitman Road, Melville, New York
11747-3064,U.S.A. Tel.: 631-547-4200
MepbI npedoctopoxhoctn (1/2)
Bo n36eKaHne nOJOMKn BaSei TeXnKIn
Nikon nnI npUHHEnHny uJep6a Bam IuHNo i
OKpyKaHouIm, n3yUHe CNeDyUOuNe npAByNA
npEoCTOpOxHooT nepeD nCIOb3OBaHEm
3ToI TeXnKIn. DejkHte 3Tu npAByNA B
MeCe, doCTyHmO JIbnBCExTeN, KTO 6ydet
nonb3OBaTcB 3ToI TeXnKOn.
IocneDCTBnA, KOtOpbE MOyT BO3HNKHyTb Bpeyltate HapuShenYka3aHHbx npaBInppeoctopoxHOctnO603NaeHbCneJyUoiMIM3HaKAMi:
3TOT 3nak 603nauaet npdeynpexkdenne, KOTOPOE Heo6OdmoIpouectb neped nCIOJIb3OBaHmE BaSeIe TseNkNi Nikon BO nB6ExKaHNe B0MxOReTO BbXoJa ee n3 cTPOJ nII pInuHHeHn BpeA BaSeMy 3doOpBO.
Hepa36bupaIteHneMoDnΦuIpyuTe H3dennE
HecobioeHne3ToMepbI npoocTopokHoCTN MOKet npBcctn KnpaJekHIO 3neKpTneCckIM TOKOM nHn HnepaBnblHO np6Ote n3dEINa. Ecln n3dEIne pa3bnoc Bpeyltate naEHHn nnn pnp dpytnx o6ctOaTeNbctBax, n3BnKeNte 6aTapen n npoocTaBeI erO gnpoBepKn B cepBnchYO cnjXby kOmpanHn Nikon.
Держинецнданecухим
He bepnte n3dJeHne MOKpbIMn pykAmn, He nporpykaite erO B0NDy INHbIM Oba3OM He noDBepratReero Bo3JeCTBNI BLnr (Haprimep, Dojma). HecobIoJeHne 3TOro Tpe6oBaHnI MOKeT npBVeCTN K KOJAPy IIN NopaxEnIO 3JIeKTPnuECKM TOKOM.
He nonb3yItecb foKoAmepoi npH nauuHn NERKOBOcNlaMeHNOUxCHra3OB
Hecobndenehe 3ToM MepbI npedoctopoxhocn MOKeT npVBcTeN K B3pByI INI NOxapy.
Bepereute ot ete
JaHnHOe n3dEne CoepxNt MeKNe DeTANI, KOtOpBE MOYr Bb3BaTb yUdUbE PnI NpAaHN B roPNo. HeMeJEnHo 6oPaNTecB K BpaUy B cIyue, ecNI pe6eHOK npOrnTot kKaYo-1n60 aCtb n3dEInN.
HemeJeHNO BbIKNoaIte H3dJIeN pInn HEnpaBInbHOM erfoyHKUOnHOpBaHN
PnI NOBVAHENIM DbMa IIN HeOBbUHOrO 3aNaXa,
NCXoDAJrero OT N3dEJIrN, HEMeDJIeHNO IVBLeKIne
6aTapei, Co6IIOJaA MeByI pPeIOCTOpOXHOCtN,
OTb6bHe O6BeYbcra, INOTHEcITBE CepBVCbY CEHTP
KOMnAHmN Nikon dJe npOBePKn IN daIaHOctNIk.
PiOdoJIKeHne paObTo b MoKeT pIbIeCTN K
NoIyueHEnIO TpaBMbl.
MepbI npedoctopoxhoctn (2/2)

He noDBeprAte H3dEne DeiCTBnO BbICOKX temepatyp
He octabIaIe I3dJIeNBE 3aKpbITOM aBTOM6bIe NOI cONHcEM INI B DpyNX MecTAs, rIe OHO MOKeT IOBcERHpyTbCr DeIcETBnU qpeMeHPO bIcOKIN TEmnpaTp. HecO6IODeHne 3oT Me MPBI npEOCTOPOXHOCTNI MOKeT pPiBeCTN KIOXApY INI NOBpeKJENIO KOpNca NiIO BHyTpeHHNX uactTe.

Co6nloaite octopoxhnoctb npn o6paueHm c 6atapema
HnnpaBnIbHoe oBaPaeHne c 6batapeMm MoKET npBcEtn K IN pOTeKaHnIO nIN B3pBy. CoBIOJadte C neDyIOUne Mepl npEOCTOpOxHocTn PnO bpaAteHn C 6batapeMn, IcNpOJIb3yEmbIMB DaHHOM yCTpoiCtBe:
IcN0b3yHte 6atapeu TOnbKO TOrO TnHa, KOTOpB yKa3aH B HACToHcE pyKOBoCTBe. HeDOnyCTMIO COBMcTHeO IcN0b3OBAHHe CTapbx N HObIx 6atapei, a TaKke 6atapeu Pa3hNx TnOB.
O3aKoMbTeB co BcEMn ppeDynpExeHnIMn INHCTpykUINMn, ppeOCTbLnEHHbIMn npOn3BOdITenEM.
- He 3aMbIkaIte KOHTaKtBi 6atapeu n He pa3bnpaIte ee.
- He harpebaite 6aTaapeio n He 6pocai Te ee B orohb.
- Пи установke 6атapestи соблюдайтправильную opиентцию.
ПОЛНOCТБЮ разржевы AkkyMЛЯТOPье 6batpen MORYT npOTEkath.Bo ИЗБекане 6porte nI3ФOTOKampebИЗВЕКайte 6batpen nI3ФOTOKampebI пп сдпгнHOM HeICNpOLBJ3OBaHnII INI B cIvyae NOHON pa3PДКI 6batpen.
B cnlyae nonanadhya jxidkoctn 3batape H Ka Koyu nn OeJXH MeHeknHPOpOMte COOTBETCTByUooCe METo npTOouHO BDOH.
BveeHne
Bnaorapnmbac3a npno6pehenhe Tpocnka nctaunonHoro ynpabneHnMC-36! Tpocnk MC-36
obopyoBaH INTEpBaIbHbIM TaImePOM, pnpOrdHbIM IJIy BInOpHeHn ⅢIpOKOro CneKtpa 3aIau,
BkIIOUaA actPOHomueckyIO cbemky. IpeueeHbCOBMeCTmMbIX FOToKaMep cm. Na cTpaHnCe 17.
IpeuehenyacheTei MC-36 (1/3)
Cm. nlllouctpaun Ha nepBoi cTp. oBnKn.
Kopnyc
① 10-KoHTaKTbI WTeKepe.7
② TpocnK
③ INIINKAtOp cnycka 3aTBopa. 12-13
④ KOnTpOJIbHbIy IuCpIeI 6,7,8-13,15
⑤ KhoNka TIMER START/STOP 12-13
⑥ KhoNka SET. 8,10,12
⑦ KhONkaNoCDCBETKN/6IOKINPOBKN 7
⑧ KhoPka co cTpeNko.. 10-11
⑨ Cnyckobary KhoNka 3aTBopa. 15
10 Kpbuika 6aTaapeHoro OTecka.
⑪ YuKoДЯ pemHЯ (прИбpeTaTeCЯОТДeнБHo; ИПЛьЗУte pemHЯ ДЯ MOБиьНOrTo TelenФona ИЛIN дPyroI aHaNoTmUHbI pemHb)
Korda MC-36 He nCnoJb3yetc
Tpocnk MC-36 He obopuyoban BbIKIouatelem nHTAHn. YTo6bl yMeHbWntb paCXoD 3Heprtni 6aTapei, KOrda MC-36 He IcNoIb3yetcA, 3aBePwnte CbEMky uYbeINTeCb, YTO INdikatOpbl TIMER ACTIVE (5), SET (7) IN RELEE (8) He oTo6paKaIOCTc (cm. cnpaba).KOrda 3tN INdikatOpbl MmraIoT, HarpUz3ka Ha 6aTapei yBebInuBaETcA.
HOBbIe yCTaHOBKn 6yDyT DeNCTBOBaTdo INx IN3MeHENININO IN3BLeHEnRAIN60 pa3PraDa 6atapei.
3. 3anyck taimepa
Haxmte KhoNky TIMER START/STOP (5).
HaunhaeTcAOTcET BpeMeHn, HA KOHTpOblHOM
IaCnIe3 ZAMnEaET INHdNkATOp TIMERACTIVE 5.
B nPomexyTke MeJy ChmKamHa
KOHTpOlbHOM dCnIeoe OTo6paJeaTeCBApeM,
OCTaBWeecsDo CbemKn CneJyoero KaJa.
EcIn DaHAMIK BKNIOUey, IpePe OTKpbITNeM
3aTbopa 6yEt 3ByuAtb Tpi KOPOTKHX 3BYKOBbIX
CINHana C INTEPBALOM B ONDY CekyHdy.
Korda wTOpKn 3aTbopa OTKpbTb,Ha KOHTPOlbHOM dMnCnpee OTObpaKaAeTc BpEma, OCTabWeecn DO 3aKpbTnIg WToPOK, a INdNkAtOP CnCyKa u INdNkAtOP RELEASE (3) MInaIOT C nepnoDM B oDHy cekyHnd. yCnlo OCTabWnxC KHMKO INMmHeTc PnD CbEmKe KaJDO RKApa.
Cbemka c TaHMePOM aBTOcnycka (6/7)
KoHmpoIbHyduCnneu (8 xode pa6obmymaMepa)
Muraet, noka taimep pa60aet
Mekdy kaipamn: BpeM yo Cbemkn cnelyuioe ro kaipa
Noka wtopk n OKpbItb: BpeM do 3aKpbTnA WTOPOK
Unclo OCTabWUnXc CHIMKOB
Miraet, noka wtopKn OKpbTb
UHAMUK u UHdukamop cnycka
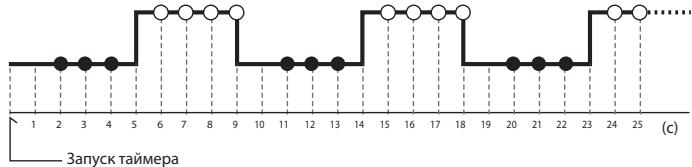
Ha cIeIyUioem pICcYHKe IOKa3aHbI MOMeHTb, B KOTOpBie 6yTeB bIaBaTbC3 3ByKOBoI CnTHaI ( ) MmTaTb INdKATop CnYcKa (O) npi 3aepXke 5 c, dInTeIbHocTn 3kCIO3uIN4 c n INTEpBaIe 9c.
UToPknOtKpbTb
UToPkn3aKpbTbI
4.3aBepweHne cbeMkn
CbeMka 3aBePunTc abTomatNueCKn, KOrda 6ydet CdeNaHO yCTaHOBnEHNO YNCIO CHIMKOB. UTo6bl 3aKOHHTb CbeMKy paHbIe, HaxMITE KHONKY TIMER START/STOP (⑤).
Ru
Cbemka taimepom ABtocnycka (7/7)
YctaHOBKa BbIepeKkCnMoosbIo OToKaMepbI
IJIa CbEMKNC BBydepKKOY, yCTaHOBJIeHHoC NOMOUsbIO 3JMeHToB ynpabJIeHHa KAmepoH, HAcTpoHTe CNeDyUOuHe npapMeTpbl.
VITIOJIb3OBAHnE TaIMepa
PpexJe CEm IcNObTb TaIeMpB TteUHe NdIITbHOrO BpeMeHN, y6EJIeTcB, YTO 3aqrA 6bapeJ RAJIeTc DOCTaTOuHBIM. Ecnn Ha KOHTpOBHOM DcNtnee (4) MmaTeH INHkAToT P aRpaIb6bapei (C), zAmEHNTe IX.
Puchon cnysk 3aTbopa
Cnyckobay KhoNka 3aTbopa (9) MC-36
fHyHKUHOHpye tHaNoRyuHO KhoNke Cnycka
3aTbopa fOToKaMepbl.
1. Hactpoika napametpoB otoKaamepbI
尅수halt내용의종류를다름의그름 Positive to the end of the year.
0i反RIOMoT KoDMC-36(iHa[MC-36]iRA和g)
RechHnDi)将GJHfAeHJFJFJFJFJFJFJFJFJFJFJFJFJFJFJFJFJFJFJFJFJFJFJFJFJFJFJFJFJFJFJFJFJFJFJFJFJFJFJFJFJFJFJFJFJFJFJFJFJFJFJ
鍍鍔鍇鍙鍇鍙鍙鍙鍙鍙鍙鍙鍙鍙鍙鍙鍙鍙鍙鍙鍙鍙鍙鍙鍙鍙鍙鍙鍙鍙鍙鍙鍙鍙鍙鍙鍙鍙鍙鍙鍙鍙鍙鍙鍙鍙鍙鍙鍙鍙鍙鍙鍙鍙鍙鍑
五人山
MC-36 的 셶터버트 (9) 是 키모라의 셶터버트와 Some is the best way to get your kaki and you can get kaki of the kaki.
1. 썸명사의 힘명
Fuji Bldg., 2-3 Marunouchi 3-chome, Chiyoda-ku, Tokyo 100-8331, Japan

Printed in Japan
SB7B03(D3)
8MRG01D3--