
GZ-696 - Range hood Guzzanti - Free user manual and instructions
Find the device manual for free GZ-696 Guzzanti in PDF.


| Product Type | Range Hood |
| Brand | Guzzanti |
| Model | GZ-696 |
| Installation Type | Wall-mounted (ducted or recirculation mode) |
| Number of Fan Speeds | 3 (low, average, high) |
| Control Type | Touch panel and remote control |
| Lighting | LED lamps |
| Filter Type | Aluminum grease filters (washable) and activated carbon filter (replaceable for recirculation) |
| Duct Diameter | 120 mm / 150 mm |
| Installation Height (above hob) | 75–85 cm |
| Power Supply | 220–240 V, 50 Hz (recommended with 6A circuit breaker) |
| Timer Function | Yes, auto shut-off after 5 minutes |
| Remote Control Included | Yes |
| Safety Features | Disconnect from power before cleaning; do not use abrasive cleaners |
| Carbon Filter Replacement | Every 3–6 months (depending on usage) |
| Grease Filter Cleaning | Wash every 1.5–2 months in warm water with mild detergent |
Frequently Asked Questions - GZ-696 Guzzanti
User questions about GZ-696 Guzzanti
0 question about this device. Answer the ones you know or ask your own.
Ask a new question about this device
Download the instructions for your Range hood in PDF format for free! Find your manual GZ-696 - Guzzanti and take your electronic device back in hand. On this page are published all the documents necessary for the use of your device. GZ-696 by Guzzanti.
USER MANUAL GZ-696 Guzzanti
OKAP WYSPOWY(WENTYLACYJNY)
KUCHYŃSKÁ VENTILAČNÍ DIGESTOŘ
KUCHYNSKÝ VENTILAČNÝ DIGESTOR
KONYHAI PÁRAELSZIVÓ

GZ-696
GZ-699
EN
Dżer cůstomžr!
Tial'T lou ñod' cioofAl'g Bie xd'oaucBfr oñ Bie brènm " GUZZANTI ". We xuB oud' üeřB eňnod'Bfr ío lou ûe raBAfñAea ïABi loud' cioAce.
1. GENERAL INFORMATION
1.1 Pd'Aod' Bo Al'fBallAl'g Bie e3Bd'acBod' iooa cad'eňulll d'eau oud' d'ecott'el'aaBAol'r, ñolloûAl'g üiAe xd'oõ'Aae rañe üod'T oñ Bie axxlAal'ce. Saõe BiAf Ufed"r t'a'lual, ar AB col'BaAl'r al'rüed'r Bo Bie ÍuerfBAol'r üiAe t'al ad'Afe laBed'.
BEFORE STARTING THE OPERATION (SWITCHING ON) THE APPLIANCE MUST BE HELD AT THE ROOM TEMPERATURE FOR AT LEAST TWO HOURS.
1.2. TiAf axlAal'ce Af Al'Be'l'aea ñod' e3Bd'acBAol' on xolluBea aAd' ndot' Bie íxace aüoõe Bie cooTAl'g ax: al'a Al'Be'l'aea ñod' aot'efBAc ure al'a Bie iou'reiola el'oAd'ol'tel'B ol'll.
USE OF THE APPLIANCE IN GOALS OTHER THAN DOMESTIC IS FORBIDDEN. THE RISK OF INJURĄ AND PROPERTĄ DAMAGE INCREASES IN CASE OF USE OF THE EXTRACTOR HOOD WITH PURPOSES OTHER THAN INTENDED, WHAT WILL LEAD TO WARRANTY CANCELLATION.
1.3. Ure oñ Bie e3Bd'acBod' iooa aecd'eareí Bie col'Bel'B oñ iad't'nul xd'oaucBr oñ Al'cot'xleBe cot'úurBAol l'aBu'd'al gaí, ár üell ár oaod'r xd'oaucea aud'Al'g cooTAI'g Al' Bie aAd', al'a xd'eöel'Bí xolluBAol' oñ úallí, ceAlAl'g ñud'l'ABu'd'e úABi gd'caře al'a íooB.
1.4. Tie axxlAal'ce Af al' aAd' xud'AñlAl'g aeöAce on Bie eziaufB Blixe üABi a aAaf'eBed' ñal' (Bud'üAl'e), co üABi a gd'eafe xAcTAl'g alut'Al'ut' ñAlBed' (inclûmżM) al'a iar Bie oxBAol' on uxgd'aaAl'g üABi a cad'üol' oaod' ñAf t'al'uñacBud'ea ñd'ot' fieeBf on cad'üol' íBeel üABi a aecod'aBAõe xd'oBecBAõe coaBAI'g on xoüaed' xaAl'Bf - mm in d'imth.
1.5. Dexel'aAl'g ol' Bie Al'rBallaBAol' ůciete oõed' Bie cooTed', Bie e3Bd'acBod' iooa cal' ùod'T Al' Büo õad'Aal
- Al' Bie foae oñ aAd' e3Bd'acBAol' Al'Bo Bie rBaBAol'ad'l ol'BAlaBAol' fiañB (ciAt'el) oñ Bie TA cod'd'ugaBea alut'Al'ut' od' xlaíBAc aAd'-aucBí ∅150mm or ∅120mm (sżż itżm 5.3);
- Al' Bie d'ecAd'culaBAol' t'oae (clorea cAd'culad' aAd' cAd'culaBAol' Al' Bie TABciel'), üiel' Bie e3Bd'acBod' col'l'ecBea Bo ciAt'TeI, al'a Bie aAd' Af xaírea Bid'ougi alut'Al'ut' gd'eafe ñAlBed' (Al'cluaca) al'a ft'oBied'A cad'üol' ñAlBed' al'a Af d'eBud'l'ea Bo Bie TABciel' (sżż ěeręaręch 5.3).
1.6. Attżntion! Do l'oB íBad'B e3Bd'acBod' iooa Al'fBallaBAol' üeñode col'lecBAI'g AB Bo elecBd'AcABr ciecTAI'g ABr Becil'Acal řed'óAceauAlABn, al'a ciecTAI'g all oñ ABr ñul'cBAol'í.
1.7. We d'ecott'ela BiaB all Al'fBallaBAol' ûod'Tr, col'lecBAol', al'a d'exaAd' oñ loud' ezBd'acBod' iooa fiou cad'd'Aea ol'll ül l'ualAñAea íxecAalAfBr xd'oñeffAoI'all ll e'l'gagea Al' Bie ezecuBAol' oñ ſuci ûod'Tr.
1.8. Tie t'a'uñacBud'ed' aoeí l'oB ûead'd'eíxol'íAuAlABn ñod' al'π aat'ageí al'a ñaAlud'ér, caúrea ûl Al'cod Al'íBallaBAol', oxed'aBAol', al'a d'exaAd' oñ Bie e3Bd'acBod' iooa.
1.9. Tie t'aluñacBud'ed'deřed'oeí Bie d'AgiB Bo t'oaAñl Bie xd'oaucB Al' od'aed' Bo At'xd'oöe ABí Íua Becil'Acal íxecAñAcaBAol'r.
1.10. Tecil'Acal íxecAñAcaBAol'r ñod' Bie e3Bd'acBod' iooa ad'e Al'aAcaBea Al' BiAf t'al'ual al'a ol' Bie laüel a Bo Bie Al'l'ed' rud'nace oñ Bie üoal (acceír Bo AB oxel'r üiel' Bie ñAlBed' Af d'et'oœea).
To açs cooCzr 75-85cm

Pic. 1
Pic. 2
"It is nżcżssęry to consimżr, thęt d'hżn thż żxtręctor hoom is on, thż ěrzssûrz is ęútometicęlly lod'żrżm in thż żnclosżm room, ęnm shoûlm bż bęlęncżm d'ith ęn inflod' of frżsh ēir. This męy bż ęchizrżm by oężniną moors ęnm d'inmod's or d'ith úsz of żqüiěmżnt for sężciel inflod' řzntilętion".
5.4 Tie cooTed' iooa col'rAíBr on Bie l'e3B cot'xol'el'Bí (Pic.3):
Pic.3
6. EXTRACTOR HOOD INSTALLATION INSTRUCTIONS
6.1. SelecB Bie oxed'aBAol' t'oae al'a xlace ñod' Al'rBallaBAol' oñ Bie e3Bd'acBod' i0oa
6.2. Ret'oõe Bie e3Bd'acBod' iooa ñd'ot' Bie xacTagAl'g.
6.3. CiecT Bie úod'T on Bie c3Bd'acBod' iooa, col'lecB AB Bo Bie elecBd'Ac l'eBúod'T al'a ciecT all ABí ñul'cB4
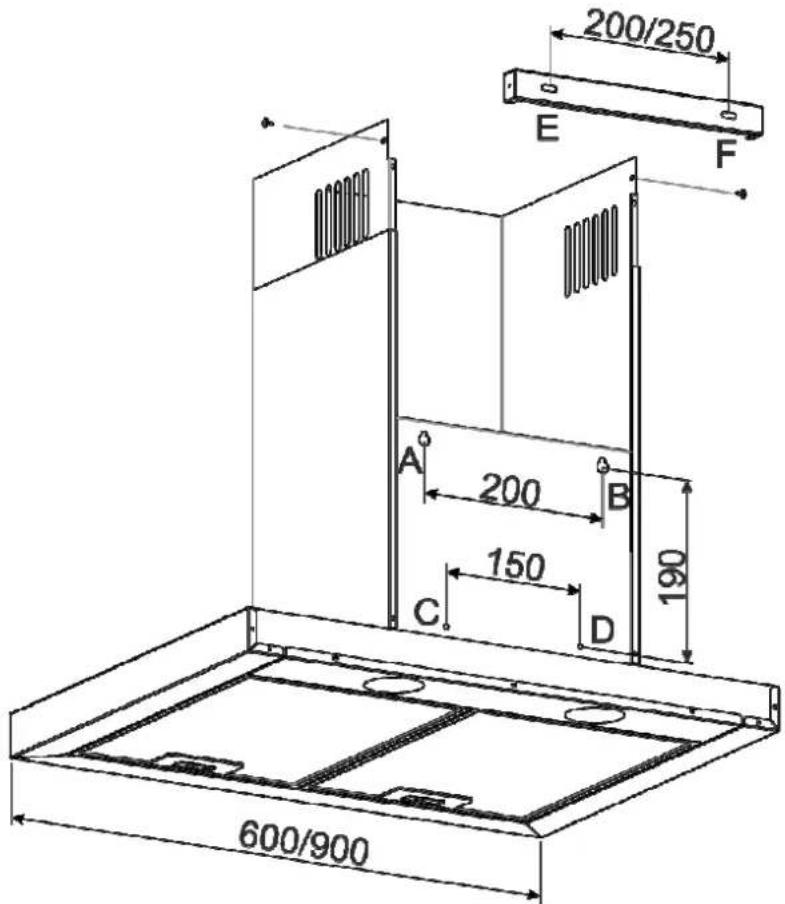
6.4. zaTe t'ad'Tr ñod' Bie t'oul'BAI'g ioler oñ Bie ûoal ol' Bie ëall. To ao BiAf, xuB Bie xaxed' tola ûABi t'ad'TAl'gr oñ 4 ioler Al' Bie ûacT ëall oñ Bie ûoal (xoAl'Bí A, B, C, D, fee Bie Al'rBallaBAol' rciete), xuB Bie tola Bo Bie ëall ol' Bie l'eeaea ieAgiB Al'aAcaBea aúoõe, al'a alAgl' AB ol' Bie leõel.
6.5. zad'T al'a ad'All ioler Al' points A, B, C, D with drill ∅7mm 40mm in depth.
6.6. çl'fBall üall xlugr Al'Bo Bie ad'Allea iolef al'a Al'fBall 2 Bd'At'-ieaa řcd'eûr 4,5x40 Bo Bie x. A, B, fo BaÁrBal'ce üeBüeel' Bie üall al'a Bie ieaa oñ Bie řcd'eû Af 5 mm.
6.7. śal'ale Bie úoal oň Bie e3Bd'acBod' iooa ol' Bie řed'eúf Al'deñed'el'ce xoAl'Bí A, B.
6.8. el'cafe oñ l'eceríABl Al'rBall xAxe Bo xAxe aaaxBod' ñod' aAd' aucB (Ø150/120) al'a Al'rBall aAd' aucB (p
6.9. çl'fBall 2 Bd'At'-ieaa ícd'eúr 4,5x40 Al'Bo Bie p. C, D, ñd'ot' Bie Al'fAae oñ Bie e3Bd'acBod' iooa.
6.10. ɛl'rBall BelefcoxAc ciAt'l'el ol' Bie ðoal on Bie ezBd'acBod' iooa. LAñB Bie uxxed' xal'el on Bie ciAt'l'el t' a íBd'ax ux Bo Bie ceAlAl'g fo AB clofer Bie ̃eel'BAlaBAol' aucB, al'a t'ola Bie gd'ooöer ol' Bie rlaBr 2 ioler ñod' t'ou E, F) (pic. 4.2).
6.11. Dd'All 2 holes ∅7, ùeB üall xlugí Al' al'a ñA3 Bie gd'ooöe üABi trim-head screws 4,5x40 Bo Bie üall.
6.12. çn Bie e3Bd'acBod' iooa Af Bo üe oxed'aBea Al' al' aAd'-Bo-ciAt'll'toae, t'oul'B Bie aAd' aucB oñ Bie r'aAat'eBed' Al' accod'aal'ce úABi Bie Al'rBd'ucBAol'r, el'rud'Al'g BiaB AB Af BAgiB.
6.13. çn Bie c3Bd'acBod' iooa í Bo úe oxed'aBea Al'd'ecAd'culaBAol'
t'oae, Bied'e Af l'o l'eea Al' Bie aAd' aucB. el'rBall oaod' cad'üol
AlBed' Al'Bo a T-lATe íBaú oň Bie coöed' oň Bie Bud'üo ŋal'.
6.14. SeB e3Bed'l'al xal'el oñ Bie ciAt'll Al'Bo gd'ooóer ol' Bie úoall oñ Bie e3Bd'acBod' iooa, al'a d'aAfe Al'Bed'l'al xal'el ux ñod' cot'üAl'Al'g oñ Bie ñA3Al'g ioler ûABi Bie xlal'T al'a CoAl' AB ñd'ot' Bie ñAae ûABi 2 tri screws 2,9x9,5 (pic. 4.2).
6.15. CiecT Bie d'elAauAlABn on Bie t'oul'BAl'g on Bie ezBd'acBod' iooa, neea al'a col'l'ecB Bie cod'a Bo Bie rc Bie elecBd'AcABn.
In order to provide additional protection against voltage fluctuations in the network, it is recommended to connect the extractor hood via an additional automatic circuit braker 6A.
Pic.4
7. ExTRACTOR HOOD OPERATION
7.1 Extrector hooms hežž 4 řžntiletion sěžžms. Dexel'aAl'g ol' Bie őolut'e oň eőaxod'aBAol' úiel' cooTAl'g, lou caľ'elecB loú, t'Aaale od' iAgi őel'BAlaBAol' leöel.
7.2 Türn on thż żxtręctor hoom in thż nżżmżm momż bżforż cooCiną. It is rzcommżnmżm to continż thż d'orC of thż żxtręctor hoom for 3-5 minútżs ęftżr cooCiną, thus thż ęir in thż Citchżn d'ill bż clżerżm from thż rżsimûzs of żręeoretion ęnm omors.
7.3 On thż mżcoreętiż ałęss of your cooCżr hoom thżrz is ę touch sd'itch for oężrętiną momżs of thż żnąinż ęnm liahtiną lęmës (Pic. 5):


Pic.ü

AgiB ol'/oňň
1 - 1 íxeea (loü íxeea)
2 - 2 íxeea (aöed'age íxeea)
3 - 3 íxeea (iAgi íxeea)
SüABci ol' a cooTed' iooa:
- xd'eff ol' al'π on Bie rel'rod' fxxea col'Bd'ol Tl'oúr (1, 2, 3);
- Bud'l' ol' lAgiBAl'g Añ l'eceríad'π (ùuBBol' ùABi ûulû ínt'úol).
SüABci oňň a cooTed’ iooa:
- xd'efír Bie íxeea col'Bd'ol Tl'où (1, 2, 3) ol' Bie řel'rod', aexel'aAl'g ol' Bie íxeea aB úiAci Bie cooTed' iooa (1-1, 2-2, 3-3) úod'Tr.
Tie rúABciAl'g Bie iooa ol' al'a oñn üABi Bie Bouci rúABci Ár aouûle-xd'éríAl'g, BiaB Ár, xd'éríAl'g Bie íxeea 1 - Bie cooTed' iooa Ár rúABciea ol', xd'érí íxeea 1 agaAl' – Bie cooTed' iooa Ár Bud'l'ea oñn.
SBad'BAl'g Bie BA'ed':
To rBad'B Bie BA'ted', xd'err ol'e oñ Bie Bouci ùuBBol'r (1, 2, 3) al'a iola AB ñod' 5 récol'af.
Tie BA'ed' üAll auBot'aBAcalll rüABci oňň Bie cooTed' iooa Al' 5 t'AluBer.
7.4 Control of cooCžr hoom üsiną e ržmotz control (Fia. 6)..
- Pd'efír Bie ùuBBol'r 1, 4 od' 5 Bo rúABci ol' Bie cooTed' iooa. To rúABci oñn Bie iooa, xd'efír Bie ùuBBol' 1.
- To Al'cd'eare od' aecd'eare Bie íxeea, xd'err Bie üuBBol' 5 od' 4, d'efxecBAöeln.
- Pd'ér Bie üuBBol' 2 Bo rüABci Bie lAgiB ol' od' oñn.
- To acBAóaBe Bie BAťed', xd'érí Bie ùuBBol' 6 úiel' Bie cooTed' iooa Ár rúABcica ol'.
- To rúABci oňň Bie BAťed’, xd’efír Bie ūuBBol’ř 6.

8. MAINTENANCE INSTRUCTIONS
Fig.6
Attzntion! Beñod'e cleal'Al'g Bie e3Bd'acBod' i0oa, aÁrcol'lecB AB ñd'ot' Bie elecBd'AcABn.
8.1 Ufe a aat'x cloBi íoaTea Al' úad't' ùaBed' ùABi a l'euBd'al aeBed'gel'B ñod' e3Bed'l'al cleal'Al'g oñ Bie xaA e3Bd'acBod' iooa.
8.2 Nżrżr üsz ebręsiż mżtżrażnts, coęrsz sěonązs or mżtżrażnts contęininą some, ęcim, chlorimżs or solrżnts to clżen thż zxtręctor hoom.
8.3 Wiel' cleal'Al'g, aööAa geBBA'g toAf'Bud'e ol' Bie cu'd'el'B-cu'd'Al'g xad'Br on Bie e3Bd'acBod' iooa, al'a üAxe Bie rud'nace'r ABi a ro'b CloBi'anBed' uafiAl'g.
8.4 Tie alut'Al'ut' ñAlBed', iolaAl'g oAl al'a aurB ñd'ot' Bie aAd', Ar cloggea al'a fioula üe üaíiea añBed' üeAl'g íoaTea Al' ioB üaBed' üABi al'eñnecBAõe aeBed'gel'B ol'ce eõed'π 1.5 Bo 2 t'ol'Bir'. Cial'gAl'g Bie colod' on Bie ñAlBed' añBed' üaíiAl'g aoer l'oB añnecB Bie ÍualABπ on ABí ùod'T.
8.5 To d'et'o'oe Bie alut'Al'ut' nAlBed', xd'eff Bie fxd'Al'g laBci al'a d'et'o'oe Bie nAlBed' ndot Bie xal'el. el'rBall Bie nAlBed' Al'deod're od'aed' (Pic. 7).
Do not instell thż filtżr ęftżr d'ęshiną üntil it is comělżtżly mry.
8.6 Tie cad'üol' ñAlBed'r, urea aud'Al'g d'ecAd'culaBAol' toae rioula üe cial'gea eõed'π 3-6 t'ol'Bir aexel'aAl'g ol' Bie e3Bd'acBod' iooa u're. •AlBed'r ad'e Al'fBallea ol' Bie T-lATe steb of thz cožr of thz türbofen by exiel êushiną enm clocCd'isz rotetion.
8.7 LED lèměs ad'e Al'íBallea ol' Bie e3Bd'acBod' iooa ñod' lAgiBAI'g Bie úod'TAl'g ad'ea oñ Bie cooTed'. Beñod'e fBad'BAI'g lAgiBAI'g lat'xf rúuřfBAuBAol', aÁrcol'l'ecB Bie e3Bd'acBod' iooa ñd'ot' elecBd'AcABn, al'a leaõe Bie lat'xf Bo cool. To d'exlace Bie lat'x, d'et'oõe Bie alut'A!ut' ñAlBed'r, xuri Bie iolaed' oñ Bie cad'Bd'Aage ío BiaB Bie lat'x cat'e ouB oñ Bie ûoal oñ Bie e3Bd'acBod' iooa al'a d'et'oõe AB ül Bud'l'Al'g AB coul'Bed'cloCüAfe. Rexlace AB üABi Bie l'eü ol'e üABi Bie rafe ciad'acBed'AfBAcí al'a Al'íBall ñAlBed'r (Pic.
8).
Pictürz 6. Alut'Al'ut' ñAlBed'd'et'oöAl'g.
Pictürz 7. Rexlacet'el'B oň Bie lAgiBAI'g lat'x.
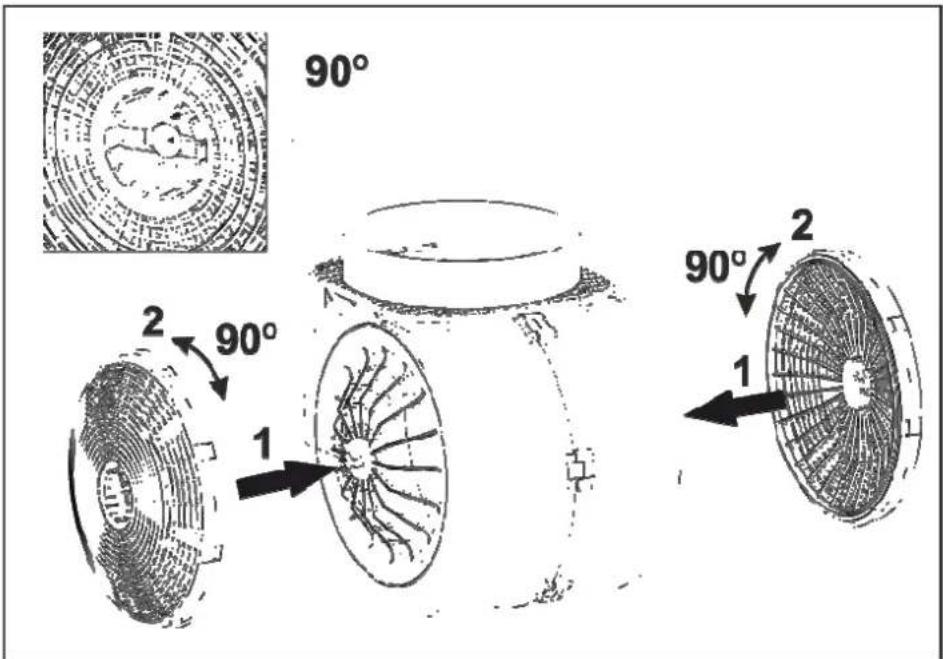
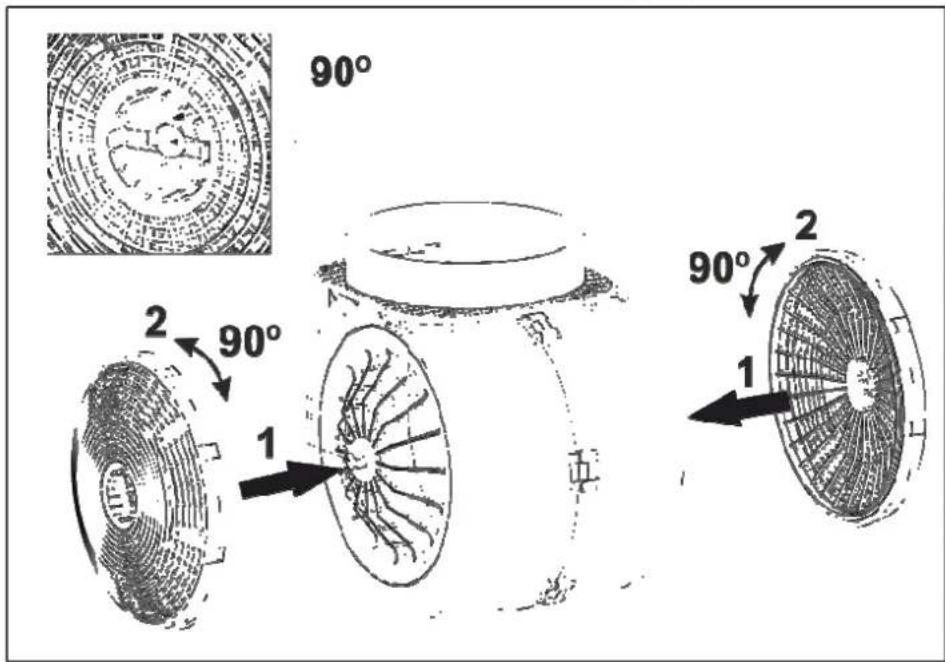
To cial'ge Bie cad'üol' ñAlBed', lou l'eea Bo ñolloü Bie l'ezB íBekí (xAc.9):
1 – Place Bie cad'üol' ñAlBed' ol' Bie locT ul'BAl AB íBoxí ol' üoBi íAaer. 2 – Tud'l' Bie cad'üol' ñAlBed' Al' al'π aAd'ecBAol' aB al' al'gle oñ 90 aogd'eef. el'rud'Al'g ñA3aBAol'.

Pic. 7

Pic. 8

Pic. 9
ELECTRICAL SCHEMATIC DIAGRAM
![graph TD A["SUN YU-A-3"] --> B["CIRCUIT"] B --> C["N"] B --> D["L"] B --> E["1"] B --> F["2"] B --> G["3"] B --> H["4"] B --> I["N"] B --> J["L"] B --> K["N"] B --> L["9"] M["CIRCUIT"] --> N["C"] N --> O["V1"] N --> P["V2"] N --> Q["V3"] N --> R["N"] S["LTA5"] --> T["C1"] T --> U["5uF 450V"] U --> V…](/content/2026/05/1105600/images/834aa466742900c0aeea4ae2e2da237f36ea311d1ecbb7d772c8a3a2b48d3d74.jpg)
| E3Bracbor 100a aces nob wort. | The 1amx aces nob Iaglb. | Recauca acvorname of xcriformance of ictorformance of ictorformance of ictorformance of ictorformance of ictorformance of ictorformance of ictorformance of ictorformance of ictorformance of ictorformance of ictorformance of ictorformance of ictorformance of ictorformance of ictorformance of ictorformance of ictorformance of ictorformance of ictorformance of ictorformance of ictor enhance | |
| CiecT carbon fAIBer (rexlacementB once evern 3-4 monBis). |
PL
Drogi Cliżnciż!
Rys.1
Rys.2
Rys.3
6. INSTRUKCJA MONTAŻU OKAPU
6.1 WlbAere Brlb xrasl (rys.1 / rys.2) A mAeCsce monBažu oTaxu.
6.2 WлCmAC oTax e oxaTowanAa.
6.3 Poalace oTax ao sAecA A sxraważ wsełsBTAe Cego funTcCe.
Obr.1
Obr.2
5.4 ZioTlaaní xroveaení (obr.3):
Obr.3
6. INSTALACE
RESENI MOZNYCQU PROBLEMU
SK
Obr.3
6. INŠTALÁCIA
6.1 Zvol'te si xrevioaeTový režim (obr.1 / obr.2) a miesto na Ttorom sa aigestor buae inštalovať.
6.2 Roebal'te aigestor.
6.3 Dočasne xrixojte aigestor T eleTtricTej sieti a sTontrolujte xrevioaeTlscioxnost' jeio funTčnýci xrvTov, a xo Tontrole oaxojte io oa naxiojacej siete.
Obr.8
Obr.9
ZÁKLADNÝ ELEKTRICKÝ SCHÍ'MA
![graph TD HL1["HL1"] --> A["Switch"] HL2["HL2"] --> B["Switch"] CIRCUIT["CIRCUIT"] --> N["N"] CIRCUIT --> L["L"] CIRCUIT --> 1["1"] CIRCUIT --> 2["2"] CIRCUIT --> 3["3"] CIRCUIT --> 4["4"] CIRCUIT --> N["N"] CIRCUIT --> L["L"] CIRCUIT --> N["N"] LTA5["LTA5"] --> CIRCUIT LTA5 --> CIRCUIT LTA5 --> CIRC…](/content/2026/05/1105600/images/b07f1b8399794e08f4eef0c1541bc5ffe61d0e5a6592da3c8995b6a980e62567.jpg)
| Dágsbor nac Ce hntiny | ZarovT nac Ce hntiny | StonBroluCBe, čA Ce cleTBrAcTé xAxoCenAc xevin | |
| ● | ● | STonBroluCBe, čA Ce cleTBrAcTé xAxoCenAc xevin | |
| ● | ● | STonBroluCBe, čA Ce neBor eaxuBy | |
| ● | ● | STonBroluCBe, čA Ce neBor eaxuBy | |
| ● | ● | STonBroluCBe, čA Ce neBor eaxuBy | |
| ● | ● | STonBroluCBe, čA Ce neBor eaxuBy | |
| ● | ● | STonBroluCBe, čA Ce neBor eaxuBy | |
| STonBroluCBe, čA Ce neBor eaxuBy | |||
| STonBroluCBe, čA Ce neBor eaxuBy | |||
| STonBroluCBe, čA Ce neBor eaxuBy | |||
| STonBroluCBe, čA Ce neBor eaxuBy | |||
| STonBroluCBe, čA Ce NeBor eaxuBy | |||
| STonBroluCBe, čA Ce neBor eaxuBy | |||
| STonBroluCBe, čA Ce neBor eaxuBy | |||
| STonBroluCBe, čA Ce neBor eaxuBy | |||
| STonBroluCBe, čA Ce neBor eaxuBy | |||
| StonBroluCBe, čA Ce neBor eaxuBy | |||
| STonBroluCBe, čA Ce neBor eaxuBy | |||
| STonBroluCBe, čA Ce neBor eaxuBy | |||
| STonBroluCBe, čA Ce neBor eaxuBy | |||
| STonBroluCBe, čA Ce neBolaxuBy | |||
| STonBroluCBe, čA Ce neBolaxuBy | |||
| STonBroluCBe, čA Ce neBolaxuBy | |||
| STonBroluCBe, čA Ce neBolaxuBy | |||
| STonBroluCBe, čA Ce neBolaxuBy | |||
| STonBrotuCBe, čA Ce neBolaxuBy | |||
| STonBrotuCBe, čA Ce neBolaxuBy | |||
| STonBrotuCBe, čA Ce neBolaxuBy | |||
| STonBrotuCBe, čA Ce neBolaxuBy | |||
| STonBrotuCBe, čA Ce neBolaxuBY | |||
| STonBrotuCBe, čA Ce neBolaxuBY | |||
| STonBrotuCBe, čA Ce neBolaxuBY | |||
| STonBrotuCBe, čA Ce neBolaxuBY | |||
| STonBrotuCBe, čA Ce neBolaxuBY | |||
| STonBrotuCBE, čA Ce neBolaxuBY | |||
| STonBrotuCBE, čA Ce neBolaxuBY | |||
| STonBrotuCBE, čA Ce neBolaxuBY | |||
| STonBrotuCBE, čA Ce neBolaxuBY | |||
| STonBrotuCBE, čA Ce neBolaxuBY |
RISENE MIZYCHROBILJALOV
ra Ce
IBAe
Tisztżlt vźvő!
rajz.1
rajz.2
rajz.3
rajz.8
ELEKTROMOS DIAGRAM
![graph TD A["HL1"] --> B["Switch"] B --> C["HL2"] D["SUN YU-A-3"] --> E["CIRCUIT"] E --> F["N 1"] E --> G["L 2"] E --> H["1 3"] E --> I["2 4"] E --> J["3 5"] E --> K["4 6"] E --> L["N 7"] E --> M["L 8"] E --> N["N 9"] O["CIRCUIT"] --> P["L 1"] P --> Q["GND 2"] P --> R["N 3"] S["L 1"] --> T["CIRCUIT"]…](/content/2026/05/1105600/images/9ebda49f96d1b3799c6f1ef37f04dcf6d7615043cbc75a1d2c845f7865830095.jpg)
| ● | ||||||||||||||||||||||||||||||||||||||||||||||||||||||||||||||||||||||||||||||||||||||||||||||||||||||||||||||||||||||||||||||||
| ● | ||||||||||||||||||||||||||||||||||||||||||||||||||||||||||||||||||||||||||||||||||||||||||||||||||||||||||||||||||||||||||||||||
| ● | ||||||||||||||||||||||||||||||||||||||||||||||||||||||||||||||||||||||||||||||||||||||||||||||||||||||||||||||||||||||||||||||||
| ● | ||||||||||||||||||||||||||||||||||||||||||||||||||||||||||||||||||||||||||||||||||||||||||||||||||||||||||||||||||||||||||||||||
| ● | ||||||||||||||||||||||||||||||||||||||||||||||||||||||||||||||||||||||||||||||||||||||||||||||||||||||||||||||||||||||||||||||||
| ● | ||||||||||||||||||||||||||||||||||||||||||||||||||||||||||||||||||||||||||||||||||||||||||||||||||||||||||||||||||||||||||||||||
| ● | ||||||||||||||||||||||||||||||||||||||||||||||||||||||||||||||||||||||||||||||||||||||||||||||||||||||||||||||||||||||||||||||||
| ● | ||||||||||||||||||||||||||||||||||||||||||||||||||||||||||||||||||||||||||||||||||||||||||||||||||||||||||||||||||||||||||||||||
| ● | ||||||||||||||||||||||||||||||||||||||||||||||||||||||||||||||||||||||||||||||||||||||||||||||||||||||||||||||||||||||||||||||||
| ● | ||||||||||||||||||||||||||||||||||||||||||||||||||||||||||||||||||||||||||||||||||||||||||||||||||||||||||||||||||||||||||||||||
| ● | ||||||||||||||||||||||||||||||||||||||||||||||||||||||||||||||||||||||||||||||||||||||||||||||||||||||||||||||||||||||||||||||||
| ● |


- EN
- DŻER CŮSTOMŽR
- GENERAL INFORMATION
- BEFORE STARTING THE OPERATION (SWITCHING ON) THE APPLIANCE MUST BE HELD AT THE ROOM TEMPERATURE FOR AT LEAST TWO HOURS
- USE OF THE APPLIANCE IN GOALS OTHER THAN DOMESTIC IS FORBIDDEN. THE RISK OF INJURĄ AND PROPERTĄ DAMAGE INCREASES IN CASE OF USE OF THE EXTRACTOR HOOD WITH PURPOSES OTHER THAN INTENDED, WHAT WILL LEAD TO WARRANTY CANCELLATION
- EXTRACTOR HOOD INSTALLATION INSTRUCTIONS
- EXTRACTOR HOOD OPERATION
- PIC.Ü
- AGIB OL'/OŇŇ
- 7.4 CONTROL OF COOCŽR HOOM ÜSINĄ E RŽMOTZ CONTROL (FIA. 6)
- MAINTENANCE INSTRUCTIONS
- FIG.6
- ELECTRICAL SCHEMATIC DIAGRAM
- PL
- DROGI CLIŻNCIŻ
- INSTRUKCJA MONTAŻU OKAPU
- 5.4 ZIOTLAANÍ XROVEAENÍ (OBR.3)
- INSTALACE
- SK
- INŠTALÁCIA
- TISZTŻLT VŹVŐ
Brand : Guzzanti
Model : GZ-696
Category : Range hood