
PR5020 - Video projector Planar - Free user manual and instructions
Find the device manual for free PR5020 Planar in PDF.


| Product type | Video projector |
| Brand | Planar |
| Model | PR5020 |
| Lamp technology | Mercury lamp |
| Connectors | DVI-D (PR5020 only), VGA-In, VGA-Out, S-Video, Composite video, Audio input R/L, PC audio input, Audio output, USB, RS-232 (PR5020 only), Power, Security lock |
| Remote control | With batteries, screen pointer, navigation, volume, mute, zoom, freeze, blank, source, auto, menu, keystone correction |
| Functions | Focus, zoom, keystone correction, height/angle adjustment, OSD |
| Power supply | Mains (power cord included) |
| Included accessories | Remote control, batteries, VGA cable, USB cable, composite RCA cable, mini-jack audio cable, CD-ROM, user guide, carrying case |
| Maintenance | Do not block ventilation openings, clean with a soft cloth |
| Safety | Kensington lock, lamp recycling (mercury), caution overheating |
| Spare parts | Replacement lamp available at www.PlanarOnline.com |
| Support | Website www.planar.com/support, hours Mon-Fri 8am-4pm ET |
| Manual | CD-ROM included with full user guide |
| Registration | Register the product online (HTTP://WWW.PLANAR.COM/SUPPORT/PRODUCT%20REGISTRATION.HTML) |
| Recycling | Recycle the lamp according to local laws, contact EIAE or lamprecycle.org |
| Remote control batteries | Use the provided batteries, observe polarity |
| Switch | On/off switch on the projector |
| Indicators | POWER and READY indicators |
Frequently Asked Questions - PR5020 Planar
User questions about PR5020 Planar
0 question about this device. Answer the ones you know or ask your own.
Ask a new question about this device
Download the instructions for your Video projector in PDF format for free! Find your manual PR5020 - Planar and take your electronic device back in hand. On this page are published all the documents necessary for the use of your device. PR5020 by Planar.
USER MANUAL PR5020 Planar
Planar Systems, Inc.
Corporate Headquarters
1195 NW Compton Drive
Beaverton, OR 97006-1992
Planar Customer Support
Telephone: US: 1-866-PLANAR1 (866) 752-6271 Outside US: (503)
748-5799
E-mail: PlanarSupport@planar.com
Online Technical Library: http://www.planar.com/support
Hours: M-F, 8am - 8pm ET, 12pm - 12am GMT
Planar Systems, Inc.
Corporate Headquarters
1195 NW Compton Drive
Beaverton, OR 97006-1992
Assistance clientèle de Planar
Téléphone: US: 1-866-PLANAR1 (866) 752-6271 Hors des USA: +1 (503)
748-5799
E-mail: PlanarSupport@planar.com
Planar Systems, Inc.
Planar Systems, Inc.
Sede corporativo
1195 NW Compton Drive
Beaverton, OR 97006-1992, USA
Planar Systems, Inc.
Cooperar Quartel-general
1195 NW Compton Drive
Beaverton, OR 97006-1992
Planar Systems, Inc.
Sede dell'azienda
1195 NW Compton Drive
Beaverton, OR 97006-1992
Planar Systems, Inc.
1195 NW Compton Drive Beaverton, OR
97006-1992
Planar kundestøtte
Telephone: USA: 1-866-PLANAR1 (866) 752-6271 Utenfor USA: +1 (503)
748-5799
E-post: PlanarSupport@planar.com
Online teknisk bibliotek: http://www.planar.com/support
Timer: M-F, 08 - 20 ET, 12 - 24 GMT
Planar Systems, Inc.
Huvudkontor
1195 NW Compton Drive
Beaverton, OR 97006-1992
Planar Kundsupport
Telefon: US: 1-866-PLANAR1 (866) 752-6271 Internationellt: +1 (503)
748-5799
E-post: PlanarSupport@planar.com
On-line tekniska bibliotek: http://www.planar.com/support
Öppet: M-F, 8am - 8pm ET, 12pm - 12am GMT
Planar Systems, Inc.
Hoofdzetel
1195 NW Compton Drive
Beaverton, OR 97006-1992
Planar klantenondersteuning
Telefoon: VS: 1-866-PLANAR1 (866) 752-6271 Buiten de VS: +1 (503)
748-5799
E-mail: PlanarSupport@planar.com
Online technische bibliotheek: http://www.planar.com/support
Planar Systems, Inc.
КорпоративныйШтаб
1195 NW Compton Drive, USA
Beaverton, OR 97006-1992
The information contained in this document is subject to change without notice. This document contains proprietary information that is protected by copyright. All rights are reserved. No part of this document may be reproduced, translated to another language or stored in a retrieval system, or transmitted by any means, electronic, mechanical, photocopying, recording, or otherwise, without prior written permission. Windows is a registered trademark of Microsoft, Inc. Other brand or product names are trademarks of their respective holders.
Important Recycle Instructions:

Lamp(s) inside this product contain mercury. This product may contain other electronic waste that can be hazardous if not disposed of properly. Recycle or dispose in accordance with local, state, or federal Laws. For more information, contact the Electronic Industries Alliance at WWW.EIAE.ORG. For lamp specific disposal information check WWW.LAMPRECYCLE.ORG.
Register Your Planar Products Today
Thank you for choosing Planar. To assure you receive all the benefits of your Planar product and services, register your Planar product today. Visit our website to register your product at http://www.planar.com/support/product_registration.html
Cables, Replacement Lamps and Accessories
To find cables, replacement lamps and accessories for your Planar projector, LCD monitor, touchscreen or other Planar products visit our online store at www.PlanarOnline.com or find other stores who carry Planar products at http://www.planar.com/howtobuy






CHECK PARTS LIST
Congratulations on your purchase! Please check that the following items are included with your projector.
| Parts List | |
| 1. | Projector |
| 2. | Remote control with batteries |
| 3. | Computer cable (VGA-VGA) |
| 4. | Power cord |
| 5. | USB cable |
| 6. | Composite cable (RCAx3-RCAx3) |
| 7. | Audio cable (Mini jack-Mini jack) |
| 8. | CD-ROM (user manual) |
| 9. | User's Guide |
| 10. | Carrying case |
Contact your dealer immediately if any items are missing or damaged.

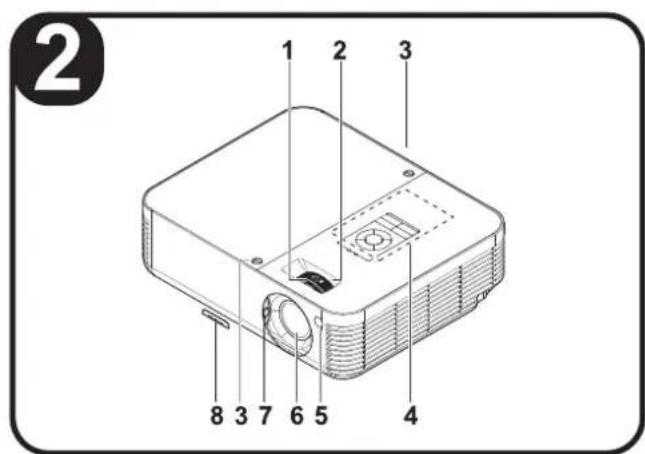
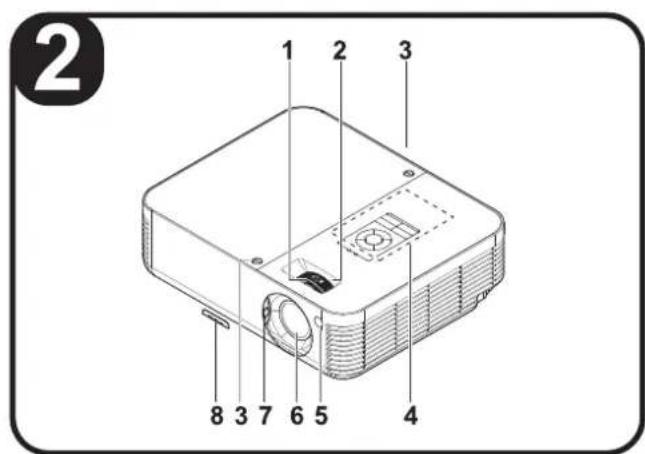
IDENTIFY PROJECTOR PARTS
| Projector Parts Description | |
| 1. | Focus—turn to focus the projected image |
| 2. | Zoom—turn to enlarge the projected image |
| 3. | Lamp cover screws |
| 4. | OSD buttons and LEDs |
| 5. | Front IR receiver |
| 6. | Lens |
| 7. | Lens cover |
| 8. | Height adjusters—adjusts level of projector |
Caution:
Overheating can damage the projector. Do not block any of the air vents around the unit.

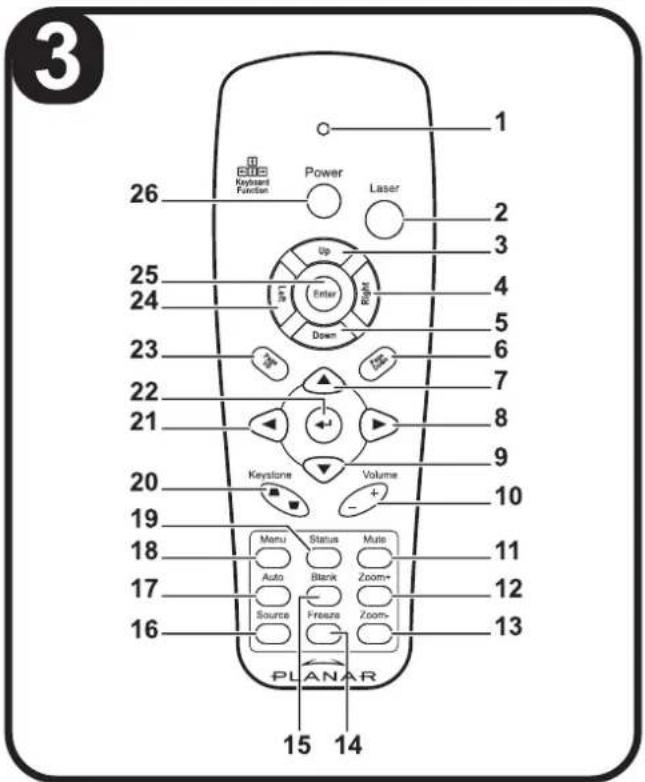
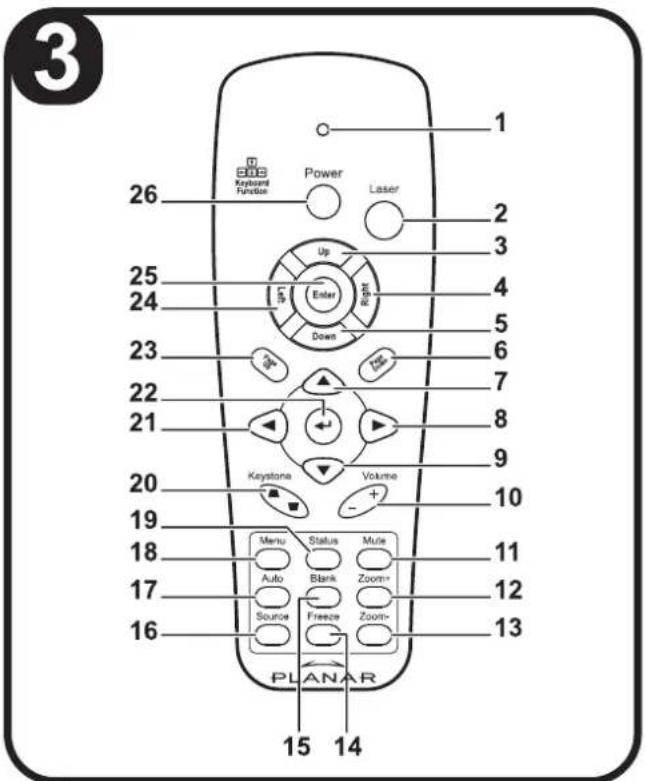
IDENTIFY REMOTE CONTROL PARTS
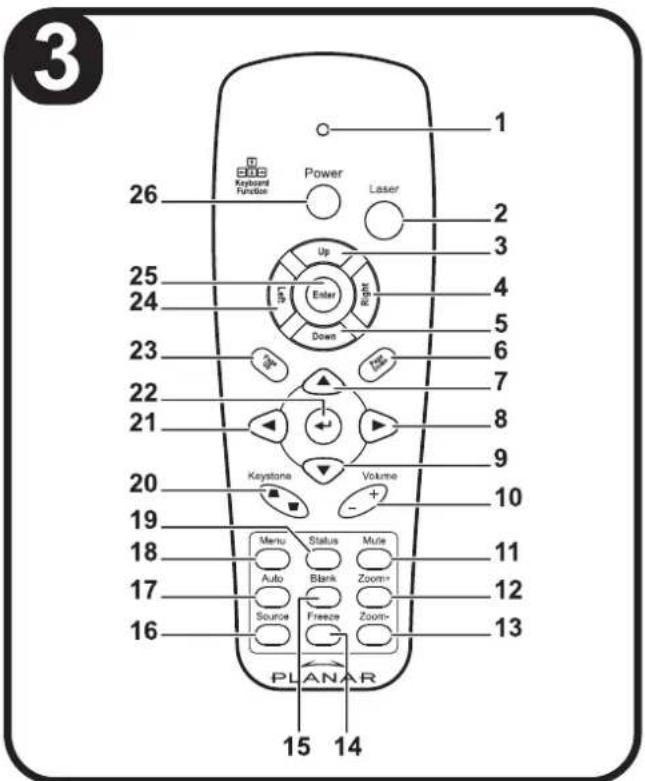
| Remote Buttons Description | |
| 1. | Lights when the remote control is used |
| Remote Buttons Description | |
| 2. | Press to operate the on-screen pointer |
| 3. | Up arrow when connected through USB to a PC |
| 4. | Right arrow when connected through USB to a PC |
| 5. | Down arrow when connected through USB to a PC |
| 6. | Page down when connected through USB to a PC |
| 7. | Navigate and change settings in the OSD |
| 8. | |
| 9. | |
| 10. | Adjust volume |
| 11. | Mutes the built-in speaker |
| 12. | Zoom in |
| 13. | Zoom out |
| 14. | Freeze/unfreeze the on-screen picture |
| 15. | Make the screen blank |
| 16. | Detect the input device |
| 17. | Auto adjustment for phase, tracking, size, position |
| 18. | Open the OSD |
| 19. | Open the OSD Status menu (menu only opens when input device detected) |
| 20. | Correct image-trapezoid (wider top/bottom) effect |
| 21. | Navigate and change settings in the OSD |
| 22. | Change settings in the OSD |
| 23. | Page up when connected through USB to a PC |
| 24. | Left arrow when connected through USB to a PC |
| 25. | Enter key when connected through USB to a PC |
Remote Buttons Description
26.
Turn the projector on or off
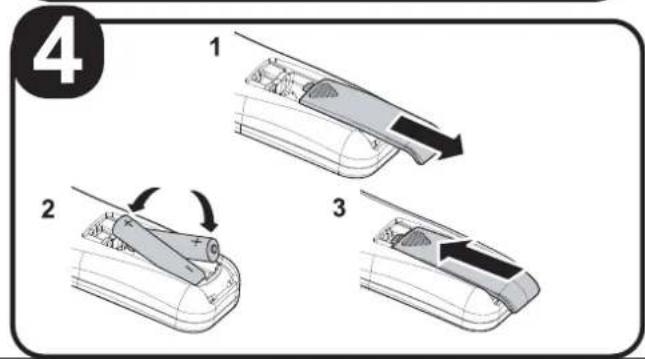
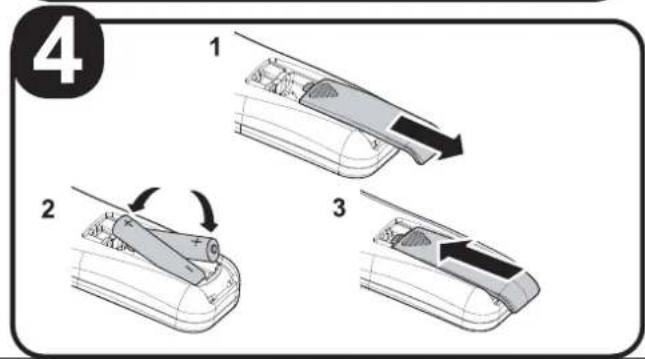
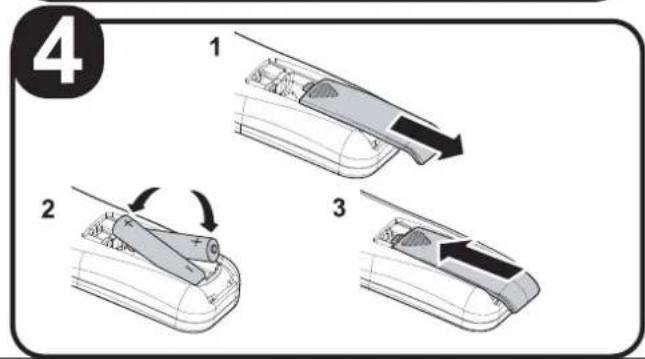
4 INSERT REMOTE CONTROL BATTERIES
- Remove the battery compartment cover by sliding the cover in the direction of the arrow.
- Insert the supplied batteries taking note of the polarity (+/-).
- Replace the cover.

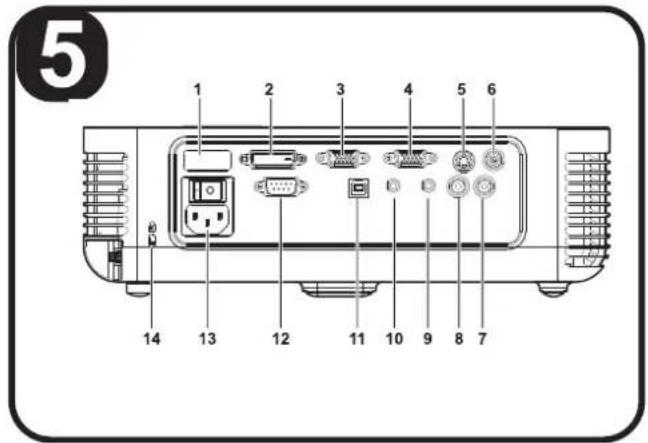
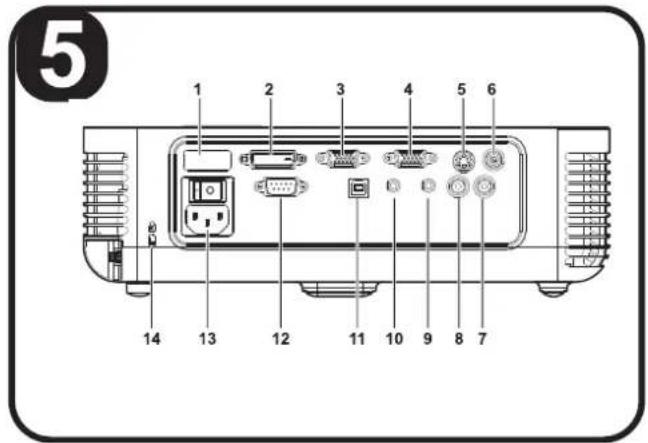
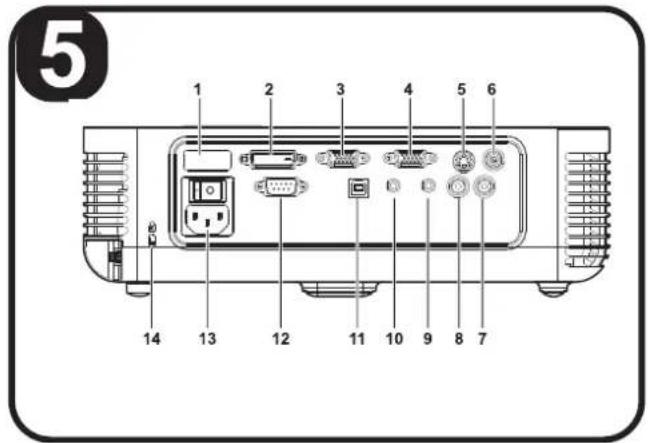
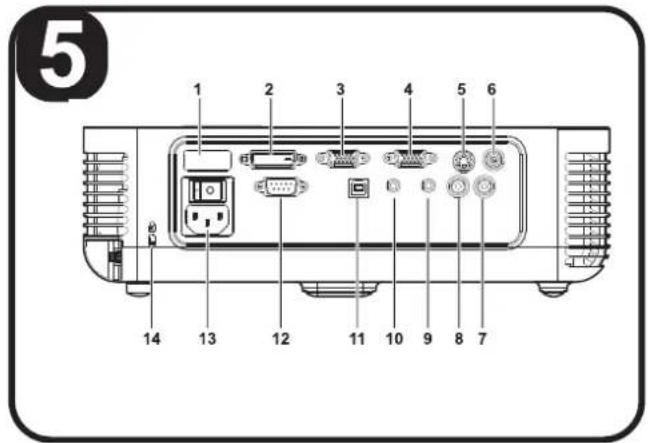
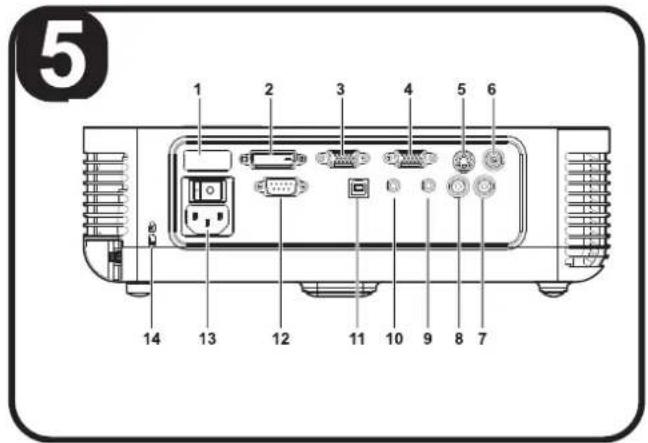
MAKE CONNECTIONS
Warning:
As a safety precaution, disconnect all power to the projector and connecting devices before making connections.
| Label Description | ||
| 1. | Rear IR receiver | Receiver for IR signal from remote control |
| 2. | DVI-D (For PR5020 only) | Connect the DVI-D cable from a computer (not supplied) |
| 3. | VGA IN | Connect a VGA cable from a computer (supplied) |
| 4. | VGA OUT | Connect to a monitor (not supplied) |
| 5. | S-video | Connect S-video cable from a video device (not supplied) |
| 6. | Video | Connect a composite video cable from a video device (supplied) |
| 7. | Audio in-R | Connect the audio cable from an audio input device (supplied) |
| 8. | Audio in-L | Connect the audio cable from an audio input device (supplied) |
| 9. | Audio-in | Connect an audio cable from the computer's audio-out connector (supplied) |
| 10. | Audio-out | Audio loop-thru |
| 11. | USB | Connect the USB cable from a computer (supplied) |
| 12. | RS-232(For PR5020 only) | Installation control |
| 13. | Power | Connect the power cord (supplied) |
| 14. | Security Lock | Secure to permanent object with a Kensington® Lock system |

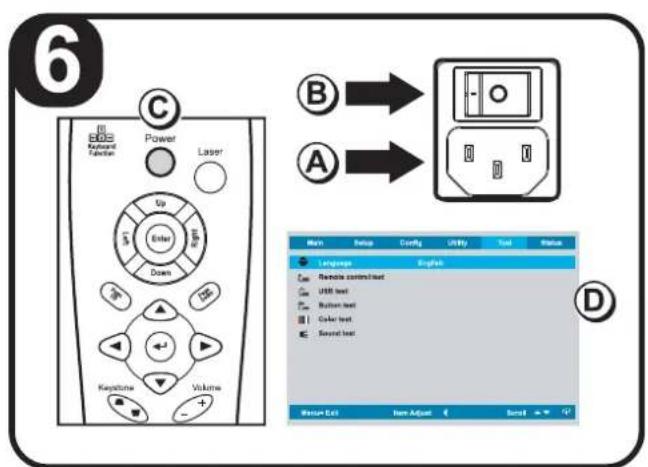
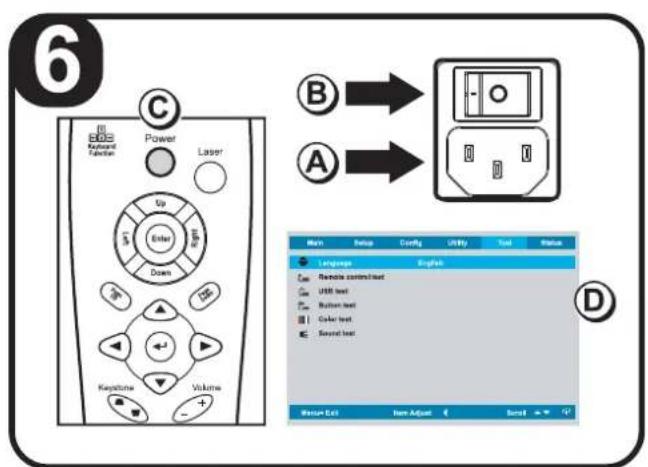
POWER ON/OFF AND SET LANGUAGE
-
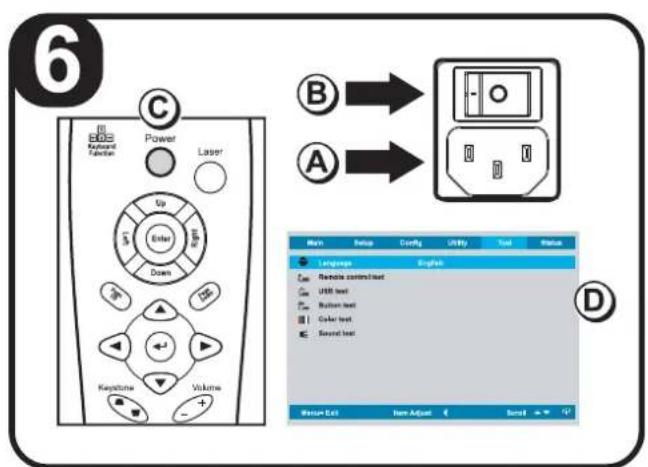
Connect the power cord to the projector [A]. Connect the other end to a wall outlet.
Switch [B] from on (O) to off (—) -
The POWER and READY LEDs on the projector turn on.
Turn on the connected devices.
- Ensure the Power LED is on (not flashing) and then press the
Power button [C] to turn on the projector.
(If any LEDs are flashing, do not press the Power button. See "LED Error Messages" in the CD-ROM user manual.)
The projector splash screen displays and connected devices are detected.
- Press the Menu button and then press the cursor ◀▶ button until Tool is highlighted [D].
- Press the cursor button until Language is highlighted [D].
- Press the ◀ until your language is displayed.
- Press the Menu button twice to close the OSD.

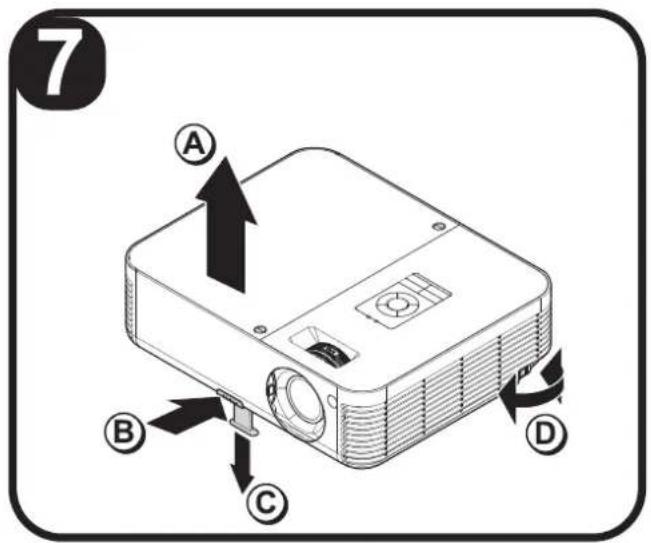
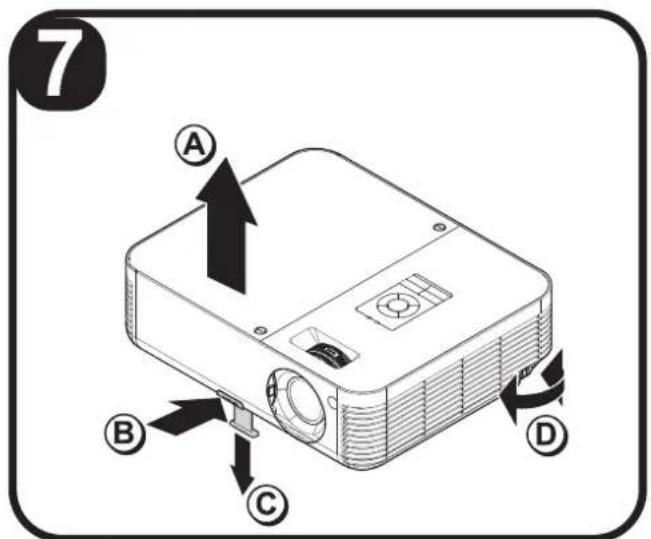
ADJUST PROJECTOR LEVEL
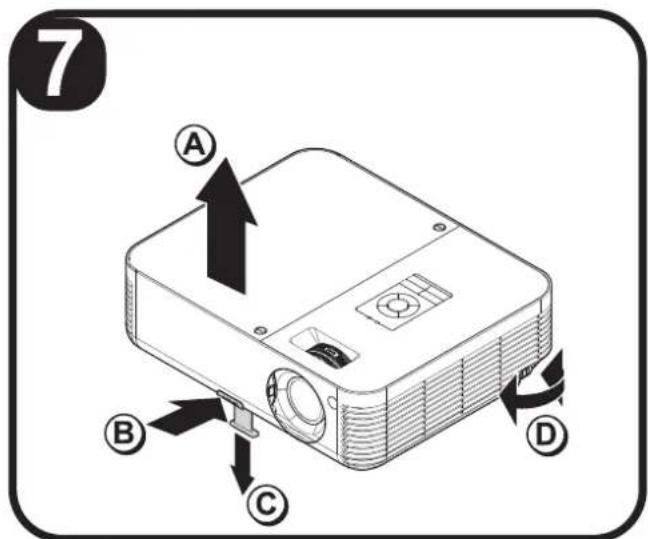
- To raise the level of the projector, lift the projector [A] and press the height-adjuster button [B].
The height adjuster drops down [C]. - To lower the level of the projector, press the height-adjuster button and push down on the top of the projector.
- To adjust the angle of the picture [D], turn the tilt adjuster right or left until desired angle has been achieved.

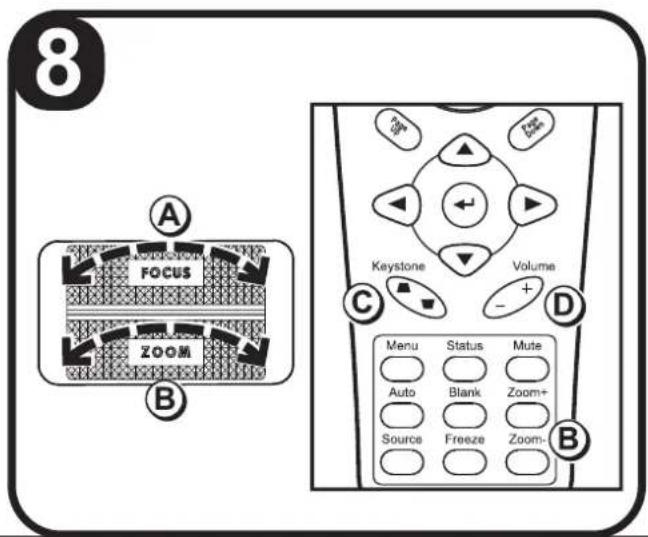
ADJUST IMAGE AND VOLUME
- Use the Image-focus control to sharpen the projected image (A).
-
Use the Image-zoom control to resize the projected image and screen size (B).
-
Use the Keystone buttons to correct keystone (wider top or bottom) effect (C).
-
Use the Volume buttons to adjust the volume (D).
NEED MORE INFORMATION?
The CD-ROM that shipped with your projector features a detailed user manual in a printer-friendly format. The user manual includes hardware, operation, and maintenance descriptions. You will also find troubleshooting procedures and instructions on securing the projector by means of a security lock.
The projector has an On-Screen Display (OSD) that lets you make image adjustments and change various settings. To open the OSD, press the Menu button on the remote control. Use the remote control cursor buttons to navigate and make changes to the projector settings.
Refer to the “On-Screen Display Settings” section of the CD-ROM user manual for more information.


VERIFIER LA LISTE DES ARTICLES




LISTE MIT EINZELTEILEN


ELENCO COMPONENTI


SJEKKLISTE OVER LEVERTE DELER.






VERIFIQUE A LISTA DE ITENS
AJUSTA A IMAGEM E VOLUME
Planar Systems, Inc.
Corporate Headquarters 1195 NW Compton Drive Beaverton, OR 97006-1992
Planar Customer Support
Telephone:
US: 1-866-PLANAR1 (866) 752-6271
Outside US: (503) 748-5799
Email: PlanarSupport@planar.com
Online Technical Library: http://www.planar.com/support
Hours: M-F, 8am - 8pm ET, 12pm - 12am GMT
© 2006 Planar Systems, Inc. Planar is a registered trademark of Planar Systems, Inc.
Other brands and names are the property of their respective owners.
Technical information in this document is subject to change without notice.

- Planar Systems, Inc.
- Planar Customer Support
- Assistance clientèle de Planar
- Planar kundestøtte
- Planar Kundsupport
- Planar klantenondersteuning
- Important Recycle Instructions:
- Register Your Planar Products Today
- Cables, Replacement Lamps and Accessories
- CHECK PARTS LIST
- IDENTIFY PROJECTOR PARTS
- Caution:
- IDENTIFY REMOTE CONTROL PARTS
- Remote Buttons Description
- INSERT REMOTE CONTROL BATTERIES
- MAKE CONNECTIONS
- Warning:
- POWER ON/OFF AND SET LANGUAGE
- ADJUST PROJECTOR LEVEL
- ADJUST IMAGE AND VOLUME
- NEED MORE INFORMATION?
- VERIFIER LA LISTE DES ARTICLES
- LISTE MIT EINZELTEILEN
- ELENCO COMPONENTI
- SJEKKLISTE OVER LEVERTE DELER.
- VERIFIQUE A LISTA DE ITENS
- AJUSTA A IMAGEM E VOLUME
Brand : Planar
Model : PR5020
Category : Video projector