ROB-900P - Food Processor BRANDT - Free user manual and instructions
Find the device manual for free ROB-900P BRANDT in PDF.
| Brand | BRANDT |
| Model | ROB-900P |
| Product type | Food processor |
| Power supply | 220-240 V ~ 50/60 Hz (check the rating plate) |
| Control | On/Off button and operation key (pulse) |
| Bowl capacity | Approximately 1.5 L (estimated) |
| Included accessories | Grinding blade, variable slicing disc (0-7 mm), reversible discs for chopping and grating/slicing, emulsifying disc |
| Functions | Chopping, kneading, beating, emulsifying, slicing (adjustable thickness), grating, mincing |
| Safety | Safety thermal switch, lid lock with alignment arrows |
| Maintenance | Removable parts dishwasher safe (except motor block) |
| Bowl material | Polycarbonate or plastic (not specified, but typical) |
| Cord length | Approximately 1 m (estimated) |
| Storage | Integrated accessory compartment in base, cord storage |
| Maximum continuous use | 4 minutes |
| Weight | Approximately 3.5 kg (estimated) |
| Dimensions (W x D x H) | Approximately 25 x 20 x 35 cm (estimated) |
Frequently Asked Questions - ROB-900P BRANDT
User questions about ROB-900P BRANDT
0 question about this device. Answer the ones you know or ask your own.
Ask a new question about this device
Download the instructions for your Food Processor in PDF format for free! Find your manual ROB-900P - BRANDT and take your electronic device back in hand. On this page are published all the documents necessary for the use of your device. ROB-900P by BRANDT.
USER MANUAL ROB-900P BRANDT
natural_image
Line drawing of a brandt blender with control buttons and power outlet (no text or symbols on the device itself)ROBOT DE CUISINE / BLENDER-FOOD PROCESSOR /
FOOD PROCESSOR / ROBOT DE COCINA
MOD.:
ROB-900 P
ROB-1100 I
text_image
Diagram showing seven labeled parts of a kitchen appliance, including a measuring cup and fan assembly.
text_image
8 9 10 11 12 Brandt 13Fig. 2
natural_image
Illustration of a kitchen blender with a downward arrow indicating cooling effect (no text or symbols)Fig. 3

natural_image
Illustration of a kitchen blender with a rotating button and power plug (no text or symbols)Fig. 4
natural_image
Line drawing of a kitchen oven with a screwdriver and a handle, showing a downward arrow indicating motion (no text or symbols)Fig. 5
natural_image
Illustration of a kitchen blender with a downward arrow indicating compression (no text or symbols)Fig. 6
natural_image
Diagram showing a kitchen appliance with a lid and base, connected to a side mirror (no text or symbols present)Fig. 7
text_image
Diagram showing a kitchen appliance with a lid and a screwdriver, indicating a process step with downward arrow.Fig. 8

natural_image
Illustration of a coffee maker with a lid and handle, showing a downward arrow indicating compression (no text or symbols)Fig. 9
text_image
Diagram showing a mechanical device with labeled parts and directional arrows indicating motion or forceFig. 10
natural_image
Illustration of a kitchen appliance with a handle and power outlet (no text or symbols)Fig. 11a
natural_image
Line drawing of a mechanical component with no visible text or symbolsFig. 12a

natural_image
3D technical drawing of a mechanical housing or enclosure with internal components (no text or symbols)Fig. 11b
natural_image
Technical line drawing of a mechanical device with internal components (no text or symbols)Fig. 12b
natural_image
Technical line drawing of a device casing with ventilation slots and a handle (no text or symbols)Fig. 11c

natural_image
Technical line drawing of a mechanical device with internal components (no text or symbols)Fig. 12c

natural_image
Technical illustration of a mechanical device with two circular components and a central hub (no text or symbols)Fig. 11d

natural_image
Line drawing of a microwave oven with lid and side dish (no text or symbols)Fig. 12d
natural_image
Technical line drawing of a dual-chamber electric motor or fan assembly (no text or symbols)FR
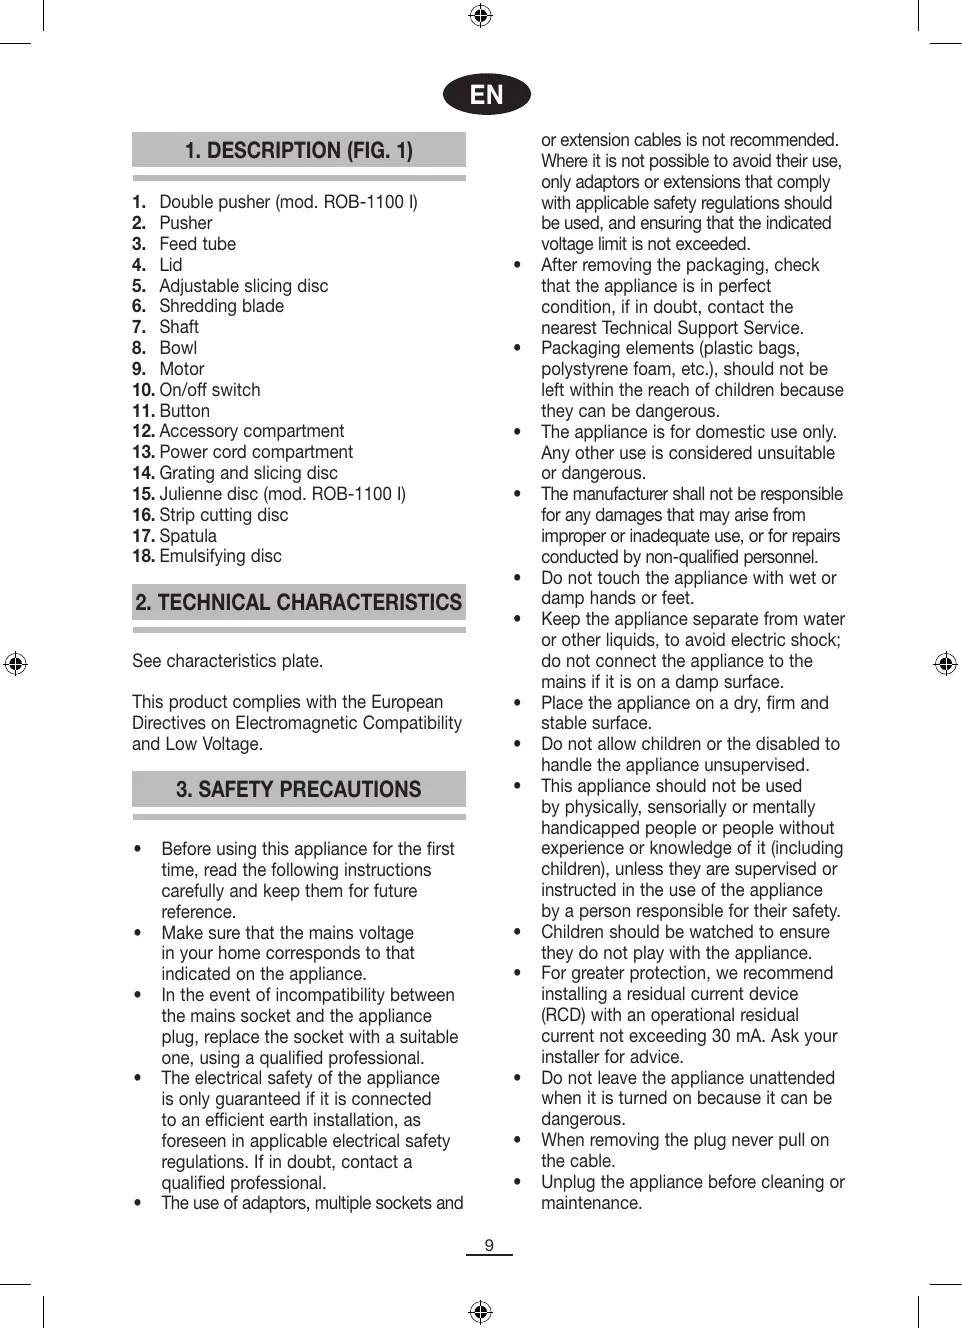
1. DESCRIPTION
- Double pusher (mod. ROB-1100 I)
- Pusher
- Feed tube
- Lid
- Adjustable slicing disc
- Shredding blade
- Shaft
- Bowl
- Motor
- On/off switch
- Button
- Accessory compartment
- Power cord compartment
- Grating and slicing disc
- Julienne disc (mod. ROB-1100 I)
- Strip cutting disc
- Spatula
- Emulsifying disc
2. TECHNICAL CHARACTERISTICS
See characteristics plate.
This product complies with the European Directives on Electromagnetic Compatibility and Low Voltage.
3. SAFETY PRECAUTIONS
- Before using this appliance for the first time, read the following instructions carefully and keep them for future reference.
- Make sure that the mains voltage in your home corresponds to that indicated on the appliance.
- In the event of incompatibility between the mains socket and the appliance plug, replace the socket with a suitable one, using a qualified professional.
- The electrical safety of the appliance is only guaranteed if it is connected to an efficient earth installation, as foreseen in applicable electrical safety regulations. If in doubt, contact a qualified professional.
• The use of adaptors, multiple sockets and
or extension cables is not recommended. Where it is not possible to avoid their use, only adaptors or extensions that comply with applicable safety regulations should be used, and ensuring that the indicated voltage limit is not exceeded.
- After removing the packaging, check that the appliance is in perfect condition, if in doubt, contact the nearest Technical Support Service.
- Packaging elements (plastic bags, polystyrene foam, etc.), should not be left within the reach of children because they can be dangerous.
- The appliance is for domestic use only. Any other use is considered unsuitable or dangerous.
- The manufacturer shall not be responsible for any damages that may arise from improper or inadequate use, or for repairs conducted by non-qualified personnel.
- Do not touch the appliance with wet or damp hands or feet.
- Keep the appliance separate from water or other liquids, to avoid electric shock; do not connect the appliance to the mains if it is on a damp surface.
- Place the appliance on a dry, firm and stable surface.
- Do not allow children or the disabled to handle the appliance unsupervised.
- This appliance should not be used by physically, sensorially or mentally handicapped people or people without experience or knowledge of it (including children), unless they are supervised or instructed in the use of the appliance by a person responsible for their safety.
- Children should be watched to ensure they do not play with the appliance.
- For greater protection, we recommend installing a residual current device (RCD) with an operational residual current not exceeding 30 mA. Ask your installer for advice.
- Do not leave the appliance unattended when it is turned on because it can be dangerous.
- When removing the plug never pull on the cable.
-
Unplug the appliance before cleaning or maintenance.
-
In the event of fault or malfunction where the appliance is not to be used, turn off the appliance and do not attempt to repair. If a repair is required, contact a Technical Assistance Service authorised by the manufacturer and request the use of original spare parts.
- If the cable for this appliance is damaged, contact an authorised Technical Assistance Service for it to be replaced.
- Do not leave the appliance exposed to the elements (rain, sun, ice, etc.).
- Do not use or let any part of the appliance come into contact or near hot surfaces (kitchen gas or electric hobs or ovens).
- Do not use detergents or abrasive sponges to clean the appliance.
- Do not touch the hot surfaces. Use the handles.
- Do not let the cable come into contact with the hot parts of the appliance.
- Take great care when handling the cutting blades and discs – they are very sharp.
- Disconnect the appliance before removing and changing the blades.
- Do not remove the lid until the blades have stopped turning.
- Only hold the blade and discs by the shaft, to prevent risk of cuts.
- Unplug the appliance before fitting or removing the accessories, before cleaning and when the appliance is out of use.
- Do not pour hot liquids into the bowl.
- Do not leave the appliance running for any longer than 4 minutes.
• Always remove the blade before emptying the bowl. - Never use your fingers to push food into the food processor.
4. ASSEMBLY
-
Before using the appliance for the first time, wash the bowl (8), the lid (4) and all the accessories very carefully with warm soapy water. Dry all the parts thoroughly.
-
Place the food processor on a flat, stable surface.
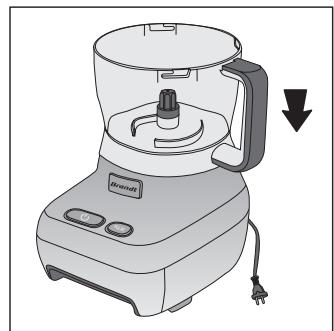
- Place the bowl (8) on the motor (9) (fig. 2) and turn the bowl clockwise until you hear a click (fig. 3).
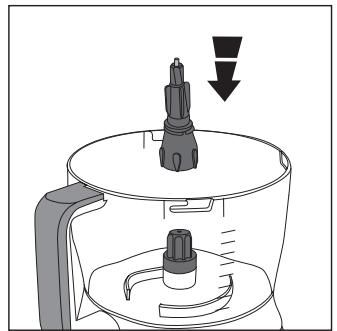
- Fit the shaft (7) onto the motor (fig. 4)
- Fit the corresponding accessory, depending on the function you wish to use. All accessories must be firmly fitted onto the shaft (7).
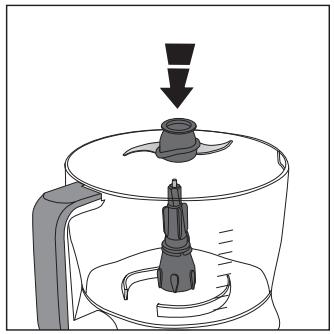
• SHREDDING BLADE (6)
Fit the shredding blade (6) onto the shaft and press it firmly into place (fig. 5).
The shredding blade is designed for cutting, kneading, beating and whipping food. To obtain better, more consistent results, you should process pieces of food of the same size wherever possible
• ADJUSTABLE SLICING DISC (5)
Fit the slicing disc (5) onto the shaft and press it firmly into place (fig. 6). This disc is ideal for slicing cooked meat, ham, cheese, vegetables, etc. You can vary the thickness of the slices from 0mm to 7mm by turning the central shaft. If you turn it clockwise, the blade will move outwards and the slices will be thicker. If you turn it anti-clockwise, the blade will move inwards and the slices will be thinner.
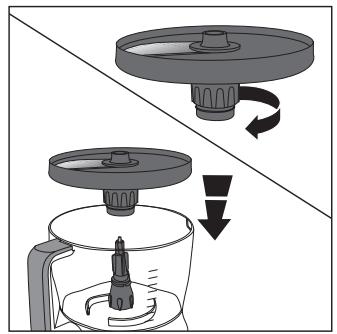
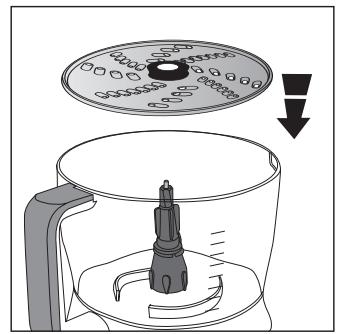
- REVERSIBLE STRIP CUTTING (16) AND GRATING AND SLICING DISCS (14)
Select a disc for the process required. Fit the disc onto the shaft and press it firmly into place (fig. 7).
The strip cutting disc (16) allows you to cut thick or thin strips, depending on which side of the disc you use.
The grating and slicing disc (14) cuts food into thin strips on one side (grating parmesan cheese or thinly slicing chips) and cuts the food into coarser slices on the other side (grating hard cheese or chocolate).
• JULIENNE DISC (15) (mod. ROB-1100 I)
Fit the julienne disc (15) onto the shaft and press it firmly into place (fig. 6). This disc is ideal for evenly shredding food, for salads for example.
• EMULSIFYING DISC (18)
Fit the emulsifying disc (18) onto the shaft (fig. 8). This disc is for whipping egg whites or for making creams and sauces.
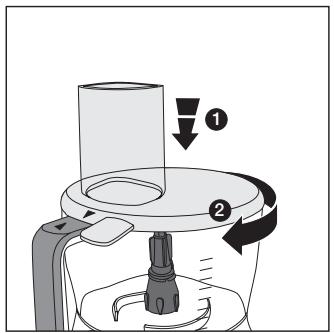
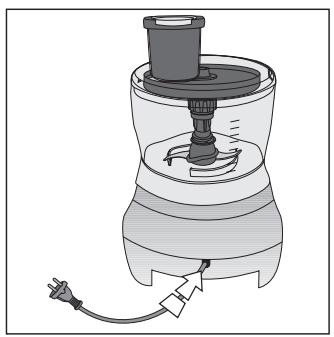
- Fit the lid (4) onto the bowl. Observe the arrow ▼ on the left of the lid support. When you fit the lid onto the bowl, this arrow must be lined up with the arrow on the bowl handle ▲. To lock it, turn the lid clockwise (fig. 9). NOTE: If the bowl and lid are not correctly fitted, the food processor will not work.
5. FUNCTIONING
- Follow the instructions given in Section "4. Assembly".
- For shredding or whipping food, place the ingredients in the processor bowl (8).
- Close the lid (4) as described in section "4. Assembly".
- If you wish to slice food, first cut the ingredients to a suitable size so that they fit into the feed tube.
- Plug in the appliance.
- To start processing the food, you may press either the on/off switch (10) or the button (11):
a. On/Off switch: The food processor will run until you press the on/off switch again, or until you press the button.
b. Button: The food processor will function while you hold the button down.
- Add the ingredients through the feed tube (3). Always use the food pusher (2) to press them down evenly. Never use your fingers. For model ROB-1100 I, take out the double pusher (1) if you wish to add liquids or process small amounts of food such as a carrot or a stick of celery.
- If you have pressed the on/off switch (10) to start up the food processor, to stop it you must either press the same switch again, or press the button (11).
- Unplug the food processor.
- Remove the shaft and the blade or disc before emptying the bowl.
- Empty the bowl with the aid of the spatula supplied (17).
- Dismantle the food processor following the steps described in point “4. Assembly” in reverse order.
IMPORTANT: the food processor has a safety thermal switch-off device incorporated, and it will switch off in case of overload. If this happens, unplug the appliance and leave it to cool down for a few minutes.
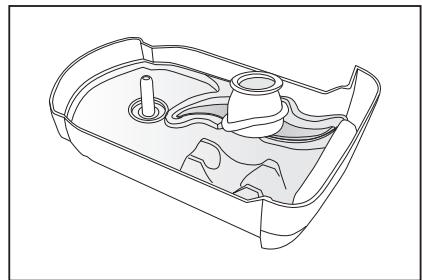
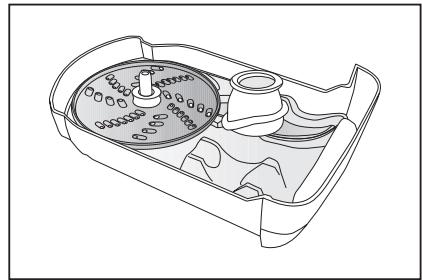
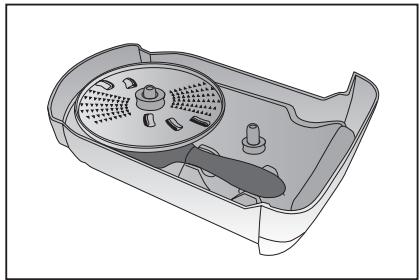
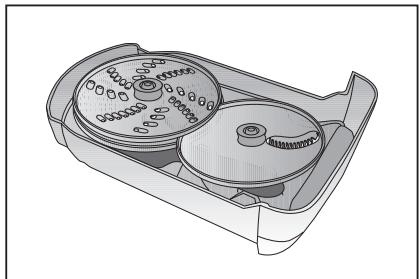
6. STORAGE
Place the food processor bowl, shaft, shredding blade (model ROB-1100 I only), adjustable slicing disc and lid as described in the steps given in section "4. Assembly". The food processor is designed for all the accessories to be stored inside the unit itself. Pull the accessory compartment (12) out of the food processor base. Follow the steps shown in Figure 11 for model ROB-900 P, and the steps shown in Figure 12 for model ROB-1100 I. Then insert the compartment in the food processor base. The power cord can be stored in the cord compartment (13) on the rear of the motor base, by pushing it into the compartment (fig. 10).
7. PRACTICAL HINTS
- If a recipe requires dry ingredients such as flour, place them directly in the bowl before starting up the food processor. Liquid ingredients can be added while the food processor is running, through the feed tube.
-
Meat should be cut up before processing. It is recommendable for the meat to be very cold (not frozen) before processing, and to press the button at 2-second intervals.
-
For sauces or semi-liquid ingredients, use the spatula supplied to remove them from the bowl after processing.
- Push the food into the feed tube firmly so that it falls onto the food already in the bowl.
- For longer slices, feed the ingredients into the feed tube horizontally.
- For shorter slices, feed the ingredients into the feed tube vertically.
8. CLEANING
Always unplug the appliance before cleaning it. All the food processor accessories and utensils, except the motor, can be washed in soapy water. Clean the outside of the motor with a damp cloth. Take great care when handling the blades as they are very sharp. All parts of the food processor except the motor are dishwasher-safe.
9. INFORMATION FOR THE CORRECT DISPOSAL OF ELECTRICAL AND ELECTRONIC APPLIANCES
At the end of its working life, the product must not be disposed of as urban waste. It must be taken to a special local authority differentiated waste collection centre or to a dealer providing this
service. Disposing of a household appliance separately avoids possible negative consequences for the environment and health deriving from inappropriate disposal and enables the constituent materials to be recovered to obtain significant savings in energy and resources.
To remind you that you must collaborate with a selective collection scheme, the symbol shown appears on the product warning you not to dispose of it in traditional refuse containers.
For further information, contact your local authority or the shop where you bought the product.