
ROB707BX - Food Processor BRANDT - Free user manual and instructions
Find the device manual for free ROB707BX BRANDT in PDF.
| Product type | Compact food processor |
| Brand | Brandt |
| Model | ROB707BX |
| Dimensions (HxWxD) | 440 x 290 x 250 mm |
| Net weight | 3.9 kg |
| Power supply | 220-240 V ~ 50 Hz |
| Rated power | 700 W |
| Main bowl capacity | 3.5 L |
| Working capacity (chopper/kneader) | 2 L maximum |
| Main functions | Chopping, kneading, grating, slicing, french fry cutting, blending |
| Number of speeds | Variable electronic selector (multiple speeds) |
| Pulse function | Yes, for short bursts |
| Bowl material | Plastic |
| Safety | Protective lid with child safety, unplug before handling blades, do not immerse motor block |
| Cleaning | Removable parts dishwasher safe or wash with warm soapy water, motor block wiped with a damp cloth |
| Warranty | 2 years from date of purchase |
| Consumer service | By phone, email or mail (see manual) |
| Included accessories | Chopping blade, kneader, grating disc (fine and coarse), slicing disc (fine and coarse), french fry cutting disc, blender with measuring cup, spatula |
| Control type | On/Off switch and speed selector |
| Recommended use | Household only |
Frequently Asked Questions - ROB707BX BRANDT
User questions about ROB707BX BRANDT
0 question about this device. Answer the ones you know or ask your own.
Ask a new question about this device
Download the instructions for your Food Processor in PDF format for free! Find your manual ROB707BX - BRANDT and take your electronic device back in hand. On this page are published all the documents necessary for the use of your device. ROB707BX by BRANDT.
USER MANUAL ROB707BX BRANDT
FR MANUEL D'INSTRUCTION EN
INSTRUCTION MANUAL
Robot Compact Compact Food Processor ROB707BX
natural_image
Black-and-white photo of a brandt blender with food preparation on a wooden table (no visible text or symbols)Brandt
Chère Cliente, Cher Client
ENGLISH INSTRUCTION MANUAL
12
1) A L'ATTENTION DE L'UTILISATEUR

You have just purchased a BRANDT food processor and we would like to thank you.
We have placed in this appliance all our passion and know-how in order to meet at best your need. Innovative and efficient: we designed it to be always easy to use.
In the BRANDT products line, you will also find a wide range of small domestic appliances that can be coordinated to your new BRANDT food processor.
Of course, in a permanent wish to satisfy as best as possible your expectations toward our products, our after-sales service department is at your disposal and at your listening to answer to all your questions and suggestions.
You can also visit our website www.brandt.com where you will find all our products, as well as additional and useful information.
BRANDT
As part of our commitment to constantly improving our products, we reserve the right to make changes to their technical, functional and/or esthetic properties in line with their technological development.

Attention: Before installing and using your appliance, please carefully read this Guide to Installation and Use, which will allow you to quickly familiarise yourself with its operation.
www.brandt.com

1) INFORMATION FOR THE USER.... 14
a) Safety recommendations....14
b) Technical data 17
c) Protecting the environment 17
2) PREPARING YOUR APPLIANCE....18
a) Description of your food processor 18
b) Before using your food processor....18
3) USING YOUR APPLIANCE....19
a) Using the chopper or the kneading blade....19
b) Using the shredders, slicers and fry cutting disc 19
c) Using the blender assembly 20
a) Cleaning the food processor 20
b) Storing the food processor 20
5) WARRANTY AND CUSTOMER RELATIONS....21
a) Warranty 21
b) Customer relations....21
1) INFORMATION FOR THE USER
a) Safety recommendations

Keep this guide with your appliance. If the appliance is ever sold or transferred to another person, ensure that the new owner receives this user guide. Please familiarise yourself with these recommendations before installing and using your appliance. They have been written for your own safety as well as the safety of others.
Safety tips when connecting the appliance:
- This appliance is intended for household use only. Any other use is considered unsuitable or dangerous. It can only be used in covered, closed and warmed environment such as kitchen or a room with the same specifications.
- After removing the packaging, check that the appliance is in good condition and especially that the power cord is not damage. In doubt, contact the After Sales Service of your dealer.
- Before connecting the appliance, make sure that the electric power supply is compatible with the power rating and voltage indicated on the bottom of the appliance.
- The use of adaptors, multiple sockets or extension cables is not recommended. If theses elements were essential, only use adapters or extension cable that comply with the safety standards.
-
This appliance is not intended to be operated by an external timer or separate remote control system.
-
Place the appliance on a dry, stable and smooth surface.
- Keep the appliance and its cord out of reach of children under 8 years.
- Always hold the plug itself, rather than pulling on the power cable.
- Children should be supervised to ensure that they do not play with the appliance.
Safety tips when using the appliance:
- This appliance shall no be used by children from 0 to 8 years. It can be used by children aged from 8 years and above if they are continuously supervised.
- This appliance can be used by persons with reduced physical, sensory or mental capabilities or lack of experience and knowledge if they have been given supervision or instruction concerning use of the appliance in a safe way and understand the hazards involved.
- Do not leave the appliance unattended when it is turned on because it can be dangerous.
- Handle the chopper blade only by the shaft, and the shredding and slicing discs only at the outer edge.
- Unplug the appliance before changing the cutting tools, disassembling or cleaning.
- Wait until the blades have stopped rotating before removing the cover.
- Never place your hand in way of the chopper blade or the shredding and slicing disc. Always use the pusher.
- Make sure that the cover is properly closed before using the appliance.
- The use of accessory attachments not recommended by the appliance's manufacturer may cause hazard or injury.
Cleaning and Maintenance:
- Unplug the appliance before cleaning and allow the appliance to cool down.
- The supply cord cannot be replaced. If the cord is damaged the appliance should be scrapped. However, this product is covered by a 2-year warranty. For more details, please refer to the warranty conditions supplied by your distributor.
- To protect against electric shock, do not place any part of this appliance in water or other liquid.
- Do not use harsh abrasive cleaners or sharp metal scrapers to clean your Sushi Party.
- Cleaning and user maintenance shall not be made by children.
Improper use:
- Use this appliance only for its intended uses as described in manual.
- The manufacturer shall not be liable for any damage resulting from improper use.
- The appliance is intended for domestic use only in private housing environments. The use of this appliance in common or professional's area such as staff kitchen areas in shop, offices and other working environments; by clients in hotels, motels and restaurants or any other shops; by clients in kitchen areas or campsite; are not a proper us as defined by the manufacturer
b) Technical data
| Model no. | ROB707BX |
| Power supply | 220-240V~50HZ |
| Rated power | 700W |
| Chopper capacity | 3.5L |
| Dimensions mm (HxLxW) | 440x290x250 mm |
| Net wt. | 3.9Kg |
c) Protecting the environment
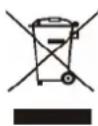
At the end of its working life, the product must not be disposed with household waste. It must be taken to a special local authority waste collection centre or to a company providing this service. Disposing household appliances separately avoids possible negative effects on the environment and health and enables the constituent materials to be recycled which saves energy and resources.
To remind you that you must dispose of this appliance correctly the symbol shown above appears on the product warning you not to dispose of it with household waste.
For further information, contact your local authority or the shop where you bought the product.
2) PREPARING YOUR APPLIANCE
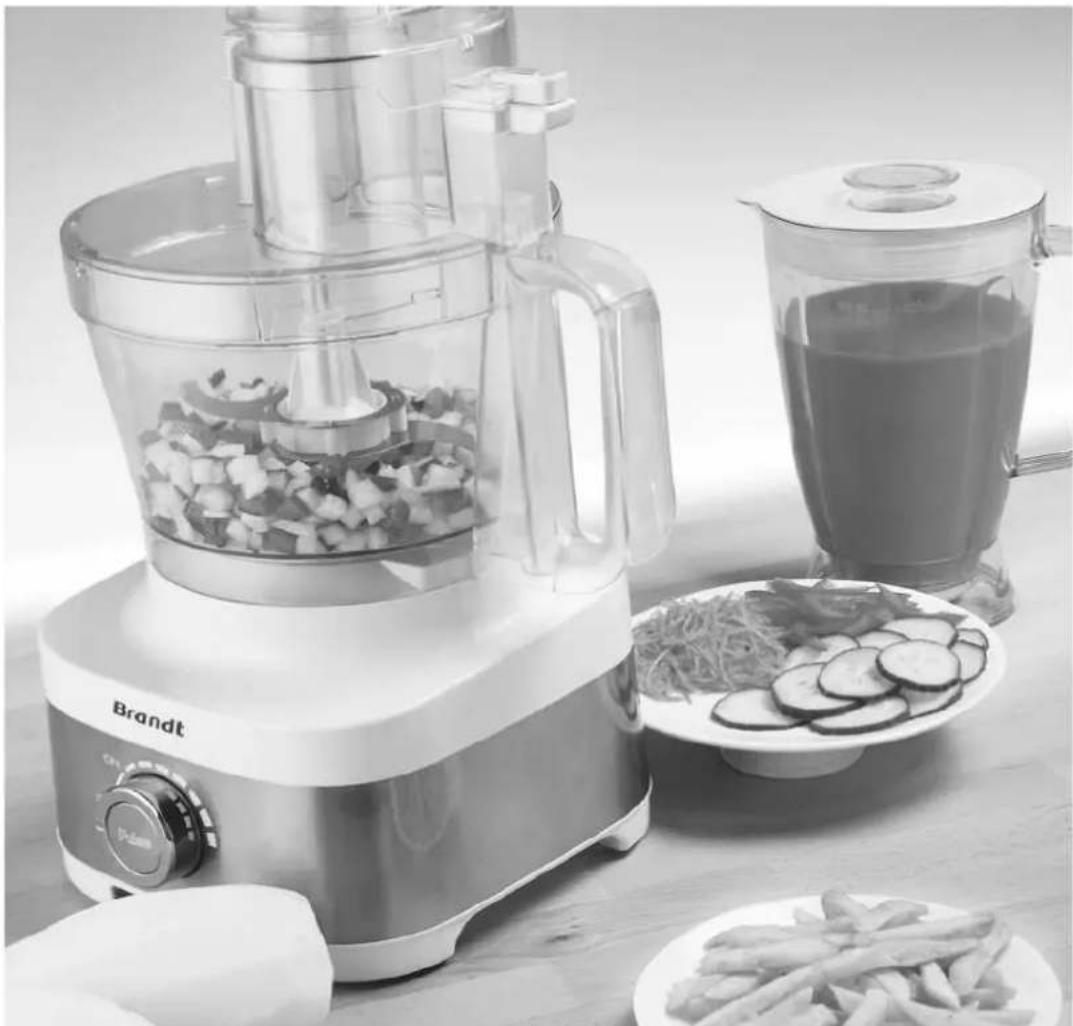
a) Description of your food processor
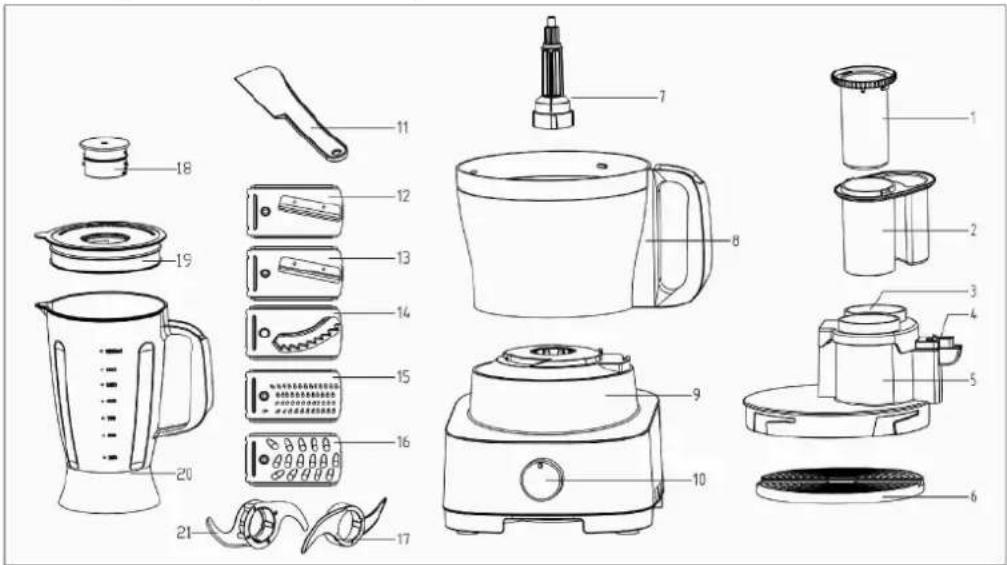
- Small pusher
- Big pusher
- Protection cover
- Safety lock
- Bowl cover
- Disc holder
- Driving shaft
- Processing bowl
- Motor base
- Speed selector
- Spatula
- Slicing disc fine
- Slicing disc coarse
- French Fry cutting disc
- Shredding disc fine
- Shredding disc coarse
- Doughing blade(plastic)
- Filling cap on blender cover
- Blender cover
Blender jar
Chopping blade
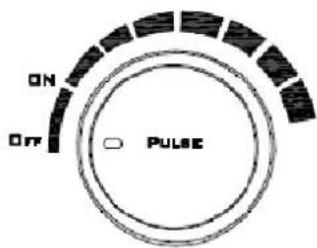
On / Off switch
Pulse: If you wish to chop food with short pulses, puch the centrer of the button as many times as you need
On: ON
b) Before using your food processor
- When unpacking the product and removing packing material, handle the Chopping Blade, and Slice/Shred Disc carefully; they are very sharp.
- Before using this appliance for the first time, clean the motor unit with a damp cloth.
- Clean the shaft and blades in warm soapy water.
- Dry all parts thoroughly.
3) USING YOUR APPLIANCE
a) Using the chopper or the kneading blade
Assembly
- Place bowl (8) on top of motor unit (9), ensuring that the two closing fixtures interlock. Turn bowl (8) in an clock-wise direction as far as it will go.
- Place the chopping blade (21) or the kneading blade (17) on the drive shaft.
- Put the food to be processed into bowl (8). The maximum feeding amounts is 2L.
- Take hold of lid (5) by the two outer grooved and ridged areas. Put the lid onto the bowl (8) in such a way as to allow the L-shaped lug to be turned into the safety slit situated beneath switch. Turn the lid in a clockwise direction as far as it will go. The lug on the lid must be seated in the slit. The appliance can be started only if the lug on the lid is correctly positioned in the safety slit.
Operation
- Insert the mains plug in the socket outlet.
- Insert food into the bowl (8).
- Lock the bowl, ensuring that the two closing fixtures interlock.
- Rotate the speed selector to "ON" position. Choose the speed. (10)
- Rotate the speed selector to "OFF" position.
- Disengage and remove the lid only when the chopper blade or the (21) or the kneading blade (17) has stopped rotating.
- Carefully remove the chopper blade (21) or the kneading blade (17) and empty the bowl.
- When you have finished preparing your food, pull out the mains plug.

- Do not work with the chopper blade for more than 1 minute at a time. After 1 minutes of continuous operation, allow the appliance to cool down for 3 minutes.
- Do not attempt to cut or chop up hard food-stuffs such as coffee, ice etc., as this could damage the chopper blade.
- Allow cooked foods to cool down slightly before placing them in the bowl.
- Remove any bones and tendons before putting meat in the bowl.
- Should you wish to process different types of foods, always start with the hardest one.
- Stop processing if you notice that bits of food are sticking to the walls of the bowl. Remove these food pieces using the spatula (11).
b) Using the shredders, slicers and fry cutting disc
Assembly
- Place bowl (8) on top of motor unit (9), ensuring that the two closing fixtures interlock. Turn bowl (8) in an clock-wise direction as far as it will go.
- Place the driving shaft (7). Then, put the shredding (15 or 16), slicing disc (12 or 13) or the fry cutting disc (14) on the disc holder (6).
- Put the disc holder (6) on the driving shaft (7) and engage in position.
Operation
- Open the protection cover (3) by pulling the safety lock (4).
- Put the food to be processed in feeding tube on lid (5). Lock the protection cover by clipping it with the safety lock.
- Rotate the speed selector to "ON" position. Choose the speed. (10)
- Insert pusher (1 or 2) in feeding tube. Using the pusher, push the food slowly through the feeding tube and onto the disc holder (6).
- Rotate the speed selector to "OFF" position.


- When you have finished preparing your food, remove the mains plug.
- Do not work with the shredding and slicing disc more than 1 minute at a time. After 1 minute of continuous operation, allow the appliance to cool down for 3 minutes.- Do not attempt to cut or grate food such as tomatoes, lemons, dates, peaches, or frozen foods.
c) Using the blender assembly
Assembly
- Place the blender jar (20) on top of motor unit (9), ensuring that the two closing fixtures interlock. Turn the blender jar (20) in a clock-wise direction as far as it will go.
Operation
- Put the food to be processed into the jar (20).
- Install measuring cup and cover properly with the blender cover (19) and filling cap (18). - Rotate the switch PULSE for pre-mixing.
- Rotate the speed selector to "ON" position. Choose the speed. (10)
- Rotate the speed selector to "OFF" position.
- When you have finished preparing your food, remove the mains plug.
a) Cleaning the food processor

To avoid any danger:
- Always disconnect the appliance from the mains before cleaning.
- Whenever possible, rinse parts immediately after processing for easy cleanup.
- Never immerse the motor unit in water or use caustic or abrasive cleaning materials clean only with a damp cloth.
- Wipe the base, control knob, and feet with a damp cloth and dry thoroughly. Stubborn spots can be removed by rubbing with a damp cloth and a mild, non-abrasive cleaner. Do not immerse the base in liquid.
- Do not use rough scouring pads or cleansers on any plastic or metal parts.
- Do not fill the bowl with boiling water or place any of the parts of the appliance in boiling water
- Discoloration on the housing caused by carotene, for example, can be removed using cooking oil.
b) Storing the food processor
After cleaning the various parts, wipe gently with a clean cloth. Reassemble all parts and keep the appliance in a dry place. Remember to clean all the parts after each use.
5) WARRANTY AND CUSTOMER RELATIONS
a) Warranty
This product is covered by your retailer two years after your purchase. For more details, please refer to the warranty conditions supplied.
- Service calls
Any repairs that are made to your appliance must be handled by a qualified professional authorised to work on the brand.
When you call, mention your appliance's "Service" reference, as well as its serial number "Nr". This information appears on the manufacturer's nameplate which can be found stuck behind the machine.
b) Customer relations
- Customer relations
To find out more about all the brand's products you can visit our website: www.brandt.com
To communicate:
You may visit our website www.brandt.com and go to the "CONTACT" section
You may e-mail us: relations.consommateurs@groupebrandt.com
You may write us at the following address:
Or phone us from Monday to Friday from 8:30 am to 6:00 pm :


- Robot Compact Compact Food Processor ROB707BX
- Brandt
- ENGLISH INSTRUCTION MANUAL
- 1) A L'ATTENTION DE L'UTILISATEUR
- 1) INFORMATION FOR THE USER
- a) Safety recommendations
- Safety tips when connecting the appliance:
- Safety tips when using the appliance:
- Cleaning and Maintenance:
- Improper use:
- b) Technical data
- c) Protecting the environment
- 2) PREPARING YOUR APPLIANCE
- On / Off switch
- b) Before using your food processor
- 3) USING YOUR APPLIANCE
- a) Using the chopper or the kneading blade
- Assembly
- Operation
- b) Using the shredders, slicers and fry cutting disc
- c) Using the blender assembly
- a) Cleaning the food processor
- b) Storing the food processor
- 5) WARRANTY AND CUSTOMER RELATIONS
- a) Warranty
- b) Customer relations
- To communicate:
Brand : BRANDT
Model : ROB707BX
Category : Food Processor