USER MANUAL RCD203U THOMSON
Carefully read the instructions of this manual, respecting recommendations for use and safety. Keep this document and tell potential users about it.
ATTENTION: Do not expose the equipment to rain or damp to prevent any risk of fire or electric shock. Therefore, do not use the equipment near a tap or in a damp room (bathroom, swimming pool, sink, etc.). Do not place any objects filled with water (ex.: vases...) on the equipment.
To prevent any risk of electrocution, do not open the case. Entrust the equipment's maintenance exclusively to qualified personnel.
□ If liquid penetrates inside the case, unplug the equipment and get it checked by a qualified technician before using it again.
Laser equipment
ATTENTION: This equipment comes within the category of CLASS 1 LASER products. To prevent direct exposure to the laser beam, do not try to open the case.
Do not stare at the laser beam.
Never touch the laser lens located in the disc compartment.
Installation
- Do not place the equipment in direct sunlight, near heating equipment or any heat source or in a place subject to excessive dust or mechanical shocks.
-
Do not expose to extreme temperatures. This equipment is intended for use in a temperate climate.
-
Do not place any heat emitting source (candle, ashtray, etc.) near the equipment.
Place the equipment on a flat, rigid and stable surface.
- Install the equipment in a sufficiently ventilated place to prevent any internal overheating. Avoid enclosed spaces such as bookcase, cupboards, etc.
- Do not obstruct the equipment's ventilation holes. Do not install the equipment on a soft surface, such as a carpet or covers, that could block the ventilation holes.

ATTENTION! RISK OF ELECTRIC SHOCK DO NOT OPEN

This equipment complies with the current standards applicable to this type of product.

- This equipment is designed to work with the local electricity supply. Comply with the information given of the identification plate, fixed on the back of the equipment.
SAFETY RECOMMENDATIONS
Use
- Never move the appliance while you are using it, since this could damage it and affect the disk. Remove the disk before you move the appliance.
If the appliance is moved directly from a cold location to a hot location, condensation may form on the lens located inside the disk compartment. As a result the appliance may not work properly. In that case, remove the disk and leave the appliance switched on for at least 30 minutes until the humidity has completely evaporated.
This appliance has been designed solely for domestic use; the manufacturer's liability shall not be engaged in the event of any professional use, by any misuse or by any use not complying with the operating instructions.
This appliance is not a toy; keep it away from children. We recommend only letting children use the appliance under the supervision and responsibility of their parents.
- Never let children insert foreign objects into the appliance.
Due to the effect of electrostatic and/or fast electrical transient phenomena, the product may not operate properly and will need to be reset by the user.
Warning concerning the electrical cable
- Do not use the appliance if it or the electrical cable is faulty.
If the electrical cable is faulty it must be identical cable (complies with EN60320).
□ You are recommended to plug appliances into a dedicated circuit: they must not be plugged into a multiplug, instead they must be directly plugged into a mains socket. Do not overload mains sockets. Overloaded, loose or damaged mains sockets, frayed electrical cables, extension cords, or cracked or damaged insulation wires, are dangerous. These situations can cause a fire or an electrical discharge.
Inspect the radio's electrical cable regularly, and if it shows signs of weakness unplug it. Do not use the appliance until the electrical cable has been replaced by a qualified person.
- Protect the electrical cable from physical or mechanical stresses: make sure that it is not distorted, tangled, pinched, stuck or crushed. Pay particular attention to the plugs, mains sockets and the electrical cable where it exits from the appliance.
- Disconnect the cable from the mains power supply by grasping the electrical cable's plug. Do not pull on the cable.
- When you install the radio make sure that the plug can be accessed easily, so that it can be unplugged quickly if necessary.
SAFETY RECOMMENDATIONS
In order to function properly when it is not connected to the mains power supply, the appliance must be equipped with the appropriate batteries.
Only recommended batteries should be used.
- Polarity must be respected when inserting batteries.
The batteries should be inserted in such a way as to avoid any short circuit.
Do not mix used and new batteries.
Replace all batteries at the same time with identical batteries.
- Do not mix alkaline, standard (carbon-zinc) and rechargeable (nickel-cadmium) batteries.
□ Do not recharge or try to open the batteries. Do not throw the batteries in the fire.
Remove the batteries when unused for a long time.
If the liquid contained in the battery comes in contact with eyes or skin, wash the area immediately and carefully with clear water and consult a doctor.

In order to respect the environment, do not throw used batteries out with household waste.
Dispose of them at your nearest recycling centre or at a used battery collection point.
DISPOSING OF THE APPLIANCE AT THE END OF
ITS LIFE
This appliance bears the WEEE mark (Waste of Electric and Electronic Equipment) signifying that, at the end of its life cycle, it should not be disposed of with household waste, but at a recycling centre. The recycling of waste contributes to the conservation of our environment.
ABOUT THE DISKS
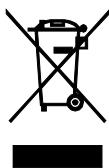
Handling

Do not touch the playback side of disks. Hold disks by the edges to avoid leaving fingerprints on the surface. Any dust, fingerprints or scratches may cause a malfunction. Never attach a label or sticky tape to the disk.

Storage
Put disks back in their case after playing them. Never expose disks to direct sunlight or heat sources. Never leave disks inside a car parked in full sunlight.
Cleaning
Use a clean soft lint-free cloth to clean the disk, working from the centre outwards in a straight line.
Do not use solvents such as petrol, thinners, commercially available cleaners or antistatic sprays for vinyl disks.
Compatible disks
This appliance can play CD-R/CD-RW disks and MP3.
This equipment can run on batteries or on the mains.
Mains power supply
Make sure that the appliance is switched off.
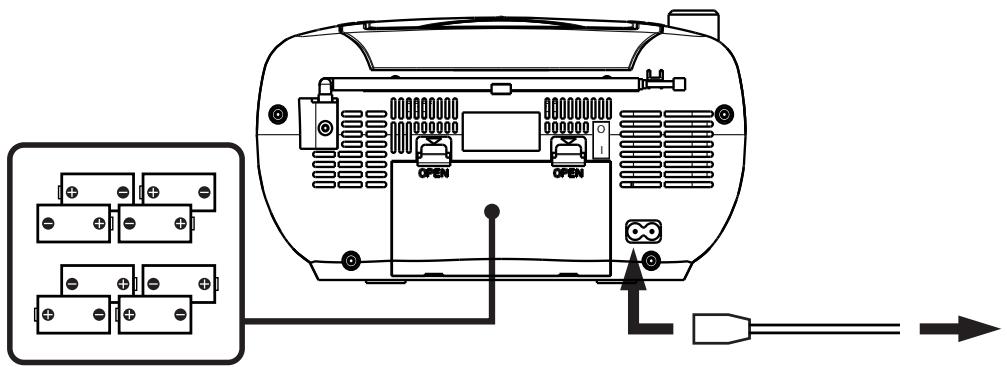
Connect the electrical cable to the AC socket at the back of the appliance, then plug the other end of the cable into a mains socket.
Note: If the electrical cable is plugged in, the batteries are automatically inoperative.
To avoid the batteries leaking, they should be removed if the appliance is powered via the electrical cable.
Battery power supply
Press the tabs and lift the cover up to open the battery compartment (21) located at the back of the appliance.
- Insert 8 LR14 (C) 1.5V batteries (not supplied), taking care to respect the polarity indicated.
- Close the battery compartment cover.
Note: In order to use battery power, the electrical cable must be unplugged from the socket at the back of the appliance or from the mains socket.
DESCRIPTION OF THE COMMANDS

DESCRIPTION OF THE COMMANDS
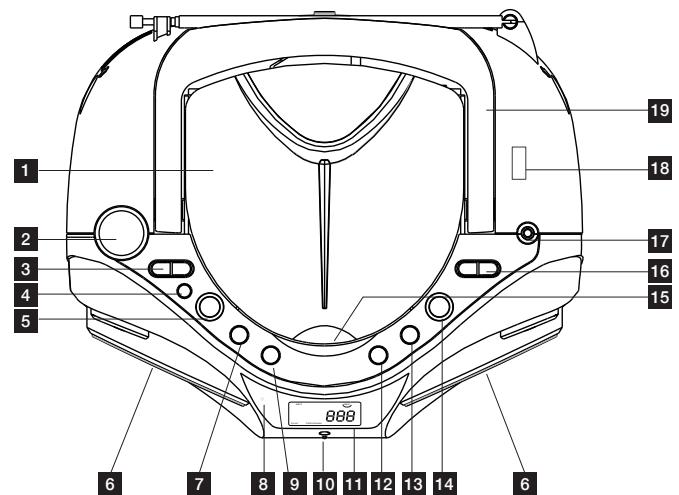
| 1 | CD compartment |
| 2 | Volume set button (VOLUME) |
| 3 | Function selector (RADIO - MP3/CD) FUNCTION |
| 4 | Stop button (STOP) - CD/USB |
| 5 | Play, pause or USB button (PLAY/PAUSE/USB) - CD |
| 6 | Speakers |
| 7 | Next track button (NEXT) - CD/USB |
| 8 | FM STEREO radio indicator |
| 9 | Previous track button (BACK) - CD/USB |
| 10 | Remote control infrared sensor |
| 11 | LCD screen |
| 12 | Program button (PROGRAM) - CD/USB |
| 13 | Repeat button (REPEAT) - CD/USB / Random play button (RANDOM) |
| 14 | Radio frequency selector (TUNING) |
| 15 | CD compartment opening recess |
| 16 | Frequency band selector (FM ST./FM/MW) |
| 17 | Earphone jack |
| 18 | USB port |
| 19 | Handle |
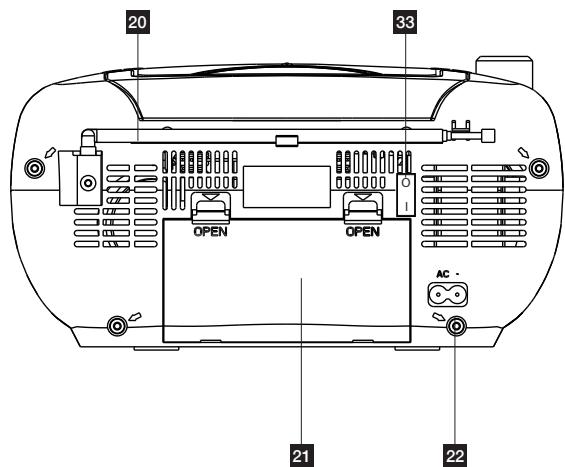
| 20 | Telescopic aerial |
| 21 | Battery compartment |
| 22 | AC mains power supply socket |
| 23 | Program range selector (-10 Tracks) |
| 24 | Play, pause or USB button (PLAY/PAUSE/USB) - CD |
| 25 | Previous track button (BACK) - CD/USB |
| 26 | Stop button (STOP) - CD/USB |
| 27 | Volume set button (VOLUME -) |
| 28 | Volume set button (VOLUME +) |
| 29 | Repeat button (REPEAT) - CD/USB / Random play button (RANDOM) |
| 30 | Next track button (NEXT) - CD/USB |
| 31 | Program range selector (+10 Tracks) |
| 32 | Program button (PROGRAM) - CD/USB |
| 33 | ON / OFF button (On / Off) |
Note: The remote control only works in CD or USB mode.
BASIC FUNCTIONS
Note: Before using the appliance for the first time, remove the cardboard protecting the lens located inside the CD compartment (1). To open the CD compartment, use the recess (15) to lift the cover up.
Switching the appliance off
- Set the ON/OFF button (33) to OFF. Then unplug the electrical cable.
Power off alarm
- When the unit idle on CD or USB mode over 10 min. Then the unit will switch to the Power Off Alarm mode automatically. At Power Off Alarm mode, the unit will alert you to switch off the unit by 10 sec. "Beep" sound and periodically by every 10 min. for saving energy.
Setting the volume
To increase or decrease the volume, turn the VOLUME button (2) to the right or the left or VOL-/VOL+ on the remote control.
USING THE RADIO
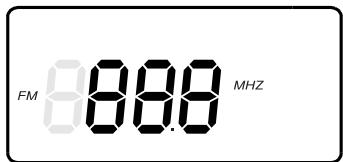
- Set the function selector (3) to RADIO. The LCD screen (11) lights up.
- Set the band selector (16) to the type of frequency: FM ST. (FM Stereo), FM (FM Mono) or MW.
- Select the required radio station by turning the radio frequency selector, TUNING (14).
Adjust the volume with the volume set button (2).
- Unfold the telescopic aerial (20) when listening to FM/FM ST stations. The FM Stereo signal is weaker than the FM (mono) signal. If reception of the FM ST. station is weak or crackles, try to improve reception by adjusting the FM telescopic aerial or switch to FM (mono) mode.
When FM ST. mode is selected, the FM ST. indicator (8) lights up.
In MW mode, an aerial is integrated in the radio.
To improve radio reception, turn the radio to orient the internal aerial and get the best possible reception. For MW frequencies the stations are broadcast in mono only.
To switch the radio off, set the function selector (3) to OFF.
USING THE CD PLAYER
Playing a CD
- Set the function selector (3) to CD: the LCD screen (11) lights up.
- Open the CD compartment (1) by lifting the door up using the recess (15).
- Place an audio CD in the compartment, labelled surface up. Close the CD compartment by pushing the door.
- The total number of tracks is displayed on the LCD screen. Press the PLAY/PAUSE/USB button (5) to play the disk. The disk starts playing from the first track.
Adjust the volume with the volume set button (2).
To pause, press the PLAY/PAUSE/USB button (5): the PLAY indicator blinks. Press this button again to resume playing the disk.
To stop playing the disk, press the STOP button (4) Notes:
This appliance can play audio CD disks and MP3 files.
The CD player cannot play a disk that is dirty, damaged or not correctly inserted.
To avoid damaging disks, never open the CD compartment while a disk is being played. Wait until the disk has stopped.
- Never move the appliance while a CD is being played. This appliance must be on a flat surface.
Skipping a track / Finding a specific piece
- When the disk is stopped, use the BACK (9) or NEXT (7) button to select a track, then press the PLAY/PAUSE/USB button (5).
While a CD is playing, press the NEXT button (7) to go to the next track. Press the BACK button (9) once to go back to the beginning of the track being played. Press this button twice to go back to the previous track.
USING THE CD PLAYER
Repeat mode
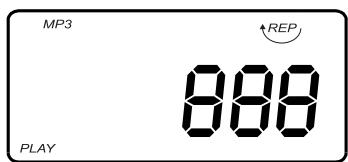
To play a single track again, press the REPEAT/RANDOM button (13) once during playback. The repeat indicator is displayed.
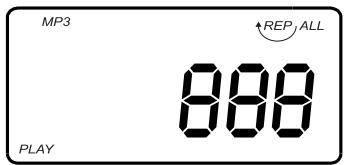
To play all the tracks on the disk again, press the REPEAT/ RANDOM button (13) twice during playback. ALL is displayed alongside the repeat indicator.
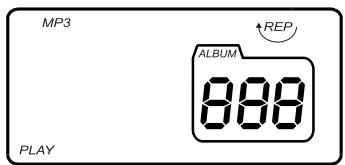
To play all the albums again, press the REPEAT/RANDOM button (13) three times during playback.
ALBUM is displayed as well as the repeat indicator.
To cancel the repeat function, press the REPEAT/RANDOM button (13) several times until the repeat indicator disappears from the screen.
USING THE CD PLAYER
Programmed playback
The program function allows you to program the order in which a disk's tracks are played, up to 99 tracks.
Note: Programming can only be done in STOP mode.
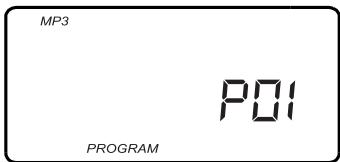
Press the PROGRAM button (12) "PROGRAM" blinks on the LCD screen.
- Use the NEXT (7) or BACK (9) buttons to select the first track of the program.
Press the PROGRAM button (12) again to confirm the selection and store the track. The program number is increased on the screen (e.g. P0I).
Repeat these 2 steps to program other tracks.
- Press the PLAY/PAUSE/USB button (5) to start playing the tracks. Tracks are played in the programmed order.
The program indicator is displayed without blinking when the program function is used.
Press the STOP button (4) once to stop playing the program without deleting it. The program indicator is still displayed.
To cancel the program function, press the STOP button (4) twice: the program indicator is switched off.
Playback stops automatically after the last track has been played. The program remains in memory until the mode is changed, the disk is removed or the appliance is switched off.
Programming of the tracks can be combined with the repeat function. Begin by programming the order, then start playing the CD. Then use the Repeat function (see the "Repeat mode" section).
Random playback
You can play the current selection's audio files in a random order:
During playback, press the REPEAT/RANDOM button (13) to activate or de-activate the random playback function.
- When you activate this function, the current selection's audio files are played in a random order.
USING A USB KEY (not supplied)
Reading a USB key
The appliance is equipped with a USB port (18) for reading music files (MP3) from a USB key.
The appliance must not be in the process of playing a disk.
Insert a USB key into the appliance's USB port (18).
Press the USB button to read the contents of the USB key.
The playback functions are identical to the CD playback functions.
Refer to the section corresponding to the type of files to be played.
Notes:
- Do not remove the USB key while the files are being played as this could damage them.
□ You are recommended to save the key's contents in order to avoid losing data.
□ ATTENTION: Only use USB keys with a capacity that does not exceed 8 GB. The player does not handle all USB devices (e.g. external hard disk, etc).
REPAIRS AND MAINTENANCE
Repairs
Consult the following table if there is a problem with the appliance.
| Problem | Reason | Solution |
| The CD cannot be played | There in no CD in the appliance or the CD is not correctly positioned. | Check that the labelled surface is on top. |
| Batteries too weak. | Change the appliance's batteries or plug it's power supply cable in. |
| The CD skips during playback | Check the condition of the disk (fingerprints, dirt or scratches) | Clean the disk with a soft cloth, from the centre to the outside edge. |
Cleaning
Unplug the appliance before cleaning it.
□ Remove finger prints and dust with a soft cloth. Do not use abrasive products or solvents that may damage the appliance's surface.
ATTENTION: Never immerse the appliance in water or in any liquid whatsoever.
□ If it is not used for a long time, unplug the appliance and remove its batteries.
TECHNICAL SPECIFICATIONS
Power supply: 230V~50Hz or 8 LR14 (C) 1.5V batteries (not supplied)
Power consumption: 13.5W
FM frequency range: 88 - 108.0MHz
FM frequency range: 520 - 1,620kHz
We recommend using an alkaline battery. For the best possible results, we recommend replacing the battery every 6 months.
Note: Unit design and specifications are subject to change without notice. The manufacturer reserves the right to make the necessary improvements.

Find us on Facebook

THOMSON is a trademark of TECHNICOLOR S.A. used under license by:
Parsons International France - 19 Boulevard Albert Einstein 77420 Champs sur Marne - France

Azur (+33)0825745770
call rate according to operator
French time: Monday to Thursday (from 9 am to 18 pm) and Friday (9 am to 3:30 p.m.)
www.thomsonaudiovideo.eu
According To Rate Bedlenernuf