BOT61MXD - Built-in oven THOMSON - Free user manual and instructions
Find the device manual for free BOT61MXD THOMSON in PDF.
User questions about BOT61MXD THOMSON
0 question about this device. Answer the ones you know or ask your own.
Ask a new question about this device
Download the instructions for your Built-in oven in PDF format for free! Find your manual BOT61MXD - THOMSON and take your electronic device back in hand. On this page are published all the documents necessary for the use of your device. BOT61MXD by THOMSON.
USER MANUAL BOT61MXD THOMSON
- Plat multi usages (fig.2)
MAINTIEN AU CHAUD / PATE A PAIN
(temperature préconisee 80^ mini 35^ maxi 100^ )
You have just acquired a THOMSON oven and we would like to thank you.
We have invested all our dedication and know-how in this appliance so that it would best meet your needs. With innovation and performance, we designed it to be always easy to use.
In the THOMSON product range, you will also find a wide choice microwaves, cooking hobs, ventilation hoods, that you can coordinate with your new THOMSON oven.
Visit our website where you will find all of our products, as well as useful and complementary information.
THOMSON
As part of our commitment to constantly improving our products, we reserve the right to make changes to them based on technical advances to their technical and functional features and appearance.

Warning: Before installing and using your appliance, please carefully read this Guide to Installation and Use, which will allow you to quickly familiarise yourself with its operation.
1/ DESCRIPTION OF YOUR APPLIANCE
• Introduction to your oven 4
Description of the accessories 5
Description of your programmer 6
2/ USING YOUR APPLIANCE
Using the programmer 7
How to set the time 7
o How to adjust the time 8
Instant cooking 9
- Programmed cooking 10
Using the timer function 11
3/OVEN COOKING MODES 12
4/TROUBLESHOOTING 13
- Changing the bulb 14
INTRODUCTION TO YOUR OVEN
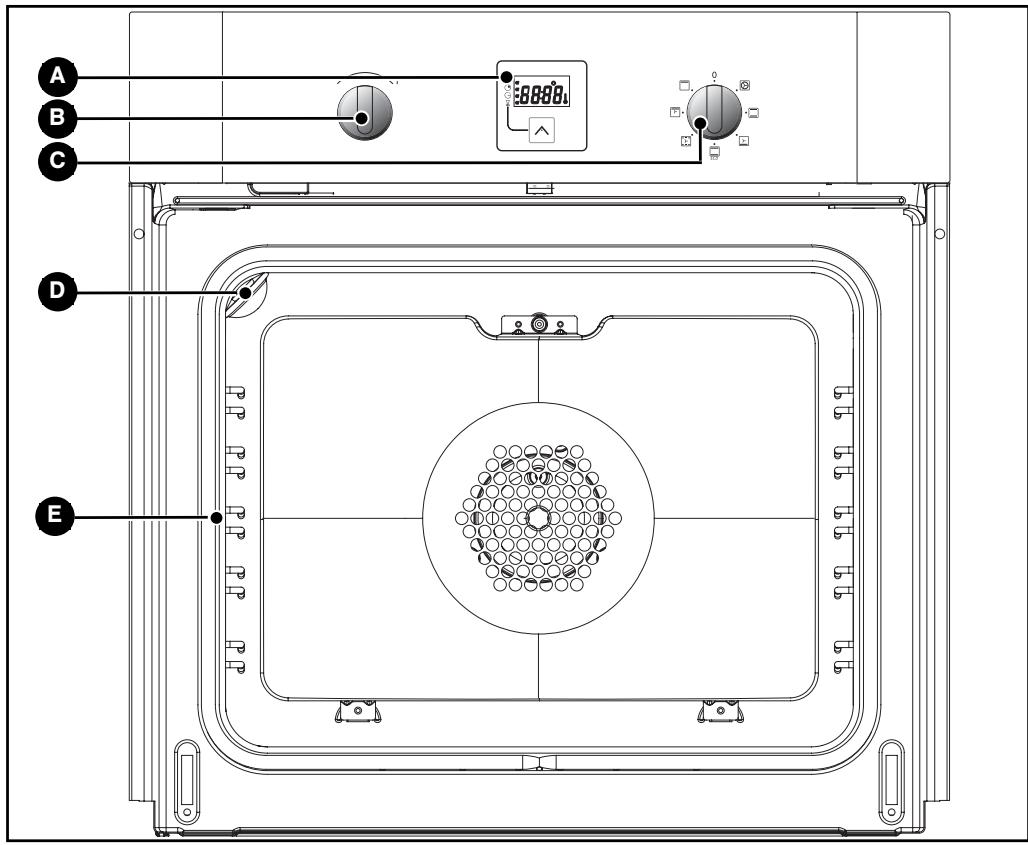
A Programmer
Light
B Temperature selector switch
E Wire shelf supports
C Function selector switch

Tip
This Guide to Installation and Use is valid for several models. Minor differences in details and fittings may emerge between your appliance and the descriptions provided.
DESCRIPTION OF THE ACCESSORIES
- Anti-rocking safety grid (fig.1)
The grid can be used to hold all dishes and moulds containing foodstuffs to be cooked or browned.
It can be used for barbecues (to be placed directly on the grid).
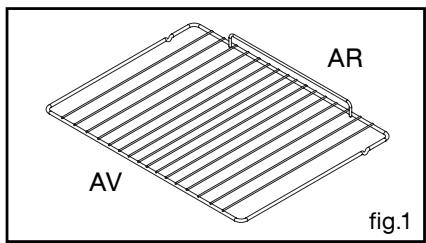
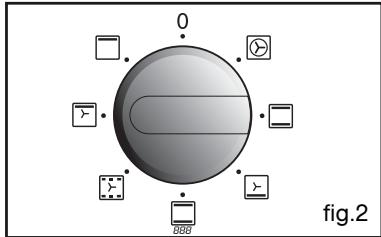
- Multi-purpose dish (fig.2)
It serves as a cake dish and has a sloped edge. It is used for cooking pastries such as cream puffs, meringues, cup cakes, puff pastry, etc.
Inserted under the grid, it catches barbecue juices and grease. It can also be used half-full of water for double-boiler cooking methods. Avoid placing roasts or meats directly in the dish because this is certain to cause significant spattering on the oven walls.

- DESCRIPTION OF YOUR PROGRAMMER
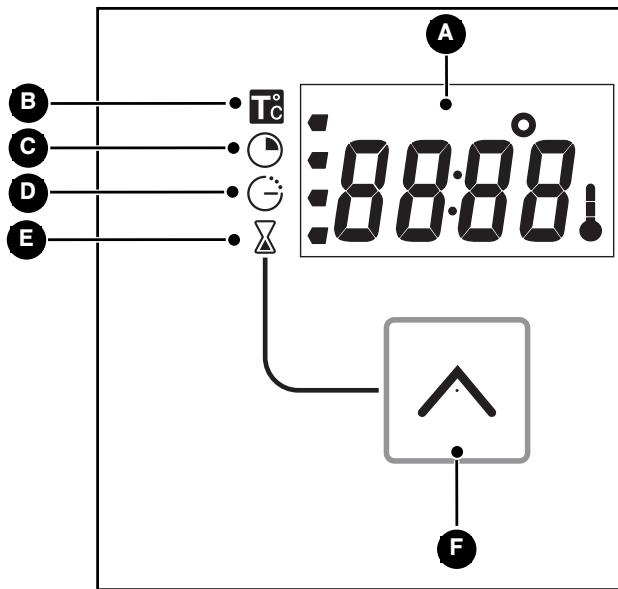
A Time and cooking time display
Temperature indicator
Cooking time indicator
Cooking end time indicator
E Timer indicator
Selection touch control (cooking time and time)
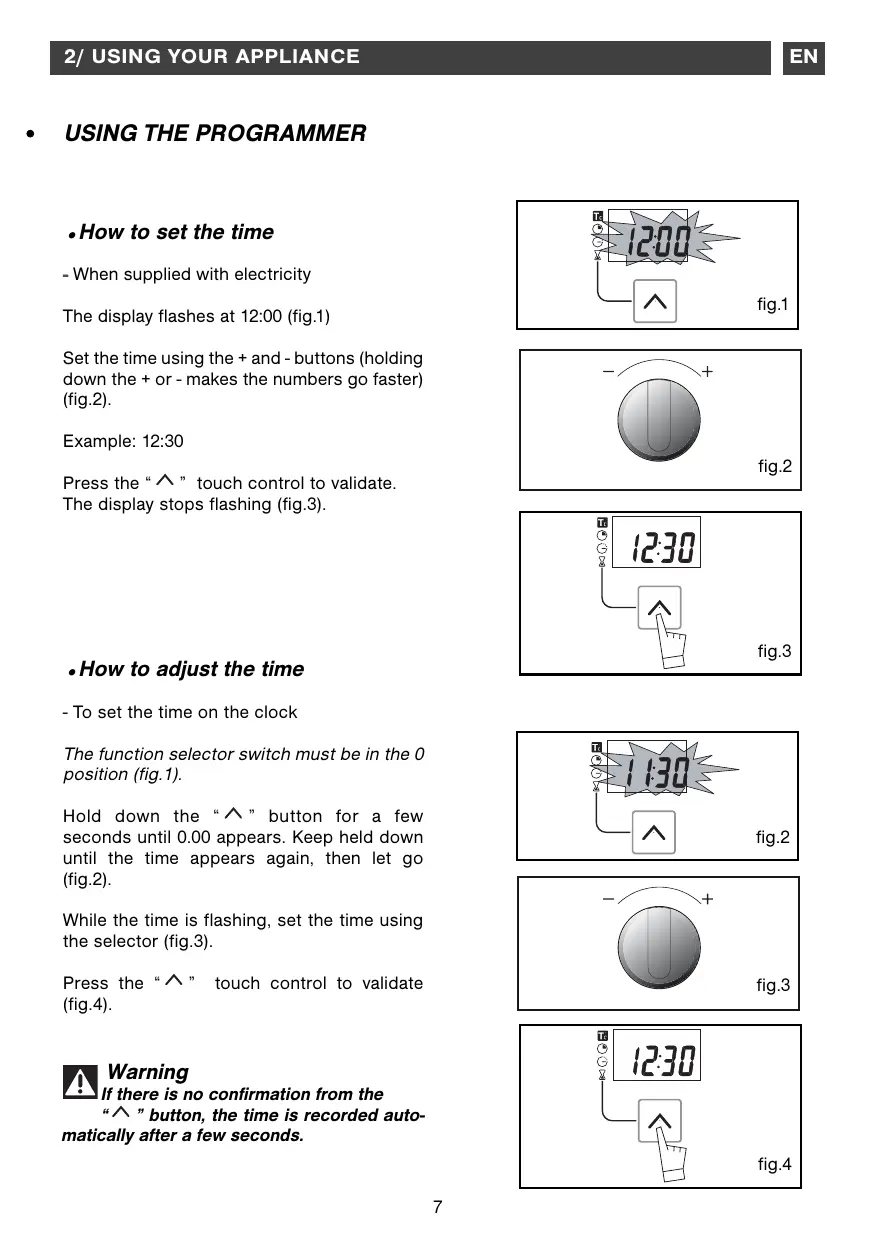
USING THE PROGRAMMER
How to set the time
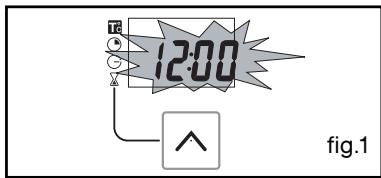
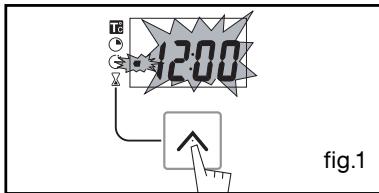
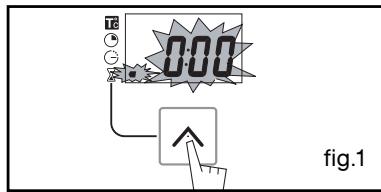
- When supplied with electricity
The display flashes at 12:00 (fig.1)
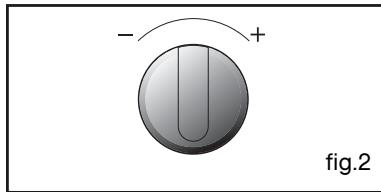
Set the time using the + and - buttons (holding down the + or - makes the numbers go faster) (fig.2).
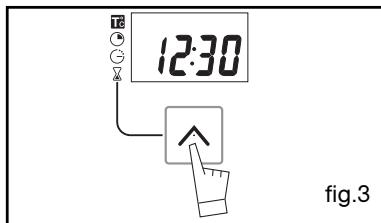
Example: 12:30
Press the " " touch control to validate. The display stops flashing (fig.3).
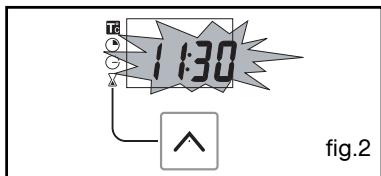
How to adjust the time
- To set the time on the clock
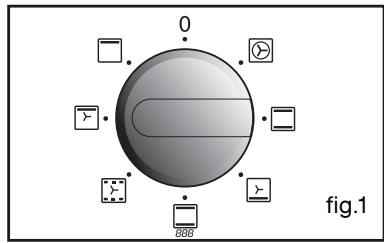
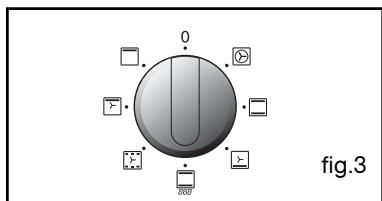
The function selector switch must be in the 0 position (fig.1).
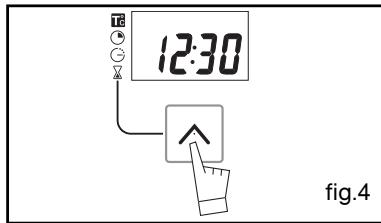
Hold down the “ ” button for a few seconds until 0.00 appears. Keep held down until the time appears again, then let go (fig.2).
While the time is flashing, set the time using the selector (fig.3).
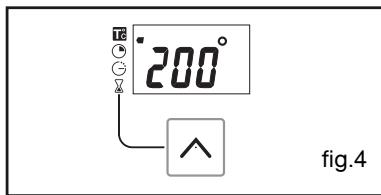
Press the “ ” touch control to validate (fig.4).

Warning
If there is no confirmation from the
" " button, the time is recorded automatically after a few seconds.
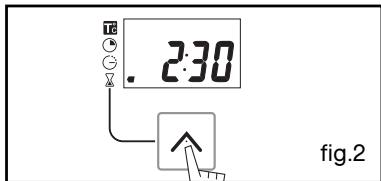
- Instant cooking
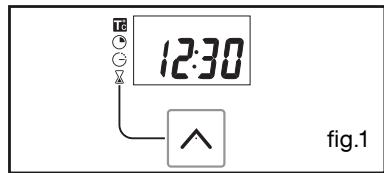
- The programmer should display only the time.
It should not be flashing (fig.1).
Turn the function selector to the position of your choice.
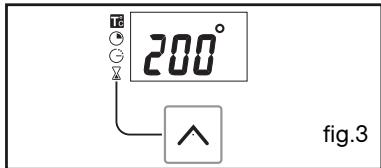
Example: position (fig.2).
Your oven recommends the ideal temperature for the chosen cooking mode (fig.3).
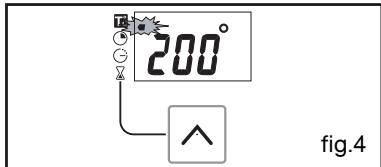
It is, however, possible to adjust the temperature. The temperature symbol flashes (fig.4).
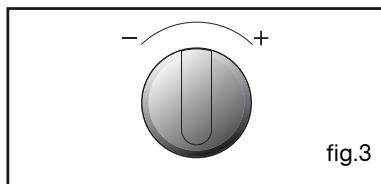
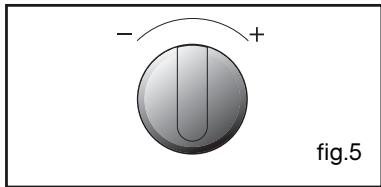
Set the temperature using the ^+ or - selector (fig.5).
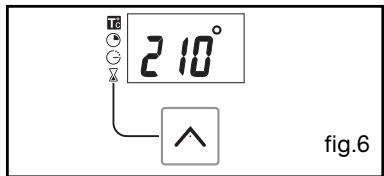
Example: temperature set to 210^ (fig.6).
Place your dish in the oven based on the recommendations provided by the cook book.
After these steps, the oven heats up and the temperature indicator flashes.
A series of beeps will be emitted when the oven reaches the selected temperature.
The temperature stops flashing.

Warning
After a cooking cycle, the cooling fan continues to operate for a period of time in order to guarantee optimal oven reliability.

Warning
All types of cooking are done with the door closed.
PROGRAMMED COOKING
- Cooking with immediate start and programmed duration
- Select the desired cooking mode and adjust the temperature (fig.1).
Example: position temperature 210^ (fig.2).
- Press the “ ” button until the cooking time indicator flashes “ ”.
The display flashes 0:00 to indicate that you can now adjust the setting (fig.2).
Example: 25 mins cooking time (fig.3).
The cooking time is automatically recorded after a few seconds.
The cooking time display stops flashing and returns to temperature mode (fig.4).
The countdown of the cooking time begins immediately after it has been set.
After these three steps, the oven heats up:
A series of beeps will be emitted when the oven reaches the selected temperature.
At the end of cooking (end of programmed time),
- the oven stops,
- 0:00 is displayed (fig.5),
- A series of beeps is emitted for a few minutes. The beeps can be stopped by pressing the “ ” button.
The display shows the time once again when the function selector switch is returned to 0 (fig.6),

PROGRAMMED COOKING
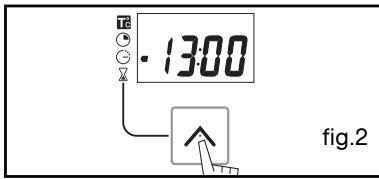
- Cooking with delayed start and chosen cooking end time
Proceed as with programmed cooking.
- After setting the cooking time, press the “ ” button until the end of cooking indicator flashes “ ”
The time display flashes to indicate that you can now adjust the setting (fig.1).
- Press the + or - touch control to set the desired cooking end time.
Example: end of cooking at 13:00 (fig.2).
The cooking end time is automatically recorded after a few seconds.
The cooking end time display stops flashing.
After these 3 steps, the oven heating is delayed so that cooking ends at 13:00.
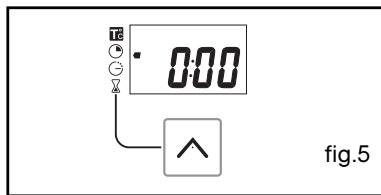
At the end of cooking (end of programmed time),
-
the oven stops,
-
0:00 is displayed,
-
A series of beeps is emitted for a few minutes. The beeps can be stopped by pressing the “ ” button.
The display shows the time once again when the function selector switch is returned to 0 (fig.3),
In the case of programmed cooking cycles, the cavity lights up until cooking begins, and remains lit until cooking is finished.
- USING THE TIMER FUNCTION
- Your oven's programmer can be used as an independent timer that allows you to count down a time without operating the oven.
In this case, the timer display has priority over the clock display.
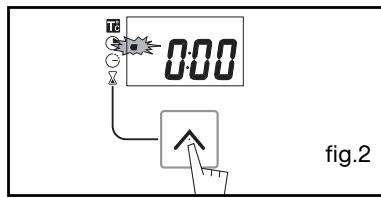
- Press the “ ” (fig.1) button until the timer symbol begins to flash
_n = 1^ - 0.00 flashes.
- Adjust the chosen time by pressing the + or - selectors.
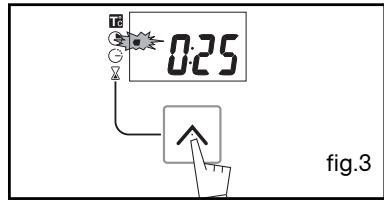
- Press the “ ” button to confirm or wait a few seconds (fig.2).
The display stops flashing after a few seconds and the timer starts working, counting down the time in seconds.
Once the time has expired, the timer emits a series of beeps to notify you.
The beeps can be stopped by pressing the “^” button.

Warning
It is possible to change or cancel the timer at any time.
EN
-
Cooking is controlled by the heating element located at the back of the oven and the fan
-
Rapid temperature increase: Some dishes can be placed in the oven while it is still cold.
- Recomended for meat, fish, vegetables, preferably placed in a terracotta dish.

TRADITIONAL
(recommended temperature 225^ min 35^ max 275^ )
- Cooking controlled by the upper and lower heating elements.
- Requires preheating before placing the dish in the oven.
- Recommended for slow, gentle cooking: rich game... For retaining the juices in red meat roasts. For simmering in a covered stew pan dishes that were begun on the hob (coq au vin, stew).

PULSED OVEN SHELF
(recommended temperature 205^ min 35^ max 275^ )
- Cooking is controlled by the lower element combined with reduced input from the grill and use of the fan.
- Cooking heat from the bottom with a small amount of heat from the top. Place the grid on the lowest shelf support.
- Recommended for moist dishes (quiches, juicy fruit tarts, etc...). The crust will be thoroughly cooked on the bottom. Recommended for dishes that rise (cakes, brioche, kugelhopf...) and for soufflés that will not be stuck by a crust formed on the top.
\*

ECO
(recommended temperature 200^ min 35^ max 275^ )
- Cooking is controlled by the upper element with some heat from the lower element.
- This position provides energy saving while preserving the quality of the cooked poultry.
- Place the poultry in a terracotta dish, preferably on the grid in the first shelf support.
There is no need to preheat the oven. You can turn the poultry half-way through cooking if you wish.

HOLD WARM FUNCTION
(recommended temperature 200^ min 35^ max 275^ )
-
Heat regulated by the upper element with use of fan.
-
Stabilisation at low temperatures.
-
Recommended for rising dough for breads, brioche, and cakes... without exceeding 40^ (warming plates, defrosting).

GRILL FAN ASSISTED
(recommended temperature 200^ min 180^ max 180^ )
- Cooking controlled by the upper element and by the fan.
- No need for preheating. Roasts and poultry that are crispy and juicy all the way around.
Ability to roast a large piece of meat placed on the special grid with the hollow dish underneath to catch the cooking juices.

HIGH TEMPERATURE GRILL
(recommended temperature 275^ min 180^ max 275^ )
-
Cooking controlled by the upper element.
-
Preheat the oven for five minutes. Slide the drip tray onto the bottom shelf support.
- Recommended for grilling chops, sausages, toast or prawns placed on the grid.
If you have a doubt about the correct functioning of your oven, this does not necessarily mean that there is a malfunction. In any event, check the following items:
| YOU OBSERVE THAT... | POSSIBLE CAUSES | WHAT SHOULD YOU DO? |
| The oven is not heating. | - The oven is not connected to the power supply. - Your fuse is out of order. - The selected temperature is too low. | Plug in your oven. Replace the fuse in your electrical set-up and check its capacity (16A). Increase the selected temperature. |
| The oven light is not working. | - The light is out of order. - The oven is not connected or the fuse is not working. | Change the bulb. Plug in your oven or change the fuse. |
| Your oven starts bee-ping. | - During cooking. - At the end of a cooking cycle. | The recommended temperature of your choice has been reached. Your programmed cooking cycle is finished. |
Warning
- Repairs to your appliance should only be performed by professionals. Non-standard repairs may be a source of danger for the user.
Tip
In all circumstances, if your efforts are not sufficient, contact the After-Sales Service Department without delay.
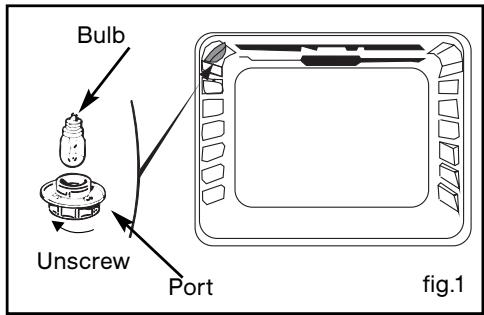
CHANGING THE BULB

Warning
- Disconnect your oven before performing any task on the bulb to avoid the risk of electric shock and, if necessary, let the appliance cool down.

Tip
To unscrew the port and the bulb, use a rubber glove, which will make disassembly r.
The bulb is located on the ceiling of your oven's cavity.
a) Unplug the oven.
b) Unscrew the lighting port (fig.1).
c) Unscrew the bulb in the same direction.
Bulbspecifications:
-15W
- 220-240 V ~
- 300^
-E14cap
d) Replace the bulb then reposition the port and reconnect your oven.