HHR 160 - Pressure washer Cocraft - Free user manual and instructions
Find the device manual for free HHR 160 Cocraft in PDF.

User questions about HHR 160 Cocraft
0 question about this device. Answer the ones you know or ask your own.
Ask a new question about this device
Download the instructions for your Pressure washer in PDF format for free! Find your manual HHR 160 - Cocraft and take your electronic device back in hand. On this page are published all the documents necessary for the use of your device. HHR 160 by Cocraft.
USER MANUAL HHR 160 Cocraft
160 Bar. Max. WATER FLOW: 8 L/MIN
HÖGTRYCKSTVÄTT
H∅YTRYKKSVASKER
PAINEPESURI

Important:
Read the entire instruction manual carefully and make sure that you fully understand it before you use the equipment. Keep the manual for future reference.
Viktig information:
natural_image
Blue and gray Cocralf water heater with coiled spring and control panel (no visible text or symbols)Art.no Model
41-2850
YLQ5630H-160C
Ver. 20221116
Original instructions
Bruksanvisning i original
Originalbruksanvisning
Please read the entire instruction manual before using the product and then save it for future reference. We reserve the right for any errors in text or images and any necessary changes made to technical data. In the event of technical problems or other queries, please contact our customer service team (see address details on the back).
Safety
General requirements for household electrical appliances
Warning
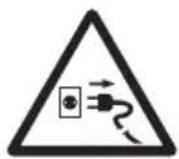
- If the mains lead is damaged in any way it must be replaced by a qualified electrician.
- Warning: The use of incorrect extension leads can be dangerous. If an extension lead is used it must be equipped with a waterproof plug and socket and be designed for outdoor use.
- Make sure that the mains lead (and extension lead if used) is not damaged by sharp edges/corners, heat sources, etc.
- Keep the product out of children's reach. Children must be supervised and never allowed to play with the product.
- The product may be used by persons with reduced physical, sensory or mental capabilities or persons with a lack of experience or knowledge which could jeopardise their safety, provided they have been instructed in the safe operation of the product and understand the hazards involved.
Particular requirements for high pressure cleaners
Warning
- Do not use the pressure washer with any liquids other than water.
- The product has been designed for use with the cleaning agent supplied or recommended by the manufacturer. The use of other cleaning agents may adversely affect the safety of the product.
- All persons present within the working area of the product must wear protective clothing.
- Explosion hazard. Never use the product to spray flammable liquids.
- The product must not be used by children or untrained operators.
- High pressure hoses, fittings and connectors are important for the safe use of the product. Only use hoses, fittings and connectors recommended by the manufacturer.
- Only use original parts for repairs and for your own safety.
- Water that has passed through the non-return valve should be considered to be non-potable.
- Do not touch electrical cables or connections with wet hands.
-
The product must never be connected to the power supply during cleaning, maintenance or when changing accessories.
-
Do not use the product if the mains lead or other parts such as safety devices, high pressure hoses or trigger are damaged in any way.
- Extension leads not designed for use with this product may be dangerous. If an extension cable is used, it must be approved for outdoor use, kept dry and raised above ground level. In order to achieve this it is advisable to use a cable reel which will support the connection at least 60 mm above ground level.

Dangerous voltage
- The wall socket that the product is connected to must have been installed by a competent electrician in accordance with IEC 60364-1 standards.
- The product should be connected to the mains via an RCD (tripping at max. 30 mA within max. 30 ms).
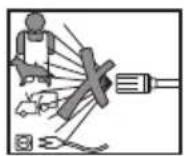
- Warning Water jets under high pressure can be dangerous if used incorrectly. Never direct the water jet towards people, animals, the pressure washer itself or any other electrical equipment.
- Never direct the water jet towards yourself or others to clean clothing or footwear.
- Always unplug the product when it is not being used, is left unattended or is to be moved.
Safety instructions

Always use ear defenders and safety goggles or a visor.
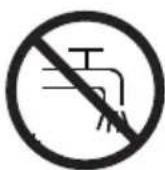
The pressure washer should not be connected to sources of drinking water. If you are forced to use a drinking water supply, the pressure washer must be equipped with a non-return valve and hose meeting IEC 61770 standards.

This product is double-insulated.

Assurance of compliance.
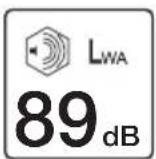
The guaranteed sound power level (LwA) is max 89 dB.

Caution
- Learn how the pressure washer works so that you can quickly stop it and depressurise it.
- Unplug the pressure washer from the power supply immediately if it should start to vibrate or behave abnormally.
- The pressure washer must never be carried by the mains lead or the pressure hose.
- Keep the work area free of bystanders and pets.
- Never use the product if you are tired or under the influence of drugs, alcohol or medication.
- Never try to repair the product or any of its accessories by yourself. All repairs must be carried out by qualified technicians using original spare parts.

Dangerous voltage
• Always unplug the product if its mains lead is damaged in any way.
- Always check that the mains lead and plug of the product are undamaged before use in order to avoid the possibility of electric shock.
- Make sure that the voltage at the wall outlet corresponds to the voltage marked on the rating plate of the product.

Important
- The product should be used only as described in this manual. Using the product for other than its intended use may lead to personal injuries or material damage.
- Do not route the mains lead over a road, track, cycle path, etc., where it could be damaged or where someone could trip over it.
• Always adopt a balanced stance with both feet on the ground when using the product. - Make sure that the product cannot be started accidentally. Always switch the product off before unplugging it from the wall socket.
- Disconnect the product from the power supply by unplugging it from the wall socket. Make sure that the wall socket and plug are easily accessible.
- Store the product in a dry, frost-free location.
Intended use
- This pressure washer is designed for domestic use only, for cleaning walls, patios, cars, lawnmowers, bicycles, etc. If required, the pressure washer may be used with specialised detergents.
- The pressure washer is intended to be used outdoors for the cleaning of: stone, wood, metal and plastic.
- This pressure washer is only intended for private, non-commercial use.
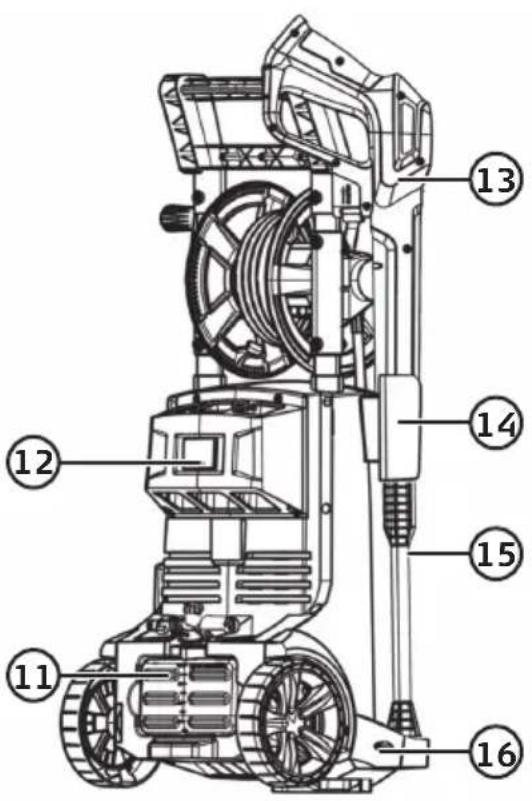
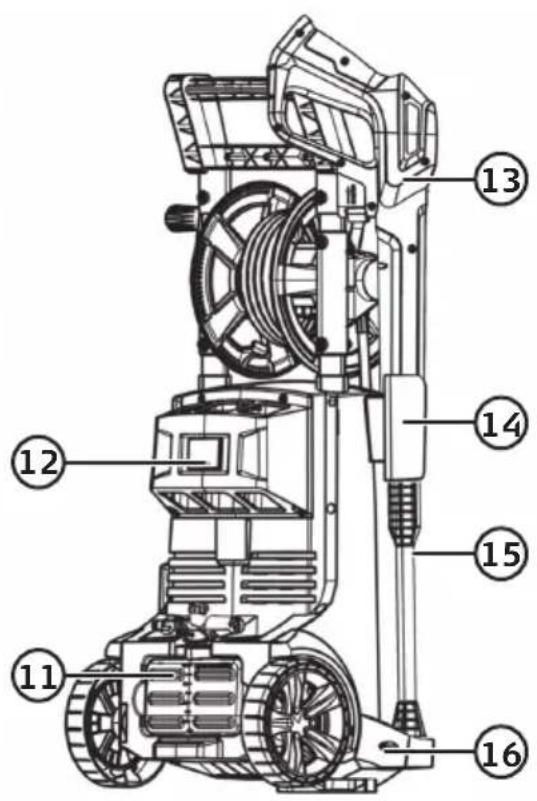
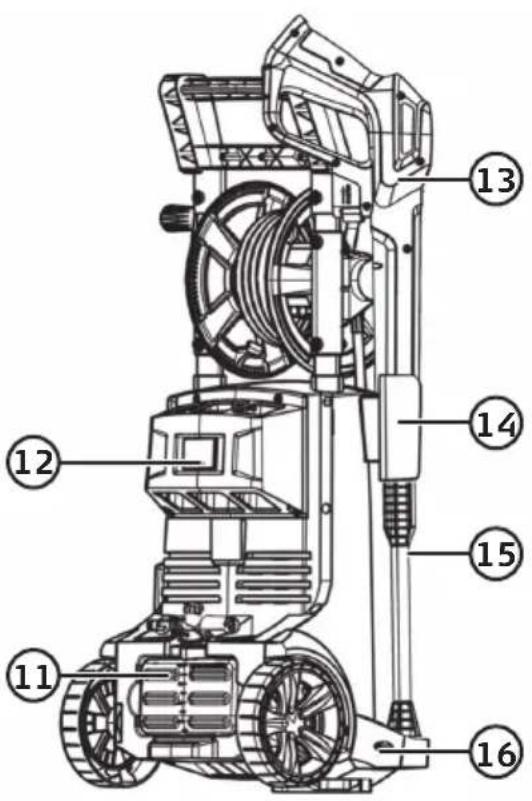
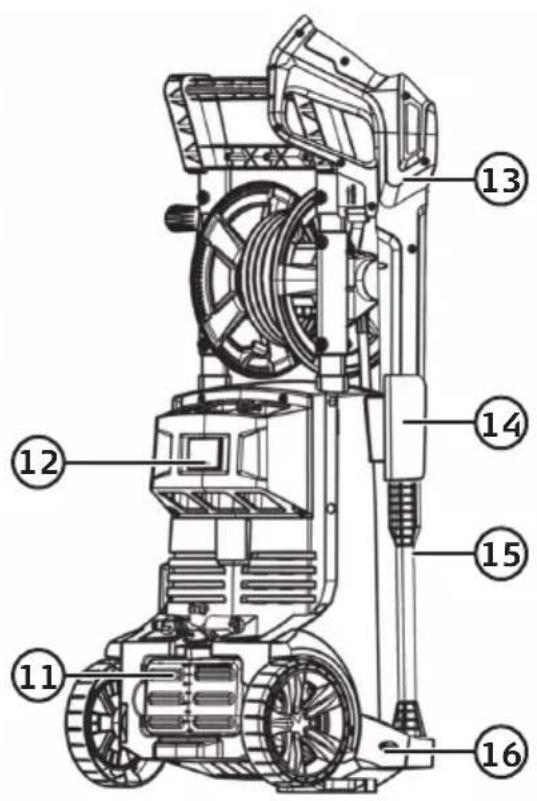
Product description
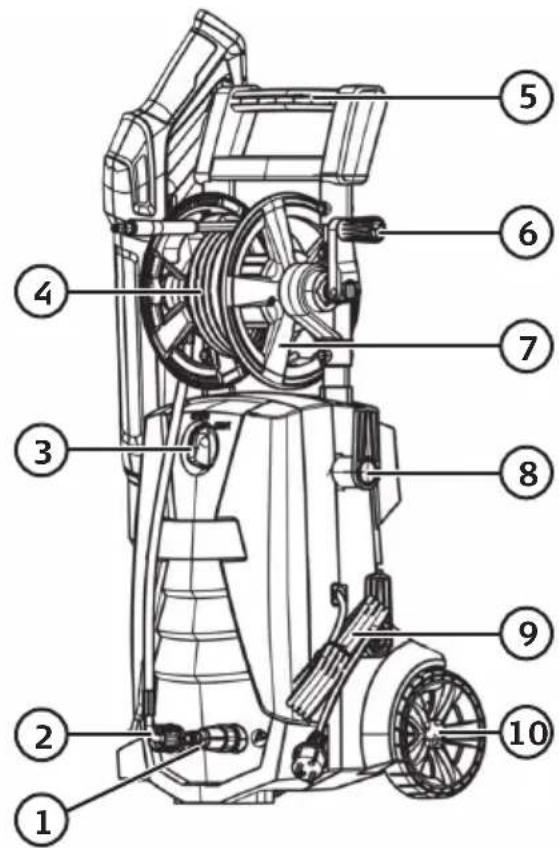


- Water supply inlet/hose connector
- Pressurised water outlet
- [I/0] On/off rotary switch
- Pressure hose
- Lifting handle/Trolley handle
- Hose reel crank (folding handle)
- Hose reel
- Mains lead holder
- Mains lead
-
Wheel
-
Foam lance with detergent bottle
- Rating plate
- Trigger gun
- Trigger gun holster
- Spray lance
- Trigger gun fence
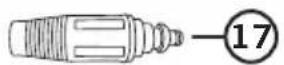
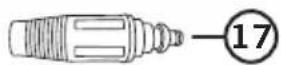
- Standard nozzle (adjustable)
- Turbo nozzle
- Cleaning needle
Assembly
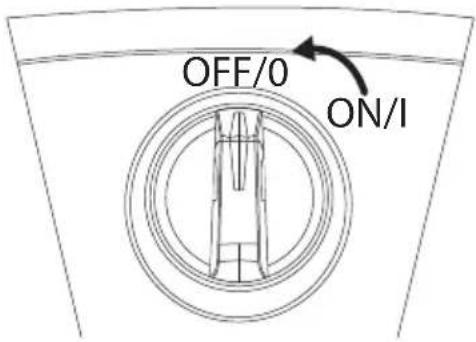
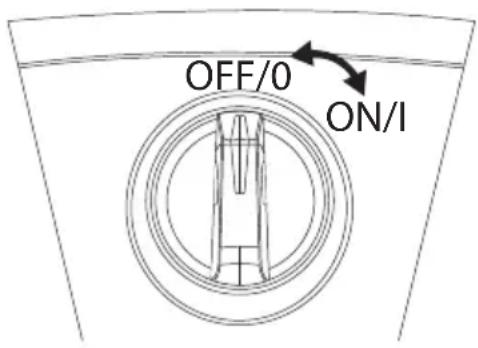
- Turn the on/off switch (3) to 0.

natural_image
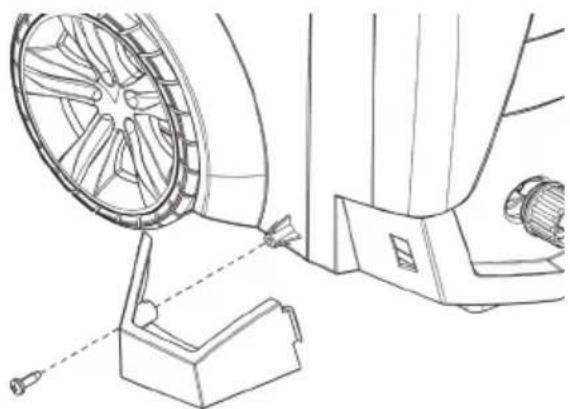
Technical line drawing of a mechanical pump assembly with no visible text or symbols- Attach the holster (14) for the trigger gun (13) to the bracket on the side of the pressure washer.
natural_image
Technical line drawing of a mechanical assembly with a wheel and base mount (no text or symbols)- Screw the trigger gun fence (16) into place.

- Insert the spray lance into the bayonet connector on the trigger gun and turn it a 14 turn clockwise until it locks into place.
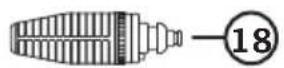
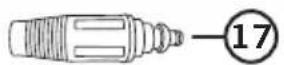
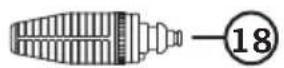
Click either the standard nozzle (17) or turbo nozzle (18) into the end of the lance. Press in the button on the lance and pull the nozzle straight out to detach it.
- Click the pressure hose (4) into the trigger gun (13).
natural_image
Technical line drawing of a mechanical assembly with three views: top view, side view, and close-up of a component (no text or symbols)
natural_image
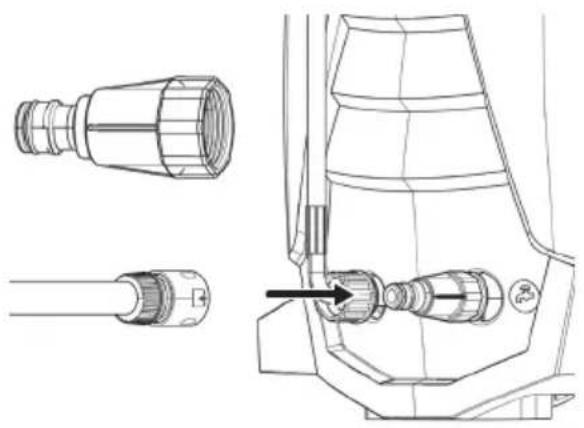
Technical line drawing of a handheld device with a coiled cable and lever (no text or symbols)- Screw the hose connector (1) onto the water inlet connector. Finger-tighten only.
Operating instructions
⚠ Warning: Risk of equipment damage/personal injury.
- The pressure washer should never be run dry (without water) as this may damage the pump.
The pressure washer must always be operated in an upright/vertical position, never in the horizontal position.
- Bear in mind that the pressure washer may still be under pressure even if it is switched off. Depressurise it by pulling the trigger before you disconnect the hoses. Disconnecting the pressure hose while the system is still under pressure can be dangerous.
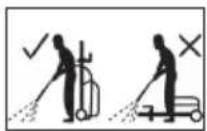
- The spray lance/trigger gun is subjected to a recoil force when the water jet is discharged. Make sure that you have a firm footing and are holding the spray lance and trigger gun firmly in both hands.
- Do not use a water connection hose shorter than 6 metres in length and with a diameter of at least 1/2 inch, the connection hose will buffer any possible pressure surges in the water lines and protect the pressure washer so that it works more smoothly.
- The water supply temperature must not exceed 40 °C. Run the hose for a moment if the hose has sat in the sun and become warm.
- Never look into the nozzle when it is attached to the washer.

Read carefully through the instruction manual before using the pressure washer, paying particular attention to the warning texts and symbols.
-
Connect a garden hose with a 1/2 inch quick connector to the water supply inlet connector.
-
Connect the other end of the hose to a tap.
-
Turn the on/off switch to 0.
-
Plug the mains lead into an earthed wall socket.
-
Pull the trigger and let water flow through the spray lance for about five seconds.
-
Unwind a sufficient length of the pressure hose.
-
Turn the on/off switch to I to switch the pressure washer on.
-
Point the trigger gun/attachment towards the object to be cleaned.
-
Pull the trigger to begin spraying water.
Note: The recommended distance between the nozzle and the surface to be cleaned is approximately 30 cm. Shorter distances provide a higher degree of cleaning power, but can damage the surface being cleaned. Longer distances result in a gentler cleaning jet. Adapt the distance to the suit the sensitivity of the surface.
-
Release the trigger when you have finished cleaning.
-
Turn the on/off switch to 0 to switch the pressure washer off.
-
Turn off the water tap.
-
Pull the trigger for a few seconds or however long it takes for water to stop coming out of the nozzle.
-
Unplug the mains lead from the wall socket. Coil the mains lead and hang it on the holder (8).
-
Wind the pressure hose onto the hose reel (7) using the crank (6).
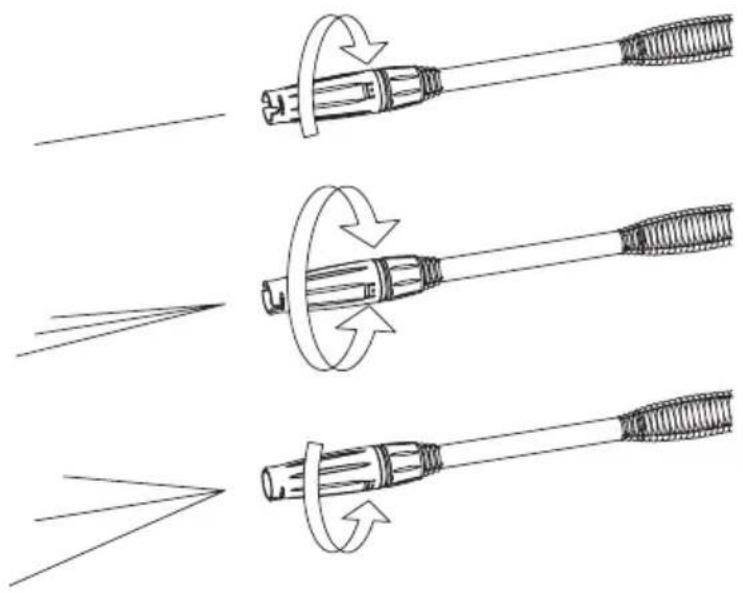
Adjusting the spray pattern (does not apply to the turbo nozzle)
The water jet fan can be adjusted when using the standard nozzle.
- Twist the nozzle to adjust the spray pattern.
natural_image
Three-step diagram showing how to interact with a cable or connector, illustrating mechanical or optical alignment (no text or symbols present)Using detergent
- Remove the cap of the foam lance detergent bottle (11). Fill the bottle with detergent and refit the cap.
- Connect the foam lance to the end of the spray lance.
- Adjust the dosage of detergent using the dosage control knob on the foam lance.
- Pull the trigger and spray detergent onto the surface to be washed.
- Leave the detergent to work for a while (do not let it dry).
- Change to a standard or turbo nozzle.
- Wash off the detergent.

Cleaning and care
- Always unplug the pressure washer from the wall socket before cleaning it or when it is not to be used for a long time.
- Clean the product by wiping it with a moist cloth. Use only mild cleaning agents, never solvents or corrosive chemicals.
Cleaning the inlet filter and nozzle
The hose connector which is screwed onto the water inlet connector is fitted with an inlet filter which hinders sand and other impurities from damaging the valves of the pump.
- Disconnect the hose connector from the water inlet connector.
- Rinse the filter under a tap.
- Screw the hose connector back onto the water inlet connector.
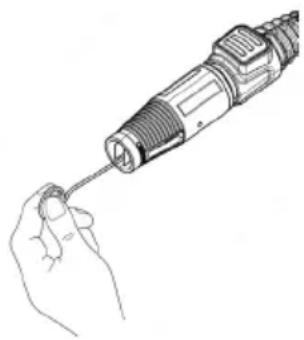
Any lance nozzles used must be cleared of dirt and debris.
- Insert the cleaning needle into the bore of the nozzle.
- Rinse the nozzle with clean water.
- Repeat steps 1 and 2 several times for best results.
natural_image
Line drawing of a hand holding a soldering iron (no text or symbols)Storage
△ Important
- Protect the pressure washer against frost. Make sure that it is completely drained of all water before it is put away for storage.
- Avoid storing the pressure washer in temperatures below 5 °C and above 40 °C.
- Store the pressure washer in a dry area out of the reach of children and others who do not have the prerequisite knowledge to operate the machine.
Troubleshooting
| The machine does not start. | Is there power at the wall socket and is the plug correctly plugged in?If you are using an extension lead,is it the right type and is it working properly?Is the on/off switch set to I? |
| The pump provides insufficient or fluctuating pressure. | Is the nozzle clogged/worn? Clean or replace if needed.Is the water supply sufficient? The hose should be able to fill a 10-litre bucket in one minute.Is the hose kinked, clogged or damaged?Is the water inlet filter clogged?Check and clean as required.Has the fuse blown?Is the extension lead too long?Test operation without an extension lead. |
| Pump sucking in air. • Is the garden hose connection tight? | |
| No water or too little watercoming out of the nozzle. | Is the pump sucking in water?Pull the trigger to release any air in the hose and check that the hose is filled with water.Is the pressure washer standing upright/vertical?The pressure washer cannot be used horizontally.Is there dirt in the nozzle? Clean if necessary.Is the inlet or outlet valve damaged? Replace. |
| The trigger cannot be pulled. | Is the trigger lock on?Disengage the trigger lock by folding it down. |
Responsible disposal
This symbol indicates that the product should not be disposed of with general household waste. This applies throughout the entire EU. In order to prevent any harm to the environment or health hazards caused by incorrect waste disposal, the product must be handed in for recycling so that the material can be disposed of in a responsible manner. When recycling the product, take it to your local collection facility or contact the place of purchase. They will ensure that the product is disposed of in an environmentally sound manner.
natural_image
Symbol of a trash bin crossed with no text or numbers, representing waste sorting or disposal (no text present)Specifications
Rated voltage 220 - 240 V AC, 50-60 Hz
Power 2200 W
Max. inlet water pressure 10 bar (1.0 MPa)
Rated operating pressure 110 bar (11 MPa)
Maximum pressure 160 bar (16 MPa)
Water flow 5.6 l/min, max 8.0 l/min
Max water temperature 40 °C
IP rating IPX5
Sound pressure level (LpA) 76 dB(A), KpA: 3 dB(A)
Sound power level (LwA) 89 dB(A)
Hand-arm vibration < 2.5 m/s ^4 , K 0.7 m/s ^2
Water hose length 6.5 m
Mains lead length 5 m
Weight 10.8 kg
Högtryckstvätt
Art.nr 41-2850 Modell YLQ5630H-160C


natural_image
Technical line drawing of a mechanical pump assembly with no visible text or symbolsnatural_image
Technical line drawing of a mechanical assembly with a wheel and bracket (no text or symbols)- Skruva fast spolhantagets skydd (16).

natural_image
Technical line drawing of a mechanical component with three views: top view, side view, and close-up (no text or symbols)
natural_image
Technical line drawing of a handheld device with a coiled cable and lever (no text or symbols)natural_image
Three-step diagram showing how to spray or spread a cable, with no text or symbols present.natural_image
Line drawing of a hand holding a soldering iron with a threaded tip (no text or symbols)Förvaring
△ Viktigt!
natural_image
Symbol of a trash bin crossed with no text or numbers, representing waste sorting or disposal (no text present)Specifikationer

- Slangekobling/tilkobling for innkommende vann
- Utgående vann
- [I/0] Strømbryter, på/av
- Høytrykksslange
- Transporthåndtak/bærehåndtak
- Sveiv til slangetrommelen (utfellbart håndtak)
- Slangetrommel
- Holder til tilkoblingskabel
- Tilkoblingskabel
-
Hjul
-
Skummunnstykke med beholder
- Merkeskilt
- Spylehåndtak
- Holder til spylehåndtak
- Lanse
- Beskyttelse spylehåndtak
- Standard munnstykke (justerbart)
- Turbo munnstykke
- Rensenål
Montering

natural_image
Technical line drawing of a mechanical pump assembly with no visible text or symbolsnatural_image
Technical line drawing of a mechanical assembly with a wheel and base mount (no text or symbols)natural_image
Technical line drawing of a mechanical component with three views: top view, side view, and close-up (no text or symbols)
natural_image
Technical line drawing of a handheld device with a circular base and lever mechanism (no text or symbols)- Skru slangekoblingen (1) fast på uttaket for innkommende vann. Bruk kun håndkraft.
Bruk
natural_image
Three-step diagram showing how to interact with a cable or connector, illustrating mechanical or electrical motion (no text or symbols)Bruk med vaskemiddel
Vedlikehold
natural_image
Line drawing of a hand holding a soldering iron with a threaded tip (no text or symbols)Oppbevaring
Viktig!
natural_image
Symbol of a trash bin crossed with no text or labels, accompanied by a black rectangle below (no readable text or symbols)Spesifikasjoner
Strømtilkobling 220 - 240 V AC, 50-60 Hz
Effekt 2200 W
- Aseta virtakytkin (3) asentoon 0.

natural_image
Technical line drawing of a mechanical pump assembly with no visible text or symbolsnatural_image
Technical line drawing of a mechanical assembly with a wheel and base mount (no text or symbols)natural_image
Technical line drawing of a mechanical component with three views: top view, side view, and close-up (no text or symbols)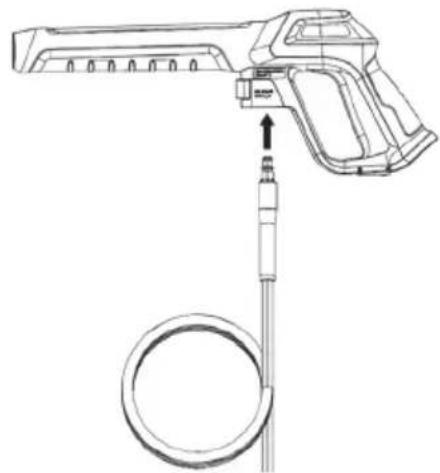
natural_image
Technical line drawing of a handheld device with a circular component inserted, no text or symbols presentnatural_image
Three-step diagram showing how to interact with a cable or connector, illustrating mechanical or electrical motion (no text or symbols)natural_image
Line drawing of a hand holding a soldering iron with a probe inserted (no text or symbols)Säilytys
△ Tärkeää!
natural_image
Symbol of a trash bin crossed with no text or numbers, representing waste sorting or disposal (no text present)Tekniset tiedot
EC Declaration of Conformity
This declaration of conformity is issued under the sole responsibility of the manufacturer.
EU-försäkran om överensstämmelse utfärdas på tillverkarens eget ansvar. / Egenerkläringen er utstedt under produsentens eget ansvar. / Tämä vaatimustenmukaisuusvakuutus on annettu valmistajan yksinomaisella vastuulla
Manufacturer and person authorised to compile technical file: Clas Ohlson AB, SE-793 85 Insjön, Sweden
| Name | Cocraft Högtryckstvätt HHR 160 |
| Type/Model | YLQ5630H-160C |
| Clas Ohlson Article Number | 41-2850 |
The product satisfies the provision for CE-marking according to the following directive(s) / regulation(s) including amendments / Produkten uppfyller kraven för CE-märkning enligt följande direktiv / förordningar inklusive ändringar/ Produktet tilfredsstiller bestemmelsen om CE-merking i henhold til følgende direktiv (er) / forskrifter, inkludert endringer / Tuote täyttää seuraavien direktiivien / asetusten mukaiset CE-merkintää koskevat vaatimukset, mukaan lukien muutokset;
Machinery Directive 2006/42/EC
EMC Directive 2014/30/EU
References to the relevant harmonised standards used or references to the other technical specifications in relation to which conformity is declared. Hänvisning till de harmoniserade standarder som använts eller hänvisningar till de specifikationer som försäkran om överensstämmelse deklareras: / Referere til harmoniserte standarder som brukes, eller henvisninger til spesifikasjonene der samsvarserklæring er erklärt: / Viittaus yhdenmukaistettuihin standardeihin tai viittaus eritelmiin, jossa vaatimustenmukaisuusvakuutus on julistettu; EN 60335-1:2012 + A11:2014 + A13:2017 + A1:2019 + A14:2019 + A2:2019, EN 60335-2-79:2012, EN 62233:2008 + AC:2008, EN 55014-1:2017 + A11:2020, EN 55014-2:2015, EN IEC 61000-3-2:2019, EN 61000-3-3:2013 + A1:2019
Signed for and on behalf of;
Carina Hemstrand
Product Compliance & Sustainability Manager
Clas Ohlson AB, SE-793 85 Insjön, Sweden
Place and date: Insjön 2022-11-02