USER MANUAL NR-BS53VX3 PANASONIC
Operating Instructions
Refrigerator-Freezer (Household use)
Model No. NR-BS53VX3 NR-BS53VW3
English 2-24
Thank you for purchasing this Panasonic product. Please read these instructions carefully before using this product. Please keep this manual for future reference. Included installation Instructions.
Deutsch 25-47
Safety instructions 2
Caring for the environment 4
Installation. 5
Choosing the right location 5
Removing the doors. 6
Connecting the refrigerator to the water supply. 7
Installing the water filter 8
Installing the refrigerator 9
Preparations 10
Parts and their functions 11
Interior and foods stored 11
For saving energy 12
Temperature label (accessory) 12
Exterior and operation panel. 12
Setting the temperature 14
Using the handy functions 15
How to use the Ice/Water dispenser 16
Concerning the user alert functions 17
Removing and re-installing 17
Cleaning and maintenance. 18
Cleaning 18
Changing the water filter 19
Stopping the automatic ice-making. 19
Checks after cleaning and maintenance. 20
When the refrigerator is not going to be used for a prolonged period 20
When moving or transporting the refrigerator 20
Troubleshooting 21
General 21
Fridge and freezer 22
Ice/Water dispenser 22
Specifications 23
Safety instructions
This appliance is intended to be used in household and similar applications such as -staff kitchen areas in shops, offices and other working environments;
-farm houses and by clients in hotels, motels and other residential type environments;
-bed and breakfast type environments;
-catering and similar non-retail applications.
This appliance can be used by children aged from 8 years and above and persons with reduced physical, sensory or mental capabilities or lack of experience and knowledge if they have been given supervision or instruction concerning use of the appliance in a safe way and understand the hazards involved. Children shall not play with the appliance. Cleaning and user maintenance shall not be made by children without supervision.

Do not

Make sure you do this

Indicates the appliance must be earthed to prevent electric shock

Do not take apart

Indicates risk of death or serious injury.

WARNING: Do not use mechanical devices or other means to accelerate the defrosting process, other than those recommended by the manufacturer.
- This can cause damage to the interior of the refrigerator or cause an explosion.
WARNING: Do not damage the refrigerant circuit.
WARNING: Do not use electrical appliances inside the food storage compartments of the appliance, unless they are of the type recommended by the manufacturer.
Do not store volatile or flammable substances in the refrigerator.
- Flammable substances such as benzene, thinners, alcohol, ether and Liquid Petroleum Gas (LPG) can cause explosions.

WARNING: Keep ventilation openings, in the appliance enclosure or in the built-in structure, clear of obstruction.
- The refrigerant (R600a) used in the refrigerator and the gases in the insulation material (cyclopentane) are both flammable. They also require special disposal procedures.
- Before you dispose of the appliance, make sure none of the pipes on the back are damaged. Refrigerant or gas leaks can cause fire or explosion.
WARNING: Connect potable water supply only.
The new hose - sets supplied with the appliance are to be used and that old hose - sets should not be reused.
The ice maker in refrigerator must be installed only by the manufacture or its service agent except ice storage box.
- Ice maker type : EAU37119711, EAU37119712
Make sure the supply cord and plug are not squashed or damaged.
- A damaged power plug or cord can cause short-circuit, fire or electric shock.
- If the supply cord is damaged, it must be replaced by the manufacturer, its service agent or similarly qualified persons in order to avoid a hazard.
DO NOT ATTEMPT TO REPLACE IT YOURSELF.
If LED or LED cover is damaged or if anything appears questionable, contact your dealer or an authorized service centre.
- Do not attempt to repair, replace or disassemble any damaged parts, etc. yourself.

Do not use a multiple socket adaptor and plug several appliances into the same socket adaptor.
- This can cause overheating, fire or short circuit.
Do not pin or bend the supply cord, or place heavy objects on it.
- This increases the risk of fire or electric shock. If the supply cord or plug of the appliance is damaged, it must be replaced by the manufacturer, its service agent or similarly qualified person in order to avoid a hazard.
Do not unplug the refrigerator by pulling on the supply cord.
- This can damage to the supply cord. Always grip the plug and pull firmly from the socket.
Do not place any water container on the top of the refrigerator.
- Water can damage insulation of electrical components and cause short circuit, fire or electric shock.
Do not spray inflammable gas near the refrigerator.
- This can cause explosion or fire.
Do not spray water onto or into the refrigerator.
- This can cause fire or electric shock.
Do not touch the power plug with wet hands.
- This can cause electric shock.
Do not install the refrigerator in a damp place, or where it may come into contact with water.
- Deteriorated insulation of electrical parts can cause short circuit, electric shock or fire.
Do not store pharmaceuticals or other temperature-sensitive products in the refrigerator.
- You should not store products that require strict temperature controls in the refrigerator.
Do not let children climb, swing or hang on the refrigerator door.
- This can cause serious injury, as well as damaging the refrigerator.

Do not operate the refrigerator in the presence of explosive fumes or flammable gas.
- This can cause explosion or fire.
Do not store petrol or other flammable liquids and vapours in the refrigerator, or use them near the appliance.
- This can cause explosion or fire.
Do not touch the crusher blades of the icebox. Do not poke your fingers into the hole where the ice is dispensed from the Ice/Water dispenser.
- Failure to do this may result in an injury to yourself.

Do not try to disassemble, repair or modify the refrigerator yourself.
- You may injure yourself – or others – with burns or electric shock, or damage the refrigerator. If your appliance needs alterations or repair, please consult authorized service centre.

Ensure that the refrigerator is plugged into an earthed mains socket. DO NOT plug into an unearthed mains socket.

Remove any dirt or dust from the plug's pins before connecting to the power supply.
- Dust build-up on the plug can cause insulation failure, especially in humid conditions. This can cause short circuit, fire or electric shock. Unplug the supply cord and wipe it with a dry cloth. Never use a wet or damp cloth.
Plug your appliance into the socket, making sure the connection is secure.
- A loosely connected power plug can cause fire or electric shock.
Install the refrigerator in a well-ventilated area.
- The more refrigerant there is in an appliance, the larger the room it should be installed in. If there's a refrigerant fluid leak, and the appliance is in a small room, the build up of combustible gases is more likely. This can cause fire or explosion. As a guide, for every 8g of coolant, you'll need at least 1 cubic metre of space in the room. The data plate inside the appliance tells you how much refrigerant your refrigerator contains.
Unplug the refrigerator before cleaning and servicing.
- Failure to do this can cause electric shock.
If you smell burning or see smoke coming from the refrigerator, disconnect the power immediately and please consult authorized service centre.
LED RADIATION
DO NOT VIEW DIRECTLY WITH OPTICAL INSTRUMENTS
CLASS 1M LED PRODUCT

Do not put glass bottles or containers in the freezer.
- When the contents freeze, the glass may break.
Do not touch the inside walls of the freezer or items stored in the freezer with wet hands.
- Your skin can become frozen onto the interior wall, or items stored in the freezer.
Do not open or close the doors by taking hold of the door handles with both hands.
- This may cause personal injury.
Do not touch the ice maker with your hand or a tool.
- The ice maker rotates automatically. This may cause personal injury or trouble.
Do not put your hand or things in the ice shooter.
- This may cause personal injury or trouble.

If there's a power cut, avoid opening the refrigerator frequently or putting unchilled food in it.
- This can cause the temperature in the refrigerator to rise and spoil food stored inside.
If you're not going to use the refrigerator for a long time, unplug it from the mains.
Also, be careful of the gap between the fridge and freezer doors, especially if they are both open at the same time.
- This may cause personal injury.
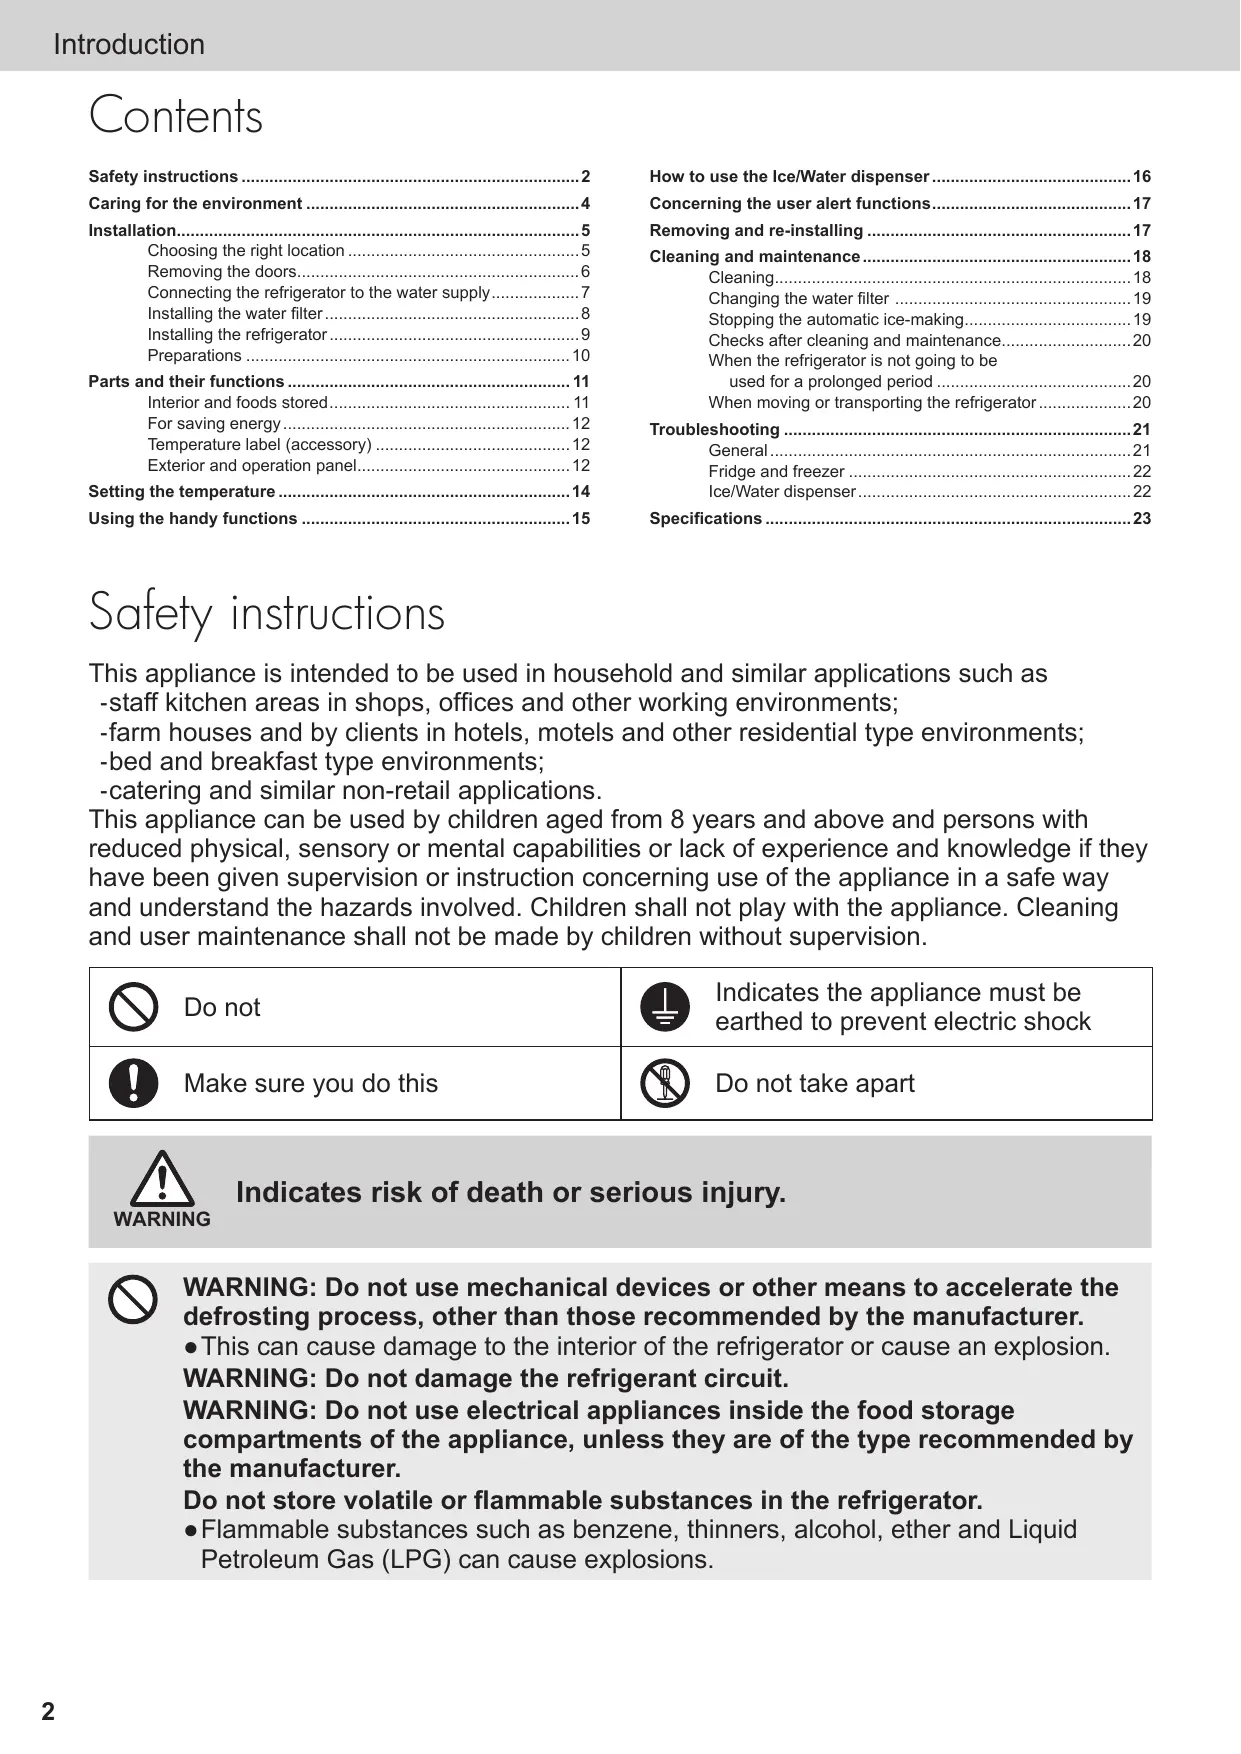
When opening the refrigerator, be careful not to pinch your fingers at the "pinch point" areas.
- This can cause personal injury.
Keep children from touching the ice maker and icebox.
- Otherwise, they may be injured.
Stop using this ice maker and contact an authorized service centre if discoloured ice was made during use.
Potential pinch point
Caring for the environment
Disposing of the packaging

Please recycle where possible (e.g. cardboard, plastic bags, adhesive tape and polystyrene) and make sure you dispose of all other packing materials safely.
Keep the packaging out of the reach of babies and young children, to avoid injury or suffocation.
Before disposing of your old appliance
Please follow either the disposal instructions from the manufacturer of the old appliance, or local disposal regulations for the appliance. Where this is not available, please follow the three step instructions below.
- Remove the plug from the socket.
- Cut the supply cord off, and safely dispose of it with the mains plug still attached.
-
Until the old appliance is collected, or you take it to a Recycling Centre, make sure it's out the reach of small children.
-
Remove all sealing materials from the door and leave all the shelves and drawers in place.
This way, children are less likely to climb in and become trapped.
Installation
Choosing the right location
Install the refrigerator in a location which satisfies the following criteria:
- Where there is a main water supply line nearby
- Where the refrigerator will not be exposed to direct sunlight
- Where the refrigerator will be at a distance from heating appliances, cooking appliances and other sources of heat
- A location which is well-ventilated and dry
- Where the floor is sturdy and level
Place a solid board underneath if the refrigerator is to be installed on top of a carpet or vinyl floor.
The board will protect the floor from becoming deformed and discoloured.
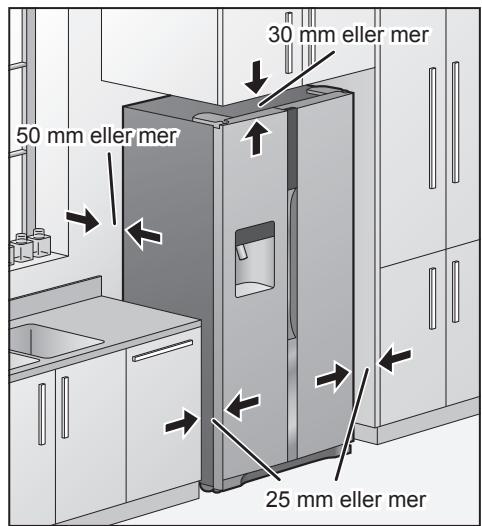
Provide clearance to allow heat to dissipate
Residual heat is always being emitted from the refrigerator while it is operating. Provide sufficient clearance around the refrigerator to allow this heat to dissipate so that its cooling ability is not impaired.
Dimensions (mm): W915 × D710 × H1860

Installing the spacers
Install the spacers on the back panel of the refrigerator to ensure the minimum amount of space required to allow the heat generated by the refrigerator.
Attach to the back panel of the refrigerator after removing the double-sided tape's release liner.
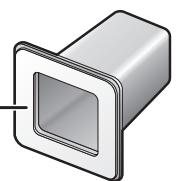
Spacer (accessory)
When the doors are completely open
When the inside drawers have been taken out
If the refrigerator will not pass through a doorway or entrance, its doors can be removed.
Before removing the doors, be absolutely sure to check that the power of the refrigerator has been turned off.
When you want to remove the doors, please contact your dealer, an authorized service centre or access to our Web site (http://panasonic.net).
Panasonic or its Authorized agent cannot be held responsible if you remove the doors by yourself.
Dimensions (mm): W910 × D610 × H1855 (Without Door)
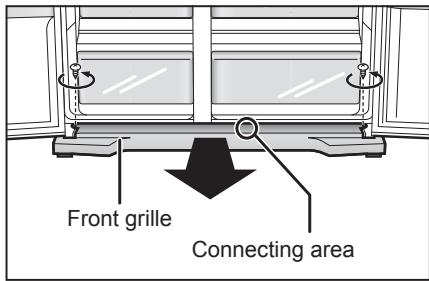
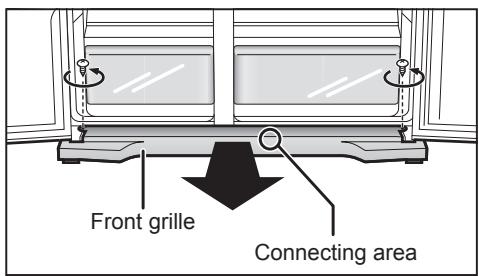
Removing the front grille
When the two doors are opened and the front grille is viewed from above, two screws – one on the left and the other on the right – will be seen.
Turn these screws counterclockwise, and remove them.
There is a connecting area slightly to the right of the centre of the front grille on its bottom.
Take hold of this area, and pull the grille toward you to remove it.
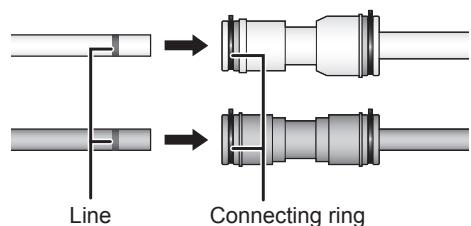
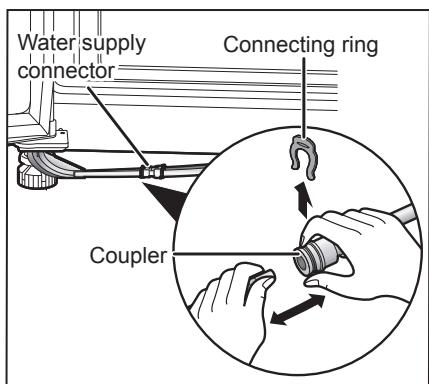
Disconnecting the water supply hoses
Remove the connecting ring (black) of the water supply connector, pressing the coupler and pull the water supply hose free.
- There are two water supply hoses, one for the Ice dispenser and one for the Water dispenser.
Disconnect both of them.
Reconnecting the water supply hoses
First insert the connecting ring (black) into the water supply connector, and then insert the water supply hose.
Insert the water supply hose into the water supply connector until the printed line on the hose is no longer visible.
- Two water supply hoses connect the same colour.
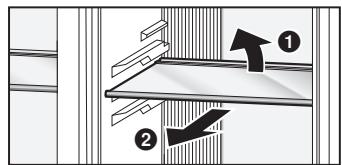
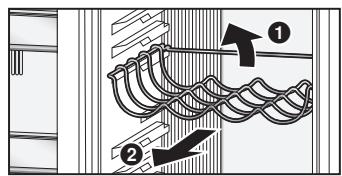
Removing the freezer door
When removing the door
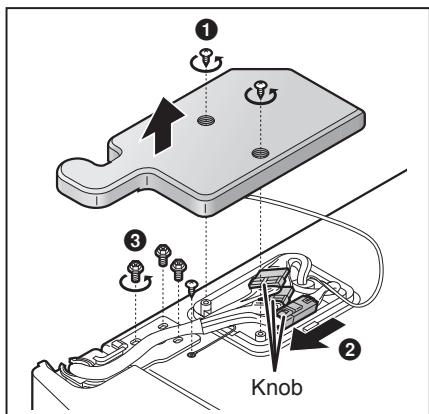
1 Remove the top hinge cover.
Turn the hinge cover screw counterclockwise, and remove it.
Disconnect the connecting cable.
While pressing on the knob, pull out the cable in the direction shown by the arrow.
3 Remove the top hinge.
Turn the hinge screws and the grounding screw counterclockwise, and remove them.
- When removing the top hinge, take care to support the door so that it will not topple forward.
4 Remove the hose guide, and remove the door.
Remove the hose guide from the bottom hinge in the direction shown by the arrow. And then lift the door straight up from the bottom hinge, and remove it.
- Pull out the water supply hoses so that it is completely disconnected.

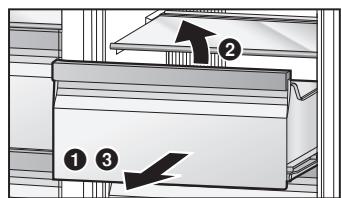
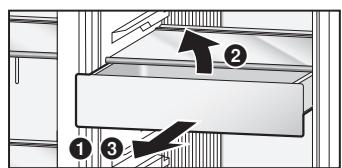
Removing the fridge door
When removing the door
- Ensure the door is in the closed position.
- Handle the removed door carefully to keep it safe from damage and impact.
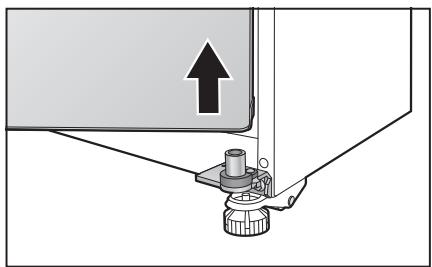
1 Remove the top hinge cover.
Turn the hinge cover screw counterclockwise, and remove it.
2 Disconnect the connecting cable.
While pressing on the knob, pull out the cable in the direction shown by the arrow.
3 Remove the top hinge.
Turn the hinge screws counterclockwise, and remove them.
- When removing the top hinge, take care to support the door so that it will not topple forward.
4 Remove the door.
- Lift the door straight up from the bottom hinge, and remove it.

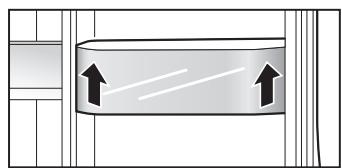
Attaching the doors and front grille
1 Follow the steps for removing the doors and grille in their reverse order.
2 Tighten up fixing screws after checking that the door is parallel to the body and cold air does not leak from around the gasket.
3 Tighten up screws to fix hinges using both the screwdriver (Phillips head) and hex wrench.
When installing the front grille and top hinge cover, be sure not to get the hoses and cord caught in. When attaching the front grille, insert the hoses into the guides inside the front grille.
Connecting the refrigerator to the water supply
Before connecting the refrigerator
A water pressure in the range of approx. 150kPa to 700kPa (22 psi to 102 psi) is must be to use the Ice/Water dispenser. If the refrigerator is to be installed in a location where the water pressure is below approx. 150kPa (22 psi), install a pressure pump to boost the natural water pressure.
Connect potable water supply only.
Parts required for the connection

Connecting the refrigerator
Before proceeding any further, be absolutely sure to check that the power plug has been disconnected from the power outlet. And check the main water supply line has been shut off.
When you want to connect the refrigerator to the water supply, please contact your dealer, an authorized service centre or access to our Web site (http://panasonic.net).
We could not be held responsible if you connect the refrigerator by yourself.
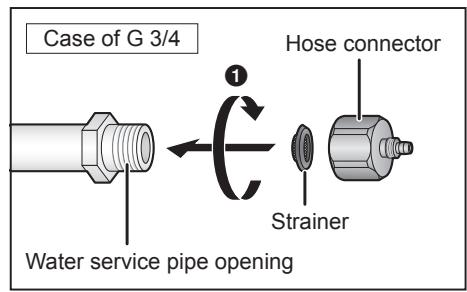
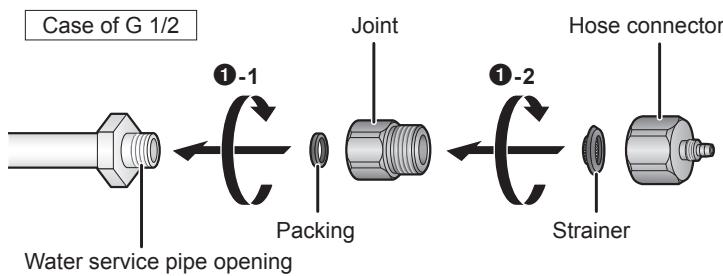
Attach the hose connector to the water service pipe opening.
Turn the hose connector clockwise to attach it.
- After tightening up the hose connector as far as it will go by hand, use a tool to further tighten the hose connector through another half-turn or so.
- Check that the strainer is fitted inside the hose connector.
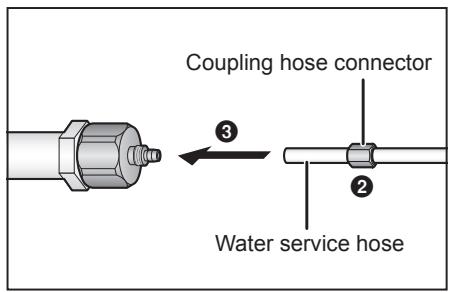
Insert the coupling hose connector into the water service hose.
Insert the water service hose into the end of the hose connector.
- The water service hose is firmly inserted into the end of the hose connector.
4 Tighten the coupling hose connector to the hose connector.
Turn the coupling hose connector clockwise to attach it.
- Tighten the coupling hose connector until space is lost between coupling hose connector and hose connector.
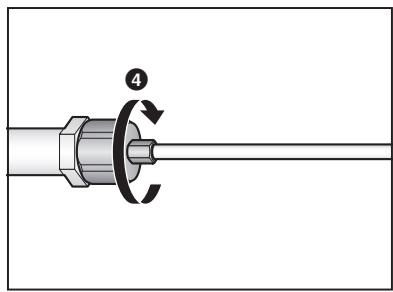
After the connection ends, turn on the main water supply line, and check that no water is leaking.
Notes:
- Failure to follow the steps as given above may cause water to leak.
- Coil the excess length of the water service hose at the back of the refrigerator.
Attach the hose connector to the G 1/2 type water service pipe opening.
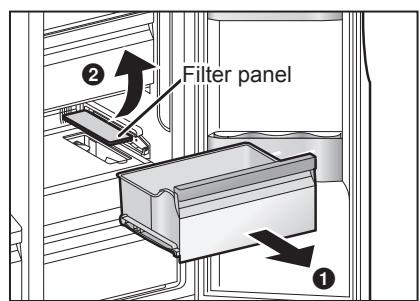
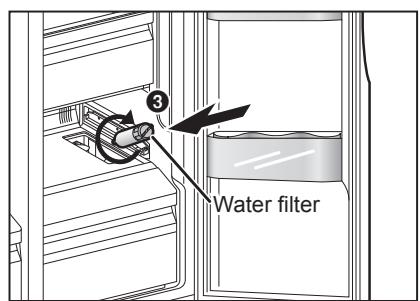
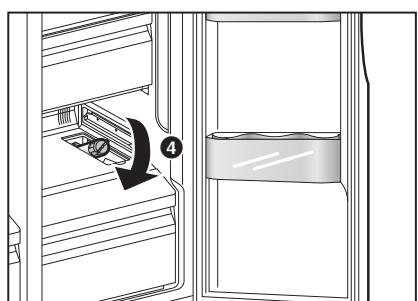
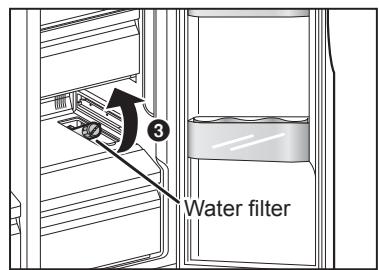
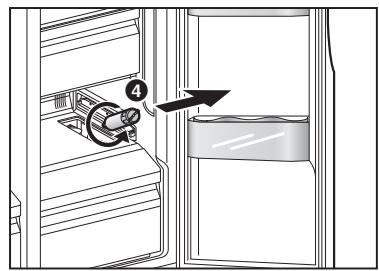
Installing the water filter
The water filter is not installed at the time the refrigerator is purchased. Install the water filter provided with the refrigerator.
1 Remove the drawer of the Vitamin-Safe Zone.
2 Remove the filter panel.
Place your fingers in the cutout at the front of the filter panel, and remove the filter panel.
Install the water filter and rotate it 90 degrees clockwise.
Push the water filter down, and put the filter panel back in place.
Note:
- Run water through the Water dispenser until the water runs clear (15 glass (approx. 3 litre)). This will clean the water supply system and remove air from the water supply hose.
The refrigerator comes on four casters to enable it to be moved easily.
Carefully read through the section "Choosing the right location", and install the refrigerator in the best location. Once the installation location has been decided upon, secure the refrigerator, and adjust it so that it is level.
Removing the front grille
When the two doors are opened and the front grille is viewed from above, two screws – one on the left and the other on the right – will be seen.
Turn these screws counterclockwise, and remove them.
There is a connecting area slightly to the right of the centre of the front grille at the bottom. Take hold of this area, and pull the grille toward you to remove it.
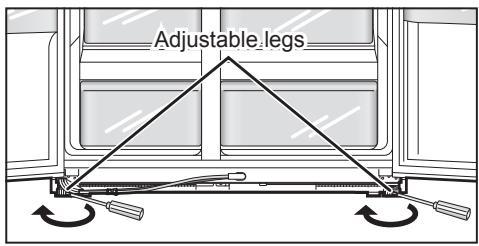
Securing the refrigerator
Insert a flat screwdriver into a slot on the adjustable legs at the left and right, turn them in the direction shown by the arrows to lower the legs to the floor level, and then secure the legs firmly.
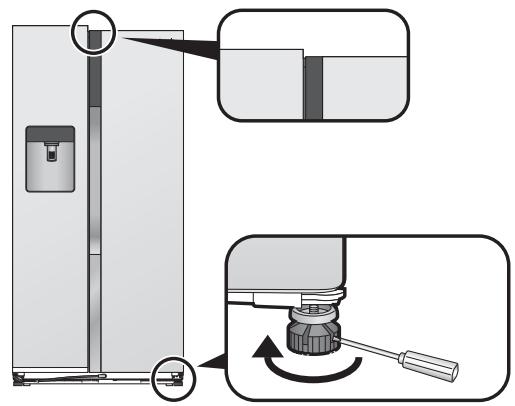
Levelling the refrigerator
Turn the adjustable legs so that the refrigerator is installed flush with the floor.
If the left and right doors are not flush with each other, turn one of the adjustable legs, and bring the doors into alignment.
If the left door is lower than the right door
Insert a flat screwdriver into a slot on the adjustable leg on the left, turn it in the direction shown by the arrow, and adjust.
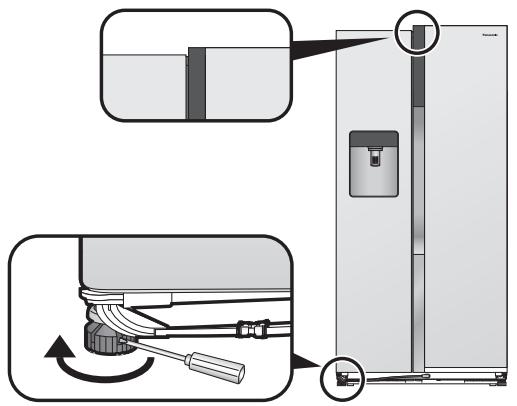
If the right door is lower than the left door
Insert a flat screwdriver into a slot on the adjustable leg on the right, turn it in the direction shown by the arrow, and adjust.
Attaching the front grille
Follow the steps for removing the grille in their reverse order.
- Take care not to pinch or damage the water supply hose.
Maintenance
Remove all the packing materials and tapes.
Wipe the inside of the refrigerator using a soft cloth which has been dipped in lukewarm water and then wrung out.
Wash and completely dry the icebox before installing it. (Do not use a dish dryer, hair dryer or other appliance when drying.)
Connecting the power plug to the power outlet
When the power plug is connected to the power outlet, the temperature display starts flashing as shown in the figure on the right, and cooling starts inside the refrigerator.
The temperatures displayed at this time are not the actual temperatures.
When the temperature of the fridge reaches 8^ , the freezer reaches -12^ and the Vitamin-Safe Zone reaches
5^ C , the temperature display stops flashing and lights, and it shows the actual temperature.
It takes about half a day to reach the set temperatures (when the room temperature is around 32^ , there is no food inside the refrigerator, and the doors are closed).
Place the food inside the refrigerator only after it was confirmed that the refrigerator compartment had been cooled.

Notes:
Cooling may take longer in the summer months or at other times when the room temperature is higher.
- While the temperature display is flashing, the alarm sounds to warn that the temperature has risen. The alarm can be turned off by pressing # .
If you need to unplug the refrigerator, wait at least 10 minutes before you plug it back in again. You might damage the compressor.
The Ice/Water dispenser and automatic ice maker
Ice must first be made by the automatic ice maker before the Ice/Water dispenser can start dispensing ice. The automatic ice maker can make six cubes of ice at a time and about 42 cubes of ice a day (although this will differ depending on the prevailing conditions).
When using the ice maker for the first time, it takes about 8 hours for ice to be made.
Automatic ice-making stops as soon as the icebox becomes full.
Note:
- When using the Ice/Water dispenser and automatic ice maker for the first time, the water or ice may be discoloured or smell: this is normal and not indicative of any trouble. When water goes around through the water filter and pipes and other parts inside the refrigerator, these symptoms will disappear so keep supplying the water and removing the ice from Ice/Water dispenser until the discolouration/smell dissipates.
In some homes, this procedure may have to be repeated a number of times.
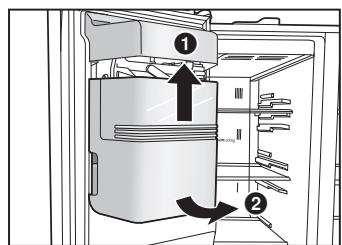
How to remove the icebox
- Raise the icebox slightly, and pull the bottom part out toward you. (fig 1)
How to set the icebox
- First align its top part with the automatic ice maker, then push down its bottom part and insert it firmly into place below as far as it will go.

- Be sure to hold the icebox with both hands.
- Be sure to confirm that the icebox has been set firmly when installing. (Fall of icebox may cause injury or trouble.)
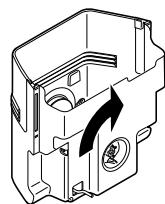
When the icebox can not be installed correctly
- Insert the icebox to the original position completely after rotating the knob 90 degrees which located in the back of icebox as indicated in fig 2.
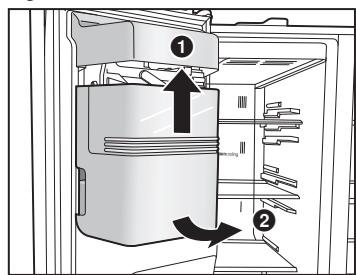
fig 1
fig 2
Parts and their functions
Interior and foods stored
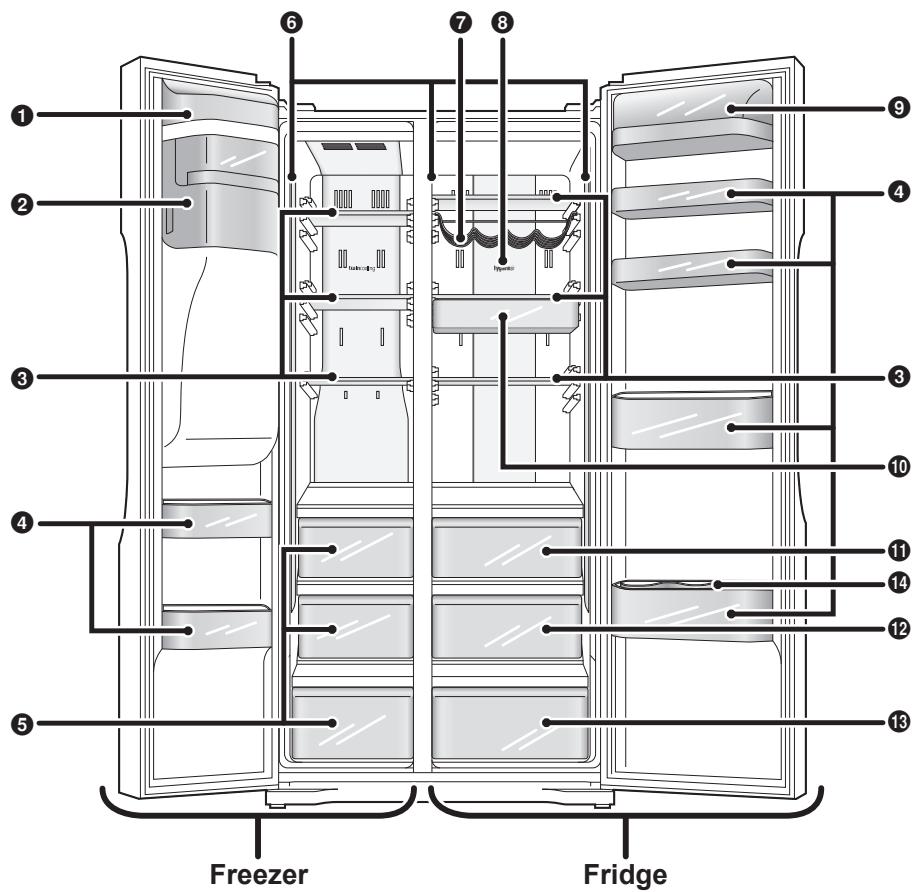
Automatic ice maker
Icebox
Glass shelves
The positions of these shelves (except for the third shelf from the top in the freezer) can be adjusted.
Door shelves
The positions of these shelves (only the second shelf from the bottom in the fridge) can be adjusted.
Egg tray, bottle stopper provided (one each).
5 Drawers
6 Front tower LED light
Wine rack
3 Hygieneair Deodorizing filter.
9 Sealed case door shelf
10 Suspend shelf
1 0^ Zone
12 Vitamin-Safe Zone
Select temperature 0^ to 5^ , and blue, green and white LED lights provided.
16 5^ Fresh Zone
Blue and green LED lights provided.
14 Bottle stopper
| Freezer
-17 °C to -25 °C | Frozen foods, meats, fish, ice cream, etc. | |
| Fridge
1 °C to 7 °C | Butter, dairy products, eggs, drinks, seasonings, cooked foods, etc. | |
| 0° Zone | Meats, fish, ham, sausages, etc. | |
| Vitamin-Safe Zone | Vegetables, fruits, etc. stored at low temperatures | |
| 5° Fresh Zone | Vegetables, fruits, etc. | |
Notes:
- The 0^ Zone and 5^ Fresh Zone temperatures change depending on the temperature set for the fridge.
-
A much larger space can be made available for use inside the freezer by removing the first and second drawers.
-
Install the refrigerator in a dry, cool and well-ventilated location. The colder the ambient temperature, the better the efficiency. (Please refer to Page 6 for dimensions and clearance)
-
The combination of drawers and shelves that result in the largest in volume and the most efficient use of energy for the refrigerator.
-
Remove the first and second drawers from the top and icebox in the freezer.
-
All shelves are the same position when you purchased.
-
Remove the icebox, then shut down the automatic ice-making function and the ice dispenser. (Please refer to Page 20)
- Do not over fill the refrigerator to allow the air to circulate.
- Open the doors only when necessary and as briefly as possible.
- Occasionally clean the ventilation openings at the bottom of the refrigerator with a vacuum cleaner, etc. (Take care not to damage the water pipe or refrigerant pipe inside the cover)
- When setting to "Super Freeze Mode", power consumption will be increased.
Temperature label (accessory)
- This label applies only to the refrigerator purchased in France.
Temperature label
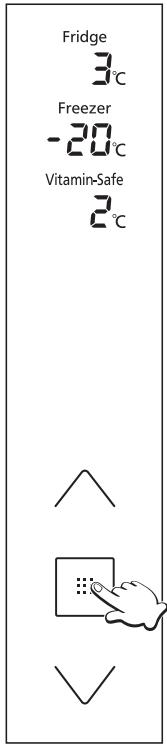
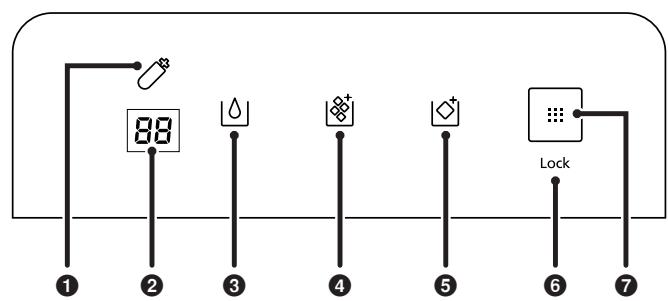
Exterior and operation panel
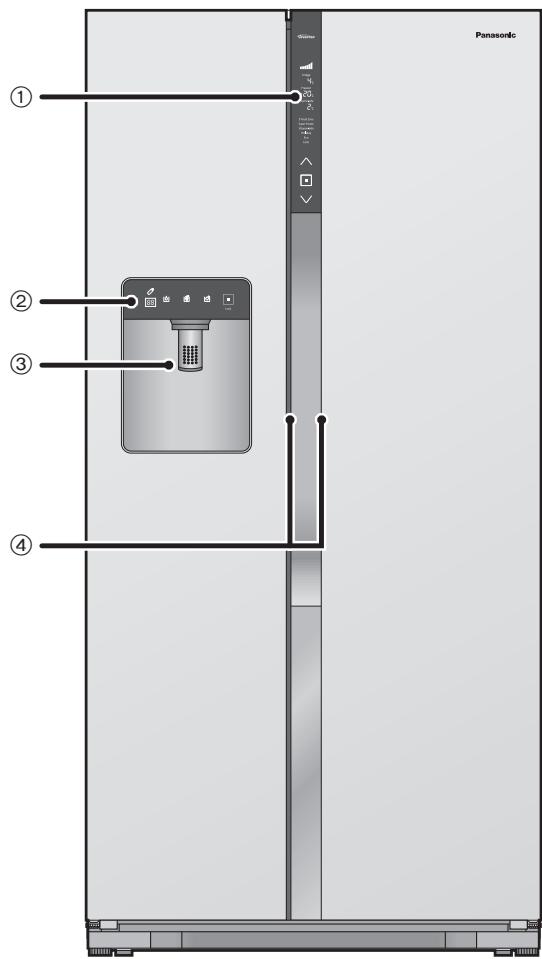
① Control panel
② Ice/Water dispenser panel
③ Ice/Water dispenser
④ Door handle
Ice/Water dispenser panel
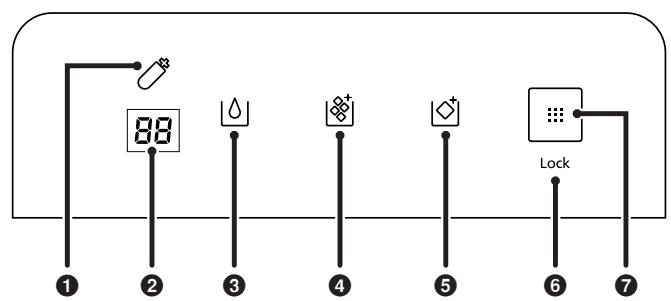
Display area
Water filter change icon This indicates that it is time to change the water filter.
2 Service engineer display This does not appear during normal operation.
3 Filtered water dispense icon
4 Crushed ice dispense icon
Ice cube dispense icon
Child Lock icon
Control area
Ice/Water dispenser button
Control panel
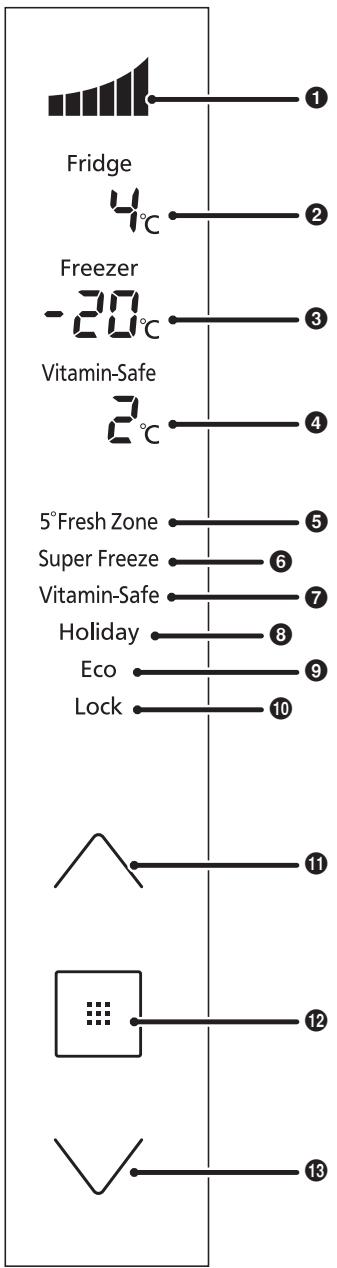
Display area
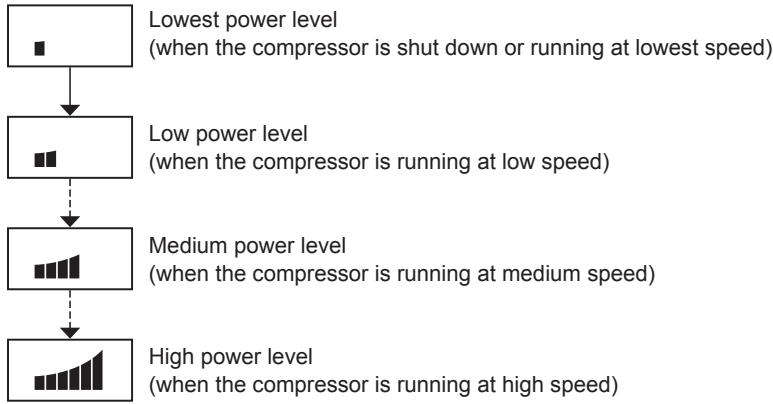
Cooling power level
Cooling power by the refrigerator is indicated here.
Fridge temperature
3 Freezer temperature
4 Vitamin-Safe Zone temperature
5° Fresh Zone Mode
6 Super Freeze Mode
7 Vitamin-Safe Mode
3 Holiday Mode
Eco Mode
10 Child Lock
Control area
Up button
12 Set button
18 Down button
Notes:
- Normally the panel displays are off. Displays appear when the buttons are operated, or the doors are opened.
- The displayed temperature may differ from the actual temperature.
- The buttons are operated by touching them.
- This refrigerator uses a microprocessor to control the temperature.
The temperature inside the refrigerator varies depending on such factors as changes in the room temperature, the speed at which the compressor is operating, how frequently the doors are opened and closed, and how much food is stored inside and how it is stored.
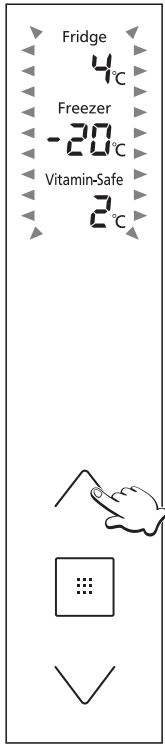
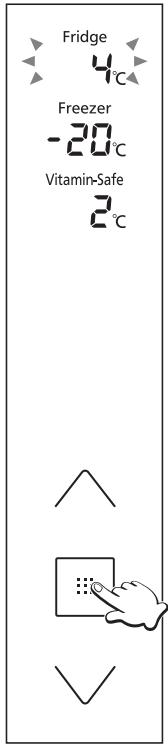
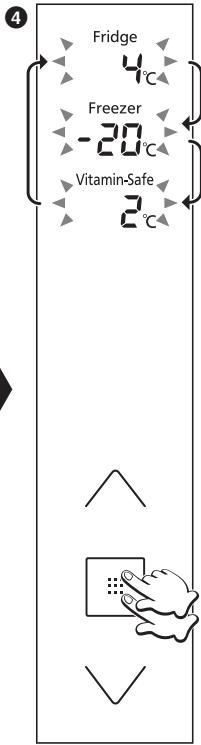
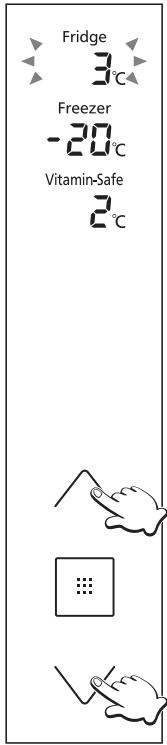
Setting the temperature
The temperatures of the fridge, freezer and Vitamin-Safe Zone can be changed. At the time of purchase, the temperatures are set as shown below.
Fridge: 4^ Freezer: -20^
Vitamin-Safe Zone: 2^
0
2
3
5
6
The control panel lights up, the temperature inside the refrigerator is displayed.
The temperature display start flashing, indicating that the temperatures can be set.
The temperature set for the fridge starts flashing.
Each time the button is pressed, the flashing display changes by one step in the sequence of fridge, freezer and Vitamin-Safe Zone.
Adjust the temperature.
- Press to raise the temperature and to lower it.
The display stops flashing and lights up, indicating that the temperatures are now set.
- Approximately 30 seconds later, the control panel goes off.
Note:
- The display in 1 is restored if no operations are performed for 5 or so seconds during the setting process.
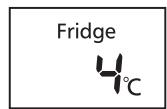
Fridge
Set the temperature for the inside of the fridge.
Any temperature within the range from 1^ to 7^ can be set.
Notes:
- When the temperature is set at 1^ for a prolonged period, some food may freeze.
- In the Holiday Mode, the temperature is not displayed, and the temperature cannot be set.
- In the Eco Mode, the temperature cannot be set either.
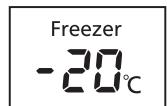
Freezer
Set the temperature for the inside of the freezer.
Any temperature within the range from -17^ to -25^ can be set.
Note:
- In the Eco Mode, the temperature cannot be set.
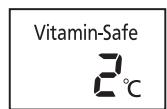
Vitamin-Safe Zone
Set the temperature of the Vitamin-Safe Zone.
Any temperature within the range from 0^ to 5^ can be set.
Notes:
- When the temperature is set between 0^ and 1^ for a prolonged period, some food may freeze.
- In the Holiday Mode, the temperature is not displayed, and the temperature cannot be set.
- In the Eco Mode, the temperature cannot be set either.
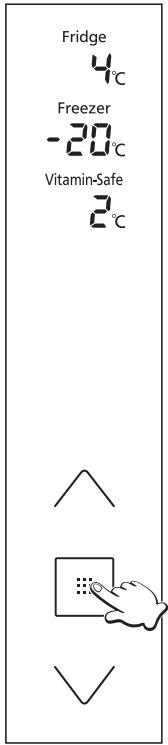
Using the handy functions
This refrigerator comes with a number of useful functions for specific applications.

The control panel lights up.
The function display start flashing, indicating that the functions can be set.
3 “5°Fresh Zone” starts flashing.
4 Select the function to be used.
The display corresponding to the selected function stops flashing and lights up, indicating that the function is set.
Each time the button is pressed, the display switches from "on" to "off".
On: The function is set.
Off: The function is released.
- Approximately 30 seconds later, the control panel goes off.
Notes:
- The display in 1 is restored if no operations are performed for 5 or so seconds during the setting process.
If the temperature display is flashing, wait about 5 seconds for the display to light up before proceeding with the operations above.
5^ Fresh Zone Mode
5°Fresh Zone
Pushing the 5^ Fresh Zone turns on the Vitamin LED lights (blue, green) to maintain the vitamin C contained in vegetables and fruits.
Super Freeze Mode
Super Freeze
In this mode, the freezer can be cooled rapidly, enabling the fresh foods, etc. which are placed there to be frozen. The Super Freeze Mode is automatically released after about 50 hours.
Notes:
-
When the Super Freeze Mode is set, the temperature inside the freezer may drop below the set temperature.
-
The compressor operates at high speed.
-
When the Super Freeze Mode is set while the Eco Mode is established, the Eco Mode is temporarily released. When Super Freeze Mode ends, operation in the Eco Mode will be restored.
-
The effect on the stored food can be reduced if setting the Super Freeze Mode several hours before storing the food in the freezer compartment.
-
The following items are recommended in order to exert the maximum freezing capacity.
① Set the Super Freeze Mode 24 hours before storing the food.
② Place the food on the second drawer from the top or on the glass shelf.
(A bigger freezing capacity can be exerted if placing the food directly on the glass shelf.)
- The maximum freezing capacity within 24 hours is written in the rating label.
| Vitamin-Safe Mode | Pushing the Vitamin-Safe Zone turns on the Vitamin LED lights (blue, green, white) to maintain the vitamin C and D contained in vegetables and fruits. |
| Vitamin-Safe | |
| Holiday Mode | Set this mode when the fridge is not going to be used for a prolonged period such as during a long vacation or when only the freezer is to be used. |
| Holiday | When this mode is set, the fridge temperature is not displayed. |
| When this mode is set, the Vitamin-Safe Zone temperature is not displayed. |
| Notes: |
| • Before using the Holiday Mode, empty out the fridge, and close its door. |
| • For hygiene reason, the temperature inside the fridge is kept at about 15 °C while the Holiday Mode is set. |
| • The freezer is cooled in the usual way. |
| Eco Mode | Set this mode when the freezer is not going to be used much such as during the winter months or at night. |
| Eco | Note: |
| • The Eco Mode cannot be set while the Super Freeze Mode is set. |
| Child Lock | The buttons on the control panel and Ice/Water dispenser panel can be locked. When the Child Lock is set, “Lock” is displayed on the control panel and Ice/Water dispenser panel. |
| Lock | To release this mode, hold down on the control panel for at least 3 seconds. |
How to use the Ice/Water dispenser
The Ice/Water dispenser can dispense water, crushed ice or ice cubes.
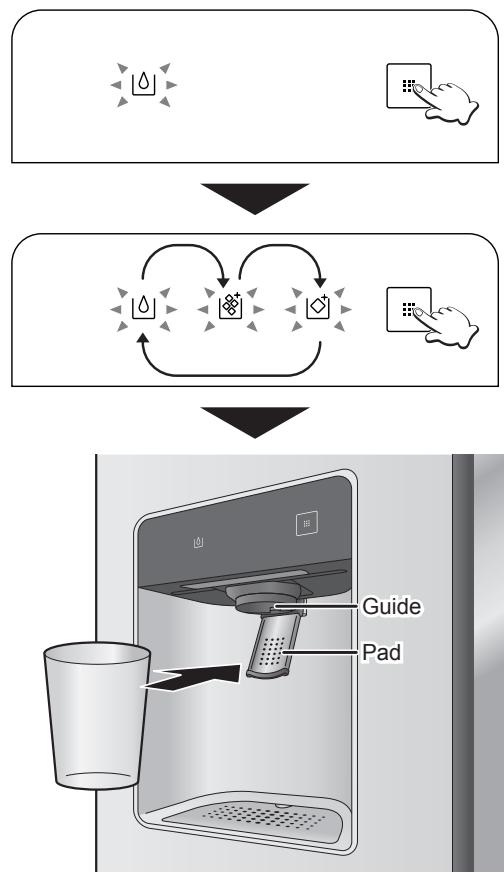
The Ice/Water dispenser panel lights up.
The icon corresponding to what was dispensed last appears.
Each time the button is pressed, the icon changes.
Keep pressing the button until what you want to be dispensed is lit up.
Place a cup against the pad and push it gently in.
Water or ice is now dispensed from the Ice/Water dispenser.
- During the dispensing, keep the cup or other container raised near the guide to ensure that the water or ice is not to be sprayed or spilt.
The water that comes out of the Water dispenser is chilled to the appropriate temperature, but if water with a lower temperature is required, first place ice in a cup or other container before dispensing water.
To prevent water or ice from splattering, pull the cup slowly away from the pad after all water or ice has been dispensed.
- More ice may be dispensed for a few moments even after the cup has been pulled away from the pad. This is normal and not indicative of any malfunction.
- Some ice or water that has remained into the guide may drop or run down for a few moments after it has been dispensed. This is normal and not indicative of any malfunction.
Notes:
- About 10 seconds after the button is operated, the Ice/Water dispenser panel goes off. When this panel is off, pressing the pad in has no effect.
- In the Child Lock, "Lock" is displayed under the button.
- The water that comes out of the Water dispenser at the beginning may have a slightly higher temperature.
- Place only the ice made by this refrigerator – and no other type of ice – in the icebox. Trouble may occur if you fail to heed this warning.
- If the ice maker produces ice that is too small, the amount of water supplied to the ice maker can be adjusted. Contact your dealer or an authorized service centre.
- If you continue pushing the pad for more than 30 seconds, the Ice/Water dispenser will automatically stop dispensing water or ice.
Concerning the user alert functions
The following user alert functions are activated when a door has been left ajar for a prolonged period of time or when the temperature inside the refrigerator has risen.
| Temperature display | Alarm | Front tower LED light |
| Door ajar | Continuous for 1 minute | Blinks | Sounds once | Blinks once |
| Continuous for 3 minutes | Blinks | Sounds twice | Blinks twice |
| Continuous for 5 minutes | Blinks* | Sounds continuously | Blinks continuously |
| Temperature rise inside the refrigerator | Freezer: -12 °C or more | Blinks* | Sounds continuously | Normal operation |
| Fridge: 8 °C or more | Blinks* | Sounds continuously | Normal operation |
*Blinks for 30 seconds every 30 minutes.
Removing and re-installing
Glass shelves
Raise the back part of the shelf slightly, and pull out the shelf.
To re-install the shelf, align it with the left and right guides, and push it into place.
Drawers
Pull the drawer out all the way, and while raising the back part of the drawer slightly, and pull out the drawer.
To re-install the drawer, align it with the left and right guides, and push it into place.
Door shelves and sealed case door shelf
Push the shelf up from below, and remove it.
To re-install the shelf, align the left and right protrusions, and insert the shelf firmly down until it will go no further.
Wine rack
Raise the back part of the wine rack slightly, and pull out the rack.
To re-install the rack, align it with the left and right guides, and push it into place.
Suspend shelf
Pull the suspend shelf out all the way, and while raising the back part of the suspend shelf slightly, and pull out the suspend shelf.
To re-install the suspend shelf, align it with the left and right guides, and push it into place.
Icebox
Raise the icebox slightly, and pull the bottom part out toward you.
To re-install the icebox, first align its top part with the automatic ice maker, then push down its bottom part and insert it firmly into place below as far as it will go.
- When removing the icebox, take care not to spill the ice inside.
- Before re-installing the icebox, take out the ice inside.
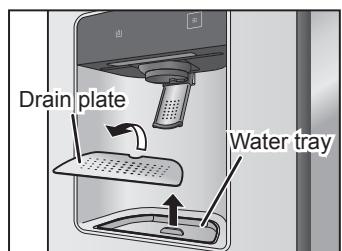
Ice/Water dispenser drain plate and water tray
Place your fingers in the cutout at the back of the drain plate, and remove the tray.
Take hold of the protrusion in the water tray, and remove the tray.
When re-installing the trays, install the water tray first, and then install the drain plate.
Cleaning and maintenance
Conduct periodic cleaning and maintenance to ensure that the refrigerator will be kept clean and that it will continue to operate for a long time to come.

Before cleaning or conducting maintenance, be absolutely sure to disconnect the power plug from the power outlet. Do not connect or disconnect the power plug with wet hands. Doing so may result in an electric shock or injury.

Do not use the following items for cleaning:
- Alkaline cleaning agents (these may dissolve the plastic parts)
- Abrasive cleaners, soap powders, very hot or boiling water, brushes, acids, benzene, paint thinners, alcohol, etc. (these may mar the surfaces, paint and plastic parts)
Cleaning
Wipe off easily removable dirt using a cloth dipped in lukewarm water.
Wipe off stubborn dirt using a cloth dipped in some diluted neutral detergent used in the kitchen.
Then take up the remaining detergent using a cloth dipped in lukewarm water.
To complete the cleaning, be absolutely sure to wipe the surfaces dry to take up the remaining moisture.
Do not use cleaning agents (containing abrasive cleaners, or chemical mixture), and wipe off food stains, seasoning or dirt on the door as soon as possible.
Interior, drawers, glass shelves and door shelves
Be absolutely sure to wipe off edible oils, butter and other types of fats and oils on the plastic parts.
Otherwise, the plastic parts may be damaged. The drawers, glass shelves and door shelves can be removed. If they are very dirty or smelly, remove and wash them.
Door opening seal
A dirty or damaged seal will allow the cold air inside to escape.
As soon as the seal becomes dirty, wipe off the dirt immediately.
Icebox
If the icebox contains old ice or ice cubes clumped together, remove it, and throw out the ice.
Ice/Water dispenser
The drain plate and water tray can be removed. At periodic intervals, throw out the water which has collected in the water tray.
Exterior of refrigerator
If the exterior becomes dirty, wipe off the dirt. Also, allowing dust to accumulate on the power plug can cause a fire. At periodic intervals, remove the dust using a dry cloth, etc.
Control panel and Ice/Water dispenser panel
Wipe these panels using a soft cloth which has been dipped in lukewarm water and then wrung out.
The control panel and Ice/Water dispenser panel are made from delicate materials.
As such, take care not to damage their surfaces.
Note:
- Do not wash the drawers, glass shelves, door shelves, or other parts in a dishwasher. Doing so will cause the gilt on the parts or their plating to peel off or the parts to be damaged.
Change the water filter periodically. As a rule of thumb, it should be changed once every six months.
When it is time to change the filter, the " icon appears on the Ice/Water dispenser panel.
This time differs depending on the quantity of water used as well as the quality and pressure of the water, and it may be much shorter than six months.
Also change the water filter under the following circumstances:
- When the ice or water have odours or an unpleasant taste (this means that the filter capacity is reduced)
- When the amount of water entering the refrigerator has diminished (this means that the filter is clogged)
How to change the filter
1 Remove the drawer of the Vitamin-Safe Zone.
2 Remove the filter panel.
Place your fingers in the cutout at the front of the filter panel, and remove the filter panel.
③ Tilt the water filter slightly upward.
4 Turn the water filter counterclockwise by 90 degrees, and pull it toward you.
Install the new water filter.
Follow the steps for removing the filter in reverse.
With " " displayed on the Ice/Water dispenser panel, hold down on the Ice/Water dispenser for at least 3 seconds.
The " "icon on the Ice/Water dispenser panel goes off.
Notes:
- When the water filter has been removed, the water inside it may spill. If water has spilled, remove the 5^ Fresh Zone drawer and wipe up the water at the bottom of the refrigerator.
- When a new water filter is to be purchased, ask your dealer or an authorized service centre to supply you with one. Water filter type : CNRAH-257760

Stopping the automatic ice-making
The automatic ice-making function can be shut down when, for instance, it is not going to be used for a prolonged period of time to dispense ice.
Remove the icebox, and set the switch on the inside of the automatic ice maker to the OFF position.
Note:
- After the switch has been set to the OFF position, return the icebox to its original position. Even after the switch has been set to OFF, the ice remaining on the ice-cube tray will be deposited in the icebox.
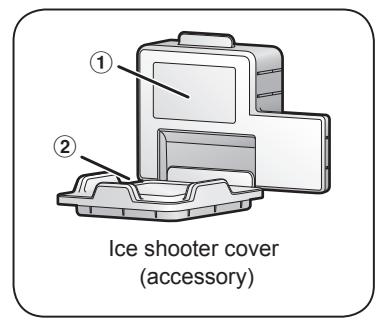
Using the freezer with the icebox removed
When the icebox is removed, large food items can be placed on the glass shelves of the freezer. To use the freezer with the icebox removed, take the steps below, and shut down the Ice dispenser.
1 Shut down the automatic ice-making function.
Display " 1 " on the Ice/Water dispenser panel.
Hold down for at least 3 seconds.
4 Attach the ice shooter cover.
For safety and energy saving, please attach the ice shooter cover provided with the refrigerator to the ice dispensing area.
The ice shooter cover consists of 2 parts. Attach ① first and then attach ②
Notes:

Is the supply cord damaged?
Has the power plug become hot?
Is the power plug firmly connected to the power outlet?
If the supply cord is damaged, remove the power plug from the socket and contact your dealer or an authorized service centre.
If LED or LED cover is damaged or if anything appears questionable, contact your dealer or an authorized service centre. Do not attempt to repair, replace or disassemble any damaged parts, etc. yourself.
When the refrigerator is not going to be used for a prolonged period
At times like this, disconnect the power plug. Leave the refrigerator doors ajar for two or three days to dry out the interior and prevent odours and mold.
When using it again, please supply the water (15 glass (approx. 3 litre)) and remove the ice (about 40 cubes) from Ice/Water dispenser until the water and ice will be clear.
When moving or transporting the refrigerator
Before moving or transporting the refrigerator
First, ensure the main water supply line has been shut off.
Remove all the food and ice inside the refrigerator, and disconnect the power plug.
1 Disconnect the water service hose from the hose connector.
Have a container ready to catch the water which will spill out from inside the water service hose.
- Also remove the hose connector attached to the water service pipe opening, and keep it in a safe place.
2 Remove the front grille.
③ Disconnect the two water supply hoses, which protrude from the area underneath the freezer door, from the water supply connectors.
Remove the connecting rings (black), and then pull out the water supply hoses.
Water will spill out from inside the water supply hoses so have a container ready to catch it.
4 Raise the adjustable legs, and pull the refrigerator toward the front.
Drain off the water from the drain outlet at the bottom of the rear panel.
Place a container under the drain outlet, tilt the refrigerator toward the rear, and drain off the water from the drain outlet.
6 Re-install the front grille.
Follow the steps for removing the front grille in reverse.

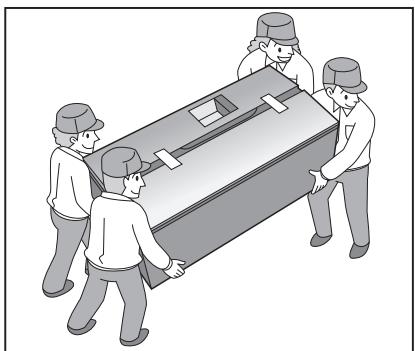
Moving or transporting the refrigerator
The refrigerator must be transported by at least four persons.
Each person takes hold of the refrigerator at one of its four corners.
- Do not take hold of the doors.
- Tape the doors completely shut so that they will not open.
Note:
- Bear in mind that water remaining inside the refrigerator may spill out.
Troubleshooting
If you feel that the refrigerator is not working properly, check out the following points first. If the trouble persists, disconnect the power plug and contact your dealer or an authorized service centre.
General
| You hear unusual sounds from the refrigerator. | ·Has the refrigerator been installed on a sturdy and level floor?
·Have sufficient clearances been provided around the refrigerator?
·Is anything vibrating on the top of the refrigerator?
·It's normal to hear some noises when the refrigerator starts or stops operation. |
| You hear a sound after the compressor has shut down. | ·This is normal, and is often caused by refrigerant flowing back to the compressor. |
| You hear a sound after you have opened or closed the door. | ·This is normal, and is due to the difference in air pressure between the inside and outside of the refrigerator. |
| You hear the sound of air or water flowing after you have opened the door. | ·This is caused by refrigerant flowing the internal pipework. |
| You hear a clicking sound each time the refrigerator's power is turned on. | ·This is the sound made by the activation of the three-way valve, and is quite normal. |
| You hear a continuous whining sound. | ·This sound is heard while the fan for circulating the cold air is operating.
·Has the refrigerator been set to the Super Freeze Mode?
In the Super Freeze Mode, the fan for circulating the cold air runs at high speed so it makes a loud noise.
·Has the food been packed too tightly together or is the room temperature high?
In cases like these, the fan for circulating the cold air runs at high speed so it makes a loud noise. |
| Sounds are heard from the automatic ice maker. | ·These are the sounds of the ice dropping into the icebox.
This is normal sound. |
| The compressor is quite loud. | ·Has the refrigerator been set to the Super Freeze Mode?
In the Super Freeze Mode, the compressor runs at high speed so it makes a loud noise.
·Has the food been packed too tightly together or is the room temperature high?
In cases like these, the compressor runs at high speed so it's normal for the compressor to be louder. |
| The compressor has been running for a long time. | ·When the power plug has been connected for the first time, the compressor runs longer than usual in order to cool down the inside of the refrigerator until the set temperatures are reached.
·Has the refrigerator been set to the Super Freeze Mode?
·Have the doors been opened and closed frequently? Are the doors completely shut?
·Have the food items been packed too tightly together or is the room temperature high?
·When many food items are placed at a time, the compressor will need to run for a longer. |
| Condensation forms on the outside of the refrigerator. | ·Condensation may form when the humidity in the room is high and is normal. Wipe it off using a dry cloth. |
| The outside of the refrigerator feels hot to the touch. | ·Some heat is normal as the refrigerator incorporates a heat-dissipating pipe to prevent condensation. |
| The controls on the control panel cannot be operated. | ·Is the power to the refrigerator on?
·Has the refrigerator been set to the Child Lock? |
| The LED light does not come on. | ·Has the refrigerator been set to the Holiday Mode?
In the Holiday Mode, the front tower LED light of the fridge does not come on.
·Is the power to the refrigerator on? |
| The alarm sounds, and the temperature display of the control panel and front tower LED light flashes. | ·One or both of the refrigerator's doors have been left ajar. Close the doors. |
Fridge and freezer
| The fridge is not chilling (and the freezer is not freezing). | • Is the power to the refrigerator on? |
| The fridge is not chilling (and the freezer is not freezing) satisfactorily. | • Is the set temperature too high?
• Is the refrigerator exposed to direct sunlight or positioned near a heating appliance?
• Have sufficient clearances been provided around the refrigerator?
• Have the food items been packed too tightly together or is the room temperature high?
• Have the doors been opened and closed frequently?
• Are the doors completely shut?
• Has the refrigerator been set to the Holiday Mode?
• When warm food is put inside the refrigerator, the temperature will rise temporarily.
• During the cold season or when the room temperature is low, it may feel as if the refrigerator is not chilling. |
| There is a difference between the set temperature and actual temperature. | • Has the refrigerator been set to the Super Freeze Mode?
• When warm food is put inside the refrigerator, the temperature will rise temporarily. |
| No ice is made. | • Has the main water supply line been turned on?
• Has the water service hose been connected properly?
• Is the power to the refrigerator on?
• Is the switch of the automatic ice maker at the ON position? |
| Food in the fridge freezes. | • Is the set temperature for the fridge too low?
• Has the food been placed at the back of the fridge?
• The area near the back wall is where the temperatures are coldest so avoid placing food which may freeze easily here. |
| Condensation forms in the fridge and drawers. | • The fridge maintains a high humidity to keep vegetables and other food items fresh.
Condensation may form when the door has been opened and closed frequently or when it has not been shut completely. Wipe off the condensation using a dry cloth. |
| It is hard to open the freezer door. | • The difference in air pressure between the inside and outside of the freezer may sometimes make it hard to open the freezer door. Wait a few moments, and then try opening the door. |
| It smells inside the refrigerator. | • Were any food items with strong odours sealed before they were placed in the fridge?
Place the items inside a sealed container and store them or store them on the sealed case door shelf.
• Odours may stick to the surfaces inside the refrigerator. Wipe the surfaces using a soft cloth which has been dipped in lukewarm water. |
Ice/Water dispenser
| The water and ice have an odour. | • Is the water filter being used an old one? |
| No water comes out. | • Has the main water supply line been turned on?
Has the water service hose been connected properly?
• Is the power to the refrigerator on?
• Is the “◇” icon displayed on the Ice/Water dispenser panel? |
| No ice comes out. | • Is the power to the refrigerator on?
• Is the “◇” or “◇” icon displayed on the Ice/Water dispenser panel?
• Is there any ice in the icebox?
• Is the ice clumped together in the icebox?
Ice may be frozen in the icebox if the ice has not been dispensed for a long time.
Ice cannot be dispensed if ice in the icebox is frozen and clumped.
Remove the clumped ice from the icebox and the ice shooter.
• Even if ice cannot be dispensed, few ice remains in the icebox. This is normal. |
| The controls on the Ice/Water dispenser panel cannot be operated. | • Is the power to the refrigerator on?
• Has the refrigerator been set to the Child Lock? |
Specifications
| Product fiche (EU Regulation 1060/2010) |
| SUPPLIER'S NAME | Panasonic |
| MODEL | NR-BS53VX3-E | NR-BS53VW3-E |
| CATEGORY | 7 (Refrigerator-Freezer) |
| ENERGY EFFICIENCY CLASS | A++ |
| ANNUAL ENERGY CONSUMPTION | 346 kWh/year*1 |
| NET FRIDGE VOLUME | 324 L |
| NET FREEZER VOLUME | 206 L |
| STAR RATING OF THE FREEZER | Four-star |
| 'FROST FREE' COMPARTMENTS | Fridge: Frost-free / Freezer: Frost-free |
| TEMPERATURE RISE TIME | 16 hours |
| FREEZING CAPACITY | 15 kg/24 h |
| CLIMATE CLASS | SN-T*2 |
| AIRBORNE ACOUSTICAL NOISE EMISSIONS | 38 dB |
| Other Information |
| TOTAL GROSS VOLUME | 615 L |
| TOTAL NET VOLUME | 530 L |
| OUTSIDE DIMENSIONS WIDTH × DEPTH × HEIGHT | 915 mm x 710 mm x 1860 mm |
| NET WEIGHT | 137 kg |
| RATED VOLTAGE | 220 V - 230 V |
| RATED FREQUENCY | 50 Hz |
| REFRIGERANT/CHARGE | R600a/70 g |
| BLOWING AGENT | Cyclo/Iso-Pentane |
Notes:
1 The energy consumption per year is based on the standard test results for 24 hours in accordance with EN153.
Actual energy consumption vary depending on how the appliance is used and where it is located.
The energy consumption when in use may vary depending on where the unit is installed, the temperature setting of each of the compartments, the ambient temperature and humidity, how often the doors are opened/closed, the volume and temperature of the food stuffs and how the appliance is used.
2 Permitted ambient temperature: 10^ to 43^
This symbol on the products and/or accompanying documents means that used electrical and electronic products should not be mixed with general household waste.
For proper treatment, recovery and recycling, please take these products to designated collection points, where they will be accepted on a free of charge basis. Alternatively, in some countries you may be able to return your products to your local retailer upon the purchase of an equivalent new product.
Disposing of this product correctly will help to save valuable resources and prevent any potential negative effects on human health and the environment which could otherwise arise from inappropriate waste handling. Please contact your local authority for further details of your nearest designated collection point.
Penalties may be applicable for incorrect disposal of this waste, in accordance with national legislation.
For business users in the European Union
If you wish to discard electrical and electronic equipment, please contact your dealer or supplier for further information.
This symbol is only valid in the European Union.
If you wish to discard this product, please contact your local authorities or dealer and ask for the correct method of disposal.

This symbol is used to refer users to the instructions or leaflets for relevant information.
This refrigerator incorporates a filter, which is considered a biocidal product.
The filter itself incorporates a substance containing silver ions which deactivates bacteria in the air inside the refrigerator and inhibits bacterial growth.
Active substance: Silver sodium hydrogen zirconium phosphate
Inhalt
KLASSE-1M LED-PRODUCT

Stand 5^ Verse zone
5°Fresh Zone
Mode Zone 5^ Fresh
5°Fresh Zone
For energisparing. 174
Mäl (mm): B915 × D710 × H1860
Montere avstandsstykkene
1 Opp-knapp
Angi-knapp
18 Ned-knapp
Merknader:
Stille inn temperature
Temperaturene i kjoleskapet, fryseren og i den vitaminsikre sonen kan endres.
Indstilling at temperature 199
Is/vand-dispenser 207
Specificationer. 208
Is/vand-dispersers panel
Displayomrade
Indstilling of temperature
5^ Frisk zone-tilstand
5°Fresh Zone
Is/vand-disperserens panel begynder at lyse.
DIODA LED PRODUKT KLASY 1M

PRODUKT LED DIOD TRIDY 1M

Pursuant to the directive 2004/108/EC, article 9(2)
Panasonic Testing Centre
Panasonic Marketing Europe GmbH
Winsberging 15, 22525 Hamburg, Germany