
DMW-BGG1E - Photo Accessories PANASONIC - Free user manual and instructions
Find the device manual for free DMW-BGG1E PANASONIC in PDF.
| Product type | Power grip for Panasonic digital cameras |
| Compatible models | Panasonic DMC-G80, DMC-G81, DMC-G85 (as of September 2016) |
| Included battery | Panasonic DMW-BLC12E rechargeable lithium-ion battery (7.2 V, 1200 mAh) |
| Alternative power supply | DMW-AC10E AC adaptor (sold separately) with DMW-DCC8 DC coupler (sold separately) |
| Dimensions (W × H × D) | Approx. 127.4 × 40.4 × 65.1 mm (without protrusions) |
| Weight | Approx. 291 g (with battery), 242 g (without battery) |
| Dust and splash resistance | Yes |
| Operating temperature | 0 °C to 40 °C |
| Operating relative humidity | 10% to 80% |
| Main functions | Vertical shooting control, front/rear dials, customizable function buttons (Fn1/Fn11), AF/AE LOCK button, exposure compensation |
| Grip power supply | 8.4 V DC (via camera electrical contacts) |
| Tripod mounting | Yes, standard screw hole at bottom of grip |
| Included accessories | DMW-BLC12E battery pack, connection terminal cap |
| Maintenance | Clean with a soft, dry cloth; avoid solvents, benzene, thinner, alcohol, detergents |
| Safety | Do not expose to heat, do not disassemble, use only with recommended Panasonic batteries |
| Warranty (Canada) | 90 days parts and labor for accessories |
| Destination countries | Europe (model DMW-BGG1E): use battery DMW-BLC12E; Canada/USA: DMW-BLC12PP |
Frequently Asked Questions - DMW-BGG1E PANASONIC
User questions about DMW-BGG1E PANASONIC
0 question about this device. Answer the ones you know or ask your own.
Ask a new question about this device
Download the instructions for your Photo Accessories in PDF format for free! Find your manual DMW-BGG1E - PANASONIC and take your electronic device back in hand. On this page are published all the documents necessary for the use of your device. DMW-BGG1E by PANASONIC.
USER MANUAL DMW-BGG1E PANASONIC
natural_image
3D rendering of a gray electronic device casing with internal components and mounting holes (no text or symbols visible)natural_image
Technical line drawing of a mechanical component with no visible text or symbolsPlease read these instructions carefully before using this product, and save this manual for future use.
If you have any questions, visit: USA : http://shop.panasonic.com/support Canada : www.panasonic.ca/english/support
Operating Instructions BATTERY GRIP
Thank you for purchasing this Panasonic product.
Please read these instructions carefully before using this product, and save this manual for future use.
Contents
Information for Your Safety 2
Precautions 5
Supplied Accessories....5
Names of the components ....6
Mounting on and removing from the digital camera....7
Inserting/Removing the Battery....8
Using the battery grip....11
Cautions for Use 11
Specifications....13
Limited Warranty (ONLY FOR U.S.A.) 14
Limited Warranty (ONLY FOR CANADA) 17
Information for Your Safety
The socket outlet shall be installed near the equipment and shall be easily accessible.
CAUTION!
To reduce the risk of fire, electric shock or product damage,
- Do not install or place this unit in a bookcase, built-in cabinet or in another confined space. Ensure this unit is well ventilated.
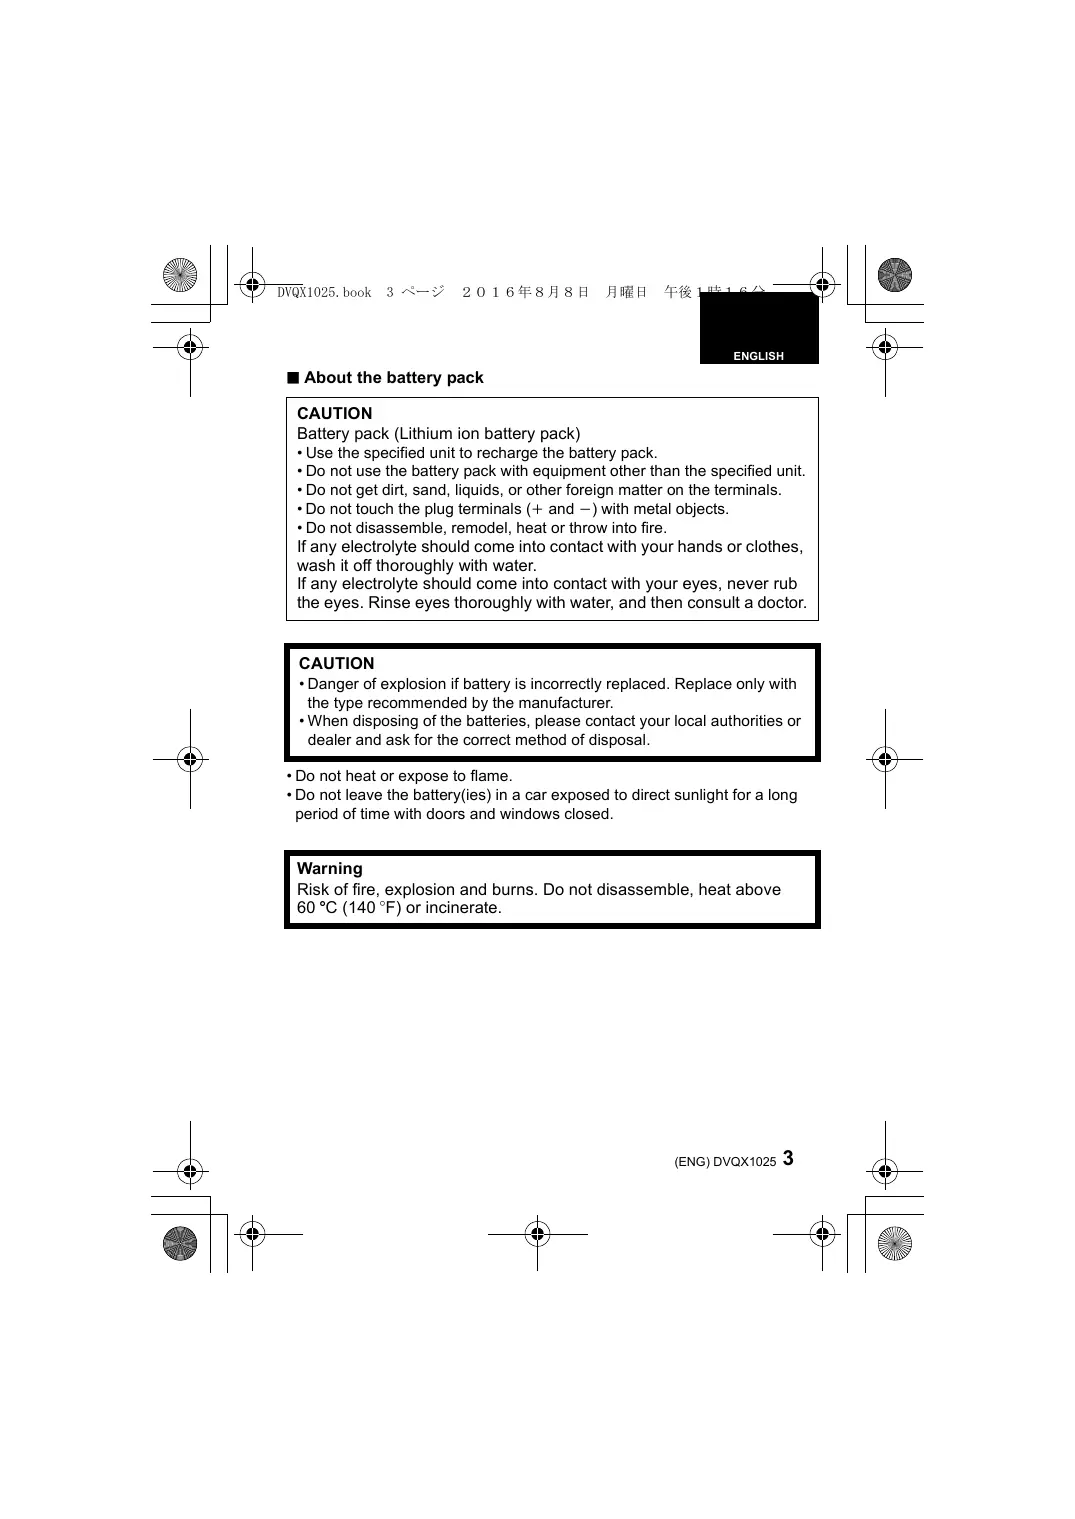
■ About the battery pack
CAUTION
Battery pack (Lithium ion battery pack)
- Use the specified unit to recharge the battery pack.
- Do not use the battery pack with equipment other than the specified unit.
- Do not get dirt, sand, liquids, or other foreign matter on the terminals.
- Do not touch the plug terminals (+ and -) with metal objects.
- Do not disassemble, remodel, heat or throw into fire.
If any electrolyte should come into contact with your hands or clothes, wash it off thoroughly with water.
If any electrolyte should come into contact with your eyes, never rub the eyes. Rinse eyes thoroughly with water, and then consult a doctor.
CAUTION
- Danger of explosion if battery is incorrectly replaced. Replace only with the type recommended by the manufacturer.
- When disposing of the batteries, please contact your local authorities or dealer and ask for the correct method of disposal.
- Do not heat or expose to flame.
- Do not leave the battery(ies) in a car exposed to direct sunlight for a long period of time with doors and windows closed.
Warning
Risk of fire, explosion and burns. Do not disassemble, heat above 60 °C ( 140 °F ) or incinerate.
Disposal of Old Equipment and Batteries Only for European Union and countries with recycling systems

These symbols on the products, packaging, and/or accompanying documents mean that used electrical and electronic products and batteries must not be mixed with general household waste.
For proper treatment, recovery and recycling of old products and used batteries, please take them to applicable collection points in accordance with your national legislation.
By disposing of them correctly, you will help to save valuable resources and prevent any potential negative effects on human health and the environment.
For more information about collection and recycling, please contact your local municipality.
Penalties may be applicable for incorrect disposal of this waste, in accordance with national legislation.

Note for the battery symbol (bottom symbol):
This symbol might be used in combination with a chemical symbol. In this case it complies with the requirement set by the Directive for the chemical involved.
For the U.S.A. and Canada only

A lithium ion battery that is recyclable powers the product you have purchased. Please call 1-800-8-BATTERY for information on how to recycle this battery.
- This unit is exclusively for Panasonic digital camera DMC-G80/DMC-G81/DMC-G85. (As of September 2016)
For the latest information on compatible devices, see the operating instructions, catalogue or website of the digital camera.
- Ease of operation and grip when held vertically during the recording will improve. The attached battery pack (supplied), in addition to the battery in the digital camera, will allow longer recording time.
■ Handling the unit
- The dust- and splash-proofing of this unit is not a guarantee of a full protection against the intrusion of dust and water. Please take care of following when using. If the unit does not operate properly, please contact the dealer where you have purchased the unit or Panasonic.
- Be careful not to allow sand, dust, or water to adhere or enter into the terminal area, digital camera, or this unit when attaching or removing this unit. - This unit is not water-proof, so this cannot be used underwater. For splash-proofing, the lens is constructed to resist the entry of water. If splashes of water etc. do adhere to the lens, wipe after use with a soft dry cloth.
- Do not subject the unit to strong vibration or impact. Those actions may result in malfunctions and failure.
- Please also read the manual of your digital camera.
Supplied Accessories
Product numbers correct as of September 2016. These may be subject to change.
Battery Pack
(Indicated as battery pack or battery in the text)
- Charge the battery before use.
Charge the battery with the battery charger supplied with the digital camera.
Terminal Cap
- The terminal cap is attached to the battery grip at the time of purchase.

DMW-BLC12PP (DMW-BGG1PP) DMW-BLC12E (DMW-BGG1E)

DVKV1001Z
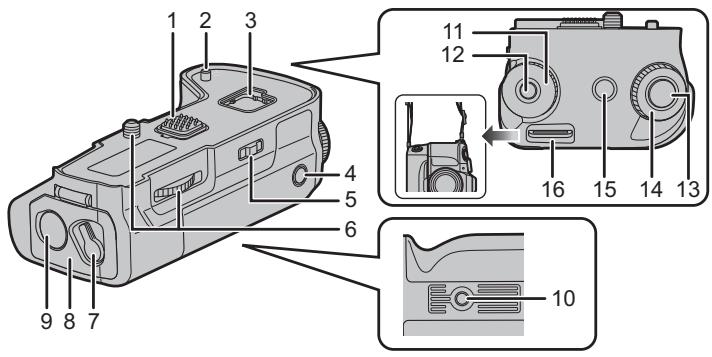
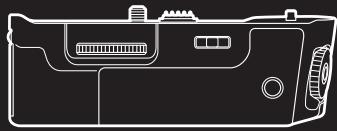
1 Electrical contacts
2 Camera attachment pins
3 Cover storage
4 [AF/AE LOCK] button
5 Operation ON/OFF switch
6 Attachment screw
7 Release lever
8 Battery door
9 DC coupler cover
10 Tripod mount
11 Rear dial
12 Function button (Fn11) ^*
13 Shutter button
14 Front dial
15 [☑] (Exposure Compensation) button/ [Fn] button (Fn1)*
16 Strap attachment holder
• We recommend using the battery grip and the digital camera with the supplied shoulder strap attached to prevent them from dropping. (Read the digital camera operating instructions for details on how to attach the strap.)
* It works in the same way as [Fn1] or [Fn11] of the digital camera.
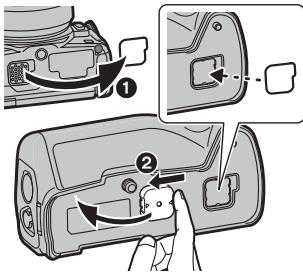
Mounting on and removing from the digital camera
- Check that the digital camera is turned off. (Mounting the unit onto, or disengaging it from, the camera while the power is on may cause trouble and is not recommended.)
1 Remove the cover for the battery grip connector on the digital camera.
② Remove the terminal cap on the electrical contacts of the battery grip.
- The cover for the battery grip connector can be stored in the cover storage in the battery grip.
- Return to their original position after use to protect the terminals.
- Be careful not to lose the terminal cap.
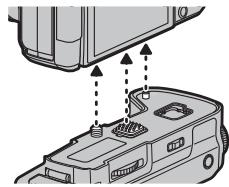
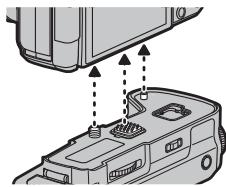
2 Insert by aligning the attachment screw, electrical contacts, and camera attachment pins.

natural_image
Diagram of a device's internal components with arrows indicating movement or assembly (no text or symbols present)3 Turn the attachment screw in direction of the arrow to attach securely.
- Confirm that the attachment screw is not loose while using.
natural_image
Technical illustration of a device component with a magnified inset showing a curved arrow (no text or symbols)Note
- Keep the Terminal Cap out of reach of children to prevent swallowing.
■ Remove the battery grip from the digital camera
- Confirm that the digital camera is not powered, and turn the attachment screw in the opposite direction of the attachment.
For the U.S.A. and CANADA
• Always use genuine Panasonic batteries (DMW-BLC12PP).
- If you use other batteries, we cannot guarantee the quality of this product.
For Other Countries
• Always use genuine Panasonic batteries (DMW-BLC12E).
- If you use other batteries, we cannot guarantee the quality of this product.
- Use the battery after charging with a dedicated charger.
- The battery grip can be used when the battery is inserted in either the digital camera or the battery grip.
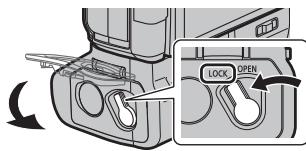
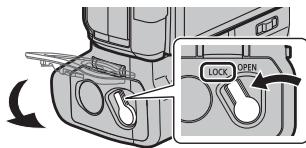
- Check that the digital camera is turned off.
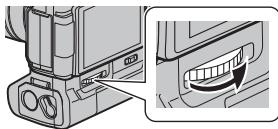
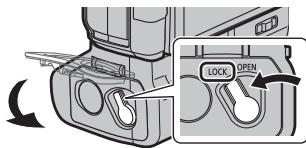
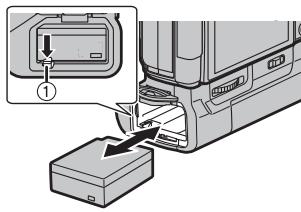
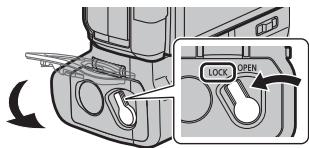
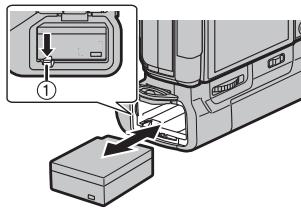
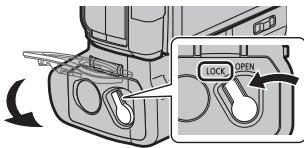
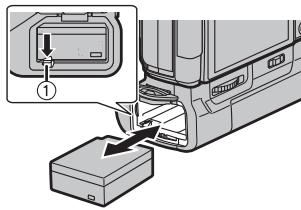
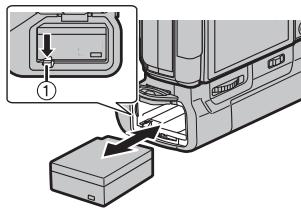
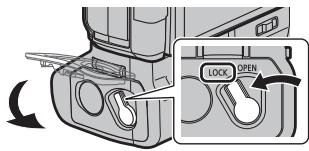
1 Turn the release lever of the battery grip toward [OPEN], and open the battery door.
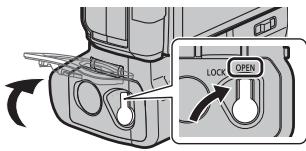
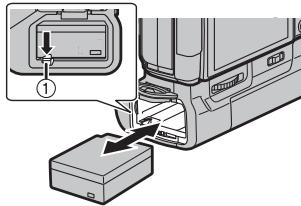
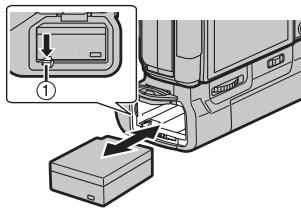
2 Taking care of the orientation, insert securely all the way until you hear locking, and confirm that the ① lever is hooked to the battery.
- When removing the battery, pull the ① lever toward the arrow and pull out the battery.
3 Close the battery door and turn the release lever toward [LOCK].

Note
- Remove the battery after use. (The battery will exhaust if it is left unused for long period of time.)
- The battery will be warm after using, while charging, and right after charging. The battery grip will also be warm while using, but this is not a malfunction.
- Confirm that there is no foreign matter on the battery door.
■ Using 2 batteries
The digital camera can be used for longer periods of time when batteries are inserted in both the digital camera and the battery grip. (It will switch to the other battery when one of the batteries is exhausted.)
- The battery to be used primarily can be set in the digital camera. Read the operating instructions of your digital camera for details.

Note
- Do not remove the battery when the battery in the battery grip is being used. (Power of the digital camera will be turned off.)
■ Using the AC adaptor (optional) and the DC coupler (optional) instead of the battery
For the U.S.A., CANADA and Latin America
- When using an AC adaptor, ensure that the Panasonic DC coupler (DMW-DCC8: optional) and AC adaptor (DMW-AC10PP: optional) are used.
- Always use a genuine Panasonic AC adaptor (DMW-AC10PP: optional).
For the Europe and CIS
- When using an AC adaptor, ensure that the Panasonic DC coupler (DMW-DCC8: optional) and AC adaptor (DMW-AC10E: optional) are used.
• Always use a genuine Panasonic AC adaptor (DMW-AC10E: optional).
For Korea
- When using an AC adaptor, ensure that the Panasonic DC coupler (DMW-DCC8: optional) and AC adaptor (DMW-AC10GD: optional) are used.
• Always use a genuine Panasonic AC adaptor (DMW-AC10GD: optional).
For Other Countries
- When using an AC adaptor, ensure that the Panasonic DC coupler (DMW-DCC8: optional) and AC adaptor (DMW-AC10G: optional) are used.
• Always use a genuine Panasonic AC adaptor (DMW-AC10G: optional).
- Always use a genuine Panasonic DC coupler (DMW-DCC8: optional).
The digital camera can be used without worrying about exhaustion of battery by connecting the AC adaptor and connect it to the outlet. To use the AC adaptor, the DC coupler is required.

Note
- When the DC coupler is being mounted, the DC coupler cover opens, so the structure ceases to be dust-proof and splash-proof. Be careful not to allow sand, dust and water etc. to adhere to or enter the structure. After use, check that there is no foreign matter attached to the coupler cover, and close it firmly.
- Also read the operating instructions for the AC adaptor and DC coupler.
Using the battery grip
Operation of the dials and buttons on the battery grip is same as the digital camera.
Read the operating instructions for your digital camera for details.
1 Turn the power switch of the digital camera to [ON].
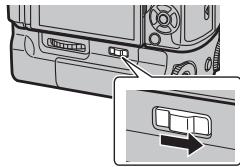
2 Turn the operation ON/OFF switch on the battery grip to [ON].
- Enables the operations of the dials and buttons.
- This cannot turn the power of the digital camera ON/OFF.
natural_image
Diagram of a vehicle rear panel with a close-up inset showing a directional arrow (no text or symbols present)
Note
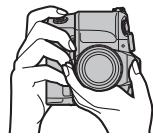
- When the digital camera is held grasping on the grip, a button on the battery grip may be pushed accidentally. In such case, turn the operation ON/OFF switch of the battery grip to [OFF].
natural_image
Line drawing of a hand holding a camera (no text or symbols)Cautions for use
■ About the unit
Keep the unit away from insecticide sprays and other volatile substances.
- If the unit is exposed to these sprays or substances, its external case may deteriorate and/or its paint may come off.
- Do not leave the unit in contact with any items made of rubber or PVC for prolonged periods of time.
- Under no circumstances should the unit be stored in any of the following locations since doing so may cause trouble in operation or malfunctioning:
• In direct sunlight or on a beach in summer
- In locations with high temperatures and humidity levels or where changes in temperature and humidity are acute
- Where there is fire
- Near heaters, air conditioners or humidifiers
• Where there is vibration
- Inside a vehicle
- Do not drop the unit, knock it into other objects or subject it to any other kind of strong impact or shock.
- Check the operation before using.
- This unit has an electrical contact that is connected to the digital camera electrically. Attach the supplied terminal cap when this unit is not attached to the digital camera and do not allow any metal objects (such as clips) to come in contact.
■ Cleaning
When cleaning, wipe the unit with a dry soft cloth.
- When the unit is soiled badly, it can be cleaned by wiping the dirt off with a wrung wet cloth, and then with a dry cloth.
- Do not use solvents such as benzine, thinner, alcohol, kitchen detergents, etc., to clean the unit, since they may deteriorate the external case or the coating may come off.
- When using a chemical cloth, be sure to follow the accompanying instructions.
■ About the battery pack
- The battery is not charged when the battery grip is shipped. Charge the battery before use.
- The battery is a rechargeable lithium ion battery. If the temperature is too high or too low, the operating time of the battery will become shorter.
- The battery becomes warm after using and during and after charging. The battery grip also becomes warm during use. This is not a malfunction.
- Do not leave any metal items (such as clips) near the batteries.
- Store the battery in a cool and dry place with a relatively stable temperature: [Recommended temperature: 15^ to 25^ (59°F to 77°F), Recommended humidity: 40% RH to 60% RH]
- Do not store the battery for a long time while fully charged. When storing the battery for a long period of time, we recommend charging it once a year. Remove the battery from the battery grip and store it again after it has completely discharged.
Specifications
Specifications are subject to change without notice.
Battery Grip (DMW-BGG1):
Information for your safety
| Power Source: DC 8.4 V (===8.4 V) | |
| Dimensions | Approx. 127.4 mm (W)×40.4 mm (H)×65.1 mm (D)[5.02" (W)×1.59"(H)×2.56" (D)](excluding the projecting parts) |
| Mass (weight) | Approx. 291 g/0.642 lb (with the battery), Approx. 242 g/0.534 lb |
| Dust-proof and splash-proof | Yes |
| Operating temperature | 0 °C to 40 °C (32 °F to 104 °F) |
| Operating humidity | 10%RH to 80%RH |
Battery Pack (lithium-ion) (Panasonic DMW-BLC12PP/DMW-BLC12E): Information for your safety
Voltage/capacity: 7.2 V/1200 mAh
The symbols on this product (including the accessories) represent the following:
DC
For the U.S.A.
Panasonic Corporation of North America
Two Riverfront Plaza, Newark, NJ 07102-5490
http://shop.panasonic.com
For CANADA
Panasonic Canada Inc.
5770 Ambler Drive, Mississauga, Ontario L4W 2T3
www.panasonic.com
Printed in China
Panasonic Products Limited Warranty
Limited Warranty Coverage (For USA Only)
If your product does not work properly because of a defect in materials or workmanship, Panasonic Corporation of North America (referred to as “the warrantor”) will, for the length of the period indicated on the chart below, which starts with the date of original purchase (“warranty period”), at its option either (a) repair your product with new or refurbished parts, (b) replace it with a new or a refurbished equivalent value product, or (c) refund your purchase price. The decision to repair, replace or refund will be made by the warrantor.
| Product or Part Name | Parts | Labor |
| Digital Camera Peripherals | 1 Year | 1 Year |
| Digital Camera Accessories | 90 Days | 90 Days |
| Rechargeable Batteries | 1 Year | 1 Year |
During the “Labor” warranty period there will be no charge for labor. During the “Parts” warranty period, there will be no charge for parts. This Limited Warranty excludes both parts and labor for non-rechargeable batteries, antennas, and cosmetic parts (cabinet). This warranty only applies to products purchased and serviced in the United States. This warranty is extended only to the original purchaser of a new product which was not sold “as is”.
Mail-In Service--Online Repair Request
Online Repair Request
To submit a new repair request and for quick repair status visit our Web Site at http://shop.panasonic.com/support.
When shipping the unit, carefully pack, include all supplied accessories listed in the Owner's Manual, and send it prepaid, adequately insured and packed well in a carton box. When shipping Lithium Ion batteries please visit our Web Site at http://shop.panasonic.com/support as Panasonic is committed to providing the most up to date information. Include a letter detailing the complaint, a return address and provide a daytime phone number where you can be reached. A valid registered receipt is required under the Limited Warranty.
IF REPAIR IS NEEDED DURING THE WARRANTY PERIOD, THE PURCHASER WILL BE REQUIRED TO FURNISH A SALES RECEIPT/PROOF OF PURCHASE. INDICATING DATE OF PURCHASE. AMOUNT PAID AND PLACE OF PURCHASE. CUSTOMER WILL BE CHARGED FOR THE REPAIR OF ANY UNIT RECEIVED WITHOUT SUCH PROOF OF PURCHASE.
Limited Warranty Limits and Exclusions
This warranty ONLY COVERS failures due to defects in materials or workmanship, and DOES NOT COVER normal wear and tear or cosmetic damage. The warranty ALSO DOES NOT COVER damages which occurred in shipment, or failures which are caused by products not supplied by the warrantor, or failures which result from accidents, misuse, abuse, neglect, mishandling, misapplication, alteration, faulty installation, set-up adjustments, misadjustment of consumer controls, improper maintenance, power line surge, lightning damage, modification, introduction of sand, humidity or liquids, commercial use such as hotel, office, restaurant, or other business or rental use of the product, or service by anyone other than a Factory Service Center or other Authorized Servicer, or damage that is attributable to acts of God.
THERE ARE NO EXPRESS WARRANTIES EXCEPT AS LISTED UNDER "LIMITED WARRANTY COVERAGE".
THE WARRANTOR IS NOT LIABLE FOR INCIDENTAL OR CONSEQUENTIAL DAMAGES RESULTING FROM THE USE OF THIS PRODUCT, OR ARISING OUT OF ANY BREACH OF THIS WARRANTY.
(As examples, this excludes damages for lost time, travel to and from the servicer, loss of or damage to media or images, data or other memory or recorded content. The items listed are not exclusive, but for illustration only.)
ALL EXPRESS AND IMPLIED WARRANTIES, INCLUDING THE WARRANTY OF MERCHANTABILITY, ARE LIMITED TO THE PERIOD OF THE LIMITED WARRANTY.
Some states do not allow the exclusion or limitation of incidental or consequential damages, or limitations on how long an implied warranty lasts, so the exclusions may not apply to you.
This warranty gives you specific legal rights and you may also have other rights which vary from state to state. If a problem with this product develops during or after the warranty period, you may contact your dealer or Service Center. If the problem is not handled to your satisfaction, then write to:
Consumer Affairs Department
Panasonic Corporation of North America
661 Independence Pkwy
Chesapeake, VA 23320
PARTS AND SERVICE, WHICH ARE NOT COVERED BY THIS LIMITED WARRANTY, ARE YOUR RESPONSIBILITY.
Shop
Accessories!
for all your Panasonic gear
Go to
http://shop.panasonic.com/support
Get everything you need to get the most out of your Panasonic products
Accessories & Parts for your Camera, Phone, A/V products, TV, Computers & Networking, Personal
Care, Home Appliances, Headphones, Batteries, Backup Chargers & more...
Customer Services Directory
For Product Information, Operating Assistance, Parts, Owner's Manuals, Dealer and Service info go to http://shop.panasonic.com/support
For the hearing or speech impaired TTY: 1-877-833-8855
As of March 2016
Panasonic Canada Inc.
5770 Ambler Drive, Mississauga, Ontario L4W 2T3
PANASONIC PRODUCT - LIMITED WARRANTY
Panasonic Canada Inc. warrants this product to be free from defects in material and workmanship under normal use and for a period as stated below from the date of original purchase agrees to, at its option either (a) repair your product with new or refurbished parts, (b) replace it with a new or a refurbished equivalent value product, or (c) refund your purchase price. The decision to repair, replace or refund will be made by Panasonic Canada Inc.
| Digital Camera | One (1) year, parts and labour |
| Digital Camera Peripherals | One (1) year, parts and labour |
| Digital Camera Accessories | Ninety (90) days, parts and labour |
This warranty is given only to the original purchaser, or the person for whom it was purchased as a gift, of a Panasonic brand product mentioned above sold by an authorized Panasonic dealer in Canada and purchased and used in Canada, which product was not sold “as is”, and which product was delivered to you in new condition in the original packaging.
IN ORDER TO BE ELIGIBLE TO RECEIVE WARRANTY SERVICE HEREUNDER, A PURCHASE RECEIPT OR OTHER PROOF OF DATE OF ORIGINAL PURCHASE, SHOWING AMOUNT PAID AND PLACE OF PURCHASE IS REQUIRED
LIMITATIONS AND EXCLUSIONS
This warranty ONLY COVERS failures due to defects in materials or workmanship, and DOES NOT COVER normal wear and tear or cosmetic damage. The warranty ALSO DOES NOT COVER damages which occurred in shipment, or failures which are caused by products not supplied by Panasonic Canada Inc., or failures which result from accidents, misuse, abuse, neglect, mishandling, misapplication, alteration, faulty installation, set-up adjustments, misadjustment of consumer controls, improper maintenance, improper batteries, power line surge, lightning damage, modification, introduction of sand, humidity or liquids, commercial use such as hotel, office, restaurant, or other business or rental use of the product, or service by anyone other than a Authorized Servicer, or damage that is attributable to acts of God.
Dry cell batteries, printer ink cartridge and paper are also excluded from coverage under this warranty.
Rechargeable batteries are warranted for ninety (90) days from date of original purchase.
THIS EXPRESS, LIMITED WARRANTY IS IN LIEU OF ALL OTHER WARRANTIES, EXPRESS OR IMPLIED, INCLUDING ANY IMPLIED WARRANTIES OF MERCHANTABILITY AND FITNESS FOR A PARTICULAR PURPOSE. IN NO EVENT WILL PANASONIC CANADA INC. BE LIABLE FOR ANY SPECIAL, INDIRECT OR CONSEQUENTIAL DAMAGES RESULTING FROM THE USE OF THIS PRODUCT OR ARISING OUT OF ANY BREACH OF ANY EXPRESS OR IMPLIED WARRANTY.
(As examples, this warranty excludes damages for lost time, travel to and from the Authorized Servicer, loss of or damage to media or images, data or other memory or recorded content. This list of items is not exhaustive, but for illustration only.) In certain instances, some jurisdictions do not allow the exclusion or limitation of incidental or consequential damages, or the exclusion of implied warranties, so the above limitations and exclusions may not be applicable. This warranty gives you specific legal rights and you may have other rights which vary depending on your province or territory.
WARRANTY SERVICE
For product operation, repairs and information assistance, please visit our Support page:
www.panasonic.ca/english/support
Manuel d'utilisation PRISE D'ALIMENTATION
natural_image
Technical illustration of a device's internal components with arrows indicating assembly or movement (no text or symbols present)
Nota
Nota
natural_image
Diagram of a vehicle rear panel with a zoomed-in inset showing a rectangular component (no text or symbols)
Nota
natural_image
Line drawing of a hand holding a camera (no text or symbols)Panasonic Canada Inc.
5770 Ambler Drive, Mississauga, Ontario L4W 2T3
www.panasonic.com
Imprimé en Chine
POUR LE CANADA
Panasonic Canada Inc.
5770, Ambler Drive, Mississauga (Ontario) L4W 2T3
PRODUIT PANASONIC – GARANTIE LIMITÉE
natural_image
Diagram of a device's internal components with arrows indicating assembly or connection (no text or symbols present)natural_image
Diagram of a computer monitor with a close-up view showing the internal gear mechanism (no text or symbols present)
Nota

Nota
natural_image
Diagram of a vehicle rear panel with buttons and a zoomed-in section showing a small rectangular button (no text or symbols)
Nota
natural_image
Line drawing of a hand holding a camera (no text or symbols)Panasonic Corporation of North America
Two Riverfront Plaza, Newark, NJ 07102-5490
http://shop.panasonic.com
Impreso en China
Bedienungsanleitung
AKKU-GRIFF
natural_image
Diagram of a device's internal components with arrows indicating assembly or connection (no text or symbols present)natural_image
Technical diagram showing a device with a highlighted internal component and an arrow indicating rotation (no text or symbols present)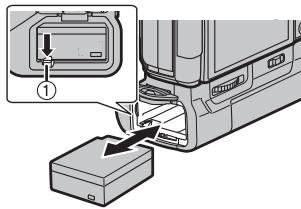

Hinweis
natural_image
Diagram of a vehicle rear panel with a zoomed-in inset showing a rectangular component (no text or symbols)
Hinweis
natural_image
Line drawing of a hand holding a camera (no text or symbols)natural_image
Diagram of a device's internal components with arrows indicating movement or assembly (no text or symbols present)natural_image
Technical illustration of a mechanical component with a close-up view showing a curved arrow (no text or symbols present)
Nota

Nota
natural_image
Diagram of a device rear panel with buttons and a zoomed-in view showing a small rectangular component (no text or symbols)
Nota
natural_image
Line drawing of a hand holding a camera (no text or symbols)Battery Grip (DMW-BGG1):
natural_image
Diagram of a device with a lock and a close-up view showing a curved arrow (no text or symbols present)
注意

注意
natural_image
Diagram of a device rear panel with buttons and a zoomed-in view showing a small rectangular component (no text or symbols)
注意
natural_image
Line drawing of a hand holding a camera (no text or symbols)使用時的注意事項
■關於本機
請使本機遠離殺蟲劑和其他揮發性物質。
natural_image
Diagram showing a device's internal components with arrows indicating movement or assembly (no text or symbols present)natural_image
Mechanical component with a close-up view of a curved mechanical component (no text or symbols visible)
주

주
natural_image
Diagram of a vehicle rear panel with a zoomed-in inset showing a rectangular component (no text or symbols)
주
natural_image
Line drawing of a hand holding a DSLR camera (no text or symbols)사용상의 주의
■기기에 관하여
natural_image
Diagram of a device's internal components with arrows indicating assembly or insertion (no text or symbols present)natural_image
Technical diagram showing a device with a highlighted component and directional arrow (no text or symbols)
Примечание

Примечание
natural_image
Diagram of a vehicle rear panel with a zoomed-in inset showing a rectangular component (no text or symbols)
Примечание
natural_image
Line drawing of a hand holding a camera (no text or symbols)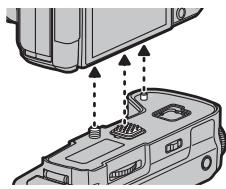
natural_image
Diagram of a device's internal components with arrows indicating assembly or connection (no text or symbols present)natural_image
Diagram of a device component with a magnified inset showing a curved arrow (no text or symbols present)
Примітка

Примітка
natural_image
Diagram of a device rear panel with a zoomed-in inset showing a rectangular component (no text or symbols)
Примітка
natural_image
Line drawing of a hand holding a camera (no text or symbols)Kadoma, Osaka, Japan
Importer for Europe:
Panasonic Marketing Europe GmbH
Panasonic Testing Centre
Winsbergring 15, 22525 Hamburg, Germany
(۸۴۴۴۴۴۴۴۴۴۴۴۴۴۴۴۴۴۴۴۴۴۴۴۴۴۴۴۴۴۴۴۴۴۴۴۴۴۴۴۴۴۴۴۴۴۴۴۴۴۴۵
مصدر الطاقة:
natural_image
Side view of a vehicle rear panel with buttons and a zoomed-in inset showing a rectangular component (no text or symbols visible)natural_image
Line drawing of a hand holding a camera (no text or symbols)ملاحظة

natural_image
3D rendering of a gray electronic device casing with internal components and mounting holes (no text or symbols visible)تعليمات التشفيل
二十五ات الحمل------------------------------------------------.
DMW-BGG1 طراز رقم
LUMIX
natural_image
Technical line drawing of a mechanical component with no visible text or symbols- Operating Instructions BATTERY GRIP
- Contents
- Information for Your Safety
- CAUTION!
- ■ About the battery pack
- CAUTION
- Warning
- Disposal of Old Equipment and Batteries Only for European Union and countries with recycling systems
- Note for the battery symbol (bottom symbol):
- For the U.S.A. and Canada only
- ■ Handling the unit
- Supplied Accessories
- Battery Pack
- Terminal Cap
- Mounting on and removing from the digital camera
- Note
- For the U.S.A. and CANADA
- For Other Countries
- ■ Using 2 batteries
- ■ Using the AC adaptor (optional) and the DC coupler (optional) instead of the battery
- For the U.S.A., CANADA and Latin America
- For the Europe and CIS
- For Korea
- Using the battery grip
- Cautions for use
- ■ About the unit
- ■ Cleaning
- When cleaning, wipe the unit with a dry soft cloth.
- Specifications
- Battery Grip (DMW-BGG1):
- For the U.S.A.
- For CANADA
- Panasonic Products Limited Warranty
- Limited Warranty Coverage (For USA Only)
- Mail-In Service--Online Repair Request
- Online Repair Request
- Limited Warranty Limits and Exclusions
- THERE ARE NO EXPRESS WARRANTIES EXCEPT AS LISTED UNDER "LIMITED WARRANTY COVERAGE".
- PARTS AND SERVICE, WHICH ARE NOT COVERED BY THIS LIMITED WARRANTY, ARE YOUR RESPONSIBILITY.
- Shop
- Accessories!
- Customer Services Directory
- Panasonic Canada Inc.
- PANASONIC PRODUCT - LIMITED WARRANTY
- LIMITATIONS AND EXCLUSIONS
- WARRANTY SERVICE
- Manuel d'utilisation PRISE D'ALIMENTATION
- Nota
- POUR LE CANADA
- PRODUIT PANASONIC – GARANTIE LIMITÉE
- Bedienungsanleitung
- AKKU-GRIFF
- Hinweis
- 注意
- 使用時的注意事項
- ■關於本機
- 請使本機遠離殺蟲劑和其他揮發性物質。
- 주
- 사용상의 주의
- ■기기에 관하여
- Примечание
- Примітка
- LUMIX
Brand : PANASONIC
Model : DMW-BGG1E
Category : Photo Accessories