
TYER3D6ME - TV PANASONIC - Free user manual and instructions
Find the device manual for free TYER3D6ME PANASONIC in PDF.

| Product type | Active liquid crystal shutter 3D glasses |
| Brand | Panasonic |
| Model | TY-ER3D6ME |
| Width | 164.7 mm |
| Height | 41.0 mm |
| Total length | 170.7 mm |
| Weight | Approx. 34 g |
| Power supply | CR2025 lithium coin battery |
| Battery life | Approx. 75 hours |
| Operating temperature range | 0 °C to 40 °C |
| Operating distance (range) | Up to 3.2 m from the front of the TV |
| Recommended viewing distance | 3 times the image height (e.g., 1.5 m for a 40-inch TV) |
| Communication system | Bluetooth® 2.4 GHz FH-SS band |
| Main body materials | Resin |
| Lens materials | Liquid crystal glass |
| Main functions | 3D viewing, 3D to 2D conversion, Bluetooth® pairing with TV |
| Care and cleaning | Soft dry cloth. Do not use benzene, thinner, or wax. Do not immerse. |
| Safety | Do not use in hospitals, near automatic doors, or within 15 cm of a pacemaker. Keep batteries out of reach of children. |
| Replacement battery | CR2025 (lithium coin) |
| Warranty | Panasonic European 24-month warranty (parts and labor). Keep proof of purchase. |
Frequently Asked Questions - TYER3D6ME PANASONIC
User questions about TYER3D6ME PANASONIC
0 question about this device. Answer the ones you know or ask your own.
Ask a new question about this device
Download the instructions for your TV in PDF format for free! Find your manual TYER3D6ME - PANASONIC and take your electronic device back in hand. On this page are published all the documents necessary for the use of your device. TYER3D6ME by PANASONIC.
USER MANUAL TYER3D6ME PANASONIC
Operating Instructions
3D Eyewear
Model No.
TY-ER3D6ME
This product cannot and must not be used as sunglasses.

natural_image
Illustration of a pair of smart glasses with transparent lenses (no text or symbols)ENGLISH
DANSK
NEDERLANDS
FRANÇAIS
DEUTSCH
ITALIANO
ΚΑЗАΚ
PORTUGUÊS
РУССКИЙ
ESPAÑOL
SVENSKA
TÜRKÇE
УКРАЇНСЬКА
GUARANTEE
ГАРАНТИЙНЫЙ ТАЛОН
Thank you for purchasing a Panasonic product.
- Before operating this product, please read the instructions carefully, and save this manual for future use.
- Before using this product, be sure to read "Safety Precautions" and "Using Precautions" (pages 2 - 6).
This 3D Eyewear can be used for Panasonic HDTVs supporting 3D and the Bluetooth® Wireless technology. For the latest information on applicable models, visit our web site. http://panasonic.net/viera/support
Safety Precautions
Warning
About Prohibited Place
■ Do not use 3D Eyewear in hospital or other medical facilities.
Radio waves from 3D Eyewear may cause interference of medical equipments.
■ Do not use 3D Eyewear nearby automatic control equipments, like a automatic door, a fire alarm apparatus, etc.
Radio waves from 3D Eyewear may cause interference of automatic control equipments.
- Keep 3D Eyewear more than 15 cm away from the implant of cardiac pacemaker, or similar implantable medical equipments, at all times.
Radio waves from 3D Eyewear may affect implantable cardiac pacemaker or similar equipment operations.
Accidental Ingestion
■ Do not ingest battery, chemical burn hazard.
This product contains a coin/button cell battery. It can cause severe internal burns in just two hours if swallowed, which can lead to life threatening injury, including death.
Keep new and used batteries away from children. If the battery compartment does not close securely, stop using the product and keep it away from children.
If you think batteries might have been swallowed or placed inside any part of the body, seek immediate medical attention.
Disassembly
■ Do not disassemble or modify the 3D Eyewear.
Caution
Battery
■ Incorrect installation may cause battery leakage, corrosion and explosion.
■ Replace only with the same or equivalent type.
■ Do not use rechargeable battery (Ni-Cd, etc.).
■ Do not burn or break up battery.
■ Do not expose battery to excessive heat such as sunshine, fire or the like.
■ Make sure you dispose of battery correctly.
■ Remove the battery from the unit when not using for a prolonged period of time to prevent battery leakage, corrosion and explosion.
About 3D Eyewear
■ Do not drop, exert pressure on, or step on the 3D Eyewear.
■ Be careful of the tips of the frame when putting on the 3D Eyewear.
■ Always keep the 3D Eyewear in a cool, dry place.
■ Be careful not to trap a finger in the hinge section of the 3D Eyewear.
■ Pay special attention when children are using this product.
Viewing 3D Content
■ Do not use the 3D Eyewear if you have a history of over-sensitivity to light, heart problems, or have any other existing medical conditions.
■ Stop using the 3D Eyewear immediately if you feel tired, discomfort, or any other uncomfortable sensation.
■ Take an appropriate break after viewing a 3D movie.
■ Take a break of between 30 - 60 minutes after viewing 3D content on interactive devices such as 3D games or computers.
■ Be careful not to strike the television screen or other people unintentionally. When using the 3D Eyewear the distance between the user and screen can be misjudged.
■ The 3D Eyewear must only be worn when viewing 3D content.
■ Do not tilt your head and/or the 3D Eyewear while viewing 3D image. Keep your eyes and the 3D Eyewear are on a horizontal level to the television.
■ If you suffer from any eyesight problems (short/far-sighted, astigmatism, eyesight differences in left and right), please ensure to correct your vision before using the 3D Eyewear.
■ Stop using the 3D Eyewear if you can clearly see double images when viewing 3D content.
■ Do not use the 3D Eyewear at a distance less than the recommended distance.
The recommended viewing distance is at least 3 times of image height.
e.g.
For a 40-inch TV 1.5 m or more
For a 42-inch TV 1.6 m or more
For a 47-inch TV 1.8 m or more
For a 48-inch TV 1.8 m or more
For a 50-inch TV 1.9 m or more
For a 55-inch TV 2.1 m or more
For a 58-inch TV 2.2 m or more
For a 60-inch TV 2.3 m or more
For a 65-inch TV 2.4 m or more
■ When the top and bottom area of the screen is blackened, such as movies, view the screen at a distance at least 3 times of the height of the actual image.
(That makes the distance closer than above recommended figure.)
3D Eyewear Use
■ 3D Eyewear should not be used by children younger than 5 - 6 years old, as a guideline.
■ All children must be fully supervised by parents or guardians who must ensure their safety and health throughout the using 3D Eyewear.
■ Before using the 3D Eyewear, ensure no breakable objects surrounding the user to avoid any accidental damage or injury.
■ Remove the 3D Eyewear before moving around to avoid falling or accidental injury.
■ Use the 3D Eyewear only for the intended purpose and nothing else.
■ Do not use if the 3D Eyewear is physically damaged.
■ Stop using the 3D Eyewear immediately if a malfunction or fault occurs.
■ Stop using the 3D Eyewear immediately if you experience any redness, pain, or skin irritation around the nose or temples.
■ In rare cases, the materials used in the 3D Eyewear may cause an allergic reaction.
Using Precautions
■ Do not drop or bend the 3D Eyewear.
■ Do not apply pressure to or scratch the surface of the liquid crystal shutter of the 3D Eyewear.
■ Do not use devices (such as mobile phones or personal transceivers) that emit strong electromagnetic waves near the 3D Eyewear as this may cause the 3D Eyewear to malfunction.
■ Do not use 3D Eyewear outside the specified usage temperature range (☐ page 14).
■ If the room is lit by fluorescent lights (50 Hz) and light appears to flicker when using the 3D Eyewear, switch off the fluorescent light.
■ 3D content will not be correctly visible if the 3D Eyewear is worn upside down or back-to-front.
■ Do not wear the 3D Eyewear when watching anything other than 3D images. Other kinds of displays (such as computer screens, digital clocks, or calculators etc.) may be difficult to see while wearing the 3D Eyewear.
■ Using radio waves
This unit uses the 2.4 GHz radio frequency ISM band (Bluetooth®). However other wireless equipment may use the same frequency. Be sure to take note of the following to prevent radio wave interference from other equipment.
- Restriction of use For use only in your country.
- Range of use
The range of use is up to approximately 3.2 m. The range may be less depending on the structure of the building, the environment and any obstacles between the receiver and the transmitter. Such obstacles as reinforced concrete walls and metal doors, in particular, obstruct the transmitter's signals.
• Interference from other equipment
Due to radio interference, malfunctions may occur if the unit is placed too close to other equipment. We recommend keeping the unit as far away as possible from the following devices:
Bluetooth ^® devices other than this unit, wireless LAN, microwaves, office automation devices, digital cordless telephones and other electronic devices.
The unit is designed to automatically avoid radio interference from these household devices.
However malfunctions may happen when radio interference occurs.
Identifying Controls

natural_image
Illustration of two types of smart glasses with labeled parts (1 and 2), no text or symbols present.(Part No.: TY-ER3D6MA)
● Power button / Mode change
| Power button | Press and hold for approx. 1 second to turn the 3D Eyewear on. (The indicator lamp lights for 2 seconds.) Press and hold for 3 seconds or more to turn the 3D Eyewear off. (The indicator lamp lights 3 times.) |
| Mode change | Press and hold for approx. 1 second to change the mode between 3D and 2D (view a 3D image in 2D). When power is off, press and hold for approx. 5 seconds to change to registration mode. For details on registration, refer to the Registration page. (page 9) |
- Indicator lamp
Lights or flashes during use to show the status.
■ Indicator lamp status
| Indicator lamp | Status |
| Lights red for 2 seconds when turned on | Sufficient battery level |
| Flashes red 5 times when turned on | Low battery level |
| Flashes red | Under registration |
| Flashes red once every 1 second | Under reconnecting to the TV |
| Flashes red 3 times | Power off (Press and hold for more than 3 seconds when in use, or automatically power off when registering / reconnecting fails, or connection is lost.) |
| Flashes red once every 2 seconds when in use | 3D mode is selected |
| Flashes red twice every 4 seconds when in use | 2D mode is selected |
Registration
■ First Registration
Perform the First Registration when the 3D Eyewear is used for the first time.
- Turn on the TV to see.
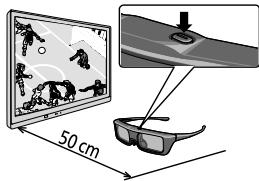
- Press Power button for about 1 second to turn the 3D Eyewear on.
The lamp lights for about 2 seconds and then flashes. The 3D Eyewear will power on and start registration. Place the 3D Eyewear within 50 cm from the TV while registration in progress.
text_image
50 cm- After the registration is successfully completed, the 3D Eyewear will reconnect with TV automatically when the 3D Eyewear is turned on near the TV in 3D mode.
■ Registration Again
When connection with registered TV fails, or when using with another TV, re-register the 3D Eyewear.
- Turn on the TV to see.
- Within 50 cm from the TV, press Power button until lamp lights, then release it to start registration.
- After the registration is successfully completed, the 3D Eyewear will reconnect with TV automatically when the 3D Eyewear is turned on near the TV in 3D mode.
* If the registration failed, the 3D Eyewear will power off. In this case, power off the TV and perform from step 1.
Storage and Cleaning
- Clean using a soft, dry cloth.
- Wiping the 3D Eyewear with a soft cloth that is covered in dust or dirt may scratch the eyewear. Shake off any dust from the cloth before use.
- Do not use benzene, thinner, or wax on the 3D Eyewear, as doing so may cause the paint to peel off.
- Do not dunk the 3D Eyewear in liquid such as water when cleaning.
- Avoid storing the 3D Eyewear in hot or highly humid locations.
- As the liquid crystal shutters (lens) are fragile and easily broken, be very careful when cleaning them.
Replacing battery
When the battery is running low, the indicator lamp flashes 5 times on turning the 3D Eyewear on. In this case, early battery replacement is recommended.
- Dispose of the old batteries as non-burnable rubbish, or in line with the waste disposal regulations in your local area.
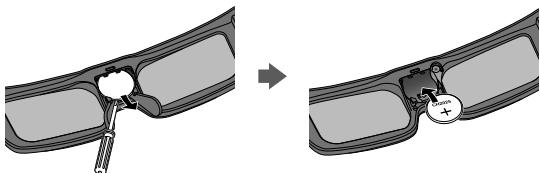
- Remove the cover
1) Loosen the screw with a precision Phillips (No.0, plus ⊕).
2) Slide the cover using pen tip or screwdriver (minus ⊖), etc.
3) Remove the cover with your finger as shown in the illustration below.
● The screw is not removed from the cover.

text_image
Diagram illustrating three-step procedure for a mechanical or biological process, labeled with steps ①, ②, and ③.-
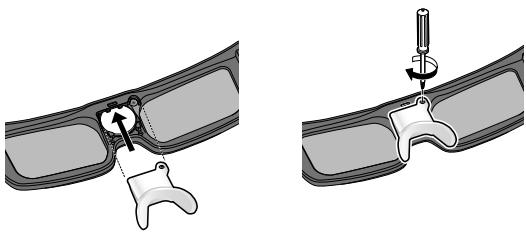
Replace the battery.
-
If difficulty, remove it with the tip of the driver.
- Use the specified type of battery (coin-shaped lithium battery CR2025.)
- Note the correct polarity (⊕ or ⊖).
natural_image
Diagram showing a mechanical assembly before and after modification, with no visible text or symbols- Replace and fasten the cover
- Tighten the screw.
natural_image
Two-step medical procedure illustration showing a tool inserted into a car body with a screwdriver inserted (no text or labels)Troubleshooting/Q&A
Check the followings first. If they do not solve the problem, please contact the place of purchase.
Cannot register a 3D Eyewear to TV.
▶ Does the TV support on this 3D Eyewear?
Use the 3D Eyewear with compatible TVs. ( page 2)
▶ Did you allow more than 1 minute to elapse after setting the unit to the device registration mode?
The registration is automatically released if you allow more than 1 minute to elapse. Set the registration with the television and connected 3D Eyeware placed as close to each other as possible.
Images are not 3D.
▶ Is the TV has been registered with the 3D Eyewear?
Perform the registration with the TV to see. ( page 9)
▶ Is the 3D Eyewear Mode set to 3D?
Push the power button once to change the mode between 3D and 2D.
▶ Are the image settings switched to 3D images?
Refer the television operating instructions.
▶ Individual differences may occur in which the 3D images are difficult to see, or cannot be seen, especially in users that have a different level of eyesight between the left and right eyes.
Take the necessary steps (wearing glasses etc.) to correct your eyesight before use.
▶ Are there any objects between the eyewear and television?
The indicator lamp does not light up when pressing Power button on the 3D Eyewear.
▶ The battery is too low to operate the 3D Eyewear.
The indicator lamp does not light when switching on the power by pressing and hold the power button for 1 second; that indicates the battery is completely flat. Replace the battery with new one.
Specifications
Lens type
Liquid Crystal Shutter
Usage temperature range
0^-40^
Battery
Coin-shaped lithium battery CR2025
Operation time: Approx. 75 hours
Viewing range\*
Within 3.2 m from front surface of the TV.
Materials
Main body: Resin
Lens section: Liquid crystal glass
Communication system
2.4 GHz band FH-SS (Frequency Hopping Spread Spectrum)
Dimensions (not including nose pad part)
| Model No. | TY-ER3D6ME |
| Width | 164.7 mm |
| Height | 41.0 mm |
| Overall length | 170.7 mm |
| Mass | Approx. 34 g |
* Viewing range
- There are differences in the viewing range of the 3D Eyewear among individuals.
- The 3D Eyewear may not operate correctly at the outside of the viewing range.
CE
Declaration of Conformity (DoC)
"Hereby, Panasonic Corporation declares that this 3D Eyewear is in compliance with the essential requirements and other relevant provisions of the Directive 1999/5/EC."
If you want to get a copy of the original DoC of this 3D
Eyewear, please visit the following website:
http://www.ptc.panasonic.eu/doc
Authorized Representative:
Panasonic Testing Centre (PTC)
Panasonic Marketing Europe GmbH
Winsbergring 11, D-22525 Hamburg, Germany
The Bluetooth ^® word mark and logos are owned by the Bluetooth SIG, Inc. and any use of such marks by Panasonic Corporation is under license. Other trademarks and trade names are those of their respective owners.
Disposal of Old Equipment and Batteries Only for European Union and countries with recycling systems

natural_image
Symbol of a trash bin crossed out by two crossed lines, with no text or labels present.These symbols on the products, packaging, and/or accompanying documents mean that used electrical and electronic products and batteries must not be mixed with general household waste.
For proper treatment, recovery and recycling of old products and used batteries, please take them to applicable collection points in accordance with your national legislation. By disposing of them correctly, you will help to save valuable resources and prevent any potential negative effects on human health and the environment. For more information about collection and recycling, please contact your local municipality.
Penalties may be applicable for incorrect disposal of this waste, in accordance with national legislation.
natural_image
Symbol of a trash bin crossed out by two diagonal lines (no text or numbers present)Note for the battery symbol (bottom symbol):
This symbol might be used in combination with a chemical symbol. In this case it complies with the requirement set by the Directive for the chemical involved.
Contact:
Panasonic Testing Centre (PTC)
Panasonic Europe Ltd.
Winsbergring 11, D-22525 Hamburg, Germany
Panasonic Corporation
Osaka Japan
Web Site : http://www.panasonic.com
© Panasonic Corporation 2016
natural_image
Illustration of two types of smart glasses with labeled parts (1 and 2), no text or symbols present.(Del Nr.: TY-ER3D6MA)
text_image
Diagram illustrating a three-step procedure for a mechanical or fluid system, showing step 1 with screw and valve, step 2 with labeled components, and step 3 with fluid inlet.- Udskift batteriet.
natural_image
Diagram showing a mechanical assembly before and after transformation, with no visible text or symbols.natural_image
Two-step diagram showing a mechanical or dental procedure on a curved surface, with no visible text or symbols.Panasonic Testing Centre (PTC)
Panasonic Marketing Europe GmbH
Winsbergring 11, D-22525 Hamburg, Germany
natural_image
Symbol of a trash bin crossed with a diagonal line, no text or numbers presentnatural_image
Symbol of a trash bin crossed out by two diagonal lines (no text or numbers present)Information om batterisymbol (eksempler nedenfor):
Panasonic Testing Centre (PTC)
Panasonic Europe Ltd.
Winsbergring 11, D-22525 Hamburg, Germany
Panasonic Corporation
Osaka Japan
Web Site : http://www.panasonic.com
© Panasonic Corporation 2016
natural_image
Illustration of two types of smart glasses with labeled parts (1 and 2), no text or symbols present.text_image
Diagram illustrating three-step procedure steps for a medical procedure involving screwdriver insertion and surgical placement.natural_image
Diagram showing a device being inserted into a car compartment, with no visible text or symbolsnatural_image
Two-step diagram showing a mechanical or electrical component being inserted into a curved panel, with no visible text or symbols.Problemen oplossen/V&A
2.4 GHz band FH-SS (Frequency Hopping Spread Spectrum)
natural_image
Symbol of a trash bin crossed with a diagonal line, no text or numbers presentnatural_image
Symbol of a trash bin crossed out by two crossed lines (no text or numbers present)Panasonic Testing Centre (PTC)
Panasonic Europe Ltd.
Winsbergring 11, D-22525 Hamburg, Germany
Panasonic Corporation
Osaka Japan
Web Site : http://www.panasonic.com
© Panasonic Corporation 2016
Mode d'emploi
lunettes 3D
N° de modèle
TY-ER3D6ME
natural_image
Illustration of two types of smart glasses with labeled parts (1 and 2), no text or symbols present.text_image
Diagram illustrating three-step procedure steps for a mechanical or biological process, labeled with numbered components.natural_image
Diagram showing a mechanical assembly before and after modification, with no visible text or symbolsnatural_image
Two-step diagram showing a mechanical or electrical component being inserted into a curved housing, with no visible text or symbols.Dépannage/Q&R
Panasonic Testing Centre (PTC)
Panasonic Marketing Europe GmbH
Winsbergring 11, D-22525 Hamburg, Germany
natural_image
Symbol of a trash bin crossed with no visible text or labelsnatural_image
Symbol of a trash bin crossed out by two crossed lines (no text or numbers present)Panasonic Testing Centre (PTC)
Panasonic Europe Ltd.
Winsbergring 11, D-22525 Hamburg, Germany
Panasonic Corporation
Osaka Japon
Web Site : http://www.panasonic.com
© Panasonic Corporation 2016
Gebrauchsanleitung
3D Eyewear
natural_image
Illustration of two types of smart glasses with labeled parts (1 and 2), no text or symbols present.(Artikelnummer: TY-ER3D6MA)
text_image
Diagram illustrating three-step procedure for a mechanical or biological process, labeled with steps ①, ②, and ③.natural_image
Diagram showing a device being processed from a device to a closed panel, with no visible text or symbols.natural_image
Two-step diagram showing a mechanical or dental tool interacting with a curved component, no text or symbols present.Fehlerbehebung
Panasonic Testing Centre (PTC)
Panasonic Marketing Europe GmbH
Winsbergring 11, D-22525 Hamburg, Germany
natural_image
Symbol of a trash bin crossed with no text or labels, representing waste sorting or disposal (no text present)natural_image
Symbol of a trash bin crossed out by two crossed lines (no text or numbers present)Panasonic Testing Centre (PTC)
Panasonic Europe Ltd.
Winsbergring 11, D-22525 Hamburg, Germany
Panasonic Corporation
Osaka, Japan
Web Site : http://www.panasonic.com
© Panasonic Corporation 2016
Istruzioni d'uso
Occhiali 3D
Codice modello
TY-ER3D6ME
natural_image
Illustration of two types of smart glasses with labeled parts (1 and 2), no text or symbols present.text_image
Diagram illustrating three-step procedure for a mechanical or biological process, showing step 1 with tool and directional arrows.natural_image
Diagram showing a mechanical component being inserted into a car compartment, with no visible text or symbolsnatural_image
Two-step medical procedure illustration showing a tool inserted into a jawbone (no text or labels)Banda 2.4 GHz FH-SS (Frequency Hopping Spread Spectrum)
Panasonic Testing Centre (PTC)
Panasonic Marketing Europe GmbH
Winsbergring 11, D-22525 Hamburg, Germany
natural_image
Symbol of a trash bin crossed with no visible text or labelsnatural_image
Symbol of a trash bin crossed out by two diagonal lines (no text or numbers present)Panasonic Testing Centre (PTC)
Panasonic Europe Ltd.
Winsbergring 11, D-22525 Hamburg, Germany
Panasonic Corporation
Osaka Giappone
Web Site : http://www.panasonic.com
© Panasonic Corporation 2016
natural_image
Illustration of a pair of smart glasses with labeled parts (1 and 2), no text or symbols present.text_image
Diagram illustrating three-step procedure for a mechanical or fluid system, showing step ①, step ②, and final step ③.natural_image
Diagram showing a device being inserted into a car compartment, with no visible text or symbolsnatural_image
Two-step diagram showing a mechanical or dental procedure on a curved surface, with no visible text or symbols.natural_image
Symbol of a trash bin crossed with a diagonal line, no text or numbers presentnatural_image
Illustration of two types of smart glasses with labeled parts (1 and 2), no text or symbols present.(Parte No.: TY-ER3D6MA)
text_image
Diagram illustrating three-step procedure steps of a mechanical or fluidic component, labeled with numbered components.natural_image
Diagram showing a mechanical assembly before and after modification, with no visible text or symbols- Volte a colocar e a apertar a tampa.
- Aperte o parafuso.

natural_image
Medical illustration showing two steps of a surgical procedure on a curved mechanical component (no text or symbols present)Banda 2.4 GHz FH-SS (Frequency Hopping Spread Spectrum)
Panasonic Testing Centre (PTC)
Panasonic Marketing Europe GmbH
Winsbergring 11, D-22525 Hamburg, Germany
natural_image
Symbol of a trash bin crossed with a diagonal line, no text or numbers presentnatural_image
Symbol of a trash bin crossed out by two crossed lines (no text or numbers present)Panasonic Testing Centre (PTC)
Panasonic Europe Ltd.
Winsbergring 11, D-22525 Hamburg, Germany
Panasonic Corporation
Osaka Japão
Web Site : http://www.panasonic.com
© Panasonic Corporation 2016
natural_image
Illustration of two types of smart glasses with labeled parts (1 and 2), no text or symbols present.text_image
Diagram illustrating three-step procedure steps for a medical procedure involving screwdriver insertion and surgical placement.natural_image
Diagram showing a mechanical assembly before and after modification, with no visible text or symbolsnatural_image
Two-step medical procedure illustration showing a tool inserted into a car body (no text or labels)natural_image
Symbol of a trash bin crossed out by two crossed lines, with no text or labels present.© Panasonic Corporation 2016
natural_image
Illustration of two types of smart glasses with labeled parts (1 and 2), no text or symbols present.text_image
Diagram illustrating three-step procedure for a medical procedure involving a tool and labeled parts, with arrows indicating steps ①, ②, and ③.natural_image
Diagram showing a mechanical assembly before and after modification, with no visible text or symbols.natural_image
Two-step diagram showing a mechanical assembly with a tool inserted into a component, no text or symbols present.Panasonic Testing Centre (PTC)
Panasonic Marketing Europe GmbH
Winsbergring 11, D-22525 Hamburg, Germany
natural_image
Symbol of a trash bin crossed with no visible text or labelsnatural_image
Symbol of a trash bin crossed out by two diagonal lines (no text or numbers present)Panasonic Testing Centre (PTC)
Panasonic Europe Ltd.
Winsbergring 11, D-22525 Hamburg, Germany
Panasonic Corporation
Osaka, Japón
Web Site : http://www.panasonic.com
© Panasonic Corporation 2016
natural_image
Illustration of two types of smart glasses with labeled parts (1 and 2), no text or symbols present.(Artikelnummer: TY-ER3D6MA)
text_image
Medical procedure diagram showing step-by-step insertion of a screw with labeled parts (①, ②, ③)2. Byt ut batteriet.
natural_image
Diagram showing a mechanical assembly before and after modification, with no visible text or symbolsnatural_image
Two-step diagram showing a mechanical or dental procedure on a curved surface, with no visible text or symbols.Panasonic Testing Centre (PTC)
Panasonic Marketing Europe GmbH
Winsbergring 11, D-22525 Hamburg, Germany
natural_image
Symbol of a trash bin crossed with no visible text or labelsnatural_image
Symbol of a trash bin crossed out by two diagonal lines (no text or numbers present)Panasonic Testing Centre (PTC)
Panasonic Europe Ltd.
Winsbergring 11, D-22525 Hamburg, Germany
Panasonic Corporation
Osaka, Japan
Web Site : http://www.panasonic.com
© Panasonic Corporation 2016
Kullanım Kılavuzu
3D Gözlük
Modeller No. TY-ER3D6ME
natural_image
Illustration of two types of smart glasses with labeled parts (1 and 2), no text or symbols present.(Parça No: TY-ER3D6MA)
text_image
Diagram illustrating three-step procedure for a medical procedure involving screwdriver insertion and vascular placement.2. Pili değiştirin.
natural_image
Diagram showing a mechanical assembly before and after modification, with no visible text or symbolsnatural_image
Two-step diagram showing a mechanical assembly with a tool inserted into a component, no text or symbols present.Panasonic Testing Centre (PTC)
Panasonic Marketing Europe GmbH
Winsbergring 11, D-22525 Hamburg, Germany
natural_image
Symbol of a trash bin crossed with no text or labels, representing waste sorting or disposal (no text present)natural_image
Symbol of a trash bin crossed out by two crossed lines (no text or numbers present)Panasonic Testing Centre (PTC)
Panasonic Europe Ltd.
Winsbergring 11, D-22525 Hamburg, Germany
Panasonic Corporation
Osaka, Japonya
Web Sitesi: http://www.panasonic.com
© Panasonic Corporation 2016
natural_image
Abstract geometric symbol with a star-like shape inside a circle (no text or symbols)109
natural_image
Illustration of two types of smart glasses with labeled parts (1 and 2), no text or symbols present.text_image
Diagram illustrating three-step procedure for a medical procedure involving a tool and labeled steps ①, ②, and ③.natural_image
Diagram showing a mechanical assembly before and after modification, with no visible text or symbolsnatural_image
Two-step medical procedure illustration showing a tool inserted into a jawbone (no text or labels)natural_image
Symbol of a trash bin crossed out by two diagonal lines (no text or numbers present)Caution: Please retain your sales receipt.
The Panasonic Pan European Guarantee applies to your product. You may obtain a copy of the guarantee from:
- Website : www.panasonic.co.uk/euguarantee
- Panasonic Customer Communications Team: UK - 0344 844 3899 / Ireland - 01 289 8333
The Panasonic Pan European Guarantee applies to your product. You may obtain a copy of the guarantee from :
- the dealer where you purchased your product
- Website : www.digitalplanet.com.mt
- Panasonic Customer Call Center : +356 21 24 1127 or +356 27 24 1127
- Email: support@digitalplanet.com.mt
CY KYΠΡΟΣ
© Panasonic Corporation 2016
Printed in China
M0516-1066