
EY37A2 - Power tool PANASONIC - Free user manual and instructions
Find the device manual for free EY37A2 PANASONIC in PDF.

| Product Type | Portable radio with Bluetooth player |
| Brand | Panasonic |
| Model | EY37A2 |
| Dimensions (W × H × D) | 344 mm × 280 mm × 239 mm |
| Weight | 4.7 kg (with battery EY9L51) / 4.0 kg (unit alone) |
| Power Supply | 12 V DC / 1500 mA adapter, center positive pin |
| Main Battery | Lithium-ion 14.4V or 18V (models EY9L41 to EY9L52) |
| Backup Battery | 2 UM-3 batteries (AA size) |
| Radio Bands | FM 87.5–108 MHz (step 0.05 MHz) / AM (MW) 522–1629 kHz (step 9 kHz) |
| Bluetooth | Version 4.0, profiles A2DP/SCMS-T, range ~10 m |
| Speakers | 2 × 3.5 inches, 8 ohms |
| Output Power | AC adapter: 1.7 W × 2; battery 14.4V: 2.6 W × 2; battery 18V: 4.5 W × 2 |
| Auxiliary Input | 3.5 mm stereo jack (AUX IN) |
| USB Port | USB 5V / 1A for smartphone charging |
| Headphone Output | 3.5 mm jack, 3 Ω / 150 mV stereo |
| Functions | AM/FM radio, Bluetooth streaming, radio/buzzer alarm, equalizer (5 modes + adjustable bass/treble), LED night light, sleep timer, snooze function |
| Protection Rating | IP64 (dust-resistant and splash-proof) |
| Maintenance | Clean with a dry, clean cloth; avoid water, solvents, or volatile substances |
| Repairability | Contact an authorized service center for any repairs; battery and charger not included in the kit |
Frequently Asked Questions - EY37A2 PANASONIC
User questions about EY37A2 PANASONIC
0 question about this device. Answer the ones you know or ask your own.
Ask a new question about this device
Download the instructions for your Power tool in PDF format for free! Find your manual EY37A2 - PANASONIC and take your electronic device back in hand. On this page are published all the documents necessary for the use of your device. EY37A2 by PANASONIC.
USER MANUAL EY37A2 PANASONIC
Before operating this unit, please read these instructions completely and save this manual for future use.
English: Page 8 Dansk: Side 80
EN Original instructions: English Translation of the original instructions: Other languages
This unit with all covers completely closed and operating on a battery pack satisfies appropriate IP Degrees of Protection based on the IEC regulations.
Definition of IP code
IP6X: No Ingress of dust (In case that the talcum powder under 75 m intrudes inside the tool)
IPX4: Water splashed against the unit from any direction shall have no harmful effects (This unit is designed to operate when the unit is sprayed by approximately 4.3 L/min of normal temperature water for 10 minutes from multiple directions using several nozzles at approximately 1 meter distance.).
NOTE:
This does not cover the included "AC power adaptor".
LIMITED WARRANTY
The rating of IP64 qualifies this unit for the minimum impact of water or dust, but not for the assurance of performance in such conditions.
See Safety and Operating Instructions for further details for proper operation.
I. IMPORTANT SAFETY INSTRUCTIONS
Read All Instructions
- SAVE THESE INSTRUCTIONS -This manual contains important safety and operating instructions for this product.
- Before using this product, read all instructions and cautionary markings.
- Do not expose this product and battery pack to rain or snow or use in damp location.
- Use of an attachment not recommended may result in a risk of fire, electric shock, or injury to persons.
- To reduce risk of damaging the electric plug and cord, pull by plug rather than cord when disconnecting charger.
- An extension cord should not be used.
- If the supply cord is damaged, it must be replaced by the manufacturer or its service agent, or a similarly qualified person in order to avoid a hazard.
-
To reduce risk of electric shock, unplug charger from outlet before attempting any maintenance or cleaning.
-
Make sure cord is located so that it will not be stepped on, tripped over, or otherwise subjected to damage or stress.
- This product and battery pack are specifically designed to work together.
- Do not attempt to disassemble this product and the battery pack housing.
- Do not store the tool and battery pack in locations where the temperature may reach or exceed 50^ (122°F) (such as a metal tool shed, or a car in the summer), which can lead to deterioration of the storage battery.
- Do not charge battery pack when the temperature is BELOW 0^ (32^) or ABOVE 40^ (104^) .
- Do not incinerate the battery pack. It can be explode in a fire.
- This product is designed to operate on standard household electrical power only. Use only on the voltage indicated on the nameplate. Do not attempt to use it on any other voltage!
- Do not abuse cord. Never carry charger by cord or yank it to disconnect from outlet. Keep cord away from heat, oil and sharp edges.
- Charge the battery pack in a well ventilated place, do not cover the charger and battery pack with a cloth, etc., while charging.
- Do not short the battery pack. A battery short can cause a large current flow, over heating and burns.
- NOTE: If the supply cord of this appliance is damaged, it must only be replaced by a repair shop appointed by the manufacturer, because special purpose tools are required.
- The appliance is not a portable luminaire for children usage.
- Children shall not play with the appliance.
| Symbol | Meaning |
| To reduce the risk of injury, user must read and understand instruction manual. | |
| For indoor use only. | |
| Use only power supplies listed in this instructions. |

WARNING:
- Do not use other than the Panasonic battery packs that are designed for use with this rechargeable tool.
- Panasonic is not responsible for any damage or accident caused by the use of the recycled battery pack and the counterfeit battery pack.
- Do not dispose of the battery pack in a fire, or expose it to excessive heat.
- Do not drive the likes of nails into the battery pack, subject it to shocks, dismantle it, or attempt to modify it.
- Do not allow metal objects to touch the battery pack terminals.
- Do not carry or store the battery pack in the same container as nails or similar metal objects.
- Do not charge the battery pack in a high-temperature location, such as next to a fire or in direct sunlight.
Otherwise, the battery may overheat, catch fire, or explode.
- Never use other than the dedicated charger to charge the battery pack. Otherwise, the battery may leak, overheat, or explode.
- After removing the battery pack from this product or the charger, always reattach the pack cover. Otherwise, the battery contacts could be shorted, leading to a risk of fire.
- When the Battery Pack Has Deteriorated, Replace It with a New One. Continued use of a damaged battery pack may result in heat generation, ignition or battery rupture.
- If you detect any abnormalities, discontinue use immediately and contact the retailer from which you purchased this product.
- Do not turn the volume up too high when using headphones or earphones.
- Be careful not to raise the volume as your hearing adapts.
- Do not use this product over a long period of time, and always take a break to rest your ears.
If you experience any discomfort to your ears, discontinue use and contact your physician. - Do not place heavy objects on the radio or climb on top of it.
- Do not place the radio on an unstable surface or in an unstable position.
- Be sure to always back up the data saved in the device connected to this radio to prevent the loss of data in the event of a device failure.
II. ASSEMBLY
Battery Installation
NOTE:
If the batteries are removed from both the main battery pack compartment and backup battery compartment, initialization will be performed about three minutes later.
Installing back up batteries [Fig. 1]
- Pull out the battery compartment locker to release battery compartment. There are main battery pack compartment and back up battery compartment.
- Remove back up battery compartment cover and insert 2 fresh UM-3 (AA sizes). Make sure the batteries are with correct polarity as shown inside the compartment. Replace the battery cover.
NOTE:
- The radio can be used without connecting the backup battery.
- Keeping back up batteries inside the compartment prevent stored data in preset memories from being lost.
CAUTION:
- Do not use any batteries other than those specified (UM-3).
- Remove batteries if product is not to be used for a long time.
- Do not mix new batteries with old ones or use different types of batteries together. Improper use of batteries may result in battery leakage, heat generation, fire or explosion.
If any fluid is leaking from the batteries, pay careful attention to the following safety points.
- Never touch battery fluid with your bare hands. Doing so could result in a skin inflammation or an injury.
- Blindness could result if the fluid gets in your eyes.
- Completely wipe up any spilled battery fluid.
Attaching/Removing main battery pack [Fig. 2]
- After back up batteries are inserted, insert the main battery pack to the main unit. Always insert it all the way until it locks in place with a little click. The suitable battery packs for this radio listed in the Specifications.
EN
- To remove the battery pack, pull the battery off the compartment.
- Return the battery compartment locker to the original position.
Low battery indicator
- Reduced power, distortion and a "stuttering sound" or low battery sign (□) that appears on the display are all the signs that the main battery pack needs to replace.
NOTE: The battery pack can't be charged via the supplied AC power adaptor. - When the main battery is removed and the low battery sign ( l ) flashes and an "E." is shown on the display, this indicates that it is time to replace the back up batteries.
Using the soft bended antenna [Fig. 3]
Straight up the soft bended antenna.
CAUTION:
The soft bended antenna works in one direction only.
Forcibly bending it can cause it to break or result in an injury.
Using Supplied AC power adaptor
Remove the rubber cover and insert the adaptor plug into the DC socket on the right side of the radio. Plug the adaptor into a standard mains socket outlet. Whenever the adaptor is connected, the battery pack is automatically disconnected. The AC adaptor should be disconnected from the main supply when not in use.
NOTE:
- The sound is slightly quieter when using an AC power adaptor than when using a battery pack.
- When the radio has any interference in AM band by its adaptor, please move the radio away from its AC adaptor over 30 cm.
- When the AC adaptor and the battery pack are used simultaneously, the AC adaptor will take precedence in powering the unit. In this case, the power of the battery pack will not be consumed.
- This unit does not have a charging function. Running the unit using both the AC adaptor and battery pack at the same time will not charge the battery pack.
- The AC power adaptor is for exclusive use with this product and is not to be used with other equipment. Also, do not use AC adaptor for other equipment with this product.
III. OPERATIONS
Operating the radio - Scan tuning AM/FM
NOTE:
If the reception signal is weak, try changing the orientation of the radio or antenna.
- Press and hold the Power button to switch on the radio.
- Press the Source button until "AM" or "FM" is displayed.
- Press the Tuning control knob to carry out an auto-tune. The radio will scan up the AM/FM band from the currently displayed frequency and will stop scanning automatically when it finds a station of sufficient strength.
- After a few seconds the display will update. The display will show the frequency of the signal found.
- To find other station, press the Tuning control knob as before.
- When the end of the waveband is reached the radio will recommence tuning from the opposite end of the waveband.
- Rotate the Volume control to adjust the sound level as required.
- To switch off the radio, press and hold the Power button.
Manual tuning - AM/FM
- Press and hold the Power button to switch on the radio.
- Press the Source button until "AM" or "FM" is displayed.
- Rotate the Tuning control knob to tune to a station.
- When the end of the waveband is reached the radio will recommence tuning from the opposite end of the waveband.
- Use the Volume control to adjust the sound level as required.
Presetting stations in AM/FM mode
There are 6 preset stations each for AM and FM radio. They are used in the same way for each waveband.
- Tune to the required radio station as previously described.
- Press and hold the required Preset button (1 to 6) until the radio beeps. "M1" for example is shown next to the frequency. The station will be stored using the preset number. Repeat this procedure for the remaining presets as needed. Preset stations which have already been stored may be overwritten by following the above procedure if required.
Recalling a preset in AM/FM mode
- Press the Source button until "AM" or "FM" is displayed.
- Momentarily press the required Preset button to cause the radio to tune to one of the stations stored in the preset memory.
FM stereo/mono FM
If the FM radio station being listened to has a weak signal some hiss may be audible. It is possible to reduce this hiss by forcing the radio to play the station in mono rather than stereo.
- Press the Source button as needed to select the FM band and tune to the desired FM station as previously stated.
- Press and hold Tuning control knob to enter the menu setting.
- Rotate the Tuning control until "FM" shows on the display and press the Tuning control knob to enter the setting. If the setting is ST (stereo) press the Tuning control to switch to MN (mono) mode to reduce the hiss. Press the Tuning control to select the option.
Listening to music via Bluetooth® streaming BT
You need to pair your Bluetooth® device with the radio before you can auto-link to play/ stream Bluetooth® music through the radio. Paring creates a 'bond' so two devices can recognize each other.
Pairing your Bluetooth® device for the first time
- Press the Source button until "BT" is displayed. READY will be appeared on the display and the Bluetooth® icon will flash on the display.
- Activate Bluetooth® on your device according to the device's user manual to allow the paring procedure.
- Press the Bluetooth® pairing button, then PAIR will show on the display. You can start the search of the radio on your Bluetooth® device. Once "EY37A2" is appeared on your Bluetooth® device, press the item in your Bluetooth® list and it will link with the radio.
- Once connected, the Bluetooth® icon will remain steady on the display. You can now play the music in your Bluetooth®-enabled device via the radio.
NOTE:
If 'EY37A2' shows on your Bluetooth device list but your device cannot connect
with it, please delete the item from your list and pair the device with the radio again following the steps described previously.
- The effective operation range between the radio and the paired device is approximately 10 meters (30 feet). Any obstacle between the radio and the device can reduce the operational range.
- Bluetooth® connectivity performance may vary depending on the connected Bluetooth® devices. Please refer to the Bluetooth® capabilities of your device before connecting to the radio. All features may not be supported on some paired Bluetooth® devices.
Playing previously-paired devices
This unit can memorize up to 8 sets of paired devices, when the memory exceeds this amount, the earliest paired device will be overwritten from the radio.
If your Bluetooth® device already paired with the unit previously, the unit will memorize your Bluetooth® device and it attempts to reconnect automatically with a device in memory which is last connected. If the last connected device is not available, the radio will try to connect to the second last device, and so forth.
Erasing the paired device memory
Press and hold the Bluetooth® pairing button for approximately 7 seconds until you hear a double tone. The radio clears all devices from its memory and becomes discoverable.
Disconnecting your Bluetooth device
Press and hold the Bluetooth® pairing button until the radio beeps to disconnect with your Bluetooth® device. The Bluetooth® icon will flash on the display indicating the radio is discoverable again for pairing.
Clock and Alarms
Setting the clock format TIM
The clock display used in stand-by mode and on the playing mode screens can be set to different format. The selected format is then also used when setting the alarms.
- Make sure the radio is powered on. Press and hold the Tuning control to enter the advanced menu of the current mode.
- Rotate the Tuning control until "TIM" shows on the display and press the Tuning control to enter the setting.
EN
- Rotate the Tuning control to select either 12 or 24 hour format. Press the Tuning control to confirm your choice of clock format.
NOTE:
If the 12 hour clock format is chosen, the radio will then use the 12 hour clock for the setting of alarms and will display a 12 hour clock with PM indicator when in standby mode.
Setting the clock time manually CLK
- Make sure the radio is powered on. Press and hold the Tuning control knob to enter the Advanced menu of the current mode.
- Rotate the Tuning control until "CLK" shows on the display and press the Tuning control to enter the setting. Now the hour setting begins flashing.
- Rotate the Tuning control to select the desired hour and press the Tuning control to confirm the setting. Now the minute setting begins flashing.
- Rotate the Tuning control to select the desired minute and press the Tuning control to confirm the setting. The display will then revert to the previous menu.
Setting the alarm clock
The radio has two alarms which can each be set to wake you to AM/FM radio or buzzer alarm. Ensure the clock time is set before setting the alarms.
a. Setting radio alarm:
- Make sure the radio is powered on.
- Press and hold the radio alarm button, the radio alarm symbol (RADIO) and the display hour will flash followed by a beep.
- When the hour digit flashes, rotate the Tuning control to select the required alarm hour and press the Tuning control to confirm the hour setting.
- Then rotate the Tuning control to select the required alarm minute and press the Tuning control to confirm the setting.
- When radio alarm symbol is flashing, rotate Tuning control to select desired wake-up band and station, then press Tuning control to confirm the selection.
- Rotate Tuning control to select the desired volume and press Tuning control to confirm the setting. Radio alarm setting is now completed.
NOTE:
If the selected AM/FM alarm station is not available when the alarm is sounding, the buzzer alarm will be used instead.
b. Setting HWS (Humane Wake System) buzzer alarm:
- Make sure the radio is powered on.
- Press and hold the buzzer alarm button, the buzzer alarm symbol (BUZZER) and the display hour will flash followed by a beep.
- When the hour digit flashes, rotate the Tuning control to select the required alarm hour and press the Tuning control to confirm the hour setting.
- Then rotate the Tuning control to select the required alarm minute and press the Tuning control to confirm the setting.
- Rotate Tuning control to select the desired volume and press Tuning control to confirm the volume. Buzzer alarm setting is now completed.
When the alarm sound
To cancel a sounding alarm, press the Power button.
Disabling/cancelling alarms
To disable an active alarm, press the corresponding alarm button to cancel the alarm setting.
Alarm sound duration ALM
- Press and hold the Tuning control to enter the advanced menu of the current mode.
- Rotate the Tuning control until "ALM" shows on the display. Press the Tuning control to enter the setting.
- Rotate the Tuning control to cycle through the option of 1, 3, 5, 10, 15, 30 and 60 minutes. Stop when the desired option appears on the display, then press the Tuning control to confirm the setting.
Snoopze SNZ
- When the alarm sounds, press any button other than the Power button will silence the alarm. Snooze symbol (z^z^z) will appear on the display.
- To adjust the silence time for the snooze timer, press and hold the Tuning control to enter the menu setting.
- Rotate the Tuning control until "SNZ" appears on the display, then press the Tuning control to enter the setting. Rotate the Tuning control to adjust the silence time from the options of 1, 3, 5, 10, 15 minutes or OFF for the snooze timer.
- To cancel the snooze timer while the alarm is suspended, press the Power button.
To disable the snooze function, rotate the Tuning control until "OFF" is displayed.
Sleep timer SLP
The radio can be set to turn off automatically after a preset time has elapsed. The Sleep Timer setting can be adjusted between OFF, 15, 30, 45, 60 and 90 minutes.
- Press and hold the Tuning control to enter the advanced setting menu.
- Rotate the Tuning control until "SLP" shows on the display. Press the Tuning control to enter the setting.
- Rotate the Tuning control to cycle through the option of OFF, 15, 30, 45, 60 or 90. Stop when the desired sleep timer setting appears on the display. The setting will be saved and the LCD will return to normal display.
- The radio will switch off automatically after the preset Sleep Timer has elapsed. The Sleep Timer icon (z^*z) will show on the display indicating an active Sleep Timer.
- To cancel the Sleep Timer function before the preset time has elapsed, simply press and hold the Power button to turn the unit off manually. To cancel the function when countdown is progressing, go to sleep timer setting menu and select "OFF".
Tone control function TON
The sound of your sound system can be adjusted to suit your personal taste for the material that you are listening to. The radio has 5 preset equalizer modes. Alternatively, you may set the treble and bass levels to your own preferences.
- Press the Volume control to enter EQ menu.
- Rotate the Volume control until "TON" is shown on the display. Press the Volume control to enter the setup menu.
- Rotate the Volume control to cycle through the 6 modes below until the desired mode is displayed. Then press the Volume control to confirm the setting.
a. TN 1-Flat
b. TN 2-Heavy
c. TN 3- Soft
d. TN 4- Clear
e. TN 5-Vocal
- To revert back to the upper level menu, rotate the Volume control until is shown on the display. Then press the Volume control again to return to the upper level menu.
Set my own EQ BAS
BAS
EN
If you find the preset equalizer functions not to your liking, you may set up a custom treble and bass as following:
- Press the Volume control to enter EQ menu.
- Rotate the Volume control until "BAS" is shown on the display. Press the Volume control to enter the setup menu.
- Rotate the Volume control to adjust the bass level (between -5 and +3). The sound will change as you adjust the level. Press the Volume control again to confirm the setting.
- Rotate the Volume control until "TRE" is shown on the display. Press the Volume control to enter the setup menu.
- Rotate the Volume control to adjust the treble level (between -5 and +3). The sound will change as you adjust the level. Press the Volume control again to confirm the setting.
Setting the operation sound—SND
You can turn on or off the operation sound of the radio.
- Press and hold the Tuning control to enter the menu setting of the current mode.
- Rotate the Tuning control until "SND" appears on the display and press the Tuning control to enter the setting.
- Rotate the Tuning control to choose the required selection and press the Tuning control to confirm the setting.
Auxiliary input socket
A 3.5mm stereo Auxiliary Input sockets is provided at the left side of the radio.
- Connect an external audio source (for example, smartphone, MP3 or CD player) to the Auxiliary Input socket.
- Press the Source button until AUX IN is displayed.
- Adjust the volume setting on your smartphone, MP3 or CD player to ensure an adequate signal level from the player, and then use the Volume control on the radio as needed for comfortable listening.
Headphone socket
A 3.5mm Headphone Socket located on the right hand side of the radio is provided for use with headphones. Inserting a plug automatically mutes the internal loudspeaker. Please be aware that the sensitivity of headphones can vary widely. We therefore recommend setting volume to a low level before connecting headphones to the radio.
EN
It is also recommended to reduce the volume before unplugging your headphones.
CAUTION:
Excessive sound pressure from earphones and headphones can cause hearing loss.
USB socket for Smartphone charging
NOTE:
USB devices cannot be charged while receiving AM broadcasts.
The radio has a USB socket which is intended only for charging a smartphone and similar devices.
Charge time may vary and in some cases may take longer to charge than when using the manufacturers charging unit supplied with the smartphone.
- Connect your smartphone to the USB charging socket at the left side of the radio.
- Your smartphone will begin to charge. Please note that charging can take place in FM/Bluetooth®/Aux-in mode.
- Once your smartphone has charged remove the USB lead.
CAUTION:
Some USB devices allow charging only by a specific method.
Be sure to check before charging your device.
- The charger may not supply power to some USB devices.
- When not using or after charging, remove the USB cable and close the cover.
- Do not connect power source to USB port. Otherwise there is risk of fire. The USB port is only intended for charging lower voltage device. Always place the cover onto the USB port when not charging the lower voltage device.
- Do not insert a nail, wire, etc. into USB power supply port. Otherwise a circuit short may cause smoke and fire.
- Do not connect this USB socket with your PC USB port, as it is highly possible that it may cause breakdown of the units.
- Never use the USB socket in rainy or moist conditions to prevent moist from entering the radio. Always keep the rubber cover on the back well closed under these conditions.
LED light
The radio is fitted with a long life LED light located on the front panel of the radio. Press the Light button to switch on and off the LED light.
Caution: DO NOT STARE INTO BEAM.
NOTE:
When no operations are performed, the lights starts blinking after 10 minutes, and then it turns off one minute later.
IV. MAINTENANCE
Use only a dry, soft cloth for wiping the unit. Do not use a damp cloth, thinner, benzine, or other Volatile solvents for cleaning.
In the event that the inside of the unit or battery pack is exposed to water, drain and allow to dry as soon as possible. Carefully remove any dust or iron filings that collect inside the unit. If you experience any problems operating the unit, consult with a repair shop.
V. ACCESSORIES
Battery Pack
See the Specification.
Battery Charger
- For inquiries please contact an authorized dealer.
NOTE:
Battery pack and charger are not included in this kit.
[Battery Pack]
For Appropriate Use of Battery Pack
Li-ion Battery Pack [Fig. 4]
- The rechargeable batteries have a limited life.
- For optimum battery life, store the Li-ion battery pack following use without charging it.
- When charging the battery pack, confirm that the terminals on the battery charger are free of foreign substances such as dust and water etc. Clean the terminals before charging the battery pack if any foreign substances are found on the terminals.
The life of the battery pack terminals may be affected by foreign substances such as dust and water etc. during operation.
- When battery pack is not in use, keep it away from other metal objects like: pape clips, coins, keys, nails, screws, or other small
metal objects that can make a connection from one terminal to another. Shorting the battery terminals together may cause sparks, burns or a fire.
- When operating the battery pack, make sure the work place is well ventilated.
- When the battery pack is removed from the main unit, replace the battery pack cover immediately in order to prevent dust or dirt from contaminating the battery terminals and causing a short circuit.
CAUTION:
- To protect the motor or battery, be sure to note the following when carrying out operation.
- If the motor and battery becomes hot, the protection function will be activated and the motor and battery will stop operating.
For safe use
- The battery pack is designed to be installed by proceeding two steps for safety. Make sure the battery pack is installed properly to the main unit before use.
[Battery Charger]
Charging
CAUTION:
1) The charger is designed to operate on standard domestic electrical power only as stated in the rating plate. Charge only on the voltage indicated on the rating plate of unit. e.g.230 V/50 Hz.
2) Do not attempt to use it on any other voltage or frequency rating!
3) If the temperature of the battery pack falls approximately below -10^ (14°F), charging will automatically stop to prevent degradation of the battery.
4) The ambient temperature range is between 0^ (32^) and 40^ (104^) . If the battery pack is used when the battery temperature is below 0^ (32^) , the unit may fail to function properly.
5) Use the charger at temperatures between 0^ (32^) and 40^ (104^) , and charge the battery at a temperature similar to that of the battery itself. (There should be no more than a 15^ (59^) difference between the temperatures of the battery and the charging location.)
6) When charging a cool battery pack (below 0^ ( 32^ )) in a warm place, leave the battery pack at the place and wait for more than one hour to warm up
the battery to the level of the ambient temperature.
7) Cool down the charger when charging more than two battery packs consecutively.
8) Do not insert your fingers into contact hole, when holding charger or any other occasions.
9) To prevent the risk of fire or damage to the battery charger.
- Do not cover vent holes on the charger and the battery pack.
- Unplug the charger when not in use.
NOTE:
Your battery pack is not fully charged at the time of purchase. Be sure to charge the battery before use.
How to charge
- Plug the charger into the AC outlet.
NOTE:
Sparks may be produced when the plug is inserted into the AC power supply, but this is not a problem in terms of safety.
-
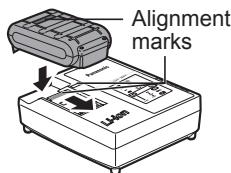
Connect the battery pack firmly into the charger.
-
Line up the alignment marks and place the battery onto the dock on the charger.
- Slide forward in the direction of the arrow.
-
During charging, the charging lamp will be illuminated. When charging is completed, an internal electronic switch will automatically be triggered to prevent overcharging.
-
Charging will not start if the battery pack is hot (for example, immediately after heavy-duty operation).
The orange standby lamp will be flashing until the battery cools down. Charging will then begin automatically.
- The charge lamp (green) will flash slowly once the battery is approximately 80% charged.
- When charging is completed, the charging lamp in green color will turn off.
- If the temperature of the battery pack is 0^ C ( 32^ F ) or less, charging takes longer to fully charge the battery pack than the standard charging time.
EN
Even when the battery is fully charged, it will have approximately 50% of the power of a fully charged battery at normal operating temperature.
-
Consult an authorized dealer if the charging lamp (green) does not turn off.
-
If a fully charged battery pack is inserted into the charger again, the charging lamp lights up. After several minutes, the charging lamp in green color will turn off.

LAMP INDICATIONS
Battery Recycling
ATTENTION:
For environmental protection and recycling of materials, be sure that it is disposed of at an officially assigned location, if there is one in your country.
Information for Users on Collection and Disposal of Old Equipment and used Batteries

These symbols on the products, packaging, and/or accompanying documents mean that used electrical and electronic products and batteries should not be mixed with general household waste.
For proper treatment, recovery and recycling of old products and used batteries, please take them to applicable collection points, in accordance with your national legislation and the Directives 2012/19/EC and 2006/66/EC.
By disposing of these products and batteries correctly, you will help to save valuable resources and prevent any potential negative effects on human health and the environment which could otherwise arise from inappropriate waste handling.
For more information about collection and recycling of old products and batteries, please contact your local municipality, your waste disposal service or the point of sale where you purchased the items.
Penalties may be applicable for incorrect disposal of this waste, in accordance with national legislation.
For business users in the European Union
If you wish to discard electrical and electronic equipment, please contact your dealer or supplier for further information.
EN
[Information on Disposal in other Countries outside the European Union]
These symbols are only valid in the European Union. If you wish to discard these items, please contact your local authorities or dealer and ask for the correct method of disposal.
VI. SPECIFICATIONS
[MAIN UNIT]
| AC power adaptor | DC12 V/1500 mA, center pin positive |
| Battery | Back up: UM-3 (AA size) × 2 |
| Main battery: 14.4 V/18 V | |
| Bluetooth® QD ID | 58625 |
| Bluetooth® version | 4.0 |
| Bluetooth® profiles | A2DP/SCMS-T |
| Transmission power | Bluetooth® specification power Class 2 (2.5 mW) |
| Transmission range | Approximately 10 m (varies according to usage conditions) |
| Supported codec | SBC |
| Compatible Bluetooth® profile | A2DP |
| Frequency range | FM 87.5-108 MHz (0.05 MHz/step) |
| AM (MW) 522-1629 kHz (9 kHz/step) | |
| Loudspeaker | 3.5 inches 8 ohm × 2 |
| Output Power | When using AC power adaptor: 1.7 W × 2 When using 14.4 V battery pack: 2.6 W × 2 When using 18 V battery pack: 4.5 W × 2 |
| Input terminal | 3.5 mm dia./Max. 2 V/stereo (AUX IN) |
| Output terminal | USB: DC OUT 5 V/1 A Headphone: 3.5 mm dia./3 Ω/150 mV/stereo |
| Antenna system | FM: soft beded antenna |
| AM: bar antenna | |
| Dimension (W × H × D) | 344 mm × 280 mm × 239 mm |
| Weight | 4.7 kg (with EY9L51)/4.0 kg (main unit only) |
| Power consumption | Max. 7 W 0.12 W (Standby mode) |
[BATTERY PACK]
| Model No. | EY9L41 | EY9L42 | EY9L44 | EY9L45 | EY9L47 | EY9L50 | EY9L51 | EY9L52 |
| Storage battery | Li-ion Battery | |||||||
| Motor voltage | 14.4V DC (3.6V × 4 cells) | 14.4V DC (3.6V × 8 cells) | 14.4V DC (3.6V × 4 cells) | 18V DC (3.6V × 10 cells) | 18V DC (3.6V × 5 cells) | |||
| Operating time at 50 W+50 W (FM Received) | Approx. 18 h | Approx. 9 h | Approx. 19 h | Approx. 24 h | Approx. 11 h | Approx. 19 h | Approx. 24 h | Approx. 11 h |
EN
[BATTERY CHARGER]
| Model No. | EY0L82 | |||||||
| Electrical rating | See the rating plate on the bottom of the charger | |||||||
| Weight | 0.93 kg | |||||||
| Charging time | EY9L41 | EY9L42 | EY9L44 | EY9L45 | EY9L47 | EY9L50 | EY9L51 | EY9L52 |
| Usable: 35min. | Usable: 30min. | Usable: 40min. | Usable: 50min. | Usable: 35min. | Usable: 40min. | Usable: 55min. | Usable: 35min. | |
| Full: 50min. | Full: 35min. | Full: 55min. | Full: 60min. | Full: 40min. | Full: 55min. | Full: 70min. | Full: 40min. | |
NOTE: This chart may include models that are not available in your area.
Please refer to the latest general catalogue.
For the dealer name and address, please see the included warranty card.
VII. LICENSE
- The Bluetooth® word mark and logos are registered trademarks owned by Bluetooth SIG, Inc. and any use of such marks by Panasonic Corporation is under license. Other trademarks and trade names are those of their respective owners.
- The various names, company names and product names presented in this manual are the trademarks or registered trademarks of their respective companies. Please note that some TM or ® symbols are omitted in this document.
About Bluetooth®
Panasonic bears no responsibility for data and/or information that is compromised during a wireless transmission.
Frequency band used
This system uses the 2.4 GHz frequency band.
■ Certification of this device
- This system conforms to frequency restrictions and has received certification based on frequency laws. Thus, a wireless permit is not necessary.
-
The action below are punishable by law in some countries:
-
Taking apart or modifying the unit.
- Removing specification indications.
Restrictions of use
-
Wireless transmission and/or usage with all Bluetooth® equipped devices is not guaranteed.
All devices must conform to standards set by Bluetooth SIG, Inc.
Depending on the specifications and settings of a device, it can fail to connect or some operations can be different. -
This system supports Bluetooth® security features. But depending on the operating environment and/or settings, this security is possibly not sufficient. Transmit data wirelessly to this system with caution.
- This system cannot transmit data to a Bluetooth® device.
Range of use
Use this device at a maximum range of 10m The range can decrease depending on the environment, obstacles or interference.
Interference from other devices
- This system may not function properly and troubles such as noise and sound jumps may arise due to radio wave interference if the main unit is located too close to other Bluetooth® devices or the devices that use the 2.4 GHz band.
This system may not function properly if radio waves from a nearby broadcasting station, etc. are too strong.
Intended usage
This system is for normal, general use only.
- Do not use this system near equipment or in an environment that is sensitive to radio frequency interference (example: airports, hospitals, laboratories, etc.).
Declaration of Conformity (DoC)
Hereby, "Panasonic
Corporation" declares that this product is in
compliance with the essential requirements and other relevant provisions of Directive 1999/5/EC.
C∈1797
Customers can download a copy of the original DoC to our R&TTE products from our DoC server:
http://www.doc.panasonic.de
Contact to Authorised Representative:
Panasonic Testing Centre, Panasonic Europe
Ltd. - Hamburg office, Winsbergring 15,
22525 Hamburg, Germany
ONLY FOR U.K.
VII. ELECTRICAL PLUG INFORMATION
FOR YOUR SAFETY PLEASE READ
THE FOLLOWING TEXT CAREFULLY
This appliance is supplied with a moulded three pin mains plug for your safety and convenience. A 5 amp fuse is fitted in this plug.
Should the fuse need to be replaced please ensure that the replacement fuse has a rating of 5 amp and that it is approved by ASTA or BSI to BS1362.
Check for the ASTA mark or the BSI mark on the body of the fuse.
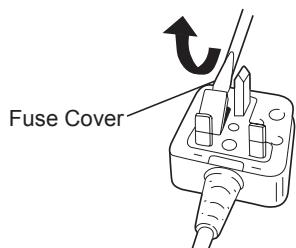
If the plug contains a removable fuse cover you must ensure that it is refitted when the fuse is replaced.
If you lose the fuse cover the plug must not be used until a replacement cover is ob-tained.
A replacement fuse cover can be purchased from your local Panasonic Dealer.
IF THE FITTED MOULDED PLUG IS UNSUITABLE FOR THE SOCKET OUT-LET IN YOUR HOME THEN THE FUSE SHOULD BE REMOVED AND THE PLUG CUT OFF AND DISPOSED OF SAFELY. THERE IS A DANGER OF SEVERE ELECTRICAL SHOCK IF THE CUT OFF PLUG IS INSERTED INTO ANY 13 AMP SOCKET.
If a new plug is to be fitted please observe the wiring code as shown below.
If in any doubt please consult a qualified electrician.
IMPORTANT:
The wires in this mains lead are coloured in accordance with the following code:
Blue: Neutral
Brown: Live
As the colours of the wire in the mains lead of this appliance may not correspond with the coloured markings identifying the terminals in your plug, proceed as follows.
The wire which is coloured BLUE must be connected to the terminal in the plug which is marked with the letter N or coloured BLACK. The wire which is coloured BROWN must be connected to the terminal in the plug which is marked with the letter L or coloured RED. Under no circumstances should either of these wires be connected to the earth terminal of the three pin plug, marked with the letter E or the Earth Symbol 1 .
How to replace the fuse: Open the fuse compartment with a screwdriver and replace the fuse and fuse cover if it is removable.
This apparatus was produced to BS800.
DE
Panasonic Testing Centre, Panasonic Europe
Ltd. - Hamburg office, Winsbergring 15, 22525
Hamburg, Duitsland
Denna enchets certificering
Panasonic Testing Centre, Panasonic Europe
Ltd. - Hamburg office, Winsbergring 15, 22525
Hamburg, Tyskland
C∈1797
Panasonic Testing Centre, Panasonic Europe Ltd. - Hamburg office, Winsberging 15, 22525 Hamburg, Almanya
Panasonic Testing Centre
Panasonic Europe Ltd. - Hamburg office,
Winsberging 15,
22525 Hamburg,
Germany
Panasonic Corporation
1006,Kadoma,Osaka 571-8501,Japan
http://www.panasonic.com
EN. DE. FR. IT. NL. ES. DA. SV. NO. FI. TR
EY971037A201 2015.02 S
Printed in China
- EN Original instructions: English Translation of the original instructions: Other languages
- Definition of IP code
- NOTE:
- LIMITED WARRANTY
- IMPORTANT SAFETY INSTRUCTIONS
- Read All Instructions
- WARNING:
- ASSEMBLY
- Battery Installation
- Installing back up batteries [Fig. 1]
- CAUTION:
- Attaching/Removing main battery pack [Fig. 2]
- EN
- Low battery indicator
- Using the soft bended antenna [Fig. 3]
- Using Supplied AC power adaptor
- OPERATIONS
- Operating the radio - Scan tuning AM/FM
- Manual tuning - AM/FM
- Presetting stations in AM/FM mode
- Recalling a preset in AM/FM mode
- FM stereo/mono FM
- Listening to music via Bluetooth® streaming BT
- Pairing your Bluetooth® device for the first time
- Playing previously-paired devices
- Erasing the paired device memory
- Disconnecting your Bluetooth device
- Clock and Alarms
- Setting the clock format TIM
- Setting the clock time manually CLK
- Setting the alarm clock
- a. Setting radio alarm:
- b. Setting HWS (Humane Wake System) buzzer alarm:
- When the alarm sound
- Disabling/cancelling alarms
- Alarm sound duration ALM
- Snoopze SNZ
- Sleep timer SLP
- Tone control function TON
- Set my own EQ BAS
- BAS
- Setting the operation sound—SND
- Auxiliary input socket
- Headphone socket
- USB socket for Smartphone charging
- LED light
- MAINTENANCE
- ACCESSORIES
- Battery Pack
- Battery Charger
- [Battery Pack]
- For Appropriate Use of Battery Pack
- Li-ion Battery Pack [Fig. 4]
- For safe use
- [Battery Charger]
- Charging
- How to charge
- Battery Recycling
- ATTENTION:
- Information for Users on Collection and Disposal of Old Equipment and used Batteries
- For business users in the European Union
- [Information on Disposal in other Countries outside the European Union]
- SPECIFICATIONS
- [MAIN UNIT]
- LICENSE
- About Bluetooth®
- Frequency band used
- ■ Certification of this device
- Restrictions of use
- Range of use
- Interference from other devices
- Intended usage
- Declaration of Conformity (DoC)
- C∈1797
- ONLY FOR U.K.
- ELECTRICAL PLUG INFORMATION
- FOR YOUR SAFETY PLEASE READ
- THE FOLLOWING TEXT CAREFULLY
- IMPORTANT:
- DE
- Denna enchets certificering
Brand : PANASONIC
Model : EY37A2
Category : Power tool