
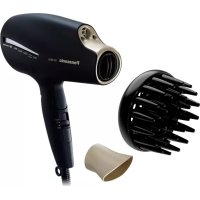
EH-HW32 - Hair dryer PANASONIC - Free user manual and instructions
Find the device manual for free EH-HW32 PANASONIC in PDF.
| Product type | Multi-style straightener |
| Brand | PANASONIC |
| Model | EH-HW32 |
| Power supply | 100-130 V AC / 220-240 V AC, 50-60 Hz, automatic voltage conversion |
| Power consumption | 37 W (100-130 V) / 39 W (220-240 V), max 400 W |
| Temperature range | 130 °C to 170 °C (5 levels) |
| Temperature adjustment | + and - switches, LED display |
| Functions | Straightening and curling with attachments |
| Included accessories | Curling attachments (attach/detach with push button) |
| Illumination lamp | Yes, lights up when turned on |
| Automatic shut-off | After approximately 60 minutes of use |
| Heat-up time | Approximately 1 minute to reach 100 °C |
| Cleaning | Soft cloth dampened with water and soap, well wrung out |
| Safety | Do not use near water; hot surfaces do not touch |
| Warranty | See Panasonic website or authorized service center |
| Intended use | Household use only |
Frequently Asked Questions - EH-HW32 PANASONIC
User questions about EH-HW32 PANASONIC
0 question about this device. Answer the ones you know or ask your own.
Ask a new question about this device
Download the instructions for your Hair dryer in PDF format for free! Find your manual EH-HW32 - PANASONIC and take your electronic device back in hand. On this page are published all the documents necessary for the use of your device. EH-HW32 by PANASONIC.
USER MANUAL EH-HW32 PANASONIC
Operating Instructions
(Household) Multi-Styling Straightener
Model No. EH-HW32
Before operating this unit, please read these instructions completely and save them for future use.

English. 4 Dansk. 85
Deutsch 13 Suomi. 94
Français 22 Polski 103
Italiano 31 Cesky 112
Espanol 40 Slovenica. 121
Nederlands 49 Româna 130
Portugues 58 Magyar 139
Norsk 67 Turkce 148
Svenska 76

2
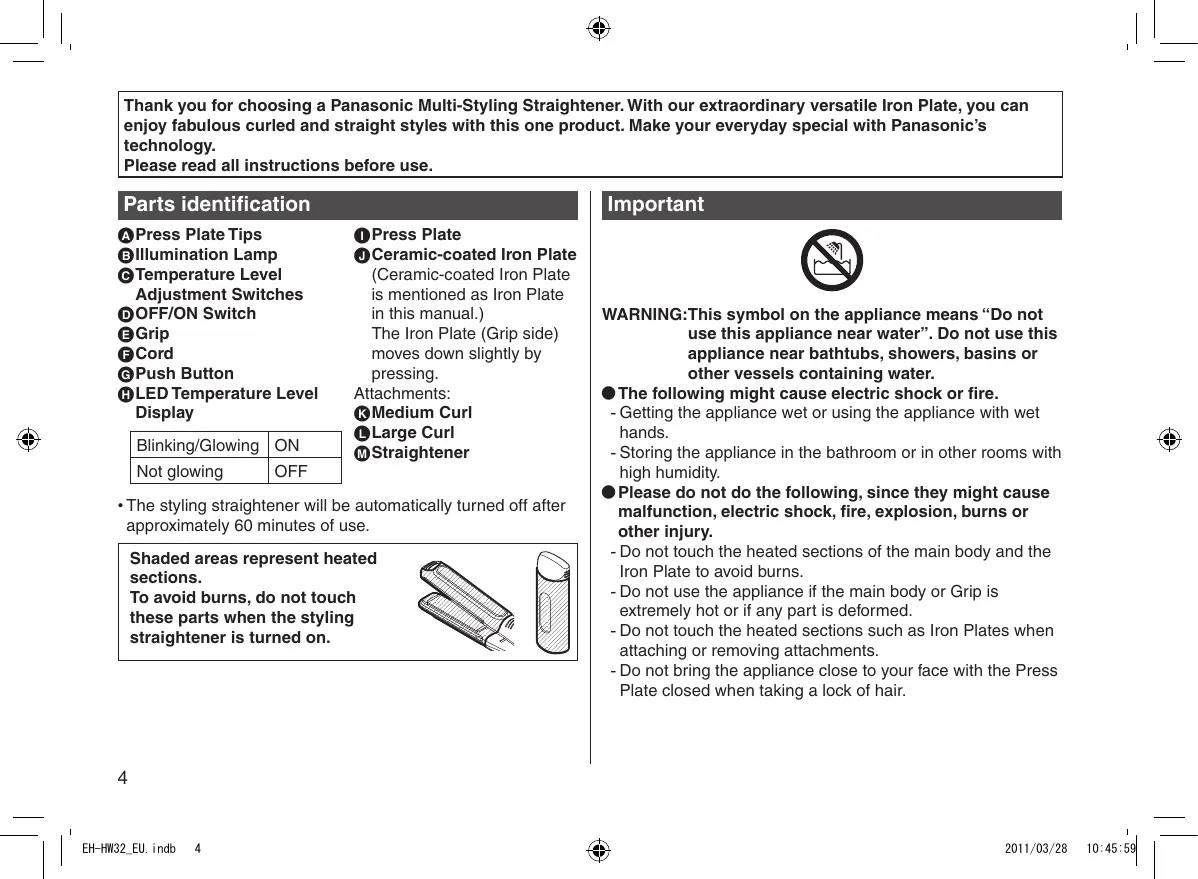
Thank you for choosing a Panasonic Multi-Styling Straightener. With our extraordinary versatile Iron Plate, you can enjoy fabulous curled and straight styles with this one product. Make your everyday special with Panasonic's technology.
Please read all instructions before use.
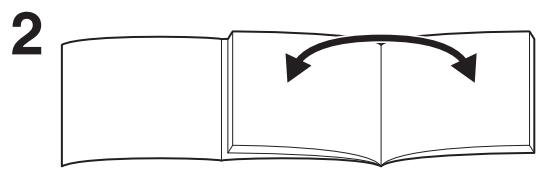
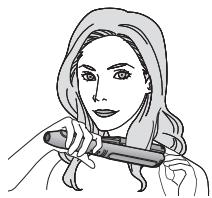
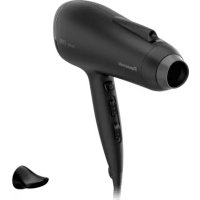
Parts identification
A Press Plate Tips
Illumination Lamp
Temperature Level Adjustment Switches
OFF/ON Switch
Grip
Cord
Push Button
LED Temperature Level Display
| Blinking/Glowing | ON |
| Not glowing | OFF |
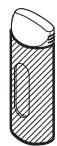
1Press Plate
① Ceramic-coated Iron Plate (Ceramic-coated Iron Plate is mentioned as Iron Plate in this manual.)
The Iron Plate (Grip side) moves down slightly by pressing.
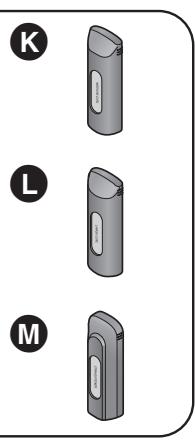
Attachments:
Medium Curl
Large Curl
Straightener
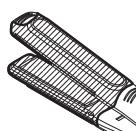
- The styling straightener will be automatically turned off after approximately 60 minutes of use.
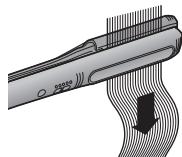
Shaded areas represent heated sections.
To avoid burns, do not touch these parts when the styling straightener is turned on.
Important

WARNING: This symbol on the appliance means "Do not use this appliance near water". Do not use this appliance near bathtubs, showers, basins or other vessels containing water.
The following might cause electric shock or fire.
-
Getting the appliance wet or using the appliance with wet hands.
-
Storing the appliance in the bathroom or in other rooms with high humidity.
-
Please do not do the following, since they might cause malfunction, electric shock, fire, explosion, burns or other injury.
-
Do not touch the heated sections of the main body and the Iron Plate to avoid burns.
- Do not use the appliance if the main body or Grip is extremely hot or if any part is deformed.
- Do not touch the heated sections such as Iron Plates when attaching or removing attachments.
-
Do not bring the appliance close to your face with the Press Plate closed when taking a lock of hair.
-
This appliance is not intended for use by persons (including children) with reduced physical, sensory or mental capabilities, or lack of experience and knowledge, unless they have been given supervision or instruction concerning use of the appliance by a person responsible for their safety. Children should be supervised to ensure that they do not play with the appliance.
The following might cause malfunction, electric shock or fire.
- Keep using the damaged appliance or dropping the appliance or subject it to impact.
- Applying any spray directly onto the appliance.
- Using flammable substances (benzine, aerosol sprays, thinners, etc.) near the appliance.
- Forcibly opening the Press Plate.
- Repairing or disassembling the appliance and the supply cord by non-qualified personnel.
- Using the appliance on infants or for anything other than hair.
- Failure to follow the following precautions may result in fire, electric shock, short circuit, or burns.
- Always grasp the plug while unplugging.
- Always ensure the appliance is operated on an electric power source matched to its rated voltage.
- After use, be sure to remove the plug from the power outlet. Wrapping the cord around the appliance may cause fire and/or electric shock.
- Stop using it immediately if the cord or plug is damaged or becomes hot; or the plug fits loosely in the outlet.
-
If the supply cord is damaged, it must be replaced by the manufacturer, its service center, or similarly qualified persons in order to avoid a hazard.
-
If the appliance is not working properly, smells of burning, or if all the LED Temperature Level Displays are blinking, stop using it immediately and contact an authorized service center.
- Do not scratch, break, alter, or excessively bend, twist, or pull the power cord in any way. Also, do not place the power cord under or between heavy objects.
- When the appliance is used in a bathroom, unplug it after use since the proximity of water presents a hazard even when the appliance is switched off.
- For additional protection, the installation of a residual current device (RCD) having a rated residual operating current not exceeding 30mA is advisable in the electrical circuit supplying the bathroom. Ask your installer for advice.
- Keep the appliance out of reach of children or invalids.
- Do not leave the appliance powered on, to avoid fire, discolouration, or warping of nearby objects.
Styling will hold for 1 day only. Hair will return to its normal condition after shampoo.
Not suitable for those with extremely fizzled or curly hair. - Do not store the power cord in a twisted state.
- Storing the appliance with make up or hair care products still adhered may result in degradation in the plastic and discoloration or cracking, which may in turn prevent the appliance from working properly. To clean the appliance, use a cloth that has been soaked in soap and water and well wrung out.

Tips for best straightening results
Tips for effective styling
- If your hair is too wet, it cannot be set properly. Be sure that your hair is no more than slightly damp. If your hair is wet, semi-dry your hair until it reaches the appropriate level of dampness.
- If your hair has strong curls or is particularly thick or hard, you may not be able to straighten your hair using the styling straightener alone.
In this case, applying a commercially available styling product (for hair-straightening) will help with the straightening.
1 Brush your hair to ensure it is lying in the same direction.
2 dampen your hair using a base styling product, water or a wet towel.
- In the case of using the styling product, lightly moisten the surface and underlying hair by applying the spray evenly from a distance of approximately 10 cm.
3 For beautiful straightening, bundle and pin to hold your hair in the order shown in the illustration.
Although it may appear to be time consuming, it is the fastest way to straighten hair neatly.
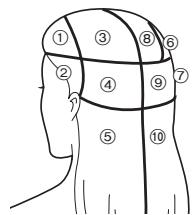
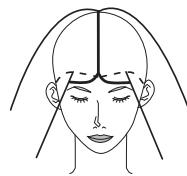
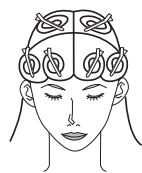
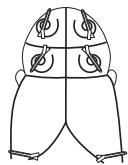
How to bundle your hair
Part your hair evenly to the left and right, and divide your hair.
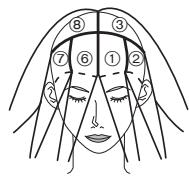
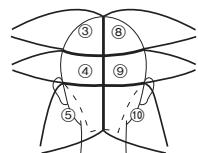
2 Divide the hair on the rear of your head into six parts from top to bottom.
3 Twist each bundle of hair into a roll, then pin to hold.
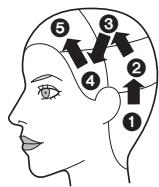
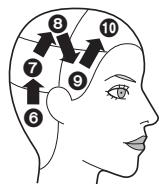
Styling order
Start styling from the bottom on the back of your head in the order of 1 to
5 (6 to 10 as well).
Hair types and straightening guidelines
- The hair straightening effect may differ according to the individual, such as the degree of curliness and hair type. Straightening tends to be more difficult for hard hair and hair having a flat (oval or triangular) cross-section.
- This styling straightener is intended to straighten hair only for that day.
- This styling straightener does not straighten kinked hair.
About hair-straightening products
- Do not use the styling straightener immediately after a home straight perm liquid is used. Doing so may damage your hair. (The styling straightener may be used 3-4 days after a straight perm liquid. The styling straightener may also be used 3-4 days after having your hair treated at a beauty parlor.)
- Do not use together with straight perm liquids having the same ingredients (reducing agent) as permanent wave liquids. The reducing agent may damage your hair. Check the back of cosmetic bottles whether liquid contains a reducing agent or not.
About dyeing products
- Dyeing places great stress on the hair. After dyeing please wait for 2 or 3 days before using the styling straightener. If you use a temporary dye, wash it out and dry your hair before use.
- It takes some time after dyeing for the color to settle. In the case of the temporary dye, the dye can dirty the styling straightener if it is not fully washed out. Also, your hair cannot be straightened when it is wet.
Before Use
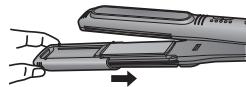
Attaching and removing attachments
Attaching
- Holding the attachment as illustrated.
- Press the attachment in along the groove on the Press Plate side until you hear a click.
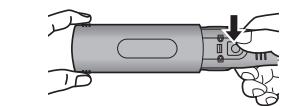
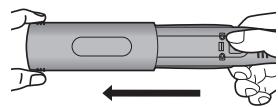
Removing
Press the Push Button, and pull out the attachment while holding the attachment as illustrated.
- Do not touch the heated sections such as Iron Plates when attaching or removing attachments.
Heating the Iron Plate
1 Insert the plug into the power outlet.
2 Press and hold the OFF/ON Switch (D) for approximately 1 second to turn on the styling straightener.
- The Illumination Lamp (B) glows.
- Confirm that the LED Temperature Level Display (H) for level 1 is blinking green.
- Do not use the styling straightener if all the lamps are blinking.
3 Set a temperature by using the Temperature Level Adjustment Switches (C) according to the characteristics and condition of your hair.
| Indicator | Temperature | Wavy | Less damaged |
| 5 | Approx.170 °C | ▲ | ▲ |
| 4 | Approx.160 °C | Your hair type | Your hair condition |
| 3 | Approx.150 °C | ||
| 2 | Approx.140 °C | ↓ | ↓ |
| 1 | Approx.130 °C | Straight | Damaged |
- For strong curls, raise the temperature setting. For gentle curls, lower the temperature setting.
- The temperature is raised using "+" and lowered using "-"
- Confirm that the LED Temperature Level Display (H) have changed.
8
- When the selected LED Temperature Level Display (H) stops blinking (and glows), the styling straightener has reached the selected temperature.
(Note that the time taken to reach operating temperature may vary depending on the operating environment.)
- When you use the styling straightener for the first time, be sure to set the temperature to level 1.
- The temperature level 5 is high and may damage your hair.
We recommend that you avoid continuous lengthy use of this level, and only use it if your hair is in a suitable condition.
After switching on, the styling straightener reaches operating temperature (approximately 100^ ) after about 1 minute.
- Steam will be generated when you apply the high-temperature Iron Plate (①) to wet hair. Be careful not to burn yourself.
- Avoid using flammable styling products, since they may generate gases when heated.
- Avoid accidentally touching the Temperature Level Adjustment Switches (C) and changing the temperature during use.
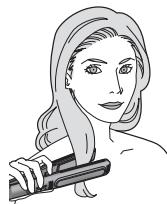
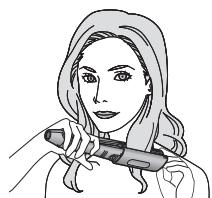
Using the styling straightener
Before use, confirm that the LED Temperature Level Display (H) has stopped blinking and glows.
Straightening
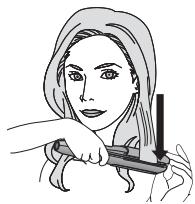
Use the appliance without an attachment. If you want to fully straighten your hair further towards the ends, use with the Straightener (M) attached.
1 Hold a bundle of hair with a width of approximately 5 cm.
- Do not take much hair as it may be difficult to straighten your hair.
2 Clamp the bundle of hair with the Press Plate (0) underneath the hair.
- Clamp the bundle of hair in the center of the Iron Plate (①).

- Use both hands and hold the Press Plate Tips (A) to straighten curly hair. Do not use excessive force as it may place a strain on hair ends.
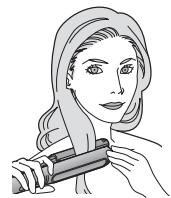
3 With the hair clamped, move the styling straightener straight toward the hair ends.
- Move the styling straightener slowly (at a speed slower than ordinary brushing).
| Recommended speeds (from scalp to hair ends) | |
| Short | Approx. 3 sec. |
| Semi-long | Approx. 4-5 sec. |
| Long | Approx. 7-8 sec. |
- When using the styling straightener at temperature level 5, do not straighten the same bundles of hair more than 2 times. At other temperature levels, adjust the number of straightening strokes to suit the degree of curliness.
- When hair is clamped, do not hold the styling straightener in the same position. Doing so may damage or even cut the hair.
4 After use, press and hold the OFF/ON Switch (D) for approximately 1 second to turn off the styling straightener.
Style your hair using hair cream, wax, etc. If styling product adheres to the styling straightener please refer to the cleaning procedure.
9
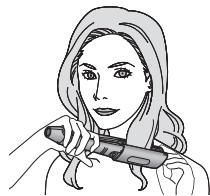
Curling
1 Select the attachment you want to use and attach it to the main body.
2 Hold a bundle of hair with a width of approximately 3 cm.
- Do not take much hair as it may be difficult to style your hair.
3 For an inward curl, clamp the hair with the attachment facing inwards.
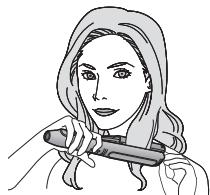
For an outward curl, clamp the hair with the attachment facing outwards.
- Clamp the bundle of hair in the center of the Iron Plate (0).
- Clamp the hair just above the point at which you want to make curls.
After clamping a bundle of hair, rotate the main body through an angle amounting to slightly more than a half-rotation (180^) .
- For an inward curl, rotate the main body towards your face.
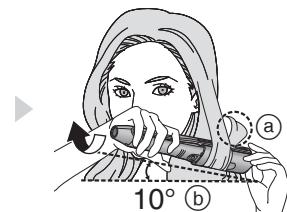
- For an outward curl, rotate the main body outwards.
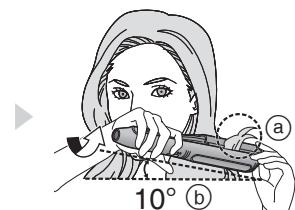
(a) After the half-rotation, ensure that the hair tips protrude towards the back-of-the-head.
⑥ Tilt the main body 10^ towards the back-of-the-head.
5 Keeping the styling straightener in the halfrotated position, slide it straight down towards the hair ends while clamping the bundle of hair.
- Move the styling straightener slowly (at a speed slower than ordinary brushing).
| Recommended speeds (from scalp to hair ends) | |
| Short | Approx. 3 sec. |
| Semi-long | Approx. 4-5 sec. |
| Long | Approx. 7-8 sec. |
- For a more defined curl, make a full rotation (360^) of the main body and slide it towards the hair ends.
- For an effective curl, move the styling straightener slowly at a same speed while clamping a small bundle of hair.
- Grip the root of an already created curl with your hand. Then move it up and down. It will give you a more defined curl.
Do not detangle the finished curls until the hair cools down.
Cleaning
Clean the styling straightener or attachments after they have cooled and with the plug removed from the power outlet.
- To clean the styling straightener or attachments, use a cloth that has been soaked in soap and water and well wrung out.
- Do not use alcohol, thinner, benzine or remover.
Doing so may crack or discolor the surface of the styling straightener.
- Do not touch the body until it has cooled down.
Guarantee
Please visit Panasonic web site http://panasonic.net or contact an authorized service center (you find its contact address in the pan european guarantee leaflet.) if you need information or if the styling straightener or the cord gets damaged.
Specifications
Model No.: EH-HW32
| Power source | 100 - 130 V AC 50-60 Hz | 220 - 240 V AC 50-60 Hz |
| (Automatic voltage conversion) | ||
| Power consumption | 37 W (Max 400 W) | 39 W (Max 400 W) |
| Iron temperature | Approx. 130 °C to 170 °C | |
This product is intended for household use only.
Information on Disposal for Users of Waste Electrical & Electronic Equipment (private households)
This symbol on the products and/or accompanying documents means that used electrical and electronic products should not be mixed with general household waste.
For proper treatment, recovery and recycling, please take these products to designated collection points, where they will be accepted on a free of charge basis.
Alternatively, in some countries you may be able to
return your products to your local retailer upon the purchase of an equivalent new product.
Disposing of this product correctly will help to save valuable resources and prevent any potential negative effects on human health and the environment which could otherwise arise from inappropriate waste handling. Please contact your local authority for further details of your nearest designated collection point.
Penalties may be applicable for incorrect disposal of this waste, in accordance with national legislation.
For business users in the European Union
If you wish to discard electrical and electronic equipment, please contact your dealer or supplier for further information.
Information on Disposal in other Countries outside the European Union
This symbol is only valid in the European Union. If you wish to discard this product, please contact your local authorities or dealer and ask for the correct method of disposal.
Identification of dele
- Tag/DD: 1. Tagging the dog.
- Tagging the dog.
- Tagging the dog.
- Tagging the dog.
- Tagging the dog.
2 Klem fast om hårtotten med Pressepladen (1) nedenunder haret.
Navanakorn Industrial Estate, Zone 3
No. 106 Moo 18, Khlong 1,
Khlong Luang, Pathum Thani 12120
Thailand
YETKILI TEMSILCI
Panasonic Elektronik Satis A.S.
Maslak Mah. Bilim Sok.
Sun Plaza No:5 K:16
34398 Maslak-Sisli
Istanbul Turkey
Tel: (+90) 212 367 94 00
Fax: (+90) 212 286 21 11
www.panasonic.com.tr
URUNUN KULLANIM OMRU 7 YILDIR
MEMO


Panasonic Electric Works (Thailand) Co., Ltd.
http://panasonic.net
EN,GE,FR,IT,SP,DU,PT,NW,SW,DA,FI,PL,CZ,SK,RO,HU,TK
Printed in Thailand
0000000000 X0000-0

- Parts identification
- Important
- Tips for best straightening results
- Tips for effective styling
- How to bundle your hair
- Styling order
- Hair types and straightening guidelines
- About hair-straightening products
- About dyeing products
- Before Use
- Attaching and removing attachments
- Attaching
- Removing
- Heating the Iron Plate
- Insert the plug into the power outlet.
- Press and hold the OFF/ON Switch (D) for approximately 1 second to turn on the styling straightener.
- Set a temperature by using the Temperature Level Adjustment Switches (C) according to the characteristics and condition of your hair.
- Using the styling straightener
- Straightening
- Curling
- Cleaning
- Guarantee
- Specifications
- Information on Disposal for Users of Waste Electrical & Electronic Equipment (private households)
- For business users in the European Union
- Information on Disposal in other Countries outside the European Union
- Identification of dele
- YETKILI TEMSILCI
- MEMO
Brand : PANASONIC
Model : EH-HW32
Category : Hair dryer