RP-WF6000 - Headphones PANASONIC - Free user manual and instructions
Find the device manual for free RP-WF6000 PANASONIC in PDF.

| Product type | Digital wireless surround headphones |
| Brand | Panasonic |
| Model | RP-WF6000 |
| Transmission | Digital wireless, 2.4 GHz band, DSSS modulation |
| Transmission range | Approx. 30 meters |
| Built-in decoders | Dolby Digital, Dolby Pro Logic II, DTS, MPEG-2 AAC |
| Surround modes | Music, Cinema, Voice, Off |
| Speaker | 50 mm diameter |
| Frequency response | 10 Hz - 24,000 Hz |
| Transmitter power supply | DC 9 V AC adapter (included, model RFX5726) |
| Headphone power supply | Dedicated Ni-MH rechargeable battery (RP-BP6000) or 2 LR6/AA alkaline batteries |
| Charging time | Approx. 3 hours |
| Battery life (rechargeable) | Approx. 8 hours |
| Battery life (alkaline batteries) | Approx. 6 hours |
| Headphone weight | Approx. 380 g (including rechargeable battery) |
| Dimensions (transmitter + headset vertical) | 202 × 244 × 161.5 mm |
| Dimensions (transmitter + headset horizontal) | 202 × 115 × 270 mm |
| Audio inputs | 2 optical digital inputs (TOSLINK), 1 RCA analog input (L/R) |
| Audio output | 1 optical digital output (TOSLINK) |
| Special functions | Automatic power on/off, Muting function, auto-shutdown of transmitter after 5 minutes without signal |
| Maintenance | Clean with a soft, dry cloth; do not use alcohol, thinner, or benzine |
| Spare parts | Rechargeable battery RP-BP6000, AC adapter RFX5726 |
Frequently Asked Questions - RP-WF6000 PANASONIC
User questions about RP-WF6000 PANASONIC
0 question about this device. Answer the ones you know or ask your own.
Ask a new question about this device
Download the instructions for your Headphones in PDF format for free! Find your manual RP-WF6000 - PANASONIC and take your electronic device back in hand. On this page are published all the documents necessary for the use of your device. RP-WF6000 by PANASONIC.
USER MANUAL RP-WF6000 PANASONIC
natural_image
Illustration of a multi-band headphones mounted on a control panel (no text or symbols visible)Note:
“EB” on the packaging indicates the United Kingdom.
Before connecting, operating or adjusting this product, please read the instructions completely. Please keep this manual for future reference.
Thank you for purchasing this product.
For optimum performance and safety, please read the instructions carefully.
Supplied Accessories

Please check and identify the supplied accessories.
For the United Kingdom only:
Use numbers indicated in parentheses when asking for replacement parts. "As of August 2006"
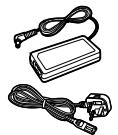
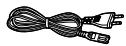
□AC adaptor ....1 (RFX5726)
☐ AC adaptor power cord ....1 For United Kingdom: (K2CT3CA00004)
For Continental Europe: (K2CQ2CA00006)
□ Dedicated nickel-metal hydride rechargeable battery .....1 (RP-BP6000)
☐ Optical digital cable (Approximately 2 meters) ..1 (K7CXJFA00001)

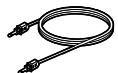
The shape of replacement parts may differ.
Table of contents
Features 2
Caution for AC Mains Lead 3
Precautions 5
Control reference guide 6
Transmitter's front panel 6
Transmitter's rear panel 6
Headphones 7
Power supply preparations: Headphones ...... 8
Using the rechargeable battery (supplied).... 8
Using alkaline dry cell batteries (not included) .... 10
Connections 11
Connecting digital equipment 11
Connecting analogue equipment 12
Placement of transmitter and headphones ..... 13
Listening to audio from equipment connected to
the transmitter 14
Selecting the surround field 16
Maintenance 16
Troubleshooting guide 17
Specifications 20
Features
The RP-WF6000 is a digital wireless surround headphones system using the 2.4 GHz radio frequency band for digital transmission.
You can enjoy multi-channel surround sound when you listen with the headphones.
- The headphones are compatible with Dolby Digital, Dolby Pro Logic II, DTS, Dolby Digital Surround EX and DTS-ES.
- The headphones are compatible with the MPEG-2 AAC audio format.
- The headphones use non-compressed digital wireless transmission that provides sound quality equal to a CD and is resistant to external noise.
- The “Personal Surround” technology developed by Panasonic and the large diameter, high quality ∅ 50 mm driver unit mean you can enjoy the powerful presence of surround audio from these headphones.
- The headphones have a reception range of up to approximately 30 meters. This range differs depending on the conditions under which the headphones are used.
- The headphones are charged by simply placing them on the transmitter. (3 hours quick charge)
- The headphones can be placed on the transmitter in 2 different ways. (The battery can be charged in both positions).
- This unit has 2 OPTICAL DIGITAL IN terminals and 1 OPTICAL DIGITAL OUT (pass-through) terminal.
- If no audio signal is input for more than approximately 5 minutes, the radio waves being emitted from the transmitter automatically stop to save power consumption.
- The headband has a free adjusting mechanism eliminating the need for headband adjustment.
- The headphones have an AUTO POWER ON/OFF function which automatically turns on the power when the headphones are put on and turns it off when the headphones are removed.
- A single volume control adjusts both the right and left volume of the headphones.
- The headphones are powered by either the supplied nickel-metal hydride rechargeable battery or "LR6, AA" alkaline dry cell batteries (not included).
- The MUTING function cuts noise if the headphones are used outside their effective range.
- The headphones are comfortable to wear as they use a velvety material that is soft and breathes well. This transmitter has a DTS decoder, Dolby Digital decoder, a Dolby Pro Logic II decoder and a MPEG-2 AAC decoder.
Manufactured under license from Digital Theater Systems, Inc. U.S. Pat. No's. 5,451,942; 5,956,674; 5,974,380; 5,978,762; 6,487,535 and other U.S. and world-wide patents issued and pending. "DTS" and "DTS Virtual" are trademarks of Digital Theater Systems, Inc. Copyright 1996, 2003 Digital Theater Systems, Inc. All Rights Reserved.
Caution for AC Mains Lead
(For United Kingdom)
("EB" area code model only)
For your safety, please read the following text carefully.
This appliance is supplied with a moulded three pin mains plug for your safety and convenience.
A 5-ampere fuse is fitted in this plug.
Should the fuse need to be replaced please ensure that the replacement fuse has a rating of 5-ampere and that it is approved by ASTA or BSI to BS1362.
Check for the ASTA mark 📊 or the BSI mark 🌼 on the body of the fuse.
If the plug contains a removable fuse cover you must ensure that it is refitted when the fuse is replaced.
If you lose the fuse cover the plug must not be used until a replacement cover is obtained.
A replacement fuse cover can be purchased from your local dealer.
CAUTION!
IF THE FITTED MOULDED PLUG IS UNSUITABLE FOR THE SOCKET OUTLET IN YOUR HOME THEN THE FUSE SHOULD BE REMOVED AND THE PLUG CUT OFF AND DISPOSED OF SAFELY.
THERE IS A DANGER OF SEVERE ELECTRICAL SHOCK IF THE CUT OFF PLUG IS INSERTED INTO ANY 13-AMPERE SOCKET.
If a new plug is to be fitted please observe the wiring code as stated below.
If in any doubt please consult a qualified electrician.
IMPORTANT
The wires in this mains lead are coloured in accordance with the following code:
Blue: Neutral, Brown: Live.
As these colours may not correspond with the coloured markings identifying the terminals in your plug, proceed as follows:
The wire which is coloured Blue must be connected to the terminal which is marked with the letter N or coloured Black or Blue.
The wire which is coloured Brown must be connected to the terminal which is marked with the letter L or coloured Brown or Red.
WARNING: DO NOT CONNECT EITHER WIRE TO THE EARTH TERMINAL WHICH IS MARKED WITH THE LETTER E, BY THE EARTH SYMBOL 12 OR COLOURED GREEN OR GREEN/YELLOW.
THIS PLUG IS NOT WATERPROOF—KEEP DRY.
Before use
Remove the connector cover.
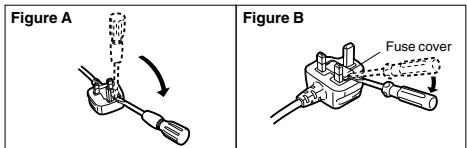
How to replace the fuse
The location of the fuse differ according to the type of AC mains plug (figures A and B). Confirm the AC mains plug fitted and follow the instructions below. Illustrations may differ from actual AC mains plug.
- Open the fuse cover with a screwdriver.
text_image
Figure A Figure B Fuse cover- Replace the fuse and close or attach the fuse cover.

text_image
Figure A Fuse (5 ampere) Figure B Fuse (5 ampere)Sales and Support Information
(For United Kingdom and Republic of Ireland)
Customer Care Centre
• For customers within the UK: 08705 357357
- For customers within the Republic of Ireland: 01289 8333
- Visit our website for product information
• E-mail: customer.care@panasonic.co.uk
Direct Sales at Panasonic UK
- Order accessory and consumable items for your product with ease and confidence by phoning our Customer Care Centre Monday - Thursday 9:00am – 5:30pm, Friday 9:30am – 5:30pm (Excluding public holidays).
- Or go on line through our Internet Accessory ordering application at www.panasonic.co.uk.
- Most major credit and debit cards accepted.
- All enquiries transactions and distribution facilities are provided directly by Panasonic UK Ltd.
- It couldn't be simpler!
- Also available through our Internet is direct shopping for a wide range of finished products, take a browse on our website for further details.
Interested in purchasing an extended guarantee?
Please call 0870 240 6284 or visit our website
www.panasonic.co.uk/guarantee.
VAROITUS!
- ÄLÄ ASENNA TAI LAITA TÄTÄ LAITETTA KABINETTITYYPPISEEN KIRJAKAAPPIIN TAI MUUHUN SULJETTUUN TILAAN, JOTTA TUULETUS ONNISTUISI. VARMISTA, ETTÄ VERHO TAI MIKÄÄN MUU MATERIAALI EI HUONONNA TUULETUSTA, JOTTA VÄLTETTÄISIIN YLIKUUMENEMISESTA JOHTUVA SÄHKÖISKU- TAI TULIPALOVAARA.
- ÄLÄ PEITÄ LAITTEEN TUULETUSAUKKOJA SANOMALEHDELLÄ, PÖYTÄLIINALLA, VERHOLLA TAI MUULLA VASTAAVALLA ESINEELLÄ.
- ÄLÄ ASETA PALAVAA KYNTTILÄÄ TAI MUUTA AVOTULEN LÄHDETTÄ LAITTEEN PÄÄLLE.
- HÄVITÄ PARISTOT LUONTOA VAHINGOITTAMATTOMALLA TAVALLA.
VAROITUS:
TULIPALO-, SÄHKÖISKUVAARAN TAI TUOTETTA KOHTAAVAN MUUN VAHINGON VÄHENTÄMISEKSI EI LAITETTA SAA ALTISTAA SATEELLE, KOSTEUELLE, VESIPISAROILLE TAI ROISKEELLE, EIKÄ NESTETTÄ SISÄLTÄVIÄ ESINEITÄ, KUTEN ESIMERKIKSI MALJAKOITA, SAAASETTAA LAITTEEN PÄÄLLE.
TÄMÄ LAITE ON TARKOITETTU KÄYTETTÄVÄKSI LEUDOSSA ILMASTOSSA.
TO REDUCE THE RISK OF FIRE, ELECTRIC SHOCK OR PRODUCT DAMAGE, DO NOT EXPOSE THIS APPARATUS TO RAIN, MOISTURE, DRIPPING OR SPLASHING AND THAT NO OBJECTS FILLED WITH LIQUIDS, SUCH AS VASES, SHALL BE PLACED ON THE APPARATUS.
Marking sign is located on bottom of the unit.
The socket outlet shall be installed near the equipment and easily accessible or the mains plug or an appliance coupler shall remain readily operable.
This product may receive radio interference caused by mobile telephones during use. If such interference is apparent, please increase separation between the product and the mobile telephone.
-If you see this symbol-
Information on Disposal for Users of Waste Electrical & Electronic Equipment (private households)

This symbol on the products and/or accompanying documents means that used electrical and electronic products should not be mixed with general household waste.

For proper treatment, recovery and recycling, please take these products to designated collection points, where they will be accepted on a free of charge basis. Alternatively, in some countries you may be able to return your products to your local retailer upon the purchase of an equivalent new product.
Disposing of this product correctly will help to save valuable resources and prevent any potential negative effects on human health and the environment which could otherwise arise from inappropriate waste handling. Please contact your local authority for further details of your nearest designated collection point.
Penalties may be applicable for incorrect disposal of this waste, in accordance with national legislation.
For business users in the European Union
If you wish to discard electrical and electronic equipment, please contact your dealer or supplier for further information.
Information on Disposal in other Countries outside the European Union
This symbol is only valid in the European Union.
If you wish to discard this product, please contact your local authorities or dealer and ask for the correct method of disposal.
Precautions
AC adaptor
Handle the AC adaptor carefully. Improper handling is dangerous.
- Do not touch it with wet hands.
- Do not place heavy objects on top of it.
Be sure to use the supplied AC adaptor.
Batteries
- The rechargeable battery can be recharged about 300 times. If it's operating time becomes extremely short, you should replace it.
- Do not mix old and new batteries or different types of batteries.
- Do not heat the batteries or expose them to flames.
- Do not recharge ordinary dry cell batteries.
- Remove the battery if the unit is not to be used for a long time.
- Carry and store the rechargeable batteries in the battery carrying case to prevent contact with metal objects.
- Do not peel off the covering on batteries and do not use if the covering has been peeled off.
Mishandling of batteries can cause electrolyte leakage which can damage items the fluid contacts and may cause a fire.
The unit
This unit uses the 2.4 GHz radio frequency band. However other wireless equipment may use the same frequency. Be sure to take note of the following to prevent radio wave interference from other equipment.
■ Restriction of use
For use only in the countries listed on page 20.
■ Range of use
The range of use is up to approximately 30 m. The range may be less depending on the structure of the building, the environment and any obstacles between the headphones and the transmitter. Such obstacles as reinforced concrete walls and metal doors are particularly to obstruct the transmitter's signals.
■ Interference from other equipment
Due to radio interference, malfunctions such as sound distortion may occur if the unit is placed too close to other equipment. We recommend keeping the unit as far away as possible from the following devices.
Wireless LAN, microwaves, office automation devices, digital cordless telephones and other electronic devices
The unit is designed to automatically avoid radio interference from these household devices. However the sound will be broken when radio interference occurs. In this case reset the most appropriate frequency ( 120 page 16 [Setting the most appropriate frequency]).
■ Using the unit
- Do not drop, hit or otherwise subject the transmitter or headphones to strong shocks of any kind. This may damage them.
- Do not expose the unit to water or other liquids as it may damage it.
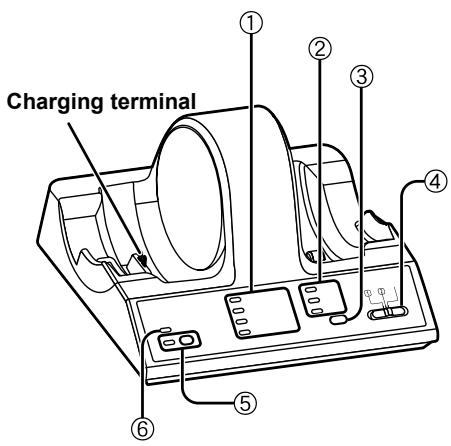
Transmitter's front panel
text_image
Charging terminal ① ② ③ ④ ⑤ ⑥① DECODE MODE lamp ( finger pages 14 to 15) (DOLBY DIGITAL, DOLBY PRO LOGIC II, DTS, MPEG-2 AAC)
The transmitter automatically distinguishes the recording method of the input signal and the DECODE MODE lamp lights.
② SURROUND lamp (page 16) (MUSIC, CINEMA, VOICE)
③ SURROUND button (page 16)
Switch between MUSIC, CINEMA, VOICE and OFF in SURROUND MODE.
④ INPUT SELECT (page 14)
Switch between DIGITAL 1, DIGITAL 2 and ANALOG input.
⑤ ID/TUNING button, lamp (page 16)
Use when the radio waves are weak.
⑥ OPR/CHARGE (operation/charge) lamp (page 9)
- It glows red when the headphones are being charged.
- It glows green when the transmitter is in operation.
- It goes out when the charging finishes or when there are no audio signals input for approximately 5 minutes.
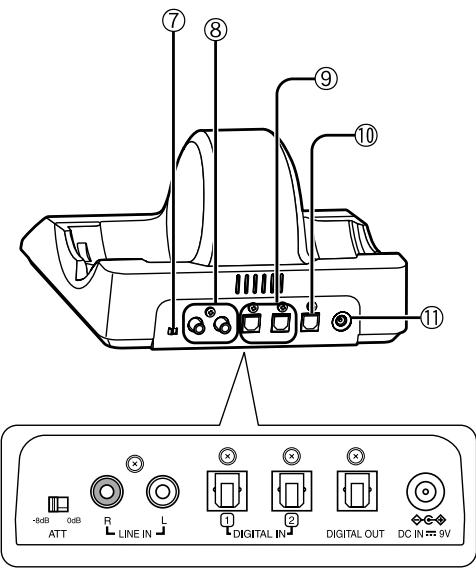
Transmitter's rear panel
text_image
⑦ ⑧ ⑨ ⑩ ⑪ -8dB 0dB ATT R LINE IN L 1 DIGITAL IN 2 DIGITAL OUT DC IN 9V⑦ ATT control (page 13)
Switch to [0 dB] when sound from an analogue input is low. The standard setting is [-8 dB].
⑧ LINE IN terminal (page 12)
To connect to the audio out terminals of AV equipment such as a video cassette recorder or television (not included).
⑨ DIGITAL IN 1, 2 terminal (optical digital input) (page 11)
To connect to digital equipment such as a DVD player or a television (not included).
⑩ DIGITAL OUT terminal (optical digital output) ( page 11)
The same digital signal as the input signal selected with the INPUT SELECT control is output.
- When ANALOG is selected, the same digital signal as the input signal to DIGITAL IN 2 is output.
| INPUT SELECT control | DIGITAL OUT |
| DIGITAL 1 | The same signal as the signal input to DIGITAL 1 |
| DIGITAL 2 | The same signal as the signal input to DIGITAL 2 |
| ANALOG |
⑪ DC IN 9V terminal (page 8)
To connect to the supplied AC adaptor.
(Use only the supplied AC adaptor. Use of other AC adaptors with, for example, a different plug polarity is dangerous and can damage the unit.)
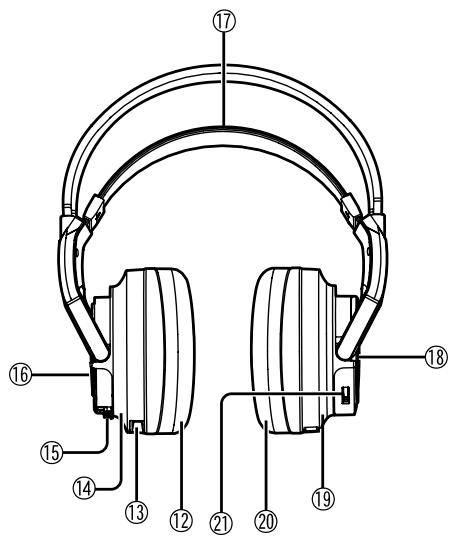
Headphones
text_image
Technical diagram of a headset with numbered parts for identification⑫ Ear pad (left)
⑬ Charging terminal
⑭ Left housing
⑯ Battery compartment lid
Press BATT to open the battery compartment lid. Use the supplied rechargeable battery or "LR6, AA" alkaline dry cell batteries (not included).
⑰ Free-adjusting band (page 10)
The power turns on automatically and the OPR lamp lights when you put on the free-adjusting band.
⑱ OPR (operation) lamp
Pull up the free-adjusting band and check that the OPR lamp glows red. You can now use the headphones.
⑲ Right housing
⑳ Ear pad (right)
②1 ID button, VOL control
VOL: When adjusting the volume (page 14)
Using the rechargeable battery (supplied)
The supplied rechargeable battery must be charged before using this unit.
Nickel-metal hydride rechargeable battery
Use the supplied battery or a dedicated replacement battery RP-BP6000 (optional).
Commercially available rechargeable batteries
You cannot charge commercially available rechargeable batteries.
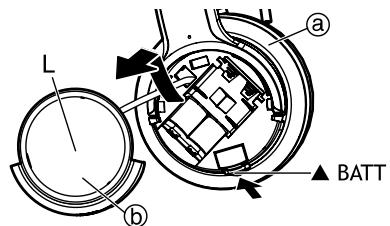
Inserting the supplied nickel-metal hydride rechargeable battery
1 Press the [BATT] knob on the left housing ⓐ to open the battery compartment lid ⓑ and then take it off.
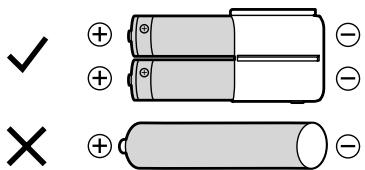
2 Insert the supplied nickel-metal hydride rechargeable battery.
- Align the poles and correctly when inserting.
- Push down on the ⊖ pole spring when inserting.
Remove the ⊕ poles first when removing.
3 Insert the rib © on the battery compartment lid into the hole on the left housing and then close the battery compartment lid.
Push the battery compartment lid until it locks.
text_image
L B a BATT b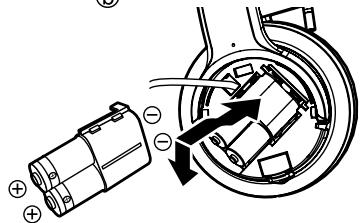
text_image
Technical diagram showing electrical connector connections with polarity indicators and wiring labels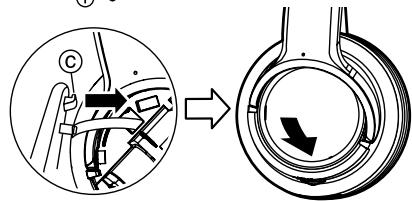
text_image
Diagram illustrating a mechanical or electrical component with directional arrows and labeled parts, likely from an engineering or manufacturing context.Charging
For the United Kingdom:
BE SURE TO READ THE CAUTION FOR THE AC MAINS LEAD ON PAGE 3 BEFORE CONNECTION.
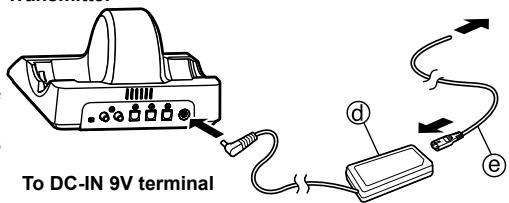
1 Connect the AC adaptor (supplied) ⓓ to the transmitter.
Note
- The AC adaptor power cord (supplied) Ⓤ is for use with this unit only. Do not use it with other equipment. Also do not use cords for other equipment with this unit.
- Be sure to use the supplied AC adaptor.
Transmitter
text_image
To DC-IN 9V terminal2
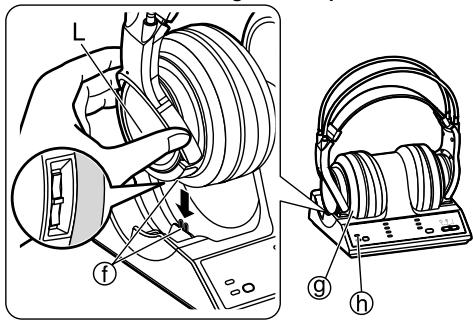
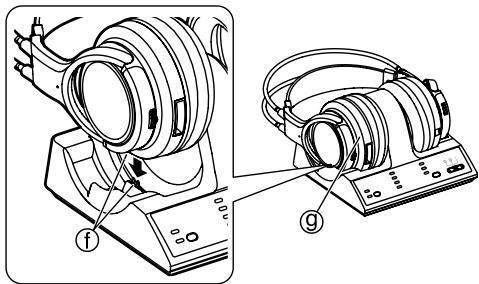
Put the headphones on the transmitter making sure that the charging terminals are in contact with each other.
⑨ Left housing
The battery can be charged with the headphones placed vertically or horizontally.
- The OPR/CHARGE lamp ⓗ on the transmitter glows red.
- The OPR/CHARGE lamp ⓗ goes out when the battery is fully charged.
- When putting the headphones on the transmitter, hold the left and right housings in each hand and put the headphones straight down onto the transmitter.
Placing the headphones vertically
text_image
Technical diagram showing ear device components with labeled parts and a close-up of the headset assemblyPlacing the headphones horizontally
Note
The headphones are recharged if they are put back onto the transmitter after being fully charged.
Do not keep recharging the battery if you do not use it between recharges.
The battery will be overcharged causing overheating and electrolyte leakage.
text_image
Technical diagram showing two types of electronic devices labeled f and g, with components like headphones and a display board.For your reference
- Radio wave emission automatically stops when the headphones are placed onto the transmitter.
- The headphones can be used even if the battery is not fully charged.
- Disconnect the AC adaptor from the household mains socket if the unit is not going to be used for a long time. This unit consumes a small amount of power (approximately 1.8 W) if the AC adaptor is connected, even when it is turned off.
The unit is in the standby condition when the AC adaptor is connected. The primary circuit is always “live” as long as the AC adaptor is connected to an electrical outlet.
- Charge the battery in an environment with an ambient temperature between 0 °C and 40 °C or it may not be fully charged.
■ Charging and operating times
| Charging time | Operating time *1 |
| Approx. 3 hours *2 | Approx. 8 hours *3 |
^1 At 1 kHz, 1 mW + 1 mW output.
^2 The time required to fully charge from empty.
*3 Operating times may differ depending on the temperature of the surrounding environment and operating conditions.
^1 At 1 kHz, 1 mW + 1 mW output.
^2 The time required to fully charge from empty.
*3 Operating times may differ depending on the temperature of the surrounding environment and operating conditions.
Power supply preparations: Headphones
■If the OPR/CHARGE lamp does not glow red
Check that the left and right sides of the headphones are correctly placed on the left and right sides of the transmitter.
Check that the charging terminals on the headphones and transmitter are touching each other. Adjust them if they are not touching.
- When there is dirt on the charging terminals of the headphones or the transmitter, remove it gently with a cotton bud, etc.
■To charge the battery after using the headphones
Put the headphones back on the transmitter. The OPR/CHARGE lamp glows red and charging begins.
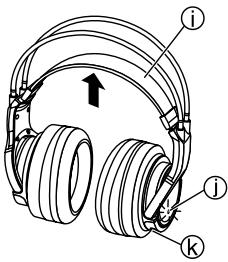
■To check the remaining battery power
Pull the free-adjusting band ① and check if the OPR lamp ② on the right housing ③ is dim or off. This means that the battery has run down and should be charged or replaced.
If the sound is distorted, intermittent or there is excessive background noise while using the headphones, the battery should be charged or replaced.
text_image
Technical diagram of a multi-band headphones with labeled parts (i, j, k) and an upward arrow indicating motion or assembly.The service life for the supplied rechargeable battery
The supplied nickel-metal hydride rechargeable battery can be recharged approximately 300 times. If the operation time of the battery becomes extremely short after charging, the battery's service life has reached the end. Be sure to replace it with the dedicated rechargeable battery RP-BP6000 (optional).
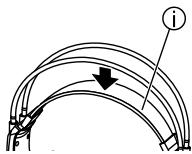
■The power turns off automatically when you remove the headphones.
(Auto power on/off function)
Do not pull up the free-adjusting band ⓘ when not using the headphones. This may cause the auto power on/off function to switch the headphones back on and battery power to run down.
Using alkaline dry cell batteries (not included)
Use “LR6, AA” alkaline dry cell batteries. Put the 2 alkaline dry cell batteries into the headphones in the same way as described in [Inserting the supplied nickel-metal hydride rechargeable battery] (page 8).
You cannot charge dry cell batteries even if you put the headphones on the transmitter.
■Operating time for the dry cell battery
| Battery type | Operating time *1 |
| Panasonic Alkaline batteries | Approx. 6 hours *2 |
*1 At 1 kHz, 1 mW + 1 mW output.
^*2 Operating times may differ depending on the temperature of the surrounding environment and operating conditions.
Connections
- Before connecting, turn off the digital or analogue equipment.
- After connecting the digital or analogue equipment to the transmitter, connect the AC adaptor (supplied) (page 8 [Charging] step 1)
- Refer/Read to the operating instructions of the connected equipment.
Connecting digital equipment
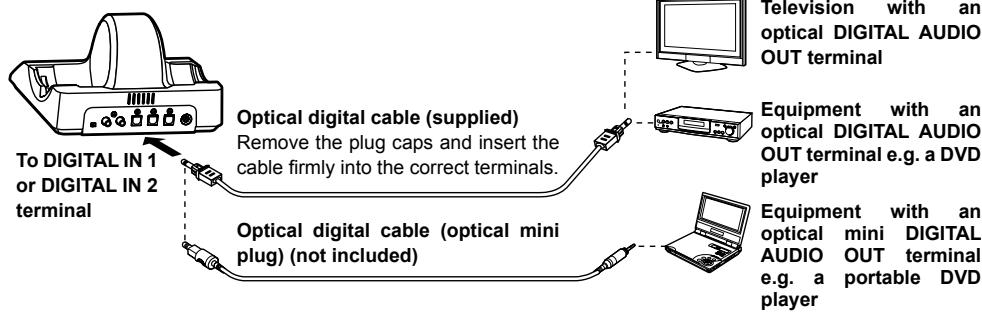
Use the supplied optical digital cable to connect a television or DVD player's ^1 optical DIGITAL AUDIO OUT terminal ^2 to the transmitter's DIGITAL IN 1 or 2 terminal.
Transmitter
flowchart
graph TD
    A["To DIGITAL IN 1 or DIGITAL IN 2 terminal"] --> B["Optical digital cable (supplied)"]
    B --> C["Remove the plug caps and insert the cable firmly into the correct terminals."]
    A --> D["Optical digital cable (optical mini plug) (not included)"]
    D --> E["Equipment with an optical DIGITAL AUDIO OUT terminal e.g. a DVD player"]
    A --> F["Equipment with an optical mini DIGITAL AUDIO OUT terminal e.g. a portable DVD player"]
    B --> G["Television with an optical DIGITAL AUDIO OUT terminal"]
Optical digital cable (optical mini plug) (not included)
When connecting the optical DIGITAL AUDIO OUT terminal of, for example, a portable DVD player or portable CD player to the transmitter's DIGITAL IN 1 or 2 terminal, use the optional digital cable (mini plug to angular plug) or similar.
For your reference
*1 Operation is not guaranteed when connecting to a computer's optical DIGITAL AUDIO OUT terminal.
*2 When the connected equipment supports PCM output only, the surround sound will become DOLBY PRO LOGIC II.
■Connecting an amplifier etc.
If you connect optical digital output equipment to the DIGITAL IN 1 and DIGITAL IN 2 terminals and an AV amplifier (not included) to the DIGITAL OUT terminal, you can switch the input without changing the optical digital cable.
- You can select the signal input to this unit and the signal output to the connected equipment at the same time with the INPUT SELECT control. When ANALOG is selected, the signal input to DIGITAL 2 is output to the connected equipment (AV amplifier, etc.). (page 6)
- The input signal cannot be switched if the AC adaptor is not connected to the transmitter.
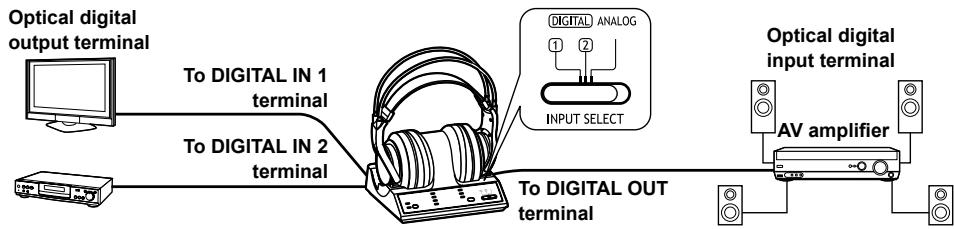
flowchart
graph LR
    A["Optical digital output terminal"] -->|To DIGITAL IN 1 terminal| B["Headphones"]
    C["Computer"] -->|To DIGITAL IN 2 terminal| B
    B -->|To DIGITAL OUT terminal| D["AV amplifier"]
    B -->|DIGITAL ANALOG INPUT SELECT| E["Analog"]
    E --> F["Output"]
■ Using an optical digital cable
- Do not let falling objects subject the optical digital cable to vibration or shock.
- Hold the plugs in your hands and carefully connect or disconnect the optical digital cable.
- If the ends of the optical digital cable become dirty or dusty, efficiency will decrease. Keep them clean.
- For safety reasons, attach plug caps and do not bend the optical digital cable too much.
The optical digital cable's minimum bending radius is 25 mm.
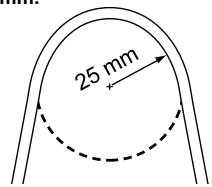
text_image
25 mm■ Playing DTS signals
Select the DTS audio signal on the connected equipment.
- A DTS compatible DVD player is necessary to play DVD discs recorded in DTS. (Refer to your DVD player's operating instructions for further details.)
- If “OFF” has been selected for the DVD player’s DTS digital setting, sound may not be output even when DTS output is selected in the DVD menu.
- When connecting a DVD player and this unit with an analogue connection, sound may not be output. Change to a digital connection if this happens.
- There may be some noise emitted during functions such as rewinding and fast forwarding with a DTS format DVD. This does not indicate a problem with the unit.
Connecting analogue equipment
Use an audio cable when connecting the AUDIO OUT terminals of a video cassette player, television etc. to the transmitter's LINE IN (L/R) terminal.
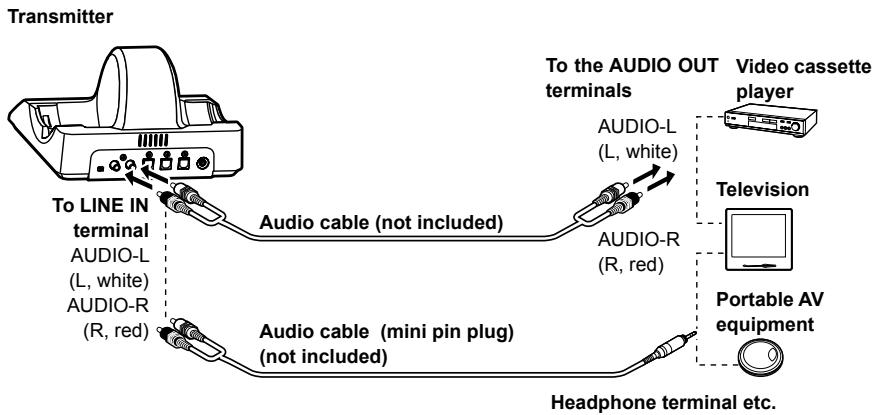
flowchart
graph TD
    A["Transmitter"] --> B["To LINE IN terminal"]
    B --> C["Audio-L (L, white)"]
    B --> D["Audio-R (R, red)"]
    C --> E["Audio cable (not included)"]
    D --> F["Audio cable (mini pin plug) (not included)"]
    E --> G["Headphone terminal etc."]
    F --> G
    H["Video cassette player"] --> I["AUDIO-L (L, white)"]
    H --> J["AUDIO-R (R, red)"]
    I --> K["Portable AV equipment"]
    J --> K
Audio cable (mini pin plug) (not included)
Use the audio cable (stereo mini plug to 2-pin plug) or similar to connect the transmitter's LINE IN terminal to a stereo mini headphone jack on the television or portable AV equipment. If the output level from the television or portable AV equipment is set to low, there may be unwanted noise. Set the volume so the sound is not distorted.
■ATT Control
When the sound is low with an analogue connection, switch the ATT (attenuator) control on the Transmitter's rear panel to [0 dB].
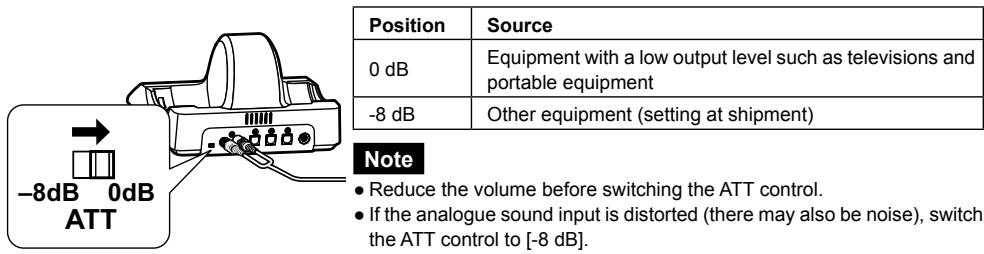
text_image
Position Source 0 dB Equipment with a low output level such as televisions and portable equipment -8 dB Other equipment (setting at shipment) Note • Reduce the volume before switching the ATT control. • If the analogue sound input is distorted (there may also be noise), switch the ATT control to [-8 dB].Placement of transmitter and headphones
This unit uses radio waves to transmit the signals so use the headphones within the range of the radio waves.
■The range of the radio waves
The radio waves have a maximum range of 30 m from the transmitter.
The most appropriate frequency is automatically set when the headphones are taken off the transmitter. When the headphones are used outside the range of the radio waves or the radio waves weaken, the sound is broken. Move nearer to the transmitter or reset the frequency (☐ page 16 [Setting the most appropriate frequency]).
- Since this unit is using the 2.4 GHz radio frequency band, obstacles (such as reinforced concrete walls and metal doors) may cause the sound to be broken. This is a characteristic of radio waves and not a malfunction.
- The sound heard from the headphones will differ depending on where the transmitter is placed and the kind of location in which it is used. We recommend placing the transmitter where the sound is received best.
- The sound may be broken when the unit is used at the same time as other equipment that uses the 2.4 GHz radio frequency band such as wireless equipment or microwaves.
Locations
Avoid placing the unit in the following locations
- Places with high temperatures such as near heating appliances or places directly exposed to sunlight
- Places with a lot of dust
- On top of unstable carts or inclined surfaces
- Places with excessive vibration
- Bathrooms and other moisture-prone places
Before using the transmitter, read [Connections] (☐ page 11 to 12) and ensure that it is connected correctly.
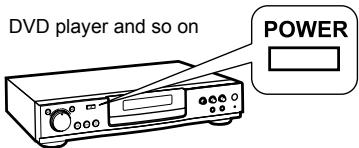
1 Turn on the equipment connected to the transmitter.
2 Select the signal with [INPUT SELECT].
DIGITAL 1: To hear sound from equipment connected to the transmitter's DIGITAL IN 1 terminal.
DIGITAL 2: To hear sound from equipment connected to the transmitter's DIGITAL IN 2 terminal.
ANALOG: To hear sound from equipment connected to the transmitter's LINE IN terminal.
Note
With dual sound sources (MAIN/SUB), select the desired sound on the player or television connected through the LINE IN terminal.
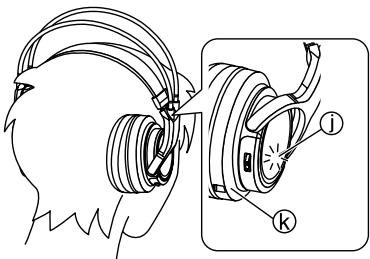
3 Take the headphones off the transmitter.
4 Put the headphones down onto your head.
Make sure that the headphones are facing so that the right housing (R) goes over the right ear and the left housing (L) over the left ear. Then put the headphones straight down onto your head. Doing this will ensure that the auto power on/off function (page 10) works correctly.
- The OPR lamp ⓚ on the right housing Ⓛ glows red and the power automatically turns on.
5 Start play on the equipment selected in step 2.
- The OPR/CHARGE lamp ⓗ on the transmitter will light green and radio waves will be emitted. The most appropriate frequency is automatically set.
- The DECODE MODE lamp ① glows approximately 5 seconds later depending on the signal sent from the connected equipment.
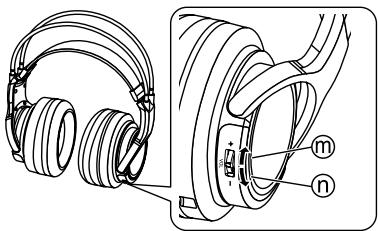
6 Use [VOL] to adjust the volume.
- The volume is the same as when the headphones were previously used.
- The volume will keep changing while the [VOL] control is pushed to either side.
m To increase the volume
(n) To decrease the volume
Refer to page 16 for information about the SURROUND effects.
text_image
DVD player and so on POWER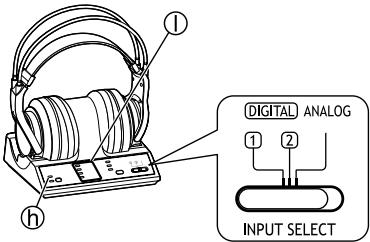
text_image
① DIGITAL ANALOG ① ② INPUT SELECT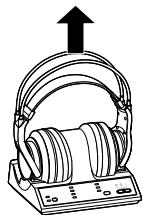
text_image
Technical diagram showing ear profile and ear component with labeled parts ① and ②
natural_image
Technical line drawing of a pair of headphones with labeled parts (no text or symbols present)Note
- When watching movies, be careful not to turn up the volume too high during quiet scenes. The movie may suddenly switch to a very noisy scene and you could damage your ears if the volume is raised too high.
- Avoid listening for prolonged periods of time to prevent hearing damage.
- Be sure to use the headphones within the range of the radio waves.
- Discontinue use if you experience discomfort. Continued use may cause rashes or other allergic reactions.
For your reference
- If you disconnect the AC adaptor from the transmitter before taking off the headphones, there may be static noises.
- The actual location of the sound may be difficult to recognize with music and audio only sources such as music CDs.
- This unit simulates the average person's HRTF*. However individual differences in human's HRTF mean that the effect of this system will vary between individuals.
* An abbreviation for Head Related Transfer Function.
■Time required for mode changes
The actual time required for the unit to change to a particular mode after it has been selected using the slide switch on the transmitter, may vary between individual modes. This is due to different internal systems being used to change to different modes.
■DECODE MODE lamp ①
The transmitter automatically distinguishes the recording method of the input signal and this lamp lights as shown below. When switching to DOLBY DIGITAL/DTS and so on, do so on the connected equipment e.g. the DVD player.
• DOLBY DIGITAL: Signals recorded in DOLBY DIGITAL format.
- DOLBY PRO LOGIC II: Analogue input signals, digital input signals (PCM 2-channel signals) and DOLBY DIGITAL 2-channel signals treated as DOLBY PRO LOGIC II. (Select "OFF" in SURROUND MODE (☑ page 16) to stop this).
• DTS: Signals recorded in DTS format.
- MPEG-2 AAC: One of the audio compression formats defined by the MPEG-2 standard. Advanced audio coding is used for the sound in digital televisions.
For your reference
When any function other than [PLAY] - such as fast-forward or rewind - is selected on the equipment connected using the DIGITAL IN terminal, the DECODE MODE lamp may not light correctly. If [PLAY] is selected, it will however light correctly.
■When you are unable to hear any sound from the headphones (MUTING function)
If the headphones are used outside the range of the radio waves or the radio waves weaken, reception will decline and the MUTING function will come on. No sound will then be heard from the headphones. If this happens, move nearer to the transmitter and the MUTING function will automatically switch off. If the sound is still broken, reset the headphones to the most appropriate frequency.( page 16 [Setting the most appropriate frequency])
■If no audio signal is received at the transmitter for more than approximately 5 minutes
The radio waves being emitted from the transmitter automatically stop and the transmitter's OPR/CHARGE lamp goes out. The radio waves start being emitted again when an audio signal is received. When the input audio (analogue only) continues to be very low for more than 5 minutes (approximately), the radio waves being emitted from the transmitter may stop. If this happens, increase the volume level on the connected equipment and decrease the volume level on the headphones.
If a noise signal is input from equipment connected by the LINE IN terminal, the output of radio waves may not stop.
Listening to audio from equipment connected to the transmitter
■If the sound is broken or noisy when the headphones are in use (Setting the most appropriate frequency)
The sound may be broken or noisy if the headphones are used outside the range of the radio waves or if the reception becomes poor due to the interference from other wireless equipment using the 2.4 GHz radio frequency band, a microwave etc.
Perform the following steps to manually reset the appropriate frequency for transmitting.
Press [ID/TUNING] on the transmitter once.
- The ID/TUNING lamp on the transmitter glows green, the transmitter changes the frequency and then radio waves start being transmitted.
- The headphones will automatically detect the emitted frequency and noise and sound distortion will stop.
![PANASONIC RP-WF6000 - Press [ID/TUNING] on the transmitter once. - 1](/content/2019/11/104325/images/f17d08fe337ae170bf1855dd3e19e7907b47349a699b38dd9cc1267c9107c02f.jpg)
text_image
OPR/CHARGE ID/TUNINGWhen the noise or sound distortion does not stop
Repeat the above step until the most appropriate frequency is set.
- This may not solve the problem if the headphones are being affected by a digital cordless telephone or other device. In this case, moving the transmitter and the headphones as far as possible from the digital cordless telephone or other device may stop the noise or sound distortion.
Selecting the surround field
Press [SURROUND] to select the desired surround mode.
Each time the button is pressed
![PANASONIC RP-WF6000 - Press [SURROUND] to select the desired surround mode. - 1](/content/2019/11/104325/images/43c2e35afbc47ae8dec34fa0942977ba8526897b67bf69728eb0d047d950b364.jpg)
- The SURROUND lamp for the selected mode will come on.
- This will go off, if "OFF" is selected.
- If the AC adaptor is disconnected and then connected, CINEMA is automatically selected.
![PANASONIC RP-WF6000 - Press [SURROUND] to select the desired surround mode. - 2](/content/2019/11/104325/images/26176a80f7e557635fd78e97bd8f2aeb4fb37b989077f582e3697d04a32d4f69.jpg)
| Surround mode | Surround mode and suitable input source |
| OFF | For normal headphone play |
| MUSIC | When playing music sources for enhanced acoustics |
| CINEMA | When playing movie sources for greater audio impactCreates a feeling close to being actually part of the scene |
| VOICE | When playing sports game sourcesReproduces the excitement of being in a stadium at a noisy sports scene while making the sound of the announcer or commentator easier to hear. |
For your reference
- Depending on the signal being input, volume may vary when changing between surround modes.
- There is no surround effect when playing a monaural source.
Maintenance
To clean this unit, wipe with a soft, dry cloth.
- Never use alcohol, paint thinner, or benzine to clean this unit.
- Before using chemically treated cloth, read the instructions that came with the cloth carefully.
Troubleshooting guide
Before requesting service, make the below checks. If you are in doubt about some of the check points, or if the remedies indicated in the chart do not solve the problem, consult your dealer for instructions.
Take both the headphones and the transmitter when you visit your dealer.
| Problem | Possible cause and suggested remedy |
| No sound. | → Check that the AC adaptor is connected to the transmitter ( page 8 ).→ Check that the transmitter and the AV equipment are connected ( page 11 to 12 ).→ Turn on the AV equipment connected to the transmitter and start play on it. Check that the OPR/CHARGE lamp on the transmitter lights green ( page 14 ).→ Check that the transmitter’s INPUT SELECT control is set correctly for the connected equipment ( page 14 ).→ If the transmitter is connected to the headphone jack, turn up the volume on the connected equipment ( page 12 ).→ Put the headphones on again.→ Turn up the volume on the headphones ( page 14 ).→ The MUTING function is activated ( page 15 ).• Move into the range of the radio waves.→ The headphones’ OPR lamp is not on ( page 10 ).• The supplied rechargeable battery has run down. Recharge them or replace the alkaline dry cell batteries with new ones. If the OPR lamp is still off, take the unit to your dealer.→ Set the digital output setting on the connected equipment to “ON” if digital input is selected.→ You are playing a DTS audio track on a DVD player that is not compatible with DTS ( page 12 ).• Use a DTS compatible DVD player or select a PCM or Dolby Digital track.→ You are playing a DVD recorded in DTS audio on a DVD player (includes game machines) when “OFF” has been selected for the DVD player’s DTS digital output setting ( page 12 ).• Set the DVD player’s DTS digital output setting to “ON”.→ You are playing a DVD recorded in DTS audio on a DVD player (includes game machines) connected to this unit with an analogue connection ( page 12 ). |
| Sound is low. | → If analogue input is selected, switch the transmitter's ATT control to “0 dB” ( page 13).→ If the transmitter is connected to the headphone jack, turn up the volume on the connected equipment ( page 12).→ Turn up the volume on the headphones ( page 14). |
| Sound is distorted. | → If analogue input is selected, switch the transmitter's ATT control to “-8 dB” ( page 13).→ If the transmitter is connected to the headphone jack, turn the volume down on the connected equipment ( page 12).→ Set “CINEMA”, “MUSIC” or “VOICE” with the SURROUND button on the transmitter when playing a DTS source. |
| Sound is broken (noise may be heard too). | → Change the placement of the transmitter. Stay within the range of the transmitter ( page 13).→ The headphones’ OPR lamp dims. Sound is distorted, intermittent or there is excessive background noise during use ( page 10).● The rechargeable battery has run down. Recharge it or replace the alkaline dry cell batteries with new ones.→ Make sure that there is no other equipment that uses the 2.4 GHz radio frequency band such as wireless equipment or microwaves near the transmitter or headphones ( page 5).→ Set the most appropriate frequency ( page 16 [Setting the most appropriate frequency]). |
| There is excessive background noise. | → If the transmitter is connected to the headphone jack, turn the volume up on the connected equipment ( page 12).→ The headphones’ OPR lamp dims. Sound is distorted, intermittent or there is excessive background noise during use. ( page 10).● The rechargeable battery has run down. Recharge it or replace the alkaline dry cell batteries with new ones.→ Make sure that there is no other equipment that uses the 2.4 GHz radio frequency band such as wireless equipment or microwaves near the transmitter or headphones ( page 5).→ Set the most appropriate frequency ( page 16 [Setting the most appropriate frequency]). |
| Audio cannot be heard while analogue is selected. | → When the input audio (analogue only) continues to be very low for more than 5 minutes (approximately), the radio waves being emitted from the transmitter may stop ( page 15).In this case perform the following steps.1. Switch the ATT control on the transmitter to “0 dB” ( page 13).If audio still cannot be heard2. Increase the volume level on the equipment connected to the analogue input and decrease the volume level on the headphones. |
| Problem | Possible cause and suggested remedy |
| No surround effect. | → Set “CINEMA”, “MUSIC” or “VOICE” on the transmitter’s SURROUND button ( page 16).→ The input audio signal is not multi-channel. There is no surround effect when playing a monaural source ( page 16). |
| The DOLBY DIGITAL lamp does not light. | → You have selected “PCM” for the audio digital output setting on the DVD player (includes game machines).● Select “Dolby Digital/PCM” or “Dolby Digital” if the DVD player has an internal Dolby Digital decoder.→ You are playing a signal that is not recorded in DOLBY DIGITAL format.→ The chapter being played is not DOLBY DIGITAL format. |
| The DOLBY PRO LOGIC II lamp does not light. | → You have set the transmitter’s SURROUND button to “OFF” ( page 15).→ There are no analogue input signals, digital input signals (PCM), Dolby Digital 2-channel signals or MPEG-2 AAC 2 channel signals being input. |
| The DOLBY PRO LOGIC II lamp lights. | → You have set the transmitter’s SURROUND button to a setting other than “OFF” ( page 15).→ There are analogue input signals, digital input signals (PCM), Dolby Digital 2-channel signals or MPEG-2 AAC 2 channel signals being input. |
| The DTS lamp does not light. | → You have selected “OFF” for the DVD player’s DTS digital output setting ( page 12).● Refer to the operating instructions for the DVD player and set the DTS digital output setting on the DVD player to “ON”.→ You are playing a signal that is not recorded in DTS format.→ The chapter being played is not DTS format.→ The DVD player is not DTS compatible ( page 12).● Use a DTS compatible DVD player. |
| The MPEG-2 AAC lamp does not light. | → The television’s output setting is set to “PCM”.● Refer to the operating instructions for the television and set the television to output MPEG-2 AAC signals. |
| Cannot select dual audio (MAIN/SUB) when input is digital. | → Connect the analogue audio output of the equipment to the LINE IN terminal and select the desired sound on the connected equipment ( page 14). |
| Cannot charge. | → The OPR/CHARGE lamp on the transmitter does not glow red ( page 9).● Check that the headphones are put on the transmitter correctly.→ A dry cell battery is inserted.● Be sure to insert the supplied nickel-metal hydride rechargeable battery.→ A nickel-metal hydride rechargeable battery other than the supplied one is inserted.● Insert the supplied nickel-metal hydride rechargeable battery or a dedicated replacement battery RP-BP6000 (optional). ( page 8)→ There is dirt on the charging terminals of the headphones or the transmitter ( page 10).● Remove it gently with a cotton bud etc. |
| Radio wave output does not stop. | → A noise signal is being received from the connected equipment.● Turn off the power on the connected equipment. |
Specifications
■Transmitter (RP-WF6000T)
| Decoder function | Dolby Digital |
| Dolby Pro Logic II | |
| DTS | |
| MPEG-2 AAC | |
| Surround function | OFF |
| MUSIC | |
| CINEMA | |
| VOICE |
Modulation method
DSSS (Direct-Sequence Spread Spectrum)
| Transmitting frequency | 2.412 GHz to 2.472 GHz |
Transmitting distance
Approximately 30 meters
| Frequency response | 10 Hz to 24,000 Hz |
Distortion factor
Less than 0.1 % (1 kHz)
| Audio input |
| Optical digital input (TOS Link type) x 2 |
| Analogue input (RCA type, left/right) x 1 |
Audio output
| Optical digital output (TOS Link type)(Pass through) x 1 |
Power supply
DC 9 V (using supplied AC adaptor)
| Dimensions (W x H x D) | |
| 178 mm x 105.5 mm x 161.5 mm | |
| Mass | Approx. 355 g |
■Headphones (RP-WF6000H)
| Frequency response | 10 Hz to 24,000 Hz |
| Power supply |
Supplied rechargeable nickel-metal hydride battery (1 pair) or commercially available “LR6, AA” alkaline dry cell batteries (2) (not included)
Mass
| Approx. 380 g (Including supplied rechargeable nickel-metal hydride battery) |
■Transmitter and Headphones in the Charging Position
Dimensions (W x H x D)
| 202 mm x 244 mm x 161.5 mm (Vertical position) |
| 202 mm x 115 mm x 270 mm (Horizontal position) |
■AC Adaptor (RFX5726)
| Input | AC 100 - 240 V, 50/60 Hz |
| Output | DC 9 V, 2 A |
| Power consumption | 30 W |
Power consumption of the AC adaptor in standby mode (when connected to the transmitter)
approx. 1.8 W
Note
Specifications are subject to change without notice.
CE0682①
Declaration of Conformity (DoC)
Hereby, “Matsushita Electric Industrial Co., Ltd.” declares that this product is in compliance with the essential requirements and other relevant provisions of Directive 1999/5/EC.
Customers can download a copy of the original DoC to our R&TTE products from our DoC server: http://www.doc.panasonic.de
Contact in the EU: Panasonic Services Europe, a Division of Panasonic Marketing Europe GmbH, Panasonic Testing Centre, Winsbergring 15, 22525 Hamburg, F.R. Germany
This product is intended to be used in the following countries.
The UK, FRANCE, GERMANY, ITALY, SWITZERLAND, AUSTRIA, NETHERLANDS, BELGIUM, SPAIN, TURKEY, SWEDEN, NORWAY, DENMARK, FINLAND, HUNGARY, CZECH REPUBLIC, SLOVAKIA, SLOVENIA, BULGARIA, POLAND
This product is intended for general consumer. (Category 3)
NORSK
ADVARSEL!
| ● APPARATET MÅ IKKE PLASSERES I EN BOKHYLLE, ET INNEBYGGET KABINETT ELLER ET ANNET LUKKET STED HVOR VENTILASJONSFORHOLDENE ER UTILSTREKKELIGE. S∅RG FOR AT GARDINER ELLER LIGNENDE IKKE FORVERRER VENTILASJONSFORHOLDENE, SÅ RISIKO FOR ELEKTRISK SJOKK ELLER BRANN FORÅRSAKET AV OVERHETING UNNGÅS. |
- APPARATETS VENTILASJONSÅPNINGER MÅ IKKE DEKKES TIL MED AVISER, BORDDUKER, GARDINER OG LIGNENDE.
- PLASSER IKKE ÅPEN ILD, SLIK SOM LEVENDE LYS, OPPÅ APPARATET.
- BRUKTE BATTERIER MÅ KASSERES UTEN FARE FOR MILJ∅ET.
ADVARSEL:
| FOR Å REDUSERE FAREN FOR BRANN, ELEKTRISKST∅TELLERSKADERPÅPRODUKTET, MÅ DETTE APPARATET IKKE UTSETTES FOR REGN, FUKTIGHET, VANNDRÅPER ELLER VANNSPRUT. DET MÅ HELLER IKKE PLASSERES GJENSTANDER FYLT MED VANN, SLIK SOM BLOMSTERVASER, OPPÅ APPARATET. |
DETTE APPARATET ER BEREGNET TIL BRUK UNDER MODERATE KLIMAFORHOLD.
text_image
⑦ ⑧ ⑨ ⑩ ⑪ -8dB 0dB ATT R LINE IN L 1 DIGITAL IN 2 DIGITAL OUT DC IN 9Vtext_image
Technical diagram of a multi-band headphones with numbered labels pointing to different ear components.text_image
L a b ▲ BATT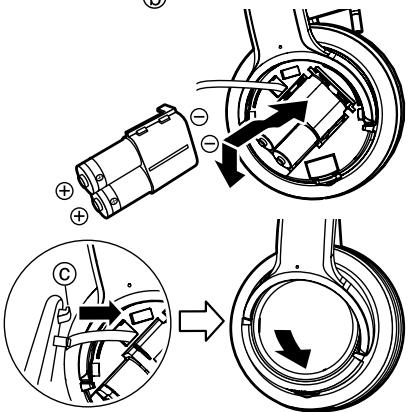
text_image
Diagram illustrating the working principle of a mechanical device, showing assembly steps and component positioning.Aufladen
1
text_image
Technical diagram showing earphone installation steps with labeled parts (L, f, g, h)text_image
Technical diagram showing two types of electronic devices labeled f and g, with components like a speaker and headphones visible.Anmerkungen
text_image
Technical diagram of an ear with labeled components (i, j, k) and a directional arrow indicating motion or movement.text_image
Technical diagram showing ear profile and ear component with labeled parts ① and ②
natural_image
Technical illustration of a pair of headphones with labeled parts (no text or symbols present)Hinweise
text_image
⑦ ⑧ ⑨ ⑩ ⑪ -8dB 0dB ATT R LINE IN L 1 DIGITAL IN 2 DIGITAL OUT DC IN 9V⑦ Commande ATT (page 11)
text_image
Technical diagram of a dual-band headphones with numbered labels pointing to different ear components.text_image
L a b ▲ BATT
text_image
Technical diagram showing electrical connector assembly with labeled components and directional arrows indicating motion or flow.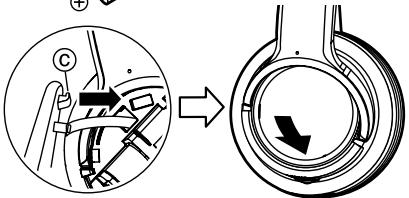
text_image
Diagram illustrating a mechanical or electrical component with labeled parts and directional arrow, likely from an engineering or manufacturing context.Charger la pile
text_image
Technical diagram showing earphone installation steps with labeled parts (L, f, g, h)text_image
Technical diagram showing two types of electronic devices labeled f and g, with components like a speaker and headphones visible.text_image
Technical diagram of an ear with labeled parts (i, j, k) and an arrow indicating direction or movement.text_image
Technical diagram showing ear ear with headband and earbell components, labeled with parts ① and ②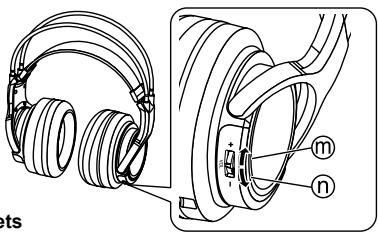
text_image
m nRemarque
Dimensions (L x H x P)
| 178 mm x 105,5 mm x 161,5 mmEnviron 355 g |
■Casque (RP-WF6000H)
text_image
⑦ ⑧ ⑨ ⑩ ⑪ -8dB ddB ATT R LINE IN L ① DIGITAL IN ② DIGITAL OUT DC IN 9Vtext_image
Technical diagram of a headset with numbered parts for identificationtext_image
L a b ▲ BATT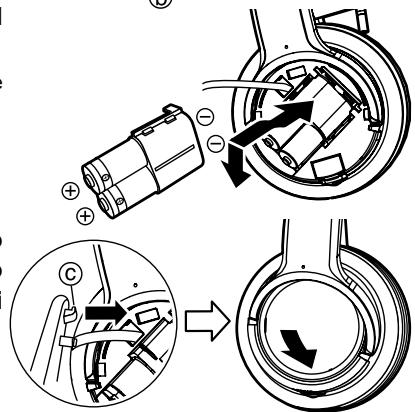
text_image
Technical diagram illustrating mechanical assembly steps with labeled components and directional arrowsCarica

text_image
Technical diagram showing earphone installation steps with labeled parts (L, f, g, h)text_image
Technical diagram showing two types of electronic devices labeled f and g, with components like a speaker and headphones visible.Riferimento
text_image
Diagram of an electronic headset with labeled parts (i, j, k) and an upward arrow indicating motion or orientation.text_image
Technical diagram showing ear profile and ear component with labeled parts ① and ②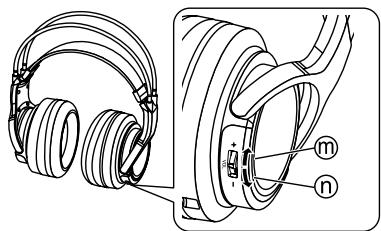
natural_image
Technical illustration of a pair of headphones with labeled parts (no text or symbols present)Nota
text_image
⑦ ⑧ ⑨ ⑩ ⑪ -8dB 0dB ATT R LINE IN L 1 DIGITAL IN 2 DIGITAL OUT DC IN 9V⑦ Control ATT ( page 11 )
text_image
Technical diagram of a dual-band headphones with numbered labels pointing to different ear components.text_image
L a BATT b
text_image
Technical diagram showing electrical component assembly with polarity indicators and directional arrows
text_image
Diagram illustrating a mechanical assembly process with labeled components and directional arrows indicating motion or movement.Carga
text_image
AI terminal DC-IN 9V d e2
text_image
Technical diagram showing ear ear assembly with labeled parts and component annotationstext_image
Technical diagram showing two types of electronic devices labeled f and g, with components like a speaker and headphones visible.Para su referencia
text_image
Technical diagram of an ear with labeled components (i, j, k) and a directional arrow indicating motion or movement.natural_image
Line drawing of a portable electronic device with control panel and indicator lights (no text or symbols)text_image
Technical diagram showing ear profile and ear component with labeled parts ① and ②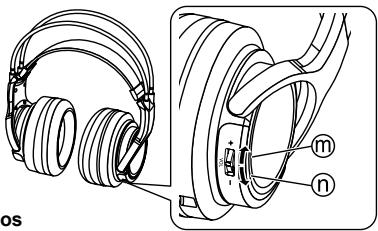
text_image
os m nNota
text_image
⑦ ⑧ ⑨ ⑩ ⑪ -1dB ATTT R LINE IN L ① DIGITAL IN ② DIGITAL OUT DC IN 9V① Lampje DECODE MODE (☐ page 12-13) (DOLBY DIGITAL, DOLBY PRO LOGIC II, DTS, MPEG-2 AAC)
text_image
Technical diagram of a headset with numbered parts for identification⑫ Oorkussen (links)
text_image
L a BATT b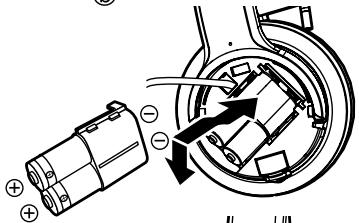
text_image
Technical diagram showing electrical component assembly with polarity indicators and directional arrows
text_image
Diagram illustrating a mechanical assembly process with labeled components and directional arrows indicating motion or movement.Opladen
text_image
Technical diagram showing earphone installation steps with labeled parts (L, f, g, h)text_image
Technical diagram showing two types of electronic devices labeled f and g, with components like a speaker and headphones visible.text_image
Technical diagram of a multi-band headphones with labeled parts (i, j, k) and an arrow indicating directiontext_image
Diagram illustrating the installation of an electronic device with headphones, showing head and ear components and a directional arrow.
text_image
Technical diagram showing front and side views of a pair of headphones with labeled parts (m and n)Opmerking
text_image
⑦ ⑧ ⑨ ⑩ ⑪ -8dB 0dB ATT R LINE IN L 1 DIGITAL IN 2 DIGITAL OUT DC IN 9V⑦ ATT -kontrol (☐ side 11)
text_image
Technical diagram of a dual-band headphones with numbered labels pointing to different ear components.⑫ ∅repude (venstre)
⑬ Opladeterminal
⑭ Venstre hus
⑮ BATT (batteri) knap (☐ side 6)
⑯ Batterirumsdæksel
⑱ OPR (drifts) lampe
text_image
L a b ▲ BATT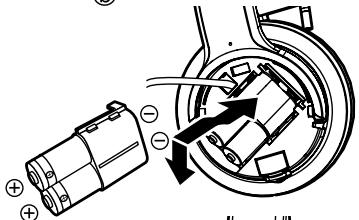
text_image
Technical diagram showing electrical component assembly with labeled parts and directional arrows indicating motion or flow.
text_image
Diagram illustrating a mechanical or electrical component with directional arrows and labeled parts, likely from an engineering or manufacturing context.Opladning
1 Slut lysnetadapteren (medfølger) ® til senderen.
Bemærk
text_image
Technical diagram showing earphone installation steps with labeled parts (L, f, g, h)text_image
Technical diagram showing two types of electronic devices labeled f and g, with components like a speaker and headphones visible.Til din oplysning
text_image
Technical diagram of a multi-band headphones with labeled parts (i, j, k) and an upward arrow indicating motion or assembly.text_image
Technical diagram showing ear profile and ear component with labeled parts ① and ②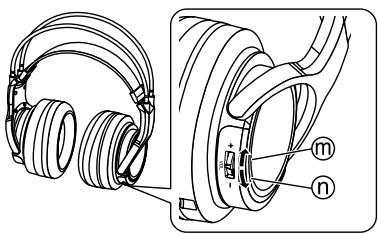
natural_image
Technical illustration of a pair of headphones with labeled parts (no text or symbols present)Bemærk
text_image
⑦ ⑧ ⑨ ⑩ ⑪ -8dB 0dB ATT R LINE IN L 1 DIGITAL IN 2 DIGITAL OUT DC IN 9V⑦ ATT-kontroll (sidan 11)
text_image
Technical diagram of a dual-band headphones with numbered labels pointing to different ear components.text_image
L a b ▲ BATT
text_image
Technical diagram showing electrical component assembly with polarity indicators and directional arrows
text_image
Diagram illustrating a mechanical or electrical component with directional arrows and labeled parts, likely from an engineering or manufacturing context.Laddning
text_image
Technical diagram showing earphone installation steps with labeled parts (L, f, g, h)text_image
Technical diagram showing two types of electronic devices labeled f and g, with components like a speaker and headphones visible.Bra att veta
text_image
Technical diagram of an ear with labeled components (i, j, k) and a directional arrow indicating motion or movement.text_image
Technical diagram showing ear profile and ear component with labeled parts I and K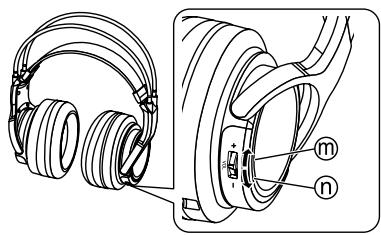
natural_image
Technical line drawing of a pair of headphones with labeled parts (no text or symbols present)Observera
TENTO PŘÍSTROJ JE KONSTRUOVÁN PRO POUŽITÍ V MÍRNÉM KLIMATU.
UPOZORNĚNÍ:
ABYSTE SNÍŽILI NEBEZPEČÍ VZNIKU POŽÁRU, ÚRAZU ELEKTRICKÝM PROUDEM NEBO POŠKOZENÍ PŘÍSTROJE, NEVYSTAVUJTE TOTO ZAŘÍZENÍ DEŠTI, NADMĚRNÉ VLHKOSTI, KAPAJÍCÍ VODĚ A POSTŘÍKÁNÍ. NA ZAŘÍZENÍ BY NEMĚLY BÝT UMISTOVÁNY ŽADNÉ OBJEKTY NAPLNĚNÉ VODOU, JAKO JSOU NAPŘÍKLAD VÁZY.
text_image
⑦ ⑧ ⑨ ⑩ ⑪ -8dB 0dB ATT R LINE IN L 1 DIGITAL IN 2 DIGITAL OUT DC IN 9Vtext_image
Technical diagram of a headset with numbered parts for identificationtext_image
L a b ▲ BATT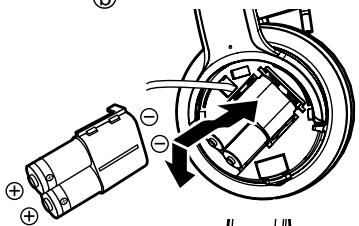
text_image
Technical diagram showing electrical connector assembly with labeled components and directional arrows indicating motion or flow.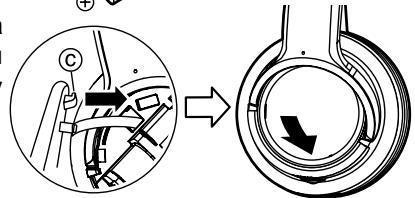
text_image
Diagram illustrating a mechanical or electrical component with directional arrows and labeled parts, likely from an engineering or manufacturing context.Nabíjení
text_image
Technical diagram showing earphone installation steps with labeled parts (L, f, g, h)text_image
Technical diagram showing two types of electronic devices labeled f and g, with components like a speaker and headphones visible.Pro informaci
text_image
Technical diagram of a multi-band headphones with labeled parts (i, j, k) and an arrow indicating directiontext_image
Technical diagram showing ear profile and ear component with labeled parts ① and ②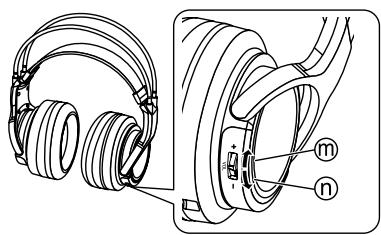
natural_image
Technical illustration of a pair of headphones with labeled parts (no text or symbols present)Poznámka
text_image
⑦ ⑧ ⑨ ⑩ ⑪ -8dB 0dB ATT R LINE IN L 1 DIGITAL IN 2 DIGITAL OUT DC IN 9Vtext_image
Technical diagram of a headset with numbered parts for identificationtext_image
L a b ▲ BATT
text_image
Technical diagram showing electrical connector assembly with labeled components and directional arrows indicating motion or movement.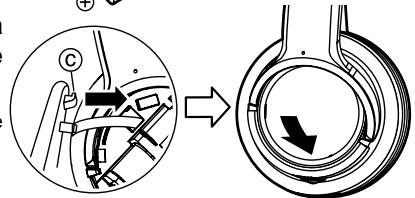
text_image
Diagram illustrating a mechanical or electrical component with directional arrows and labeled parts, likely from an engineering or manufacturing context.Ładowanie
text_image
Technical diagram showing earphone installation steps with labeled parts (L, f, g, h)text_image
Technical diagram showing two labeled components of a mechanical device, with parts f and g indicated.Wyjaśnienie
text_image
Diagram of a multi-band headphones with labeled parts (i, j, k) and an upward arrow indicating motion or orientation.text_image
Technical diagram showing ear profile and ear component with labeled parts ① and ②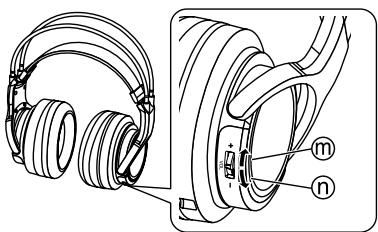
natural_image
Technical illustration of a pair of headphones with labeled parts (no text or symbols present)Uwaga
text_image
⑦ ⑧ ⑨ ⑩ ⑪ -8dB 0dB ATT R LINE IN L 1 DIGITAL IN 2 DIGITAL OUT DC IN 9Vtext_image
Technical diagram of a headset with numbered parts for identification⑫ Fülpárna (bal)
⑬ Töltőcsatlakozó
⑭ Bal hangszóróház
text_image
L a b ▲ BATT
text_image
Technical diagram showing electrical connector assembly with labeled components and directional arrows indicating motion or flow.
text_image
Diagram illustrating a mechanical or electrical component with directional arrows and labeled parts, likely from an engineering or manufacturing context.Töltés
text_image
Technical diagram showing earphone installation steps with labeled parts (L, f, g, h)text_image
Technical diagram showing two types of electronic devices labeled f and g, with components like a speaker and headphones visible.További tudnivaló
text_image
Technical diagram of an ear with labeled components (i, j, k) and a directional arrow indicating motion or movement.text_image
Diagram showing ear ear with headband and ear cap, labeled with parts ① and ②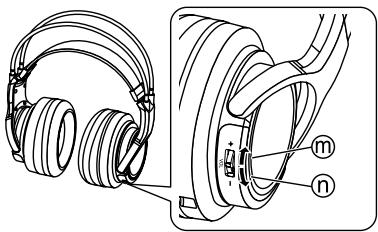
natural_image
Technical line drawing of a pair of headsets and ear brackets, showing front and side views (no text or symbols)Megjegyzés

The Ground Truth image displays a single, solid horizontal line. According to Rule 2 (UNDERSCORE & LINE RULES), this is a stylistic or background line, not a placeholder underscore. Therefore, the OCR result must ignore it and output nothing or only meaningful text. The provided OCR content is "____", which consists of four underscores. This is an incorrect interpretation of the line as a placeholder, violating the rule that stylistic lines must be ignored. The OCR has hallucinated underscores where none should exist based on the GT's visual context. Hence, the OCR result is inconsistent with the Ground Truth.
text_image
⑦ ⑧ ⑨ ⑩ ⑪ -8dB 0dB ATT R LINE IN L 1 DIGITAL IN 2 DIGITAL OUT DC IN 9Vtext_image
Technical diagram of a headset with numbered parts for identificationtext_image
Technical diagram showing electrical component assembly with labeled parts and directional arrows indicating motion or flow.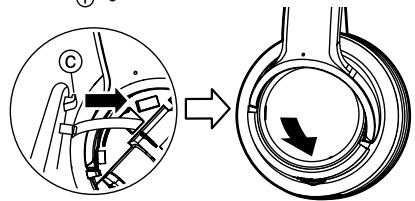
text_image
Diagram illustrating a mechanical or electrical component with directional arrows and labeled parts, likely from an engineering or manufacturing context.Şarj etme
text_image
Diagram showing a device connected to a device via cable, with labeled parts and directional arrows indicating signal or connection.DC-IN 9V terminaline
text_image
Technical diagram showing ear device components with labeled parts and a close-up of the headset assemblytext_image
Technical diagram showing two types of electronic devices labeled f and g, with components like headphones and a display board.text_image
Diagram of a multi-band headphones with labeled parts (i, j, k) and an upward arrow indicating motion or orientation.natural_image
Line drawing of a portable electronic device with a cable inserted, no text or symbols presenttext_image
Technical diagram showing ear profile and ear component with labeled parts ① and ②