
EY7270 - Power Tools PANASONIC - Free user manual and instructions
Find the device manual for free EY7270 PANASONIC in PDF.

| Product type | Cordless impact driver |
| Brand | Panasonic |
| Model | EY7270 |
| Power source | Rechargeable Ni-MH battery 12 V (model EY9201) |
| No-load speed (Hard mode) | 0 - 2300 rpm |
| No-load speed (Medium mode) | 0 - 1400 rpm |
| No-load speed (Soft mode) | 0 - 1000 rpm |
| Maximum tightening torque | 135 Nm |
| Impacts per minute (Hard mode) | 0 - 2800 ipm |
| Impacts per minute (Medium mode) | 0 - 2500 ipm |
| Impacts per minute (Soft mode) | 0 - 2000 ipm |
| Screw driving capacity (wood screws) | φ 3.5 - 9.5 mm |
| Screw driving capacity (standard bolts) | M6 - M12 |
| Chuck type | Quick-release hexagonal chuck (keyless) |
| Total length | 169 mm |
| Weight (with battery) | 1.8 kg |
| Built-in light | LED (class 1) |
| Belt hook | Yes, adjustable and removable |
| Safety | Switch lock, rotation brake |
| Maintenance | Clean with a dry and clean cloth |
Frequently Asked Questions - EY7270 PANASONIC
User questions about EY7270 PANASONIC
0 question about this device. Answer the ones you know or ask your own.
Ask a new question about this device
Download the instructions for your Power Tools in PDF format for free! Find your manual EY7270 - PANASONIC and take your electronic device back in hand. On this page are published all the documents necessary for the use of your device. EY7270 by PANASONIC.
USER MANUAL EY7270 PANASONIC
YkpaIHcbKa CToPiHa 108
FUNCTIONAL DESCRIPTION
FUNKTIONSBESCHREIBUNG
DESCRIPTION DES FONCTIONS
DESCRIZIONE DELLE FUNZIONI
FUNCTIEBESCHRIJVING
DESCRIPCION FUNCIONAL
BESKRIVELSE AF FUNKTIONERNE
FUNKTIONSBESKRIVNING
FUNKSJONSBESKRIVELSE
TOIMINTAKUVAUS
ФункциноHAJBHoe Oпиcaне
ФункциоHAJBHnОпс
EY7271

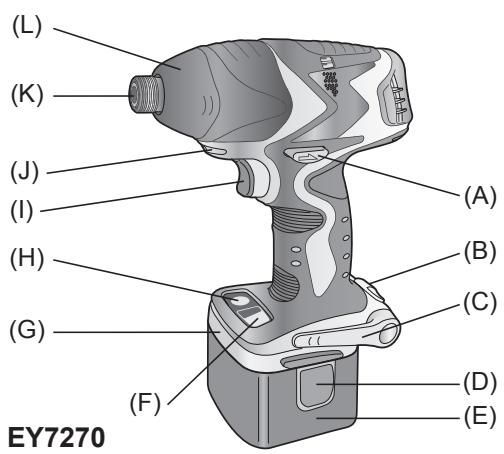
| (A) | Forward/Reverse leverVorwärts/RückwärtshebelLevier d'inversion marche avant/marche arrièreLeva di avanzamento/inversioneLinks/rechtsschakelaarPalanca de avance/marcha atrásGreb til forlæns/bagliæns retiningRiktningsomkopplareForover-/bakoverbryterEteenpään/taaksepään vipuРычаг поеклочени вторд/назадВажиль поемпканни вторд/назад | (B) | Belt hook lock leverRiemenhaken-VerriegelungshebelLevier de verrouillage du crochet de ceintureLeva di blocco gancio da cinturaBorghendel voor riemclipPalanca de bloqueo del gancho de cinturónLåsehändtag til bæltekrogLåsknapp für bælteskrokLåsespak for beltekrokVyölenkin luktusvipuРычаг φиκcaци поясноу крюkaBaxceilфхасацй поясноу крюka |
| (C) | Belt hookRiemenhakenCrocket de ceintureGancio da cinturaRiemclipGancho del cinturónBæltekrogBälteskrokBelterekrokVyölenkkiПожимкий крюПожимкий крю | (D) | Battery pack release buttonAkku-EntriegelungsknopfBouton de libération de batterie autonomeTasto di rilascio pacco batteriaAccu-ontgrendeloetsBotón de liberación de bateríaUdløserknapp til batteripakningFrigöringsknapp für batteriUtløserknapp for batteripakkeAkkupaketin irrotuspainikeKнока освобожdenя батарейного крюKaнока виевленья сатарейного крю |
| (E) | Battery pack (EY9201)Akku (EY9201)Batterie autonome (EY9201)Pacco batteria (EY9201)Accu (EY9201)Bateria (EY9201)Batteripakning (EY9201)Batteri (EY9201)Batteripakke (EY9201)Akku (EY9201)Batareña's block (EY9201)Batareña's block (EY9201) | (F) | Impact mode buttonSchlagmodustasteBouton du mode d'impactTasti modalità impattoSlagfunctietoetsBotón de modo de impactoKnap til funktion med slagSlaglagesväljareKnapp for slagstyrkeIskumuodon painikeKнока ржима удаРнока ржиму уда |
| (G) | Bit holder (inside of the body)Einsatzhalter (im Maschinenkörper)Porte-mèche (intérieur du corps)Portabit (all'interno della struttura)Bithouder (geintegreerd in de behuizing)Soporte de broca (en el interior del cuero)Bitholder (individig i værktøj)Bitshällare (inuti höjet)Bitholder (inne i maskinhuset)Terān pidin (rungon sisällä)Оtmék dla xpaneniewna hascadk (Вунтури корпuya)Вidcik dla 3xbepirangna наcasdk (Всяредини корпусу) | (H) | LED light ON/OFF buttonLED-Leuchten-EIN/AUS-TasteBouton Marche/Arrêt de la lumière DELTasti di accensione e spegnimento della luce LEDAan/uit-toets (ON/OFF) voor LED-lampjeBotón ON/OFF de luz LEDTÆND/SLUK-knap til LED-lysStrömbrytablefor LED-ljusPÄ/AV-knapp for LED-lysLED-valon kytkin/katkaisupainikeKнока Великий/ьглковая С蓝天то只得�имон поcodetКнока Великий/ьглковая С蓝天то只得�имон поcodetКнока Великий/ьглковая С蓝天то只得�имон noic Kнока Великий/ьглковая С蓝天то只得�имон noic Pädcbivba�ня |
| (I) | Trigger switch (Variable speed control trigger) Elektronikschalter (Drehzahlregler) Commutateur de la gâchette (Gâchette de commande de vitesse) Interruttore a scatto (Grilletto di controlled velocity variable) Startschakelaar (startschakelaar met variabile toerentalregeling) Interruptor disparador (disparador de control de velocidad variable) Trykker (trykker til variabel hastighedskontrol) Avtryckare (med variabel varvitalsregering) Kontrollløser (Kontrollløser for variabel hastigkeit) Laukaisukytkin (nopeudensätökytkin) Пусковий пеклочател (Пеклочател р发电机 Ременон сборости) Пусковий пекмкан (Пекмкан р发电机 Ременьни змін就近увачо) | (J) | LED light LED-Leuche Lumière DEL Luce LED LED-lampje Luz indicadora LED-lys LED-ljus LED lys LED-valo С被告пождая посbeltа С被告пождая посbeltа |
| (K) | 6.35 mm (1/4") hex quick connect chuck (EY7270), Square drive (Ball detent) (EY7271) 6.35 mm (1/4") Sechskant-Schnellaufspannffutter (EY7270), Futter (EY7271) Mandrin de connexion rapide hexagonal de 6,35 mm (1/4") (EY7270), Mandrin (EY7271) Mandrino esagonale di collegamento rapido da 6,35 mm (1/4") (EY7270), Mandrino (EY7271) 6,35 mm zeskantboorkop met snelkoppeling (EY7270), Boorkop (EY7271) Mandril hexagonal de conexión rápida de 6,35 mm (1/4") (EY7270), Portabroca (EY7271) 6,35 mm (1/4") hexagonal borepatron til hurtig tilsnutting (EY7270), Borepatron (EY7271) Snabbchuck med 6,35 mm sexkantsyhyla (EY7270), Fyrkantig drivbult (med kulspärr) (EY7271) 6,35 mm (1/4") hex hurtigtilkopingschuck (EY7270), Chuck (EY7271) 6,35 mm (1/4") kuusipiokaistukka (EY7270), Kiinitsyslaite (EY7271) 6,35 mm (1/4")会选择 refinements nach poltoroh'sьстroduю поcodeniendemies (EY7270), Замений poltoroh (EY7271) 6,35 mm (1/4")会选择 refinements nach poltoroh'sьстroduю поcodeniendemies (EY7270), 3atickнй poltoroh (EY7271) | ||
| (L) | Nose protector Frontabdeckung Protection du bec Protezione frontale Neusbeschermer Protector delorro Næsebeskyter Nosskydd Nesebeskyter Kärjen suojus Pecnipatop Pecnipatop | (M) | Battery charger (EY0110) Ladegerät (EY0110) Chargeur de batterie (EY0110) Caricabatteria (EY0110) Acculader (EY0110) Cargador de baterias (EY0110) Batterioplader (EY0110) Batteriladdare (EY0110) Batterilader (EY0110) Akkulaturi (EY0110) Зарадное устroductо (EY0110) Зараднои princtriй (EY0110) |
Read "the Safety Instructions" booklet and the following before using.
I. ADDITIONAL SAFETY RULES
1)Wear ear protectors when using the tool for extended periods.
2)Be aware that this tool is always in an operating condition, since it does not have to be plugged into an electrical outlet.
3) When screwing or driving into walls, floors, etc., "live" electrical wires may be encountered. DO NOT TOUCH THE HEX QUICK CHUCK OR ANY FRONT METAL PARTS OF THE TOOL! Hold the tool only by the plastic handle to prevent electric shock in case you screw or drive into a "live" wire.
4)If the screw driver does not rotate anymore, immediately turn the trigger switch off for a longer period to prevent an overload, which can damage the battery pack or motor. Use reverse motion to loosen jammed bits.
5)Do NOT operate the Forward/Reverse lever when the trigger switch is on. The battery will discharge rapidly and damage to the unit may occur.
6)During charging, the charger may become slightly warm. This is normal. Do NOT charge the battery for a long period.
7) When storing or carrying the tool, set the Forward/Reverse lever to the center position (switch lock).
8)Do not strain the tool by holding the trigger switch halfway (speed control mode) so that the motor stops.
II.ASSEMBLY
NOTE:
When attaching or removing a bit or socket, disconnect battery pack from tool or place the trigger switch in the center position (switch lock).
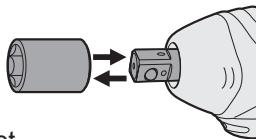
Attaching or Removing Bit (EY7270)
- Hold the collar of the quick connect chuck and push it outwards.
- Insert the bit into the chuck.
- The collar will return to its original position when it is released.
- Pull the bit to make sure it does not come out.
- To remove the bit, pull back on the collar in the same way.
CAUTION:
If the collar does not return to its original position or the bit comes out when pulled on, the bit has not been properly attached. Make sure the bit is properly attached before use.
Attaching or Removing Socket (EY7271)
- Attaching Socket
Attach the socket by sliding the female detent on the bottom of the socket to the square drive on the body.
Make sure the socket is firmly connected to the body.
- Removing Socket
Pull out the socket.
NOTE:
Attaching or Removing Original Options and Sockets
Keep the body above freezing point (0^ 32^) when attach or detach original options and sockets to the square drive on the body. The cushion rubber in the square drive to push up the ball may get hard under freezing point. This requires extra force in detaching and attaching sockets.
If the hex quick connect chuck attachment (optional) is attached, the EY7271 impact wrench can be used in the same manner as driver model EY7270.
| Symbol | Meaning |
| V | Volts |
| --- | Direct current |
| n0 | No load speed |
| .../min | Revolutions or reciprocation per minutes |
Attaching or Removing Battery Pack
- To connect the battery pack: Insert the battery pack. It snaps into place to indicate proper connection.
- To remove the battery pack: Press the two battery pack release buttons on the sides of the battery pack. Slide the battery pack out of the tool body.
III. OPERATION
Select the Impact Mode
The tool has an impact mode selection feature. By pressing the impact mode button, the impact strength can be selected according to Hard, Medium or Soft. Pressing the button toggles the mode from Hard Medium Soft. (The factory default setting is the Hard impact mode.)
In the Soft impact mode the torque is lower to prevent damaging material caused by overtightening. This mode is recommended when you wish to minimize possible damage to small screw heads or to a soft material surface to be fastened by controlling the variable speed control trigger.
The Medium impact mode also has a lower torque setting to help prevent damage to materials caused by overtightening. This mode is recommended when you wish to minimize possible damage to screws and screw heads.
The Hard impact mode is for selecting maximum torque and rotational speed.
CAUTION:
Do not press the impact mode button before rotation has stopped completely.
Operation panel

Impact mode button
Recommended work guideline table
| Impact Power Mode Display | Recommended Application |
| H Approx. 2800 R.P.M. (Max.) | For hard impact power mode. • Fastening long wood screws. • Tightening bolts when installing devices, etc. |
| M Approx. 2500 R.P.M. (Max.) | For medium impact power mode. • Fastening small diameter screws into hard materials. • Driving machine screws when installing devices. |
| S Approx. 2000 R.P.M. (Max.) | For soft impact power mode. • Installing gypsum board. • Installing soft metal window flame. • Installing interior finishings. |
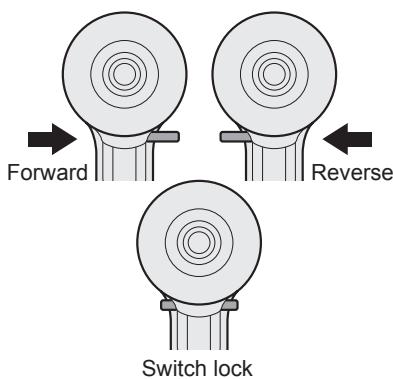
Switch and Forward/Reverse Lever Operation
CAUTION:
To prevent damage, do not operate Forward/Reverse lever until the bit comes to a complete stop.
Forward Rotation Switch Operation
- Push the lever for forward rotation.
- Depress the trigger switch slightly to start the tool slowly.
- The speed increases with the amount of depression of the trigger for efficient tightening of screws. The brake operates and the bit stops immediately when the trigger is released.
- After use, set the lever to its center position (switch lock).
Reverse Rotation Switch Operation
- Push the lever for reverse rotation. Check the direction of rotation before use.
- Depress the trigger switch slightly to start the tool slowly.
- After use, set the lever to its center position (switch lock).
CAUTION:
To eliminate excessive temperature increase of the tool surface, do not operate the tool continuously (using two or more battery packs consecutively). Tool needs cool-off time before switching to another pack.
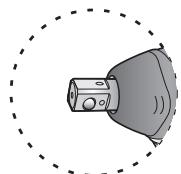
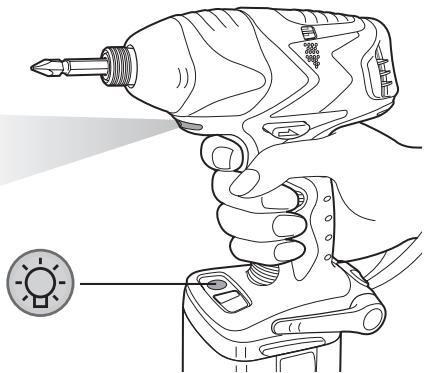
LED Light
CAUTION:
The built-in LED light is designed to illuminate a small work area temporarily.
Do not use it as a substitute for a regular flashlight, since it does not provide enough illumination.
Pressing the LED light ON/OFF button will turn the LED light on and off.
If the tool has not been operated for 5 minutes while the LED light is on, the light turns off automatically.
The light illuminates with a very low current, and it does not adversely affect the performance of the tool during use or its battery capacity.

The impact mode display on the operation panel will turn off in the following cases:
- 5 minutes have passed with no operation;
- During battery replacement.
If the variable speed control trigger is pressed, the impact mode display will return to the previous setting before the light turned off.
This product has a built-in LED light.
This product is classified as a "Class 1 LED Product" under EN 60825-1.
CLASS 1 LED PRODUCT
Caution: DO NOT STARE INTO BEAM.
How to Use the Belt Hook
WARNING:
- Be sure to attach the belt hook securely to the main unit with the screw firmly fastened. When the belt hook is not firmly attached to the main unit, the hook may depart and the main unit may fall.
This may result in an accident or injury.
- Be sure to attach the belt hook firmly and securely onto a waist belt or other belt. Pay attention so that the unit does not slip off from the belt.
This may result in an accident or injury.
- When the main unit is held by the belt hook, avoid jumping or running with it. Doing so may cause the hook to slip and the main unit to fall.
This may result in an accident or injury.
-
When the belt hook is not used, be sure to return it to the storage position. Otherwise the belt hook may catch on something. This may result in an accident or injury.
-
When the unit is hooked onto the waist belt by the belt hook, do not attach a bit other than driver bits to the unit.
A sharp-edged object, such as a drill bit, may cause injury or an accident.
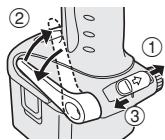
To Set the Belt Hook Angle Position
-
Slide the belt hook lock lever ① and hold it to unlock the belt hook.
-
Pull the belt hook from storing position ② and set it.
-
Release the belt hook lock lever to lock the angle of belt hook.
-
Make sure the belt hook is firmly locked. Also make sure the belt hook lock lever is firmly locked into position ③.
-
The belt hook cannot be locked in this position. Firmly lock it into position before use.
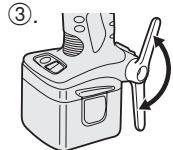
To return the belt hook to the storing position, Follow step 1. and 2. above, then lower the belt hook.
To secure the lock, follow 3 and 4 above.
To Change the Belt Hook Location Side
The belt hook can be attached to either side of the unit.
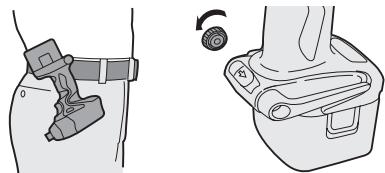
- Set the belt hook at storing position.
- Loosen the screw turning it counter
clockwise, using a flat metal or a flat blade screw driver.
- Take out the belt hook and insert into the other side of the slot on the main unit.
- Fasten the screw firmly, turning it clockwise.
The belt hook can be taken out from the main unit only when it is at storing position.
Appropriate Use of Battery Pack
Ni-MH Battery Pack (EY9201)
- Charge the Ni-MH battery fully before storage in order to ensure a longer service life.
- The ambient temperature range is between 0^ (32^) and 40^ (104^) . If the battery pack is used when the battery temperature is below 0^ (32^) , the tool may fail to function properly. In that case, charge the battery until charging is completed for appropriate functioning of the battery.
- When battery pack is not in use, keep it away from other metal objects such as paper clips, coins, keys, nails, screws, or other small metal objects that can make a connection from one terminal to another.
Short-circuiting the battery terminals together may cause sparks, burns or a fire.
- When operating with a Ni-MH battery pack, make sure the area is well ventilated.
Battery Pack Life
The rechargeable batteries have a limited life. If the operation time becomes extremely short after recharging, replace the battery pack with a new one.
Battery Recycling
ATTENTION:
For environmental protection and recycling of materials, be sure that it is disposed of at an officially assigned location, if there is one in your country.
Charging
NOTE:
When you charge the battery pack for the first time, or after prolonged storage, charge it for about 24 hours to bring the battery up to full capacity.

Battery charger (EY0110)
- Plug the charger into the AC outlet.
NOTE:
Sparks may be produced when the plug is inserted into the AC power supply, but this is not a problem in terms of safety.
- Insert the battery pack firmly into the charger.

Battery pack
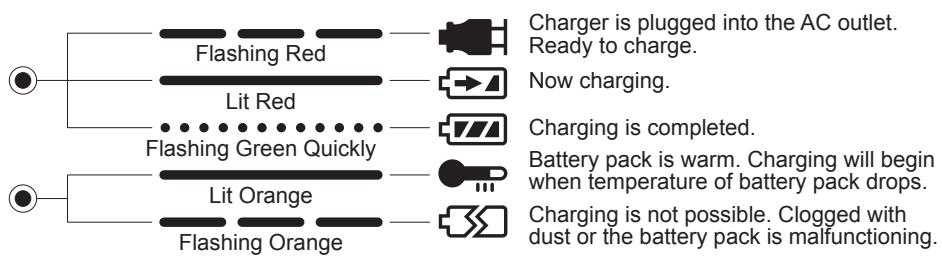
- During charging, the charging lamp will be lit.
When charging is completed, an internal electronic switch will automatically be triggered to prevent overcharging.
- Charging will not start if the battery pack is warm (for example, immediately after heavy-duty operation).
The orange standby lamp will remain on until the battery cools down. Charging will then begin automatically.
-
When charging is completed, the green charging lamp will start flashing quickly.
-
If the battery pack is too cool, or the battery pack has not been used for a long time, the charging lamp will light up. In this case it takes longer than normal to fully charge the battery pack.
-
If a fully charged battery pack is inserted into the charger again, the charging lamp lights up. After several minutes, the charging lamp may flash quickly to indicate that charging is completed.
-
If the charging lamp does not light immediately after the charger is plugged in, or if, after the standard charging time passes, the lamp does not go off, consult an authorized dealer.
NOTE:
-
When charging a cool battery pack (below 5^ (41^) ) in a warm place, leave the battery pack in the place and wait for more than one hour to allow the battery to reach the ambient temperature. Otherwise battery pack may not fully charge.
-
Allow the charger to cool down when charging more than two battery packs consecutively.
-
Do not insert your fingers into contact hole when holding charger or at any other time.
CAUTION:
To prevent fire or damage to the battery charger:
- Do not use an engine generator as a power source.
- Do not cover vent holes on the charger and the battery pack.
- Unplug the charger when not in use.
Information on Disposal for Users of Waste Electrical & Electronic Equipment (Private Households)
This symbol on the products and/or accompanying documents means that used electrical and electronic products should not be mixed with general household waste.
For proper treatment, recovery and recycling, please take these products to designated collection points, where they will be accepted on a free of charge basis. Alternatively, in some countries you may be able to return your products to your local retailer upon the purchase of an equivalent new product.
Disposing of this product correctly will help to save valuable resources and prevent any potential negative effects on human health and the environment which could otherwise arise from inappropriate waste handling. Please contact your local authority for further details of your nearest designated collection point.
Penalties may be applicable for incorrect disposal of this waste, in accordance with national legislation.
For Business Users in the European Union
If you wish to discard electrical and electronic equipment, please contact your dealer or supplier for further information.
Information on Disposal in Other Countries Outside the European Union
This symbol is only valid in the European Union.
If you wish to discard this product, please contact your local authorities or dealer and ask for the correct method of disposal.
IV. MAINTENANCE
Use only a dry, soft cloth for wiping the unit. Do not use a damp cloth, thinner, benzine, or other volatile solvents for cleaning.
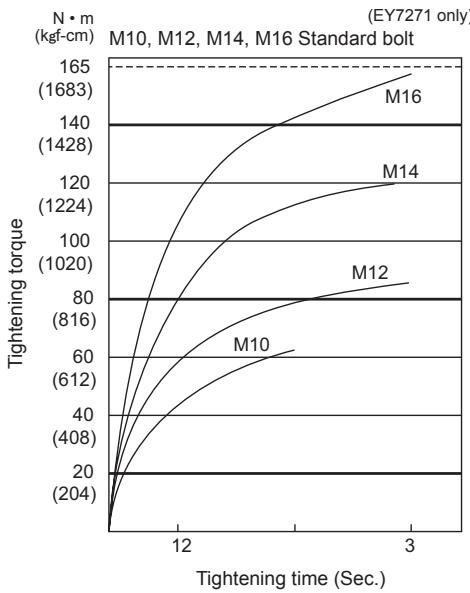
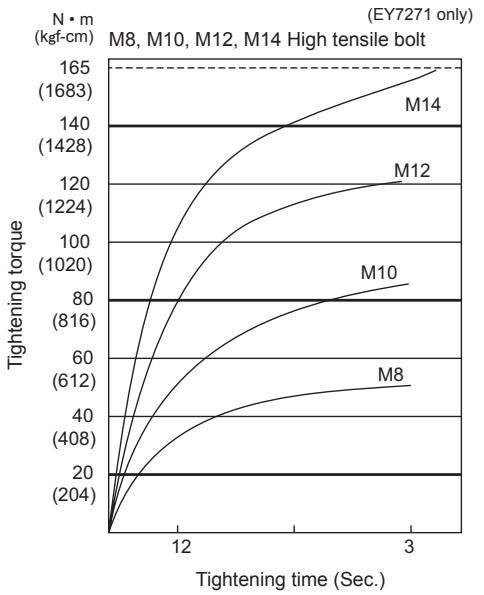
V. TIGHTENING TORQUE
The power required for tightening a bolt will vary depending on the bolt material and size, as well as the material being bolted. Choose the length of tightening time accordingly.
Reference values are provided below.
(They may vary according to tightening conditions.)
Factors Affecting Tightening Torque
The tightening torque is affected by a wide variety of factors including the following. After tightening, always check the torque with a torque wrench.
1) Voltage
When the battery pack becomes nearly discharged, the voltage decreases and the tightening torque drops.
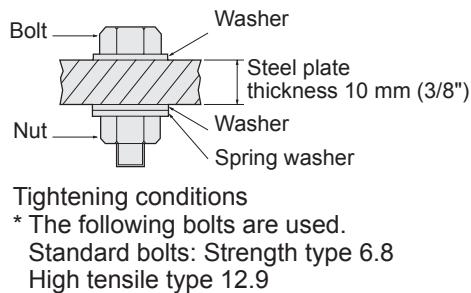
Bolt Tightening Conditions
2) Tightening time
Longer tightening time results in increased tightening torque. Excessive tightening, however, adds no value and reduces the life of the tool.
3) Different bolt diameters
The size of the bolt diameter affects the tightening torque.
Generally, as the bolt diameter increases, tightening torque rises.
4) Tightening conditions
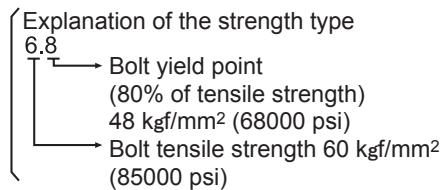
- Tightening torque will vary, even with the same bolt, according to grade, length, and torque coefficient (the fixed coefficient indicated by the manufacturer upon production).
- Tightening torque will vary, even with the same bolting material (e.g. steel), according to the surface finish.
- Torque is greatly reduced when the bolt and nut start turning together.
5) Socket play
Torque is lowered as the six-sided configuration of the socket of the wrong size is used to tighten a bolt.
6) Switch (Variable speed control trigger)
Torque is lowered if the unit is used with the switch not fully pulled out.
7) Effect of connecting adaptor
The tightening torque will be lowered through the use of a universal joint or a connecting adaptor.
VI. ACCESSORIES
Use only bits suitable for size of drill's chuck.
Use Panasonic original Optional Keyless drill chuck (EY9X003E) and Quick change chuck (EY9HX110E) for maximum performance.
MAXIMUM RECOMMENDED CAPACITIES
| Model | EY7270/7271 | |||
| Screw driving | Wood screw | φ 3.5 - φ 9.5 mm (1/8" - 3/8") | ||
| Tech screw | φ 3.5 - φ 6 mm (1/8" - 1/4") | |||
| Bolt fastening | EY7270 | EY7271 | ||
| Standard bolt: | M6 - M12 | M6 - M16 | ||
| High-tensile bolt: | M6 - M10 | M6 - M12 | ||
VII. SPECIFICATIONS
MAIN UNIT
| Model | EY7270 | EY7271 |
| Motor voltage | 12 V DC | |
| No load speed | Soft impact mode: 0 - 1000/min (rpm) | |
| Medium impact mode: 0 - 1400/min (rpm) | ||
| Hard impact mode: 0 - 2300/min (rpm) | ||
| Maximum torque | 135 Nm (1380 kgf-cm, 1190 in-lbs.) | 165 Nm (1680 kgf-cm, 1460 in-lbs.) |
| Impact per minute | Soft impact mode: 0 - 2000 ipm in Impact Mode | |
| Medium impact mode: 0 - 2500 ipm | ||
| Hard impact mode: 0 - 2800 ipm in Impact Mode | ||
| Overall length | 169 mm | 177 mm |
| Weight (with battery pack) | 1.8 kg (4.0 lbs) | 1.8 kg (4.1 lbs) |
BATTERY PACK
| Model | EY9201 |
| Storage battery | Ni-MH battery |
| Battery voltage | 12 V DC (1.2 V x 10 cells) |
BATTERY CHARGER
| Model | EY0110 | ||||||
| Rating | See the rating plate on the bottom of the charger. | ||||||
| Weight | 0.78 kg (1.72 lbs) | ||||||
| Charging time | 7.2 V | 9.6 V | 12 V | 15.6 V | 18 V | 24 V | |
| 1.2 Ah | EY9065 | EY9080 | EY9001 | ||||
| EY9066 | EY9086 | EY9006 | |||||
| 20 min. | |||||||
| 1.7 Ah | EY9180 | EY9101 | |||||
| EY9182 | |||||||
| 25 min. | |||||||
| 2.0 Ah | EY9168 | EY9106 | EY9136 | EY9116 | |||
| 30 min. | 30 min. | EY9117 | |||||
| 60 min. | |||||||
| 3.0 Ah | EY9200 | EY9230 | EY9210 | ||||
| 45 min. | 90 min. | ||||||
| 3.5 Ah | EY9201 | EY9231 | EY9251 | ||||
| 55 min. | 65 min. | ||||||
NOTE: This chart may include models that are not available in your area. Please refer to the catalogue.
ONLY FOR U. K.
VIII. ELECTRICAL PLUG INFORMATION
FOR YOUR SAFETY PLEASE READ THE FOLLOWING TEXT CAREFULLY
This appliance is supplied with a moulded three pin mains plug for your safety and convenience.
A 3 amp fuse is fitted in this plug.
Should the fuse need to be replaced please ensure that the replacement fuse has a rating of 3 amp and that it is approved by ASTA or BSI to BS1362.
Check for the ASTA mark or the BSI mark on the body of the fuse.
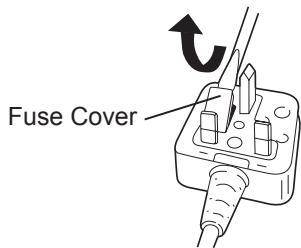
If the plug contains a removable fuse cover you must ensure that it is refitted when the fuse is replaced.
If you lose the fuse cover the plug must not be used until a replacement cover is obtained.
A replacement fuse cover can be purchased from your local Panasonic Dealer.
IF THE FITTED MOULDED PLUG IS UNSUITABLE FOR THE SOCKET OUTLET IN YOUR HOME THEN THE FUSE SHOULD BE REMOVED AND THE PLUG CUT OFF AND DISPOSED OF SAFELY.
THERE IS A DANGER OF SEVERE ELECTRICAL SHOCK IF THE CUT OFF PLUG IS INSERTED INTO ANY 13 AMP SOCKET.
If a new plug is to be fitted please observe the wiring code as shown below.
If in any doubt please consult a qualified electrician.
IMPORTANT:
The wires in this mains lead are coloured in accordance with the following code:
Blue: Neutral
Brown: Live
As the colours of the wire in the mains lead of this appliance may not correspond with the coloured markings identifying the terminals in your plug, proceed as follows.
The wire which is coloured BLUE must be connected to the terminal in the plug which is marked with the letter N or coloured BLACK.
The wire which is coloured BROWN must be connected to the terminal in the plug which is marked with the letter L or coloured RED.
Under no circumstances should either of these wires be connected to the earth terminal of the three pin plug, marked with the letter E or the Earth Symbol 1± .
How to replace the fuse: Open the fuse compartment with a screwdriver and replace the fuse and fuse cover if it is removable.
This apparatus was produced to BS800.
LED-PRODUKT DER KLASSE 1
VORSICHT: SEHEN SIE NICT IN DEN STRAHL.
Verwendendes Riemenhakens
WARNING!
CBeToIIOJHaI NOcBETKa BHHMaHHe:
BcTpoEHnHa CBTeODnOHDn IOCDBeTKa npEdHa3NaYeHa DJIa BpeMeHHOro OCBeSeHnHa HeobJbWo paOohy 3Onbl. He nCnOJb3yIte ee B KaueCTbe 3aMeHbIOCTOaHHOro fOhapNka, TAK KAc OHa He oBlaaet DoCTaTOHoi RpKoCTbIO.
Haxatne KhoNKn BkLIOUeHn/BybIKLIOUeHn CBTeODINOHOI NOCDCBETK 6yDet BKIOUaTb N BbIKIOUaTb CBeTOIONDHyIOIDCBETKy.
Ecnn Hnctpyment He nCnoIb3ObaIcB TeueHne 5 MInHyT C BkNIOeHHo CBETODIOHO
IIOcBETKo, IIOcCBETKa BbIKJIouHTcABTOMaTnueckn.
IIOCBETKa ropnt npn OueHb HN3KOM TOKe n He OKa3bIBaet He6NaIorOpnraTHOro BO3JeCTBnHa npOn3BOUInTeNbHOCTb INHCTpyMeHTa BO BpEmpa60tbl nn Ha EMKOctb erO baTapei.
BHHMaHHe:HE CMOTPETb HA JIyU.
KaK NOJIb3OBaTbCЯ NOJCHbIM KpIOKOM
OCTOPOXHO!
-
Y6eDInTeCb, yTO nOraCHO KpIOK HAdExH0 npNkpePJIeH K OCHOBHOMy 6JOkY npn NOMOUs pIOTHO 3aTAYTOBnTa. EcIn nOraCHO KpIKoHE npNkpePJIeH HAdExHO K OCHOBHOMy 6JOkY, KpIKo MoKet OToITn IN OCHOBHO 6JOk MoKet yNaCTb. 3TO MOKET pINBeCTn K HeCuaCTHOMy CnyaIO nn TpaMe.
-
Y6eIntecb, yTo nOraChOn KpIOK pIOTHO nHaTeJHO npIKpePJIeN K IONCHOMY pEMHIO nIIN dpyROMy pEMHIO. BHNMaTeBHo cIeIte 3a TeM, yTO6bl 6nOK He COCKoJIb3Hyn C nOraCa.
3TO MOKET INPBBeCTN K HecCaTHO My CJUaH OJIIN TpaBMe.
- Ecnn OCHOHON 6JOK yIepKINBaETcnoRCHbIM KPIOKOM, n36eRaTe npBiratbN 6eRaTb C HmM. 3TO MOKeT pInBecTNI K COCKaJIb3bIBaHnIO KpIoka N NaDeHnIO OCHOBHOrO 6JOKa.
3TO MOKET INPBBeCTN K HecCaTHO My CJIyauHO NIN TpaBMe.
- Ecπn pɔraCHO KnpOK He nCnoJIb3yETcγ, y6eIntecb, yTO OH BO3BpaIeH B pOIOKeHne dIy XpaHEnH. IPOrCHOn KpOK MoKet 3aIeINITbcg 3a yTO-JIb60. 3TO MoKet npIBeCTN K HeCuaCTHOMy Cnyauo nn TpaMe.
- Ecπn 6JLOK NOBWeSeH Na NɔrchOM pεmHe πρι NOMOùN NOYCHORO KpIOKa, He 3aKpEePJIe THe HεrO HacAdkn ⅢypynOBePTa.
Obekt c ocTpblm KpOMkamn, Tako KaK HacaIka IJIA CBepJeHna, MOKeT npuBecTI K HeCuaCTHOMy CJIyauIO IIN TpaBMe.
(OH MOryT MeHrTbCBy 3aBnCmOCTn OT yCIOBNI 3aTgKKn.)
3APYdHOE yCTPOINCTBO
Matsushita Electric Works, Ltd.
Osaka, Japan