BR 834 - Radio CLATRONIC - Free user manual and instructions
Find the device manual for free BR 834 CLATRONIC in PDF.

| Product Type | Portable Radio |
| Brand | Clatronic |
| Model | BR 834 |
| Color | Black / Silver |
| Dimensions (W x H x D) | 200 x 130 x 80 mm |
| Weight | 0.5 kg |
| Power Supply | AC 230V ~ 50Hz or 2 x 1.5V R14/SUM-2 batteries |
| Power Consumption | 5 W |
| Radio Bands | FM 87.5–108 MHz, AM 520–1710 kHz |
| Tuning Type | Analog dial |
| Speaker | Built-in monaural speaker, 3 W |
| Headphone Jack | Yes, 3.5 mm |
| Antenna | Telescopic for FM, built-in ferrite for AM |
| Volume Control | Rotary knob |
| Tuning Control | Rotary knob with frequency scale |
| Carry Handle | Yes, top strap |
| Indicators | On/off with power LED |
| Cleaning | Wipe with a soft, dry cloth. Do not use abrasive cleaners. |
| Safety | Keep away from moisture and direct sunlight. Do not disassemble. |
| Spare Parts / Repairability | Use only specified batteries. No user-serviceable parts inside. |
Frequently Asked Questions - BR 834 CLATRONIC
User questions about BR 834 CLATRONIC
0 question about this device. Answer the ones you know or ask your own.
Ask a new question about this device
Download the instructions for your Radio in PDF format for free! Find your manual BR 834 - CLATRONIC and take your electronic device back in hand. On this page are published all the documents necessary for the use of your device. BR 834 by CLATRONIC.
USER MANUAL BR 834 CLATRONIC
natural_image
Black and white portable electronic device with digital display and speaker grille (no visible text or symbols)DEUTSCH
DEUTSCH
Inhalt
Overview of the Components ...... Page 3
Instruction Manual Page 9
Technical Specifications Page 12
Disposal Page 12
Overview of the Components
Bedienungsanleitung
$$ F M = U K W, A M = \text { Mittelwelle } $$
Thank you for choosing our product. We hope you will enjoy using the appliance.
Symbols in this user manual
Important notes for your safety are marked distinctively. Pay absolute attention to them to avoid accidents and damage to the device:

WARNING:
Warns of dangers for your health and indicates potential risks of injury.

CAUTION:
Indicates potential dangers for the device or other objects.

NOTE:
Highlights tips and information for you.
General Safety Guidelines
Before using this device, carefully read this user manual and keep it together with the Warranty Certificate, cashier receipt and if possible, the original package inclusive its interior packing. If you hand on the device to any third person, include the user manual as well.
- To avoid the risk of fire or an electric shock, you should not expose the device to rain or moisture. Consequently, do not use the device in the immediate vicinity of water - for example near a bath tub, a swimming pool or in a damp cellar.
- Use the appliance only for the intended, private use. This appliance is not intended for commercial use.
- The power adaptor is only intended for use in dry environment.
- Ensure that the output voltage, currency and polarity of the power adaptor correspond to the nameplate specifications!
- Do not touch the power adaptor with wet hands!
- Unplug the power adaptor from the appliance when cleaning or if a fault occurs.
- Make sure that the adaptor cable is not bent, crushed, run over or does not come into contact with heat sources.
- Only connect the device at a properly installed plug socket. Pay attention that the specified voltage corresponds to the voltage of the plug socket.
- When using external mains supply, pay attention to the correct polarity and voltage. Always place the batteries in the correct direction.
- Assemble the device in such a way that the available ventilation openings are not covered.
-
Never open the housing of the device. Incorrect repairs can constitute a considerable risk for the user. Should the device become damaged, in particular the mains supply cable, do not operate the device any longer, but rather have it repaired by an expert. Check the mains supply cable regularly for damage.
-
For safety reasons a broken or damaged mains lead may only be replaced by an equivalent lead from the manufacturer, our customer service department or a similar qualified person.
- If the device is not used for a longer period, remove the plug connector from the plug socket or take out the batteries.
These symbols may be found on the device and are intended as warnings:

The lightning flash is intended to alert the user to the presence of dangerous voltage within the device.

User to the presence of important operating and maintenance instruction accompanying this device.
Children and disabled persons
- For the safety of your children, keep any packing parts (plastic bags, cartilage, Styrofoam etc.) out of their reach.

WARNING!
Don't let small children play with foils for danger of suffocation!
- This device is not intended for use by persons (including children) with reduced physical, sensory or mental capabilities, or lack of experience and/or knowledge unless they have been given supervision or instructions concerning the use of the device by a person responsible for their safety.
- Supervise children to ensure they do not play with the device.
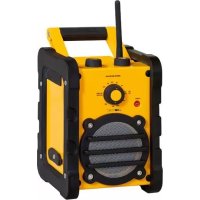
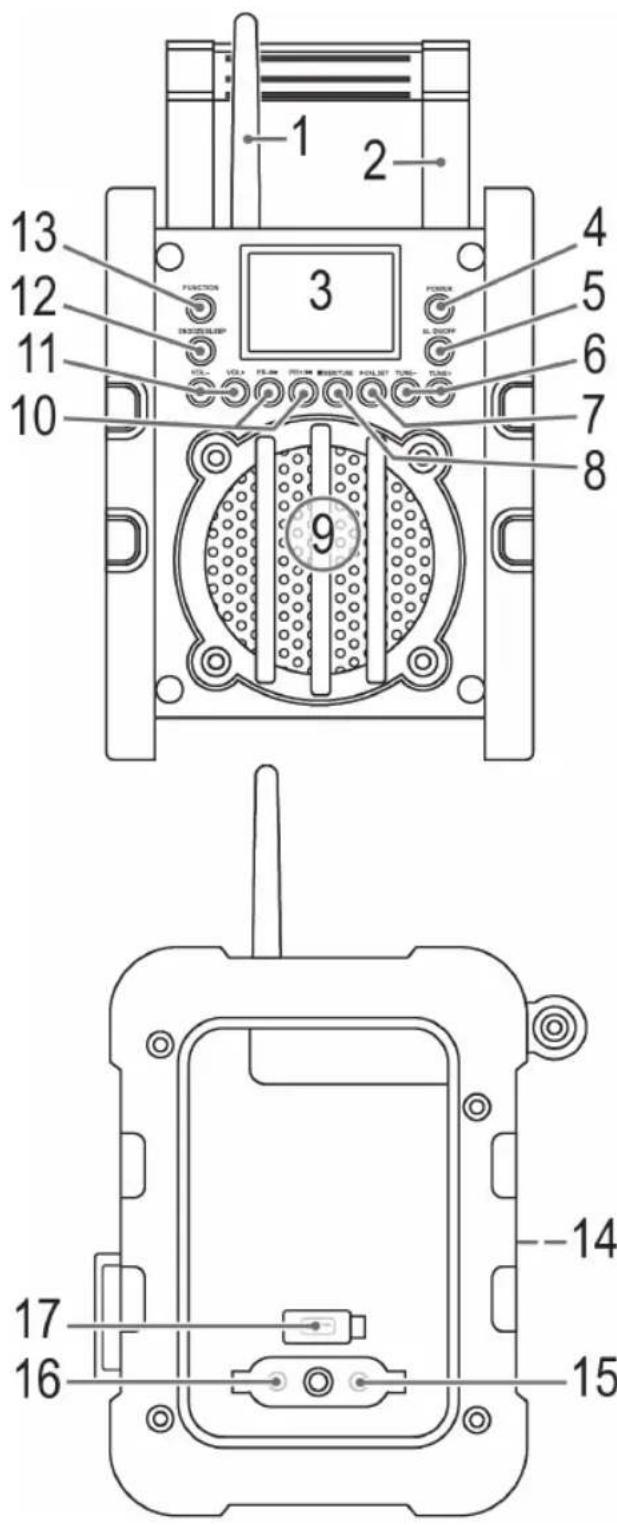
Overview of the components
1 FM Antenna
2 Handle
3 LCD Display
4 POWER button (On/Off)
5 AL ON/OFF button (Alarm on/off)
6 TUNE+/TUNE- buttons (Radio scan)
7 /AL.BET button (Play/Pause/Alarm time)
8 /MEM/TIME button (Stop/Memory/Time)
9 Speaker
10 PR+/▶/PR-/ buttons
(Station presets/Scan forwards/Backwards)
11 VOL+/VOL- buttons (volume)
12 SNOOZE/SLEEP button
13 FUNCTION button
14 Battery compartment
15 7.5 V DC IN jack
16 AUX IN jack
17 Cover USB connection
Accessories (without illustration)
Power adaptor
Installation
- Read the manual thoroughly before operating the device!
- Choose a suitable location for the device. Suitable locations are dry, even and antislip surfaces on which you may operate the device easily.
- Make sure there is proper ventilation for the device!
- Remove, if necessary, the protection sheet from the display.
- If necessary, screw the flexible antenna onto the correct connection.
Power supply (Adaptor)
- Insert the grid plug into a properly installed three prong socket. Connect the device with the plug connector by inserting its plug into the 7.5 V DC IN jack of the device.
- Make sure the grid voltage corresponds to the figures on the rating plate.
CAUTION:
- Only use the supplied power adaptor for this device. Do not use for other devices.
- Only use power adaptor with 7.5 V (⊖-C-⊕), other adaptors may cause damage to the device.
i NOTE:
- Disconnect from mains power supply during longer periods of non-use.
- The preset time and stations will be lost as soon as you disconnect the device from the mains.
Battery Operation (Batteries not included)
You can also operate the device with 4 batteries.
- Open the battery compartment (14) at the rear, loosen the screw with a screw driver.
- Insert 4 batteries type UM 2/R14 1.5 V. Observe correct polarity (see battery compartment)!
- Close the battery compartment and tighten the screw.
- To avoid battery leakage remove the batteries during longer periods of non-use.
i NOTE:
- Battery operation is automatically deactivated after connecting the power adaptor.
- If the display brightness (3) decreases, the batteries must be replaced.
- The preset time and stations will be lost as soon as you remove the batteries from the device.
WARNING:
Do not subject batteries to heat or direct sunlight. Do not dispose of batteries by burning. Danger of explosion!
CAUTION:
- Different battery types or new and used batteries must not be used together.
CAUTION:
- Do not dispose of batteries with the household waste. Return exhausted batteries to collection points or your dealer.
General operation
Turning the device on/ off
Press the POWER button (4), to turn the device on and off.
FUNCTION button (13)
For switching between FM, AM, USB and AUX mode.
VOL+/VOL- Volume (11)
Adjust to your preferred volume level.
Delayed shut-off (SLEEP)
The device automatically switches off when the selected time is reached.
- Select the time by repeatedly pressing the SNOOZE/SLEEP button (12) after which the device switches off. Select from: 120, 90, 60, 45, 30 and 15 minutes. The SLEEP indicator will appear in the display.
- Deactivating: If you press the SNOOZE/SLEEP button once again after the 15 minutes are indicated, the SLEEP indicator will disappear from the display. The function is then deactivated.
i NOTE:
Briefly press the SNOOZE/SLEEP button to show the remaining time.
Setting the time (in standby)
- When in standby, press the ■/MEM/TIME button (8). The hours will start to flash.
- You can make the adjustment with the PR-| | / PR+| | / buttons (10).
- Press the MEM/TIME once more. The minutes will flash.
- You can make the adjustment with the PR-◄◄ / PR+►►I buttons.
- Save the time, by pressing the MEM/TIME button once again.
i NOTE:
The preset time will be lost as soon as the power supply has been interrupted.
Listening to the radio
Scan stations
- Press the FUNCTION button (13) until "FM" or "AM" appears on the display, depending on which frequency band you want to listen to.
$$ \mathrm{FM} = \text { VHF }, \mathrm{AM} = \text { Medium wave } $$
-
You have two options for tuning a station:
-
Press the TUNE+/TUNE- buttons (6).
-
Keep the TUNE+/TUNE- button (6) pressed. The device scans to the next and the previous radio station respectively.
-
If the reception is too weak, or if there is interference on the station being received, try to improve the reception by changing the position of the device.
Save station
i NOTE:
The preset stations will be lost as soon as the power supply has been interrupted.
- If you have found the desired station, push the ■/MEM/TIME button (8). The memory location (e.g. 02) will be shown in the display and the information "MEM" in the display will blink.
- For choosing the memory position, please press PR+/PR-/-buttons (10).
- Press /MEM/TIME to save the settings.
Select a preset station
To select the preset radio stations, press the PR+▶ or PR-/◀◀ button (10).
Automatic station scan
You can also make the device automatically search for stations. To do this, please proceed as follows:
- If you keep the ■/MEM/TIME (8) button pressed down for approx. 3 seconds, the device will start its automatic station scan. The entire frequency range is thereby automatically scanned for channels. The stations found are thereby stored in the preset locations 1 – 20 in ascending order.
i NOTE:
- The scan will only stop, when all 20 preset locations have been occupied. If you want to cancel the scan prematurely, press the TUNE+ or TUNE button (6).
- The order of the presets cannot be subsequently changed.
Connection of external devices
AUX IN jack (16)
Connect analogue playback devices. When connecting to this jack you may also listen to the audio of other devices, such as MP3 or CD players etc., via the speakers.
- Fold down the rubber flap.
- Connect the external device to the AUX jack with a 3.5 mm mono jack plug. If necessary, use a suitable adapter. (Adapter not included.)
- Now use FUNCTION button (13) to select AUX mode.
-
Via the speakers you will listen to the audio of the external device; use VOL+/- buttons (11) to adjust the volume.
-
For further functions please refer to the user manual of the external audio device.
Always keep the flap closed when not in use.
i NOTE:
Set the volume of the external device to a proper audible level.
USB port
This device has been developed in line with the latest technical advances in the USB field. The wide range of different USB storage devices of all types which are currently on the market, unfortunately do not allow us to guarantee full compatibility with all USB storage devices. For this reason, in rare cases there may be problems in playing back files from USB storage devices. This is not a malfunction of the device.
- Flip open the cover (17).
- Press the FUNCTION button (13) until the message "REAd" appears on the display.
- Directly connect a USB storage medium to the respective port. USB appears on the display. Playback then begins. The number of the current title will be shown on the display.
i NOTE:
Always directly connect a USB storage medium to the USB port to prevent any malfunctions.
4. Operation:
- Skip to the next, previous title respectively with the PR+▶/PR-◀buttons (10). If you keep the buttons pressed down, a music search will start.
- You can interrupt the replay with the /ALSET button (7). The number of the current title will flash in the display. If you push the button again, the replay will start in the same location.
Always keep the cover closed when not using it.
CAUTION:
Before you remove the USB memory medium, switch the device to Radio operation.
i NOTE:
The USB operating voltage is only active in "USB mode".
Alarm function
You have an option to set up to two alarms.
When the function is activated, a buzzer will sound when the set alarm time has been reached. The volume of the buzzer cannot be adjusted.
Setting the alarm time (in standby)
- When in standby, keep the ▶ II/AL.SET button (7) pressed down. The message "AL1" and the hours will start flashing.
-
Make the adjustment with the PR-/ |◀/ PR+/▶buttons (10).
-
Press the AUSET button once again. The message "AL1" and the minutes will flash.
- You make the adjustment with the PR-/ |PR+/ buttons.
- Press the AUSET button to start setting the second alarm time. The message "AL2" and the hours will flash.
- To set the second alarm time, proceed as described under point 2. -4.
- Finally, press the ⚠SET button once again.
Turning off/ on the alarm function
Press the AL ON/OFF button (5) repeatedly.
Press 1x = first alarm time is active. The message "AL1" appears in the display.
Press 2x = second alarm time is active. The message "AL2" appears in the display.
Press 3x = first and second alarm times are active. The message "AL1" and "AL2" appear on the display.
Press 4x = the alarm function is deactivated.
Automatic Alarm Interval
The automatically set alarm function can be shut off for approximately 9 minutes with the SNOOZE/SLEEP button (12).
Cleaning and maintenance

CAUTION:
Do not dip the appliance in water.
- Disconnect the mains plug before cleaning.
- You may wipe off external stains, using a slightly damp cloth without any additives.
Trouble shooting
| Problem Cause Solution | ||
| The unit cannot be operated | The unit is blocked and “hangs” | Pull the mains plug for approximately 5 seconds. Then connect the unit again |
| No sound Volume | Volume is too low | Increase the volume |
| Poor sound quality | Radio signal too weak | Try to improve the reception by changing the location. |
| Batteries too weak | Insert new batteries, or operate the device via the power adaptor. | |
Technical Specifications
Model: BR 834
Battery operation: 4x 1.5 V UM2/R14
Protection rating: IPX 4
Power consumption: 7 W
Playable formats: MP3
Net weight: 2.46 kg
Radio:
Frequency ranges:...... VHF/FM 87.5 \~ 108.0 MHz ...... MW/AM 530 \~ 1600 kHz
External power adaptor
Input: AC 100-240 V, 50/60 Hz
Output: DC 7.5 V / 1 A
Polarity: ⊖-C-⊕
Protection Class: II
Specifications are subject to change!
This device complies with all current CE directives, such as electromagnetic compatibility and low voltage directive and is manufactured according to the latest safety regulations.
Disposal
Meaning of the "Wheelie Bin" Symbol
Take care of our environment, do not dispose of electrical appliances via the household waste.
Dispose of obsolete or defective electrical appliances via municipal collection points.
Please help to avoid potential environmental and health impacts through improper waste disposal.
You contribute to recycling and other forms of utilization of old electric and electronic appliances.
Your municipality provides you with information about collecting points.


CLATRONIC®
INTERNATIONAL GMBH
D-47906 Kempen/Germany · Industriering Ost 40
Internet: http://www.clatronic.de · email: info@clatronic.de